
Applies ToWindows 11 Windows 10
Использование буфера обмена
При копировании содержимого на компьютер оно автоматически копируется в буфер обмена для вставки. Вы можете вставить несколько элементов из журнала буфера обмена, а также закрепить элементы, которые вы, как правило, используете все время, и синхронизировать журнал буфера обмена с облаком.
Ниже приведены ответы на некоторые вопросы, связанные с буфером обмена.
Открытие параметров буфера обмена
Чтобы включить буфер обмена в первый раз, выберите клавиши с логотипом Windows + V, а затем выберите Включить.
Чтобы синхронизировать элементы буфера обмена с компьютером, необходимо убедиться, что функция синхронизации включена.
-
Выберите Пуск > Параметры > системный > буфер обмена .
-
Установите переключатель журнал буфера обмена на всех устройствах в значение Вкл.
Примечание: Функция синхронизации привязана к вашей учетной записи Майкрософт или рабочей учетной записи, поэтому не забудьте использовать одни и те же данные для входа на всех устройствах.
Вы можете быстро очистить все, кроме закрепленных элементов, на устройстве и в облаке.
-
Выберите Пуск > Параметры > системный > буфер обмена .
-
В области Очистить данные буфера обмена выберите Очистить.
Вы также можете очистить журнал буфера обмена устройства, выбрав клавиши с логотипом Windows +V, а затем выбрав параметр Очистить все в верхней части экрана.
Вы можете очистить любой конкретный элемент в буфере обмена.
-
Выберите Клавиша с логотипом Windows + V.
-
Рядом с рассматриваемым элементом выберите Дополнительные сведения (…), а затем — Удалить .
Устранение неполадок с буфером обмена
Убедитесь, что вы включили журнал буфера обмена. Чтобы включить буфер обмена в первый раз, выберите клавиши с логотипом Windows + V и выберите Включить.
Журнал буфера обмена очищается при каждом перезапуске компьютера, за исключением закрепленных элементов.
Вы можете настроить автоматическую синхронизацию скопированных элементов с другими устройствами.
Примечание: Функция синхронизации привязана к вашей учетной записи Майкрософт или рабочей учетной записи, поэтому не забудьте использовать одни и те же данные для входа на всех устройствах.
-
Выберите Пуск > Параметры > системный > буфер обмена .
-
В разделе Журнал буфера обмена на устройствах установите переключатель в значение Вкл.
-
Выберите Автоматически синхронизировать текст, который я копируем.
Примечание: Параметр Вручную синхронизировать текст, который я копируем, означает, что вам нужно открыть журнал буфера обмена (клавиша с логотипом Windows + V) и вручную нажать кнопку синхронизации в элементе буфера обмена. Затем текст будет отправлен в облако и синхронизирован с другими устройствами.
Размеры элементов не должны превышать 4 МБ. Поддерживаются форматы файлов text, HTML и bitmap.
Журнал буфера обмена рассчитан не более чем на 25 скопированных записей. Система автоматически удаляет старые элементы(если они не закреплены), чтобы освободить место для новых.
Нужна дополнительная помощь?
Нужны дополнительные параметры?
Изучите преимущества подписки, просмотрите учебные курсы, узнайте, как защитить свое устройство и т. д.
The modern clipboard offers a synced history of copied items
Updated on February 8, 2021
What to Know
- Copy to clipboard: Highlight the text or image and press Ctrl+C or right-click the text or image and select Copy in the pop-up menu.
- Paste from clipboard: Press Ctrl+V to paste the last copied item. Paste from clipboard history: Press Windows key+V and select item to paste.
- Clear clipboard: Press Windows key+V. Select X in the corner of an item to delete it or select Clear all to remove all items.
This article explains how to use the clipboard in Windows 10. In addition to information on copying, pasting, and clearing the clipboard, it includes information on pinning items to the clipboard.
How to Copy Content to the Windows 10 Clipboard
The clipboard in the Windows 10 operating system is more advanced than the previous clipboard experience. With the new clipboard, you can view the text and images that are copied to the clipboard and choose which content you want to paste.
In addition, the new clipboard can sync to other Windows 10 computers and tablets that use the same Microsoft account login. This means you can copy images and text from one Windows 10 device and paste to another device.
Basic copying of content to the clipboard on Windows 10 can be done using either of the following methods.
- Highlight the chosen text or image within an app and press Ctrl+C.
- Right-click text or images and select Copy from the pop-up menu.
How to Paste From the Clipboard on Windows 10
To paste the last copied content from the clipboard into an app, use either of the two standard paste methods:
- Press Ctrl+V.
- Right-click where you want to paste the content and select Paste from the pop-up menu.
By using the modern Windows 10 clipboard functionality, though, you can choose from several previously copied entries from the clipboard history.
Only images smaller than 4 MB save to the Windows 10 clipboard.
To view the clipboard history, press Windows key+V.
After the clipboard open, scroll up or down to find the text or image and select it to paste it into the open app.
How to Clear Clipboard Data
Deleting text and images from the Windows 10 clipboard can be done in three ways.
- Open the clipboard by pressing Windows key+V and then select the X in the upper-left corner of each item you want to delete.
- Open the clipboard by pressing Windows key+V and then select Clear all. This deletes every item in the Windows 10 clipboard except for the items that you pinned.
- Open Settings > System > Clipboard and select Clear. This deletes everything in the Windows 10 clipboard except for pinned items.
Pin Windows 10 Clipboard Text
While clearing clipboard content can be useful, there may be some content that you don’t want to delete. Manually select specific items and protect those items from deletion by pinning them.
To pin clipboard content, press Windows key+V to open the clipboard and then select the small pin icon to the right of the text and images you want to preserve. If done correctly, the horizontal pin icon should tilt to a 45-degree angle.
To unpin clipboard text or images, click on the pin icon again.
When as item is pinned, it is protected every time you clear the clipboard in the future.
Thanks for letting us know!
Get the Latest Tech News Delivered Every Day
Subscribe
The Clipboard in Windows 10 has had an interesting evolution. Initially, it was the same basic clipboard we got used to from the old days of Windows 7. Then, it turned into an app that stores your clipboard’s history, synchronizes items across devices, and enhances your overall productivity like never before in Windows. If you use Windows 10, and you want to be more productive when creating documents, presentations, or simply accessing data you’ve copied to the clipboard some time ago, read this guide:
How to find and access the clipboard in Windows 10
Accessing the clipboard in Windows 10 is very easy: after you log in, press Windows + V on your keyboard. You then see it displayed on the screen, listing all the items you recently copied. Inside the Clipboard window, you’ll find text, images, or links you’ve previously added.

The Windows 10 Clipboard
Only a few people know that the Windows 10 clipboard can also display items you copied on other computers or devices using the same Microsoft account. Therefore, don’t be surprised if you just logged into Windows 10 and accessed the clipboard to see something you didn’t copy on the computer or device you’re using now. Instead, read this guide on how to sync the Windows 10 clipboard with other computers and devices.🙂
The clipboard can sync items across devices
The items stored inside the Windows 10 clipboard get deleted each time you log out or restart. Therefore, each time you sign into Windows 10, and you don’t copy to the clipboard items on other devices that are synced to it, the clipboard will be empty when you press Windows + V on your keyboard.
An empty clipboard
If your clipboard is empty, like in the screenshot above, don’t worry. I’ll show you how to start adding items to it, so keep reading this tutorial.
Where are the clipboard files saved in Windows 10?
While the clipboard stores most of its information in your computer’s RAM, it also stores some information on the system drive. If you are a technical user and you want to know where exactly the Windows 10 clipboard stores its data, you’ll find it in this location:
C:\Users\Your User Account\AppData\Local\Microsoft\Windows\Clipboard
Remember that Your User Account is a folder name that varies from one computer to another based on the user account that is using it. On my computer, this folder is named ciprian, after my actual name. On your computer, it will be something different.
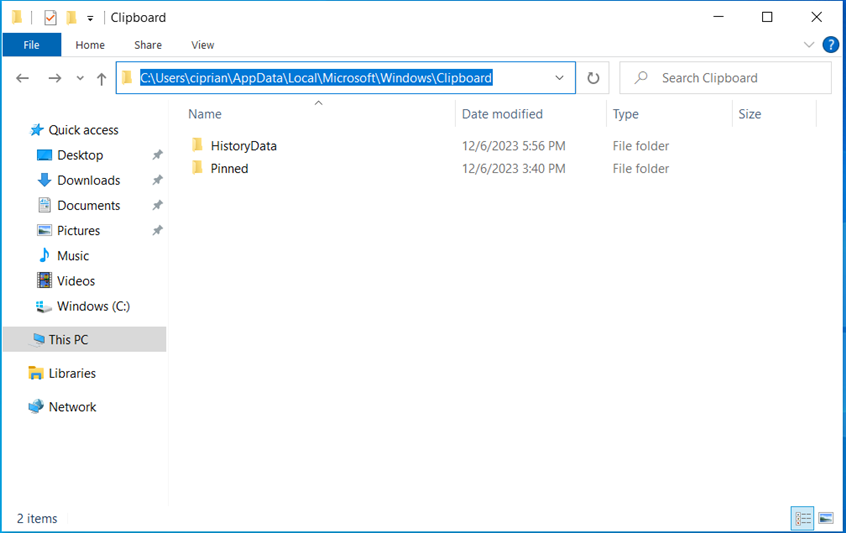
The clipboard’s location on disk
To make things simpler, you can use the %LOCALAPPDATA% environment variable to get to this location more easily. Simply copy and paste this location into the address bar of File Explorer or the Run window:
%LOCALAPPDATA%\Microsoft\Windows\Clipboard
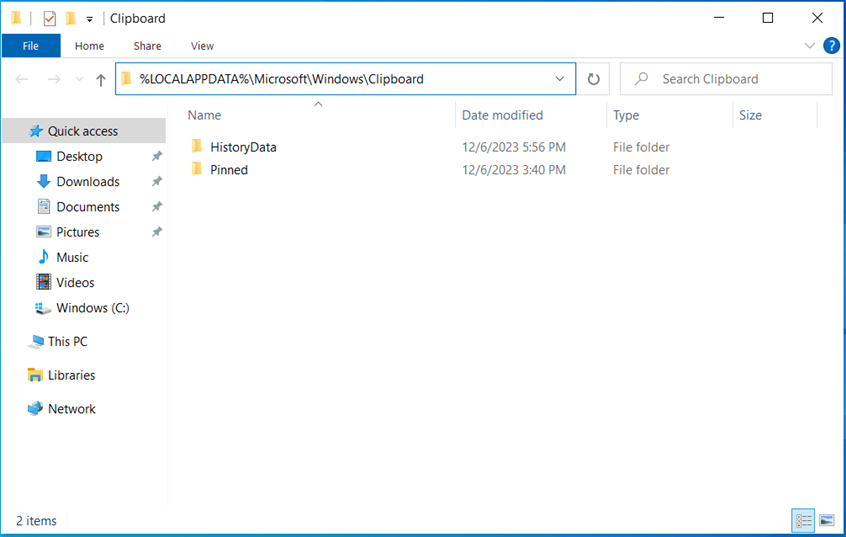
Accessing the clipboard folder using environment variables
TIP: If you like using environment variables and consider them useful, here’s how to create user and system environment variables in Windows.
How to copy items to the Windows 10 clipboard
Adding items to the clipboard is as simple as selecting them and choosing Copy or Cut. While there are many ways to copy or cut items in Windows, let’s quickly show you two of them:
When you write a document in Word and enter some text that you want to paste somewhere else, select it with the mouse and then press the Windows + C keys on your keyboard. This action adds the selected text to the Windows 10 clipboard. Therefore, when you press Windows + V, you see the text added to the top side of the clipboard.
Copying items to the clipboard is easy
Or let’s assume that you’re browsing the web in Microsoft Edge and want to copy a cool image you find online. You right-click on it and choose Copy image.
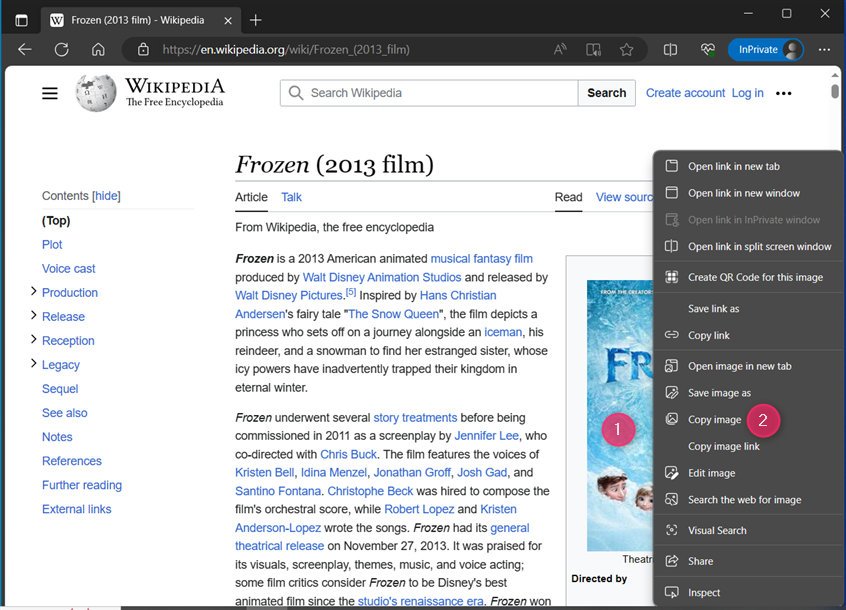
Copying an image from the web to the clipboard
When you press Windows + V, you see the image added to the top side of the clipboard. Also, all the items you recently copied to the clipboard are listed vertically, starting from the most recent one at the top.
Clipboard items are listed vertically, with the most recent at the top
The Windows 10 clipboard can hold more than just the last item you’ve copied. To make things more useful, there is no maximum size for Windows clipboard data; you can add as many items as you want.
Therefore, if your clipboard has a long list of items, and you want to see the older clipboard items, scroll down in the Clipboard window. You can do this using the mouse and the scroll bar on the right side of the window or using your finger and sliding up and down your device’s touchscreen (if it has one).
Scroll the clipboard up and down
TIP: If you don’t want the clipboard to keep multiple items, here’s how to turn off the Windows 10 clipboard history and clear your data.
How to paste from the clipboard in Windows 10
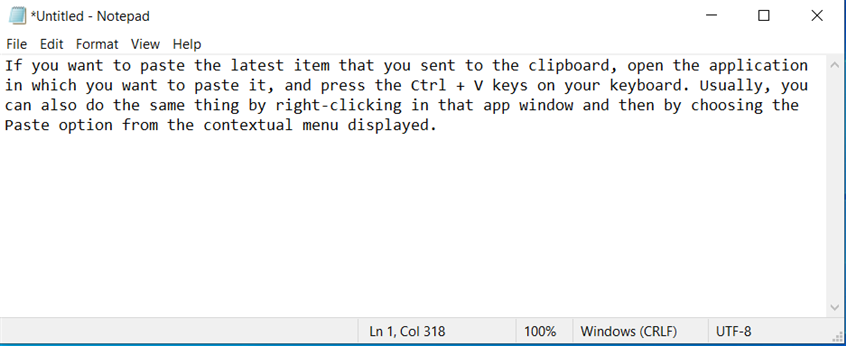
If you want to paste the latest item you sent to the clipboard, open the application you want to paste it in and press the Ctrl + V keys on your keyboard.
Ctrl + V pastes the most recent item from the clipboard
You can also do the same thing by right-clicking (or pressing and holding) in that app window and then choosing the Paste option from the contextual menu displayed.
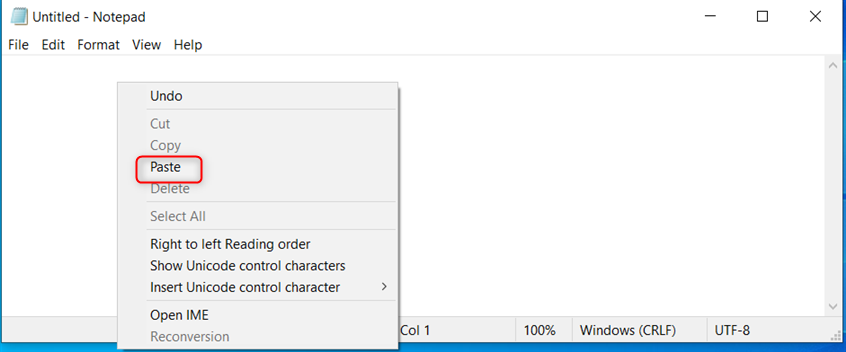
You can also right-click and choose Paste
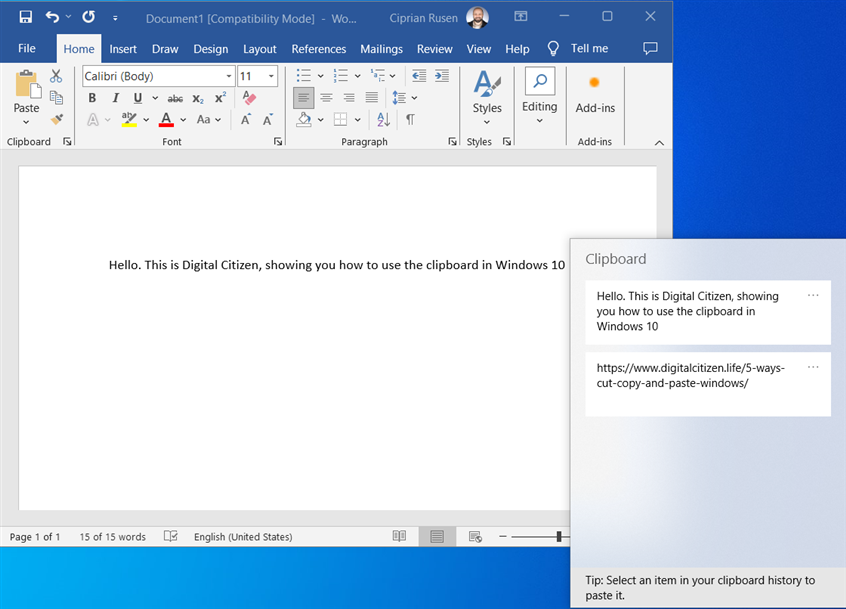
You can also use the Clipboard window to paste the last item in it. Go to the app window where you want to paste this last item, press the Windows + V keys on your keyboard, then click or tap the first element in the Clipboard window. It automatically appears in the app window, like in the screenshot below.
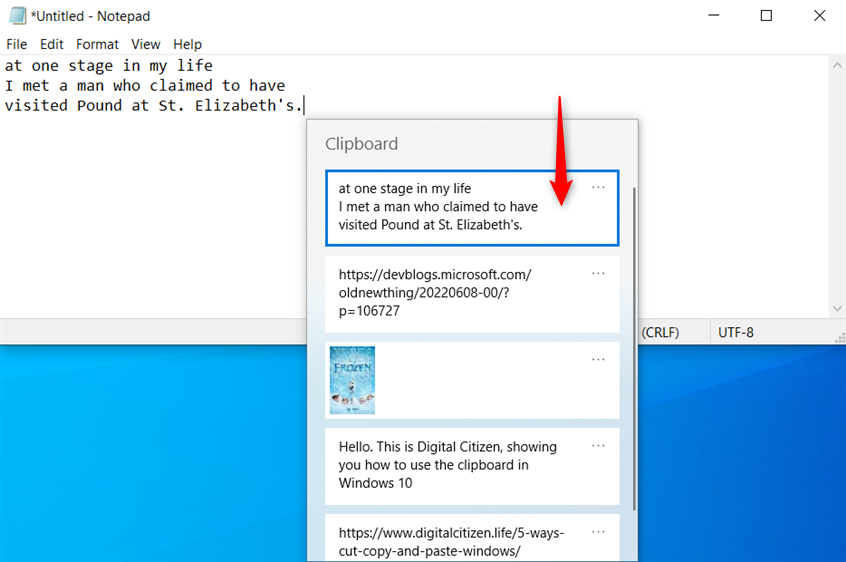
Pasting the latest item from the clipboard
How to paste older items from the clipboard in Windows 10
If you want to paste older items from the clipboard, go to the app window where you want to paste them. Then, press the Windows + V keys on your keyboard to view the Clipboard window, and click or tap the item you want to paste. The item then shows up in the app.
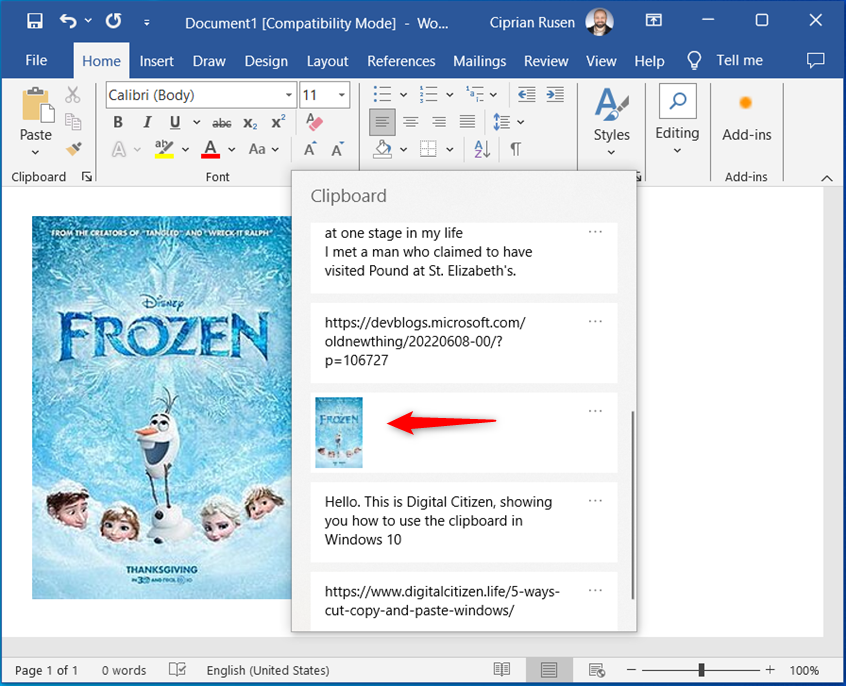
Pasting an older item from the clipboard
How to pin items to the clipboard in Windows 10
As I mentioned, each time you sign out from Windows 10 or reboot your computer, the clipboard is cleared and deletes all stored items. However, you can keep those items between Windows 10 reboots and logouts by pinning them to the clipboard. After you add several items to the clipboard, open it by pressing Windows + V. Then, scroll down the list of items and click or tap the three dots next to the item you want saved for future use. In the menu that pops up, click or tap Pin.
How to pin to the clipboard
Repeat this process until you pin all the items you want to keep for later use. To test if things worked out well, sign out from Windows 10 or clear the clipboard (instructions on how to do this will follow later in this guide), and then access the clipboard again. You will see all the items that you have pinned to it.
The clipboard stores pinned items
NOTE: Remember that pinned clipboard items are not displayed at the top of the clipboard; they’re just kept inside the clipboard in the order that they were added to it in the first place.
How to unpin an item from the Windows 10 clipboard
If you no longer need an item from the clipboard again, simply unpin it by doing this:
Press Windows + V to access the clipboard, find the item that interests you, and click or tap on the three dots in its top-right corner. Then, in the menu that appears, choose Unpin.
How to unpin an item from the clipboard
The item remains stored inside the clipboard until you delete it, clear the clipboard, sign out of Windows 10, or reboot the computer.
How to delete items from the clipboard in Windows 10
If you want to delete an item from your clipboard, open the Clipboard window (press Windows + V), locate the item you want to remove, and click or tap the three dots next to it. In the menu that appears, choose Delete.
Deleting a clipboard item
The item is removed from the clipboard immediately without any confirmation required.
How to clear the clipboard in Windows 10
Each time you restart Windows 10 or sign out, the clipboard gets cleared automatically. It only keeps the items you manually pinned to it. If you want to clear it immediately, press Windows + V to access the Clipboard window. Then, click or tap the three dots next to any item from the list and choose Clear all.
Clearing the items in the clipboard
The Windows 10 clipboard gets cleared immediately, storing only your pinned items. If you want those removed as well, first unpin them using the instructions shared earlier in this guide, and then clear the clipboard again.
Do you like the Windows 10 clipboard?
When Windows 10 was released in 2015, you could not see your clipboard contents unless you used a third-party app designed for this purpose. Also, the clipboard was rather primitive and a lot less useful than it is today. Therefore, I appreciate its evolution and what Microsoft has done with it, helping users become more productive. But this is my opinion, and before closing this tutorial, I’m curious to know yours: do you like the Windows 10 clipboard? Does it work the way you need it? Does it make you more productive? Comment using the options available below, and let’s discuss.
Download Article
Download Article
- Copy and Paste
- Using Clipboard History
- Syncing Your Clipboard
- Tips
- Warnings
|
|
|
|
The clipboard on Windows 10 is packed with more features than ever before! Some of the neat features include clipboard history and the ability to sync the clipboard across your devices. This wikiHow article will show you how to make use of all of the features of the Windows 10 clipboard.
-

To copy text, highlight it, then right click it and select, «Copy».
- You can also press Ctrl+C instead of right clicking.
- Another option is to cut text. When you cut text, the text that you highlighted is deleted and moved to the clipboard. You can then paste it. To cut text, select, «Cut» instead of, «Copy». You can also press Ctrl+X
-
Right click the location where you want the text to go. Then, select, «Paste».
- You can also press Ctrl+V.


Advertisement
-
. Press the Windows key (it looks like the Windows 10 logo

, or the Windows flag
), and V together. Then, click Turn on.
- If clipboard history is already enabled, then you can skip this step. It’s easy to tell if it’s enabled or not. If the Turn on button is not displayed, then clipboard history is already enabled.
-
Press the Windows key and V. This will open a box that shows your clipboard history.
-
Click on the item that you want to make the current item. This will allow you to paste the item.
-
Click on the three dots next to the item, and then select, «Delete». This will remove the item from clipboard history. This is not reversible.
-
By default, items that are not pinned are deleted whenever you turn off or restart your computer. When you pin items in clipboard history, they will not be deleted. To pin an item to the clipboard, click on the three dots next to the item, and then select, «Pin».
-
. Click on the three dots next to an item, and then select, «Clear all». This will immediately delete all non-pinned items in your clipboard history. This action is not reversible.
- To delete a pinned item, click on the three dots next to it, and then select, «Delete».


Advertisement
-
Open the Start menu
, and select settings

. Then, open the «System» options and select «Clipboard» in the left pane. Then, turn the «Sync across devices» switch on

.
- You need to be signed into your Microsoft account on all of the devices that you want to sync your clipboard to. If you do not have a Microsoft account, then you can create one for free.[1]
- You need to be signed into your Microsoft account on all of the devices that you want to sync your clipboard to. If you do not have a Microsoft account, then you can create one for free.[1]
-
There are two options to choose from. You can select, «Automatically sync text that I copy», and, «Never automatically sync text that I copy».
- If you select, «Automatically sync text that I copy», then everything that you copy will be shared will be synced across your devices.
- If you select, «Never automatically sync text that I copy», then you will need to open clipboard history, click on the three dots next to the item that you want to sync, and then click, «Sync».
-
Press Ctrl+V on the other device to paste the synced item. You will also be able to see it when you open clipboard history.
- It may take a while for the item to sync, especially if you have slow internet.


Advertisement
Ask a Question
200 characters left
Include your email address to get a message when this question is answered.
Submit
Advertisement
-
There is a 4MB limit to clipboard syncing. If you are syncing an image, you will need to make sure that it is less that 4MB.[2]
-
According to Microsoft, clipboard history will soon allow you to sync your clipboard to your phone.
-
Clipboard history is limited to 25 items. The oldest items will be cleared after you exceed this limit, unless they are pinned.
Thanks for submitting a tip for review!
Advertisement
-
If you copy a password to your clipboard, then you may want to make sure that you delete it once you are done, especially if clipboard syncing is enabled.
Advertisement
References
About This Article
Thanks to all authors for creating a page that has been read 29,225 times.
Is this article up to date?
Всё, что нужно знать о полезной функции для более продуктивной работы.
Что такое журнал буфера обмена
Стандартный буфер, который все привыкли использовать через контекстное меню «Скопировать» и «Вставить» или через сочетания Ctrl + C, Ctrl + V, имеет лишь одну «ячейку памяти». Чего бывает очень мало. Начиная с Windows 10 Microsoft внедрила журнал буфера обмена, который умеет запоминать до 25 элементов. Копировать и вставлять при этом можно текст, ссылки, изображения и другой контент.
Как включить журнал буфера обмена Windows 10 и Windows 11
По умолчанию функция неактивна. Её можно активировать следующим образом.

Удерживая клавишу Win (с символом «окошка»), нажмите V на клавиатуре. Вы увидите предложение включить журнал буфера обмена с помощью соответствующей кнопки.

Если при нажатии Win + V ничего не происходит, то активировать функцию можно в настройках. Для этого сделайте правый клик по меню «Пуск» и выберите «Параметры». Далее в разделе «Система» → «Буфер обмена» включите тумблер как на скриншоте выше.
Как просмотреть буферы обмена Windows 10 и Windows 11
После включения система начнёт хранить всё, что вы копируете или вырезаете, в буфере обмена.

Для просмотра журнала нажмите Win + V. На экране отобразится плавающее окошко со списком сохранённых элементов, которое можно переместить в удобное место. Запомнить сочетание легко — как обычная вставка, только вместо Ctrl используется клавиша Win.
Как вставить куда-то скопированный элемент

Для вставки элемента в документ или, например, в строку поиска достаточно кликнуть по нужному тексту, ссылке или изображению в списке, после чего буфер автоматически закроется. Помимо этого можно использовать стрелки клавиатуры для навигации и Enter для вставки.
Как закрепить нужный элемент
Если вам часто приходится вставлять одинаковые данные вроде реквизитов, ссылок или номеров телефонов, можно закрепить их в буфере, чтобы они всегда были под рукой.

Для этого просто кликните по значку иголки напротив нужного элемента.
Как очистить журнал буфера обмена
Как упоминалось выше, в памяти буфера всего 25 ячеек. При их заполнении во время записи новых элементов самые старые стираются.

Каждую из них можно удалить по отдельности, кликнув на троеточие в списке и выбрав значок корзины. Для освобождения места во всём буфере используется кнопка «Очистить всё».
При этом буфер автоматически очищается после перезагрузки и выключения компьютера. Из памяти исчезают все элементы, кроме закреплённых.