
Пройдите тест, узнайте какой профессии подходите
Работать самостоятельно и не зависеть от других
Работать в команде и рассчитывать на помощь коллег
Организовывать и контролировать процесс работы
Быстрый ответ
Если система не распознаёт Conda, проблема решается путем добавления пути к Conda в переменную среды PATH. В командную строку или терминал следует ввести следующие строки:
Windows:
macOS/Linux:
Вам необходимо заменить путь C:\Anaconda3 или $HOME/anaconda3 на тот, что актуален для местоположения Conda на вашем устройстве. Примените эти изменения на время текущей сессии или введите их постоянно в настройки системы для сохранения после перезагрузок.

Пошаговое решение проблемы
Шаг 1: Проверка установки Conda
Убедитесь в корректности установки Anaconda или Miniconda, узнав их месторасположение при помощи следующих команд:
Для Windows:
Для macOS/Linux:
Шаг 2: Ручное настройки переменных среды
Если ваша операционная система — Windows, пройдите в Свойства системы, чтобы получить доступ к Переменным среды. Для пользователей Windows 10 это необходимо делать с правами администратора:
- Нажмите Windows + X и выберите «Систему».
- Откройте «Дополнительные параметры системы».
- В вкладке «Свойства системы» выберите «Переменные среды».
- В разделе «Системные переменные» найдите «Path» и кликните «Изменить…».
- Добавьте через «Создать» пути:
C:\Anaconda3\ScriptsиC:\Anaconda3. - Закройте и откройте командную строку, чтобы активировать новые переменные.
На macOS/Linux редактирование переменных среды происходит через редактирование файла конфигурации оболочки (.bashrc или .bash_profile), куда следует добавить строку export PATH.
Шаг 3: Использование Anaconda Prompt
Для удобства работы сможете использовать Anaconda Prompt — это терминал, входящий в пакет Anaconda:
Шаг 4: Обновление Anaconda
Регулярно обновляйте вашу Anaconda, чтобы избежать возможных трудностей с Conda:
Поддерживайте Conda в актуальном состоянии!
Шаг 5: Финальная проверка после внесения изменений
После того как все изменения применены, запустите командную строку или терминал и введите:
Чтобы просмотреть список окружений, которыми управляет Conda, введите:
Визуализация
Ошибка Conda не распознаётся можно представить как следующую ситуацию:
Это как если бы вы пытались вызвать недоступное такси:
Ваши шаги:
- Найти такси (Conda) (🔍),
Теперь связь установлена:
Решение постоянных проблем
Решение 1: Временное изменение PATH
В экстренных случаях используйте команду setx:
Примечание: Будьте внимательны, это влияет на системные переменные навсегда.
Решение 2: Особенности устаревших ОС
Для Windows 7 следует внимательно применять инструкции обновления PATH, так как процесс имеет свои особенности.
Решение 3: Проверка прав доступа
Недостаточные права доступа в Windows могут вызвать трудности. Запускайте обновления Anaconda с правами администратора для их решения.
Решение 4: Предотвращение потенциальных проблем
Предпочитаете безопасные решения? Устанавливайте Anaconda с рекомендуемыми настройками. Это гарантирует более надёжную работу.
Полезные материалы
- Официальное руководство по установке Conda — подробное пособие по настройке среды.
- Обсуждение на Stack Overflow о проблемах с Conda — опыт и советы от сообщества.
- Управление окружениями с помощью Conda — профессиональные рекомендации и инструкции.
- Известные проблемы Conda на GitHub — решения для распространенных ошибок.
- Руководство по переменным среды Windows — глубокое погружение в тему переменных среды.
- Шпаргалка по Conda — краткое руководство по основным командам.
- Установка Python на Windows с помощью Anaconda — пошаговое руководство по использованию Conda на Windows 10.
Last Updated :
14 May, 2024
Anaconda is open-source software that contains Jupyter, spyder, etc that are used for large data processing, data analytics, and heavy scientific computing. Anaconda works for R and Python programming languages. Spyder(a sub-application of Anaconda) is used for Python. for Python will work in Spyder. Package versions are managed by the package management system called Conda.
What is the Environment Variable?
Environment variables define the behavior of the environment. They can affect the processes ongoing or the programs that are executed in the environment. The region from which this variable can be accessed or over which it is defined is termed as the scope of the variable.
Steps to Set up Anaconda Path to Environment Variable:
Windows
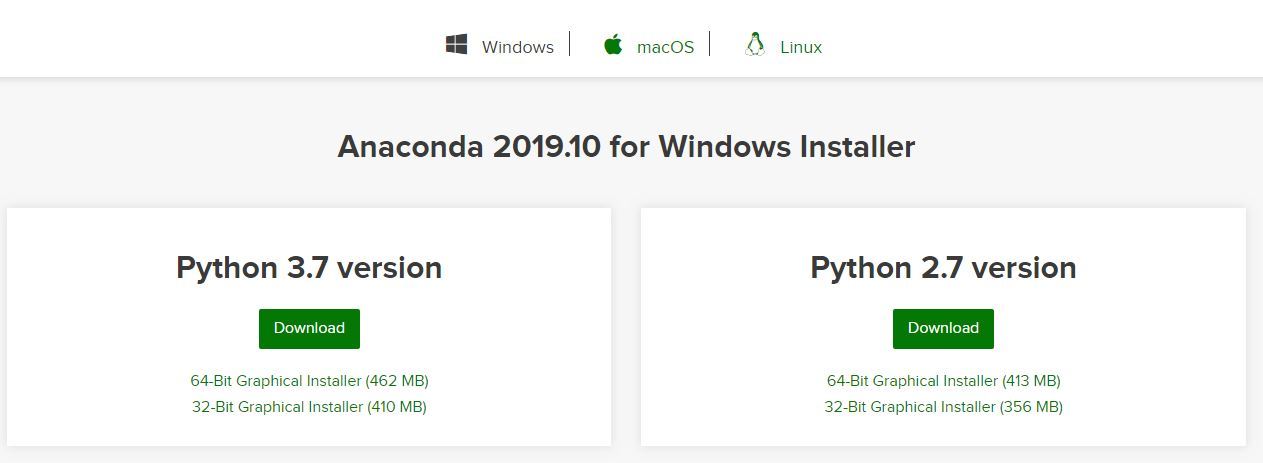
- Download Anaconda for Python. Make sure to download the “Python 3.7 Version” for the appropriate architecture.
- After the download is over, go through How to install Anaconda on windows? and follow the given instructions.
- After the installation is done, we need to set up the environment variable.
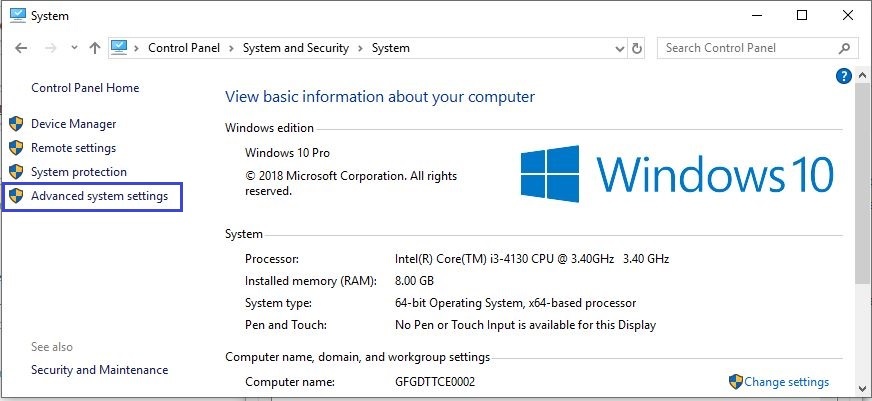
Go to Control Panel -> System and Security -> System
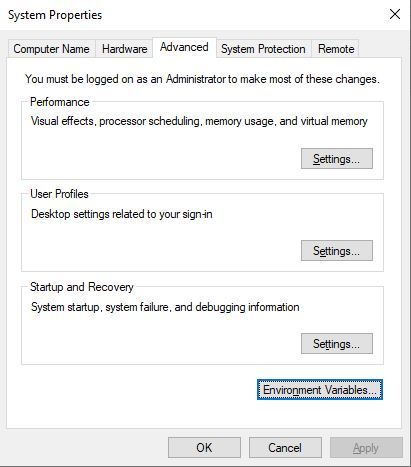
Under the Advanced System Setting option click on Environment Variables as shown below:
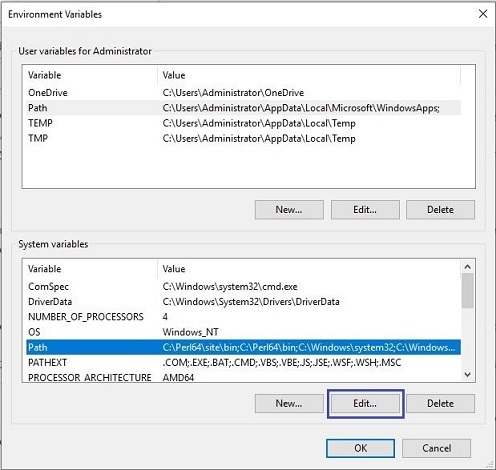
- Now, we have to alter the “Path” variable under System variables so that it also contains the path to the Anaconda environment. Select the “Path” variable and click on the Edit button as shown below:
- We will see a list of different paths, click on the New button and then add the path where Anaconda is installed.

- Click on OK, Save the settings and it is done !! Now to check whether the installation is done correctly, open the command prompt and type anaconda-navigator. It will start the anaconda navigator App if installed correctly.
Linux
In Linux, there are several ways to install Anaconda. But we will refer to the simplest and easy way to install Anaconda using the terminal. Go through How to install Anaconda on Linux? and follow the instructions. Generally, the Path variable is automatically set in Linux at the time of installation, but it can also be set manually by the following steps:
- Go to Application -> Accessories -> Terminal
- For setting up Environment Variable, type the following command in the Terminal with the use of the Installation path:
export ANACONDA = /home/nikhil/anaconda3

- For setting up the Environment Value, type the following command in the Terminal with the use of the Installation path:
export PATH = $PATH:/home/nikhil/anaconda3/bin

- It is done!! Now to check whether the installation is done correctly, open Terminal and type anaconda-navigator. It will start the anaconda navigator App if installed correctly.
Conclusion
In conclusion, Anaconda is a powerful tool for Python programming, offering a range of features like Jupyter and Spyder for data processing and scientific computing. Setting up Anaconda involves adding its path to system variables, ensuring smooth execution of Anaconda commands. So this was all about How to add Anaconda Path to Environment Variable.
Anaconda: More Than Just a Big Snake (of Python Packages)
So, you’ve downloaded Anaconda, huh? Good choice! It’s a seriously handy distribution of Python, especially if you’re into data science, machine learning, or just wrangling a bunch of different packages. But sometimes, getting Anaconda to play nice with your system can be a bit… frustrating. Specifically, you might run into issues where you can’t just type conda or python in your terminal and have things work. That’s often because Anaconda isn’t correctly added to your system’s PATH environment variable.
Think of the PATH like a list of directions your computer uses to find programs. When you type a command, your computer checks that list to see if it can find an executable file with that name. If Anaconda isn’t on that list, your computer shrugs and says, «Command not found.» And nobody wants that, right?
This guide will walk you through how to add Anaconda to your PATH, step by step, on Windows, macOS, and Linux. We’ll cover why you might want to do this, potential problems, and how to make sure everything’s working correctly. By the end, you should be able to use Anaconda and its tools from any terminal window, without any headaches. I think it’s pretty cool, anyway.
And if you’re completely new to Anaconda, don’t worry! We’ll start with a quick overview of what it is and why it’s so useful. Let’s get started!
Why Bother Adding Anaconda to Your PATH?
Okay, so why is this PATH thing even important? Well, there are a few key reasons why you’d want to add Anaconda to it. Basically, it’s all about convenience and making your life easier. No one wants to type out really long commands, you know?
- Easy Access: Once Anaconda is in your PATH, you can run
condacommands (likeconda install,conda update, etc.) from any terminal or command prompt window. This means you don’t have to navigate to Anaconda’s installation directory every time you want to use it. - Python, Everywhere: Similarly, you can run Python scripts from anywhere. This is super useful when you’re working on projects in different directories.
- No More «Command Not Found»: This is the big one. Adding Anaconda to your PATH gets rid of those annoying «command not found» errors when you try to use
condaorpython.
Okay, But What Happens If I Don’t Add It?
If you skip adding Anaconda to your PATH, you’ll still be able to use it, but you’ll have to do things the hard way. This usually means you have to open the Anaconda Prompt (on Windows) or navigate to the Anaconda installation directory in your terminal and run commands from there. It’s doable, but it’s definitely less convenient. It’s like having to walk across the room to turn on the light switch instead of just flipping it by the door.
Adding Anaconda to PATH on Windows: A Step-by-Step Guide
Alright, let’s get down to business. Here’s how to add Anaconda to your PATH on Windows. This might sound scary, but I promise it’s not too bad. Just follow along carefully, and you’ll be fine.
- Find Your Anaconda Installation Directory: This is usually something like
C:\Users\YourUsername\Anaconda3orC:\Anaconda3. If you’re not sure, search for the Anaconda Navigator application on your computer, right-click on it, and select «Open file location.» That should take you to the Anaconda installation directory. - Open System Properties:
- Press the Windows key + R to open the Run dialog box.
- Type
sysdm.cpland press Enter. This opens the System Properties window.
- Edit Environment Variables:
- In the System Properties window, click on the «Advanced» tab.
- Click the «Environment Variables…» button.
- Edit the PATH Variable:
- In the Environment Variables window, you’ll see two sections: «User variables for YourUsername» and «System variables.» Look for a variable named «Path» (or «PATH») in both sections.
- Select the «Path» variable in the User variables section (if it exists). If it doesn’t exist, select the «Path» variable in the System variables section.
- Click the «Edit…» button.
- Add Anaconda Directories to PATH:
- In the Edit environment variable window, click «New» to add a new entry.
- Add the following paths, replacing
C:\Users\YourUsername\Anaconda3with your actual Anaconda installation directory:C:\Users\YourUsername\Anaconda3C:\Users\YourUsername\Anaconda3\ScriptsC:\Users\YourUsername\Anaconda3\Library\bin(This one is important for some packages!)
- Click «OK» to close the Edit environment variable window.
- Click «OK» to close the Environment Variables window.
- Click «OK» to close the System Properties window.
- Test It Out:
- Open a new Command Prompt or PowerShell window (it’s important to open a new one, so it picks up the changes to the PATH).
- Type
conda --versionand press Enter. If Anaconda is correctly added to your PATH, you should see the Anaconda version number. - Type
python --versionand press Enter. You should see the Python version number associated with your Anaconda installation.
What if It Still Doesn’t Work?
Sometimes, even after following these steps, things might not work perfectly. Here are a few things to try:
- Restart Your Computer: This is a classic, but it often works. Restarting your computer ensures that all the environment variables are properly updated.
- Check for Typos: Double-check that you’ve entered the Anaconda installation directories correctly in the PATH variable. Even a small typo can cause problems.
- Conflicting Python Installations: If you have other Python installations on your system, they might be interfering with Anaconda. Try temporarily removing those other installations from your PATH to see if that resolves the issue.
- Anaconda Prompt: As a last resort, you can always use the Anaconda Prompt, which is a special command prompt that’s pre-configured to work with Anaconda. You can find it in your Start menu.
Adding Anaconda to PATH on macOS: A Slightly Different Approach
Adding Anaconda to your PATH on macOS is a bit different than on Windows, but it’s still pretty straightforward. The main difference is that you’ll be editing a shell configuration file instead of using a graphical interface. Don’t worry, it’s not as scary as it sounds! It’s actually pretty easy, and I’ll walk you through it.
- Open Your Terminal: You can find the Terminal application in the /Applications/Utilities folder.
- Determine Your Shell: macOS uses different shells, like bash or zsh. To find out which shell you’re using, type
echo $SHELLin the Terminal and press Enter. The output will tell you which shell you’re using (e.g.,/bin/bashor/bin/zsh). - Edit Your Shell Configuration File:
- If you’re using bash, you’ll need to edit the
~/.bash_profilefile. If that file doesn’t exist, you can create it. - If you’re using zsh, you’ll need to edit the
~/.zshrcfile. - To open the file in a text editor, you can use the
nanocommand. For example, if you’re using bash, you would typenano ~/.bash_profileand press Enter.
- If you’re using bash, you’ll need to edit the
- Add Anaconda to Your PATH:
- In the text editor, add the following line to the end of the file, replacing
/Users/YourUsername/opt/anaconda3/binwith your actual Anaconda installation directory:export PATH="/Users/YourUsername/opt/anaconda3/bin:$PATH" - If you installed Anaconda for all users (which is less common), the path might be something like
/opt/anaconda3/bin. - Press Ctrl+X to exit the text editor, then press Y to save the changes, and then press Enter to confirm the filename.
- In the text editor, add the following line to the end of the file, replacing
- Apply the Changes:
- To apply the changes to your current terminal session, you need to source the configuration file.
- If you’re using bash, type
source ~/.bash_profileand press Enter. - If you’re using zsh, type
source ~/.zshrcand press Enter.
- Test It Out:
- Type
conda --versionand press Enter. You should see the Anaconda version number. - Type
python --versionand press Enter. You should see the Python version number associated with your Anaconda installation.
- Type
Common macOS Issues and Solutions
- Incorrect Anaconda Path: Make sure you’re using the correct path to your Anaconda installation directory. You can find this by opening Anaconda Navigator and looking at the Preferences.
- Incorrect Shell Configuration File: Double-check that you’re editing the correct shell configuration file (
~/.bash_profilefor bash,~/.zshrcfor zsh). - Permissions Issues: Sometimes, you might run into permissions issues when editing the shell configuration file. If this happens, you can try using the
sudocommand to open the file with administrator privileges (e.g.,sudo nano ~/.bash_profile). Be careful when usingsudo, as it can have unintended consequences if used incorrectly.
Adding Anaconda to PATH on Linux: Similar to macOS
Adding Anaconda to your PATH on Linux is very similar to macOS. You’ll be editing a shell configuration file, just like on macOS. The specific file you need to edit might vary depending on your Linux distribution and the shell you’re using, but the general process is the same.
- Open Your Terminal: This is usually called something like «Terminal» or «Konsole,» depending on your Linux distribution.
- Determine Your Shell: Type
echo $SHELLin the Terminal and press Enter to find out which shell you’re using. Common shells include bash (/bin/bash) and zsh (/bin/zsh). - Edit Your Shell Configuration File:
- If you’re using bash, you’ll typically edit the
~/.bashrcfile. Some distributions might also use~/.bash_profileor~/.profile. - If you’re using zsh, you’ll edit the
~/.zshrcfile. - Use a text editor like
nanoorvimto open the file. For example, if you’re using bash and want to usenano, you would typenano ~/.bashrcand press Enter.
- If you’re using bash, you’ll typically edit the
- Add Anaconda to Your PATH:
- Add the following line to the end of the file, replacing
/home/YourUsername/anaconda3/binwith your actual Anaconda installation directory:export PATH="/home/YourUsername/anaconda3/bin:$PATH" - If you installed Anaconda for all users, the path might be something like
/opt/anaconda3/bin. - Save the changes and exit the text editor.
- Add the following line to the end of the file, replacing
- Apply the Changes:
- Source the configuration file to apply the changes to your current terminal session.
- If you’re using bash, type
source ~/.bashrcand press Enter. If you edited~/.bash_profileor~/.profileinstead, source those files accordingly. - If you’re using zsh, type
source ~/.zshrcand press Enter.
- Test It Out:
- Type
conda --versionand press Enter. You should see the Anaconda version number. - Type
python --versionand press Enter. You should see the Python version number associated with your Anaconda installation.
- Type
Linux-Specific Tips and Tricks
- Which File to Edit?: If you’re not sure which shell configuration file to edit, try editing
~/.bashrcfirst. This is the most common file used by bash on Linux. - Using
vim: If you’re using thevimtext editor, you’ll need to pressito enter insert mode before you can start typing. To save the changes and exit, press Esc, then type:wqand press Enter. - Anaconda Not Found After Reboot: If Anaconda works after sourcing the configuration file but stops working after you reboot your computer, it means the changes weren’t permanently saved. Make sure you’re editing the correct configuration file and that the changes are being saved correctly.
A Few Words of Caution
While adding Anaconda to your PATH is generally a good idea, there are a few things to keep in mind.
- Order Matters: The order of the directories in your PATH variable matters. If you have multiple Python installations, the one that appears first in the PATH will be the one that’s used by default. If you want Anaconda’s Python to be used by default, make sure its directory appears before any other Python directories in the PATH.
- Potential Conflicts: Adding too many directories to your PATH can sometimes lead to conflicts, especially if you have multiple versions of the same program installed. If you start experiencing unexpected behavior, try simplifying your PATH variable to see if that resolves the issue.
I’m not sure about this, but I think following these steps will fix everything!
What if You Messed Up Your PATH?
Okay, so you tried adding Anaconda to your PATH, and now things are even worse than before. Don’t panic! It happens to the best of us. The good news is that it’s usually possible to fix a messed-up PATH variable. Let’s look at how to fix it.
On Windows, you can simply go back to the Environment Variables window and edit the PATH variable again. Remove any incorrect entries or restore the original value of the PATH variable from a backup (if you have one). On macOS and Linux, you can edit your shell configuration file and remove any incorrect lines that you added. If you’re not sure what the original value of the PATH variable was, you can usually find it by searching online for the default PATH variable for your operating system and shell.
Wrapping Things Up
Adding Anaconda to your PATH is a simple but powerful way to make your life easier as a Python developer or data scientist. It allows you to access Anaconda’s tools and Python from any terminal window, without having to navigate to specific directories or deal with annoying «command not found» errors. By following the steps outlined in this guide, you should be able to add Anaconda to your PATH on Windows, macOS, or Linux, and start using it like a pro. I hope it helped!
FAQ
- Why is Anaconda so big? It takes up so much space!
- Anaconda comes pre-loaded with a ton of packages that are useful for data science and machine learning. That’s why it’s so big! It’s basically a one-stop shop for all your Python needs. If you want a smaller distribution, you can try Miniconda, which only includes Python and conda.
- I added Anaconda to my PATH, but it still doesn’t work. What gives?
- Make sure you’ve opened a new terminal window after adding Anaconda to your PATH. The changes won’t take effect until you do. Also, double-check that you’ve entered the Anaconda installation directory correctly in the PATH variable. A typo can cause problems.
- Should I add Anaconda to the PATH for all users or just for my user account?
- It depends on your needs. If you’re the only one using Anaconda on your computer, you can add it to the PATH for your user account only. If you want other users to be able to use Anaconda as well, you’ll need to add it to the PATH for all users. Note that this might require administrator privileges.
- What’s the difference between conda and pip? Which one should I use?
condaandpipare both package managers for Python, but they work in slightly different ways.condais primarily used for managing packages in the Anaconda ecosystem, whilepipis the standard package manager for Python. Generally, you should usecondato install packages that are available in the Anaconda repositories, and usepipfor packages that are not. Conda can also manage non-python packages (like compilers or libraries), while pip is focused on python packages. For example, if you’re trying to install TensorFlow, you would typically useconda install tensorflow. If you’re trying to install a package that’s not available on conda, you would usepip install packagename. However, it’s generally recommended to stick withcondaas much as possible when using Anaconda, to avoid conflicts and ensure compatibility. It’s like using the right tool for the job, you know? And if you really want to cause problems for yourself, try usingpipinside acondaenvironment without activating it first… that’s a recipe for dependency hell!
Adding conda to path in Windows 10 by 2 steps.
First
Preparation
Open in window «Enviroment variables».
For doing this you need open properties your computer and select «Additional system parameters».
Second
In first or second line search «Path» and click button «Change», then «Create» and «Overview». Then add anaconda location, where you installed conda.
Default:
All users: «/ProgramData/Anaconda3/condabin/»;
Just me: «/Users//Anaconda3/condabin/»;
Custom Path. For searching conda use command:
where conda.
Third
Test conda in command line.
conda —version
conda activate
conda deactivate
-
Download the installer:
-
Miniconda installer for
Windows -
Anaconda Distribution installer for
Windows -
Miniforge installer for Windows
-
-
Verify your installer hashes.
-
Double-click the
.exefile. -
Follow the instructions on the screen.
If you are unsure about any setting, accept the defaults. You
can change them later.When installation is finished, from the Start menu, open either the Anaconda Command Prompt (cmd.exe)
if using Miniconda or Anaconda Distribution, and the Miniforge Command Prompt if using Miniforge. Powershell
prompts are also available. -
Test your installation. In your terminal window, run the command
conda list. A list of
installed packages appears if it has been installed correctly.
Installing in silent mode#
Note
The following instructions are for Miniconda but should also work
for the Anaconda Distribution or Miniforge installers.
Note
As of Anaconda Distribution 2022.05 and Miniconda 4.12.0, the option to add Anaconda
to the PATH environment variable during an All Users installation has been disabled. This
was done to address a security exploit.
You can still add Anaconda to the PATH environment variable during a Just Me installation.
To run the the Windows installer for Miniconda in
silent mode, use the /S
argument. The following optional arguments are supported:
-
/InstallationType=[JustMe|AllUsers]—Default isJustMe. -
/AddToPath=[0|1]—Default is0 -
/RegisterPython=[0|1]—Make this the system’s default
Python.
0indicates Python won’t be registered as the system’s default.1
indicates Python will be registered as the system’s default. -
/S—Install in silent mode. -
/D=<installation path>—Destination installation path.
Must be the last argument. Do not wrap in quotation marks.
Required if you use/S.
All arguments are case-sensitive.
Example: The following command installs Miniconda for the
current user without registering Python as the system’s default:
start /wait "" Miniconda3-latest-Windows-x86_64.exe /InstallationType=JustMe /RegisterPython=0 /S /D=%UserProfile%\Miniconda3
Updating conda#
-
Open Command Prompt or PowerShell from the start menu.
-
Run
conda update conda.
Uninstalling conda#
-
In the Windows Control Panel, click Add or Remove Program.
-
Select Python X.X (Miniconda), where X.X is your version of Python.
-
Click Remove Program.
Note
Removing a program is different in Windows 10.