
Readers help support Windows Report. We may get a commission if you buy through our links.
Read our disclosure page to find out how can you help Windows Report sustain the editorial team. Read more
7-Zip remains one of the most popular file archivers available in Windows, especially due to its open-source nature. But oftentimes, 7-Zip is either not available in the Windows 11 context menu or disappears after an update!
This forces you to extract files or make other changes from within the app’s interface, complicating the process. But adding or re-adding 7-Zip to the Windows 11 right-click context menu shouldn’t take more than a minute.!
1. Reconfigure 7-Zip’s settings
- Launch 7-Zip on your PC, click on the Tools menu at the top, and select Options.

- Go to the 7-Zip tab, and tick the checkboxes for Integrate 7-Zip to shell context menu and Integrate 7-Zip to shell context menu (32-bit).

- Finally, click on Apply and OK to save the changes.
- You should now find 7-Zip in the right-click menu on Windows 11. Although, it will be accessible only after you click on Show more options, i.e., in the secondary context menu.


This is the easiest way to add 7-Zip to the secondary context menu on Windows 11.
In case you get the Access is denied error on enabling Integrate 7zip to the shell context menu, it indicates missing administrative privileges.

All you have to do is run 7-Zip as an administrator. To do that, right-click on the program > select Run as administrator > click Yes in the UAC prompt.
2. Use a third-party tool
NOTE
Disclaimer: Windows Report is not affiliated with the Custom Context Menu app. I am recommending it based on user reviews and the fact that it’s available on the Microsoft Store. Nevertheless, be careful with the privileges you grant to the app!
- Download and install the Custom Context Menu app from the Microsoft Store. There’s both a free and paid version.
- Once installed, launch the app, and click the Add Menu icon near the top-left corner.

- Now, enter all the details for the 7-Zip Windows 11 context menu entry in the fields on the right, including the executable (.exe) file’s path.
- Once done, press Ctrl + S to save the new entry, and then restart the PC for the changes to apply.
- You should now see a 7-Zip entry in the context menu across the PC or in specific locations, depending on the configured settings.


3. Manually modify the Registry
3.1 Finding 7-Zip’s installation path
- Press Windows + S to open the Start menu, enter 7-Zip in the text field, right-click on the relevant result, and select Open file location.

- Now, right-click on 7-Zip’s shortcut and select Properties.
- Copy the path (along with the quotes) in the Target field under the Shortcut tab. This is the path to the 7-Zip File Manager’s executable (.exe) file. In our case, it is:
"C:\Program Files\7-Zip\7zFM.exe"


- Press Windows + R to open Run, type regedit in the text field, and hit Enter.

- Click Yes in the UAC prompt.
- Now, paste the following path in the address bar and hit Enter:
HKEY_CLASSES_ROOT\Directory\Background\shell
- Right-click on the shell entry in the navigation pane, choose New, select Key from the flyout menu, and then name it 7-Zip.
- In the 7-Zip key you just created, right-click on the empty space towards the right, hover the cursor over New, select String Value, and name it Icon.
- Double-click on the Icon string, enter the 7-Zip path we copied earlier in the Value data text field, and click on OK.

- Next, right-click on 7-Zip in the navigation pane, choose New, select Key, and name it Command.
- In the Command key, double-click on the Default string, paste the 7-Zip path we copied earlier in the Value data text field, and then click OK to save the changes.
- Once done, reboot the computer for the changes to apply. You can also simply restart the Windows Explorer process from the Task Manager.


Remember, steps 5 & 6 above are optional, as the two only add 7-Zip’s icon to the context menu entry in Windows 11. It’s the Command key that does the rest.
Also, this way, you can add 7-Zip to the right-click menu on Windows 10!
If things don’t work out or you want to remove 7-Zip from the Windows 11 context menu, delete all the Keys and String Values you created earlier. Make sure not to modify/remove any other keys or entries, as it might disrupt the functioning of the PC and necessitate a reinstallation of Windows 11.
4. Use a Registry script
Tip
This method involves running a script created by a third-party developer on the PC, which will make changes to the Registry Editor. Since it may introduce instability in rare cases if not executed properly, I recommend you create a restore point beforehand.
- Go to GitHub’s official script page, and click the Download ZIP button near the top right.

- Right-click on the download file, select Extract all, then choose a location and wait for the process to complete.
- Once done, open the extracted files and run 7-Zip_Windows11.
- Click Run in the confirmation box, and similarly, give approval in all other prompts.

- After the script is executed, right-click on any file, and you shall find several additional 7-Zip-related entries in the Windows 11 context menu.


If the new Windows 11 context menu entries created for 7-Zip with the script are not what you were looking for, revert the changes using the restore point you created earlier.
That sums up all the ways you can add 7-Zip to the Windows 11 context menu. Except for the methods involving changes to the Registry Editor, the rest are all simple and quick!
In case you were looking for 7-Zip alternatives, discover our top picks for file compression software. You can also try out the portable edition.
Which method worked best for you? Share with our readers in the comments section.
Kazim Ali Alvi
Windows Hardware Expert
Kazim has always been fond of technology, be it scrolling through the settings on his iPhone, Android device, or Windows PC. He’s specialized in hardware devices, always ready to remove a screw or two to find out the real cause of a problem.
Long-time Windows user, Kazim is ready to provide a solution for your every software & hardware error on Windows 11, Windows 10 and any previous iteration. He’s also one of our experts in Networking & Security.
Как установить 7-zip, как сжать, извлечь и зашифровать файлы и папки с помощью 7-zip в Windows 11
Для сжатия, архивирования или удобного и безопасного хранения обычно используют файловый «компрессор». Существует множество хороших программ-архиваторов, включая самые популярные, «WinZip» и «WinRAR», но единственный минус этих двух программ в том, что они платные. В качестве альтернативы можно использовать очень простое и бесплатное приложение — «7-zip».
«7-zip» — один из лучших файловых архиваторов, доступных для Windows. Это ПО для архивирования файлов с открытым исходным кодом, которое может сжимать и распаковывать файлы, а также шифровать файлы.
В этой статье мы разберем, как использовать 7-zip в Windows 11, в том числе как загрузить и установить 7-zip, как сжимать, как извлекать и шифровать архивные файлы и папки с помощью 7-zip.
- 7-zip можно использовать совершенно бесплатно — как в личных, так и в коммерческих целях.
- Программа поддерживает 87 языков.
- Высокий степень сжатия для таких форматов как 7z, ZIP и GZIP.
- Поддерживает 256-битное шифрование AES для форматов 7z и ZIP.
- Упаковка и распаковка: 7z, BZIP2 (BZ2, TB2, TBZ, TBZ2), GZIP (GZ, TGZ), TAR, ZIP (JAR), XZ, WIM.
- Только распаковка: AR, ARJ, CAB, CHM, CPIO, CramFS, DMG, EXT, FAT, GPT, HFS, IHEX, ISO, LZH, LZMA, MBR, MSI, NSIS, NTFS, QCOW2, RAR, RPM, SquashFS, UDF, UEFI, VDI, VHD, VMDK, WIM, XAR, and Z.
- Мощная версия для командной строки.
7-zip постоянно усовершенствуется разработчиками, это еще не предел всех его возможжностей.
Как установить 7-zip в Windows 11
Если вы еще не устанавливали 7-zip в Windows, выполните следующие шаги для того, чтобы загрузить и установить 7-zip.
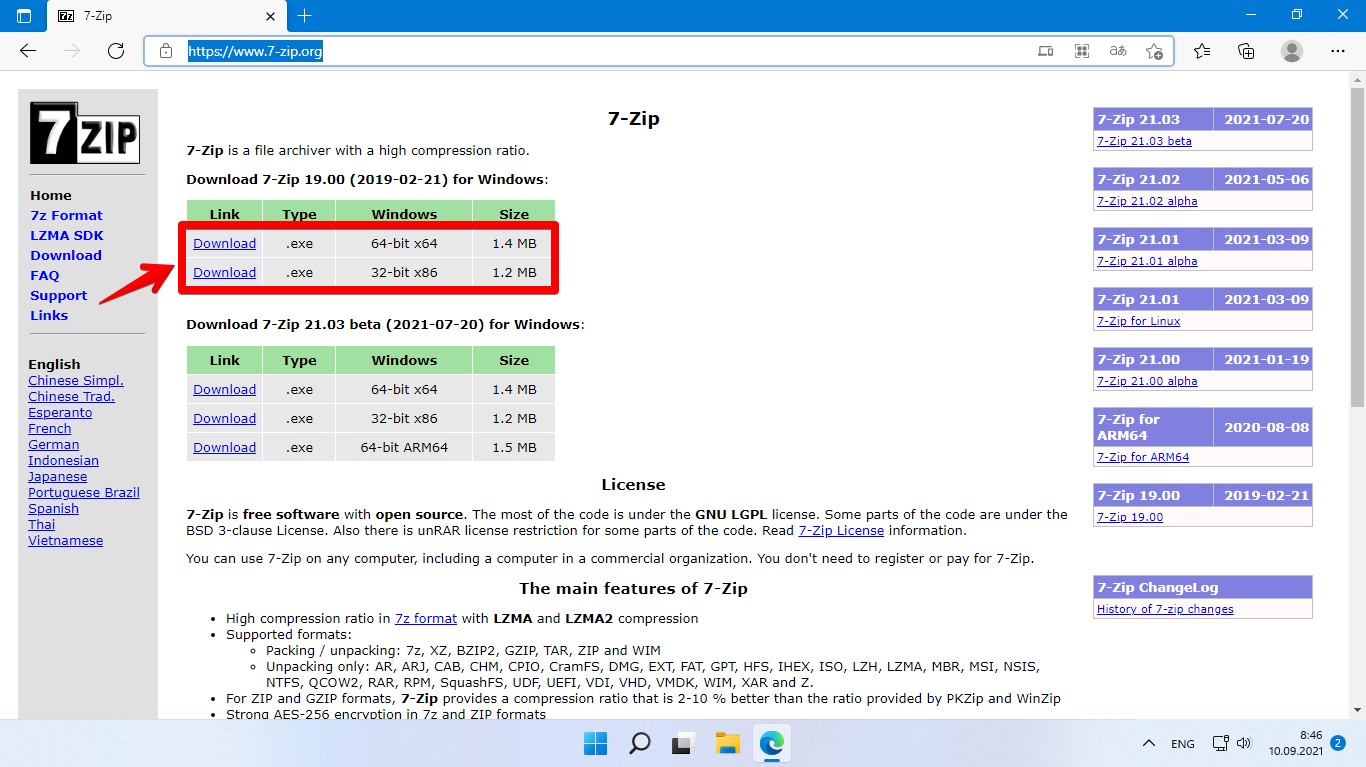
Сперва перейдем на сайт https://www.7-zip.org через веб-браузер. Затем выбираем версию 7-zip, которую хотим загрузить — если у вас 32-битная Windows, выберите 32-битную версию x86 или выберите 64-битную версию x64 для 64-битной Windows.
Щелкаем ссылку «Загрузить», чтобы загрузить файл установки.
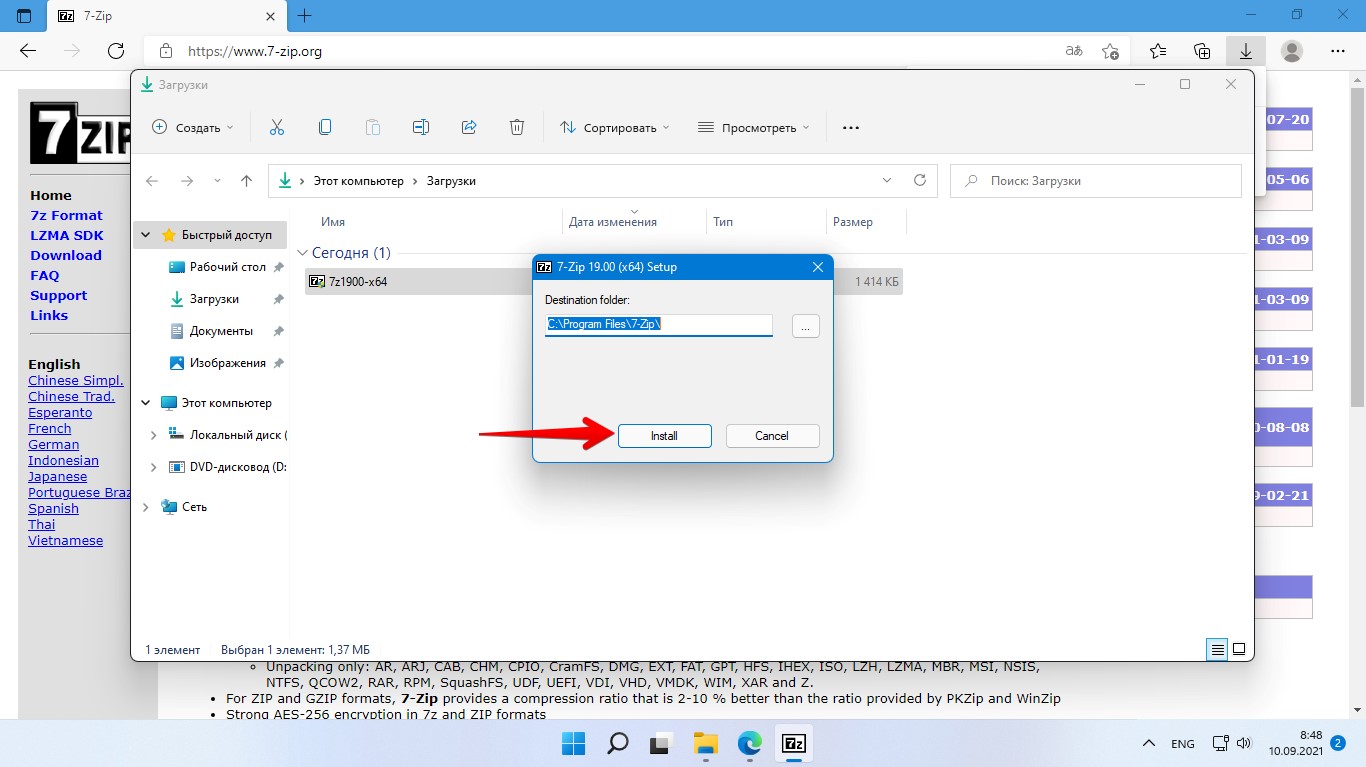
Находим инсталлятор в папке «Загрузки» и запускам двойным кликом мыши (либо через «Открыть»).

Выбираем путь для установки, либо оставляем как есть и нажимаем кнопку «Install».
По окончанию установки нажимаем кнопку «Close».
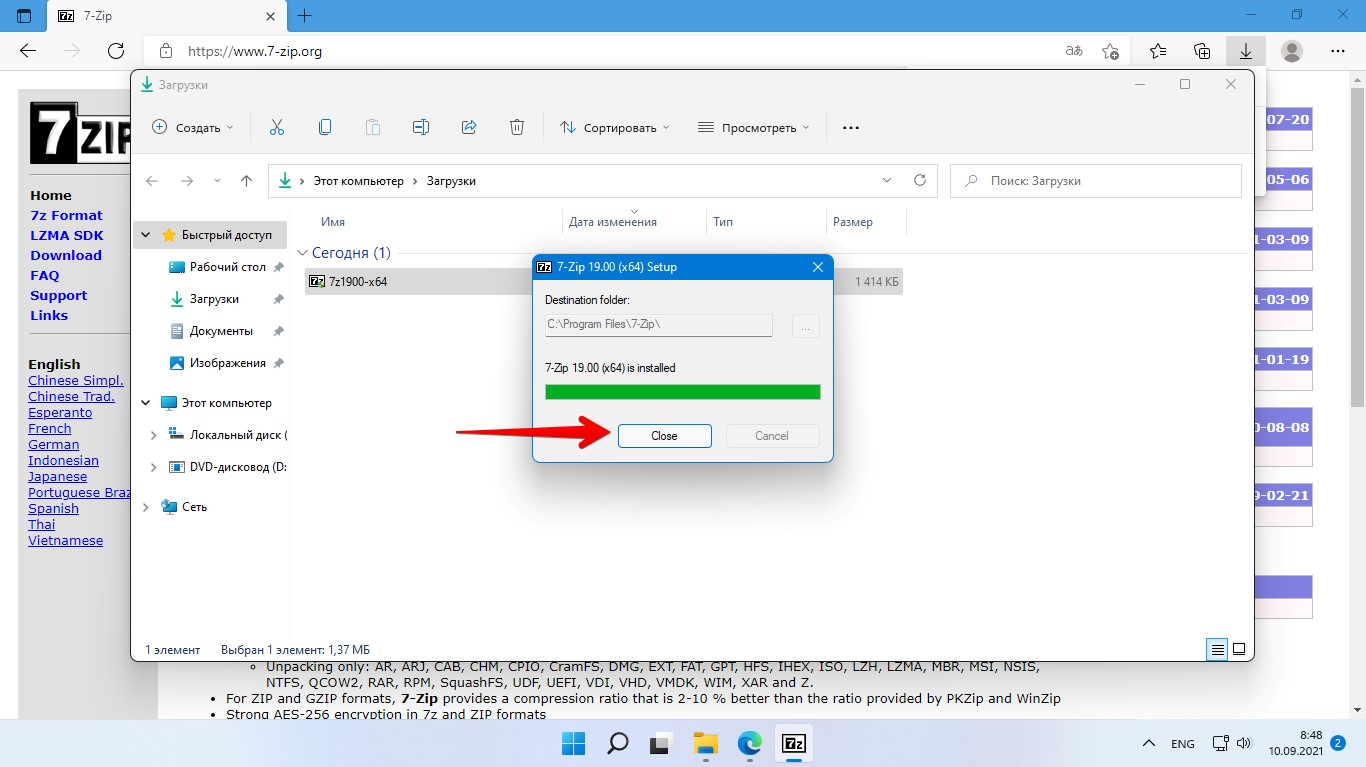
Теперь архиватор 7-zip установлен и найти его можно во всех приложениях через меню «Пуск».
Настройка 7-zip в Windows 11
Прежде чем начать пользоваться 7-zip, необходимо установить это приложение как программу по умолчанию для открытия архивных файлов. Сделать это можно следующим способом:
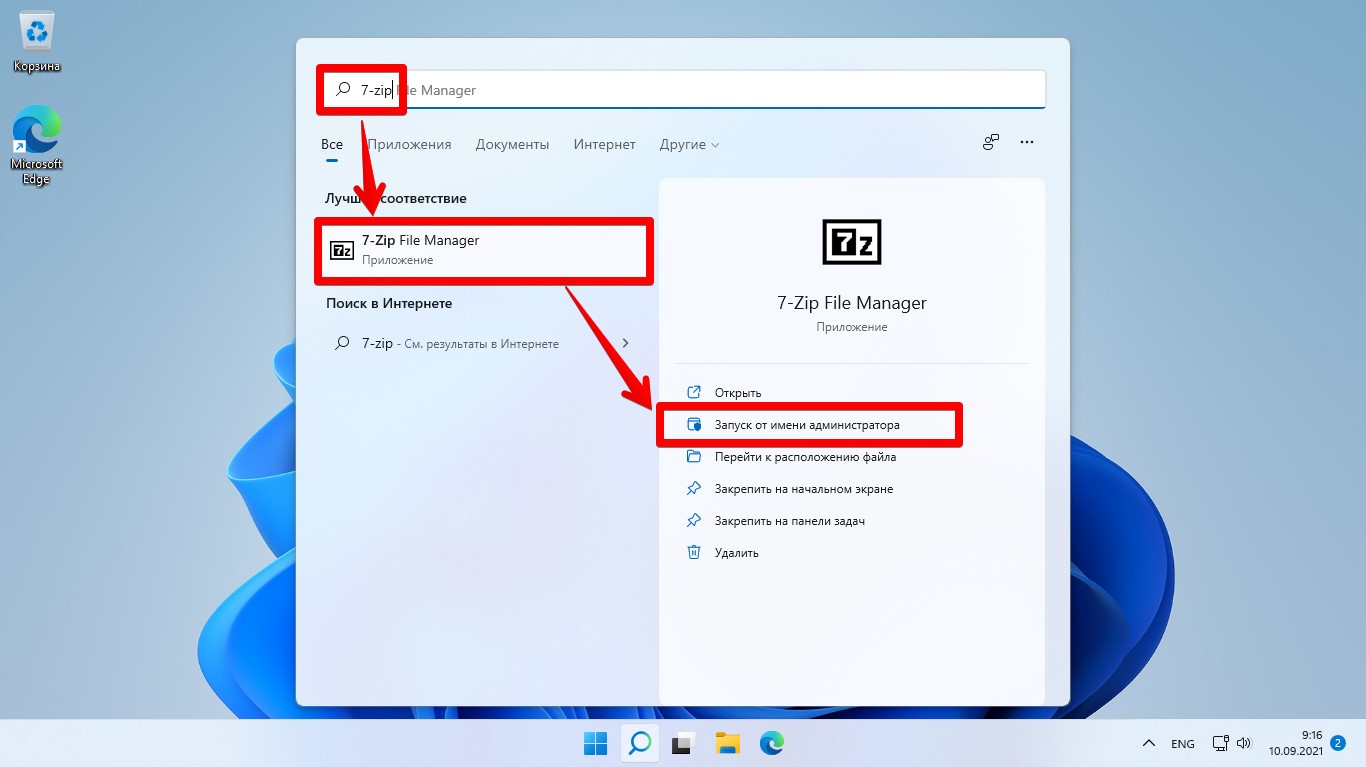
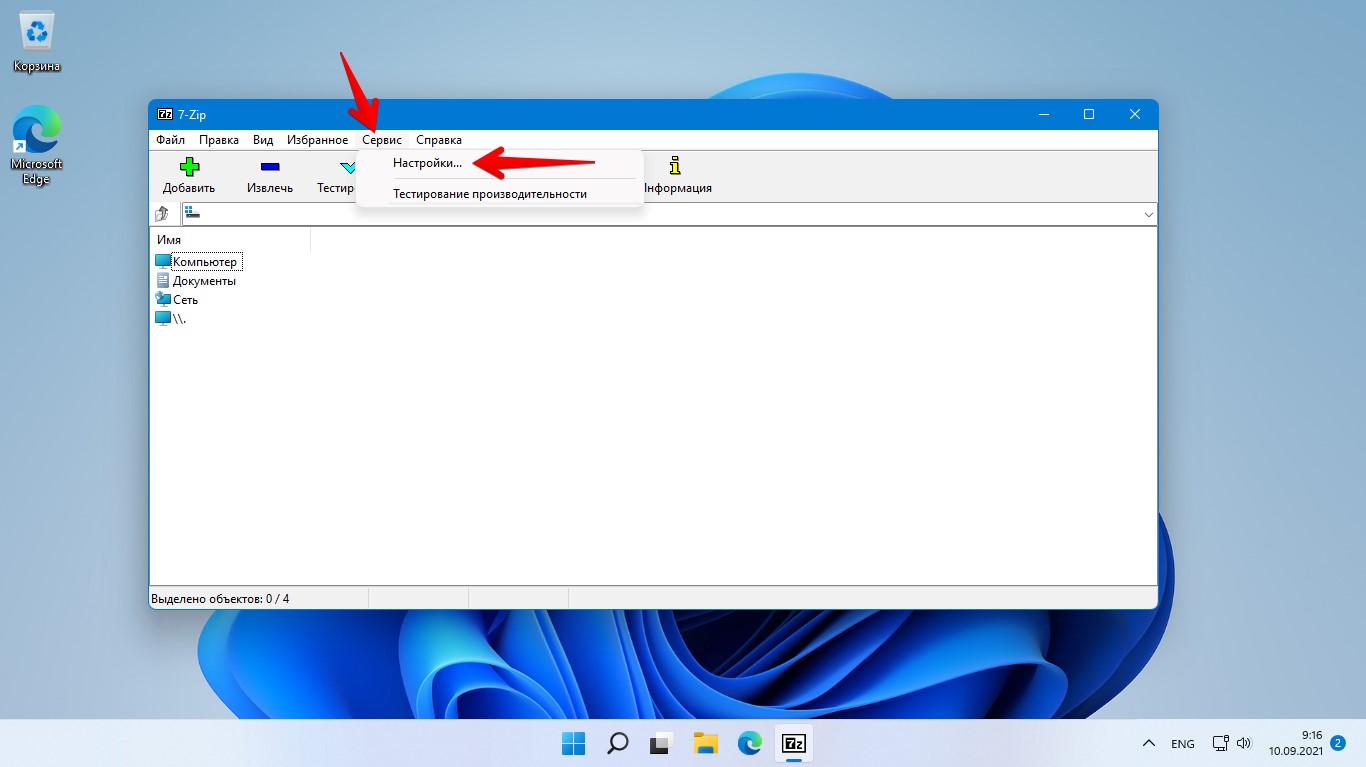
После установки приложения находим «7-zip» в поиске Windows 11 и открываем его от имени администратора.
Открываем пункт меню «Сервис» — «Настройки».
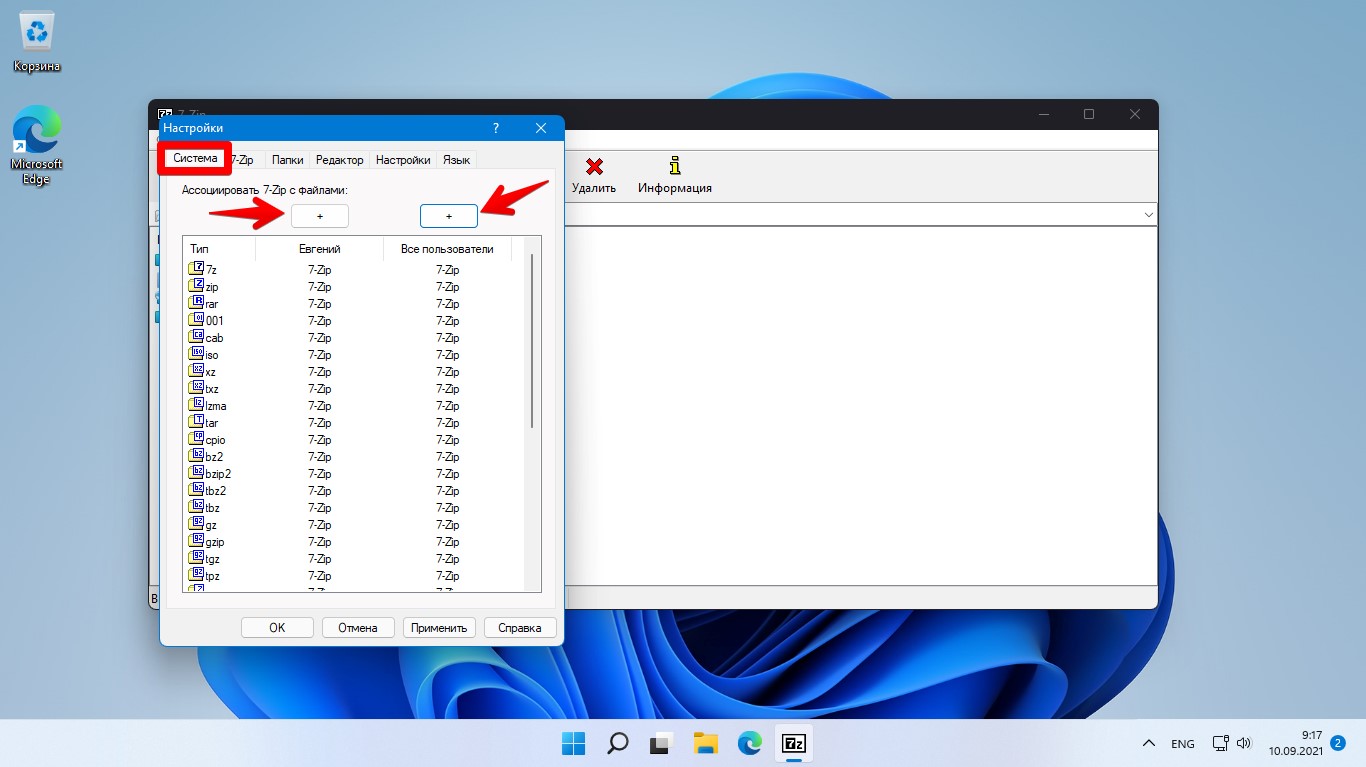
На вкладке «Система» нажимаем первую кнопку «+», чтобы сделать 7-Zip архиватором по умолчанию для всех типов архивов текущего пользователя. Даже если в системе установлено другое ПО для архивирования, нажатие этой кнопки сделает 7-zip архиватором по умолчанию.
Далее нажимаем вторую кнопку «+», чтобы сделать это приложение по умолчанию для всех пользователей. Затем нажмите «Применить», чтобы сохранить настройки, и нажмите «ОК», чтобы закрыть диалоговое окно.
Также можно настраивать типы файлов по отдельности, просто нажимая на них.
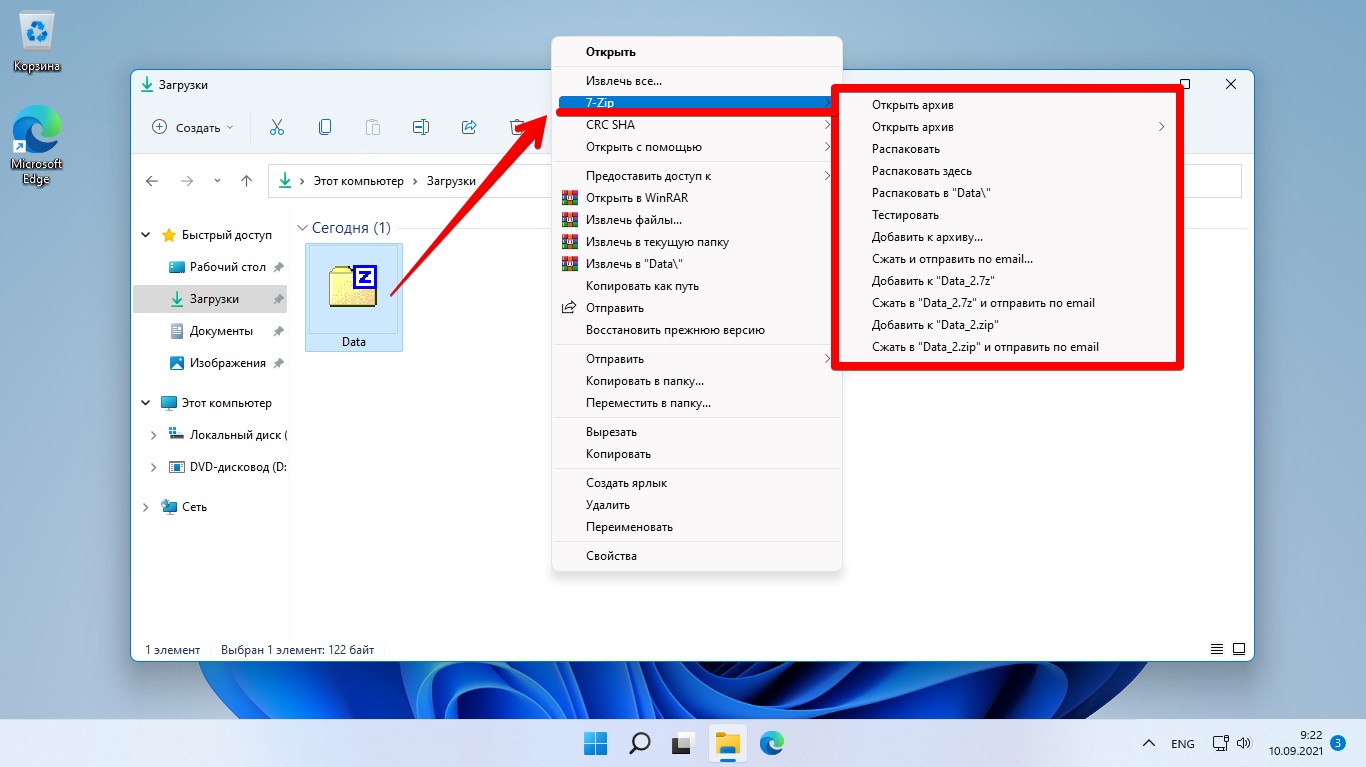
В Windows 11, когда вы щелкаете правой кнопкой мыши по архиву, появляется новое контекстное меню без дополнительных параметров для 7-zip. Для просмотра контекстного меню с дополнительными параметрами 7-zip, вам нужно нажать «Показать дополнительные параметры».

Теперь появится пункт «7-Zip», при наведении на который мы увидим еще больше параметров для работы с архиватором.
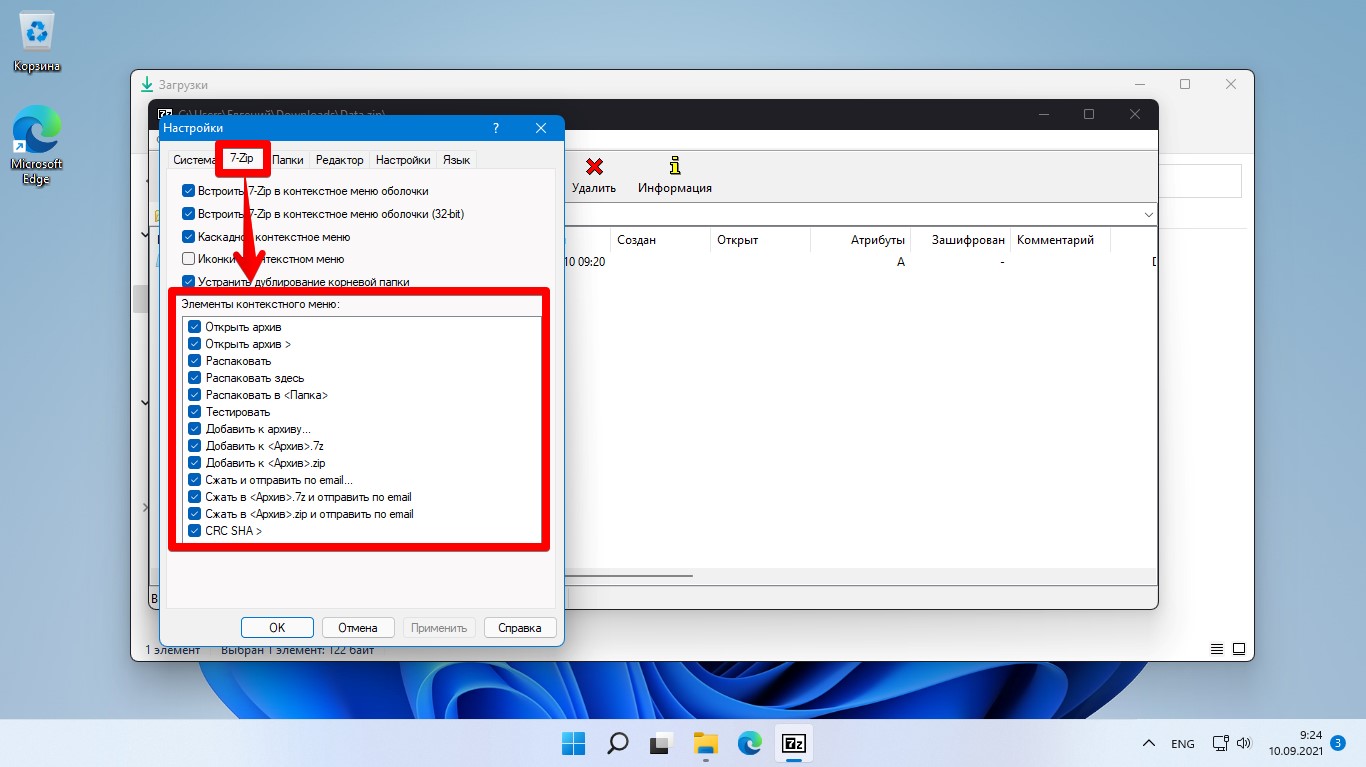
Параметры в контекстном меню можно настраивать по своему желанию. Для этого переходим в приложение «7-zip» —
«Сервис» — «Настройки» — вкладка «7-Zip» — «Элементы контекстного меню». Отмечаем элементы, которые хотим видеть в меню.
Как сжимать файлы с помощью 7-zip в Windows 11
Мы рассмотрели, как установить и настроить 7-zip. Теперь рассмотрим, как использовать 7-Zip для сжатия и извлечения файлов. Давайте сначала рассмотрим, как сжимать файлы.
Выберите один или несколько файлов, которые вы хотите заархивировать, затем щелкните правой кнопкой мыши по выбранному файлу и выберите опцию «Показать дополнительные параметры».

Затем наведите указатель мыши на «7-Zip» и выберите «Добавить в Имя_файла.zip» или «Добавить в Имя_файла.7z» для быстрого сжатия.
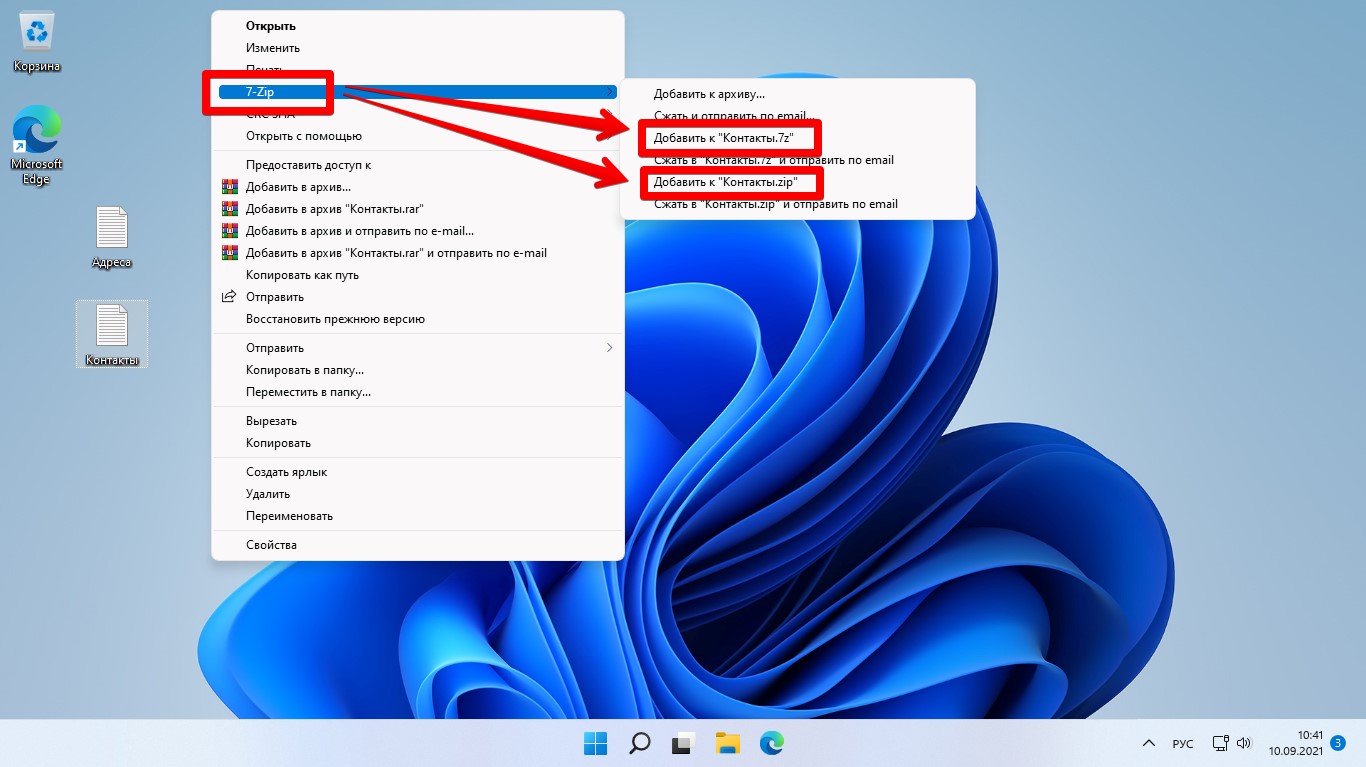
Поскольку форматы «zip» и «7z» являются самыми популярными типами архивов, эти форматы указаны как форматы архивов по умолчанию в контекстном меню. Но 7-zip может архивировать файлы и в других форматах, включая zip, tar, wim и 7z.
Чтобы выбрать другой формат файла и настроить параметры сжатия, выберите файлы, которые нужно заархивировать, щелкните правой кнопкой мыши — «Показать дополнительные параметры» — «7-Zip» — «Добавить к архиву…».

В окне «Добавить в архив» у вас есть различные настройки для управления сжатием. Вы можете переименовать файл в поле «Архив». Вы также можете изменить место сохранения сжатого файла, нажав кнопку с квадратными точками рядом с полем «Архив».
Если вы хотите выбрать другой тип архива, выберите тип файла в раскрывающемся списке «Формат архива». Вы можете выбрать форматы «7z», «tar», «wim», «zip», «xz», «bzip2» и «gzip».
Увеличить и уменьшить время сжатия можно при помощи настройки «Уровень сжатия» (от «Без сжатия» до «Ультра»). По умолчанию выбран вариант «Нормальный», который обеспечивает более стабильную скорость сжатия.
Изменить степень сжатия можно при помощи различных алгоритмов в опции «Метод сжатия» (доступны «LZMA2», «LZMA», «PPMd», «BZip2»).
Если необходимо разделить архив на несколько частей, установите размер файла в настройке «Разбить на тома размером (в байтах)».

По завершении настройки параметров нажмите «ОК», чтобы начать сжатие.
Архиватор 7-zip создаст новый сжатый файл в выбранном вами формате и с выбранными вами настройками. Время сжатия файлов может составлять от нескольких секунд до нескольких часов, в зависимости от количества файлов, папок, размера и производительности вашего ПК.
Как зашифровать файлы с парольной защитой 7-zip в Windows 11
7-zip не только архивирует файлы, но также может и защищать ваши файлы паролем. 7-zip поддерживает шифрование с помощью алгоритма AES-256, который является одной из самых надежных версий AES. Это означает, что зашифрованные файлы не могут быть прочитаны без правильного ввода пароля. Это очень удобно, когда у вас есть файлы с важной информацией.
Сначала выбираем файл(ы) или папку, которые мы хотим зашифровать, далее щелкаем правой кнопкой мыши, выбираем «7-Zip», а затем нажимаем пункт «Добавить к архиву…».
В окне «Добавить к архиву» выбираем имя и путь для шифруемого файла, затем выбираем формат архива «zip» или «7z».
Затем вводим и повторяем пароль в разделе «Шифрование». «Метод шифрования» выбираем «AES-256». Если вы используете формат 7z, вы также можете установить флажок «Шифровать имена файлов» для дополнительной безопасности. По завершении нажимаем «ОК», чтобы начать сжатие.
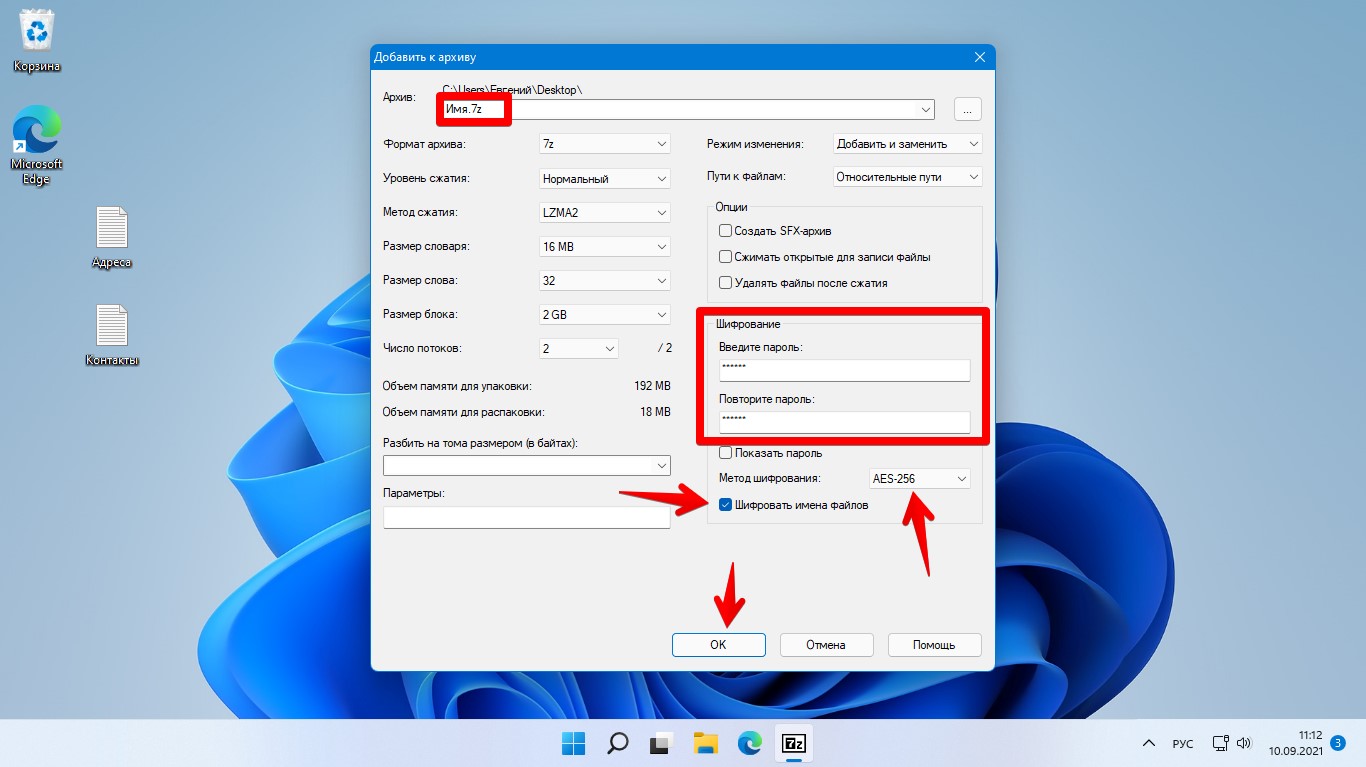
Для создания надежного пароля рекомендуется использовать пароль, содержащий хотя бы одну цифру, хотя бы одну заглавную букву, одну строчную букву и специальные символы.
Как извлечь файлы через 7-zip в Windows 11
Извлечь файлы проще, чем их сжать. Открываем архив, нажимаем кнопку «Извлечь» — кнопка с тремя точками «Обзор» — выбираем папку, куда будем извлекать файлы и нажимаем «ОК» и еще раз «ОК» в окне «Копировать».

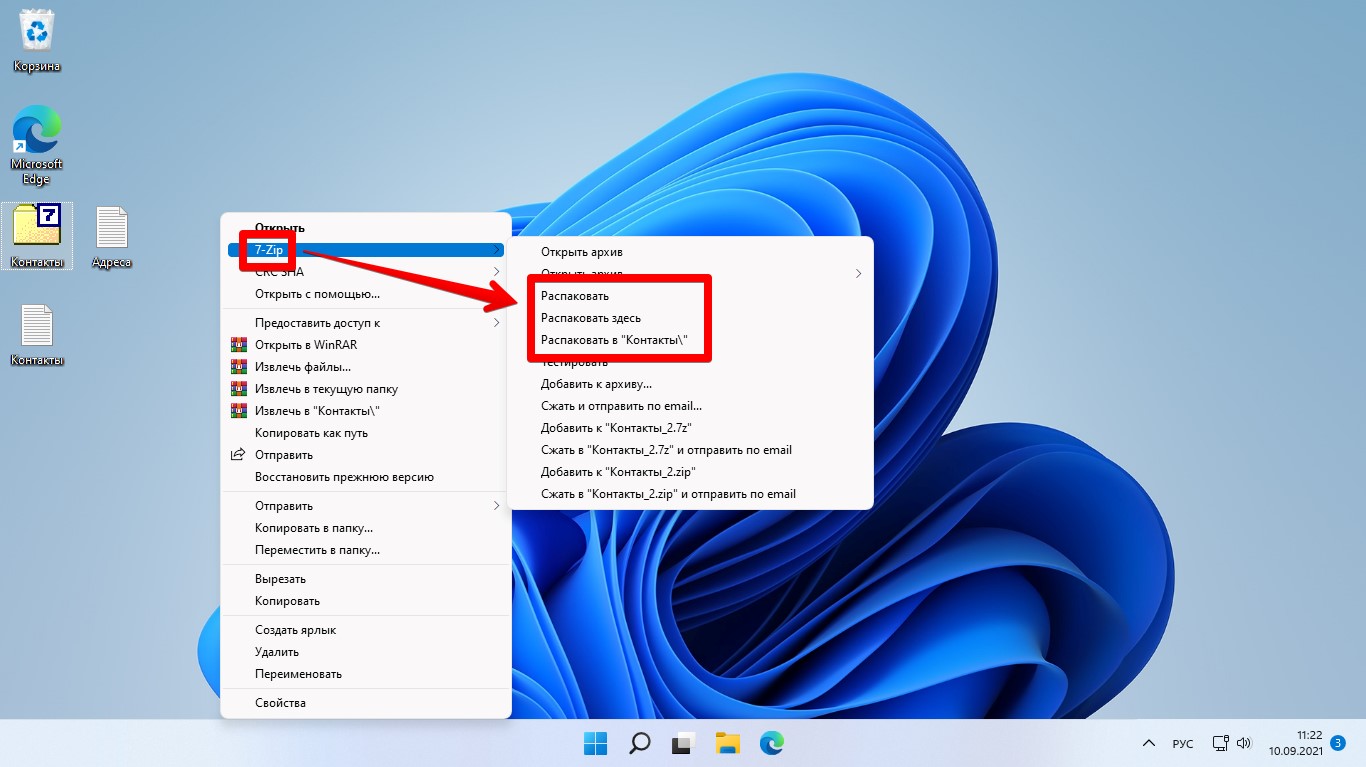
Еще один вариант для извлечения файлов — щелкаем правой кнопкой мыши по архиву — «Показать дополнительные параметры» — «7-Zip» — в дополнительном меню выбираем любой из трех вариантов в зависимости от назначения — «Распаковать», «Распаковать здесь», «Распаковать в Имя_файла».
Пожалуй это все, что вам нужно знать об использовании 7-zip в Windows 11. Удачного архивирования!
Learn how to quickly access 7-Zip’s powerful compression features directly from your Windows 11 right-click menu, streamlining your file management workflow.
Published
2 min read

7-Zip is a popular file compression tool known for its efficiency and versatility. However, many Windows 11 users find that 7-Zip’s options don’t appear in the new, streamlined right-click menu. This can make compressing and extracting files less convenient than it should be. Fortunately, there are several ways to integrate 7-Zip into your Windows 11 right-click menu, allowing for quick and easy file compression and extraction.
Method 1: Use NanaZip for Windows 11 Integration
NanaZip is a modern fork of 7-Zip designed specifically for Windows 11. It offers the same powerful compression capabilities as 7-Zip but integrates seamlessly with the new Windows 11 interface.
Step 1: Open the Microsoft Store on your Windows 11 computer. You can do this by clicking the Start button and typing “Microsoft Store”, then selecting the app from the search results.
Step 2: In the Microsoft Store search bar, type “NanaZip” and press Enter.
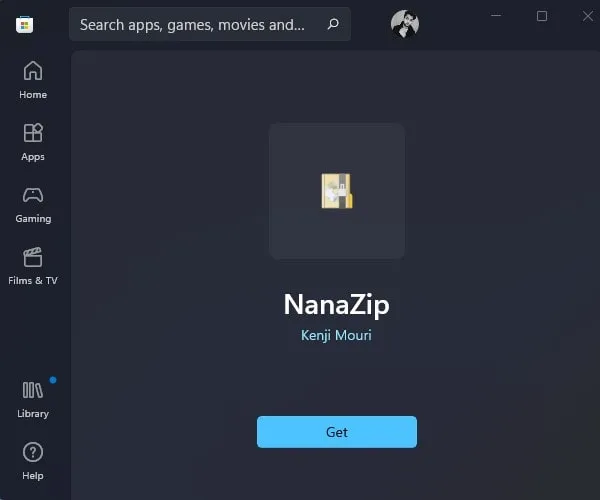
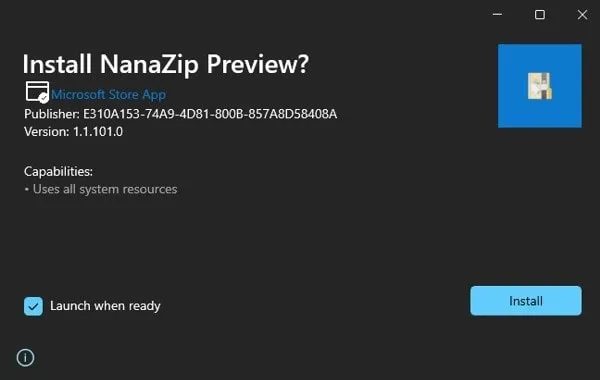
Step 3: Click on the NanaZip app in the search results, then click the “Get” or “Install” button to download and install the app.
Step 4: Once installed, NanaZip will automatically integrate with your Windows 11 right-click menu. To test it, right-click on any file or folder, and you should see NanaZip options in the menu without needing to click “Show more options”.
Method 2: Modify Windows 11 Settings to Show 7-Zip in the Classic Menu
If you prefer to stick with the original 7-Zip, you can modify Windows 11 settings to always show the classic right-click menu, which includes 7-Zip options.
Step 1: Press Win + R to open the Run dialog, type “regedit”, and press Enter to open the Registry Editor.
Step 2: Navigate to the following key:
HKEY_CURRENT_USER\SOFTWARE\CLASSES\CLSIDStep 3: Right-click on the CLSID folder, select New > Key, and name it:
{86ca1aa0-34aa-4e8b-a509-50c905bae2a2}Step 4: Right-click on the newly created key, select New > Key, and name it “InprocServer32”.
Step 5: Double-click on the (Default) value in the right pane and press OK without entering any value.
Step 6: Restart your computer or sign out and back in for the changes to take effect.
After completing these steps, your right-click menu will always show the classic extended menu, including 7-Zip options.
Method 3: Use a Third-Party Tool to Customize the Right-Click Menu
Several third-party tools allow you to customize the Windows 11 right-click menu, including adding 7-Zip options to the new compact menu.
Step 1: Download and install a reputable right-click menu editor like “Windows 11 Context Menu Manager” or “WinAero Tweaker”.
Step 2: Open the tool and look for options related to customizing the right-click menu or adding new items to it.
Step 3: Follow the tool’s specific instructions to add 7-Zip to the new Windows 11 right-click menu. This usually involves selecting 7-Zip from a list of installed applications or browsing to the 7-Zip executable file.
Step 4: Apply the changes and restart your computer if prompted.
After completing these steps, 7-Zip options should appear in your new Windows 11 right-click menu without needing to click “Show more options”.
With these methods, you can easily integrate 7-Zip into your Windows 11 right-click menu, making file compression and extraction more convenient. Choose the method that best suits your preferences and needs. Happy compressing!
In Windows 11, Microsoft has made numerous changes to the UI, including a new right-click context menu. The new context menu shows only a few options. And, to access the traditional right-click menu, you have to click on “show more options”. Or, you can press the Shift + F10 shortcut key. Initially, the refresh option was missing in the context menu. Which was later restored in Windows update. But still, many essential options are missing.
Like, when you install 7Zip software, it doesn’t appear in right-click menu. Yes, Microsoft offers an “Extract All” option to extract folders. But, it can only extract zip file format, not all. To extract and compress all kinds of files and formats, you have to install third-party tools like WinRAR or 7Zip. Well, now the question arises, can you get WinRAR and 7-Zip in the context menu? Let’s find out!
Get WinRAR and 7-Zip on Windows 11 Context Menu.
If you’re a WinRAR user, then the good news is, you can now add WinRAR in Windows 11 right-click menu. WinRAR now officially offers some integrations options for the new Windows 11. So that, you can quickly access the app from right-click like Windows 10.
Although, If you’re a 7Zip user, then things are not simple for you. Because, till now, 7Zip doesn’t offer such an option. But, there is an open-source software called NanaZip available. Which is a fork of the 7-Zip’s code. And, NanaZip comes with context menu support. So, you can use NanaZip to compress and extract files in Windows 11. Ok, so here is how you can get WinRAR and NanaZip (7Zip Alternative) into Windows 11 Context Menu.
NanaZip (Modern Version of 7Zip.)
NanaZip is a 7-Zip derivative, developed for the modern Windows experience. Yes, as of now, it is in the early development stage. But since it is forked from a well-known open-source file archiver 7-Zip, so it will work flawlessly. It does support Brotli, Fast-LZMA2, Lizard, LZ4, LZ5 and Zstandard codecs. Mainly, it does support the context menu in Windows 10/11 File Explorer. Which is all we need.
Add 7-Zip on Windows 11 Context Menu using NanaZip.
There are two ways to install NanaZip on Windows 11 PC. Either you can install it from Microsoft Store, or you can get the latest version from GitHub.
- Open the following link to install NanaZip from Microsoft Store. Once link get open, Click on Get. And, NanaZip will get installed on your Windows 11 PC.
Alternatively, you can download the NanaZip MsixBundle file from Github. And, install it by running the setup file.
- Once NanaZip gets installed, open the Settings App by pressing Windows + I keyboard shortcut. (You can also check out Windows 11 Keyboard Shortcuts List.)
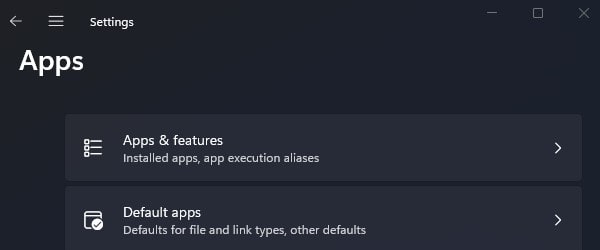
- Click on Apps > Default Apps.
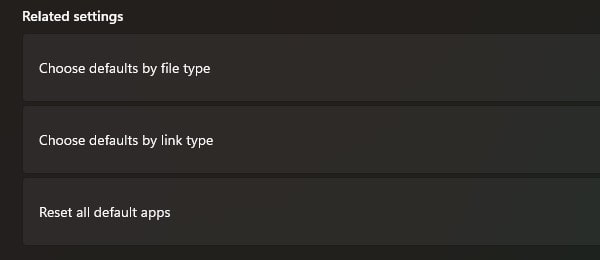
- Scroll down to the default apps page, and at the bottom, you will find the “Choose defaults by file type” option in related settings. Do click on it.
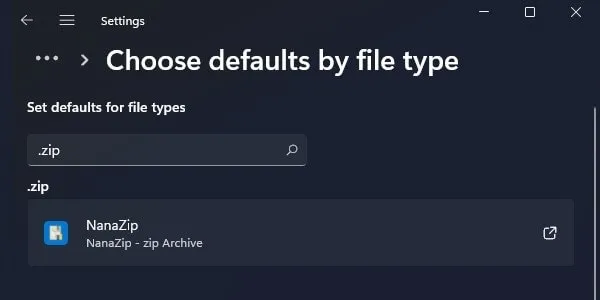
- Search for “.Zip” and you will see Windows Explorer is set for the compressed (zipped) folder.
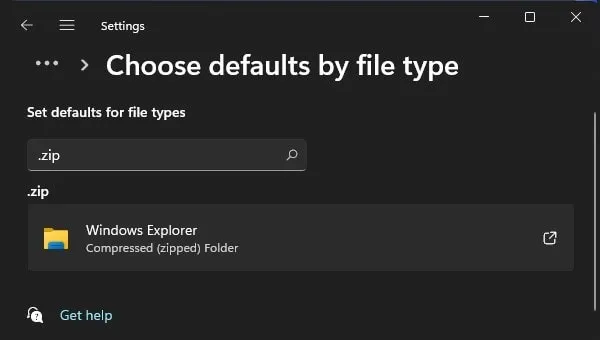
- Click on it, and select NanaZip from the app list, and click on ok.
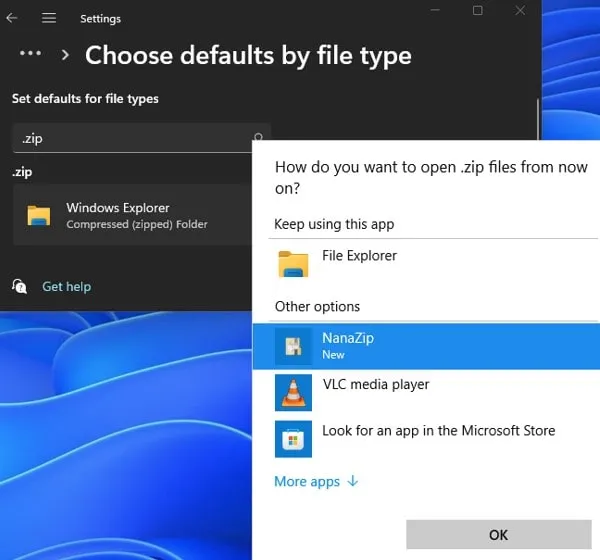
- NanaZip will be set as a default app for Zip files.
- Now, Do right-click on any Zip file you have. And, you will see NanaZip in the context menu.
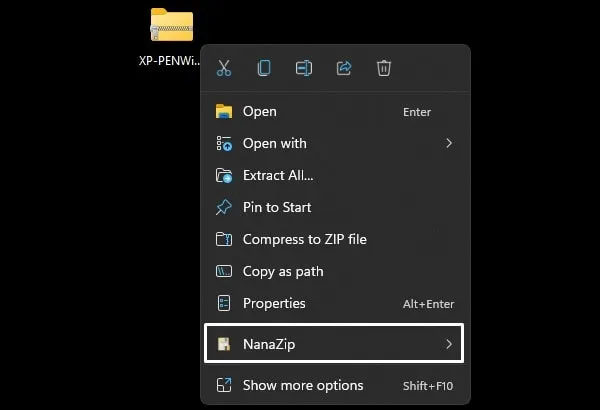
Take mouse pointer over NanaZip and you will find all 7Zip options that you like to use.
Add WinRAR on Windows 11 Context Menu
To Get WinRAR option in Windows 11 Context Menu or Right-Click Menu. You have to install the beta version of WinRAR. Because it comes with the “Legacy Context menu” option. With that option, you can get WinRAR in right-click menu of Windows 11.
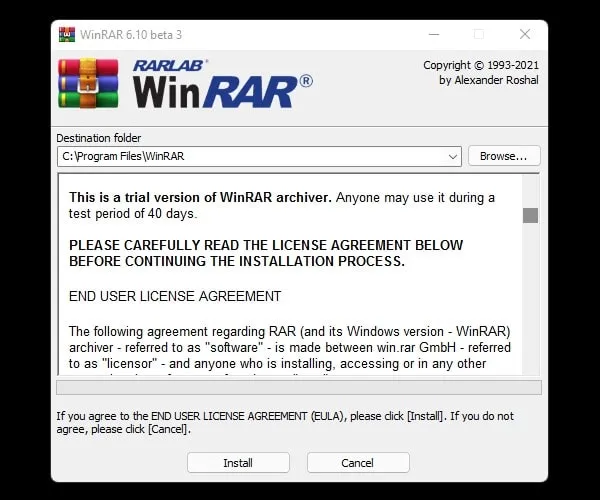
- First, download the latest version WinRAR setup file. (Do check your system type before downloading the WinRAR version. Open Windows 11 Settings App > scroll down and click on About.)
- Now, do right-click on the setup file and then click on “Run as administrator”.
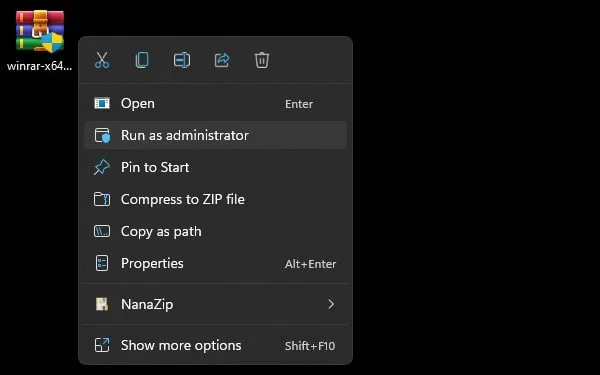
- WinRAR setup window will now appear, click on install.
- Next, the WinRAR setup window will appear. In the shell integration section, you will find the “Legacy Context Menus” option. Enable it, and click on OK.
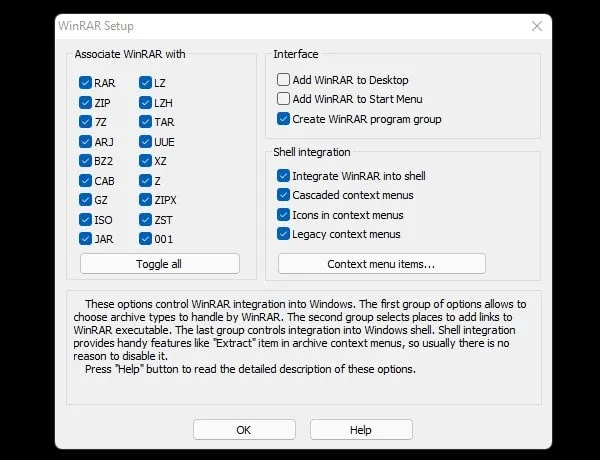
- That’s it, WinRAR will now get installed, click on Done.
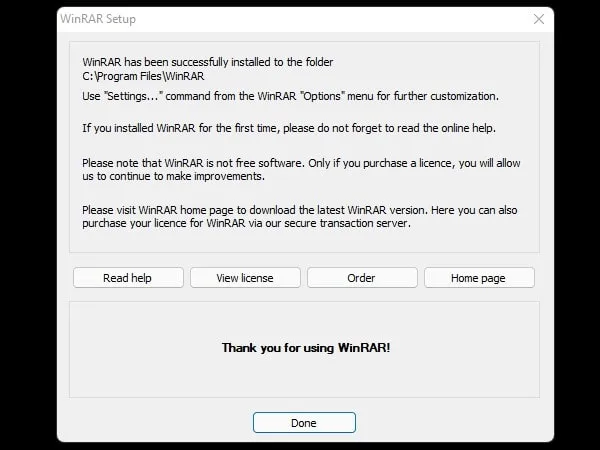
- Now, right-click on any zip file and you will see the WinRAR option in the context menu.
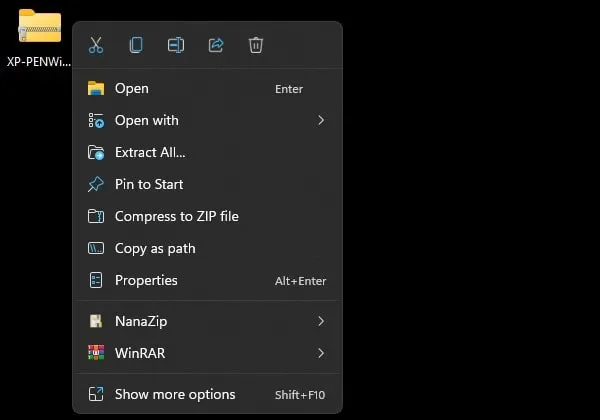
Ok, so that’s how you can add 7Zip and WinRAR in Windows 11 context menu. You can use NanaZip instead of 7Zip. Or, you can download the beta version of WinRAR.
Windows 11 is the latest iteration in the family of Microsoft Windows, allowing users to experience a best-in-class operating system in 2022 that’s a ton of steps up from its popular predecessor. Although the program is a visual overhaul and improves upon Windows 10 in many aspects, there are still some features of the latter that have been unable to make it to Windows 11. In other cases, the new functionality is unwelcome, and users want their previous functions back.
One such case is the context menu, which is more of a hassle and less of an improvement in the newest Windows operating system. In this guide, we will walk you through how to get back the 7-Zip right-click context menu in Windows 11 so you can get back to using your PC the same way. Moreover, the forthcoming guidelines will also work for users with the context menu missing on Windows 10.
What is the right-click context menu in Windows?
Right-click the context menu in Windows 11
When you double-click or right-click anywhere on the screen, you visualize what is known as the context menu. This simple, go-to shortcut section allows you to access many compatible applications quickly. For example, tools, programs, and software like 7-Zip or WinRar are best utilized from the right-click context menu. It’s also what you use to maneuver the Chrome browser, especially when you are not too fond of using keyboard shortcuts.
The original Windows 10 context menu is plain and straightforward, but the developers thought it fit to upgrade the feature to a higher level for Windows 11. To access the proper context menu that grants access to usable tools, you first need to perform a right-click, then hover over “Show more options” and click on it again to get the actual context menu. This may not sit well with a plethora of users, so it’s imminent for individuals to start demanding a change in this respect.
With no further ado, let us get right down to the matter and talk about reverting the context menu to the original one on your Windows 11 PC.
Getting back the 7-Zip right-click context menu in Windows 11/10
The following instructions are going to work for not only Windows 11 but for Windows 10 as well. Although we will write down the steps as plainly as possible to the best of our ability, please try to implement them on your end diligently for the best results.
1. first, open the Windows Start menu and type in “Registry Editor.” Click on the system utility once done. Run the program as an administrator for the best results and unbounded access. You must confirm the User Account Control (UAC) prompt afterward.
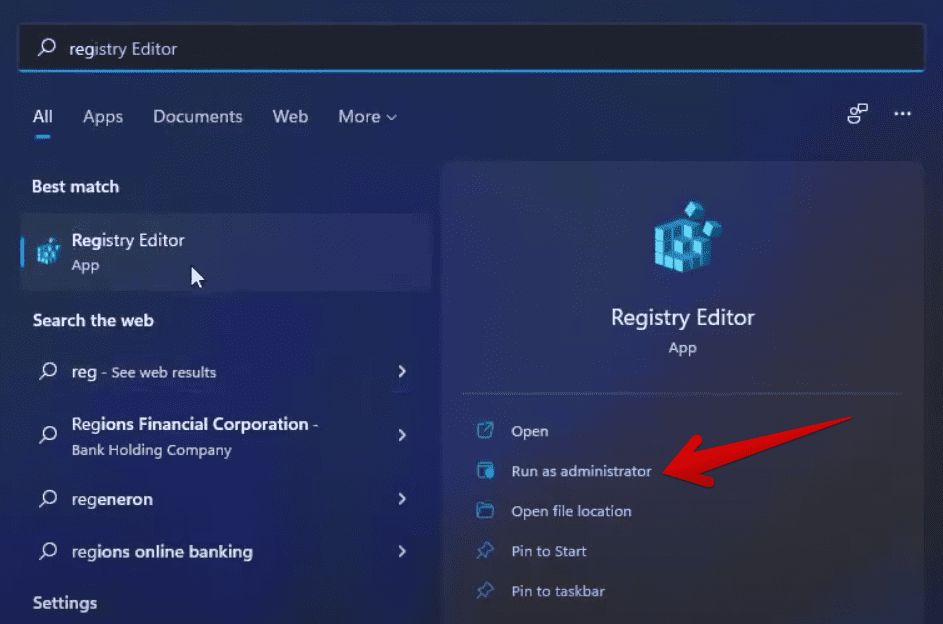
Running the Registry Editor with admin privileges
2. Now that you have the Registry Editor application up and running, you must focus on the side panel and click the “HKEY_CURRENT_USER” directory. Doing so will reveal multiple options on the screen for you. Proceed by clicking “Software,” and follow it up by selecting “Classes” next.
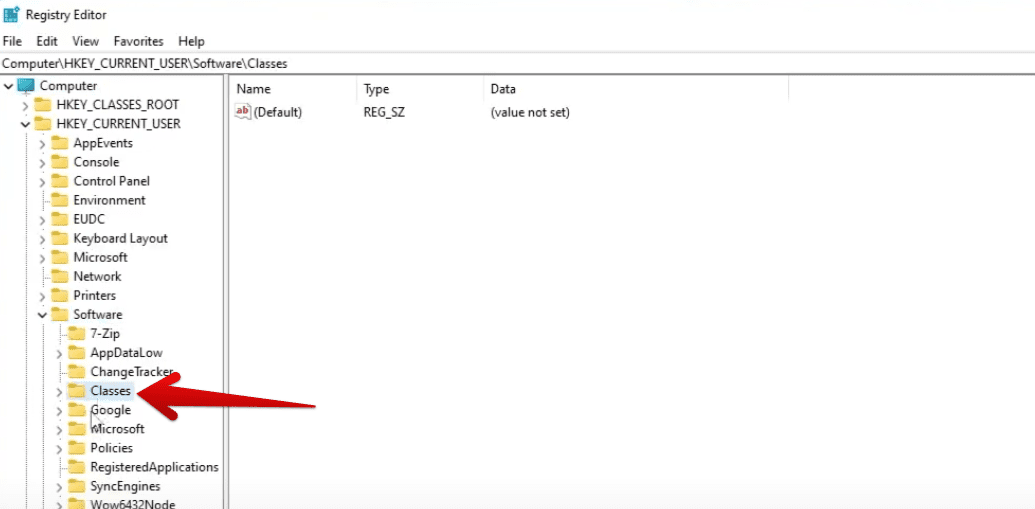
Heading to the correct directory
3. You must now click on the “CLSID” directory and right-click there to create a new “Key.” Check out the following screenshot for a visual explanation. Until now therefore, you should follow the address below to complete the process successfully ahead.
HKEY_CURRENT_USER > Software > Classes > CLSID
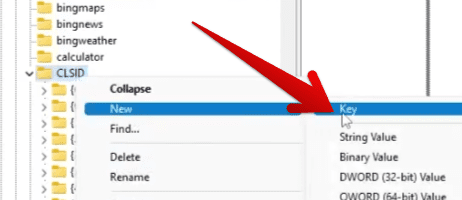
Creating a new key within the CLSID directory
4. This new key has to be named”{86ca1aa0-34aa-4e8b-a509-50c905bae2a2}.” Please do not make any errors in inputting the name of the key, or the process will not bear fruit otherwise. Now, after renaming the key, you must create another key within this key and name it “InprocServer32.”
Now, click on the “(Default)” file that you see on the right-hand side of the opened window, and you should see the “(Value not set)” remark under the “Data” option. Double-click here and click on “Modify” to move forward.
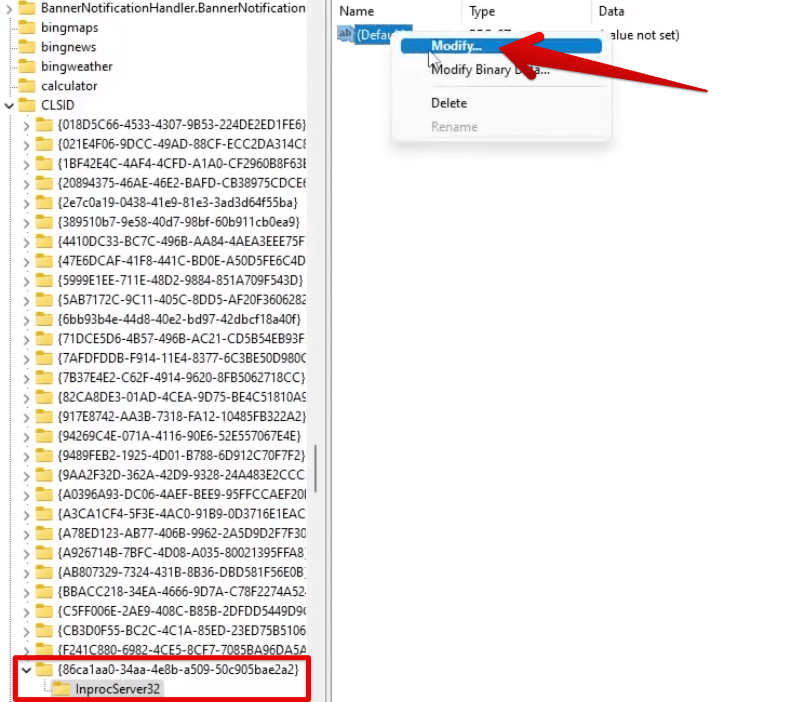
Modifying the newly created key
5. Completing the previous step successfully should open the “Edit String” window. You’ll do nothing here and click “OK” to leave things as they were. However, if you notice, the “(Value Not Set)” remark won’t be present anymore within the “Data” section. If you’ve done everything correctly up until now, the next step is to restart your PC.
Leaving the window as it is
That’s all there is to the process! After restarting your PC, double-click anywhere on the desktop to return the 7-ZIP context menu on your Windows 11 or Windows 10 PC. It’s time to conclude the article.
Conclusion
Windows 11 might be the next big thing, but there are still some instances where it has left users wanting the functionalities of Windows 10. One buzzing case is the presence of an additional right-click context menu that you’ll need to navigate to get the fully functional menu back. Well, now that you’ve gone past this issue using this guide, you hopefully won’t be running into any like-minded problems again.
Do let us know whether you found the guide helpful for your cause. We would love to read your feedback!