
Загрузить PDF
Загрузить PDF
В этой статье мы расскажем вам, как установить XAMPP на компьютер с Windows 10. XAMPP — это менеджер серверов, который позволяет запускать серверы Apache, MySQL и другие с одной панели.
-

-

Эта кнопка находится посередине страницы.
- В зависимости от браузера вам, возможно, сначала придется выбрать папку для загрузки или подтвердить скачивание.
-

Он должен называться примерно так: xampp-win32-7.2.4-0-VC15-installer. Файл находится в паке для загрузок (например, в папке «Загрузки» или на рабочем столе).
-

Откроется окно установщика XAMPP.
- Возможно, вам придется нажать «OK» во всплывающем окне, если на компьютере активирован контроль учетных записей (UAC).
-
Эта опция находится внизу окна установщика.
-

Просмотрите список атрибутов XAMPP в левой части окна; если вы видите атрибут, который не хотите устанавливать как часть XAMPP, снимите возле него флажок.
- По умолчанию будут установлены все атрибуты.
-

Эта опция находится внизу окна.
-

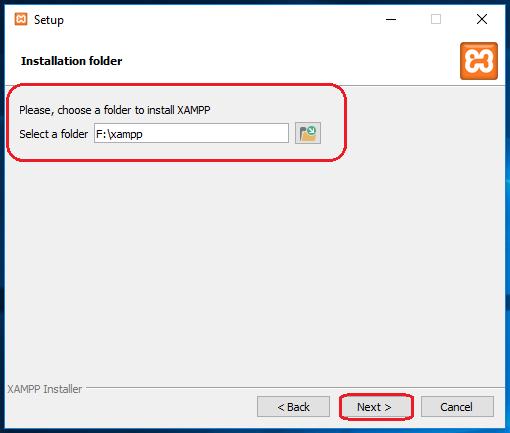
Щелкните по значку в виде папки справа от предлагаемого пути установки, а затем щелкните по нужной папке на компьютере.
- Если на компьютере активирован контроль учетных записей, не устанавливайте XAMPP в папку на системном диске (например, на диске «C:»).
- Можно выбрать папку (например, «Рабочий стол»), а затем нажать «Make New Folder» (Создать новую папку), чтобы создать новую папку и выбрать ее в качестве папки для установки XAMPP.
-
Так вы подтвердите, что выбранная папка является папкой для установки XAMPP.
-

Вы найдете эту опцию внизу страницы.
-
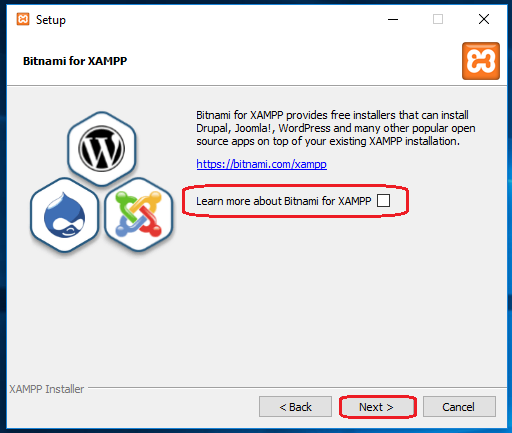
Снимите флажок у опции «Learn more about Bitnami» (Подробнее о Bitnami), а затем нажмите Next (Далее). Эта опция находится посередине страницы.
-
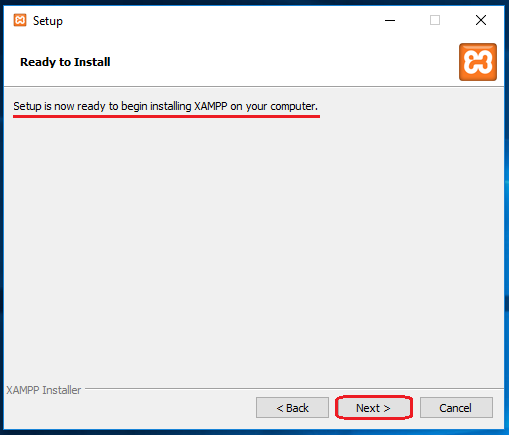
Для этого нажмите «Next» (Далее) в нижней части окна. Запустится процесс установки файлов XAMPP в выбранную папку.
-
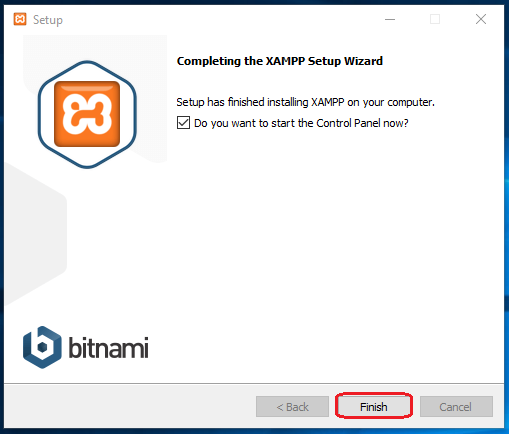
Эта опция находится внизу окна установщика XAMPP. Окно закроется, но откроется панель управления XAMPP, на которой можно получать доступ к своим серверам.
-
Для этого установите флажок рядом с флагом соответствующей страны.
-
Откроется главная страница панели управления.
-
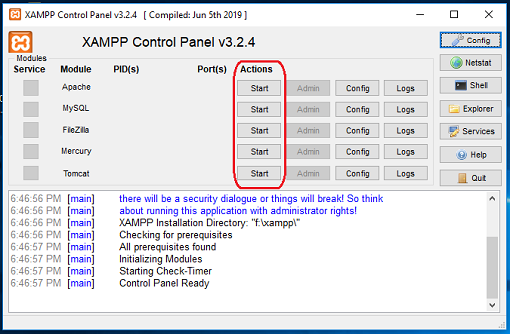
Чтобы открыть панель управления XAMPP в будущем, откройте папку, в которую вы установили XAMPP, щелкните правой кнопкой мыши по оранжево-белому значку «Xampp-control», в меню выберите «Запуск от имени администратора», а затем нажмите «Да» в окне с запросом.
- Когда вы сделаете это, слева от каждого типа сервера (например, «Apache») появятся красные символы «X». Если щелкнуть по этому символу, вам будет предложено установить программное обеспечение для соответствующего типа сервера на компьютер — если вы согласны, нажмите «Yes» (Да).
- Обратите внимание, что двойной щелчок по значку «Xampp_start» не приведет к запуску XAMPP.
-
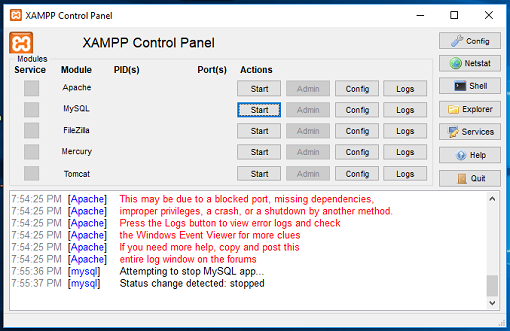
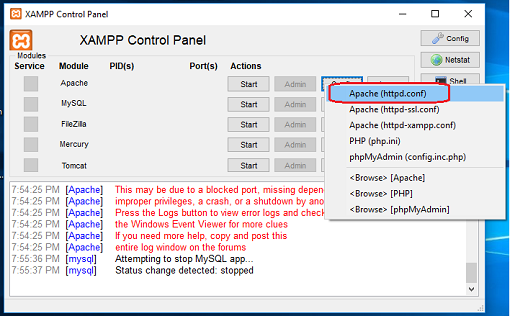
На некоторых компьютерах с Windows 10 Apache не запускается из-за «заблокированного порта». Это может произойти по нескольким причинам, но существует довольно простое решение:[1]
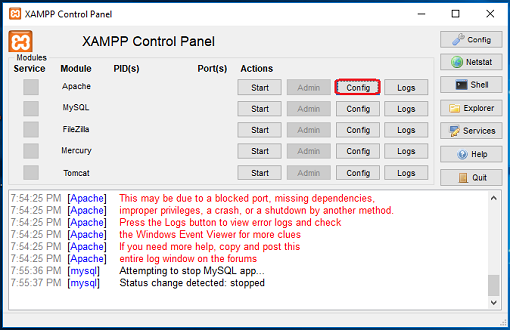
- Нажмите «Config» (Настройки) справа от «Apache».
- Выберите «Apache (httpd.conf)» в меню.
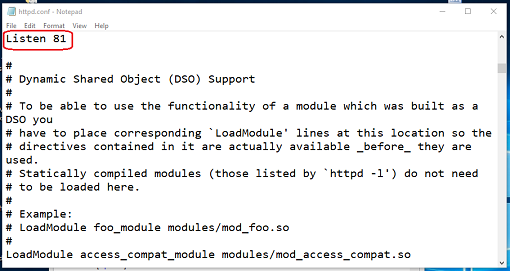
- Прокрутите вниз до раздела «Listen 80» (чтобы быстро найти его, можно нажать Ctrl+F и ввести listen 80).
- Замените 80 на любой открытый порт (например, 81 или 9080).
- Нажмите Ctrl+S, чтобы сохранить изменения, а затем закройте текстовый редактор.
- Перезапустите XAMPP, нажав «Quit» (Выйти), а затем снова запустите его от имени администратора из папки XAMPP.
Реклама


Советы
- XAMPP предоставляет доступ к различным типам серверов, включая Filezilla и Mercury.
Реклама
Предупреждения
- Если Apache запустить через порт 80, воспользоваться Skype уже не получится.
Реклама
Об этой статье
Эту страницу просматривали 10 931 раз.
Была ли эта статья полезной?
Hello friends, today I will show you how to install XAMPP in windows with a screenshot. Read this tutorial carefully and follow the steps below.
Let’s start…
First of all, let’s get some basic knowledge of XAMPP.
What is XAMPP?
XAMPP is a free and open source web server, written in PHP and Perl programming languages. It includes Apache HTTP Server and MariaDB database(PHPMyAdmin). Get more details Click Here.
Why we need to install XAMPP?
It used to host a PHP website on your localhost. Even more, it also used to store the MySQL database.
Now let’s come to the installation process.

1) Download XAMPP
First of all, you have to download XAMPP from their official site. Download the highlighted XAMPP version(5.6.38). [Download XAMMP]

2) Open XAMMP Setup
3) Start Installation

4) Check all and next
Make sure all the checkbox are selected as per screenshot.

5) Browse and choose folder to save
Choose the drive where all XAMPP files will be stored.

6) Uncheck and next
Uncheck “Learn more about Bitnami for XAMPP”. It is not required.

7) Final next

 Wait till installation process complete
 Wait till installation process complete
It maybe requires 10 minutes to complete the installation process. So, the installation process is almost complete.

9) Check and finish
Check the box and click finish.

10) Select and save the language
11) XAMPP control panel
Now, you can see the XAMPP control panel. Next, you have to start Apache and MySQL. See the screenshot.

So, you can see the screen like below after start Apache and MySQL.

Finally, you have installed the XAMPP in your windows. Even more, we have started the Apache and Mysql.
Check XAMPP is properly working or not
After starting the XAMPP server we have to check it is properly work or not. Therefore, you have to follow below steps.
1) Open your web browser
First of all, open chrome browser. and write below syntax in the search bar.
localhost/phpmyadmin/
Note: Don’t forget the “/” after phpmyadmin. Because it maybe cause an error.
2) PHPMyAdmin Dashboard
See the screenshot below. If you see the screen like this then your XAMPP is installed and work properly. If you can’t see a screen like a screenshot, Don’t worry. Go to the XAMPP control panel and restart Apache and MySql. Check again it must be work.

Finally, you can follow above all steps and install XAMPP very easily. I hope this tutorial will help you. Share this and spread your love.
Releated Articles:
- How to change wordpress admin panel password from cpanel?
- To install XAMMP on Windows 11 and 10, download and run the installer to unpack the files, continue with the default selection of components (MySQL, phpMyAdmin, PHP, and Apache), choose the installation location, continue with the on-screen directions, and allow access through the firewall.
- You can open Command Prompt (admin) and run the “winget install –id ApacheFriends.Xampp.8.2” command.
- Alternatively, it’s possible to install XAMPP using the XAMPP app on Windows 11 and 10.
UPDATED 9/24/2024: On Windows 10 and even on Windows 11, you can install XAMPP through the standalone installer or Command Prompt, and in this guide, I’ll teach you how to complete this process with both methods. XAMPP is a free, open-source software that provides an easy way for web designers and developers to install the components to run PHP-based software like WordPress, Drupal, Joomla, and others on Windows, Linux, and macOS.
If you are a web developer or are trying to get into blogging, XAMPP will save you time and frustration by automatically installing and configuring Apache, MySQL, PHP, and Perl to create a testing environment on your device.
In this guide, I will outline the steps to install XAMPP on Windows 11 (and 10) and the instructions to configure the web environment and fix common problems after the setup.
- Install XAMPP on Windows 11 and 10
- Configure XAMPP on Windows 11 and 10
- Fix Apache not starting on XAMPP
- Increase phpMyAdmin upload size on XAMPP
- Change phpMyAdmin password on XAMPP
You can install XAMPP on Windows 11 and 10 by downloading and running the application installer from the official website, using Command Prompt with the Windows Package Manager (winget) tool, or the Dev Home app.
Method 1: From Installer
To download and install XAMPP on Windows 11 and 10, use these steps:
-
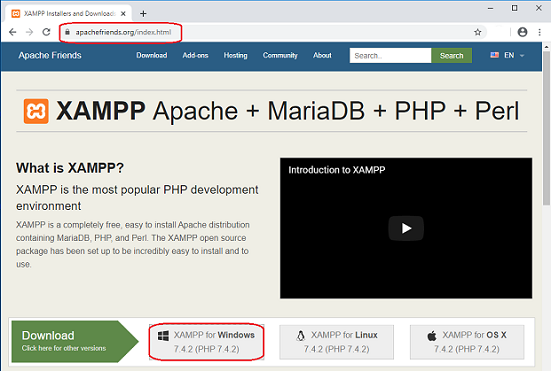
Open Apache Friends website.
-
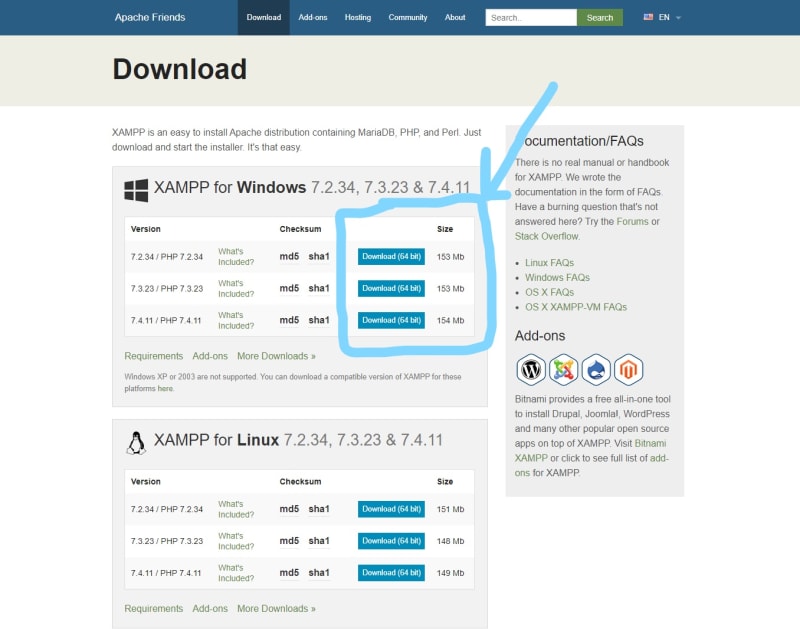
Click the Download button for the Windows version of XAMPP and save the file on your computer.
Quick note: If you have special version requirements for PHP, download the version you need to install. If you do not have a version requirement, download the oldest version, as it may help you avoid issues trying to install PHP-based software. In addition, these instructions have been tested to work for XAMPP version 8.2.12 and older versions, but you can use this guide for other versions.
-
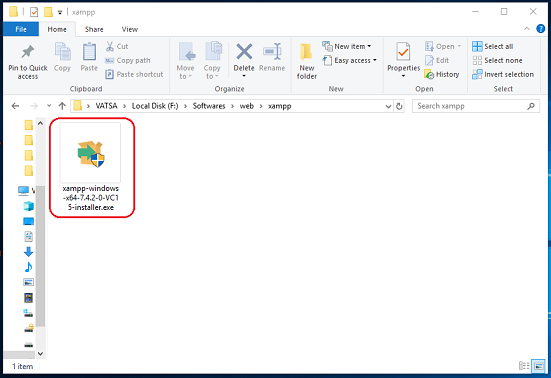
Double-click the downloaded file to launch the installer.
-
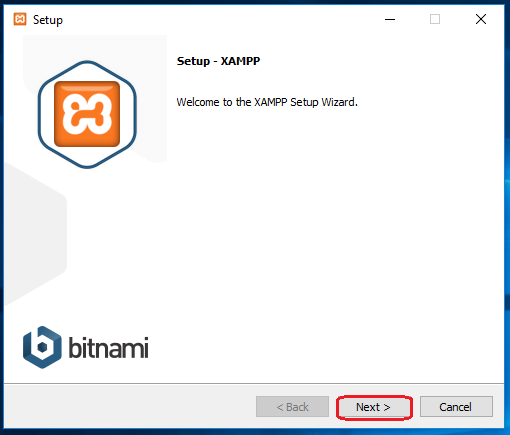
Click the OK button.
-
Click the Next button.
-
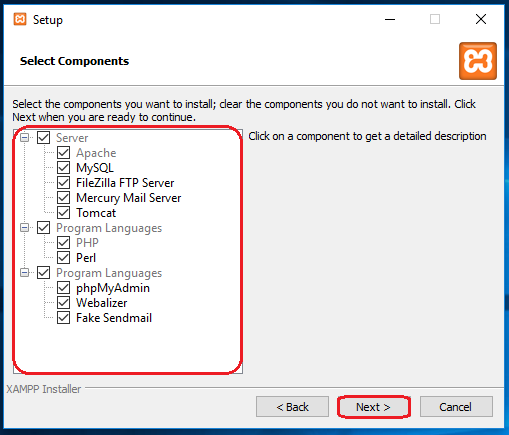
XAMPP offers various components you can install, such as MySQL, phpMyAdmin, PHP, Apache, and more. Since you will be using most of these components, I recommend that you leave the default options.
-
Click the Next button.

-
Use the default installed location. (You can also choose another folder to install the software in the “Select a folder” field.)
-
Click the Next button.
-
Select the language for the XAMPP Control Panel.
-
Click the Next button.
-
Clear the “Learn more about Bitnami for XAMPP” option.
-
Click the Next button.
-
Click the Next button again.
-
Click the “Allow access” button to allow the app through the Windows Firewall (if applicable).
-
Click the Finish button.


Once you complete the steps, the XAMPP Control Panel will launch, and you can begin configuring the web server environment.
You can also follow these instructions in my video tutorial on my YouTube channel. (Remember to like and subscribe.)
Method 2: From Command Prompt
To install XAMPP from Command Prompt with the winget tool on Windows, use these steps:
-
Open Start.
-
Search for Command Prompt, right-click the top result, and select the Run as administrator option.
-
(Optional) Type the following command to search for the name of the application and press Enter:
winget search xampp
Quick note: While the command is not required, the installation query must match the ID, name, or moniker of the package, which can change at any time. So, searching the application to execute the correct install command is a good idea and helps you to determine the available versions of the app.
-
Type the following command to install XAMPP with the Windows Package Manager and press Enter:
winget install --id ApacheFriends.Xampp.8.2

-
Continue with the on-screen directions (if applicable).

After you complete the steps, the package manager will download the package from the specified source, and it will proceed to install the application. The device may restart automatically during this process. The installation will set up the app inside the C:\xampp folder.
Method 3: From Dev Home
To install XAMPP with the Dev Home app, use these steps:
-
Open Start.
-
Search for Dev Home and click the top result to open the app.
-
Click on Machine Configuration from the left navigation pane.
-
Click the Install applications setting under the “Quick steps” section.

-
Search for XAMPP using the search box at the top of the page.
-
Click the Plus button next to the result to the app version you want on the list.

-
Click the Next button.
-
Check the “I agree and want to continue” option.
-
Click the Set up button to begin the installation.
-
Click the Yes button (if applicable).


Once you complete the steps, the Dev Home app will use the Windows Package Manager to download and install the version of XAMPP you selected.
Configure XAMPP on Windows 11 and 10
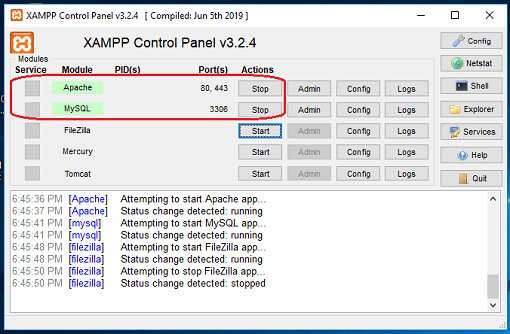
The XAMPP Control Panel includes three main sections. In the “Module” section, you will find all the web services available. You can start each service by clicking the “Start” button.
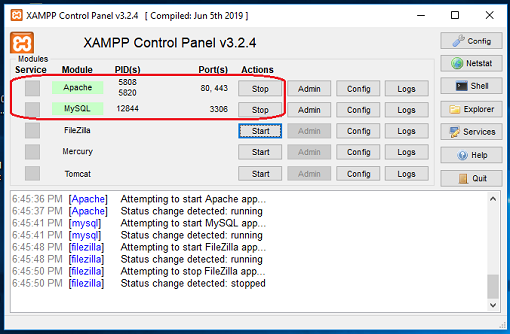
When you start some of the services, including Apache and MySQL, on the right side, you’ll also see the process ID (PID) number and TCP/IP port (Port) numbers each service uses. For example, Apache uses TCP/IP ports 80 and 443 by default, while MySQL uses TCP/IP port 3306.
You can also click the “Admin” button to access the administration dashboard for each service and verify that everything is working correctly.

On the right side is a list of buttons to configure various aspects of the control panel, including the “Config” button to configure which modules will automatically start when you launch XAMPP.
Clicking the “Netstart” button in the Control Panel will give you a list of services currently accessing the network, including TCP/IP address, port, and process ID information.

In addition, the Control Panel has quick-access buttons to open the shell command-line utility, XAMPP installation folder, and services and to close the app.
Finally, you can access the logs section to see what happens whenever you start a module or change a setting. This is the first place to look when something isn’t working.

The default settings should work for most situations to create a testing environment. However, depending on your setup configuration, you may have to change the Apache server’s TCP/IP port number, the database upload size, or the password for phpMyAdmin.
To access and change these settings, you’ll have to use the “Config” button for the corresponding service. For example, you’ll need to open the “httpd.conf” file to change the Apache server settings and the “my.ini” file to change the MySQL settings.
Fix Apache not starting on XAMPP
The XAMPP installation is very straightforward, but Windows 10 sometimes may not allow the Apache server to run. Usually, it’s because the “World Wide Publishing Service” is running on port “80” on the computer, which also happens to be the default TCP/IP port that Apaches use on XAMPP, and two apps can’t use the same networking port.
If you encounter this issue, there are several ways to resolve it. One is to uninstall the publishing service or change the default port on Apache.
Method 1: Uninstall World Wide Web Services
If you do not have any app depending on the World Wide Web Services feature, you can uninstall it with these steps:
-
Open Start.
-
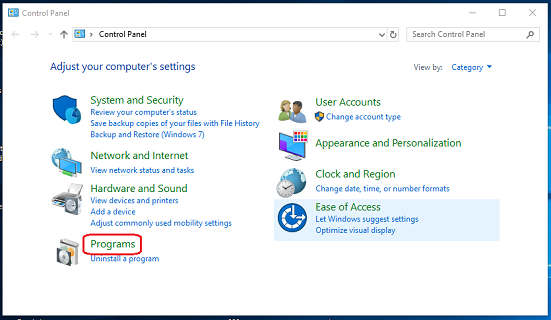
Search for Control Panel, and click the top result to open the experience.
-
Click on Programs.
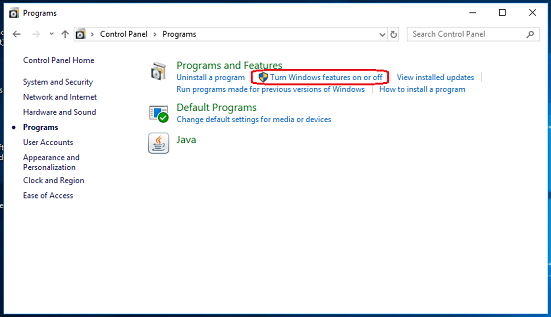
-
Click the Programs and Features option.
-
Click the “Turn Windows features on or off” option from the left pane.

-
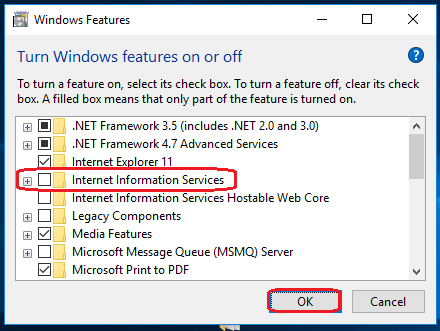
Expand the “Internet Information Services” branch
-
Clear the “World Wide Web Services” option.
-
Click the OK button.

-
Restart your computer.
-
Start the XAMPP Control Panel.
-
Click the Start button on Apache.


After you complete the steps, Apache should be able to run in port 80 on your device.
Method 2: Change the default Apache TCP/IP port
Instead of removing the World Wide Web Services, you can configure Apache to run on a different TCP/IP port.
To change the Apache listening port on XAMPP, use the steps:
-
Open XAMPP Control Panel.
-
On Apache, click the Config button.
-
Select the “Apache (httpd.conf)” option.

-
Scroll down and find the “Listen 80” line.
-
Change the number “80” for another TCP/IP port number that isn’t in use. For example, “81.”

-
Save and close the httpd.conf file.
-
Click the Start button on Apache from the XAMPP Control Panel.


Once you complete the steps, the Apache server should run without issues on the new TCP/IP port specified.
The only caveat with this configuration is that you’ll need to append the TCP/IP port number on the address whenever you want to connect to the test site. For example, to access the Apache server on the web browser, you must type “localhost:81/dashboard” instead of “localhost/dashboard.”
Method 2: Stop World Wide Web Publishing Service
Another way to fix the port problem is to stop the service and change its settings to start the service manually (only).
To change the World Wide Web Publishing Service, use these steps:
-
Open Start.
-
Search for Services, and click the top result to open the experience.
-
Double-click the “World Wide Web Publishing Service” service.

-
Click the Stop button.
-
Change the startup type to Manual.
-
Click the Apply button.
-
Click the OK button.

-
Open the XAMPP Control Panel.
-
Click the Start button to run the Apache server.


The best way to get Apache working again is to uninstall the World Wide Web Publishing Service. However, if that is not possible, you can change the TCP/IP port number or stop the service as necessary.
Increase phpMyAdmin upload size on XAMPP
Another common problem with XAMPP is the default database upload limit. For instance, developers often copy a website for troubleshooting or work on-site without disrupting the live website. However, people using WordPress or another content management software will quickly discover that they can’t upload a database because it exceeds the maximum permitted upload size, 2048 KiB.
To increase the database upload limit on phpMyAdmin, use these steps:
-
Open XAMPP Control Panel.
-
Click the Explorer button.
-
Open the php folder.
-
Open the php.ini file with any text editor.

-
Change the value for
upload_max_filesizeandpost_max_sizeto the size you want. For example:post_max_size=100Mandupload_max_filesize=100Mto import database files of up to 40MB.
-
Click the Stop button for MySQL and Apache.
-
Click the Start button to restart Apache and MySQL.


Once you complete the steps, you should be able to import large database files on phpMyAdmin.
Change phpMyAdmin password on XAMPP
By default, phpMyAdmin (MySQL) uses “root” as a username without a password. This means that if you are installing a WordPress site when prompted, you only need to enter the root as the username and leave the password field empty.
To change the phpMyAdmin password on XAMPP, use these steps:
-
Open XAMPP Control Panel.
-
Click the Admin button for MySQL.
-
Click on the “User accounts” tab.
-
Click the Edit privileges option for the username root, but only the one with the hostname localhost.

-
Click the Change password button.
-
Confirm a new password.

-
Click the Go button.


After you complete the steps, if you try to log in to phpMyAdmin, you might get an access denied “Cannot connect: invalid settings” message.
Fix phpMyAdmin access denied message
If you’re having problems signing into phpMyAdmin, you’ll need to configure the “config.inc.php” file.
To change the configuration settings in the “config.inc.php” file, use these steps:
-
Open XAMPP Control Panel.
-
Click the Explorer button.
-
Open the phpMyAdmin folder.
-
Open the config.inc.php file with any text editor.

-
Change the following lines under the “Authentication type and info” section:
-
On
$cfg['Servers'][$i]['auth_type'] = 'config';replaceconfigforcookie. -
On
$cfg['Servers'][$i]['AllowNoPassword'] = true;replacetrueforfalse.

-
-
Save and close the file.


Once you complete the steps, you can log in to the phpMyAdmin dashboard, and XAMPP should be configured and ready to use with any supported PHP-based software.
Update September 24, 2024: This guide has been updated to ensure accuracy and reflect that the instructions will work on Windows 10 as well as on Windows 11.
Introduction
XAMPP is a free and open-source tool used by web developers in the Windows family and other platforms to set up the development and testing environment. XAMPP server comes with the XAMPP control panel to manage all its components easily.
XAMPP stands for (X) Cross-platform, (A) Apache, (M) MySQL, (P) PHP, (P) Perl and with some additional modules including phpmyadmin (for the database), FileZilla, Mercury, and Tomcat.
Once you have installed and configured the XAMPP server in your system, you can easily work with any CMS like WordPress, Joomla, drupal and more. XAMPP server works like a local server in your system that is generally used by PHP developers to test the websites (web-projects).
This tutorial will show you the various steps on how to install and configure the XAMPP server on Windows 10.
Installation Process of the XAMPP Server
Step 1
To download the XAMPP server, visit the «Apache Friends» website in your web browser.
Step 2
Click on «XAMPP for Windows». Then, navigate the downloading location and the file will be automatically downloaded.
Step 3
Double-click the downloaded file to launch the XAMPP installer.
Step 4
«Setup» window will appear on the screen. Then, click on the «Next» button.
Step 5
Select the components that you want to install and click on the «Next» button.
Note
By default, all components are selected in your XAMPP installation.
Step 6
Choose a folder to install the XAMPP and click on the «Next» button.
Step 7
Uncheck the «Learn more about Bitnami for XAMPP» option and click on the «Next» button.
Step 8
«Ready to Install» window will appear on the screen, then click on the «Next» button.
Step 9
Click on the «Finish» button.
Step 10
Select a language. (either English or German) and click on the «Save» button.
Configuration Process of XAMPP Server
Step 1
Start the XAMPP control panel through the «Run as administrator» option.
Step 2
«XAMPP Control Panel» will appear on the screen and click on «Start» action to start the «Apache» and «MySQL» modules.
Note:-
The default XAMPP server settings should work for most users. When you start the related modules (services) then, the color of the related modules (service) becomes change into the green color and the PID(s) and the Port(s) number will also be shown to the user.
Fix an Issue of Apache not Starting in XAMPP
Some of the users may face an issue with Apache and MySQL module services not working in XAMPP. However, depending on the setup configuration or usage of your system, you may need to change the port number of the Apache and the MySQL. For example, because the «World Wide Web Services» under «Internet Information Services (IIS)» is also run on port 80 in your system, which is also the default port of apache in XAMPP. And, the two servers (applications) can not use (run) the same port simultaneously. Follow the instructions below to fix the problem with Apache and MySQL services.
Method 1. Change the default port of Apache
Step 1
Open the XAMPP Control Panel.
Step 2
In Apache Module Service, click on the «Config» button.
Step 3
Click on «Apache (httpd.conf)» option.
Step 4
By pressing the «Ctrl + F» key, find the «Listen 80» and replace it with another open port (like 81 or 9080) and save the file.
Step 5
Restart the XAMPP Server.
Step 6
Again, open the «XAMPP Control Panel» and click on the start option under the «Apache» module services.

Method 2. By disabling the Internet Information Services (IIS)
Step 1
From the Start Menu, search for Control Panel.
Step 2
Click on «Programs».
Step 3
Click on the «Turn Windows Feature on or off» option.
Step 4
Uncheck (clear) the «Internet Information Services» option and click on the «OK» button.
Step 5
Click on the «Restart Now» option (This will reboot/restart your computer/laptop).
Step 6
Again, open the «XAMPP Control Panel» and click on the start option in the «Apache» module services.
Conclusion
By following any of the above methods, you can install and configure the XAMPP server on Windows 10.
I hope you enjoyed this article. Follow C# Corner to learn more new and amazing things about Windows 10.
Thanks for reading this article.

Yunwen Eric
Posted on
• Edited on
Introduction
XAMPP is a free and open-source cross-platform web server solution stack package developed by Apache Friends, consisting mainly of the Apache HTTP Server, MariaDB database, and interpreters for scripts written in the PHP and Perl programming languages.
XAMPP stands for:
X: Cross Platform, as it supports all the moder operating systems like Windows, Mac OSX, Linux etc.
A: Apache Web Server
M: MySQL database management system.
P: PHP installation
P: Perl scripting language
How to go about it
Requirements:
Before stating the installation process, you should have the following;
- A Computer with windows 10 Properly installed
- A stable Internet connection
Step1: Download Xampp
Firstly, go to the official Xampp website and download the windows version
Click here
Step 2: Run the installation package
Double click on the installation package or right click and click ‘run as administator’

Step 3: Choose the location for installation. It is recommended to use the default location. Click next

Step 4: Select your default installation language in the dropdown on the top left

Step 5: Uncheck or check the box
If you don’t want to be redirected to the apache and friends site for more details on Xampp. Click on the next button to continue. This will start up the installation process. Just seat back and wait for the installation process to complete


Step 6: Prompt
Occasionally, the installation process will prompt you to allow network access for the apache server. Once you permit this, the installation process will smoothly continue.

Step 7: Finalizing the installation
Once this is all done the finale installation page appears. If you want to run Xampp instantly, check the box and click on finish.


Congratulation
Felicitation, you have successfully installed Xampp on your windows 10
