
В диспетчере задач Windows 11 и Windows 10 присутствует возможность вручную задать приоритет выполняемых процессов: эту возможность можно использовать в целях снижения нагрузки, вызываемой «необязательными» процессами и потенциального увеличения производительности для тех программ, для которых она важна.
В этой инструкции подробно о том, как задать приоритет процессов в диспетчере задач, какие параметры приоритета доступны и что означает каждый из них.
- Изменение приоритета процессов
- Что происходит и стоит ли задавать приоритет
- Видео
Изменение приоритета процессов
Для того, чтобы задать приоритет определенного процесса в Windows 11 или Windows 10, достаточно выполнить следующие шаги:
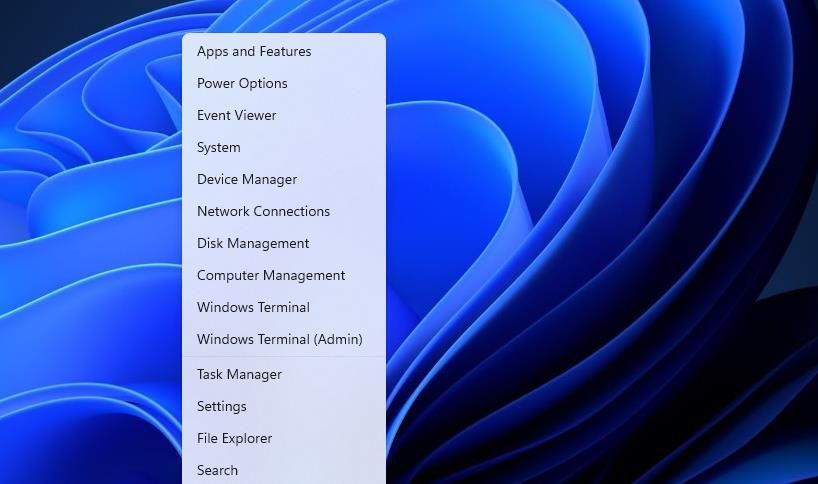
- Откройте диспетчер задач. Это можно сделать из контекстного меню по правому клику на кнопке «Пуск». Также можно нажать клавиши Ctrl+Shift+Esc или нажать клавиши Win+R на клавиатуре, ввести taskmgr и нажать Enter.
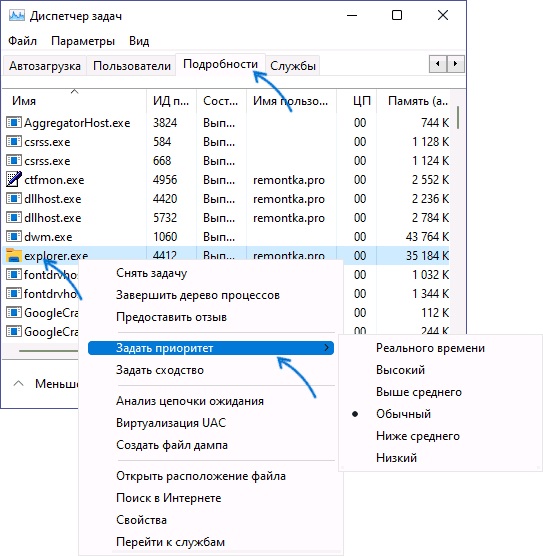
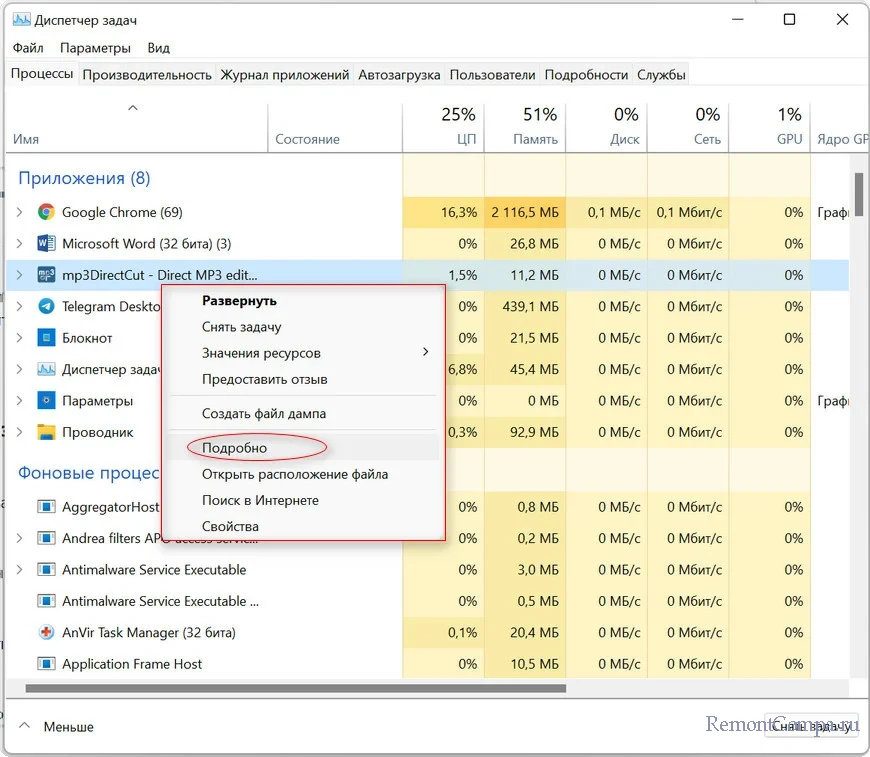
- В диспетчере задач перейдите на вкладку «Подробности». Если она не отображается, сначала нажмите по кнопке «Подробнее» внизу окна диспетчера задач.
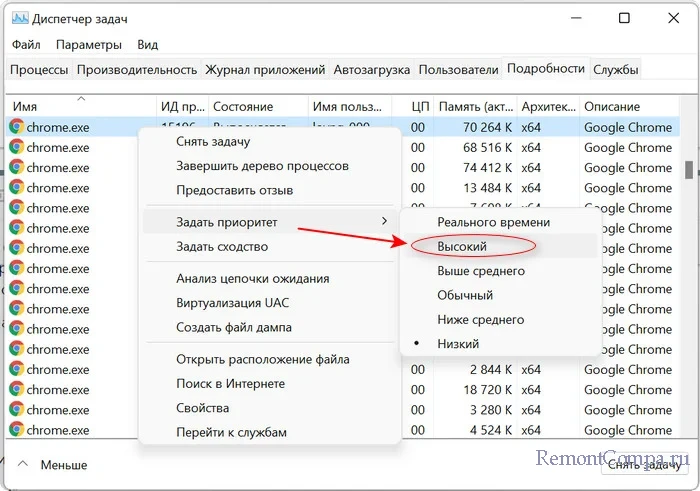
- Нажмите правой кнопкой мыши по процессу, приоритет которого следует изменить.
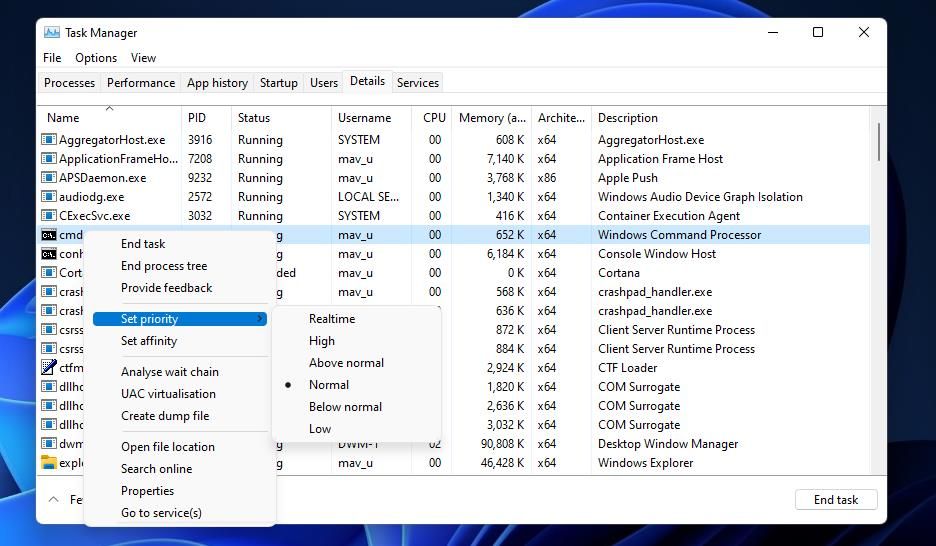
- Выберите в контекстном меню пункт «Задать приоритет» и установите одно из значений: Реального времени, Высокий, Выше среднего, Обычный, Ниже среднего, Низкий.

- Подтвердите изменение приоритета. Учитывайте, что в случаях, когда вы задаете приоритет для важных, постоянно используемых для работы системных процессов, предупреждение о том, что «Изменение приоритета некоторых процессов может нарушить стабильность системы» может оказаться правдой.
Что касается доступных для выбора вариантов приоритета:
- Реального времени — самый высокий доступный уровень приоритета процессов. Задачи процесса, для которого выставлен этот приоритет, выполняются в первую очередь. Учитывайте: если задать этот уровень для вашей игры или программы, это может привести к сбоям в работе системы (из-за накопившихся, но не выполненных задач другими процессами).
- Высокий — следующий уровень, по умолчанию задан для важных системных процессов, от которых зависит стабильность работы системы. Можно установить для пользовательских программ, но иногда может привести к сбоям.
- Выше среднего — сравнительно спокойно можно использовать для того, чтобы слегка повысить производительность вашей игры или программы, не навредив работе системных процессов.
- Обычный — приоритет, с которым работают большинство приложений по умолчанию.
- Ниже среднего — можно использовать для процессов, завершить которые нельзя, но время выполнения которых не играет роли.
- Низкий — самый низкий из возможных приоритетов. Ресурсы для задач с этим уровнем выделяются только после выполнения других активных задач.
При изменении приоритета фоновых системных процессов настоятельно рекомендую помнить, что именно вы меняли, чтобы иметь возможность вернуть параметры в значения по умолчанию в случае, если в работе системы будут замечены какие-либо проблемы.
Что происходит при изменении приоритета процессов и стоит ли его менять
Изменение приоритета процессов в диспетчере задач изменяет очередь задач этого процесса в общей очереди всех задач. Задачи с более высоким приоритетом обрабатываются процессором в первую очередь, необходимые системные ресурсы для них также выделяются в приоритетном порядке.
Что касается осмысленности изменения приоритетов процессов:
- Иногда с помощью таких изменений можно добиться повышения производительности нужного ПО.
- Меняя приоритеты системных процессов на более низкие легко получить результат в виде системных сбоев. Не следует задавать приоритет для процессов в массовом порядке.
- Зависания и сбои можно также получить, задав приоритет «Реального времени» для «тяжелых» игр и программ, либо выставив высокие приоритеты сразу для нескольких одновременно выполняемых пользовательских программ.
И ещё один момент: если ваша задача — повысить производительность в играх, включение встроенного игрового режима в параметрах Windows 11 и Windows 10 (раздел «Игры») точно будет безопаснее и в некоторых случаях может дать более заметный эффект, чем настройка приоритетов выполняемых процессов.
Видео
Априори в Windows 11 все процессы имеют «Обычный» приоритет. В редких случаях винда сама меняет приоритет некоторых процессов. Но бывают ситуации, когда определенному процессу программы нужно указать его вручную. По сути, это распределение нагрузки на процессор всех приложений. Обычно такое бывает, когда пользователь часто работает в одном приложении, но параллельно висят в фоне менее востребованные. Вот, чтобы повысить производительность главного, нужно задать более высокий приоритет. То есть на процесс с более высоким приоритетом будет выделено больше ресурсов, а с менее высоким меньше. Заметен прирост будет в основном на слабых компьютерах, где процессору не хватает мощности на обработку всех процессов одновременно.
Ну и перейдём к инструкциям как это сделать.
1. Нажимаем на Пуск ПКМ и заходим в «Диспетчер задач». Либо же нажимаем сочетание «Ctrl+Shift+Esc».
2. Далее нас интересует пункт «Подробности».
3. Выбираем необходимый нам процесс и жмём на него ПКМ.
4. Жмём «Задать приоритет».
5. Далее нам необходимо выбрать одно из представленных значений.
Всего имеется шесть вариантов приоритета. Рассмотрим подробнее каждый из них.
«Реального времени» — максимальный уровень. Задачи с таким значением выполняются первым делом и на них выделены максимальные ресурсы системы. Бывает даже так, что винда тратит важные системные ресурсы в пользу этого приоритета. В таких случаях не исключены сбои.
«Высокий» — также все процессорные мощности направлены на определенное приложение, не ограничивая при этом ресурсы выделенные для других программ, если у них не более низкое значение. Этот режим более стабилен нежели «Реального времени».
«Выше среднего» — режим повышенной продуктивности без ущемления процессов системы.
«Обычный» — стоит изначально у большинства процессов.
«Ниже среднего» — такой приоритет обычно выставляют для приложений, которые должны висеть в фоне, но не прекращать свою работу. При этом ресурсы будут задействованы минимальные.
«Низкий» — также хорошо подходит для фоновых приложений и процессов, но при этом они включаются только после того, как завершили активные задачи.
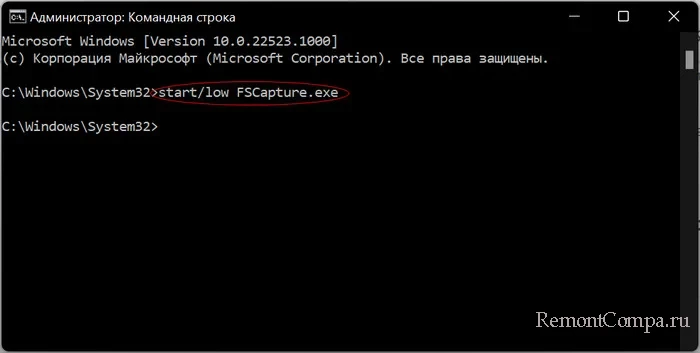
1. Заходим в меню Пуск и выбираем «Командная строка» или вводим в поиске Windows «cmd».
2. Пишем команду: start /low необходимое приложение
(Например, start/low FSCapture.exe применяет к приложению FSCapture низкий приоритет).
Таким способом разрешено поменять приоритет для любого приложения.
Обычно они имеют формат .ini или .cfg.
1. Находим в папке с приложением такой файл и кликаем по нему ПКМ.
2. Открываем с помощью любого текстового редактора.
3. Заходим в поиск по документу и пишем «Priority».
4. Меняем приоритет на нужный нам.
Задав приоритет таким способом, при каждом запуске программа будет работать в нем.
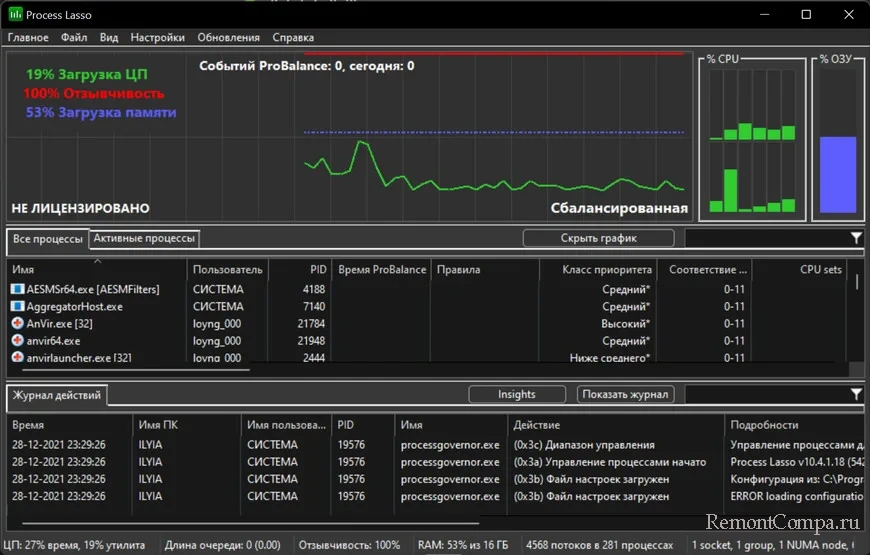
Существует множество приложений, которые помогут задать приоритет, такие как Prio и Process Lasso. Внешний вид у них довольно похож и в использовании все интуитивно понятно. При запуске обычно появляется окно со списком всех процессов, запущенных на ПК. Выбираем нужный процесс и кликаем по нему ПКМ. Далее жмём на «Класс приоритета» и выбираем нужное значение.
Таким образом можно незначительно увеличить производительность той или иной программы. Но повторимся, заметно это будет только на слабеньких компьютерах.
Sign in to your MUO account
A priority level determines the proportion of system resources, more specifically CPU time and RAM allocation, set for Windows software. Windows 11/10 automatically assigns priority levels to programs. Most standard user apps will have normal or lower priority levels, and the OS reserves higher levels for more important system processes and services.
However, you can change the priority levels for programs yourself by adjusting a Set priority option. By doing so, you’ll be giving certain software more or less system resource priority. This is how to change a program’s priority level in Windows 11.
How to Select a Priority Level for a Program With Task Manager
The Set priority option is a well-hidden Task Manager setting you can select to change the processor priority of a process. That’s a context menu option available within the Details tab of Task Manager. It includes six priority levels for users to choose from.
You can select a priority level for a running program with this option as follows.
- First, launch the software you want to set a priority level for. If it’s a game you launch, you’ll probably need to return to the desktop by pressing the Win key or Ctrl + Alt + Delete to select Task Manager.
-
Click the Start menu’s taskbar icon with the right button on your mouse to select a Task Manager option.

- Select Task Manager’s Details tab.
-
Then right-click the EXE process for the software you just started to select Set priority.

- Choose a Realtime, High, Above Normal, Normal, Below Normal, or Low option on the Set priority menu. Don’t ever select the highest Realtime setting, which is primarily for hardware-related processes.
- A confirmation prompt will then pop up. Click the Change priority button on that dialog box.
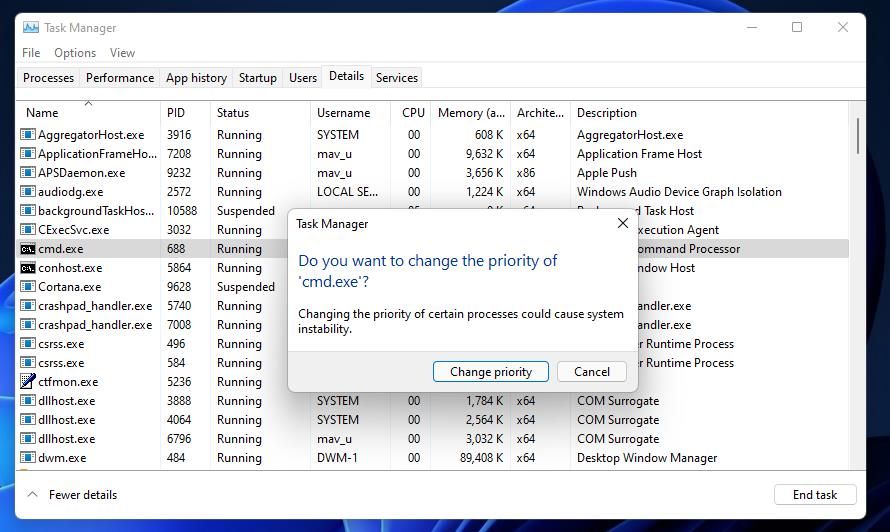
Now your selected software is running with a different priority level until you close it. Note what the confirmation prompt says about how changing priority levels for programs can generate system instability. So, don’t get carried away and start setting high priority levels for loads of third-party software processes within the Details tab. It’s best to set a higher priority level for one system-resource heavy software only, such as a game or image editor.
How to Select a Permanent Priority Level for a Program
The Task Manager’s Set priority level option isn’t a permanent setting for any program. A program you changed the priority level for will revert to default when restarted. That’s not ideal if you always want to run certain software at a different priority level.
To save yourself having to always manually change priority for a program, check out Process Hacker. Process Hacker is a Task Manager alternative with which you can select to save a chosen priority level for a running program.
Here is how you can select a permanent priority level with Process Hacker.
- Open Process Hacker’s Softpedia page.
- Click Download Now and the External mirror options.
- Then open File Explorer’s window, and navigate to the folder that includes Process Hacker’s ZIP archive.
-
Click Process Hacker’s ZIP file with the right mouse button to select Extract All.

-
Select the Show extracted files option, and click the Extract button.

- Click the x64 subfolder in Process Hacker’s folder to open it.
-
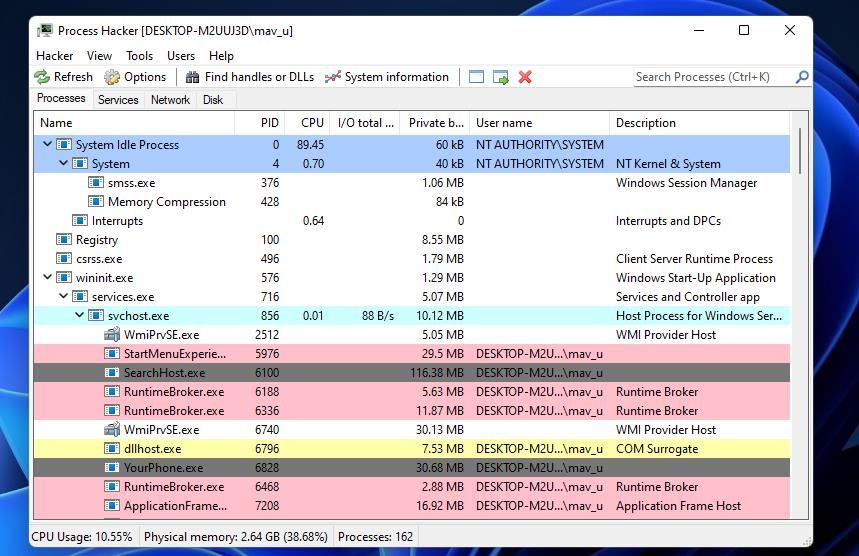
Then double-click the ProcessHacker.exe to open the window in the screenshot directly below (no installation required).

- Launch software for which to change the priority level.
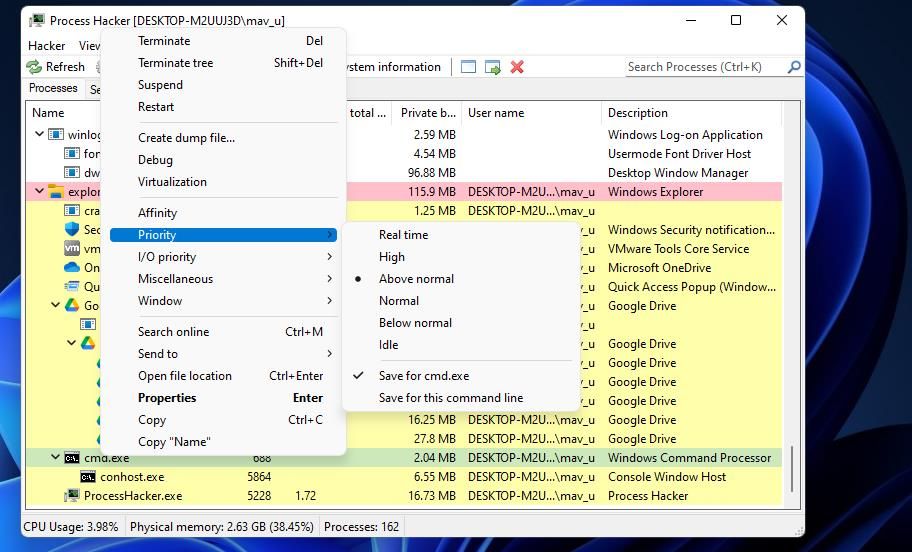
- Then right-click a program’s process in Process Hacker to select Priority. If you can’t find the software there, enter a keyword for the process in the search box.
- Select a priority level on the submenu.
-
Right-click the same software process again to select the Priority > Save for options.

- Now close the software for which you just saved the priority level. When you restart the software, you’ll see in Process Hacker that the program has the same priority level you configured and saved it to start with.


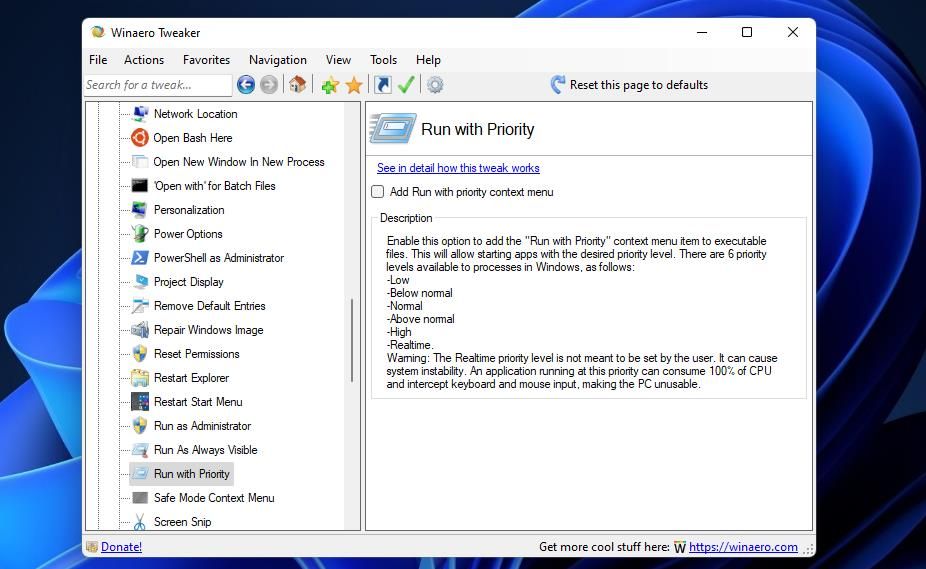
You can also add a Run with priority shortcut to Windows 11’s context menu with Winaero Tweaker. Such a shortcut will enable you to start software packages with different priority levels. Then you won’t need to rummage through Task Manager to change priority levels for processes. These are the steps for adding a Run with priority submenu to the context menu.
- Bring up the Winaero Tweaker download page.
- Select the Download Winaero Tweaker link to save a ZIP file for the software.
- Open the folder in which you downloaded Winaero Tweaker’s ZIP archive within Explorer.
- Then extract Winaero’s ZIP as covered in the fourth and fifth steps of the previous method.
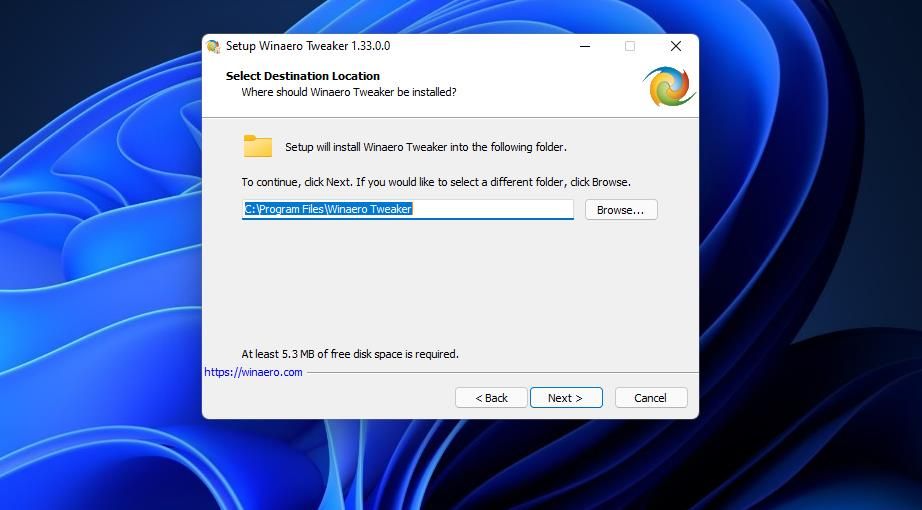
- Double-click WinaeroTweaker-1.33.0.0-setup.exe in Winaero’s extracted folder to launch that setup wizard.
- Select Next two times, and click the I accept the agreement radio button.
-
Click Next and Browse to select a different folder for the software if you prefer.

- Then you can keep clicking Next until you get to the Install option. Select Install to complete the installation.
- Make sure you’ve selected the Run Winaero Tweaker checkbox, and click the Finish option.
- Scroll down to and double-click the Context menu category in Winaero Tweaker’s left sidebar.
-
Select the Run with Priority option shown directly below.

- Then click the Add Run with priority context menu checkbox to select it.
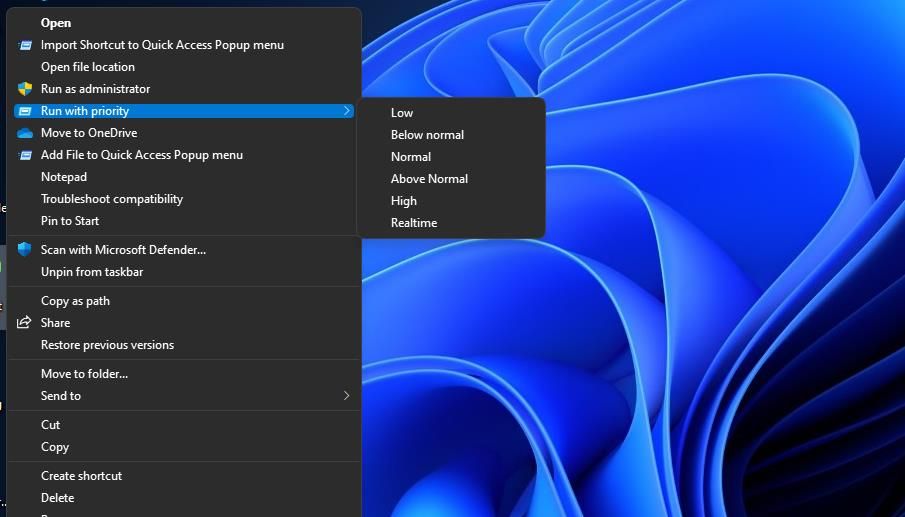
Check out the new Run with priority submenu on Windows 11’s context menu. Right-click a software shortcut on your desktop to select Show more options, which opens a classic context menu. Then select the new Run with priority menu option there to view settings. Choose one of the five priority options (excluding Realtime) to launch the software.
You can always remove that Run with priority submenu from the context menu with Winaero Tweaker. To do so, open the Run with Priority option in Winaero. Then click the Reset this page to defaults option for that setting. You can restore all the Winaero options to default by clicking Actions > Reset all Tweaks.
Give System Resource Heavy Software a Higher Priority Level
The Set priority option is mostly useful for selecting higher levels for system-resource intensive software. For example, you can get better performance from a game with high system requirements by choosing a higher priority level. Raising the priority level can even sometimes fix games crashing. So, raising the priority level is a good way to give your software a bit of a boost when needed.
Windows does a pretty good job at allocating your system’s resources to processes and programs that need it most by assigning priority levels to them. Most of the applications that you install can run perfectly fine with the “normal” priority level, which is the default.
However, every now and then, you may need to run a program at a level higher than the default normal, like a game, to give it a boost. But doing so comes at a cost, and is a bargain worth pondering over.
So how can you safely run an app at high priority without causing problems for your system? Let’s find out.
What happens when you make an app high priority?
There are a total of six priority levels at which Windows runs the different processes and programs – Low, Below Normal, Normal, Above Normal, High, and Realtime.
Depending on their priority, Windows will rank and queue applications. The higher the priority, the more time the app gets. So, services and processes that are uber important for Windows will run at a high priority. Unless you have a good reason to change app priorities, it’s best to leave it all to Windows to decide which processes get prioritized when allocating resources.
Of course, if there’s a particularly laggy application that you wished ran smoothly, you can consider changing its priority well above normal to the “high” category. But do heed that doing this will divest some of the resources away from where they’re needed most and can lead to some jarring results, such as frozen or laggy mouse and keyboard inputs.
What to consider before making an app high priority?
Whether or not you should give an app high priority depends a great deal on your processor as well as the task itself.
If the app isn’t resource hungry, you can get away with a lot. But if you’re planning to give a video editor app or a game some boost, which is what most people think of when meddling with priorities, your system is going to take a visible hit. If your high-priority app hoards up all your system resources, and there’s little to nothing left for even your commands to go through, then there’s no point in doing any of it in the first place.
Again, this will depend on the resources that your system has to offer and the app that you want to run. But if you want to experiment and see what happens when you run a CPU-intensive app at a high priority, then go right ahead. Doing so won’t damage your computer (though you will have to reach for the power button to restart) and priority changes are also reverted to default on system restart.
Related: 6 ways to disable Windows Security antivirus in Windows 11
Prerequisites to making an app high priority
Before you make an app high priority, there are a couple of things that you should get out of the way.
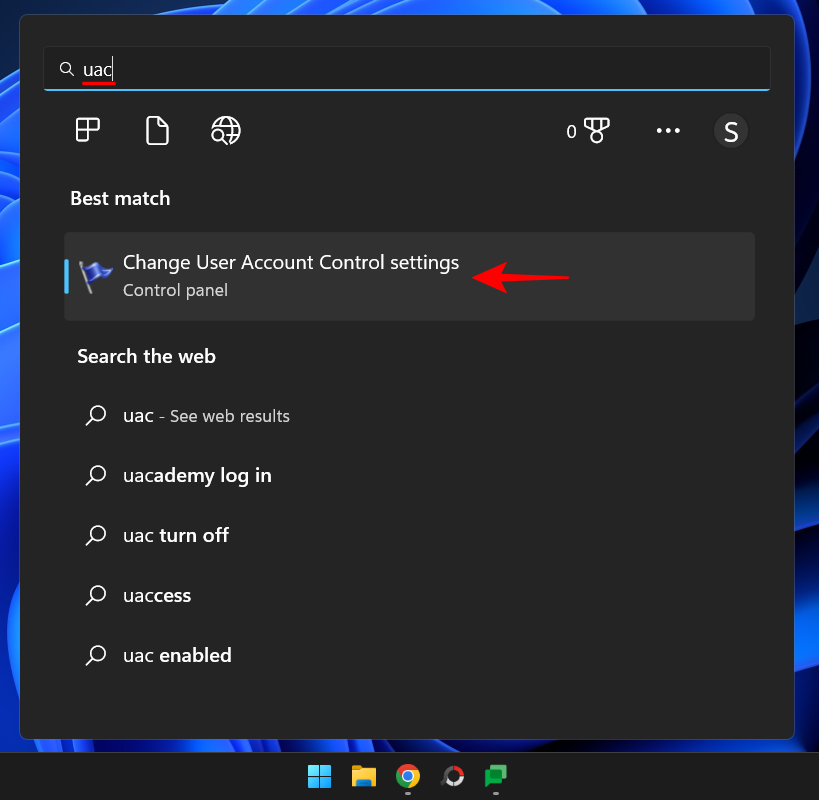
Disable UAC
User Account Control (UAC) protects your system from potentially harmful apps and settings changes by preventing you from making those changes. But if you know what you’re doing, UAC can be a nuisance. Although it won’t prevent you downright from making any changes, it does tend to throw up confirmation prompts for every little thing. It’s best to disable it and be rid of its annoying presence. Here’s how:
Press Start, type UAC, and select Change User Account Control Settings.
Bring the notify slider all the way down to “Never notify”.
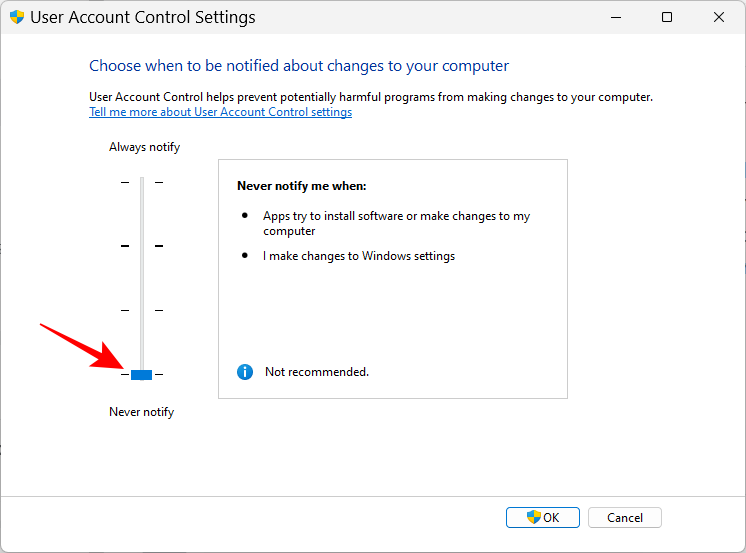
Then click OK.
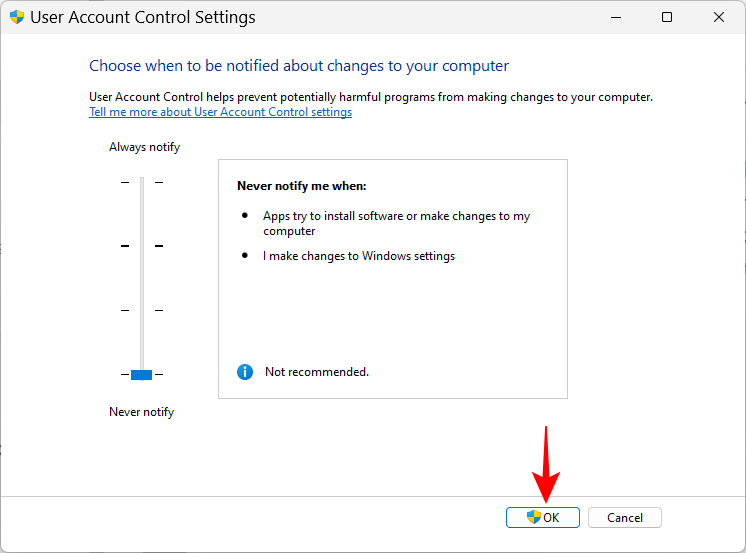
And just like that, UAC is out of the way.
Give the app Administrator privileges
Another, perhaps more important change that you need to make is to give administrator privileges to the app that you’re trying to give high priority. Here’s how to go about it:
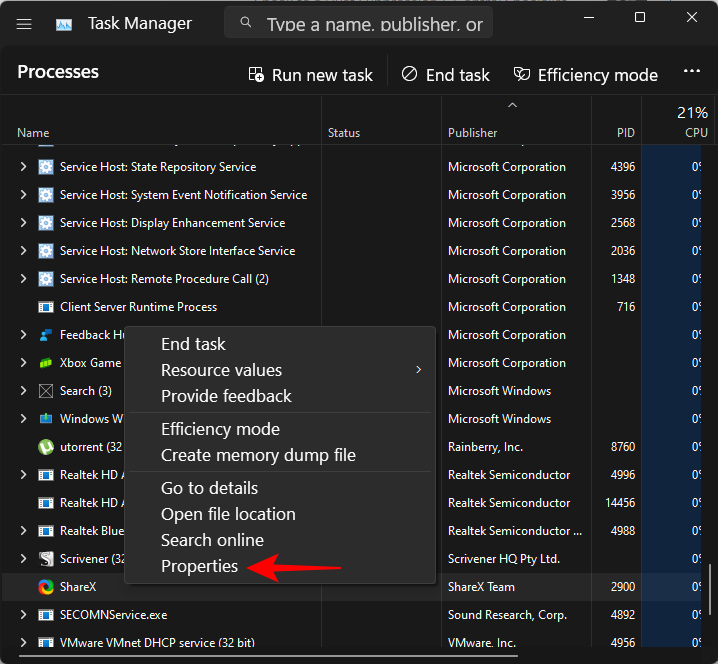
Open your app so its processes are running. Then right-click on the taskbar and select Task Manager.

Alternatively, press Ctrl+Shift+Esc to bring up the Task Manager. Then find your app’s process in the Task Manager. Right-click on it and select Properties.
Click on the Security tab to switch over to it.
Then click on the Edit box.
Then give your application “Full control” by clicking on the box under “Allow”.
Then click OK.
Click on OK again.
What are the different Priority Level IDs?
For certain methods, such as using command terminals like PowerShell and the Command Prompt given below, you will have to enter the priority level ID to change an app’s process’ priority. These priority level IDs are as follows:
Low – 64
Below Normal – 16384
Normal – 32
Above Normal – 32768
High – 128
Realtime – 256
Out of these six, you will need the priority level ID number “128” for the methods given below.
Related: How to get to BIOS in Windows 11
Now that you know what to keep in mind while making an app high priority, here are a few ways to go about it:
Method 1: In PowerShell
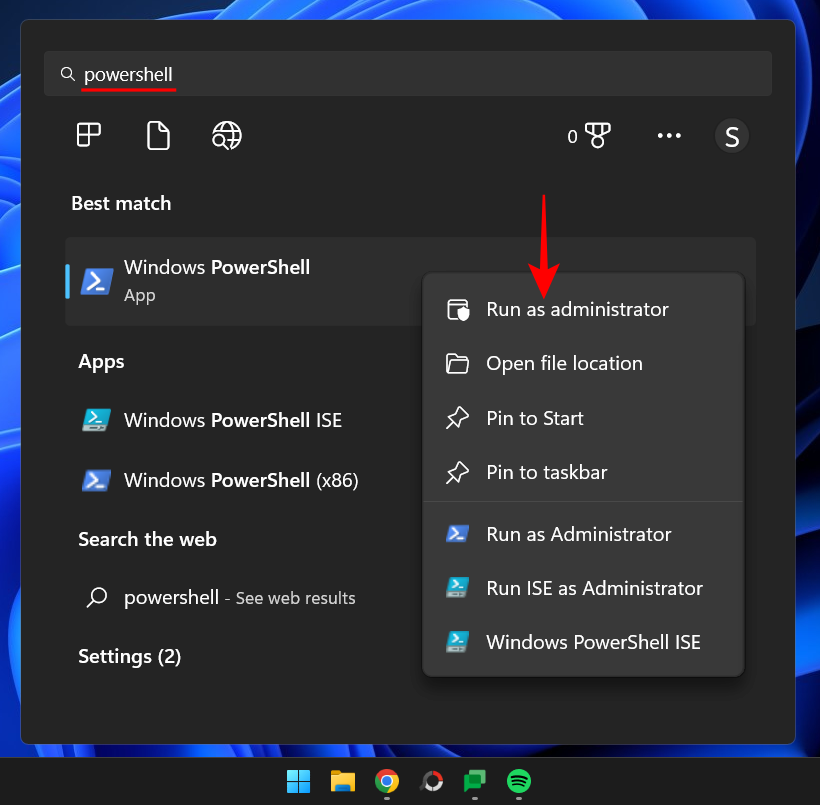
Press Start, type powershell, right-click on the result, and select Run as administrator.
Now type the following command:
Get-WmiObject Win32_process -filter 'name = "ProcessName"' | foreach-object { $_.SetPriority(PriorityLevelID) }
Replace ProcessName with the full name of your application’s executable file (along with its extension), and replace PriorityLevelID with the high priority level ID number which is 128.
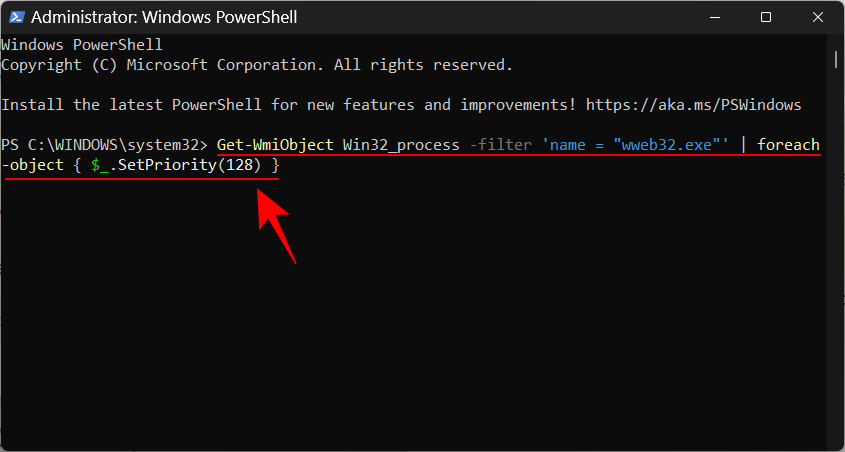
Then press Enter. And just like that, you have made your app high priority with PowerShell.
Method 2: Using the wmic command in Command Prompt
The Command Prompt commands are slightly easier to tackle. Here’s how to use it to make an app high priority:
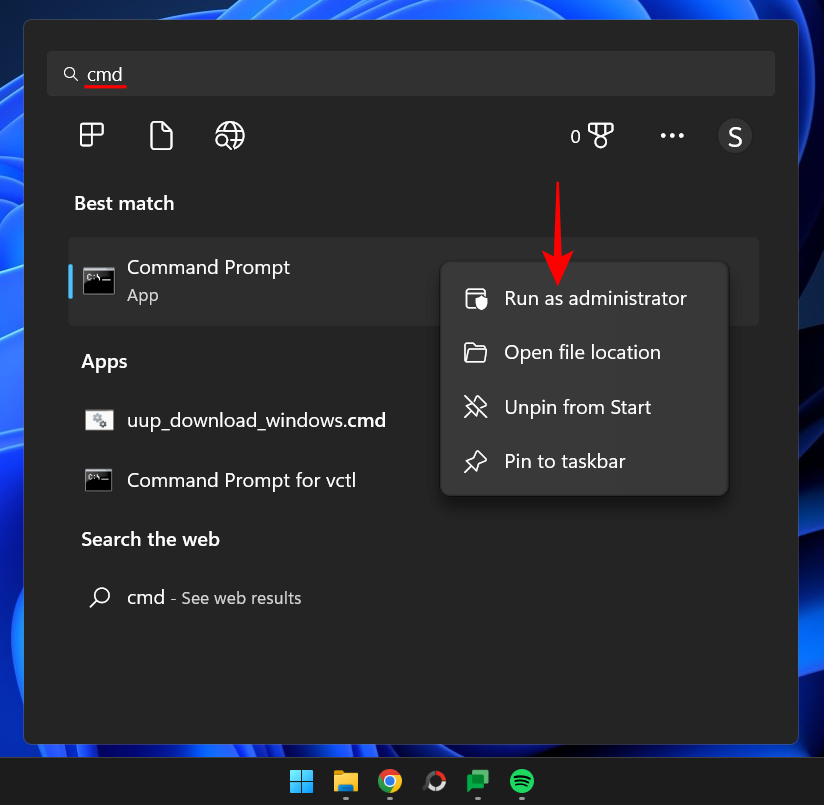
Press Start, type cmd, then right-click on the best-matched result and select Run as administrator.
Now type the following command:
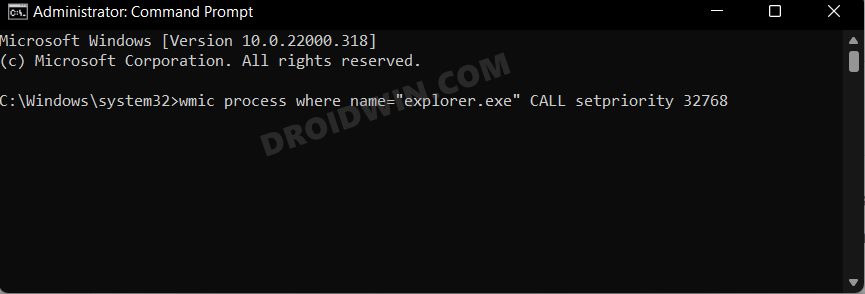
wmic process where name="ProcessName" CALL setpriority ProrityLevelID
Make sure to replace the ProcessName with the name of the application and the PriorityLevelID with 128 (for high priority), like so:
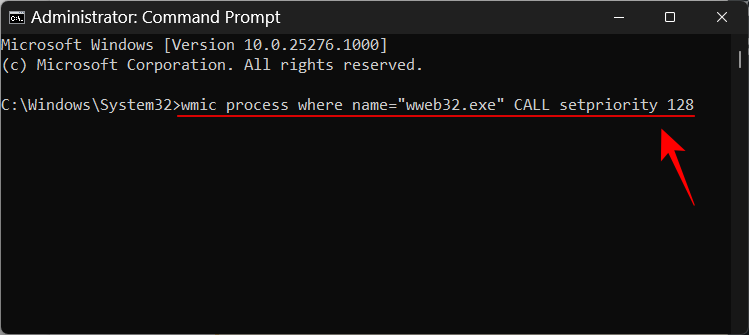
Then press Enter. The priority level will be set to high for the application.
Related: How to use the PC Manager App on Windows 11
Method 3: Start an application with high priority
So far, we’ve seen how you can set the priority of an app that is already running. But you can also use the command prompt to start an application with high priority. Here’s how:
Open the command prompt with administrative privileges, then type the following command:
start ""/'Prioritylevel' "ApplicationPath"
Make sure to replace ‘Prioritylevel’ with High (without quotations) and the ApplicationPath with the full path of the application (with quotations).
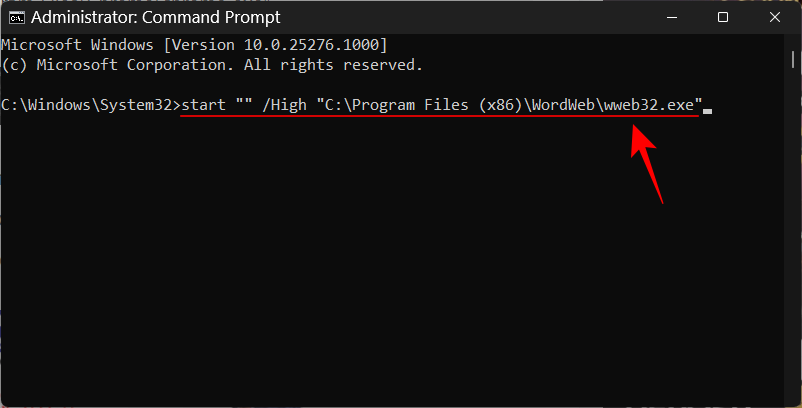
And just like that, you have started the application with high priority.
Method 4: Permanently make an app high priority
By default, all the changes that you make to an app’s priority will be reset once you restart your PC. To make the changes permanent, we’ll be adding the command prompt command to the application’s shortcut.
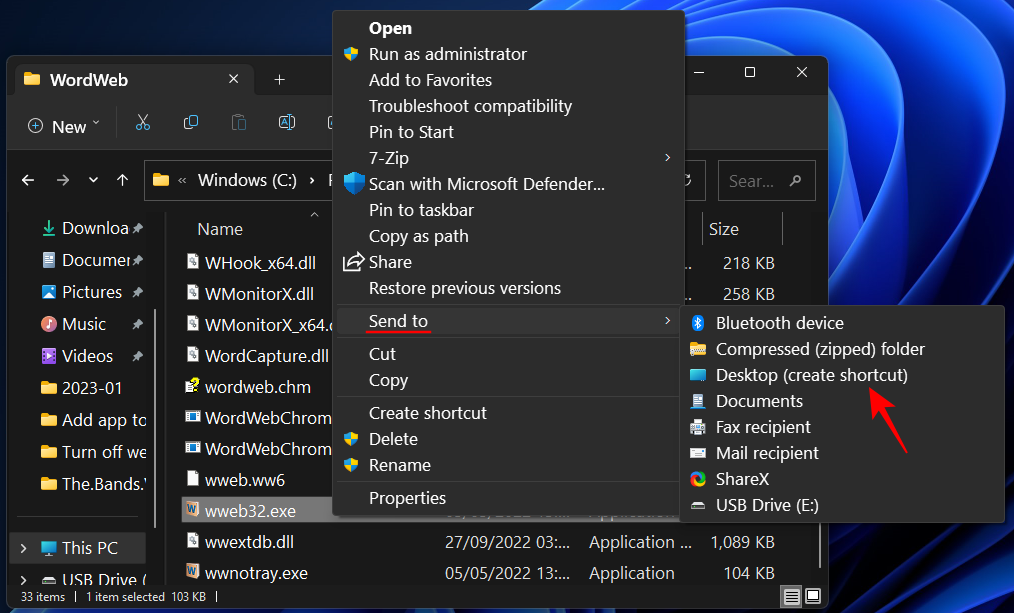
Firstly, navigate to your application’s folder, right-click on it and select Show more options.
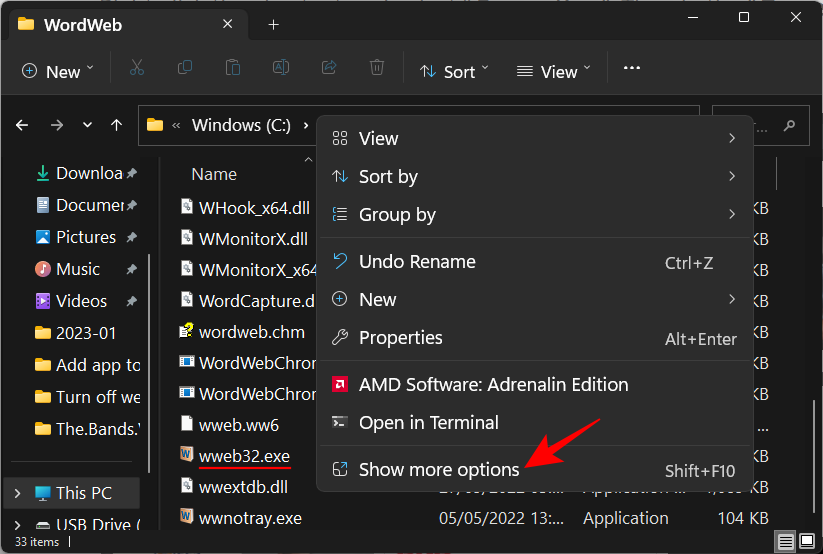
Then select Send to and then Desktop (create shortcut).
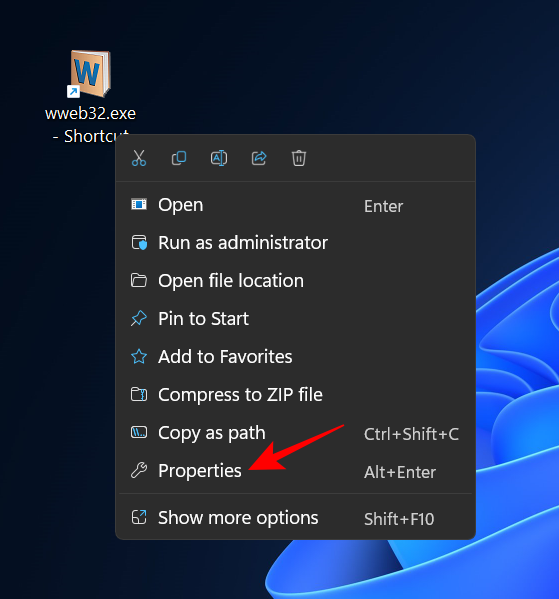
Now right-click on the shortcut and select Properties.
Next to the “Target” field, you should see the location of the application.
Bring your cursor to the beginning of the location path, then copy the following:
%windir%\system32\cmd.exe /c start "" /high
And paste it before the location of the application in the “Target” field. It should look something like this:
Then click on OK.
Now, every time you run this application using the shortcut, it will run at high priority.

Method 5: Change Processor Affinity for the high-priority app using the Task Manager
Processor affinity is not the same as the priority level of an application. Instead of shifting priorities, this option lets you decide how many CPU cores you want an application to be able to use. If you’re giving a relatively heavier app high priority, limiting its CPU core usage can help to lighten the burden on your PC so that essential services can run without any hiccups.
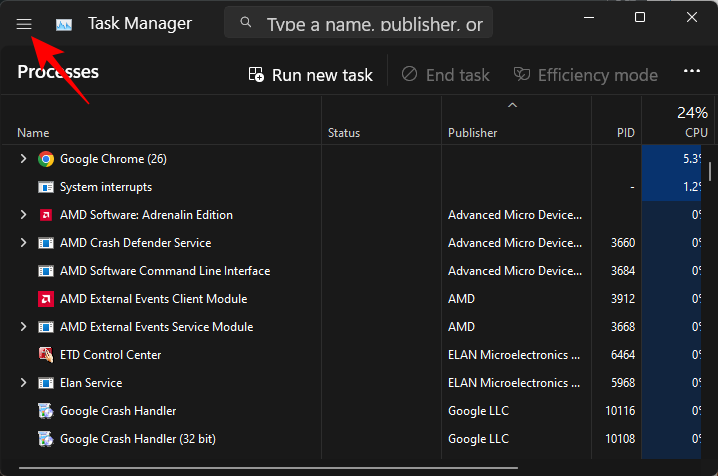
This change can be made from within the Task Manager. Press Ctrl+Shift+Esc to open it. Then click on the hamburger icon in the top left corner.
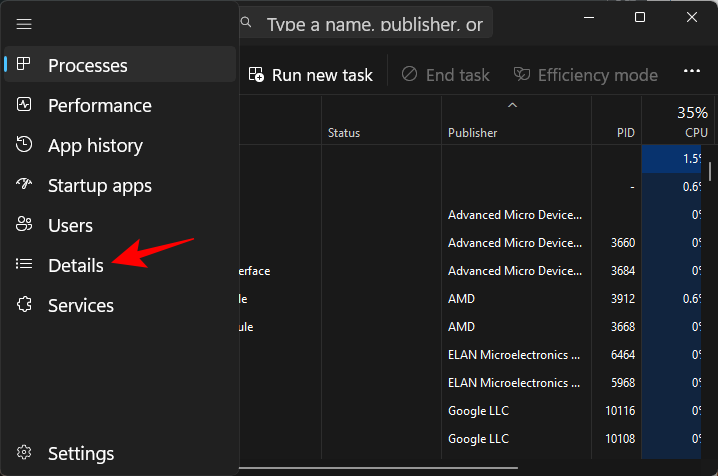
Then select Details.
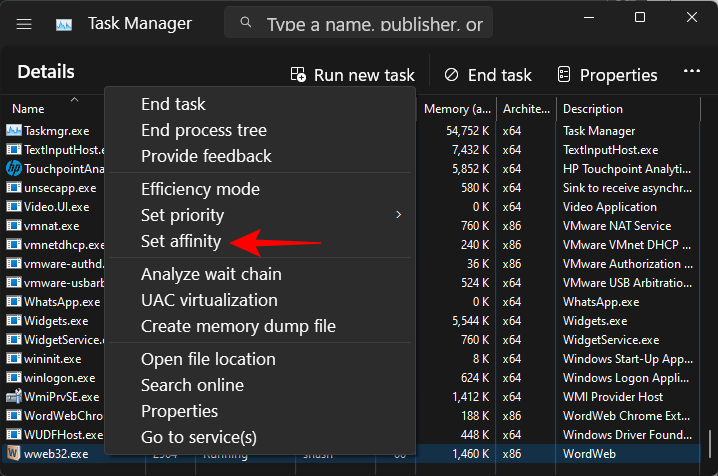
Search for your application, right-click on it and select Set affinity.
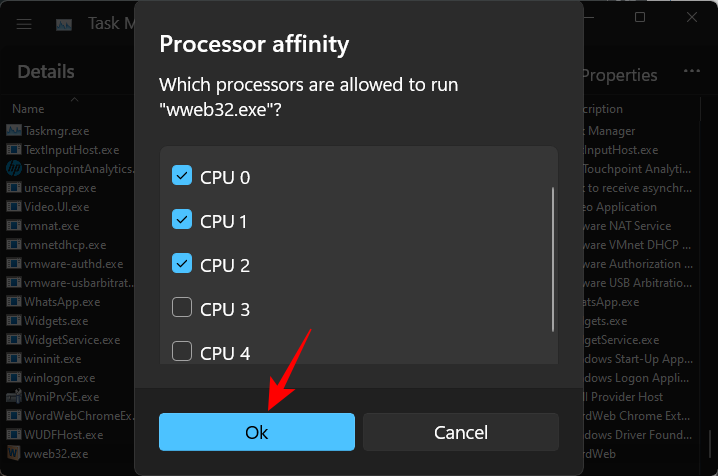
Here, limit the number of CPU cores available for the app by unchecking a few processors.

Then click OK.
Should you run an app in real time priority?
In almost all cases, the answer is a big no. Realtime priority is mostly reserved for applications that have to directly “talk” to the hardware, like the keyboard and mouse, or perform tasks that need to have minimal interruptions. If you push an app to run at realtime priority, you can almost always expect problems with Windows registering even the most basic commands.
We hope you were able to run an application at high priority in Windows 11. In most cases, doing so shouldn’t really be necessary. But you now know what to keep in mind when you must. Until next time, stay safe!
RELATED:
- What Windows 11 Services to Disable Safely and How?
- How to turn on or off the Efficiency Mode in Windows 11 for an App or Process
- 14 ways to open Command Prompt in Windows 11
- Windows 11 Widgets not working? 15 ways to fix
- How to stop Windows 11 update [7 methods explained]
In this guide, we will show you four different methods to change the priority of an app in Windows 11. Not all apps are created equal. Their requirements in terms of CPU, Memory, Graphics, and Disk Usages vary considerably, depending on its functionality as well as the domain to which it belongs. For example, video processing software would usually ask for more system resources in comparison with, say, a browser app (though Chrome could be an exception any day of the week!).
In this regard, Windows does a decent job of efficiently allocating resources to the apps running on your PC. But sometimes, it might not be in sync with your requirement as you may want to append some additional CPU prowess to an app. And in the process take away the extra processing power from the other app that might no longer require it. Fortunately, that could easily be done by changing the priority of an app in Windows 11. And in this guide, we will show you how to do just that. Follow along.
Table of Contents

There exist four different methods to carry out the said task. We have listed all four of them below. You may refer to the one that is in sync with your requirment.
Method 1: Change Priority of an App via Task Manager
- To begin with, use the Ctrl+shift+Esc shortcut keys to open the Task Manager.
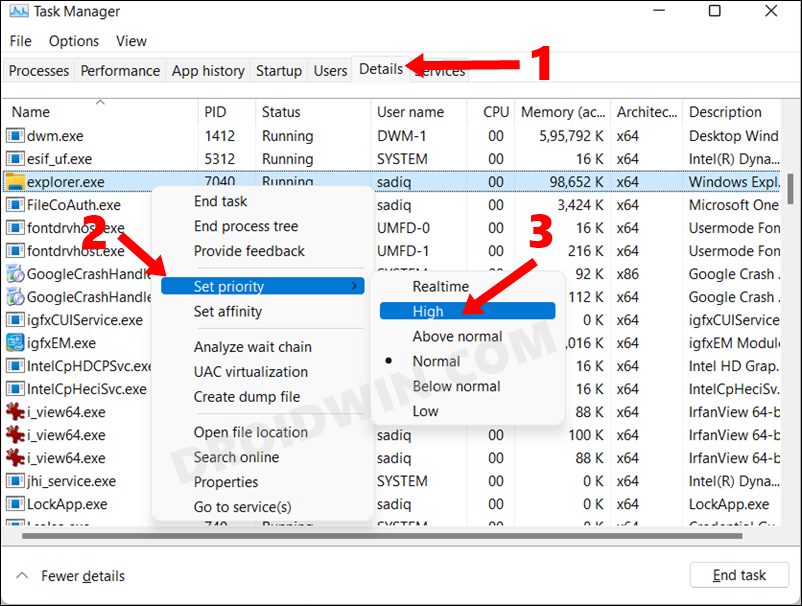
- Then go to the Details tab and select the app whose priority you need to change in Windows 11.

- Now right-click on it, select Set Priority, and choose the desired option.
- Finally, click on the Change Priority button in the confirmation dialog box that appears.
Method 2: Change the Priority of an App via Command Prompt
First off, refer to the below table and get yourself acquainted with the Priority Name and their Values
| Realtime | High | Above normal | Normal | Below normal | Low |
|---|---|---|---|---|---|
| 256 | 128 | 32768 | 32 | 16384 | 64 |
- Now head over to the Start Menu and launch Command Prompt as an administrator.
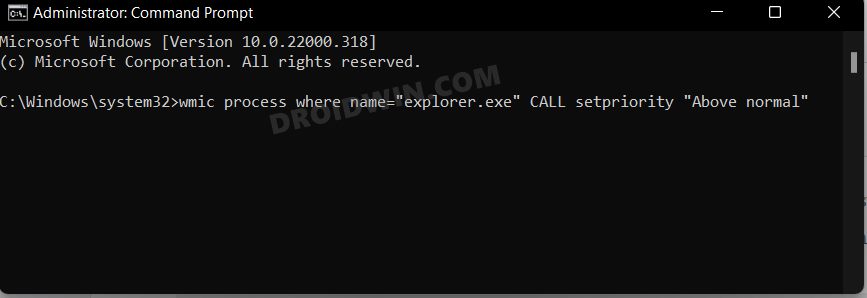
- After that, execute the below command to change the priority of an app in Windows 11. Make sure to change the name of the app and its priority accordingly
wmic process where name="explorer.exe" CALL setpriority "Above normal"

- Or if you prefer to play with numbers, then you could also replace the priority name with its numerical value using the data given in the table. As an example, our above command will now transform to:
wmic process where name="explorer.exe" CALL setpriority 32768

- The only difference between both these commands is that the priority name is written in double inverted commas, whereas the values aren’t.
Method 3: Change the Priority of an App via PowerShell
As before, get yourself acquainted with the priority names and their values using the data given below:
| Realtime | High | Above normal | Normal | Below normal | Low |
|---|---|---|---|---|---|
| 256 | 128 | 32768 | 32 | 16384 | 64 |
- Now head over to the Start Menu and launch PowerShell as an administrator.
- Then, execute the below command to change the priority of an app in Windows 11. Make sure to change the name of the app and its priority accordingly:
Get-WmiObject Win32_process -filter 'name = "explorer.exe"' | foreach-object { $_.SetPriority(32768) }
- As an example, we have used the explorer.exe process and assigned it the Above Normal Priority using its numerical value.

Method 4: Start an App with a Specific Priority in Windows 11
All the three above methods that we have discussed require you to have the app running in the background. However, that might not always prove to be the best-case scenario. So in those cases, you could directly launch an app by assigning it a specific priority beforehand. Here’s how:
- To begin with, head over to the Start Menu, search CMD, and launch it as an administrator.
- Then copy-paste the below command in the CMD window and hit Enter.
start "" /AboveNormal "C:\Windows\explorer.exe"

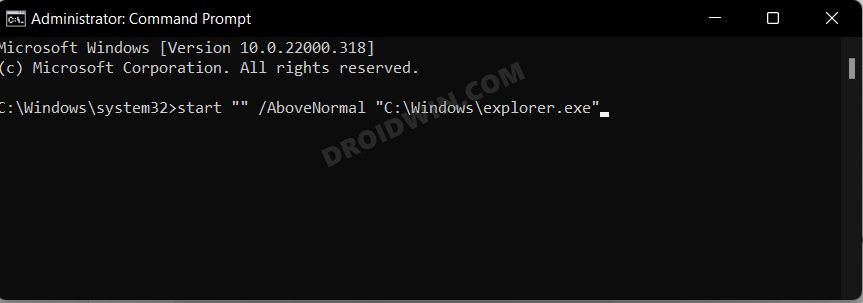
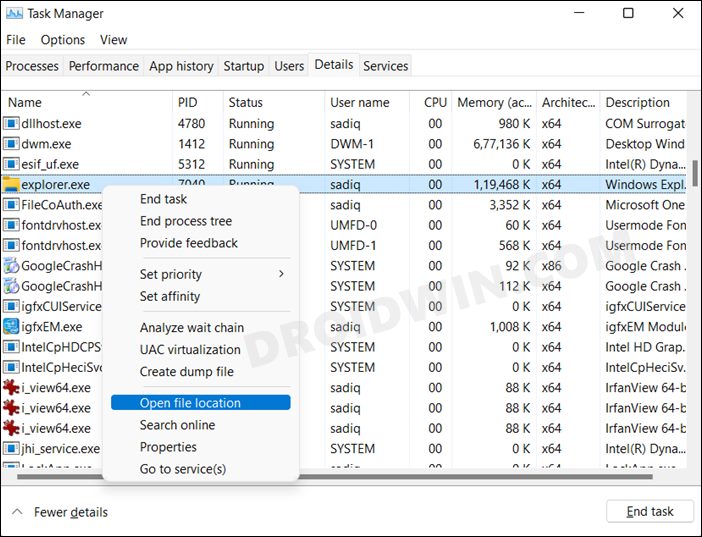
Make sure to change the priority name and the location of your app’s EXE file accordingly. To find the app’s EXE file location, open Task Manager, go to the Details tab, right-click on the desired EXE file, and select Open File Location. You will now be taken to that EXE’s file location, whose address you could copy from the File Explorer’s address bar.
So these were the four different methods through which you could change the priority of an app in Windows 11. If you have any queries concerning the aforementioned steps, do let us know in the comments. We will get back to you with a solution at the earliest.
- How to Uninstall Apps using Command Prompt (CMD) or Powershell in Windows 11
- How to Replace PowerShell with Command Prompt in Windows 11
- Fix: Task Manager not opening or working in Windows 11
- How to Install (or Reinstall) Microsoft Store in Windows 10/11