

StartAllBack Activator
Allows you to generate and activate a copy of StartAllBack v3.x.
About
StartAllBack replaces the Windows 11 menu with a more traditional Start menu. You can choose among three different menus, customize the menu with different colors and themes, and even spruce up the Taskbar and File Explorer.
Be aware that there are different programs for different versions of Windows. If you are looking to restore the start menu in Windows 8 & 10, check out StartIsBack.
| Program | Operating System |
|---|---|
| StartIsBack | Windows 8, 10 |
| StartAllBack | Windows 11 |
This generator has been developed to work on the following versions:
- StartIsBack v2.x
Notice
Developer holds no responsibility with what people decide to do with this app. It was developed strictly for demonstration purposes only.
Developed under the following conditions:
- Visual Studio 2022 (17.6.5)
- v4.8.0 .NET Framework
- C# language
Usage
If you wish to simply use the keygen, head over to the Releases section and download the latest binary as a zip or rar. The download is a single exe.
SABActivator.exe
Build
Download the source files and launch the .csproj project file in Visual Studio.
If you decide to modify or re-build my code, you are to not re-distribute. These sources are for learning purposes and should not be used in order to take advantage of others.
Signed Releases
As of v1.0.0.0 and onwards, binaries are GPG signed with the key CB5C4C30CD0D4028. You can find the key available on most keyservers:
- pgp.mit.edu
- keyserver.ubuntu.com
- keys.openpgp.org
Binaries are also signed with a certificate which has the Thumbprint 70575bdfb02b3f1b45a37431bef9a8c9933a4ace. If you downloaded this elsewhere on the internet and the binary is not signed with that certificate serial number; IT IS NOT MINE. You should delete it.
Virus Scans
Unfortunately, virus scanners such as VirusTotal can report false positives. There’s not much control I have over that. These websites will also attempt to detect keygens; sometimes you can get by it, and sometimes you can’t.
The only option I’d have is to contact these websites and tell them that it’s a false positive, but I’m writing a keygen; I highly doubt they’re going to be happy with doing anything.
I scanned with Windows Defender and it reported that the files are clean.
- VirusTotal
- Jotti
- MetaDefender
Previews

Windows 11 кому-то нравится, кому-то — нет, но что о ней можно сказать точно: изменения в части меню Пуск, работы и настроек панели задач и некоторые другие интерфейсные решения сомнительны. Действия, которые ранее были привычны: изменение размера значков в панели задач, её перемещение наверх, влево или вправо, теперь просто так не выполнить.
StartAllBack — простая в использовании и очень функциональная программа для тех, кто хочет настроить меню Пуск в Windows 11 под себя, вернув ему более «классический вид», а также вернуть возможность полноценно настраивать панель задач. Утилита не бесплатная, но первые 30 дней полностью функциональна, что позволит решить, нужна ли она вам. Другие программы для включения классического меню Пуск Windows 11.
Использование StartAllBack в Windows 11, доступные функции

Скачать бесплатную пробную версию StartAllBack можно с официального сайта — https://www.startallback.com. После почти моментальной установки программы, откроется её главное окно на русском языке, где вы можете выбрать один из предустановленных наборов настроек.
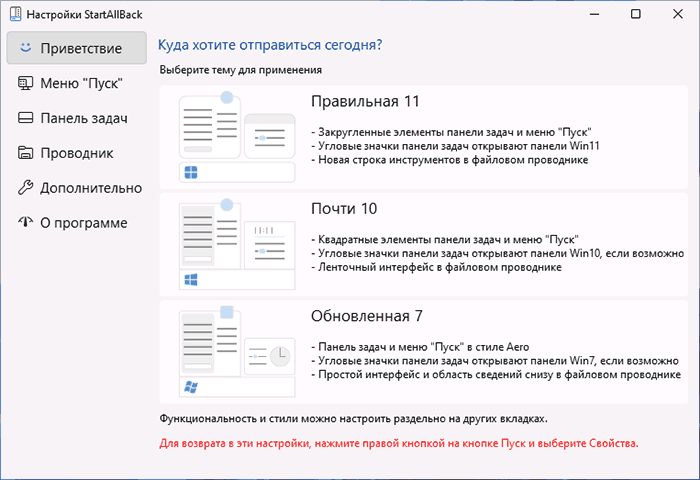
Темы, которые влияют на внешний вид меню Пуск, панели задач и оформление ленты действий в проводнике:
- Правильная 11 — меню пуск приобретает структуру меню Пуск Windows 7, сохраняя современное оформление, строка инструментов в Проводнике не меняется, панели, открываемые при нажатии по значкам в области уведомлений — тоже.
- Почти 10 — почти то же, что и в первом варианте, но меню Пуск без закругленных углов, а в Проводнике — ленточный интерфейс из Windows 10.

- Обновленная 7 — меню Пуск почти как в 7-ке, простой интерфейс действий и отображение области сведений в Проводнике, для части значков в области уведомлений (например, для даты и времени) всплывающие панели отображаются в «старом стиле».


Указанные предустановленные наборы настроек можно изменять на своё усмотрение в соответствующих разделах StartAllBack:
- Меню Пуск — выбор стиля оформления, изменение размера значков и их количества и другие настройки.

- Панель задач — размер значков на панели задач, внешний вид кнопки «Пуск» (можно загрузить свою), расположение панели задач: снизу, сверху или вертикальная панель задач Windows 11 — слева или справа, отключение группировки значков на панели задач, прозрачность, размещение значков по центру или ближе к кнопке «Пуск».
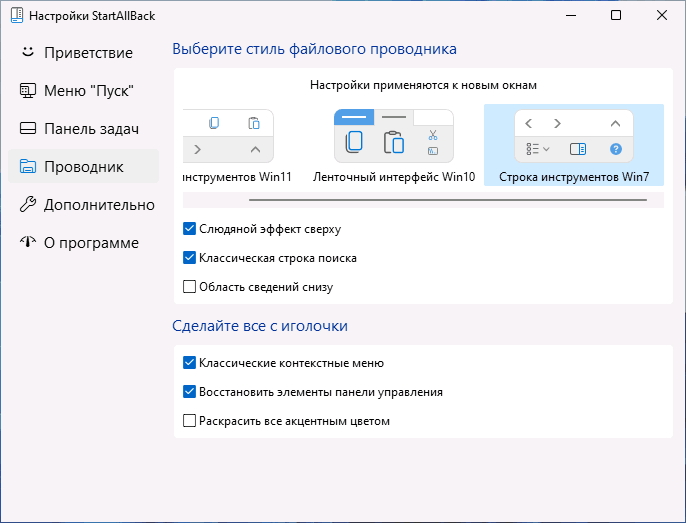
- Проводник — настройка вида ленты в проводнике, включение классического контекстного меню.
- Дополнительно — настройка цвета и прозрачности меню Пуск, настройка цвета и прозрачности панели задач, некоторые дополнительные параметры.


В любой момент времени вы можете вернуться к настройкам StartAllBack, нажав правой кнопкой мыши по кнопке «Пуск» и выбрав пункт «Свойства».
Как итог, если вы хотите вернуть более привычное меню Пуск и возможность настраивать панель задач в Windows 11 — StartAllBack будет одним из лучших вариантов для этих целей.
-
Следите за новостями и обновлениями: https://vk.com/resourceworld
StartAllBack 3.9.1 для Windows 11 + активация
2025-01-20
-
Автор
АвторBatist
-
Дата создания
Дата создания
Довольно многим пользователям после выхода операционной системы Windows 11 не понравилось стандартное обновленное меню пуск. Многие хотели бы вернуть прежнее меню, и теперь благодаря программе StartAllBack, такая возможность есть. Достаточно установить эту программу, и можно вернуть старое меню пуск от предыдущих версий Windows. Программа предлагает три варианта: «Правильная 11», «Почти 10» и «Обновленная 7». Думаю, из названия не сложно догадаться что значит каждый из представленных вариантов.
Кстати говоря, приложение так же возвращает всем привычное меню правой кнопки мышки, то есть контекстное меню. Лично я так и не смог привыкнуть к новому, поэтому решил включить старое. Кстати я долго не хотел переходить на WIndows 11 именно из-за этого. Кроме этого приложение позволяет дополнительно настроить все под свой вкус, имею ввиду какие папки и значки отображать, а какие нет. Думаю вам понятно в общих чертах для чего нужна эта программа, от себя могу добавить что работать за компьютером благодаря ей стало на много привычнее.
Теперь внесу ясность об активации StartAllBack, дело в том, что ключ встроен в установщик. Таким образом, сразу же после установки, программа становится активированной. В общем ей можно начинать пользоваться безо всяких ограничений по функционалу. Единственное в ней будут отключены обновления, это необходимо для того, чтобы регистрация не слетала.
Размер: 1.63 Mb
Язык: на русском
Активация: есть ключ
Windows 11 is the latest iteration of Microsoft’s popular operating system, featuring a refreshed user interface and several new features. While Windows 11 comes with its own Start Menu, some users prefer a more customizable and feature-rich Start Menu experience. StartAllBack is a third-party tool designed to enhance and customize the Start Menu on Windows 11, offering additional functionality and customization options.
In this detailed guide, we will walk you through the process of installing StartAllBack on Windows 11 and show you how to use its features effectively. Whether you’re looking to customize your Start Menu layout, add new features, or improve your overall Windows 11 experience, StartAllBack provides a range of options to suit your preferences.
Part 1: Installing StartAllBack
Before you can start customizing your Start Menu with StartAllBack, you need to install the software on your Windows 11 system. Follow these steps to install StartAllBack:
Step 1: Download StartAllBack
- Open your web browser and navigate to the official StartAllBack website (https://www.startallback.com/).
- On the website, locate the download link for StartAllBack compatible with Windows 11 and click on it to initiate the download.
Step 2: Run the Installer
- Once the download is complete, locate the downloaded installer file (typically in your Downloads folder) and double-click on it to run the installation wizard.
- Follow the on-screen instructions in the installation wizard to proceed with the installation. You may need to grant administrative permissions to complete the installation process.
Step 3: Activate StartAllBack
- After the installation is complete, launch StartAllBack from your Start Menu or desktop shortcut.
- If you have a license key or activation code for StartAllBack, enter it when prompted to activate the software. If you don’t have a license key, you may be able to use StartAllBack in trial mode with limited features.
Part 2: Customizing StartAllBack Settings
Once StartAllBack is installed and activated on your Windows 11 system, you can begin customizing its settings to tailor your Start Menu experience. Here’s how to customize StartAllBack settings:
Step 1: Access StartAllBack Settings
- Right-click on the Start button or press
Windows + Xon your keyboard to open the power user menu. - From the menu, select “StartAllBack Settings” to open the StartAllBack configuration window.
Step 2: Customize Start Menu Layout
- In the StartAllBack Settings window, navigate to the “Start Menu” tab.
- Here, you can customize various aspects of the Start Menu, such as the layout, appearance, and behavior.
- Use the options provided to customize the Start Menu layout, including the number of columns, icon sizes, and grouping settings.
Step 3: Customize Taskbar Settings
- Switch to the “Taskbar” tab in the StartAllBack Settings window.
- Customize taskbar settings such as icon size, taskbar position, visibility of system tray icons, and more.
- Adjust these settings according to your preferences to optimize your taskbar layout and functionality.
Step 4: Explore Additional Settings
- Explore other tabs in the StartAllBack Settings window to access additional customization options.
- Depending on your needs, you can customize features such as search behavior, appearance tweaks, and advanced settings.
Step 5: Apply Changes
- After customizing StartAllBack settings to your liking, click on the “Apply” or “Save” button to apply the changes.
- Close the StartAllBack Settings window to return to your desktop with the customized Start Menu and taskbar settings.
Part 3: Using StartAllBack Features
StartAllBack offers several features beyond basic Start Menu customization. Here are some key features and how to use them effectively:
1. Enhanced Start Menu
StartAllBack enhances the Windows 11 Start Menu by providing additional customization options, including layout adjustments, icon resizing, grouping options, and more. To use these features:
- Right-click on the Start button or press
Windowson your keyboard to open the Start Menu. - Customize the Start Menu layout by dragging and resizing tiles, adjusting groups, and organizing apps and shortcuts.
2. Taskbar Enhancements
StartAllBack allows you to customize the Windows 11 taskbar with features such as:
- Icon resizing: Right-click on an empty space in the taskbar, go to “Taskbar settings,” and adjust the “Taskbar items” size.
- Taskbar position: Right-click on an empty space in the taskbar, go to “Taskbar settings,” and choose the taskbar position (bottom, top, left, or right).
- System tray customization: Customize the visibility of system tray icons and notification area items in StartAllBack Settings.
3. StartAllBack Search
StartAllBack includes an enhanced search feature that allows you to quickly find apps, files, settings, and more. To use StartAllBack Search:
- Click on the Start button or press
Windowson your keyboard to open the Start Menu. - Begin typing your search query, and StartAllBack will display relevant results in real time.
4. Additional Tweaks and Features
Explore StartAllBack’s additional tweaks and features in the StartAllBack Settings window, including:
- Appearance customization: Change the Start Menu and taskbar appearance with options for transparency, colors, and themes.
- Advanced settings: Access advanced settings for power users, including custom hotkeys, taskbar behavior, and more.
Part 4: Troubleshooting StartAllBack Issues
While StartAllBack is designed to enhance your Windows 11 experience, you may encounter occasional issues or compatibility challenges. Here are some troubleshooting steps to resolve common StartAllBack issues:
1. Update StartAllBack
Ensure that you are using the latest version of StartAllBack by checking for updates on the official website or within the StartAllBack Settings.
2. Check Compatibility
Verify that your system meets the minimum requirements for StartAllBack and that there are no conflicts with other installed software or system configurations.
3. Reinstall StartAllBack
If you encounter persistent issues, consider uninstalling and reinstalling StartAllBack to resolve any potential installation or configuration errors.
4. Contact Support
If you continue to experience issues with StartAllBack, reach out to StartAllBack support for assistance. Provide detailed information about the problem, including error messages or symptoms, to facilitate troubleshooting.
Conclusion
StartAllBack is a powerful tool for customizing and enhancing the Start Menu and taskbar experience on Windows 11. By following the steps outlined in this guide, you can install StartAllBack, customize its settings, explore its features, and troubleshoot common issues effectively. Whether you’re looking to improve productivity, personalize your desktop layout, or add new functionality to Windows 11, StartAllBack provides a range of options to suit your needs. Experiment with different settings and features to create a Windows 11 environment that fits your workflow and preferences seamlessly.