
Switching to HDMI on a laptop running Windows 10 is a common task for many users. HDMI, short for High Definition Multimedia Interface, allows for the transfer of audio and video data from your laptop to an external display or television. This is particularly useful when you want to connect your laptop to a larger screen for presentations, gaming, or watching movies.
In this blog post, we will explore various methods you can use to switch to HDMI on your Windows 10 laptop. Whether you are using a dedicated HDMI port or an adapter, we will provide step-by-step instructions and tips to ensure a smooth and hassle-free experience. So, let’s dive in and explore the different ways to switch to HDMI on your laptop!
Video Tutorial:
What’s Needed
Before we begin, let’s take a look at what you’ll need to switch to HDMI on your Windows 10 laptop:
- A Windows 10 laptop with an HDMI port or an HDMI adapter
- An HDMI cable
- An external display or television with an HDMI input
- Optional: An additional audio cable if you want to connect separate speakers
Make sure you have all the necessary equipment ready before proceeding with any of the methods we will discuss.
What Requires Your Focus?
Switching to HDMI on your laptop requires your focus and attention to detail. You will need to follow the steps carefully and ensure that all the connections are made correctly for a successful switch to HDMI. Pay close attention to the specific instructions for your laptop model as some manufacturers may have slightly different processes.
Additionally, you should also ensure that your HDMI cable is in good condition and not damaged. A faulty cable can result in a poor connection or no connection at all, so it’s important to use a reliable HDMI cable for the best results.
Method 1. How to Switch to HDMI via Dedicated HDMI Port
If your laptop has a dedicated HDMI port, follow these steps to switch to HDMI:
- Ensure that your laptop and the external display or television are powered on.
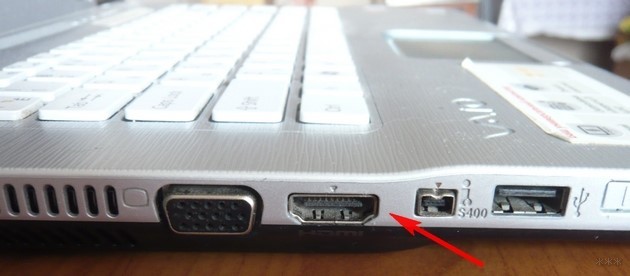
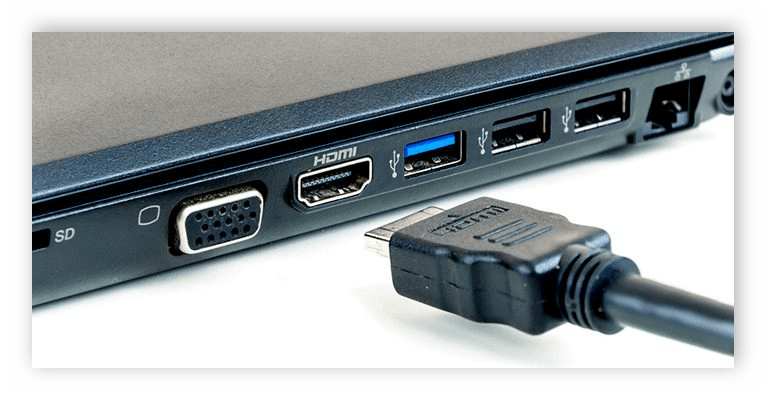
- Locate the HDMI port on your laptop. It is usually labeled «HDMI» and may be located on the side or back of your laptop.
- Connect one end of the HDMI cable to the HDMI port on your laptop.
- Connect the other end of the HDMI cable to the HDMI input on your external display or television.
- On your laptop, press the Windows key + P on your keyboard to open the «Project» menu.
- In the «Project» menu, select «Duplicate» or «Second screen only» to switch to HDMI.
- Your laptop’s display should now appear on the external display or television via HDMI.
- To switch back to your laptop’s display, use the Windows key + P shortcut again and select «PC screen only.«
| Pros | Cons |
|---|---|
| 1. Easy and straightforward process to connect via a dedicated HDMI port. | 1. Limited availability of dedicated HDMI ports on some laptop models. |
| 2. No additional adapters or cables required. | 2. May require adjusting display settings for optimal resolution and screen size. |
| 3. Allows seamless mirroring or extending of your laptop’s display to an external screen. | 3. The length of the HDMI cable may limit the distance between your laptop and the external display. |
Method 2. How to Switch to HDMI via HDMI Adapter
If your laptop does not have a dedicated HDMI port, you can use an HDMI adapter to switch to HDMI:
- Ensure that your laptop and the external display or television are powered on.
- Check the available ports on your laptop and determine the type of adapter you need (e.g., USB-C to HDMI adapter, DisplayPort to HDMI adapter).
- Purchase the appropriate HDMI adapter based on your laptop’s available ports.
- Connect the HDMI cable to the HDMI input on the adapter.
- Connect the other end of the HDMI cable to the HDMI input on your external display or television.
- Connect the adapter to your laptop’s available port.
- On your laptop, press the Windows key + P on your keyboard to open the «Project» menu.
- In the «Project» menu, select «Duplicate» or «Second screen only» to switch to HDMI.
- Your laptop’s display should now appear on the external display or television via HDMI.
- To switch back to your laptop’s display, use the Windows key + P shortcut again and select «PC screen only.«
| Pros | Cons |
|---|---|
| 1. Allows switching to HDMI even if your laptop does not have a dedicated HDMI port. | 1. The need for an additional adapter adds complexity and cost. |
| 2. Provides flexibility to connect to different types of external displays or televisions. | 2. Some adapters may require driver installation or software configuration. |
| 3. Supports display mirroring or extending of your laptop’s display to an external screen. | 3. The length of the HDMI cable may limit the distance between your laptop and the external display. |
Method 3. How to Switch to HDMI via USB to HDMI Adapter
If your laptop has a USB port but no dedicated HDMI or DisplayPort, you can use a USB to HDMI adapter:
- Ensure that your laptop and the external display or television are powered on.
- Purchase a USB to HDMI adapter from a reputable manufacturer.
- Install any necessary drivers or software that come with the USB to HDMI adapter.
- Connect the USB end of the adapter to an available USB port on your laptop.
- Connect one end of the HDMI cable to the HDMI input on the adapter.
- Connect the other end of the HDMI cable to the HDMI input on your external display or television.
- On your laptop, press the Windows key + P on your keyboard to open the «Project» menu.
- In the «Project» menu, select «Duplicate» or «Second screen only» to switch to HDMI.
- Your laptop’s display should now appear on the external display or television via HDMI.
- To switch back to your laptop’s display, use the Windows key + P shortcut again and select «PC screen only.«
| Pros | Cons |
|---|---|
| 1. Enables HDMI connectivity on laptops with only USB ports. | 1. The need for an additional adapter adds complexity and cost. |
| 2. Can provide high-quality audio and video output. | 2. Some USB to HDMI adapters may have limited compatibility with certain laptop models. |
| 3. Supports display mirroring or extending of your laptop’s display to an external screen. | 3. The length of the HDMI cable may limit the distance between your laptop and the external display. |
Method 4. How to Switch to HDMI via Wireless Display Adapter
If you prefer a wireless solution, you can use a wireless display adapter to switch to HDMI:
- Ensure that your laptop and the external display or television are powered on.
- Purchase a wireless display adapter compatible with Windows 10, such as the Microsoft Wireless Display Adapter.
- Follow the manufacturer’s instructions to set up the wireless display adapter.
- On your laptop, click on the «Action Center» icon in the taskbar (usually located in the lower-right corner).
- In the «Action Center,» click on «Connect» to search for available wireless display adapters.
- Select the wireless display adapter from the list of available devices.
- Your laptop’s display should now appear on the external display or television via HDMI wirelessly.
- To switch back to your laptop’s display, simply disconnect from the wireless display adapter.
| Pros | Cons |
|---|---|
| 1. Provides a wireless solution for switching to HDMI. | 1. Wireless display adapters may have limited range and can be affected by signal interference. |
| 2. Easy setup and connection process. | 2. Wireless display adapters may have a higher cost compared to traditional HDMI cables or adapters. |
| 3. Supports display mirroring or extending of your laptop’s display to an external screen. | 3. Some wireless display adapters may have compatibility issues with certain laptop models. |
Why Can’t I Switch to HDMI?
There can be multiple reasons why you might not be able to switch to HDMI on your laptop. Here are some common reasons and their fixes:
- The HDMI cable is not properly connected. Check the connections and ensure they are secure.
- The external display or television is not set to the correct HDMI input. Use the display settings on the external device to select the HDMI input.
- The HDMI port on your laptop is not working. Try using a different HDMI port if available or use one of the alternative methods discussed above.
Q1: Why is there no sound after switching to HDMI?
A: If you are not getting any sound after switching to HDMI, it could be due to the audio settings on your laptop. Follow these steps to fix it:
- Right-click on the volume icon in the taskbar and select «Sounds.«
- In the «Playback» tab, select the HDMI output as the default audio device.
- Click «Apply» and then «OK» to save the changes.
- If you still don’t hear any sound, try adjusting the volume settings on the external display or television as well.
Q2: Why is my laptop screen flickering after switching to HDMI?
A: If your laptop screen is flickering after switching to HDMI, it could be a compatibility issue between your laptop and the external display or television. Try the following steps to resolve the issue:
- Disconnect the HDMI cable from your laptop.
- Restart your laptop.
- Reconnect the HDMI cable and switch to HDMI again.
- If the issue persists, try using a different HDMI cable or consult the manufacturer’s support for further assistance.
Q3: Why is the image on the external display or television blurry?
A: Blurry image on an external display or television can be caused by incorrect display settings. Adjust the display settings on your laptop to achieve the optimal resolution and screen size for the external screen. You can do this by following these steps:
- Right-click on the desktop and select «Display settings.«
- In the «Display settings» menu, adjust the resolution and scaling options to match the capabilities of your external display or television.
- Click «Apply» and then «OK» to save the changes.
- If the image is still blurry, check the display settings on the external device and make any necessary adjustments.
Implications and Recommendations
Switching to HDMI on your Windows 10 laptop opens up a world of possibilities for enhanced multimedia experiences and productivity. Here are some implications and recommendations to consider:
- Take advantage of the extended screen real estate: With HDMI, you can connect your laptop to a larger monitor or TV, giving you more screen space for multitasking or viewing content in high-definition.
- Improve your gaming experience: If you’re a gamer, connecting your laptop to a larger screen via HDMI can provide a more immersive and visually stunning gaming experience.
- Enhance your presentations: HDMI allows you to effortlessly share your laptop screen during presentations, making it easier to showcase your work to a larger audience.
5 FAQs about Switching to HDMI
Q1: Can I switch to HDMI on a laptop without Windows 10?
A: Yes, you can switch to HDMI on a laptop without Windows 10. The steps may vary depending on the operating system you are using, but the concept remains the same. Consult the documentation or support resources for your specific operating system for more information.
Q2: Can I extend my laptop’s display to multiple external screens using HDMI?
A: Yes, you can extend your laptop’s display to multiple external screens using HDMI. However, the capability to do so may depend on your laptop’s graphics card and the specific settings available in your operating system. Consult the documentation or support resources for your laptop and operating system for more information on multi-monitor support.
Q3: Can I switch to HDMI on a laptop with a VGA port?
A: Yes, you can switch to HDMI on a laptop with a VGA port by using a VGA to HDMI adapter. This adapter converts the VGA signal to HDMI, allowing you to connect to an HDMI display or television. Follow the instructions provided with the adapter to make the connection and switch to HDMI.
Q4: Are there any performance differences between the different methods to switch to HDMI?
A: In general, the performance differences between the different methods to
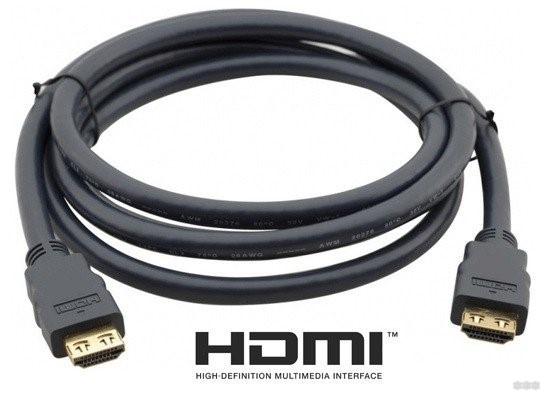
HDMI – это интерфейс мультимедийного подключения, позволяющий передать картинку высокого качества со звуком от графической карты на дисплей. Этот интерфейс стал стандартом за последние 10 лет, поэтому им оснащают все современные дисплеи. В рамках этой инструкции рассмотрим подключение таких дисплеев через HDMI на ноутбуке.
Содержание
- Особенности подключения
- Инструкция соединения
- Возможные неполадки
- Почему HDMI порт боится выгорания?
- Заключение
- Задать вопрос автору статьи
Особенности подключения
Интерфейс HDMI позволяет передавать изображение и звук на дисплеи в высоком разрешении (даже 8K). Но, чтобы сигнал при передаче не терялся, и картинка не искажалась, длина кабеля должна быть не более 5 метров.
Интерфейс с момента своего создания (2002 год) прошел несколько стадий развития. Но чем он примечательный, так тем, что кабели и порты новых версий обратно совместимы со старыми. Последняя спецификация 2.1 выпущена в 2017 году. Она поддерживает экраны до 10K, при этом частота обновления достигает до 120 Гц. Имеет пропускную способность до 48 Гбит/сек.
Подключать между собой нужно отключенные от электропитания устройства, чтобы не спалить порты.
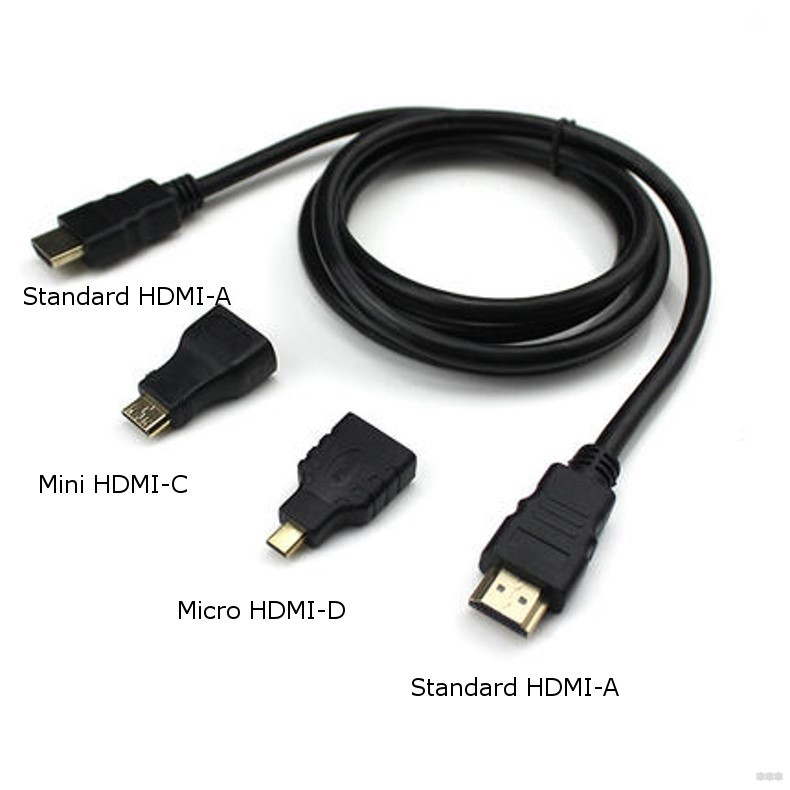
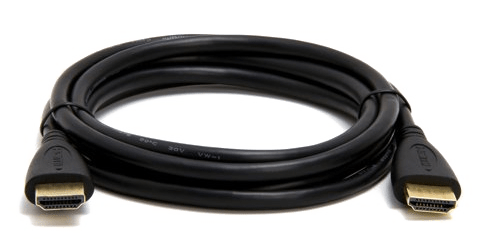
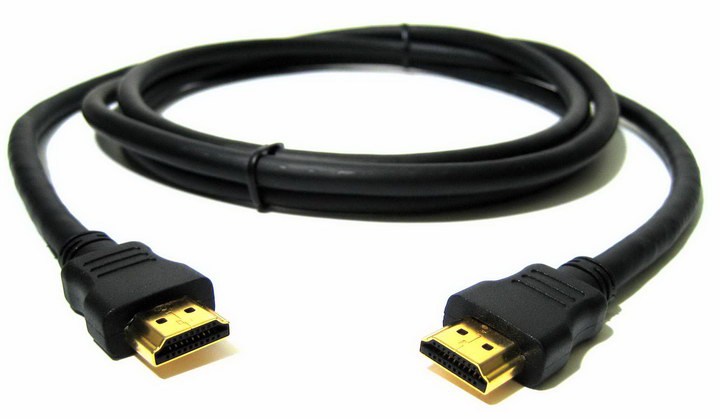
Подключение происходит с помощью кабеля HDMI папа-папа, но при отсутствии разъема на дисплее можно воспользоваться переходниками:
- HDMI (ноутбук) – DVI (дисплей).
- HDMI – Display Port.
- Display Port – HDMI.
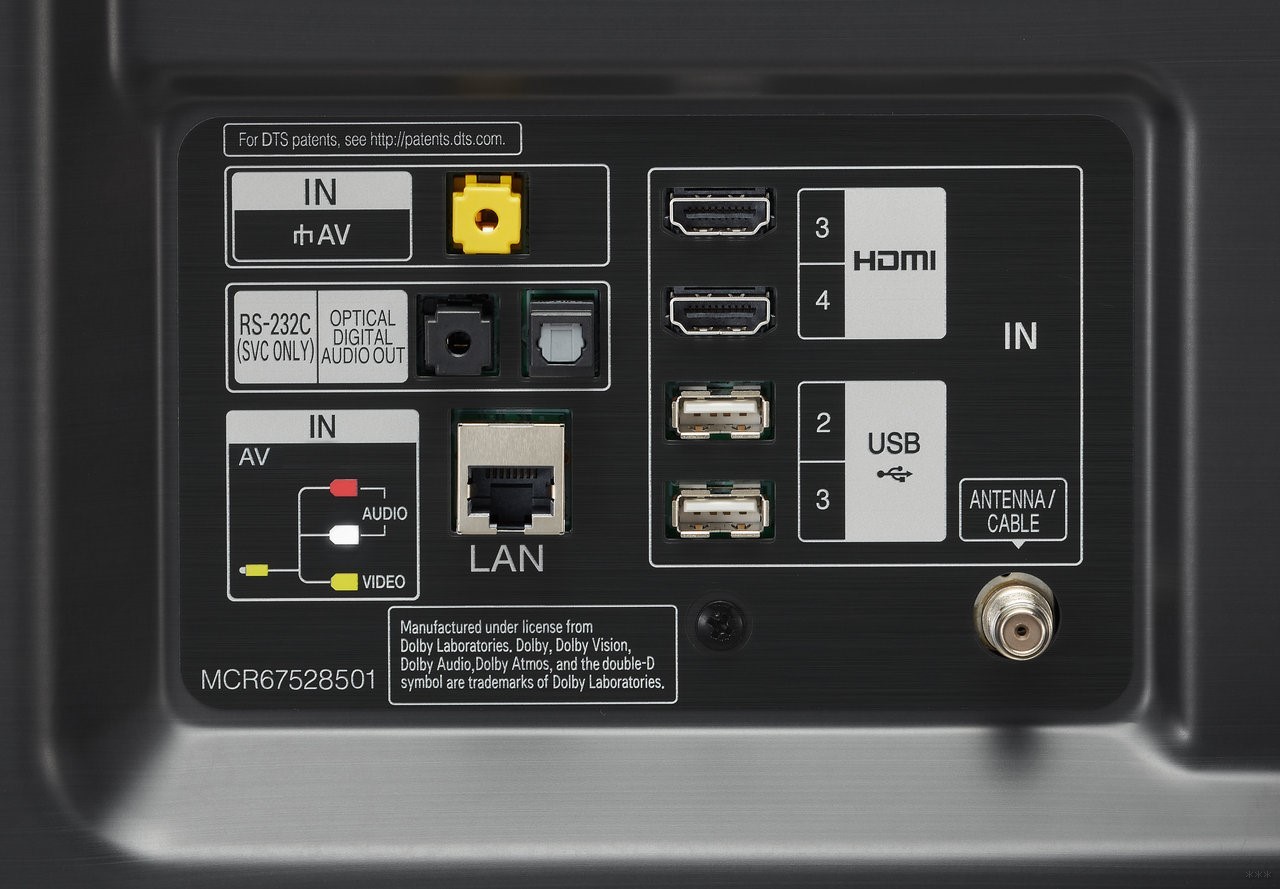
Порт HDMI ищите на боковых или задней части ноутбука. Этот же разъем в мониторе и в телевизоре находится сзади, но иногда может выводится с лицевой стороны, снизу.
Если подключаете ноутбук к какому-либо миниатюрному устройству, в котором используется уменьшенный разъем интерфейса, просто к кабелю докупите комплект переходников.
Если подключаете дисплей к ноутбуку через разъем HDMI, картинка на нем появится во время загрузки операционной системы Windows. Если этого не произошло, следует выставить тот параметр работы с экранами, который нужен вам в настройках ОС.
Инструкция соединения
Инструкция в формате видео доступна тут:
Чтобы подключить ноутбук к монитору или телевизору через выход HDMI, нужно:
- Выключить устройства.
- Если соединяете с телевизором, а к нему подключено кабельное TV, обязательно отключайте и его (защитите свои порты от выгорания!).
- Подключить порт первого и второго устройства кабелем.
- Включить дисплей и загрузить операционную систему ноутбука.
- В этот момент должна появиться картинка на втором экране. В настройках дисплея (с несколькими каналами вывода информации) выберите нужный.
- Если нет изображения или надо настроить другой вариант отображения информации, нажмите + I и перейдите в раздел «Система» – «Дисплей».
- Опуститесь вниз к разделу «Дисплей» и выберите один из четырех вариантов отображения.
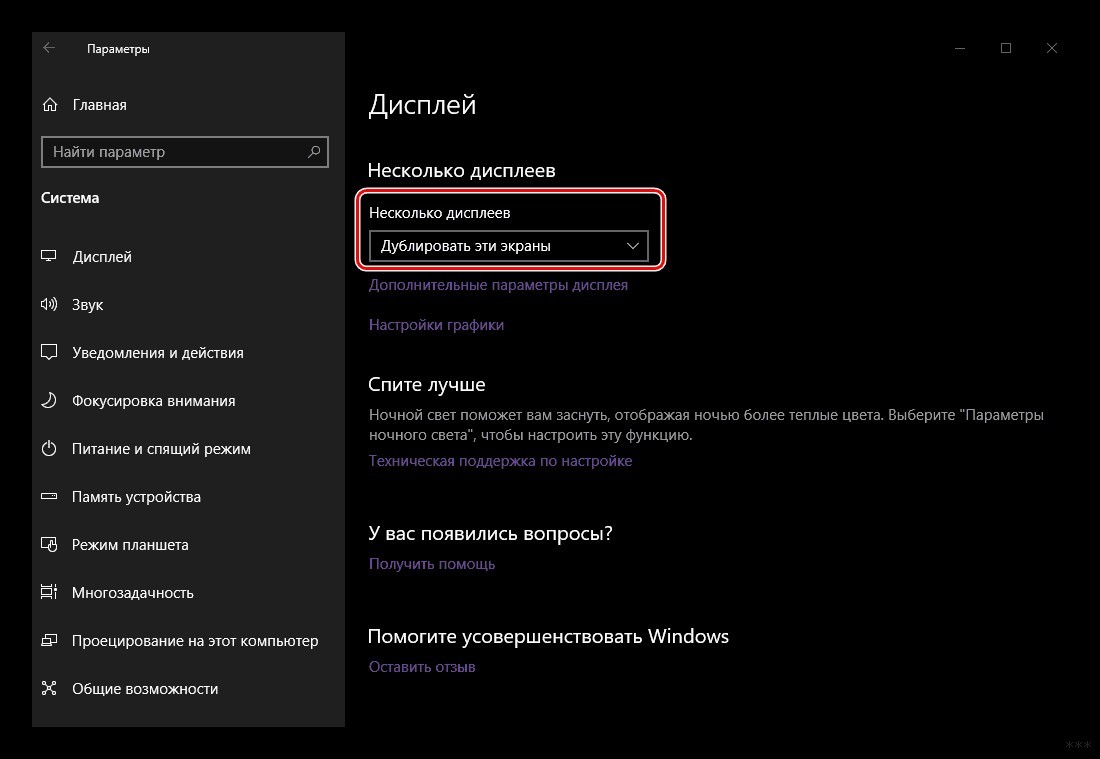
- Среди доступных есть: дублировать эти экраны, расширить видимую область, картинка только на главном (на экране ноутбука), картинка только на втором экране (на подключенном дисплее).
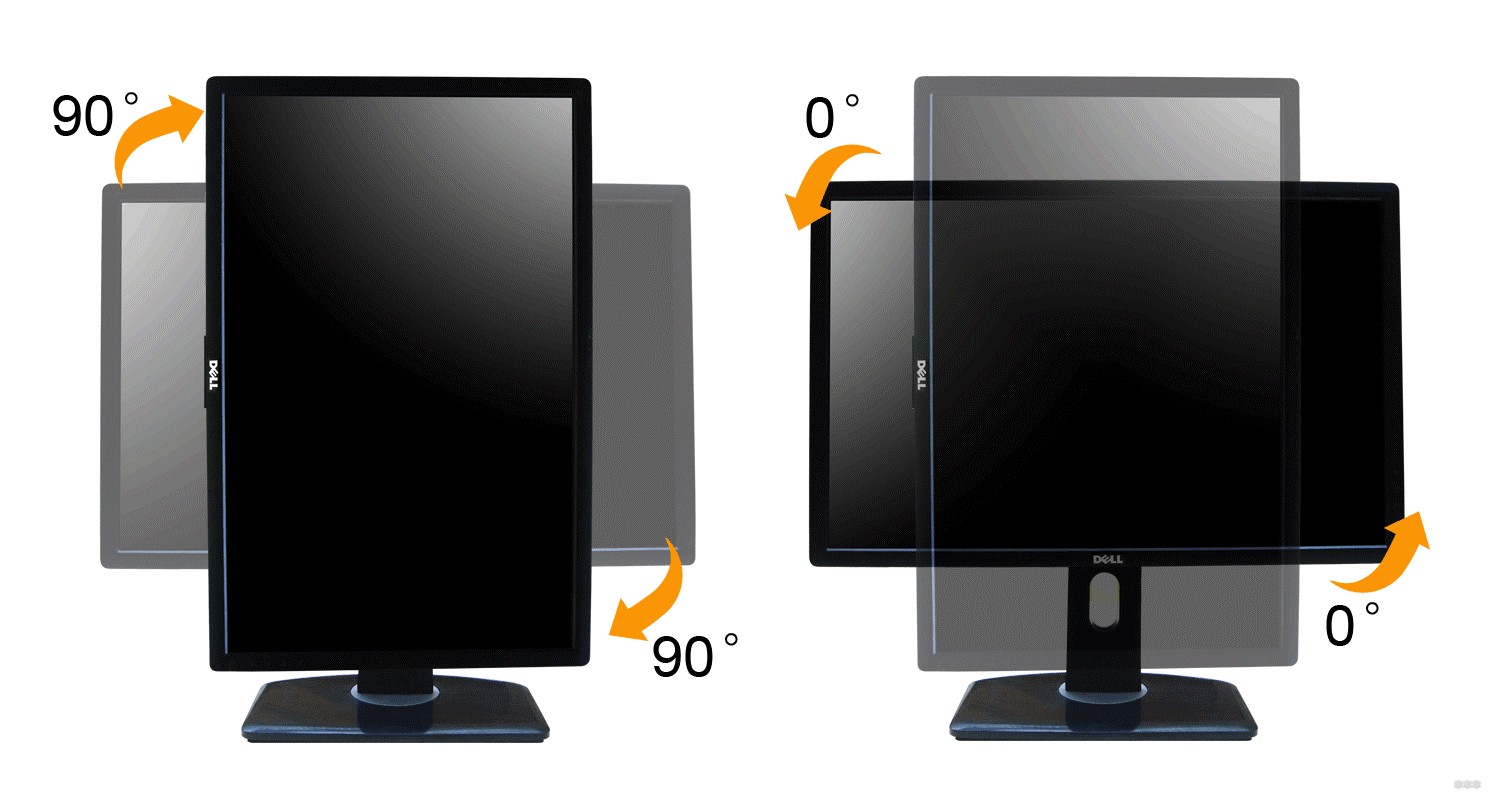
- Другие настройки производятся в разделе «Дополнительные параметры дисплея». Например, там можно перевернуть на 90 градусов отображение экрана.
Возможные неполадки
При соединении двух устройств через единственный кабель, проблемы могут быть либо с изображением, либо со звуком. Как включить беспроблемный вывод картинки и звука через HDMI на ноутбуке? Следуйте простым советам:
- После подключения перезагрузите компьютер, а также можете выключить и включить телевизор.
- Проверьте выходы на обоих устройствах. Недопустимо, чтобы коннекторы болтались в разъемах. Из-за «плохого контакта» на экране второго дисплея возможны рябь, полосы, преобладание зеленого цвета, отсутствие картинки в целом.
- Обновите драйвера графической карты ноута. После делайте перезагрузку компьютера.
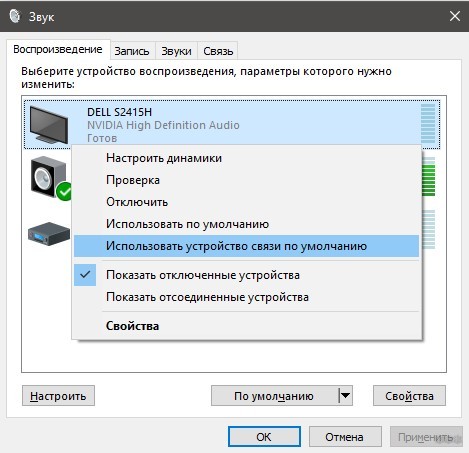
- При отсутствии только звука, в настройках «Звук» проверьте, через какое устройство по умолчанию сейчас он передаться. Переставьте параметр «Использовать по умолчанию» на нужный источник воспроизведения.
Если настройки не приносят результатов, возможно дело в используемом HDMI кабеле и портах устройств. Проверьте кабель на предмет повреждений или используйте другой для проверки портов.
Используйте для подключения только качественные HDMI кабели (с защитным экраном и толстой оплеткой).
Подключая компьютер или ноутбук с включенным питанием к HDMI разъему монитора или телевизора, есть риск спалить порты. Дело в том, что на корпусе ПК присутствует напряжение электропитания. Если к телевизору подключена антенна кабельного ТВ, то «Земля» со стороны TV имеет нулевой потенциал. Соединяя включенный ноут с TV, из-за разницы потенциалов по HDMI кабелю пробежит ток, с которым не справится порт. Разъем не имеет дополнительной защиты с помощью цепей электропитания, и его контакты напрямую идут к чипу. Чип не выдерживает нагрузки и попросту горит.
Соединять включенные ноутбук и телевизор в целом не так опасно, как ПК и ТВ, но 100% защиты «горячее включение» этих двух устройств не гарантирует. Также, горячее подключении в целом можно делать между устройствами, которые получают питание от собственного аккумулятора (например, видеокамера).
Заключение
Для соединения ноутбука и дисплея требуется качественный кабель HDMI папа-папа. Главное, придерживаться одного простого правила: соединять устройства между собой с полностью отключенным электропитанием.
Все способы:
- Основная роль HDMI-входов
- Разновидности HDMI-кабелей
- Включение интерфейса HDMI
- Причины неисправности HDMI
- Вопросы и ответы: 45
С помощью подключения через интерфейс HDMI передаются мультимедийные данные в хорошем качестве и высокой скоростью. Передача информации осуществляется через специальные кабели, соединенные с двумя или более необходимыми устройствами. HDMI является самым популярным цифровым интерфейсом и заменил старый аналоговый. В этой статье мы подробно расскажем все об этом типе подключения и разберем, как включить его на ноутбуке.
Основная роль HDMI-входов
Появлению новых цифровых интерфейсов типа HDMI поспособствовало устаревание используемого ранее популярного VGA. Он не только передавал изображение с более низким качеством, но и искажал его, что часто вызывало трудности в работе. Рассматриваемое подключение имеет большую пропускную способность и поддерживает передачу звука.
Помимо HDMI пользуются популярностью еще несколько типов цифровых интерфейсов передачи данных – DVI и DisplayPort. У всех них отличаются разъемы и некоторые характеристики, что позволяет использовать необходимое соединение для разных ситуаций. Подробнее о сравнении этих интерфейсов читайте в наших статьях по ссылкам ниже.
Подробнее:
Сравнение DVI и HDMI
Разновидности HDMI-кабелей
Как уже было сказано раньше, соединение двух устройств производится при помощи специальных кабелей. Они бывают разных размеров, стандартов и поддерживают работу только с определенным оборудованием. Кроме этого у них бывают разные типы разъемов и спецификации.
Включение интерфейса HDMI
На всех устройствах, поддерживающих подключение через интерфейс HDMI, он автоматически включен. Пользователям же нужно только выполнить несколько простых настроек, чтобы соединение двух устройств прошло успешно, а на экране появилась четкая картинка и звук.
Обычно достаточно изменить всего несколько параметров операционной системы и сразу можно приступать к работе за оборудованием. Подробные инструкции по подключению компьютеров и ноутбуков к монитору через HDMI читайте в наших статьях по ссылкам ниже.
Подробнее:
Подключаем компьютер к телевизору через HDMI
Используем ноутбук в качестве монитора для компьютера
Причины неисправности HDMI
Иногда в работе устройств возникают неполадки, связано это может быть и с интерфейсом подключения. При использовании HDMI часто наблюдаются две проблемы – отсутствие изображения и звука. Основными причинами появления неисправностей считаются неправильные настройки устройств, устаревшие драйверы или физические поломки. В таких случаях рекомендуется прибегнуть к одному из нескольких методов решения возникших проблем. Подробнее о них читайте далее.
Подробнее:
Что делать, если HDMI не работает на ноутбуке
Телевизор не видит компьютер через HDMI
Выше мы подробно рассмотрели основную функцию интерфейса HDMI, ознакомились с типами кабелей, разобрались с включением данного разъема на ноутбуке и поговорили о возможных неисправностях. Надеемся, наша статья была полезна и вы узнали все необходимое о подключении устройств через HDMI-разъем.
Наша группа в TelegramПолезные советы и помощь
How to Establish HDMI TV to Computer Connection in Windows 10 -Are you excited to enjoy Movies in DVD drive, YouTube Videos and the materials available on the Internet on a bigger screen. Advanced or you can say every HDMI Supporting Television comprises an inbuilt port and facilitate a cable you are able to pretty simply utilize and set up the connection.
Requirements to Set up HDMI TV to Computer Connection
- The first basic task is to ensure whether both the television and PC hold HDMI ports.
- If your PC is not outdated, it will positively have an HDMI port in it (For further clearance, see the below image).
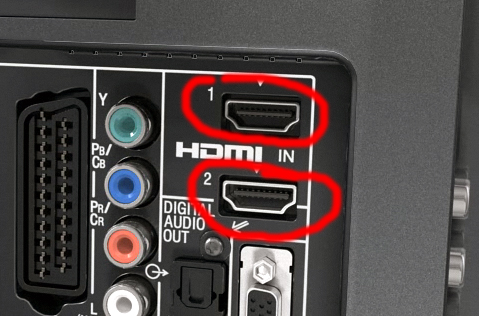
- Most of the Modern days televisions hold one HDMI port. Besides if the TV is less than six years old, then it should have the port (the port is described in orange below).
- Ensure that you possess one cable before starting the process.
How to Connect PC to TV Via HDMI in Windows 10
- First and foremost, plug one end of the cable in the television HDMI port thereupon insert the other end to the PC’s HDMI port.
- As you are staying on Windows 10, all that you need to do is to turn on the PC and television and confirm that television is set to the exact HDMI channel. On most of the Televisions, You can do by holding and pressing the AV button.
- PC will show the best and suitable setting but somehow if you don’t see, observe the next steps.
- Apply the combinations of “Win and X” keys and upon the arrival of user power menu, click “Control Panel“.
- Leave the icons into the small size and thereupon hit “Display” symbol in the Control Panel.
- In the observable links on the left flank, go ahead with a click on “Adjust resolution”.
- Click the drop down in front of “Display” and choose your TV name and see the “Resolution” box and select the resolution that will be accurate for your television in the followed screen.
Now you need to ensure that the sound is coming to be from your television, instead of PC, and to make it happen, look the below steps –
- If the Control Panel is still open on the screen it’s ok, otherwise, open it as guided above and click Sound icon or symbol.
- You see more than one device on the Playback tab in the opened dialog box. If the Television is not appearing on the list perform a right-click on a vacant space in the and select “Show disabled devices”.
- Your Television or HDMI Speaker will begin showing within the list. Make a right click on the Speaker and prefer to select Enable choice.
After the HDMI TV to Computer Connection gets set up successfully you are able to straightforwardly view and listen the operation of the system on the screen of HDMI Television. You can now seamlessly experience the Youtube videos, or videos from your DVD Player, for instance on your television. It is found that the first time connections take a little bit of time, so be patient and once you nailed it, it will be easier to do the connections later on.
-
Что нужно для подключения?
-
Как подключить компьютер к телевизору
В случае, когда Wi-Fi Direct не настроен, Miracast не поддерживается, флешки с большим объемом нет, а кино в хорошем качестве посмотреть очень хочется, мы вспоминаем про разъем HDMI – прекрасный способ продублировать изображение на другое устройство без потери качества. Поэтому появляется вопрос: как подключить телевизор к компьютеру через HDMI в Windows 10 и что для этого потребуется? Ответ располагается ниже.
Что нужно для подключения?
Для подключения нам потребуется:
- ноутбук или настольный ПК с HDMI выходом;
- телевизор с HDMI входом;
- двусторонний кабель HDMI.
Внимание! Для получения качественной картинки с аудиодорожкой не пользуйтесь переходниками с HDMI на DVI и VGA, иначе просмотр фильмов и фотографий оставит только негативные эмоции.
Как подключить компьютер к телевизору
Итак, для передачи изображения на ТВ нам нужно соединить два устройства с помощью кабеля:
- Выключите телевизор и ноутбук. Сделать это нужно обязательно, дабы не повредить контакты в результате возможного возникновения искры.
- Подключите концы HDMI кабеля в разъемы входа и выхода (телевизора и ноутбука соответственно).

- Включите оба устройства.
Скорее всего, вы не увидите проекцию экрана ноутбука на телевизоре.
Для этого ТВ и ПК нужно настроить:
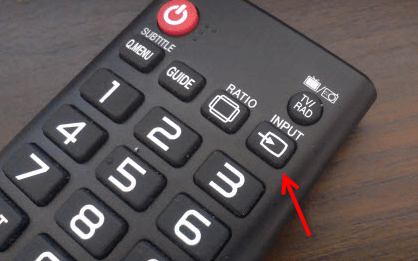
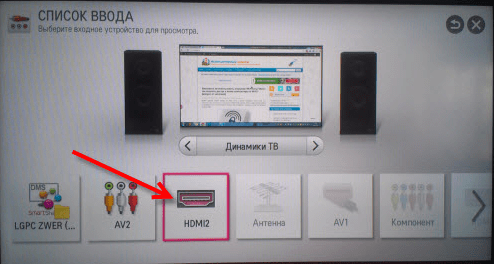
- Войдите в «Меню» телевизора и найдите пункт «Список ввода». Также его можно вызвать нажатием клавиши «Input» на пульте дистанционного управления.

- В появившемся перечне нажмите на источник входного сигнала: HDMI.

- После этого изображение с компьютера должно появится на телевизоре.
Но если этого не случилось, на ноутбуке или ПК отключена передача внешнего сигнала.
Для его включения нужно:
- Нажать одновременно клавиши Win+P.
- В появившемся окне выбрать тип проецирования.
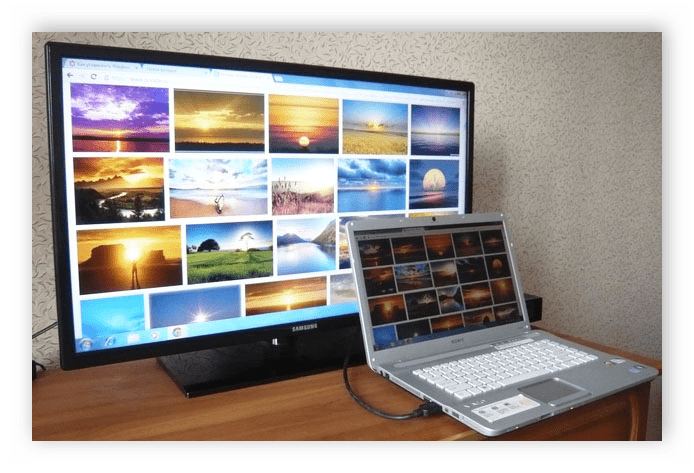
Оптимальным способом является вариант «Только второй экран», при котором изображение с вашей машины будет с точностью копироваться на экран телевизора, при чем сам дисплей компьютера останется выключенным. Выбор другого подключения приведет к одновременной работе двух мониторов, что оказывает отвлекающий эффект.
В случае, если ваша панель имеет высокое разрешение дисплея, передаваемое изображение может быть размытым или зернистым.
Для полноценного использования ресурсов экрана телевизора вам нужно:
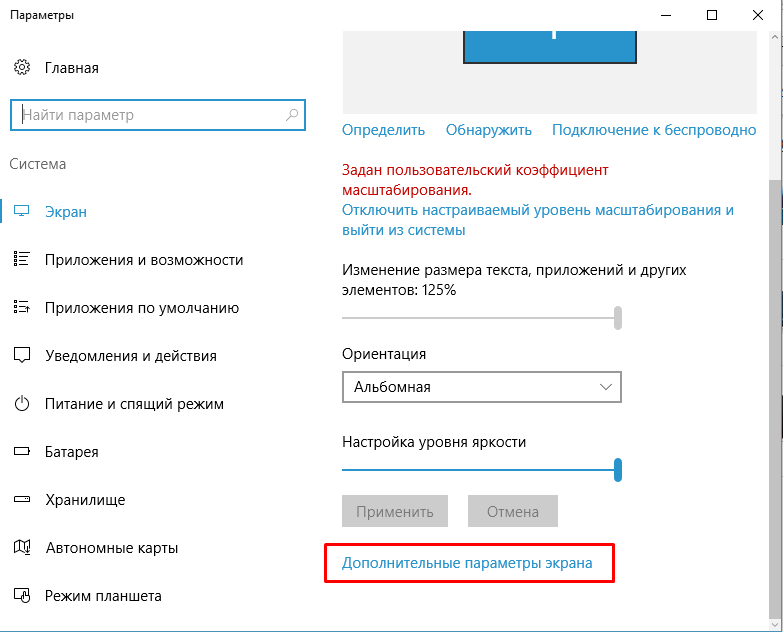
- Нажать ПКМ на рабочем столе.
- Выбрать пункт «Параметры экрана».
- В появившемся окне нажмите «Дополнительные параметры экрана».

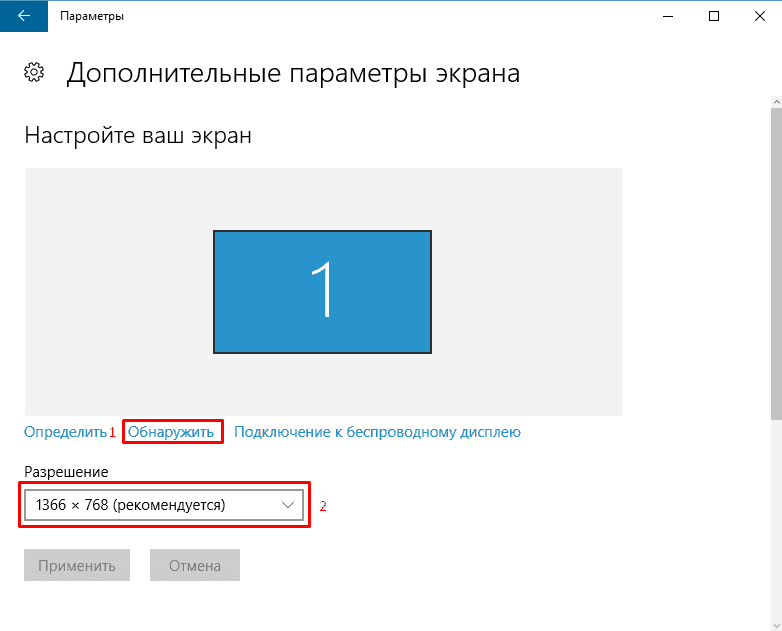
- Далее кликните на «Обнаружить» и после отображения параметров внешнего экрана выберите максимальное разрешение из выпадающего списка.

Совет! Если у вас отсутствует кабельное телевидение, а IPTV сильно бьет по кошельку, можете смотреть телевизор через компьютер: включить онлайн трансляцию или сопкаст на ПК и транслировать изображение на ТВ.