
Хотя AHCI (Advanced Host Controller Interface) является стандартом уже около двух лет, данный режим не используется SATA-дисками. Поэтому они работают на значительно более низкой скорости, составляющей лишь малую долю их потенциальных возможностей.
Существует множество возможностей включить поддержку режима AHCI в Windows XP. Мы расскажем об очень простом способе. Сначала создайте резервную копию всех важных данных. Хотя вероятность их потери в нашем случае стремится к нулю, осторожность все равно не помешает.
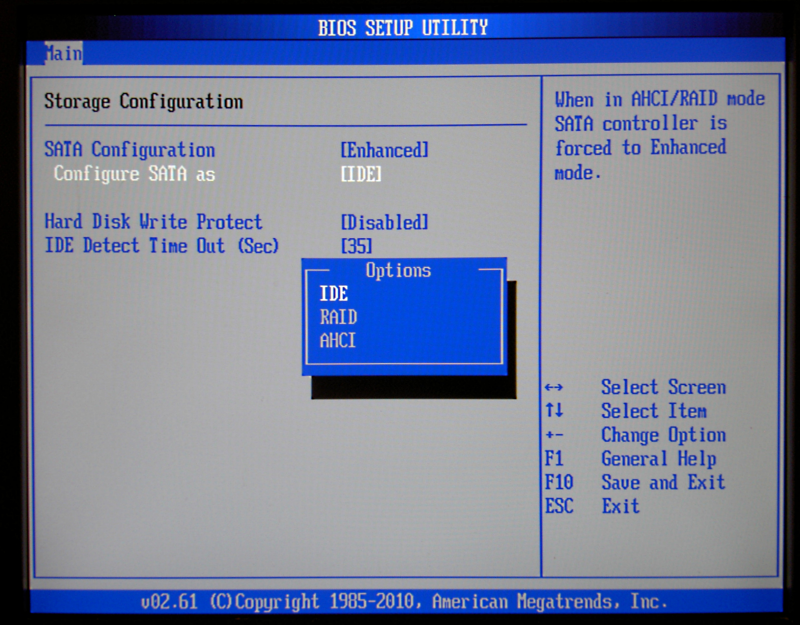
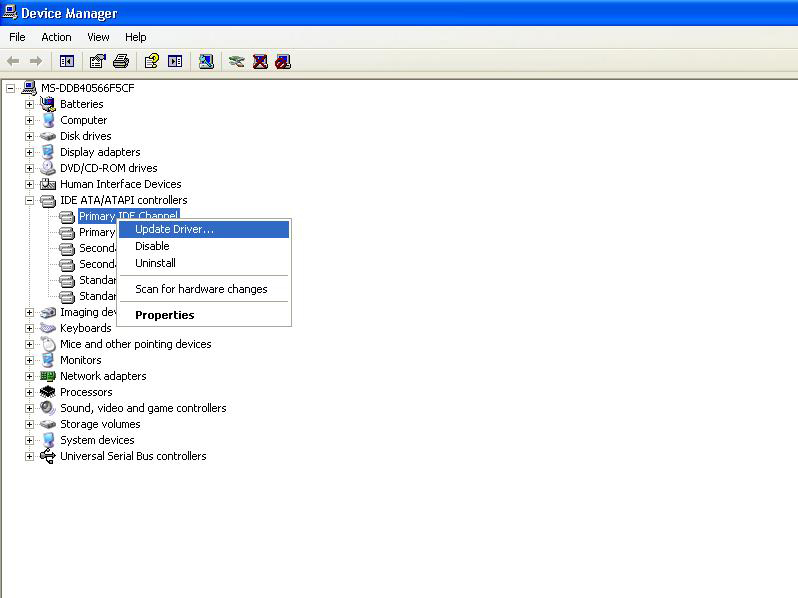
Убедитесь в том, что в BIOS отключены и RAID, и AHCI. Затем с домашней страницы Intel (www.intel.ru) скачайте 32-разрядную версию утилиты Floppy Configuration Utility. Распакуйте архив в папку на Рабочем столе. Затем откройте Диспетчер устройств и в пункте «IDE ATA/ATAPI Controller» обновите драйверы всех контроллеров, имена которых начинаются с Intel. Для этого в контекстном меню контроллера (открывается щелчком правой кнопкой мыши) выберите «Обновить драйвер». Откажитесь от обновления и поиска через Интернет, а затем самостоятельно укажите местоположение (папку на Рабочем столе). Теперь выберите AHCI-контроллер. После того как вы проделаете эту операцию со всеми имеющимися контроллерами, закройте все окна и перезагрузите компьютер.
При последующей загрузке ПК, не дожидаясь запуска Windows, зайдите в BIOS, нажав клавишу «Del» или «F2». В BIOS в меню SATA включите AHCI и перезагрузите компьютер. Если все прошло удачно, Windows определит новое AHCI-железо, и благодаря активной технологии NCQ (Native Command Queuing) станет ощутим значительный прирост производительности SATA-дисков, которые будут работать намного быстрее. Тем, кто хочет быть уверен в том, что накопители и в дальнейшем будут работать в оптимальном режиме и использовать самый последний драйвер, стоит установить программу Intel Matrix Storage Manager.
Как говорится на Intel «Спецификация интерфейса AHCI позволяет драйверу системы хранения данных включить расширенные функции Serial ATA, например,встроенную очередность команд и горячую установку».
Согласно Wikipedia …..Родная поддержка Advanced Host Controller Interface включена в Microsoft Windows (начиная с Vista), Linux (начиная с ядра 2.6.19[2]), NetBSD, OpenBSD (начиная с версии 4.1), FreeBSD, Solaris 10 (начиная с релиза 8/07). Для более старых операционных систем требуется драйвер производителя.
Другими словами, если включить режим AHCI на SATA, то дисковая подсистема начнет работать быстрее. Но, если в Vista драйвер AHCI встроен, то на XP его нужно дополнительно устанавливать.
В процессе установки ОС проблем не возникает — нажал F6 в нужный момент, подсунул на дискете правильный драйвер — и все работает.
Если же Windows XP уже установлена с драйвером в режиме IDE и переустанавливать не хочется, то нужно:
-
Скачать Intel Matrix Storage Manager с сайта производителя (для своей материнской платы) и распаковать его в папку. (Сразу устанавливаться он не дастся, скажет, что оборудование не поддерживается)
-
В диспетчере устройств выбрать «IDE ATA/ATAPI контроллеры» — «Intel…… SATA Controller» — «Драйвер» — «Обновить» — «Установка из указанного места» — «Не выполнять поиск…» — указать место, куда распаковали Intel Matrix Storage Manager и в нем подпапку с драйверами.
-
Выбираем ПРАВИЛЬНЫЙ для своей системы драйвер. После установки драйвера перезагружаемся
-
В BIOS устанавливаем режим работы SATA — AHCI.
Примечание. Если вдруг мы установили неправильный AHCI драйвер, то система упатет в синий экран (BSOD). Ничего страшного. Возвращаем в BIOS режим работы SATA — IDE, при загрузке Windows жмем F8 и из предложенных вариантов загрузки выбираем «Загрузка последней удачной конфигурации (с работоспособными параметрами)». Затем в Windows повторяем установку AHCI драйвера, но выбираем уже правильный драйвер .
-
После первой перезагрузки система переопределит все SATA устройства. Затем устанавливаем Intel Matrix Storage Manager
-
Перезагружаемся еще раз. Смотрим диспетчер устройств — там в «IDE ATA/ATAPI контроллеры» уже должен стоять AHCI драйвер.
Table of Contents
INTRODUCTION
This tutorial describes how to switch a Windows XP computer from IDE mode to AHCI mode.
Modern computers use SATA hard disks. These are normally used with AHCI mass storage drivers. However, XP AHCI drivers are not included in the standard Microsoft XP install CD, and so it is often easiest to change the hard disk BIOS mode to ‘Legacy IDE’ mode, install XP and then after XP is up and running, switch over to AHCI mode.
Note: There is very little advantage to be gained if running Windows XP in AHCI mode, so unless you have a specific need to switch to AHCI mode, I would recommend staying in the IDE mode.
This method, if done incorrectly (e.g. you choose the wrong driver), may result in a non-booting XP system. You have been warned!
The following method details an Atom based netbook which has been installed in IDE mode and you now wish to change over to use the hard disk in AHCI mode (in this case using the NM10 AHCI driver mass storage SATA driver).
REQUIREMENTS
You will need to find the correct AHCI driver files for your particular SATA controller. These can normally be downloaded from the manufacturers website. You need at least one .INF file and one or more other files, one of which is normally a .SYS file. These should all be downloaded to a folder on your target XP system whilst it is in IDE mode.
METHOD
Unsupported embed
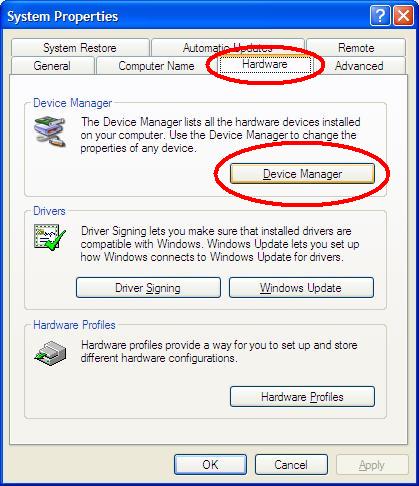
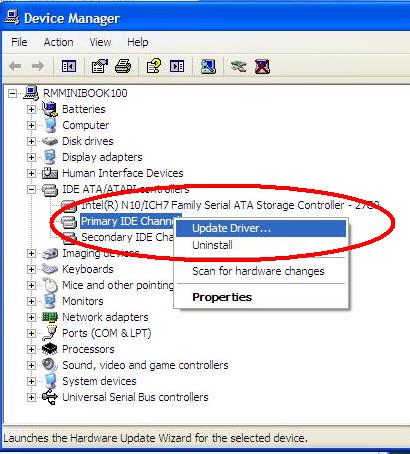
1. Boot to Windows XP on the target system (in IDE mode) and login as an Administrator. 2. Hold down the Windows key (the wavy flag key on the left of the spacebar) and then press and release the Pause/break key. You should see a System Properties window (see image below). 3. Click the Hardware tab and then click the Device Manager button. 4. Expand the IDE ATA/ATAPI Controllers section by clicking on the + sign
5. Click once on the ‘Primary IDE channel’ item to select it.

6. Right-click Primary IDE channel and then select Update Driver.
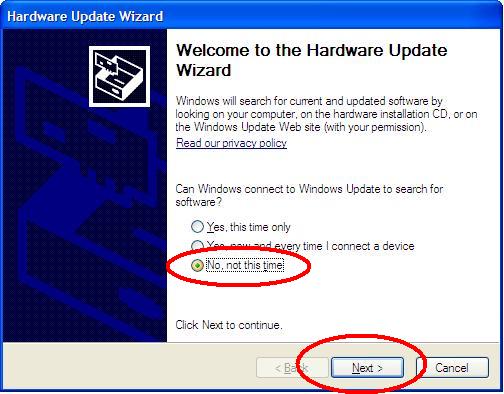
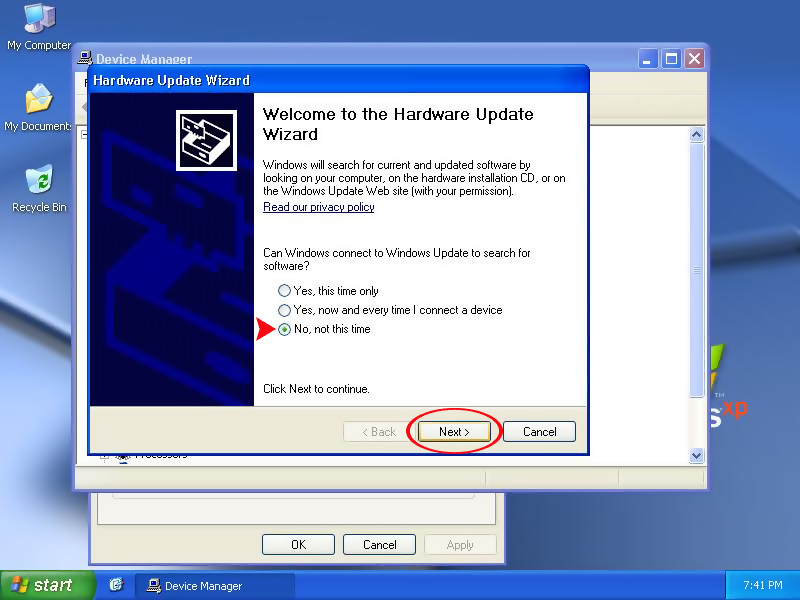
7. Select ‘Not this time’ radio button and then click Next.
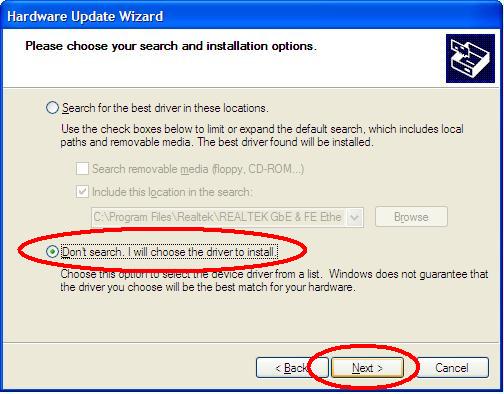
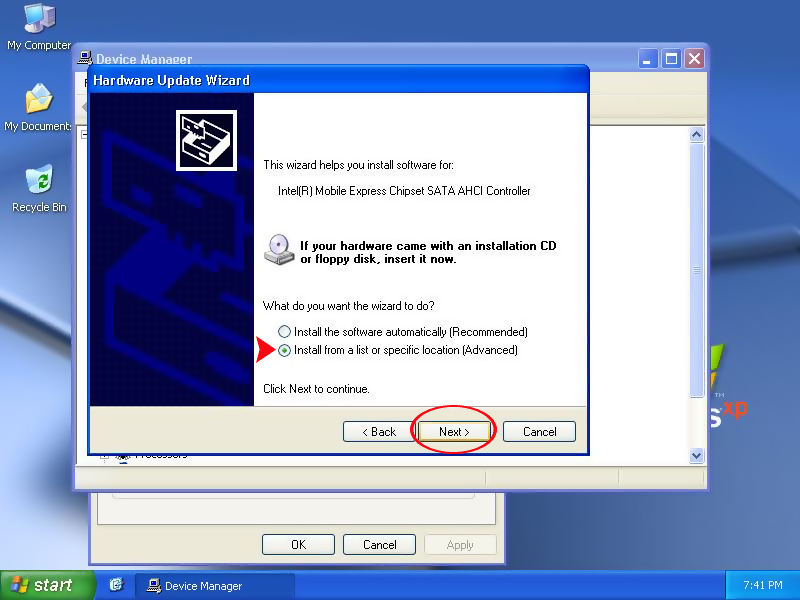
8. Select ‘Install from a list’ radio button and then click Next.

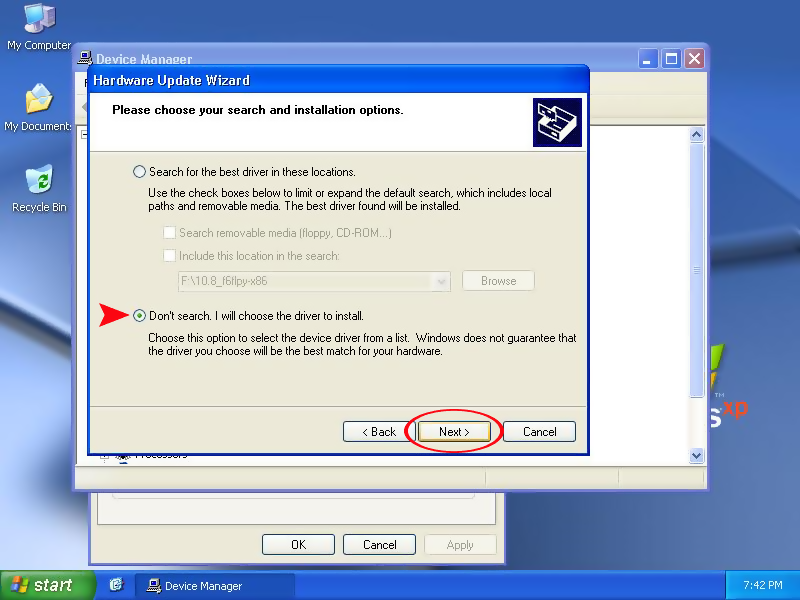
9. Select ‘Don’t search’ radio button and then click Next.
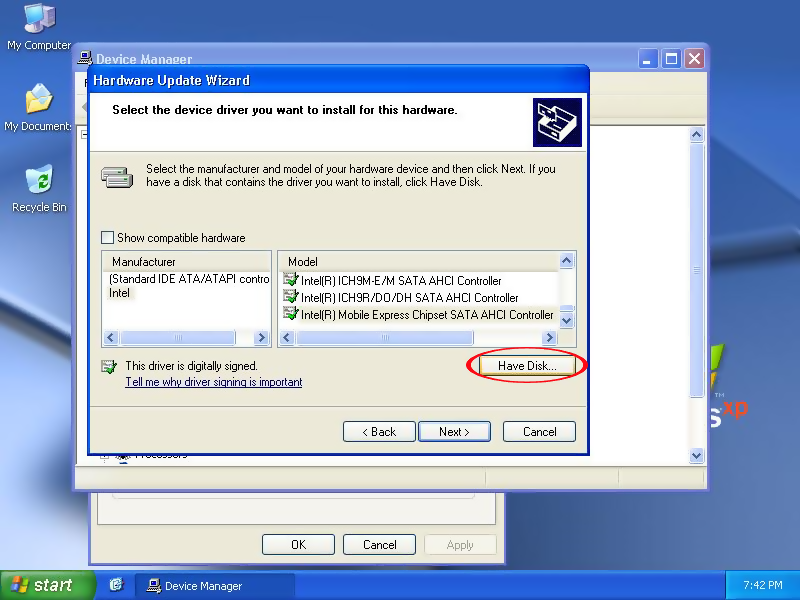
10. Click Have Disk.
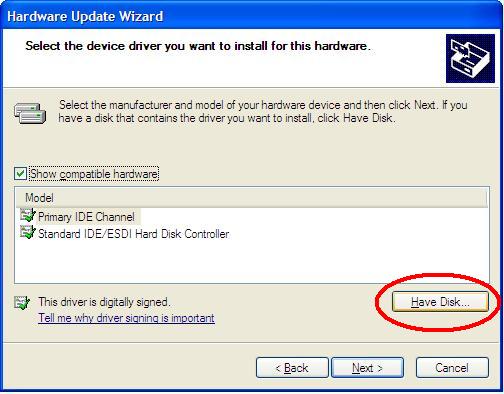
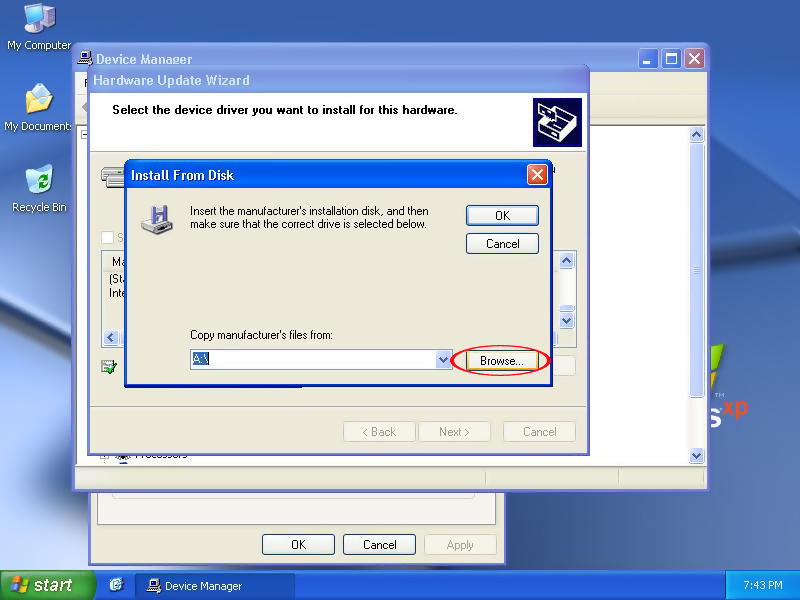
11. Click Browse.
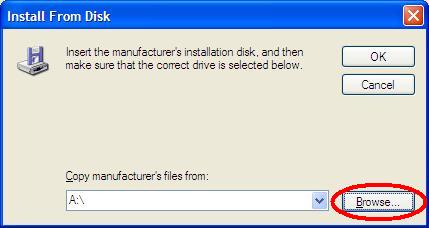
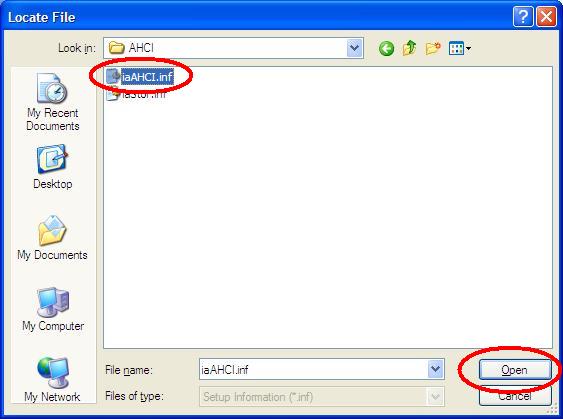
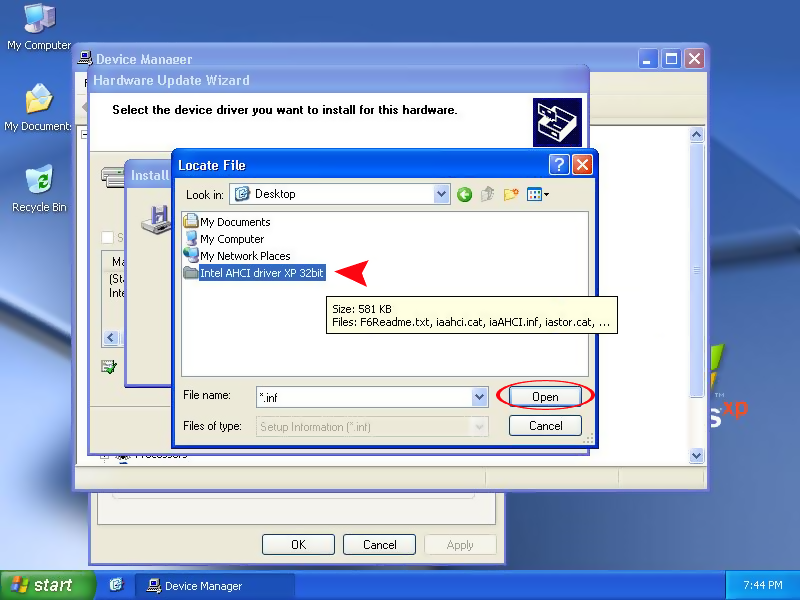
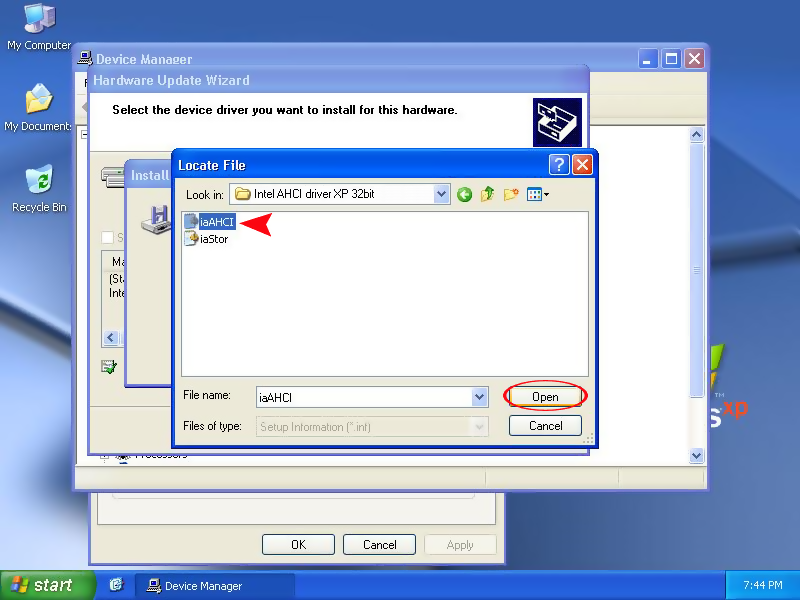
12. Browse to your AHCI driver folder and click on the AHCI.inf file (the name may vary depending on your chipset) and then click Open. Make sure you choose the AHCI inf file and not the RAID storage inf file.
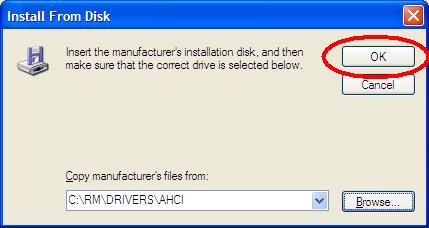
13. From the drop-down menu, select the correct folder where your AHCI drivers are located (if required), and then click OK.
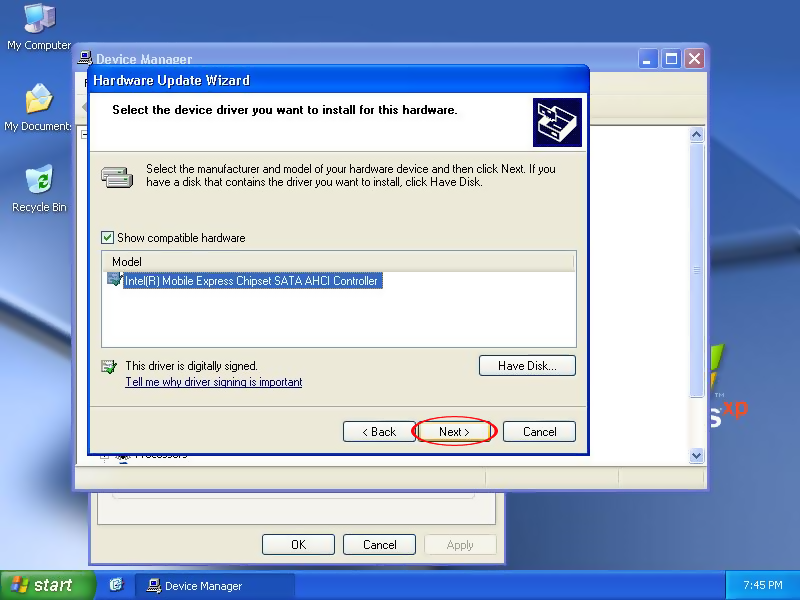
14. Ensure that the correct Chipset driver is shown and then click Next.
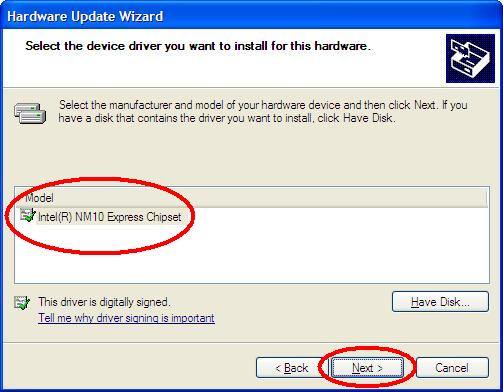
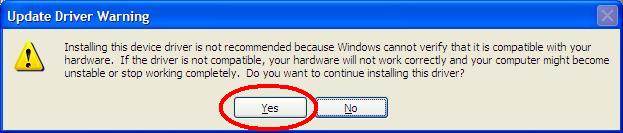
15. Ignore the warning and click Yes.
16. Now, click Finish.
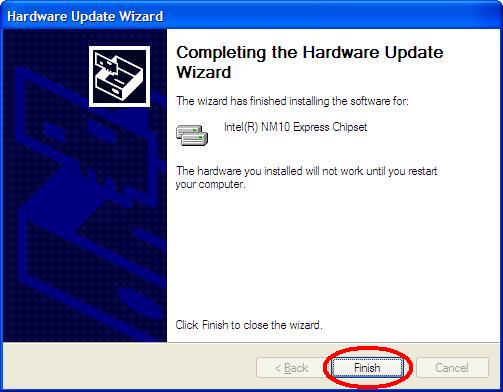
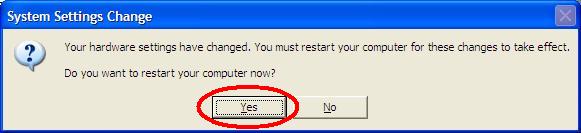
Click Yes, to restart the computer.
17. When the computer restarts, press the Del key (or whatever key is correct for your BIOS – e.g. F1) to enter the BIOS menu as you did before.
Now, change the Hard Disk AHCI options to Enhanced and/or Enabled.
Save the BIOS changes and then press Enter to reboot.
When XP reboots, you should see another ‘System Settings have changed’ prompt – restart the system again (may require several reboots).
18. Now check that the correct AHCI chipset driver has been successfully installed (for an example, see image below).
TROUBLESHOOTING
Blue Screen of Death
If you have a BSOD (e.g. 0x0000007B error) after changing the BIOS to AHCI mode in Step 17, simply change the BIOS settings back to IDE mode and try again.
With any luck it should boot back to XP again – if it does not then you may have trashed the OS by installing the wrong driver – try using the F8 key to boot in Safe Mode (in IDE BIOS mode).
If that does not work, try the BIOS is AHCI mode + Safe Mode. If that doesn’t work, you will need to re-install XP!
Identifying the correct AHCI driver
You need to determine what chipset you have and then find the correct driver for the SATA AHCI interface.
One way to find the PCI ID of the SATA controller is as follows:
1. Make a bootable USB Flash drive using RMPrepUSB – choose the FreeDOS option and allow RMPrepUSB to set the Copy OS folder to .\FREEDOS_USB_BOOT, use FAT32 and BOOT AS HDD options and then click on 6 Prepare Drive to format the USB drive as a bootable FreeDOS USB pen.
2. Check using the RMPrepUSB F11 key that the USB drive will boot and select the 2 Boot FreeDos as Hard Disk option, check that it boots to the FreeDOS command prompt inside the QEMU emulator.
3. Insert the USB Flash drive into a USB 2.0 port of your target system
4. Reboot you XP Windows target system and change the BIOS options to Hard Disk = AHCI mode
5. Change the boot options so that the target system will boot from the USB drive first and as a hard disk and Save and Exit from the BIOS setup menu
6. The target system should now reboot from the USB Flash drive to the grub4dos menu – choose menu item 2 Boot as FreeDOs Hard Disk
7. Type
checkpci m
at the FreeDos A:> command prompt – the Vendor ID and the Device ID of the AHCI controller should be listed – e.g. 8086 1C02 – make a note of these two numbers.
8. Change the BIOS back to non-AHCI (IDE/Legacy) mode and reboot to XP.
9. Now search the internet for “PCI 8086 1C02” (or whatever your PCI ID was) and locate the correct AHCI driver.
10. Download the AHCI driver files and look inside the .INF files – one of them should have the identical Vendor and Device ID – e.g.
[HardwareIds.SCSI.Napa_i386_ahci8086]
id = “PCI\VEN_8086&DEV_1C02&SUBSYS_280A103C”, “ahcix86” <<<< (example only!!!)
now search for the text that appears in the HardwareIds section name in square brackets (e.g. SCSI.Napa_i386_ahci8086 in the example), you should now search for a similar entry in the [SCSI] section of the same INF file – e.g.
[SCSI]
Napa_i386_ahci8086 = “AMD AHCI Compatible RAID Controller-x86 platform”, ahcix86 <<<< (example only!!!)
11. The text (in purple in this example) will be name of the driver displayed by Windows XP when you try to install the AHCI driver using the instructions in this tutorial (Step 14).
Enable AHCI without reinstalling Windows Xp
How to enable AHCI without reinstalling Windows Xp? Original Windows Xp didn’t have any driver for AHCI. That’s why a lot of users just turns off AHCI (Advanced Host Controller Interface) and installs Windows with IDE (Integrated Drive Electronics) settings.
Why switch to AHCI?
If your motherboard supports AHCI you should use it. It supports new features like native command queuing and hot-plugging. Also you will gain some performance boost. Switching to AHCI without reinstalling takes only few minutes.
Steps to enable AHCI without reinstalling Windows Xp
Make sure you enable system restore option for partition where Windows is installed. We recommend to make data backup before attempting this method.
- First, make sure you have system restore enabled (Open “Control Panel” then “System” and “System Restore“). In case you made mistake so you can restore settings.
- Download and extract “Intel Matrix Storage Manager” drivers. Drivers were picked from Intel.
Universal AHCI drivers 32-bit – Download
Universal AHCI drivers 64-bit – Download
- Open “Control Panel” then “System” and “Hardware“. Then open “Device Manager“.
- Expand “IDE ATA/ATAPI controllers” category. Right click “Primary IDE Channel” (there could be multiple entries, select first one) and click “Update driver“.
- Select “No, not this time“, then “Install from a list or specific location (Advanced)“.
- On next dialog select “Don’t search. I will choose the driver to install” and click “Have a disk“.
- Now click on “Browse” and select the directory where the downloaded driver is extracted.
- You will see a lot of drivers, but you will have to select the right one (refer your motherboard manual if you don’t know what controller you have).
- After selecting the driver click “Next” and confirm installation by clicking “Continue anyway“.
- When installation is finished, reboot your computer. Go to system BIOS (usually tapping F2, delete or F10) during the computer startup.
- In BIOS change hard disk controller from”IDE” to “AHCI” (if you don’t know how refer your motherboard manual).
- Save the changes and reboot again. Let it load normally. If everything is good your Windows will load and you will get installing driver message. It will ask to reboot again.
If face blue screen of death or computer restarts itself, switch back to “IDE” setting in BIOS. Also keep taping F8 before Windows start. On the startup menu select “Last Known Good Configuration”. Now you can repeat the steps and make sure to select right driver.
That’s it. You have successfully enabled AHCI without reinstalling Windows Xp.
Found this post helpful?
Donate to WindowsPro.eu website. You could help this project.
As a bonus we could provide some personal support for our generous donors. After donation just email us describing your problem and we will try our best to help you out. Thank you.
2 Comments
Add Comment
Disk controller for SATA HDDs can operate in both AHCI and IDE compatible mode. You can switch between them the in BIOS setup. AHCI mode works faster and has more features, while IDE compatible mode requires no special drivers to install older operating systems like Windows XP. Unfortunately, if you decide to switch between IDE and AHCI after installing Windows, you will get a BSOD (blue screen of death) during the next boot.
This article explains how to switch from IDE to AHCI after installation of Windows XP, how to change disk controller mode from IDE to AHCI without reinstalling Windows.
| Contents |
|
1. Intended audience
This article is for users who want to switch SATA controller from IDE-compatible mode
(aka ATA-compatible mode) to AHCI mode without reinstalling Windows XP.
Primary motivation for such a switch is to gain additional performance from disk I/O (SATA NCQ),
especially for SSD hardware. Also recommendations from this article are useful in
dual-boot configurations, where other OS must use SATA controller in AHCI mode, and Windows XP
as a first OS is using SATA controller in IDE mode.
2. Check prerequisites
- Make sure your operating system is Windows XP. If you are using Windows 7 or Vista, then
read this article. - Reboot your PC, enter BIOS setup (press DEL or F1) and make sure that currently SATA controller
is configured in IDE mode; and support of AHCI mode exists in BIOS.
3. Find or download F6 textmode AHCI driver for your SATA controller
- Find out the name of your chipset (south bridge). It should be in the user guide of your
motherboard or notebook, or at the manufacturer’s website. Also one can try to find the
SATA controller in the Windows Device Manager under «IDE ATA/ATAPI controllers» or «Storage
controllers». - Check your motherboard/notebook driver CD, try to find F6 textmode AHCI driver for your
chipset (southbridge). F6 textmode AHCI driver consists of TXTSETUP.OEM, one or several
INF files(s), SYS file(s) and CAT file(s). SYS file is a driver itself, CAT file is a catalog
of digital signatures to verify integrity of the driver, and INF is an informational file
for Windows operating system how to detect hardware, and how to install/uninstall the driver.
For example, Intel AHCI driver for ICH10R chipset consists of iaahci.cat, iaAHCI.inf,
iastor.cat, iaStor.inf, IaStor.sys, and TXTSETUP.OEM. - If you could not find F6 textmode AHCI driver on the CD, check manufacturer’s website
of the motherboard/notebook, and also check manufacturer’s website of the chipset.
For example, for ASUS EEC PC 901 netbook with Intel ICH7-M southbridge, you should check
both ASUS and Intel websites. Also downloading latest drivers from manufacturer’s website
may be helpful if old version of driver from motherboard/notebook CD was found, but didn’t
work because of alleged bugs. (But bear in mind that sometimes new version of drivers has
new bugs, not present in old version.)
4. Perform upgrade installation of AHCI driver via Windows Device Manager
Right-click My Computer, choose Properties,
then Device Manager.
Expand IDE ATA/ATAPI controllers, then right-click on
Primary IDE Channel and choose Update
Driver… from the context menu:
Choose not to use Windows Update this time:
Choose to install driver from specific location:
Choose not to use search:
Press Have Disk… button:
Install From Disk window will pop up.
Press Browse… button there:
Choose a folder where you have F6 floppy drivers for AHCI mode of your SATA controller:
Choose a proper INF file (AHCI, not RAID) if you have more than one:
Click OK:

Click Next >:
Click Finish:

Now reboot your PC.
5. During reboot, make configuration changes in BIOS setup
During reboot, enter BIOS Setup (press DEL or F1 key) and enable AHCI mode for your SATA controller:
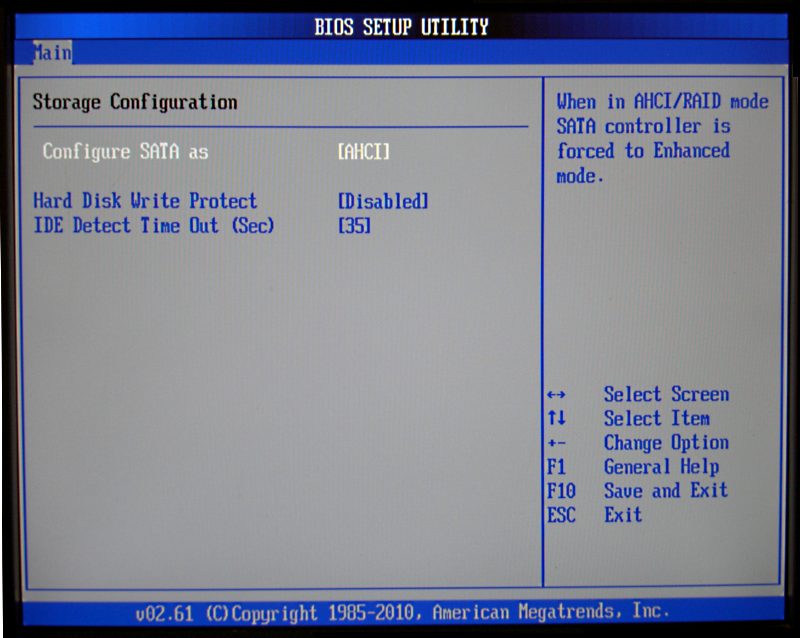
Save changes when leaving BIOS Setup.
If you fail to change SATA controller mode in BIOS setup during this reboot, then Windows will
fail to boot with BSoD (Blue Screen of Death). Stop code will be 0x0000007B:
INACCESSIBLE_BOOT_DEVICE.
6. Verify everything is OK, allow second reboot if necessary
Make sure that Windows loaded normally:
New detected hardware balloons may appear in the tray area after the first reboot after driver update.
Also Windows may ask permission to reboot just after installing the drivers, allow
second reboot if Windows asks for it.
7. Troubleshooting
Reasons why it might not work:
- You have downloaded a driver for wrong hardware, not for your chipset (south bridge).
- You have downloaded a driver for different operating system (not Windows XP).
- You have downloaded 64-bit driver for 32-bit OS or vice versa.
- You didn’t switch SATA controller from IDE-compatible mode to AHCI mode in the BIOS setup
during first reboot.
How to undo IDE to AHCI driver update (revert to IDE mode):
- Download Emergency Boot Kit
and deploy it to USB thumbdrive. You need a full version in this case. - Run Emergency Boot Kit Registry Editor, open HKEY_LOCAL_MACHINE\SYSTEM registry hive,
note the value of Select\Current (NNN). - Go to registry key ControlSetNNN\Services\pciide
and set value Start=0
(it means «loaded by
kernel loader»). - For example, your AHCI driver is called iastor. Go to registry key
ControlSetNNN\Services\iastor
and set value Start=3
(it means «started manually»). Substitute your particular name of AHCI driver instead of
iastor as needed. - Save changed registry hive HKEY_LOCAL_MACHINE\SYSTEM to disk
(F2) and exit Emergency Boot Kit Registry Editor. - Choose to reboot in the main menu of Emergency Boot Kit, go to BIOS setup and switch
SATA controller to IDE mode before Windows is loaded, otherwise you get BSoD
with stop code 0x0000007B: INACCESSIBLE_BOOT_DEVICE.