
Jitsi Desktop
Jitsi Desktop is a free open-source audio/video and chat communicator that
supports protocols such as SIP, XMPP/Jabber, IRC and many other useful features.
Please do not confuse this project
with Jitsi Meet, the online video
conferencing solution with a free instance at https://meet.jit.si.
Support
Jitsi Desktop is the heritage of Jitsi Meet. While some components are still
used in e.g. Jigasi, the project is not
actively developed anymore. Improvements, bugfixes and builds are entirely based
on community contributions.
Installation
Releases
Windows and macOS
Download the installers
from GitHub releases.
Debian/Ubuntu
An APT repository is available at https://nexus.ingo.ch/jitsi-desktop/.
Note the trailing slash at the end of the distro-name.
This is required since the repository has no components.
deb https://nexus.ingo.ch/jitsi-desktop-unstable/ <distro>/
RPM Distros
Sorry, there are currently no rpm packages available.
Snapshots
Snapshot or pre-release builds are also available in additional repositories.
- Windows and macOS: See https://github.com/jitsi/jitsi/releases
- Debian/Ubuntu: https://nexus.ingo.ch/jitsi-desktop-unstable/
Helpful Resources
- Documentation Wiki
- Community Forums
- The old website
Contributing
Please, read the contribution guidelines before opening a new
issue or pull request.
Jitsi Meet is an open-source (Apache) WebRTC JavaScript application that uses Jitsi Videobridge to provide high quality, secure and scalable video conferences.
Command Line
Download Links For Version 2025.4.0
Download Links For Version 2.9.1
Download Links For Version 2.9.0
Download Links For Version 2.8.9
Download Links For Version 2.8.8
Download Links For Version 2.8.7
Download Links For Version 2.8.6
Download Links For Version 2.8.5
Download Links For Version 2.8.3
Download Links For Version 2.8.12
Download Links For Version 2.8.11
Download Links For Version 2.8.10
Download Links For Version 2.7.1
Download Links For Version 2.6.1
Download Links For Version 2.6.0
Download Links For Version 2.5.1
Download Links For Version 2.4.2
Download Links For Version 2.4.1
Download Links For Version 2.3.1
Info
last updated 4/15/2025 12:00:00 AM
Publisher:
Jitsi Team
License:
Apache-2.0
Dependencies
No dependency information
Share
In this article we will cover how to connect to a Jitsi meeting using the web browser on a desktop computer like Linux, Windows or macOS.
The most reliable way is to just install the Jitsi Meet standalone desktop app for your system. The downloads can be found here:
https://github.com/jitsi/jitsi-meet-electron/releases
macOS: use .dmg
Windows: use .exe
Linux: use .deb or .AppImage
Be sure to have the required permissions in place for audio and video to work.
Managing permissions
For Jitsi Meet to be able to access microphone and camera, the necessary permissions need to be enabled on the operating system level, then on the web browser and finally on the specific website itself.
Testing it out
We can simply test out if everything works by joining a new empty chatroom.
If you are subscribed to the the Above Privacy Suite, you can use our own Jitsi server at:
jitsi.above.im
Note: Use your Above Suite username and password to login to our Jitsi server.
Otherwise you can use a publicly accessible Jitsi instance, like jitsi.vern.cc or fairmeeting.net
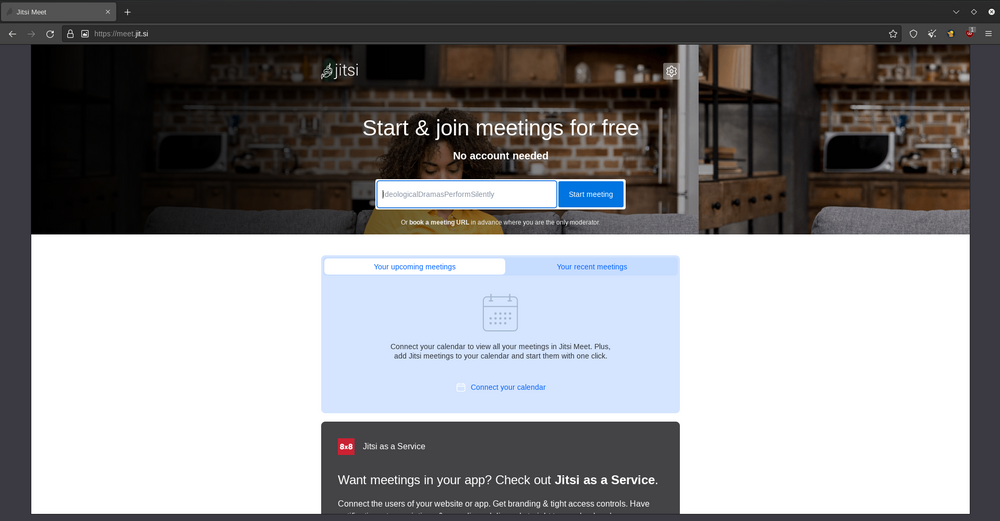
Here on the mainpage we can specify the name of the chatroom we want to join. It will also periodically create a random string of words.
Click on the blue button saying ‘Start meeting’
It will take to the lobby of the specified chatroom. Depending on your browser, you may be prompted to give camera and microphone permissions to the website.
— In a Firefox-type of browser (Librewolf, Mullvad Browser) it will look something like this:
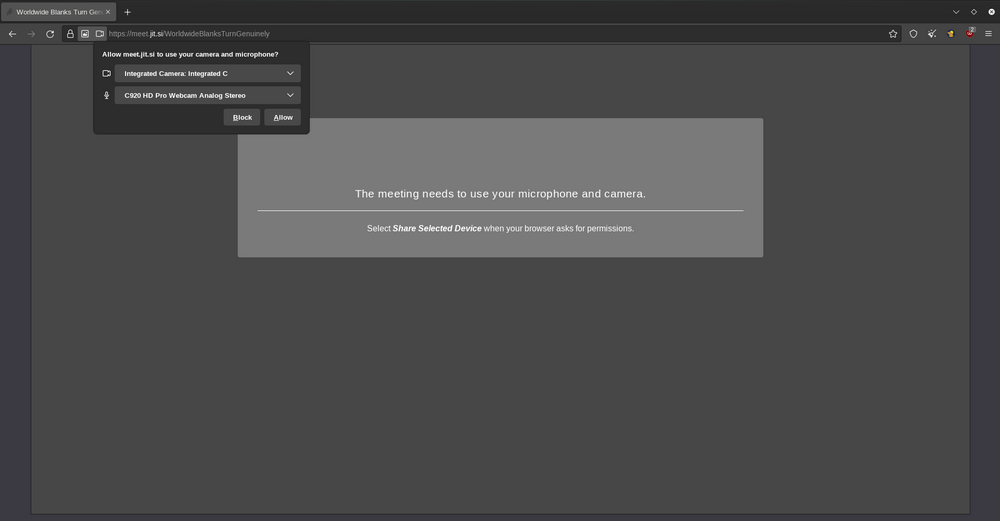
On the top left you may see a window which is the browser app asking you whether you want to give mic & camera access to this website. You can also specify which device / input source will be used for video and audio respectively.
Camera selection:
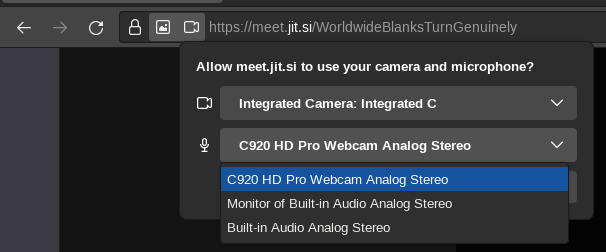
Microphone selection:
In this case we are selecting an external webcam connected via USB to have better video quality. Be sure to click ‘Allow’ here.
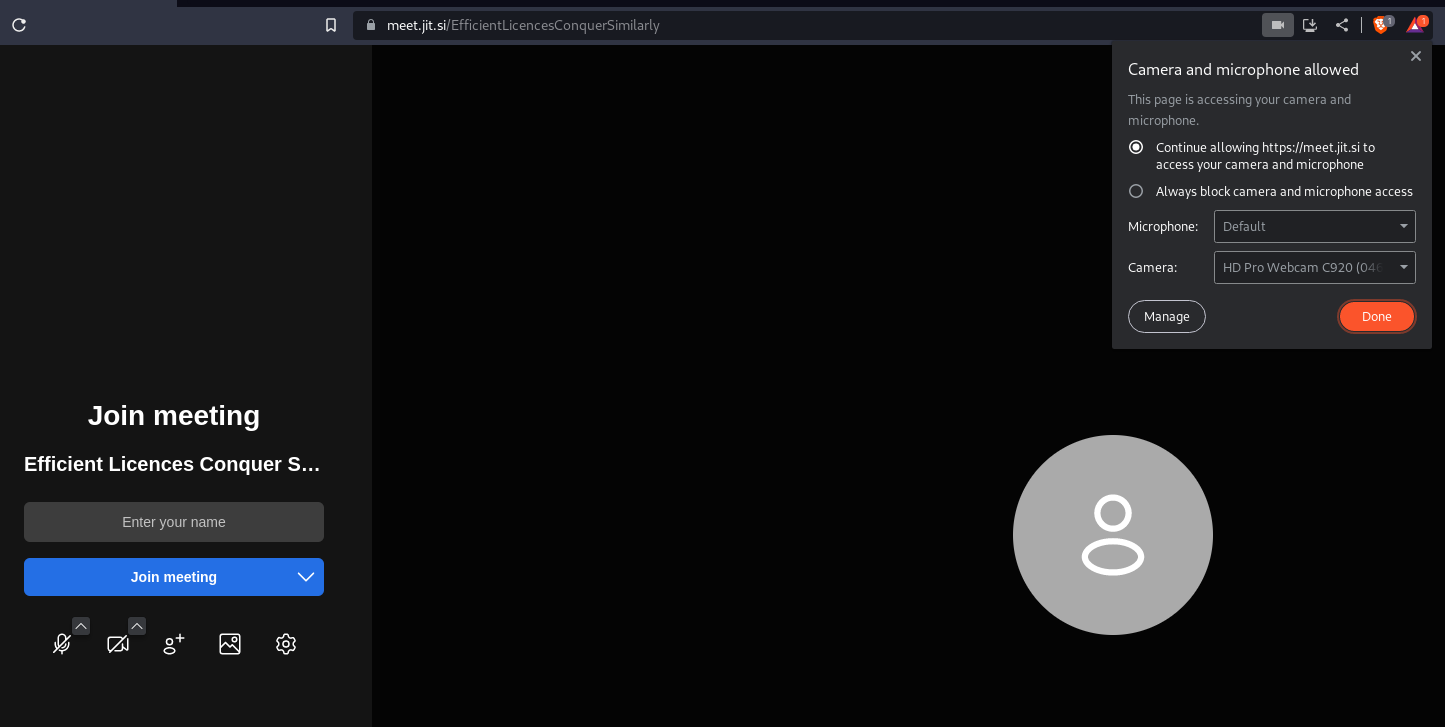
In a Chromium-type web browser (Brave, Chromium, Chrome) the initial prompt looks like this:
After the initial prompt, you can find these browser-level permission settings for cam & mic on the right side of the address bar:
Now that the browser gave the necessary permissions to this website, we can take a look at the website itself and the settings it give us.
On the left sidebar you will see a couple of buttons. If the microphone or the camera button is crossed out, it means that they are not enabled on the site itself.
Just click on them to toggle them off or on.
You can also specify the audio input / output settings, as well as the camera. There is a quick selection using the arrows on the top right of the microphone and the camera button respectively. For further settings, click on the gear icon towards the right.
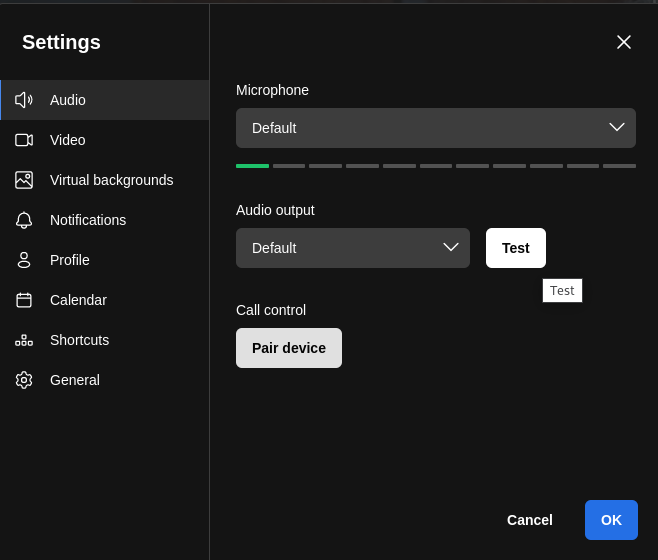
In the ‘Audio’ section you can see an indicator with columns that shows you if Jitsi Meet is able to pick up your audio at the moment.
If everything is set up right, Jitsi Meet will actually tell you that your microphone is working properly and you should see your own camera image in the screen as follows:
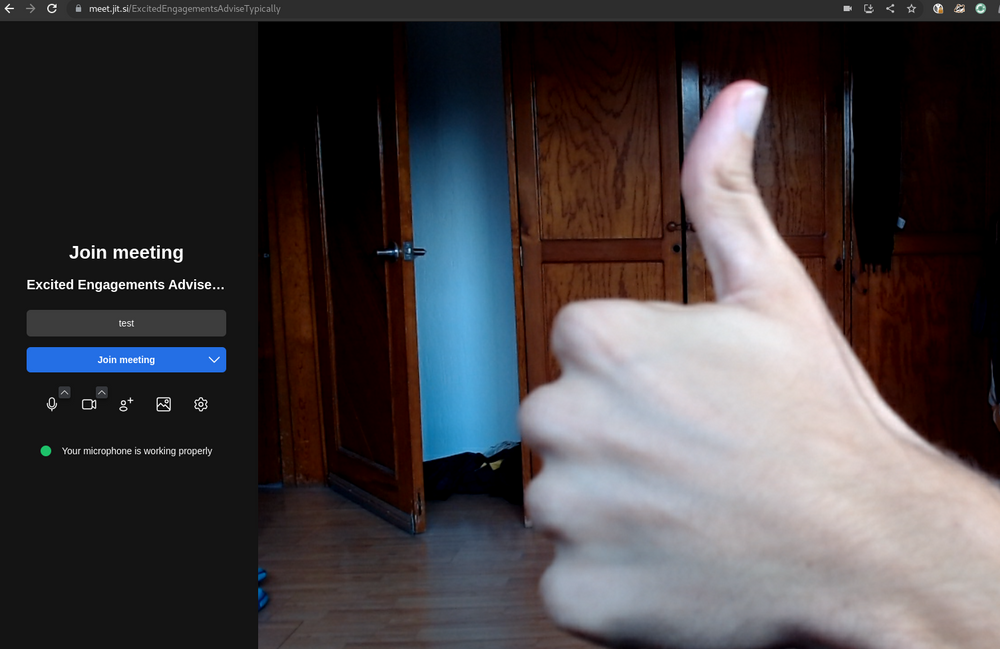
That’s it — you are now ready to join the meeting by pressing on the blue button saying ‘Join meeting’.
If things did not work for you, please keep on reading for troubleshooting steps.
Troubleshooting steps
If the initial prompt to grant permissions is dismissed, it can be hard to see what’s wrong. In this case it may be possible to go into the browser’s preferences and explicitly grant the Jitsi website permission to mic and camera. The specific steps to do this will depend on the specific browser.
Chromium-type browser:
Settings > Privacy and Security > Site Settings
Firefox-type browser:
Settings > Privacy & Security > Permissions
If the browser you are using is not working well for you, consider installing a different browser. We recommend Librewolf or Mullvad Browser.
Permissions from the operating system level
In the last section we covered how to enable and manage permissions on the web browser level, as well as on website itself. If you did not get either the camera or the microphone working, it may be because there are missing permissions on the operating system level preventing it.
Let’s take a look on what to look out for on different systems:
Windows
Camera access:
Click on the Windows logo or press the Windows key on the keyboard
Go to System Settings > Privacy & Security > Camera
Be sure that ‘Let desktop apps access your camera’ is turned ON — you should see your browser apps underneath.
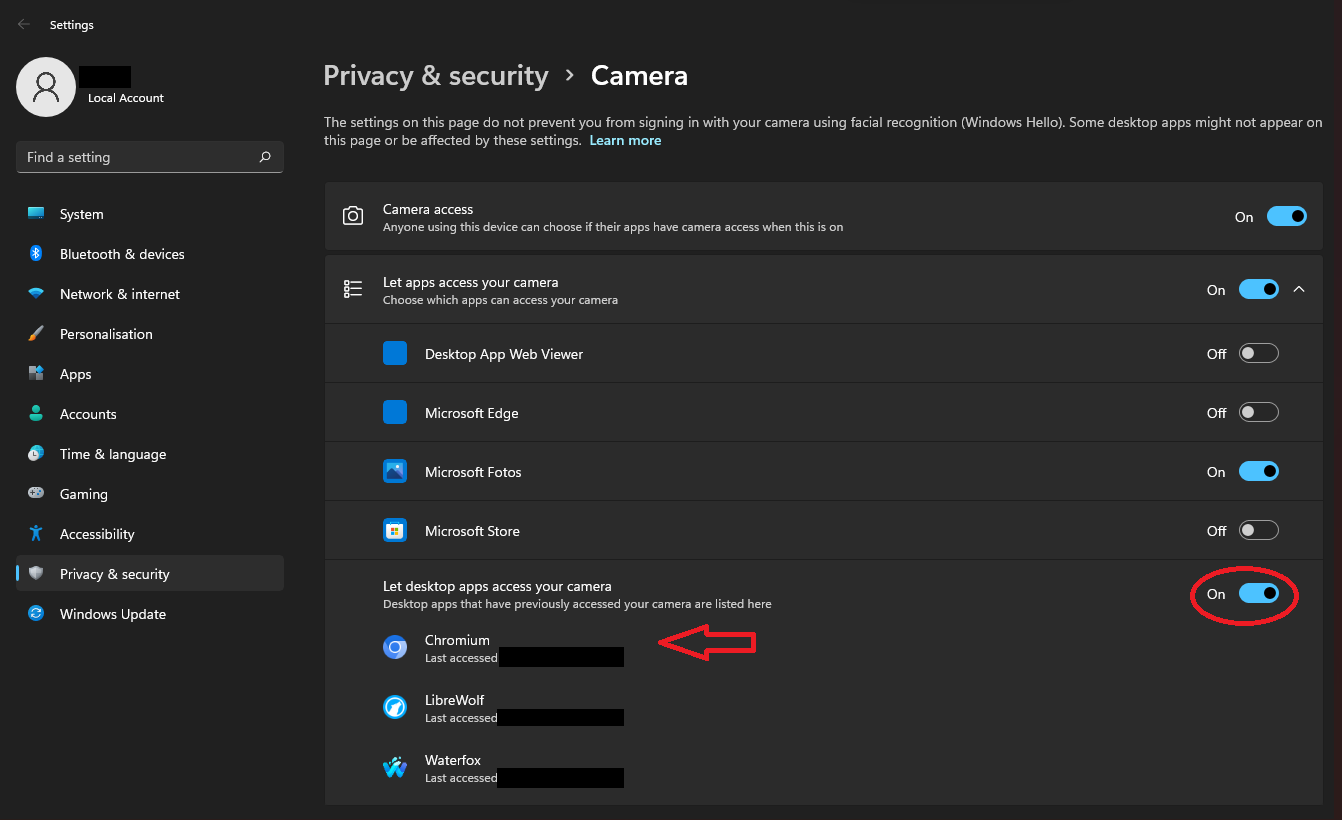
Be sure that ‘Let desktop apps access your camera’ is turned ON — you should see your browser apps underneath
Microphone access:
Click on the Windows logo or press the Windows key on the keyboard
Go to System Settings > Privacy & Security > Microphone
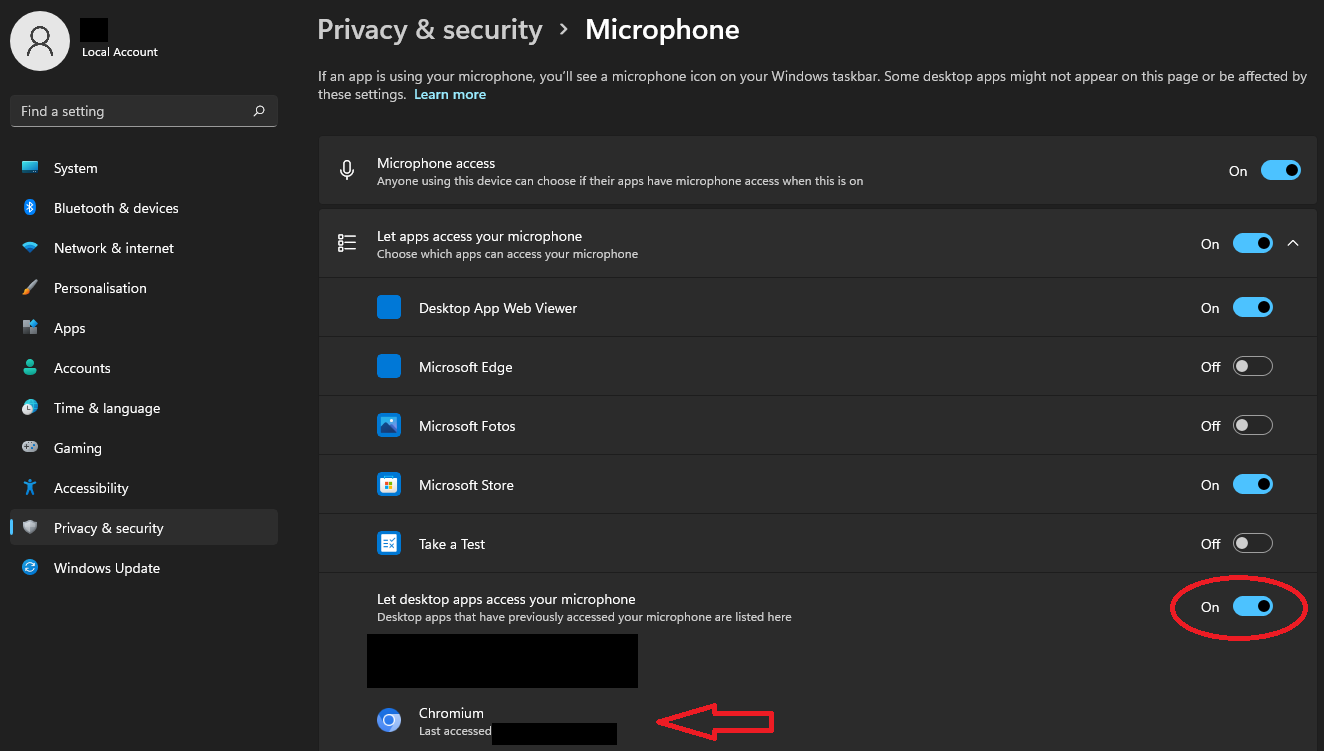
Be sure that ‘Let desktop apps access your microphone’ is turned ON — you should see your browser apps underneath
macOS
Be sure that your web browser has access to the microphone and camera, as well as screen recording, if you want to use screen sharing in Jitsi.
Click on the Apple logo on the top left, go to System Preferences > Privacy & Security. You should find a section for ‘Screen Recording’ in there.
If you see the web browser you’re using, ensure the toggle is turned on for it. If you don’t see the web browser, click the + and add it.
To learn more about Jitsi generally, please refer to our main article:
Jitsi Meet — Video Conferencing
Jitsi Meet is an open-source voice and video-conferencing application that can
run on any smartphone or within a web browser. Jitsi is an excellent alternative
to proprietary videoconferencing applications (Zoom, Skype, Microsoft Teams,
Google Hangouts) and is open for anyone to use either as a host…
mobius
Here are some more articles to get you started with Jitsi:
Jitsi Meet (main article)
How to create a meeting
Jitsi Features — Audio & Video settings, Text chat, Screen sharing and Video sharing
How to invite friends to your meeting
How to moderate your meetings on Jitsi
Это приложение для Windows под названием Jitsi Meet, последний выпуск которого можно загрузить как 2.0.6689.zip. Его можно запустить онлайн в бесплатном хостинг-провайдере OnWorks для рабочих станций.
Загрузите и запустите онлайн это приложение под названием Jitsi Meet with OnWorks бесплатно.
Следуйте этим инструкциям, чтобы запустить это приложение:
— 1. Загрузил это приложение на свой компьютер.
— 2. Введите в нашем файловом менеджере https://www.onworks.net/myfiles.php?username=XXXXX с желаемым именем пользователя.
— 3. Загрузите это приложение в такой файловый менеджер.
— 4. Запустите любой онлайн-эмулятор OS OnWorks с этого сайта, но лучше онлайн-эмулятор Windows.
— 5. В только что запущенной ОС Windows OnWorks перейдите в наш файловый менеджер https://www.onworks.net/myfiles.php?username=XXXXX с желаемым именем пользователя.
— 6. Скачайте приложение и установите его.
— 7. Загрузите Wine из репозиториев программного обеспечения вашего дистрибутива Linux. После установки вы можете дважды щелкнуть приложение, чтобы запустить его с помощью Wine. Вы также можете попробовать PlayOnLinux, необычный интерфейс поверх Wine, который поможет вам установить популярные программы и игры для Windows.
Wine — это способ запустить программное обеспечение Windows в Linux, но без Windows. Wine — это уровень совместимости с Windows с открытым исходным кодом, который может запускать программы Windows непосредственно на любом рабочем столе Linux. По сути, Wine пытается заново реализовать Windows с нуля, чтобы можно было запускать все эти Windows-приложения, фактически не нуждаясь в Windows.
СКРИНШОТЫ

Джитси Встреча
ОПИСАНИЕ
Давай, видеочат со всей командой. Собственно, пригласите всех, кого знаете. Jitsi Meet — это полностью зашифрованное решение для видеоконференцсвязи с 100% открытым исходным кодом, которое вы можете использовать весь день, каждый день, бесплатно — без необходимости в учетной записи. Перейдите на сайт meet.jit.si и посмотрите, как работает сервис, прежде чем вы решите, хотите ли вы запустить свой собственный экземпляр. Для заинтересованных ознакомьтесь с условиями обслуживания и политикой конфиденциальности meet.jit.si. Да, это бесплатно — и это тоже технологически продвинуто. Фактически, Jitsi Meet звучит лучше благодаря HD-аудио с Opus; анонимно, нет необходимости в аккаунте, никогда! Он также сохраняет конфиденциальность разговоров с помощью шифрования по умолчанию (и расширенных настроек безопасности) и удобен для разработчиков, изменяйте и настраивайте его по своему усмотрению. Это 100% открытый исходный код. Обменивайтесь сообщениями и смайликами во время видеоконференции со встроенным чатом.
Особенности
- Делитесь своим рабочим столом, презентациями и т. Д.
- Приглашайте пользователей в конференцию с помощью простого настраиваемого URL-адреса
- Совместное редактирование документов с помощью Etherpad
- Выбирайте URL-адреса забавных встреч для каждой встречи
- Обменивайтесь сообщениями и смайликами во время видеоконференции
- Предоставляет интегрированный чат
Язык программирования
JavaScript
Это приложение также можно загрузить с https://sourceforge.net/projects/jitsi-meet.mirror/. Он размещен в OnWorks, чтобы его можно было легко запускать в Интернете с помощью одной из наших бесплатных операционных систем.
Jitsi is a collection of open-source projects that you can use to easily develop and implement secure video conferencing solutions. At the heart of Jitsi are two sections called Jitsi Video bridge and Jitsi Meet, which allow you to set up video conferencing on the Internet. While other projects in this collection provide users with other features such as audio, connection (Dial-in), multiple recording, and playback. Jitsi started out as a tool for connecting people via audio and video on the Internet. However, over the course of a decade, the project became something much bigger. In this article, we are going to teach you to step by step How to Install Jitsi Meet on Windows 10 RDP. You can visit the packages available in Eldernode if you need to purchase a Windows VPS server.
Table of Contents
Unlike other video conferencing technologies, the Jitsi Video bridge, the beating heart of Jitsi, sends video and audio to everyone attending rather than blending. The result is a relationship with less latency and better quality. Scalability will be easier and cheaper if you use your own service. Jitsi is fully compliant with the free Web communications standard WebRTC.
Jitsi also supports advanced video routing concepts such as multiple playbacks, bandwidth estimation, scalable video coding, and more. It should note that Jitsi is coding using the Java programming language and the so-called Native.
In this article, we are going to introduce and express some of the features of Jitsi Meet in the first step. Then we will teach you how to Install Jitsi Meet on Windows 10 RDP. Please join us.
What is Jitsi Meet
Jitsi is a suite of free and open-source multipurpose voice applications (VoIP), video conferencing, and instant messaging for web, Windows, Linux, Mac OS, iOS, and Android applications.
The Jitsi project was formerly known as the SIP Communicator. As WebRTC grew, the project team’s focus shifted to the Jitsi Video bridge to allow multidirectional web video calling. The team later added Jitsi Meet. Jitsi Meet is a complete video-conferencing application that includes web clients for Android and iOS operating systems.
Jitsi also used Meet.jit.si, a version of Jitsi Meet hosted by Jitsi for free use in the community. This software has received support from various institutions such as the NLnet Foundation, the University of Strasbourg, and the Alsace region.
In the next section, we will mention some of the features of Jitsi Meet. Then we will teach you how to install Jitsi Meet on Windows 10 RDP.
Jitsi Meet Features
In this section, we want to introduce some of the features of Jitsi Meet. These features include:
– Simple work with software
– High power, speed, and security
– Unlimited file upload
– Make video conferencing calls
– Establish direct multimedia communication using the ICE protocol
– Powerful encryption
– File transfer for XMPP, AIM / ICQ, Windows Live Messenger, YIM
– Encrypt messages with OTR
– IPv6 support for SIP and XMPP
– Audio and video calls for SIP and XMPP using H.264, H.263, or VP8 for video encryption
– Support for group video calls
– Free, open-source, and WebRT compatible
Install Jitsi Meet on Windows 10 RDP
After you are fully acquainted with Jitsi Meet in the previous sections, now we want to teach you to step by step how to install Jitsi Meet. To do this, just follow the steps below.
In the first step, you need to go to the Jitsi website and download Jitsi.
Then go to the place where you downloaded the file. Double-click it to begin the Jitsi installation process. In the window that opens, click on Run.
Click on Next.
On the License Agreement page, click I accept… the and then click Next.
In the next step, select the path where you want Jitsi to be installed and click Next.
In this section, you must select the settings you want and click Next again.
Note: Leave “SIP” and “XMPP” checked in order to let Jitsi take calls and chat sessions when you click on special web links.
Now you have to click on Install to start installing Jitsi:
*
Finally, click Finish to complete the Jitsi installation process.
How to use Jitsi Meet on Windows 10 RDP
After you have successfully completed the steps mentioned to install Jitsi meet, now we want to teach you how to use this software.
As you can see in the image below, Jitsi lets you log into several chat accounts at once. Fill out the username and password for the accounts you already have. If you don’t have any accounts with the providers listed, create a new account by clicking on one of the “Not registered yet” links. After filling in the username and passwords for the accounts you want to use, click “Sign in.”
Once you have created your account, you will need to wait for Jitsi to connect. When the status changes to “online“, you will be ready to chat.
Conclusion
Jitsi is a collection of open-source projects that allow you to build and deploy secure video conferencing solutions. Jitsi Meet has many features and is constantly being added, some of which have been mentioned. In this article, we also tried to teach you How to Install Jitsi Meet on Windows 10 RDP.