
Getting started with Jenkins
The Jenkins project produces two release lines, LTS and weekly.
Depending on your organization’s needs, one may be preferred over
the either.
Both release lines are distributed as
.war
files, native packages, installers, and Docker containers.
Weekly
A new release is produced weekly to deliver bug fixes and
features to users and plugin developers.
Changelog
|
Past Releases
Download Jenkins
2.46.1
for:
Download Jenkins
2.53
for:
Once a Jenkins package has been downloaded, proceed to the
Installing Jenkins
section of the User Handbook.
| Скачать Jenkins | |
| Разрешить Log on as a service | |
| Установка Jenkins | |
| Дополнительная настройка при установке | |
| Статьи про Jenkins |
Скачать Jenkins
Скачать Jenkins можно
здесь
Убедитесь, что вы уже
установили Java 11
Скачать JDK 11 можно
здесь
— если у вас есть аккаунт Oracle
или
здесь
— если вы не хотите его создавать.
Разрешить Log on as a service
Сперва нужно определиться каким пользователем будет запускаться Jenkins. Я создам отдельного пользователя
JenkinsUser, но вы можете не создавать нового пользователя — в зависимости от предпочтений и прав
доступа.
Нужно дать этому пользователю возможность логиниться как сервису и запомнить его имя для
шага
в котом нужно будет выбрать
Logon Type
Зайдите в Local Security Policy -→ User Rights Assignment -→ Log on as a service

www.eth1.ru
Нажмите Select Users or Groups → Check Names → Выберите пользователя

www.eth1.ru
Установка Jenkins
Двойной клик на установочном файле → Нажать Next

www.eth1.ru
Выбрать директорию, в которую будет установлен Jenkins. Можно оставить Program Files
по умолчанию.
Как вариант — можно установить в директорию tools или dev или что-то в таком духе. Это короче и не содерижт пробела.

www.eth1.ru
Если у вас есть доступ к пользователю Administrator — можно выбрать его

www.eth1.ru
На этом шаге я добавлю заранее созданного пользователя JenkinsUser

www.eth1.ru
Обычно для Jenkins используют порт 8080 если он свободен. Подробнее про сети можно прочитать
здесь

www.eth1.ru

www.eth1.ru

www.eth1.ru
Если вы не хотите вносить изменения в конфиг и вас устраивает автозапуск — нажмите Next

www.eth1.ru
Если вы хотите, чтобы Jenkins запускался автоматически — не убирайте Start Service.
В этом примере я убираю Start Service чтобы затем внести изменения в конфигурацию.

www.eth1.ru
Нажмите Install

www.eth1.ru

www.eth1.ru
Нажмите Finish

www.eth1.ru
Дополнительная настройка Jenkins
В директории, в которой установлен Jenkins:
C:\Program Files\Jenkins или C:\tools\Jenkins
нужно отредактировать файл
jenkins.xml
<!—
<env name=»JENKINS_HOME» value=»%LocalAppData%\Jenkins\.jenkins»/>
<executable>C:\Program Files\jdk-11.0.0.1\bin\java.exe</executable>
<arguments>-Xrs -Xmx256m -Dhudson.lifecycle=hudson.lifecycle.WindowsServiceLifecycle -jar «C:\Program Files\Jenkins\jenkins.war» —httpPort=8080 —webroot=»%LocalAppData%\Jenkins\war»</arguments>
…
<pidfile>%LocalAppData%\Jenkins\jenkins.pid</pidfile>
—>
<!— Если установлен в Program Files —>
<env name=»JENKINS_HOME» value=»C:\data\jenkins_home»/>
<executable>%JAVA_HOME%\bin\java.exe</executable>
<arguments>-Xrs -Xms3g -Xmx3g -Djava.awt.headless=true -Djava.net.preferIPv4Stack=true -Djava.io.tmpdir=C:\Program Files\Jenkins\tmp\ -Dorg.apache.commons.jelly.tags.fmt.timeZone=Europe/Helsinki -Duser.timezone=Europe/Helsinki -Dhudson.lifecycle=hudson.lifecycle.WindowsServiceLifecycle -jar «C:\Program Files\Jenkins\jenkins.war» —httpPort=8080 —webroot=»C:\Program Files\Jenkins\war» —pluginroot=»C:\Program Files\Jenkins\plugins»</arguments>
<pidfile>C:\Program Files\Jenkins\jenkins.pid</pidfile>
<!— Если установлен в tools —>
<env name=»JENKINS_HOME» value=»C:\data\jenkins_home»/>
<executable>%JAVA_HOME%\bin\java.exe</executable>
<arguments>-Xrs -Xms3g -Xmx3g -Djava.awt.headless=true -Djava.net.preferIPv4Stack=true -Djava.io.tmpdir=C:\tools\Jenkins\tmp\ -Dorg.apache.commons.jelly.tags.fmt.timeZone=Europe/Helsinki -Duser.timezone=Europe/Helsinki -Dhudson.lifecycle=hudson.lifecycle.WindowsServiceLifecycle -jar «C:\tools\Jenkins\jenkins.war» —httpPort=8080 —webroot=»C:\tools\Jenkins\war» —pluginroot=»C:\tools\Jenkins\plugins»</arguments>
<pidfile>C:\tools\Jenkins\jenkins.pid</pidfile>
www.eth1.ru
В директории, в которой установлен Jenkins нужно создать директорию tmp
Автор статьи: Андрей Олегович
Статьи про Jenkins
| Jenkins | |
| Установка Jenkins | |
| Основы Jenkins | |
| Агенты | |
| Jenkins Freestyle project | |
| Jenkins Pipeline | |
| Credentials | |
| Задания по расписанию | |
| Плагины | |
| Разбор ошибок | |
| DevOps | |
| Docker | |
| Make |
If you’re a developer, you know that Jenkins is an essential tool for your workflow. Jenkins is a continuous integration (CI) server that helps you automate the build, test, and deploy process of your software projects. Jenkins download takes care of all the tedious and time-consuming tasks involved in development so you can focus on writing code.
If you are in the process of automating your software development or you are looking for a way to optimize your current practices, you can download Jenkins on Windows, macOS, Linux, as well as Docker. Here, we will take you through the steps to get Jenkins up and running on your system. We also get you the requirements for installing Jenkins and configuring it for your own projects.
Why Use Jenkins?
Jenkins is an open-source automation server written in Java. It is a powerful tool that provides you with numerous benefits including:
- Automatically build and test your code whenever you commit changes.
- Deploy your code automatically to testing or production servers.
- Orchestrate complex Jenkins deployment pipelines that include multiple stages, such as building a Docker image, pushing it to a registry, and then deploying it to a server.
- There are over 1,000 plugins available that allow you to integrate Jenkins with a wide range of tools, including Amazon AWS, Microsoft Azure, Slack, and more.
- The Jenkins user community is large and their contributors help to make it better with each release.
In a nutshell, Jenkins provides an easy way to set up a continuous integration or continuous delivery (CI/CD) pipeline. Jenkins certification will make you an expert in utilizing Jenkins for software delivery. This brings numerous benefits such as reduced risks and faster software delivery.
Before You Download Jenkins
Downloading Jenkins is as simple as a few clicks. However, before you download Jenkins, it is important to consider some crucial factors in Jenkins documentation;
Understanding Release Types
Jenkins offers two different types of releases: stable (LTS) and regular. It is important to understand the difference between the two before you download Jenkins:
- Stable (LTS) releases are chosen every 12 weeks from the stream of regular releases. They include bug and security fix backports. LTS Jenkins releases are supported for one year after their initial release and receive security updates for an additional year.
- Regular releases are delivered on a weekly cadence and include new features and bug fixes. They are aimed at users and plugin developers who need the latest features and don’t mind dealing with potential bugs.
If you’re looking for a stable, well-supported version of Jenkins, go with the Jenkins LTS download release. If you need the latest features and don’t mind dealing with potential bugs, go with a regular release.
Prerequisites
Before you download Jenkins, it is important to understand the prerequisites. It will ensure that Jenkins runs smoothly on your system:
Hardware Requirements
- Jenkins requires 256 MB of RAM and 1 GB of drive space. However, it is recommended that you have at least 10 GB of drive space and 2 GB of RAM if you are running Jenkins as a Docker container.
- If you are a part of a small team, it is recommended that you have at least 4 GB of RAM and 50 GB of drive space for Jenkins installation.
Software Requirements
- Modern versions of Jenkins require Java 8 or 11.
- Supported web browsers include Google Chrome, Mozilla Firefox, MS Edge, and Safari.
- Jenkins can run on Windows.
- Linux and Mac operating systems can also be used for running Jenkins in Docker.
How to Download Jenkins?
While Jenkins is a powerful tool, it can be challenging to download and set up. You need to first download it, and then unlock it. Fortunately, once you know the steps, the process is relatively straightforward. Let’s take a look;
Steps to Download Jenkins (With HQ Screenshots)
Missing a step in Jenkins download can lead to problems installing it. To avoid any problem, follow all the steps as instructed:
For Windows
- Visit https://www.jenkins.io/download/ and choose Windows.
How to Unlock Jenkins?
After you install Jenkins on your system, it is necessary to start its configuration for its proper use. To do this, follow the below instructions:
As soon as you finish installing Jenkins on your system, you must open your web browser and search http://localhost:8080 or http://localhost:8090 based on your port selection.
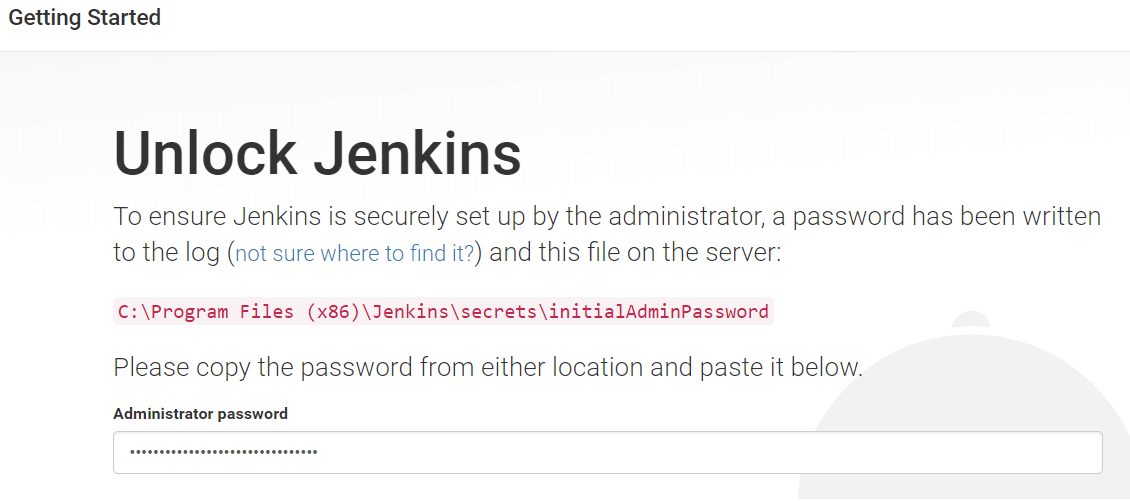
Once you visit the local host, you’ll be asked for credentials. If you’re a Windows user, you’ll get the administrator password under the installation path of Jenkins. The default one is C:\Program Files (x86)\Jenkins. However, it also varies on what directory you chose during its installation.
Once you reach there, look for the InitialAdminPassword file and open it to copy the code. Now paste the code into the pop-up tab prompting for password and choose Continue to unlock Jenkins successfully.
Mac users will get the location of the password on their screen. It is generally, /Users/Shared/Jenkins/Home/Secrets/Initialadminpassword. However, it can also vary if you chose a different installation folder.
Linux users can enter sudo cat /var/lib/Jenkins/secrets/initialadminpassword and they will get the password.
Docker users will get the password on their CMD screen after they finish the installation of Jenkins. Also, they can reach /var/jenkins_home/secrets/initialadminpassword to copy the password.
Customize Jenkins
Customizing Jenkins allows you to optimize your build pipeline for specific environment. It leads to faster builds and when combined with DevOps certification, the opportunities for your growth are doubled. Here’s how you can customize Jenkins:
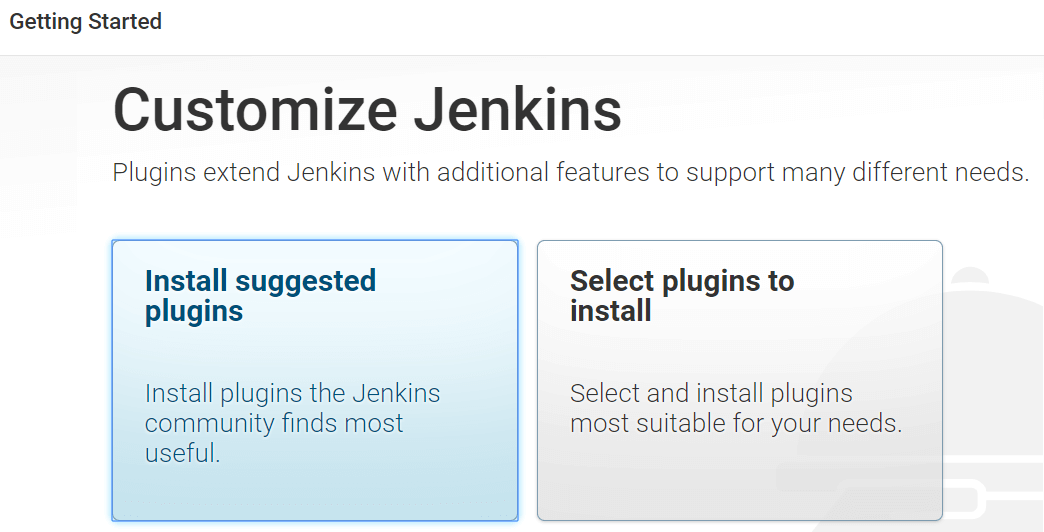
- In order to install the essential plugins for Jenkins, simply click on the «Install suggested plugins button». Jenkins will automatically begin to download and install all of the necessary plugins.
- You also have the option to «Select Plugins to Install» and hand-pick which plugins you would like to install.
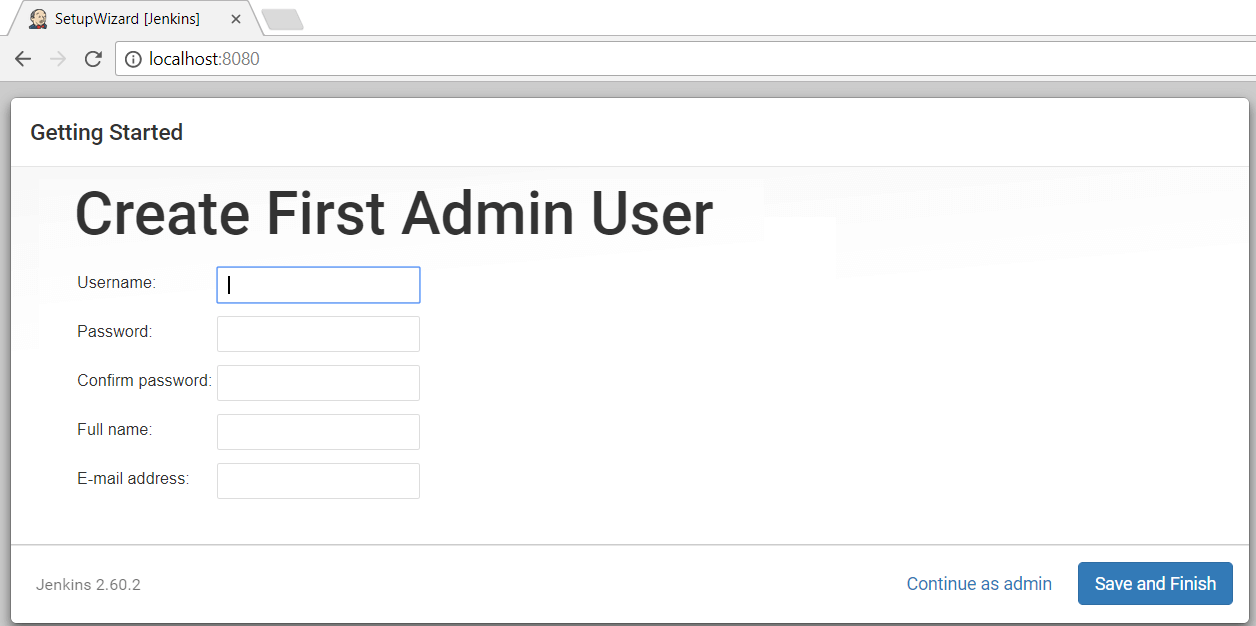
- After all of the desired plugins have been installed, fill out the fields in the «Create First Admin User» panel with your account details and hit «Save and Finish».
- Lastly, it will ask for URL information. Here, you can configure the default instance path for Jenkins.
Unless you have a good reason to change it, leave it as it is so as to avoid any confusion later on. If another application is already using port 8080, you can simply choose another port and you are all set! Now, you are ready to create some Jenkins Jobs.
Jenkins Download Links for All Environments (OS etc.)
| Download Jenkins 2.346.2 LTS for | Download Jenkins 2.359 for |
|---|---|
| Generic Java package (.war) | Generic Java package (.war) |
| Docker | Docker |
| Ubuntu/Debian | Ubuntu/Debian |
| CentOS/Fedora/Red Hat | CentOS/Fedora/Red Hat |
| Windows | Windows |
| openSUSE | openSUSE |
| FreeBSD | Arch Linux |
| Gentoo | FreeBSD |
| macOS | Gentoo |
| OpenBSD | macOS |
| OpenBSD | |
| OpenIndiana Hipster |
How to Verify Jenkins Downloads?
WAR File Verification
When you download a file from the Jenkins server, it is important to verify the authenticity of the file before opening it. One way to do this is to use jarsigner, a tool that is included with the Java Development Kit (JDK).
To use jarsigner, you first need to locate the file that you downloaded from Jenkins. If the file is compressed, you will need to uncompress it first. Once you have located the file, open a command prompt and navigate to the directory where the file is located.
At the command prompt, type «jarsigner -verify -verbose [filename]» and press Enter. This will display information about the file, including whether or not it has been signed by a trusted source.
If you see «jar verified» followed by a certificate chain, then you can be confident that the file is safe to open. If you do not see this message, or if you see an error message instead, then the download package may have been tampered with and should not be opened.
Windows MSI Installers
When you perform the Jenkins download from its official website, the installer file is signed with a digital signature. This signature helps verify the file’s integrity and authenticity. You can use the signtool utility to verify the digital signature of the file.
The signtool utility is included in the Windows SDK. To use signtool, you must first install the Windows SDK on your computer. Then, open a command prompt and navigate to the folder where the Jenkins installer file is located.
Run the following command: signtool verify /v jenkins.msi. This will display information about the digital signature, including the signer’s identity and the date and time when the file was signed.
If the signature is valid, you will see a message indicating that «Signature verification succeeded.» Otherwise, you will see an error message indicating that the signature is invalid. Either way, you can be confident that the file you downloaded has not been tampered with and is safe to install.
Linux Package Repositories
For Linux users, the most common way to do this is by using a Package Manager like apt or yum. These tools will check the digital signatures of the files you’re downloading against a known good key, ensuring that the files have not been tampered with.
You can also verify Jenkins downloads by checking the GPG signature. The Jenkins project provides a signing key that you can use to verify the authenticity of your download. Simply run the ‘gpg’ command against the downloaded file, and you’ll have a detailed report showing whether or not the file has been altered.
How to Deploy Jenkins in Public Cloud?
One of the great things about Jenkins is that you can install Jenkins on AWS, Azure, and Google Cloud Platforms like public clouds. There are two main ways to deploy Jenkins in a public cloud: using a managed service or using a self-managed virtual machine.
If you choose to use a managed service, then the cloud provider will take care of provisioning and managing the underlying infrastructure for you. This can be a great option if you don’t want to deal with the complexities of setting up and maintaining your own Jenkins server. However, it can also be more expensive than running your own server.
If you choose Jenkins deployment on your own server, then you will need to provision and configure a virtual machine in the public cloud. This option gives you more control over the server, but it also requires more work to set up and maintain. Once you have provisioned your virtual machine, you can follow the official instructions for installing Jenkins.
Once Jenkins is up and running, you will need to configure it in order to allow access from the outside world. This can be done by setting up a reverse proxy or by using a tool such as ngrok. Once your instance is properly configured, you should be able to access Jenkins cloud from anywhere in the world.
Conclusion
Jenkins is a continuous integration server that enables developers to find and solve problems faster. It is an open-source project that has been around for over 10 years and has more than 1,000 contributors. There are thousands of plugins available, making Jenkins extremely versatile and its community is one of the key reasons why it has been so successful.
While it was originally designed for Java projects, Jenkins now supports builds written in over 150 programming languages. We hope this article helped you download and install Jenkins easily.
KnowledgeHut Jenkins certification can provide you with all the knowledge necessary to utilize Jenkins effectively. With this knowledge under your belt, you will be able to streamline your development process and enhance your career opportunities.
Frequently Asked Questions (FAQs)
1. Is Jenkins completely free?
Jenkins is an open-source automation server that enables developers to build, test and deploy their software. It is free to use and distribute under the MIT license. Jenkins supports a wide range of plugins to enable you to integrate them with your existing tools and processes.
While Jenkins is free to use, it does require a dedicated server and some technical expertise to set up and maintain. However, once up and running, it can provide a cost-effective way to automate your builds and tests.
2. How do I download Jenkins?
To start Jenkins download, head to the official website at jenkins.io. On the left-hand side of the screen, under the «Download» heading, click on the platform that you’re willing to install Jenkins on.
Once the file is downloaded, launch it and follow the instructions on that page to complete the installation. Once Jenkins is up and running, you can start using it to automate your build process.
3. On which OS can Jenkins be installed?
Jenkins can be installed on a variety of operating systems, including Windows, macOS, Linux, and more. In addition, Jenkins can be run on a wide range of web servers and application servers, such as Apache Tomcat and Jetty.
There are also a number of cloud-based solutions that allow you to run Jenkins in the cloud. Regardless of your platform or infrastructure, there is a way to install and run Jenkins.
4. How do I start Jenkins on Windows 10?
To start Jenkins on Windows 10, make sure that you’re logged in as an admin. After that, follow the below instructions:
- Double-click the Jenkins icon. If you have UAC enabled, you will be prompted for permission.
- Once Jenkins starts, you should see the Unlock Jenkins screen.
- Enter the administrator password that you set during the installation process, and click Continue.
- On the next screen, select Install suggested plugins. This will install a set of default plugins, which will provide basic functionality for Jenkins.
- Once the plugin installation is complete, you will be prompted to create a first admin user.
- Fill in the required fields, and click Save and Finish.
- You should now be able to access Jenkins dashboard at http://localhost:8080/.
Earlier, we had learnt How To Install Maven in Eclipse and then we learnt How To Create Maven Project in Eclipse. Today in this post, we are going to see How To Download And Install Jenkins.
Don’t Miss: Selenium Complete Tutorial
Let’s get started.
Step 1: Download Jenkins
Step 2: Install Jenkins
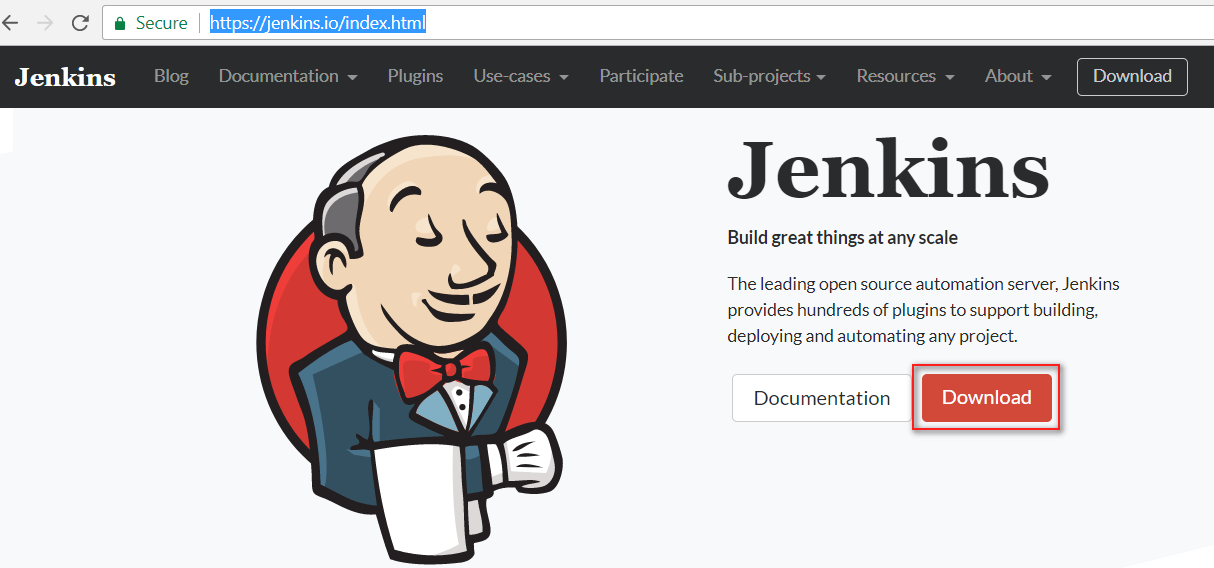
To download Jenkins, Go to ‘https://jenkins.io/index.html‘ and download correct package as per your OS.
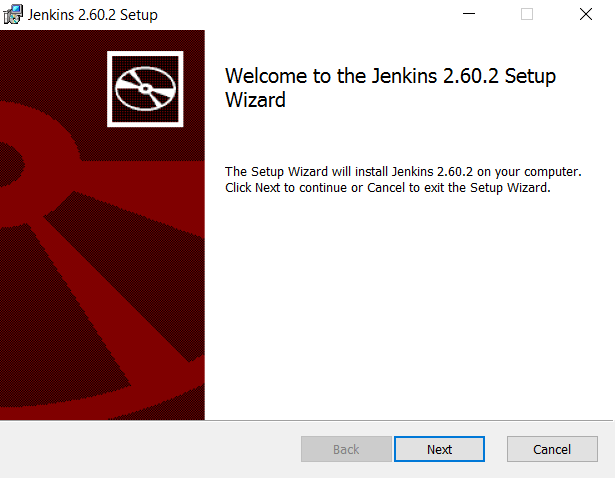
I have downloaded Jenkins version 2.60.2
Unzip Jenkins to a specified folder. Right click on ‘jenkins.msi’ file and click on ‘Install’
Click on ‘Next‘ button
Click on ‘Next‘ button

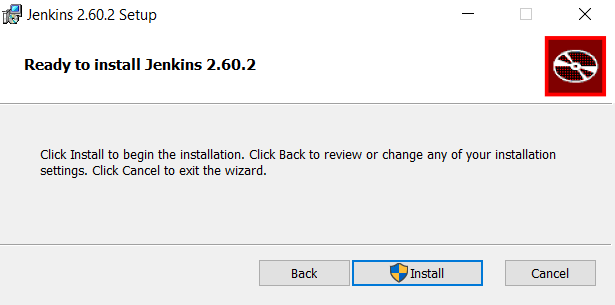
Click on ‘Install‘ button to install Jenkins.
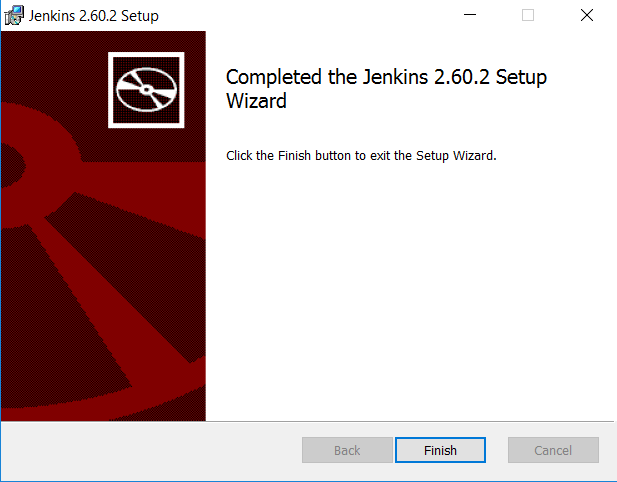
Click on Finish button.
Once the installation is done, navigate to the Jenkins Dashboard (http://localhost:8080 by default) in the browser window.
Copy the password from initialAdminPassword file and paste it. In my case the location is “C:\Program Files (x86)\Jenkins\secrets\initialAdminPassword”
Click on ‘Install Suggested Plugins‘
Create an Admin user by giving Username, Password, Full Name and Email Address of your preference.
This way we could Install Jenkins in Windows. In the next post, we see How To Execute TestNG Scripts (using TestNG.xml file) Using Jenkins and How To Execute Maven Project Using Jenkins.
Rajkumar SM is the founder of SoftwareTestingMaterial. He is a certified Software Test Engineer by profession and a blogger and YouTuber by choice. He has extensive experience in the field of Software Testing. Furthermore, he loves spending time with his wife and their cute little kid, ‘Freedom.’
- Windows
- Developer Tools
- Jenkins 2.462.3
Jenkins2.462.3
Jenkins is a widely used open-source automation server designed to facilitate continuous integration and continuous delivery (CI/CD) in software development. By automating the building, testing, and deployment of applications, Jenkins enables developers to deliver software more rapidly and with higher quality. It is highly extensible, supporting thousands of plugins that allow it to integrate seamlessly with various tools and technologies.
One of the key strengths of Jenkins is its flexibility. It can be used across different platforms and can accommodate projects of all sizes, from small individual efforts to large enterprise-level operations. Jenkins supports distributed workloads, allowing jobs to be executed on multiple machines, thereby optimizing the use of resources and speeding up the development process.
Jenkins offers a user-friendly interface that provides detailed reports and insights into the development process. Developers can easily monitor the status of their builds, tests, and deployments, ensuring that issues are identified and resolved quickly. The server’s extensive plugin ecosystem further enhances its functionality, enabling users to tailor Jenkins to meet their specific project needs.
Jenkins is an essential tool for modern software development, empowering teams to implement CI/CD practices efficiently. Its open-source nature, combined with robust community support, ensures that Jenkins remains a powerful and adaptable solution for developers worldwide.
Key Features:
- Automated Code Integration: Automatically merges code from different contributors.
- Plugin Support: Offers many plugins to extend its capabilities.
- Distributed Builds: Runs jobs on multiple machines for faster results.
- Pipeline as Code: Allows complex workflows to be written and stored as code.
- User-Friendly Interface: Easy-to-use web-based GUI for setup and monitoring.
Program available in other languages
- Télécharger Jenkins
- Herunterladen Jenkins
- Scaricare Jenkins
- ダウンロード Jenkins
- Descargar Jenkins
- Baixar Jenkins
User Reviews
User Rating
License:
Free
Requirements:
Windows Vista/ Windows 7/ Windows 8/ Windows 10/ Windows 11
Languages:
English
Size:
94.89 MB
Publisher:
Jenkins Team
Updated:
Oct 7, 2024
Security Levels
To avoid any potential harm to your device and ensure the security of your data and privacy, our team checks every time a new installation file is uploaded to our servers or linked to a remote server and periodically reviews the file to confirm or update its status. Based on this checking, we set the following security levels for any downloadable files.
Clean
It is highly likely that this software program is clean.
We scanned files and URLs associated with this software program in more than 60 of the world’s leading antivirus services; no possible threats were found. And there is no third-party softwarebundled.
Warning
This program is advertising supported and may offer to install third-party programs that are not required. These may include a toolbar, changing your homepage, default search engine, or installing other party programs. These could be false positives, and our users are advised to be careful when installing and using this software.
Disabled
This software is no longer available for download. It is highly likely that this software program is malicious or has security issues or other reasons.
Submit a Report
Thank you!
Your report has been sent.
We will review your request and take appropriate action.
Please note that you will not receive a notification about anyaction taken dueto this report.We apologize for anyinconvenience this may cause.
We appreciate your help in keeping our website clean and safe.