
-
Home
-
Partition Manager
- Fixed: Java Virtual Machine Launcher Error in Minecraft & Eclipse
By Ariel | Follow |
Last Updated
A lot of users encounter the Java Virtual Machine launcher error when running some Java programs like Minecraft and Eclipse. Don’t worry. This post of MiniTool explores several proven ways to fix the JVM launcher error.
What Does Java Virtual Machine Launcher Error Mean
Java Virtual Machine, also known as JVM, is a virtual environment that allows a computer to run Java programs written in other programming languages that are translated to Java bytecode. Without the JVM, Java programs won’t run properly. Here’s a user who encountered the Java Virtual Machine launcher error in Eclipse.
I’m having an issue with the eclipse JVM launcher. Last night, everything was working fine, as far as I know, nothing at all has changed on my pc since then. However, I woke up this morning to find that when I run any of my projects in eclipse, I receive this error: Java Virtual Machine Launcher- Error: could not open C:Program FilesJavajre1.8.0_60libamd6jvm.cfg
https://stackoverflow.com/questions/33324363/how-to-fix-eclipse-java-virtual-machine-launcher-error
After analyzing extensive user reports, the Java Virtual Machine launcher errors mainly occurs when running in Eclipse and Minecraft. It’s so annoying that the failed to create the Java Virtual Machine error will prevent you from opening the Java-based software.
The error usually indicates that your computer cannot read or understand the bytecode you’re trying to execute. There are different possible reasons behind the Minecraft could not create the Java Virtual Machine error, such as insufficient permissions, corrupt/missing Java components, and incompatibility issues.
How to Fix the Java Virtual Machine Launcher Error
How to fix the Java Virtual Machine launcher errors? Here we summarize some effective fixes. You can try them in order until the JVM error gets fixed.
# 1. Add a New System Variable for Java
Many users reported that Minecraft could not create the Java Virtual Machine error can be resolved by adding a new system variable for Java. You may have a try.
Step 1. Type system variable in the Search box and select Edit the system environment variables from the Best match.
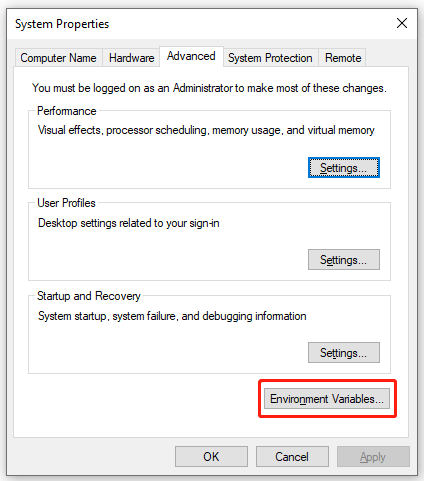
Step 2. In the pop-up window, navigate to the Advanced tab and click on Environment Variables.
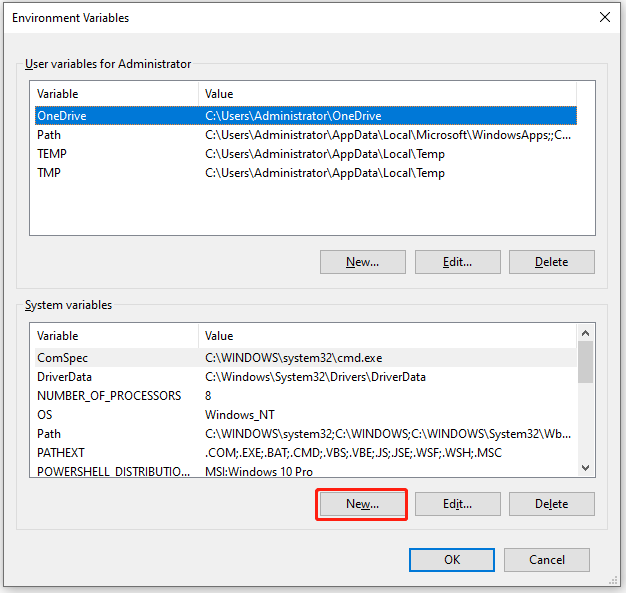
Step 3. Click on New under the System variables window.
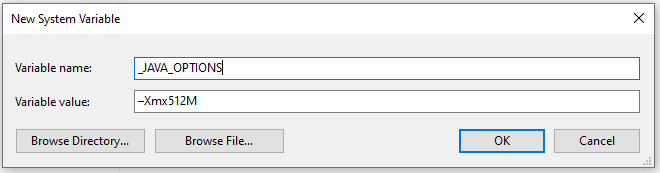
Step 4. Input _JAVA_OPTIONS in the Variable name box, and then input –Xmx512M in the Variable value box and click on OK to save the change. This will increase RAM allocation to 512 megabytes for Java.
Step 5. Click on OK in the Environment Variables window.
Once done, restart the program and check if the Java Virtual Machine launcher error Minecraft disappears.
# 2. Run Java as an Administrator
The “failed to create Java Virtual Machine” error can occur due to insufficient admin rights. Here you can follow the steps below to run the program with admin rights.
Step 1. Right-click the Java executable file and select Properties. If you can’t find the file, type Java in the search box, right-click the Java icon, and select Open file location.
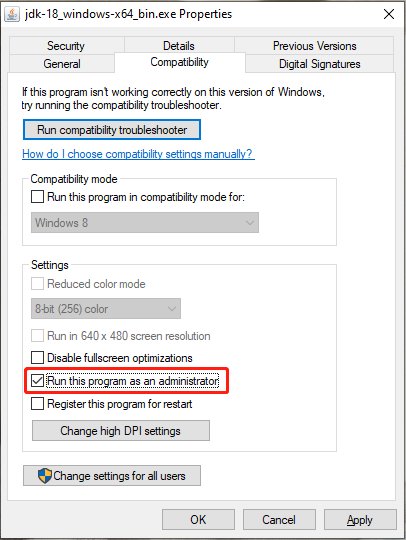
Step 2. In the Properties window, go to the Compatibility tab and select the Run this program as an administrator option.
Step 3. Click on Apply and then on OK to save the change.
Now, you can relaunch the program and see if the “failed to create the Java Virtual Machine” error gets fixed.
# 3. Reinstall Java
Sometimes the Java Virtual Machine launcher errors can occur due to corrupted or outdated Java components. In this case, you can try reinstalling Java and see if it works.
Step 1: Press Win + S to open Search. Then search for Control Panel and launch it.
Step 2: In Control Panel, select View by: Category in the upper right corner. Then click Uninstall a program.
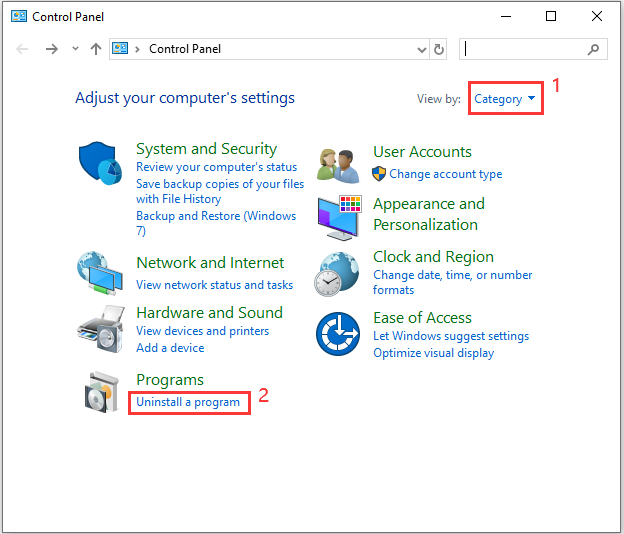
Step 3: Select each Java-related program from the list and then click Uninstall. Follow the onscreen instructions to finish the process.
Step 4. Once uninstalled, you can go to the Java official website, download the latest version and install it. If you don’t know how to do that, refer to one of the tutorials:
Java Runtime Environment Download and Install for Windows 10/11
Java Virtual Machine (JVM) Download & Install for Windows 10/8/7
Download, Install, and Update Java 32 Bit & 64 Bit [JDK vs JRE]
Further Reading: Do you want to manage your partition and disk on Windows effectively? MiniTool Partition Wizard is a good choice that can help you extend/resize/delete partition, convert a disk to MBR/GPT, migrate OS, etc. Besides, it can help fix various problems such as C drive full, and corrupt file system. Perhaps you need such a tool.
About The Author
Position: Columnist
Ariel has been working as a highly professional computer-relevant technology editor at MiniTool for many years. She has a strong passion for researching all knowledge related to the computer’s disk, partition, and Windows OS. Up till now, she has finished thousands of articles covering a broad range of topics and helped lots of users fix various problems. She focuses on the fields of disk management, OS backup, and PDF editing and provides her readers with insightful and informative content.
You are here: Home / Internet / Could Not Create The Java Virtual Machine Minecraft Error – Fixed
Minecraft requires Java to run. If the Java files are corrupted during installation or crash while running, then you can get the Java Virtual Machine error.
Here I have discussed how to fix the Minecraft Java Virtual Machine error, so follow as shown to easily fix this error.
Also read: How To Fix Minecraft Launcher Error Code 0x803f8001 [SOLVED]
Perform as shown in the following solutions to easily fix the could not create the Java Virtual Machine Minecraft error.
1. New System Java Variable
If the in-built RAM could not support the Java function, then allocate maximum RAM to the Java application to support them.
To do so, follow the steps given below:
- Press Windows + R keys to open the Run utility.
- Type sysdm.cpl in the dialog box and hit the Enter key.
- After the System properties Window opens, click on the Advanced tab.
- Select the Environmental Variables option.
- Select the New option under the System variables box.
- Enter the _JAVA_OPTIONS in the variables box.
- Enter –Xmx512M on the Variable value box, to increase RAM allocation to 512 Mb.
The number sets the memory space that you want to allocate. Use M for megabytes and G for gigabytes.
- Select Ok to close the window.
- Finally, click on Ok under Environmental Window.
Now, check if the problem is fixed otherwise, go to the next solution.
2. Run Java As Administrator
You can also try running Java as administrator when you get Java virtual machine Minecraft error.
To do so, follow the given steps:
- Type Java on the Windows search bar and right-click on the first displayed option.
- Select the Open file location option.
- After the root folder opens, right-click on the Java executable and select the Properties option.
- Go to the Compatibility tab.
- Check the box for Run this program as an administrator option.
- Finally, click on Ok followed by Apply to save the changes.
3. Reinstall Java
If you still get the same Minecraft error, try reinstalling Java. To reinstall Java, follow the steps given below:
- Press Windows + R to open the Run utility.
- Type or copy-paste appwiz.cpl in the dialog box and hit the Enter key.
- From the list of the installed applications, find Java.
- Right-click on it and select the Uninstall.
Follow the on-screen instructions to complete the process and restart the PC.
Visit the official Java site and download the latest version of Java. Make sure to select the same system architecture (32-bit and 64-bit) that you are using.
- After downloading the file, double-click on the setup exe and select the install button to initiate the installation process.
Follow the on-screen instructions to complete the process and restart the PC.
Frequently Asked Questions [FAQs]
1. How Do I Fix Resolve Could Not Create Java Virtual Machine?
To resolve the couldn’t create Java virtual machine error, simply uninstall and then reinstall Java.
2. How Do I Give Java More RAM?
To allocate more RAM to Java – open the system properties and then go to the Environmental variables under Advanced tab, enter _JAVA_OPTIONS and then Xmx512M to allocate extra 512 MB RAM to Java.
3. How Do I Fix Java Errors?
There are multiple ways to fix the Java errors – uninstall and reinstall the Java, install the latest one, temporarily turn off firewall and antivirus.
Final Words
So, there you have it. Now you know how to bypass the virtual Java machine error in Minecraft.
If you still have questions regarding this topic, ask us in the comments section provided below.
What is a Java VM Launcher?
Before knowing about “Java virtual machine Launcher Error Minecraft” Among the most popular object-oriented computer languages today is Java. Users require a Java virtual machine to run any Java-based program (JVM). It is essential because it offers the platform needed to activate source code.
This mistake indicates that the System cannot read or comprehend the code. It may occur for various causes because when Java is incompatible with the device or necessary fixes are not installed. It’s crucial to know how to fix a JVM issue if you experience one while using the device. Additionally, this issue will make it impossible for you to run Java-based programs. So for further information about “Java virtual machine Launcher Error Minecraft” keep reading.
There are a plethora of causes that facilitate this error; however, the most important ones are written down here:
1.) Permission Issues
Whenever a program (or system user) manipulates the filesystem without authorization, this is known as a permissions issue. A most reliable, production-ready permission is set up for the apps. This set of restrictions shouldn’t impact the regular functioning of the program. Uploading files, installing plugins, and upgrading plugins should all be possible if the user interface supports them. The “Java virtual machine Launcher Error Minecraft” can be due to incorrect age or a fluctuating server problem; however, there can be other related problems.
2.) Disruptions during Installations
At the very most, experts think that in most situations, the issue is caused by flaws or inconsistency with the latest launcher being used to upgrade Minecraft. The recently released Minecraft launcher has trouble downloading files from the web. The launcher may have a flaw that interferes with its ability to download files. Furthermore, the Minecraft launcher’s issues worsen with a sluggish internet connection.
3.) Memory Issues with the System
Minecraft fails with the Out of Memory problem if it can allot (obtain) more RAM from the System due to insufficient RAM or far too many tasks (including other programs, internet browsers, and apps) eating up Space. A disrupted java installation and memory issues will only aid problems with the launcher.
4.) Interruptions caused by the 3rd-party security software
Antivirus programs, in particular, have a reputation for blocking or otherwise interfering with game operations. Some security tools even go so far as to prevent game programs from the beginning or disable those that depend on applications. To know more about “Java virtual machine Launcher Error Minecraft” follow the whole section.
Recommended Reading | 10 Ways to Fix Mouse Stuttering in Games
How to Rectify “Java virtual machine Launcher Error Minecraft”?
1.) Go for a Repair
In plenty of cases, when a program displays an error message concerning a failure of a process or activity, it’s because one of its files has become corrupt. However, these are the guidelines you must adhere to fix Minecraft:
To launch the Run program, press (and hold down) the Windows logo button on your computer’s keyboard and then click the character R. If the Run program window is now visible on display, users must type the code appwiz into the text box there. Pressing the Enter key on your computer’s keyboard will execute the code. Find Minecraft inside the listing of installed programs; now right-click on it to display the list options.
2.) Manually downloading Minecraft from the official site
A specific file must be downloaded from the internet, launched, and then Minecraft must be present. The first step is establishing your internet browser by double-clicking the program shortcut or selecting from your taskbar and visiting the website. The webpage with other installation options for Minecraft: Java Version will now be displayed to you. To execute Minecraft, select Exe the package you previously acquired, find it, and hit or double-click on it. As an option, you can complete the identical program launch operation by pressing the Windows key and the character R on the computer.
3.) Check compatibility
Launch the Minecraft compatibility troubleshoot to correct “Java virtual machine Launcher Error Minecraft.” Almost all users must do is cover in the following instructions: One must first press the Windows button. Now, to execute a search operation using that phrase as the search, the user must write Minecraft into the text area. Then click on the options and choose Open file location after Minecraft Launcher appears as the first result list.
Identify the Minecraft Launcher file by browsing the objects displayed here, clicking on it, and then performing the right-click. You must choose to Troubleshoot compatibility from the extensive list of available alternatives that appears. To carry out the troubleshooting procedures, adhere to the on-screen instructions. Use the suggested compatibility option by clicking and fixing “Java virtual machine Launcher Error Minecraft.”
4.) New System Variable
- To reach the Control System Center, press the Windows button and Stop.
- Advanced System Configuration, which ought to be on the left, must be clicked.
- To access environmental variables, go here.
- Beneath System Variables, click “New.”
- Rename set variable “JAVA OPTIONS” in the text box.
- As with the values for the variable, type “Xmx256M.”
- Double-click the “Ok.”
- Using these guidelines, users can expand Java’s memory capacity, enabling Minecraft to function as intended.

5.) Include Minecraft Launcher in the Antivirus’s Registry
These instructions below must help the user get started:
Firstly, launch the antivirus software. Navigate to the main screen, the menu, or the settings window. Find the safelist choice or something comparable. Users must now look and pick Minecraft. Add the recent updates to the antivirus list. Users can now activate the antivirus. Users may need to enable the capabilities or functions you previously blocked to restrict the antiviral operations. If the “Java virtual machine Launcher Error Minecraft” problem persists, uninstall the antivirus.
6.) Select the Launch as Administrator option of Java
- Launch Cortana and type Java in the search box.
- Right-click Java and select Open file location to bring up the Java subfolder.
- Users now must hit the java.exe and select Properties.
- Select the Similarity tab.
- Select the Start, this software as administrator option.
- Select the Apply option.
- To close the window, click OK.
What is the “java virtual machine launcher error minecraft” curse forge issue?
A viewer is returned to the Minecraft Launcher with Exit Code 0 after receiving the message “Could Not Create The Java Virtual Machine, Program Will Now Exit” while attempting to run the play. There are 2 solutions to this problem. First, to To restore the launcher, go to the right-hand menu, and then click ‘Repair installation.’ Now, attempt once more to launch a mod pack, and 2nd is the correction of the command prompt (cmd).
FAQs on “Java virtual machine Launcher Error Minecraft.”
Why should we fix “Java virtual machine Launcher Error Minecraft” quickly?
This error will have multiple effects on the OS of the device.
What is the primary cause of this error?
There are 2, the first is the memory issue, and the next is a disruption in code execution.
What are the benefits of JAVA?
Java is a safe object-oriented language of programming with various advantages. It provides automated garbage collection and application development services.
The Bottom Line
The idea about Java and Minecraft is clear; users should be prepared to write, perform, or install Java applications on the PC after resolving the “Java virtual machine Launcher Error Minecraft.”
Trending Now
-
The Best Popup Builders in 2025: Boost Engagement and Conversions
●February 22, 2025
-
Fixing Xtools XToolkit Installation Error
by Dharam Nath Jha●March 3, 2023
-
Troubleshoot DeepMotion Preview Not Working: Tips and Tricks
by Dharam Nath Jha●March 3, 2023
-
Getting Virtwifi has No Internet Access? Here’s What to Do!
by Dharam Nath Jha●February 16, 2023
It is typical to encounter errors when playing Minecraft. Regrettably, it occurs regularly and often catches users off guard.
However, Minecraft is a game with an extensive community behind it, and because of that, errors are always highly likely to be solved shortly after being announced.
This also happens to be the case with the “Could Not Create The Java Virtual Machine” error that we’ll be helping you resolve in the guide below.
Let’s get into it.
The Problem Explained
This specific problem occurs when a user tries to launch Minecraft, but the Java Virtual Machine fails to start.
The user is then presented with an error prompt that doesn’t suggest a solution, as shown in the image below.

As a result, the game is unplayable (it won’t launch), and users, especially those who aren’t quite computer-savvy, are left with no possible hints as to what the problem might be caused by.
Luckily, there are a few established and effective solutions for this issue, and although they aren’t the simplest to apply, we’ve made sure to cover the processes from beginning to end in straightforward and easy-to-understand steps.
Read more in the following sections below.
1. Set A New System Variable For Java
Establishing a new Java System Variable means allocating more RAM, which in turn can solve the problem that can often be caused by a lack of memory.
As most users reported, the reason their Java Virtual Machine couldn’t start was that it didn’t have sufficient memory allocated to it, therefore, they couldn’t launch Minecraft.
We can change this by doing the following:
- Press Windows + R on your keyboard to open up the “Run” panel.
- Type in sysdm.cpl and press “Enter” on your keyboard or “OK” at the bottom.

- Click on the “Advanced” tab at the top of the window.

- Click on Environment Variables at the bottom of the window.

- Under the “System variables” section, click the New button.

- While creating the new variable, in the “Variable name:” field, type in “_JAVA_OPTIONS”, and in the “Variable value:” field, type in “-Xmx512M”, then finish by clicking the OK button.

- Finalize the process by clicking OK at the bottom of the Environmental window as well.


Doing this means you just allocated 512 megabytes of RAM to Java. If the problem was indeed Java not having enough RAM to launch properly, this problem will now be fixed.
If this text-based tutorial wasn’t clear enough, here’s a helpful video covering the process from beginning to end.
Note: The user in the video uses different values, but the end goal is still the same, which is allocating more RAM to Java.
You can reboot your PC and launch Minecraft again. It should now start without showing the “Could Not Create The Java Virtual Machine” error.
If this doesn’t work, there are other things you can try. Take a look at the following section down below for more information.
2. Ensure Only The Right Version Of Java (For Your OS) Is Installed
This solution was brought up by a Reddit user who suggests the error could be caused by Windows running the wrong Java instance for your OS type.
The fix is to manually uninstall the version of Java that doesn’t match your operating system’s type, which in this case is the 32-bit one.

The user who asked for help has a 64-bit operating system, yet their version of Java was a 32-bit one. This caused a problem and made them unable to launch Minecraft, but the problem was solved once the user uninstalled the 32-bit Java version and installed the one that was right for their OS, which is the 64-bit version.
You can check which version of Java you have installed in the “Apps & Features” section of Windows 10.
If you need to re-download Java, you can do so through the official website.
Once you have the right Java version installed, Minecraft should launch with no further issues, assuming there aren’t other things wrong, such as it not having enough RAM allocated. Check Fix #1 for more information on this.
3. Grant Java Administrator Privileges
A lack of Administrator privileges can cause the Java Virtual Machine to be unable to launch. To make sure this isn’t happening, do the following:
- Press Windows + S on your keyboard to open the search box.
- Type in Java and right-click the first result, then choose Open File Location.
- Right-click Java.exe and choose Properties.
- Click on the Compatibility tab at the top.
- At the bottom of the window, “tick” Run this program as an administrator.
- Press Apply and then OK at the bottom to save the changes and close the window.
Now Java has administrator rights on your computer, which means you won’t be experiencing the Virtual Machine error if it was caused by this.
For a lot of users, this solved the problem instantly. However, it may not work for you. Make sure to try the other two solutions listed above if this one doesn’t help.
Conclusion
With that said, you now know what actions to apply when dealing with the frustrating “Java Virtual Machine Failed To Start” Minecraft error.
Hopefully, the fixes in this guide worked and helped you get back to playing Minecraft without any other interruptions.