
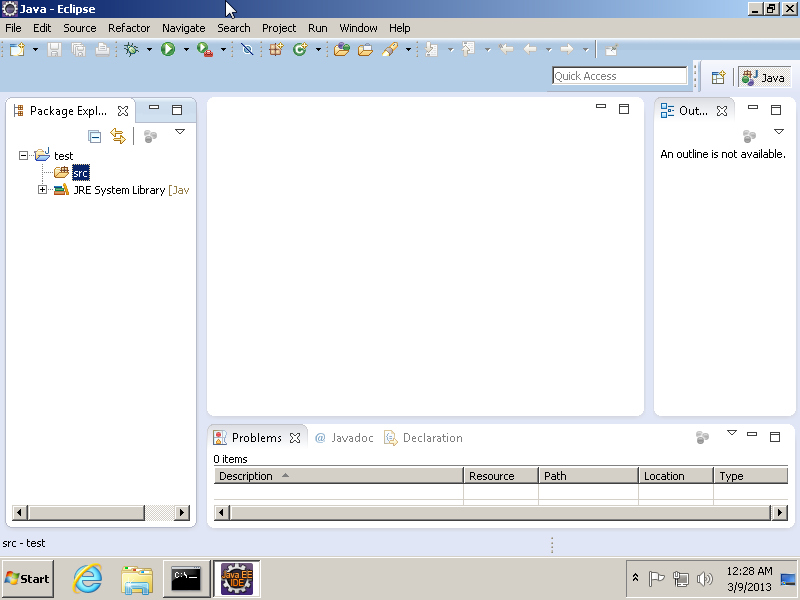
- Skip to content
- Accessibility Policy
Looking for other Java downloads?
Java 24, Java 21, and earlier versions available now
JDK 24 is the latest release of the Java SE Platform.
JDK 21 is the latest Long-Term Support (LTS) release of the Java SE Platform.
Earlier JDK versions are available below.
- JDK 24
- JDK 21
- GraalVM for JDK 24
- GraalVM for JDK 21
Java SE Development Kit 24.0.1 downloads
JDK 24 binaries are free to use in production and free to redistribute, at no cost, under the Oracle No-Fee Terms and Conditions (NFTC).
JDK 24 will receive updates under these terms, until September 2025, when it will be superseded by JDK 25.
- Linux
- macOS
- Windows
Release information
- Online Documentation
-
Installation
Instructions - Release Notes
- Documentation License
-
JDK 24 Licensing Information User Manual (includes
third-party licenses) - Certified System Configurations
- Readme
- Java Value Engineering
Java SE Development Kit 21.0.7 downloads
JDK 21 binaries are free to use in production and free to redistribute, at no cost, under the Oracle No-Fee Terms and Conditions (NFTC).
JDK 21 will receive updates under the NFTC, until September 2026, a year after the release of the next LTS. Subsequent JDK 21 updates will be licensed under the Java SE OTN License (OTN) and production use beyond the limited free grants of the OTN license will require a fee.
- Linux
- macOS
- Windows
Release information
- Online Documentation
-
Installation
Instructions - Release Notes
- Documentation License
-
JDK 21 Licensing Information User Manual (includes
third-party licenses) - Certified System Configurations
- Readme
- Java Value Engineering
GraalVM for JDK 24.0.1 downloads
GraalVM for JDK 24 binaries are free to use in production and free to redistribute, at no cost, under the
GraalVM Free Terms and
Conditions (GFTC).
GraalVM for JDK 24 will receive updates under these terms, until September 2025, when it will be superseded by GraalVM for JDK 25.
Oracle GraalVM uses the Graal just-in-time compiler and includes the Native Image feature as optional early adopter technology.
Native Image is extensively tested and supported for use in production, but is not a conformant implementation of the Java Platform. GraalVM for JDK 24 without the Native Image feature included is available for customers at My Oracle Support.
- Linux
- macOS
- Windows
Release information
- Online Documentation
- Installation Instructions
- Release Notes
- Licensing Information User Manual (includes third-party licenses)
- Certified System Configurations
- Java Value Engineering
GraalVM for JDK 21.0.7 downloads
GraalVM for JDK 21 binaries are free to use in production and free to redistribute, at no cost, under the
GraalVM Free Terms and
Conditions (GFTC).
GraalVM for JDK 21 will receive updates under the GFTC, until September 2026, a year after the release of the next LTS. Subsequent updates of GraalVM for JDK 21 will be licensed under the GraalVM OTN License Including License for Early Adopter Versions (GOTN) and production use beyond the limited free grants of the GraalVM OTN license will require a fee.
Oracle GraalVM uses the Graal just-in-time compiler and includes the Native Image feature as optional early adopter technology.
Native Image is extensively tested and supported for use in production, but is not a conformant implementation of the Java Platform. GraalVM for JDK 21 without the Native Image feature included is available for customers at My Oracle Support.
- Linux
- macOS
- Windows
Release information
- Online Documentation
- Installation Instructions
- Release Notes
-
Licensing Information User Manual (includes
third-party licenses) - Certified System Configurations
- Java Value Engineering
Protect your investment—and more
Java SE subscribers get support for JDK 17, receive updates until at least October 2029, are entitled to GraalVM, Java Management Service, and bundled patch releases (BPRs) with fixes not yet available to
nonsubscribers, and more.
Java SE subscribers have more choices
Also available for development, personal use, and to run other licensed Oracle products.
- Java 17
- GraalVM for JDK 17
- Java 11
- Java 8
- Java 8 Enterprise Performance Pack
Java SE Development Kit 17.0.15 downloads
The Oracle JDK 17 license changed in October 2024
The Oracle Technology Network License Agreement for Oracle Java SE used for JDK 17 updates 17.0.13 and greater is substantially different from prior Oracle JDK 17 licenses. This license permits certain uses, such as personal use and development use, at no cost — but other uses authorized under prior Oracle JDK licenses may no longer be available. Please review the terms carefully before downloading and using this product. FAQs are available here.
Commercial license and support are available for a low cost with Java SE Universal Subscription.
JDK 17.0.15 checksums and OL 8 GPG Keys for RPMs
- Linux
- macOS
- Windows
Release information
- Online Documentation
-
Installation
Instructions - Release Notes
- Documentation License
-
JDK 17 Licensing Information User Manual (includes
third-party licenses) - Certified System Configurations
- Readme
- Java Value Engineering
GraalVM for JDK 17.0.15 downloads
The Oracle GraaalVM for JDK 17 license changed in October 2024
GraalVM OTN License Including License for Early Adopter Versions (GOTN) used for JDK 17 updates 17.0.13 and greater is substantially different from prior Oracle GraaalVM for JDK 17 licenses. This license permits certain uses, such as personal use and development use, at no cost — but other uses authorized under prior Oracle GraaalVM for JDK licenses may no longer be available. Please review the terms carefully before downloading and using this product. FAQs are available here.
Commercial license and support are available for a low cost with Java SE Universal Subscription.
Oracle GraalVM uses the Graal just-in-time compiler and includes the Native Image feature as optional early adopter technology.
Native Image is extensively tested and supported for use in production, but is not a conformant implementation of the Java Platform. GraalVM for JDK 17 without the Native Image feature included is available for customers at My Oracle Support.
GraaalVM for JDK 17.0.15 checksums and OL 8 GPG Keys for RPMs
- Linux
- macOS
- Windows
Release information
- Online Documentation
-
Installation
Instructions - Release Notes
-
Licensing Information User Manual (includes
third-party licenses) - Certified System Configurations
- Java Value Engineering
Java SE Development Kit 11.0.27
Java SE subscribers will receive JDK 11 updates until at least
January 2032.
These downloads can be used for development, personal use, or to run Oracle licensed products. Use for other
purposes, including production or commercial use, requires a Java SE Universal Subscription or another Oracle license.
Commercial license and support are available for a low cost with
Java SE Universal Subscription.
JDK 11 software is licensed under the
Oracle Technology Network
License Agreement for Oracle Java SE.
JDK 11.0.27 checksums and OL 8 GPG Keys for RPMs
- Linux
- macOS
- Solaris
- Windows
Release information
- Online Documentation
- Installation instructions
- Release Notes
- Documentation license
-
Java SE 11 Licensing Information User Manual
(includes 3rd party licenses) -
Certified System
Configurations - Readme
- Java Value Engineering
- Linux
- macOS
- Solaris
- Windows
-
JRE 8
- Linux
- macOS
- Solaris
- Windows
-
Server JRE 8
- Linux
- Solaris
- Windows
Which Java 8 package do I need?
-
Software developers: Java SE Development Kit (JDK)
For Java developers. Includes a complete JRE plus tools for developing, debugging, and monitoring Java applications.
-
Running headless Linux workloads at or near your systems’ CPU or memory limits
Enterprise Performance Pack brings significant memory and performance improvements including modern garbage collection algorithms, reduced memory usage and many other optimizations.
Learn more
-
Administrators running applications on a server
Server Java Runtime Environment (Server JRE). For deploying Java applications on servers. Includes tools for JVM monitoring and tools commonly required for server applications, but does not include browser integration (Java plug-in), auto-update, or an installer.
Learn more
-
End user running Java on a desktop: Java Runtime Environment (JRE)
Covers most end-users needs. Contains everything required to run Java applications on your system.
Release information
- Online Documentation
- Installation Instructions
- Release Notes
-
Java SE Licensing Information User Manual (includes
third-party licenses) -
Certified System
Configurations - JDK ReadMe
- JRE ReadMe
- Demos and Samples Archive
- Java Value Engineering
- Linux
Скачивание Java (версия 64 и 32) для Windows 7
ПО Джава позволяет использовать игры и общаться с пользователями на всех пяти континентах.
Также есть
реальные возможности:
- 1. Подсчитывать проценты по закладным.
- 2. Просматривать 3D иллюстрации.
- 3. Решать различные другие задачи.
Джава также подразумевает наличие Runtime – это среда, при которой происходит исполнение
задачи.
Используются при этом
- 1. Модуль выполнения JRE.
- 2. Виртуальная машина Джава.
- 3. Java (VM, JVM, VM).
- 4. Подключаемый модуль Джава.
- 5. Дополнение и загружаемые файлы.
Использовать рациональнее всего последнюю версию Джава. Ситуация в данном ПО быстро меняется,
самые
последние обновления появляются довольно часто.
Если удалить старые версии, то открывается «окно возможностей», инсталлировать можно будет ПО
с
последними разработками в сфере защиты. Также будет улучшена производительность самой
платформы.
Достаточно зайти на официальный портал, чтобы сказать последний вариант ПО бесплатно.
Установка
Перед инсталляцией выбирается установщик софта (разрядность 32 или 64).
Возникает диалоговое окно инсталляции файла. Определяется расположение папки. Делаем
следующие действия:
- 1. Кликаем «Сохранить»
- 2. Закрываем все программы, браузер.
- 3. Кликаем на файл, который сохранился в папке.
- 4. Возникает несколько табличек с вопросами, везде ставим: «Да».
- 5. Инсталлируем программу («Учет записей»).
- 6. Кликаем Install, начинается установка.
- 7. Первый экран установки.
- 8. Кликаем «да» в иконке: «Изменение лицензионного соглашения».
- 9. Возникнет сообщение о существовании в компьютере старой версии софта. Все это надо
деинсталлировать. - 10. Возникнет иконка о деинсталляции
- 11. Иногда автоматически программа не удаляется, в этом случае потребуется вручную
удалить приложения
программы.
Далее софт в автоматическом режиме установится в машину, ее необходимо будет перегрузить.
Обновление
Обновлять программу допускается в ручном и автоматическом режиме. Вручную удаляется, как
правило,
старые модификации софта. После этого устанавливается новая программа. Чтобы шел
автоматический процесс
инсталляции, следует активировать
Check For Updates, найти файл можно в папке Java, кликнув на «Пуск». Послед этого
последовательно выполняются действия:
- 1. Кликаем на иконку: согласие с внесением изменений.
- 2. Нажимаем «ОК» на Update Now.
- 3. Если существует обновленный софт, то должно появиться окошко: Java Setup (будет
указано
порядковый номер последней версии). - 4. Кликаем Update.
- 5. Обновление активируется, дистрибутив загружается, о чем говорит соответствующее окно
инсталляции. - 6. После этого возникает окно инсталляции свежей модификации Java.
Через определенный отрезок времени процесс завершается, о чем свидетельствует соответствующая
табличка на экране компьютера. Процесс обновления закончен. Машину следует перегрузить,
чтобы
адекватно активировать новую версию.
Чтобы узнать версию софта, произвести следует манипуляции:
- 1. Активируем панель Джава.
- 2. В окошке About Java можно увидеть настоящую модификацию приложения.
- 3. Есть еще один способ узнать номер версии. Набираем сочетание: Windows+R.
- 4. В возникшем окне пишем «cmd», кликаем Enter.
- 5. В строке «Виндовс» пишем: java – version, кликаем Enter.
Процесс инсталляции Джава несложен и состоит из минимального количества этапов. Всю работу
выполняет компьютер в автоматическом режиме.
Hello friends, this is my very first post, and in this blog I will be start posting about Java. So the first post is about Java Environment Setup Windows. If you don’t know how to make your system ready for Java development then you can go through this guide. So lets learn about Java Environment Setup in Windows.
Java Development Kit (JDK) Download
So the first thing we need is JDK. It is quite easy to get JDK you can download it from oracles website. Follow these steps to get JDK.
- Go to this link.
- You will see the following screen.

- Click on Accept License Agreement.
- Then click on the required version. In my case I will download Windows x64 because I have 64bit Windows Operating System. You need to choose your version according to your system.
- Then you will get the JDK Setup file, install it in your system, the process is same as installing any other application program in windows operating system.
Once you have got the JDK installed in your system, you need to set up the environment variables to make it work. So I will teach you this now.
Follow these steps carefully to get your system ready to compile your very first Java program.
- Go to Java installation directory. (c:/program files/Java/jdk<your version>/bin);
- You need to copy the exact path according to your system. In my case the path is.
|
C:Program FilesJavajdk1.8.0_102bin |
- Once you have copied this file, press windows + q (for windows
 and for windows 7 click on start menu.
 - Type environment variables
 and for windows 7 click on start menu.
- Now click on System Environment Variables.

- Now in the bottom you can see the button Environment Variables click on it.
- In the System variables section click on new.
- In variable name type path and in variable value paste the path you have copied as shown in the above image.
- Finally press ok to apply the changes and you are done.
Testing the Java Installation
- Now lets test whether the installation is successful or not.
- For this just open command prompt (window key + r, then type cmd and hit enter).
- Now write the following command.
- If you are getting the following result then, your installation is successful and you can move further to compiling Java program.

Writing your first Java Program
Now lets try executing our very first Java program. You need a text editor to write your codes. I am using Notepad++ you can also use the normal notepad but I will recommend you using Notepad++. You can get Notepad++ from this link.
- Open notepad++ and write the following code.
|
public class HelloWorld{ public static void main(String[] s){ System.out.println(«Hello World!»); } } |
- Now save the file in any location of your system. I have saved it to my desktop. The name of the file should be HelloWorld.Java (public class name and file name should be same).
Compiling and Running your first Java Program
- Press shift and right click on the location where you saved the file.

- Click on Open command window here. Command prompt will open on the same directory.
- On command prompt write Javac yourfilename.Java see the screenshot for help.

- Now if you haven’t got any error executing this command, that means the code is correct and compilation is successful.
- The successful compilation will generate the .class file which contains the bytecode that will be executed by the Java Virtual Machine.
- To execute the program just type Java classname (see the screenshot).

- So its working absolutely fine, you can see we got our output.
Conclusion
So I am wrapping up this post about Java environment setup windows here. Java is the most popular programming language used nowdays. Java is used everywhere like we all use android mobile phones and to develop android applications Java is used. Java is used in web development, Java is used in desktop software development and almost everywhere you can use Java. So in the upcoming posts we will be doing some cool interesting stuffs with Java.
And leave your comments for feedback and clearing your confusions related to this Java environment setup windows tutorial. Thank You 🙂
I have been receiving a lot of requests over the time, from students and people willing to experiment with the Java language, on providing a simple guide on how to setup a Java development environment , similar to the one I’ve written a year ago for Mac users. See here and here. So, this post is mainly addressed to people new to Java development, that seek information about setting up their Windows (7 or similar) environment, with all the basic tools and settings, in order to start writing Java code and experiment with various tools and technologies in the Java ecosystem.
I am pretty sure there are numerous similar resources out there, I just thought to add one more. Hope you find it handy. It is really easy, so don’t be afraid of the this post’s size, I just tried to elaborate on some simple steps, but for sure it is not rocket science
and you don’t have to be a ‘hacker’ in order to complete all the steps. You may not need all the tools below, so it is not necessary to have them all installed at once.
Index
1. Setup Java JDK and JAVA_HOME (this is a must)
2. Setup Apache Ant and ANT_HOME (optional)
3. Setup Apache Maven and MAVEN_HOME (optional)
4. Setup SVN (subversion) support, using TortoiseSVN (optional)
5. Setup Git using Git Extentions (optional)
6. Setup a Java IDE, Netbeans or Eclipse (this is a must)
1. Setup Java JDK and JAVA_HOME
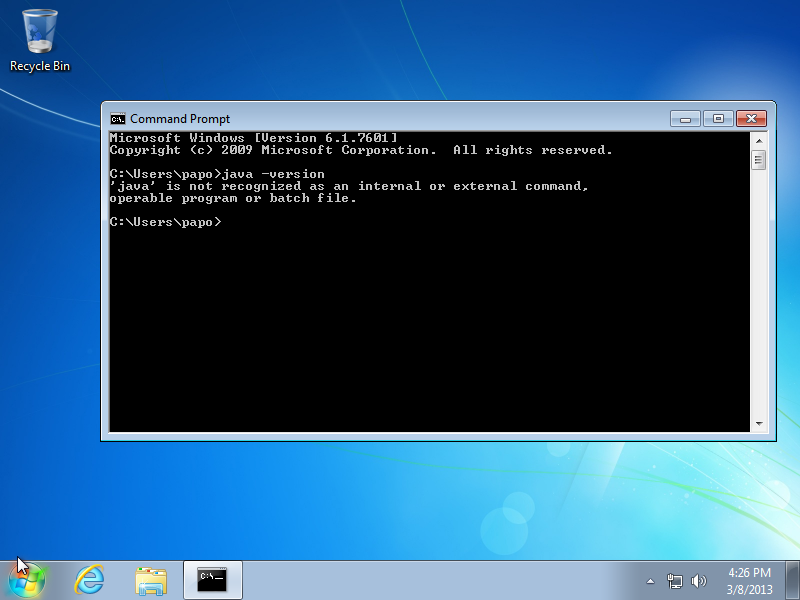
I assume that you have not installed any related tool before, and your system is ‘clean‘ from Java and other Java development tools. So I guess, if you open a Command Prompt and you type ‘java -version’ you will get something like the following.
We need to install the Java Development Toolkit aka JDK, which is bundled with the Java Runtime Environment. At this moment, that I am writing this post the latest JDK versions is JDK 7u17 (update 17 that is). All you have to do is head to the main download page provided by Oracle (here) , and download the latest version that you will find. The direct link for the JKD 7u17 is here.Start the installer and go through the steps.
Tip: One small tip or let’s say a deviation from the installer that I prefer, is to change the installation path provided by the program to something easier to remember or even type in the command line tool. So instead of installing the JDK to ‘C:\Program Files\Java\jdk7_17‘ etc, i always choose something that looks like the following, ‘C:\Java\jdk17‘.
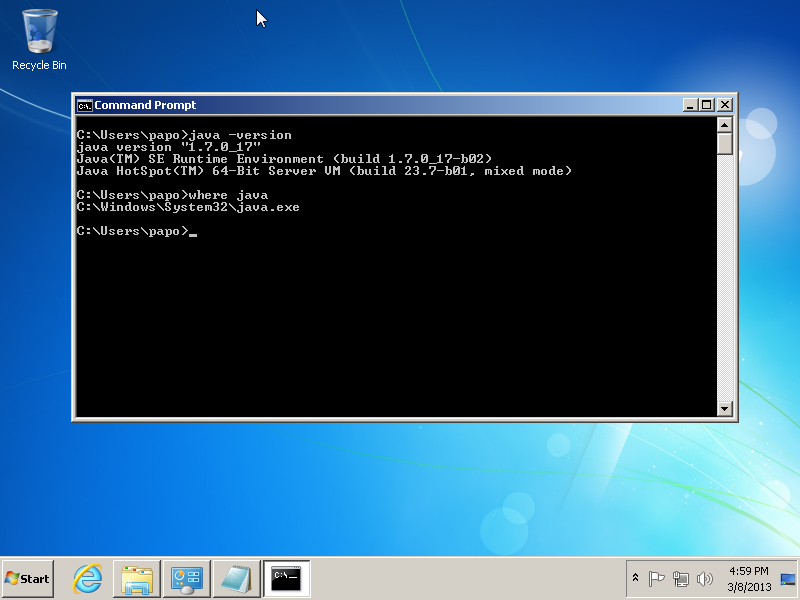
I do the same when the installer prompts me to install the JRE (java run time) and I provide the following path ‘C:\Java\jre7‘. When it is complete, I open a new command line and I re-type ‘java -version‘ as before. As you can see the installer has already done a good job and I have java in my environment. (You may use the ‘where‘ command to find out which executable is loaded on the Path – (similar to ‘which‘ in Unix) ).
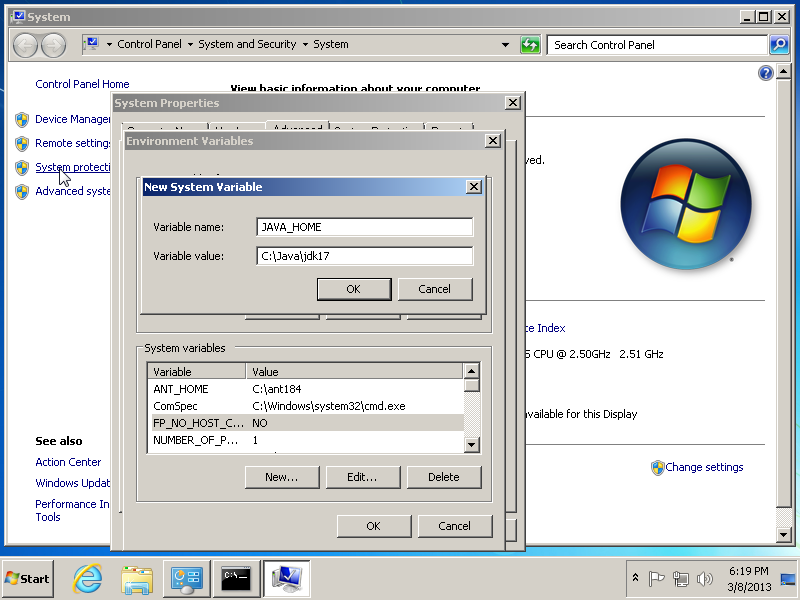
We are almost there, we just need to set, one more environment variable, that is very important by many tools that are based on Java or require Java to work. It is the famous JAVA_HOME variable and you must have heard it or seen it in various tutorials and setup resources. It is easy though! Open your Advance System Settings ( Press Start , type in the search box ‘View Advanced System Settings‘, open it, select the tab ‘Advanced‘ and press the button in the bottom called ‘Environment Variables’). Add a new system variable as it is illustrated below. The name is JAVA_HOME and the path is actually the path our JDK installation, in my case ”C:\Java\jdk17‘.
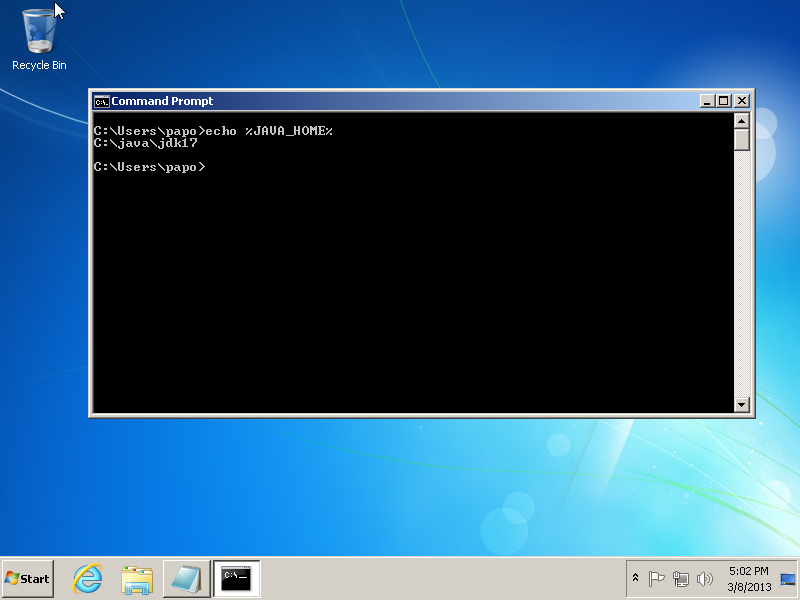
Press OK, and open a new Command prompt ( it is required). Type ‘echo %JAVA_HOME%‘ and you are done.
Congrats you have successfully set up the java run time and the jdk environment! Let’s move on.
2. Setup Apache Ant and ANT_HOME
Apache Ant is a popular build tool used in many Java projects and it is still needed in many cases when you need to setup some servers or complex projects. You can find more about Ant here. Installing Ant is easy, there is no fancy installer just a zip file you need to extract somewhere and add a similar varible like JAVA_HOME (see above) called ANT_HOME. At the time being, the latest version of Apache Ant is, 1.8.4. and can be downloaded here. After downloading the zip file, I choose to extract the contents to a similar path like before ‘C:\ant184‘. (make sure that c:\ant184 is the root folder and then you have all the sub-folders like c:\ant184\bin’. So, now we must set our ANT_HOME variable and add the ‘ant’ executable to our windows Path so that we can invoke it in our command line by typing ‘ant’. Setting ANT_HOME is similar to JAVA_HOME, add a new system variable named ANT_HOME and value the path where you have the ant zip extracted in my case ‘C:\ant184‘. See below

In order to add the ‘ant’ command to our executable path we need to update the PATH system variable, in the very same window, as illustrated below, just hit ‘Edit’. Go to the end of the line and add a new entry (all the entries are separated with ‘;’ ). The path for the ant executable is ‘C:\ant184\bin‘ but we will use the ANT_HOME variable in order to be more flexible so we will add, %ANT_HOME%\bin”. See the image below.
You are done, open a new Command Prompt, and type ‘ant -version‘, or ‘echo %ANT_HOME%‘ you should get similar results are illustrated in the image below.
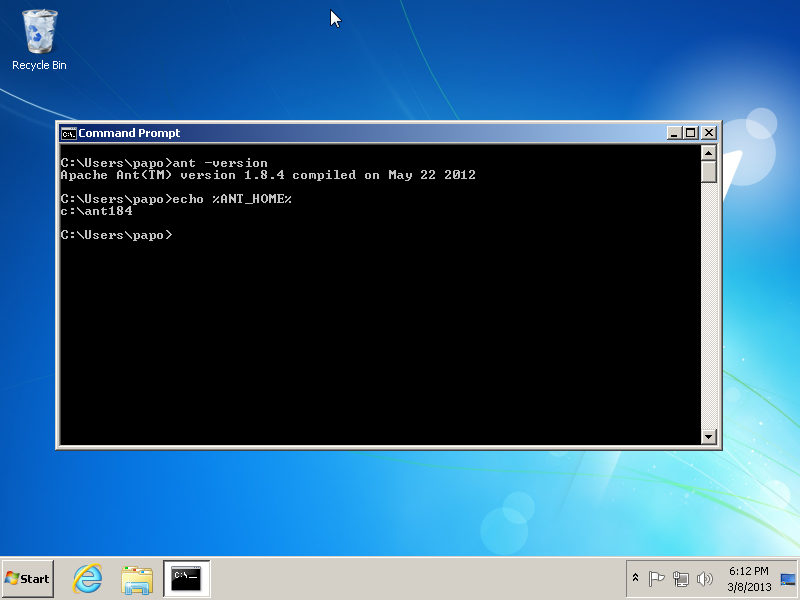
Congrats, you have successfully installed Apache Ant! Some Java IDE’s have Apache Ant already pre-bundled (as we will see in a later section) but I truly believe it is better to be installed manually,it is cleaner and easier to maintain, update.
3. Setup Apache Maven and MAVEN_HOME
Apache Maven is very popular tool among java developers, it does many things and has many uses. It is a building tool, a library dependency tool, a software project management and comprehension tool as it is indicated in the tool’s site. You may find more about maven here. The installation of maven is similar to Apache’s Ant, just a zip extracted somewhere and setting up a couple of variables + updating the system path. The latest version at the moment is 3.0.5 and can be downloaded here. There is already a short and handy setup guide provided in Maven’s site (see here), I am going to write similar steps. After downloading the zip file, I choose to extract the contents to a similar path like before ‘C:\maven305‘. (make sure that c:\maven305 is the root folder and then you have all the sub-folders like c:\maven305\bin’. So, now we must set our MAVEN_HOME variable and add the maven executable to our windows Path so that we can invoke it in our command line by typing ‘mvn‘. Setting MAVEN is similar to JAVA_HOME or ANT_HOME, just add a new system variable named MAVEN_HOME and value the path where you have the ant zip extracted in my case ‘C:\maven305‘.
See below.

In order to add the ‘mvn’ command to our executable path we need to update the PATH system variable like we did previously, in the very same window, as illustrated below, just hit ‘Edit’. Go to the end of the line and add a new entry (all the entries are separated with ‘;’ ). The path for the maven executable is ‘C:\maven305\bin‘ but we will use the MAVEN_HOME variable in order to be more flexible so we will add, %MAVEN_HOME%\bin”. See the image below.
You are done, open a new Command Prompt, and type ‘mvn -version‘, or ‘echo %MAVNE_HOME%‘ you should get similar results are illustrated in the image below.

Congrats, you have successfully installed Apache Maven 3!Some Java IDE’s have Apache Maven already pre-bundled (as we will see in a later section) but I truly believe it is better to be installed manually,it is cleaner and easier to maintain,use or update.
4. Setup Subversion (version control) using Tortoise SVN
Subversion is a popular versioning system among Java developers. You may find further information about it here. There are numerous subversion clients that you may install in your computer. The original subversion command line client can be found here (for windows). All of the Java IDE’s come with support of SVN either with pre-bundled clients or plug ins. I tend to use the clients offered by my IDE but I always want to have an extra client that gives me extra flexibility on certain things. I think that tortoise svn is an excellent choice for Windows users, it has full SVN support and excellent integration with the Windows file system.
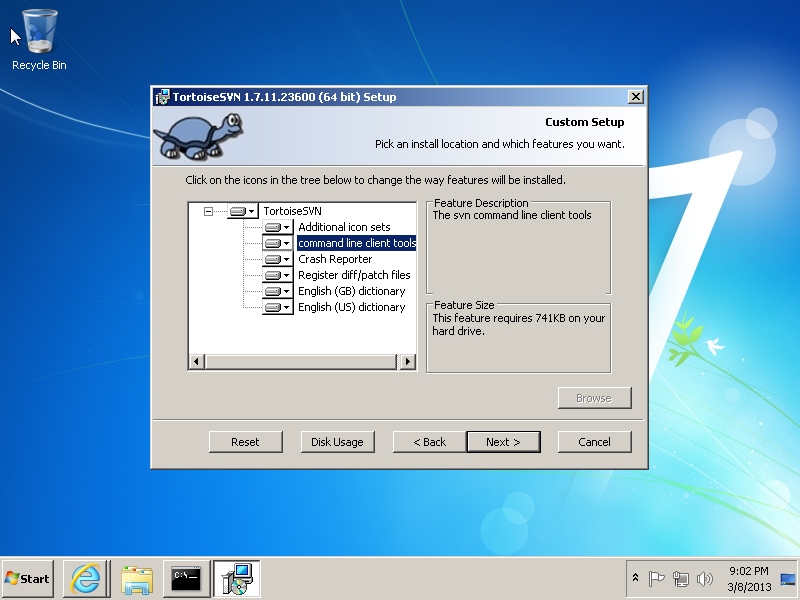
You find the latest version of the client here, current is 1.7.11 (compatible with SVN 1.7.8). Download the executable and follow the steps. The only addition on the default settings is that I select to install the command line tools as well, as illustrated in the image below.
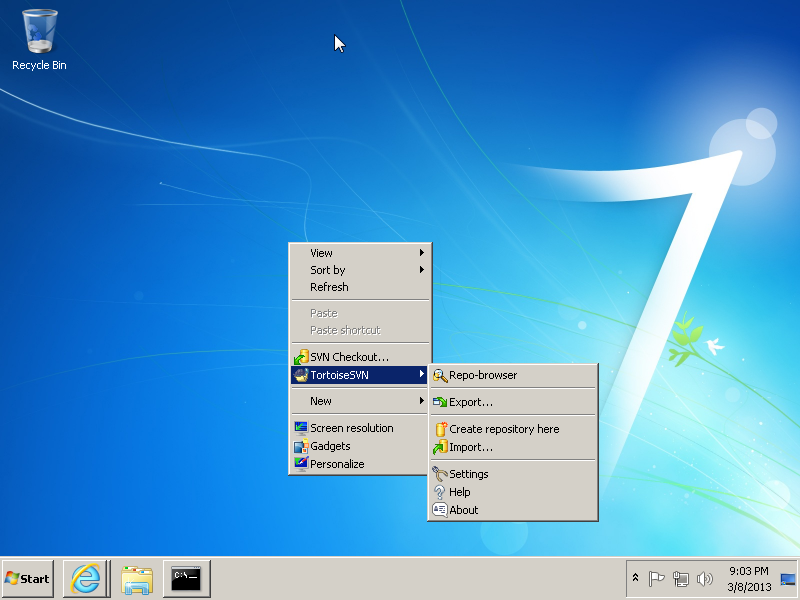
After completing the installation you can access Tortoise, using your right click in any folder, like the image below.
As I have already pointed out, most of the Java IDE’s around offer SVN integration, out of the box but is always a good thing to have an extra client, in your windows shell. Tortoise is a great one, you can actually work with tortoise and skip your IDE’s integration if you like so! If you don’t like Tortoise and you want to consider yet another client then I suggest you have a look on the free edition of SmartSVN.
5. Setup Git (version control) using Git Extentions
Git, is another version control system that is becoming very popular among developers in general. In many cases it is replacing SVN, so there is a high chance you might be required to work with it, or work in projects that store their code on a remote Git repository or contribute to an open source project at GitHub. You may find more about Git here.
Git is the new kid on the block on popular versioning systems, so some tools or support still may not be so user friendly comparing to tools and clients of SVN. Git is also encouraging users to interact with it, using the command line interface. The stand alone git installation for windows can be found here. This will install the git client and support tools and you may start experiments with it, using the command line. If you want a more UI friendly way, then you may choose one of the free clients. (so, don’t install the standalone client).
My choice at the time being is Git Extentions, which can be found here. The nice thing about Git Extentions is that with one download you get the native git client and all the nice UI tools, similar to Tortoise featured in the previous section. So you can just download the git extensions msi package, and follow the installer’s step – just make sure to enable (when you are prompted to do so) the mygit support. See the image below.
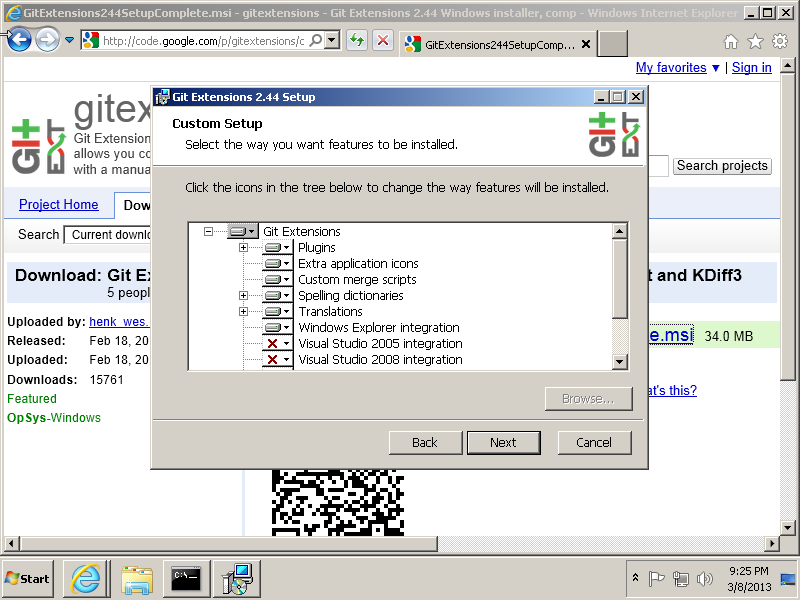
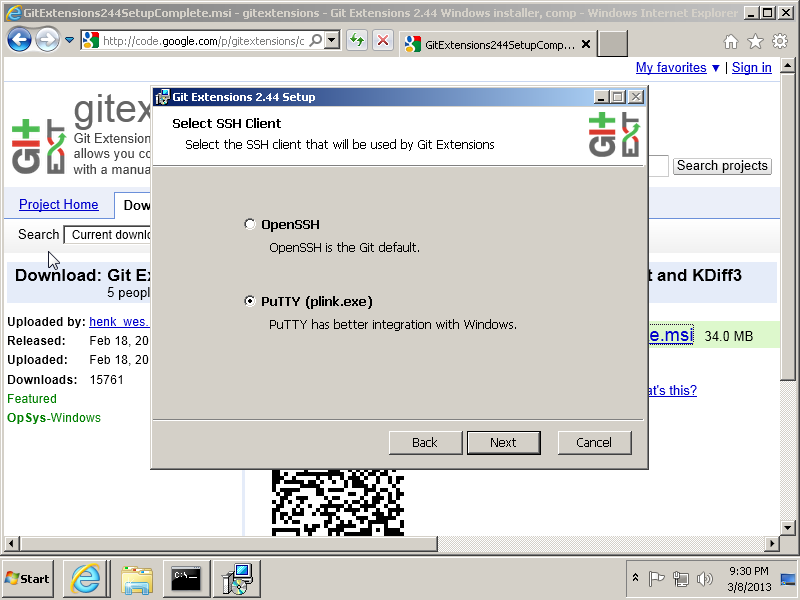
I have disabled any visual studio support, since i am not going to to install this particular IDE. On the next step, I select Putty to be installed as my ssh client.
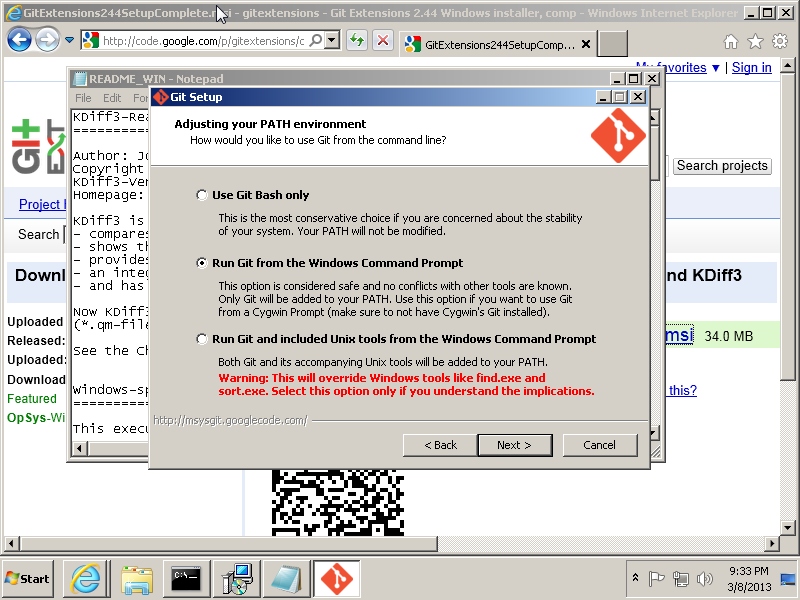
On the related prompt of the Git installer, about altering your System’s Path, I always select the second one, so that the ‘git’ command is added to my command line exec path. See the image below.
Continue with the rest of the installation and the various tools installed. The provided, default selections are safe to use.
As you can see, by the end you are going to have the related icons, copied in your Desktop. Congrats you have full Git support on your development environment! Double click on the Git Extentions icons and set the final details like language of use and username / email to be used while interacting with git repositories.
6. Pick your Java IDE : )
Up until now we have installed a variety of tools towards setting up our Java Development environment. Since the JDK is already installed (from step one) we could actually jump to coding just by using our text editor of choice (NotePad++, TextPad, NotePad, Ultra Edit etc) and invoking the javac and java commands from the command line. It is good to know that this is an option but I would highly recommend you start doing your experiments using a real IDE, and there are a lot of them in the Java development world and are considered very very powerful.
Netbeans
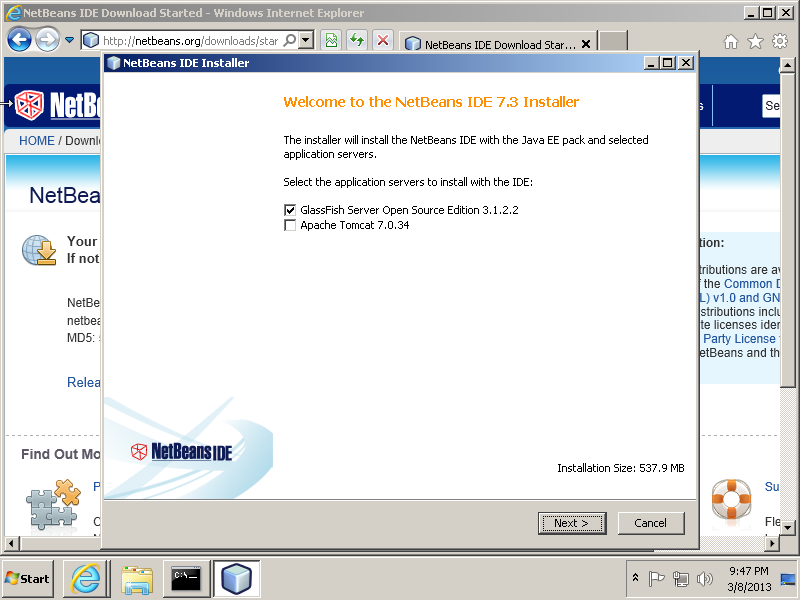
If you are a total newbie and you have just started using or learning Java, then your first stop, according to my opinion should be Netbeans. It is one of the best Java IDE’s around, used by many professional java developers all around the world and is really targeting towards ease of use and productivity from the very beginning. You can find Netbeans (currently latest version 7.3) here. If you are about to work with some more advanced java stuff like the Java Enterprise edition (aka Java EE) then I think you should try downloading and install Netbeans with Java EE support and not the simple version. Upon installation it will prompt you about the bundled Java EE container (aka application server) that can install for you. My choice is GlassFish.
See the image below.
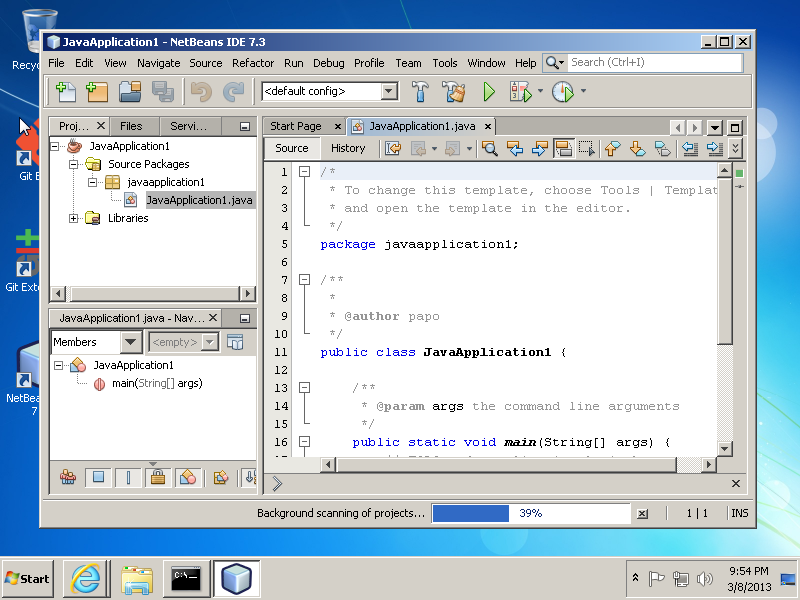
Continue with the rest of the installer prompts, your already existing JDK installation from step 1 should be picked accordingly by the setup script and be used by the IDE as well. The image below illustrates a fresh install of Netbeans running.
If you are looking for a quick guide or tutorial on using Netbeans, have a look here or have a look on numerous videos on youtube, here.
Eclipse
Eclipse is along with Netbeans, one of the most famous Java IDE’s in the whole Java development community. It’s user (installation base) might be larger comparing to Netbeans and is usually the IDE of choice for hard core Java developers. I am currently an Eclipse user as well, but I personally don’t find it a good fit for someone that is now starting to ‘play‘ with Java. There is a large community behind it, (as with Netbeans) numerous resources and support forums. It is not that hard, but if you are a new developer and you are still trying to make your way into basic stuff there is some possibility that you lose your way and get disappointed, something that we don’t want.
I don’t want the above paragraph to be the start of a flame war especially for hard cord eclipse users, I am actually an eclipse user myself, I just think that Netbeans is more ‘newbie’ user friendly, and it is critical that new java developers don’t get disappointed after trying to complete their first assignment or task in Java.The latest version of Eclipse currently is Eclipse 4.2 SR2 (codename Juno), and the downloads page can be found here. You can either select the Eclipse for Java or JEE developers download, depending on your assignments/tasks or interest. Eclipse does not pre- install any servers or support tools as such. All the extra functionality should be added afterwards through the Plugin system that offers. (See Eclipse Market place). Eclipse does not have any installer, it comes as a zip file, all you have to do, is download the zip and extract the contents (like we did with Ant, or Maven). I usually pick a simple folder, like in previous section e.g ‘C:\eclipseJuno42’ . Open the folder and you will find the executable (eclipse.exe). You should have something like the image below.
How To Install Java In Windows 7/8/10
in this blog post i will show you how to install java in windows 7/8/10 step by step.
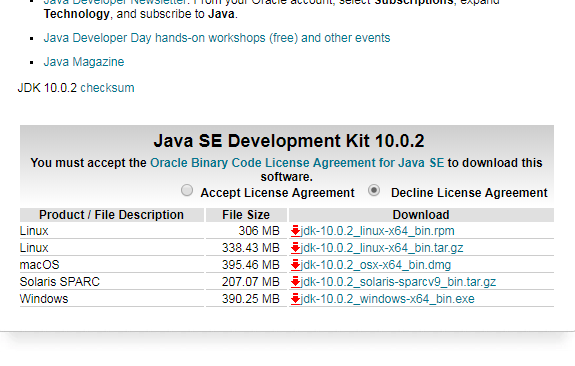
download jdk-10.0.2_windows-x64_bin.exe file-How To Install Java In Windows
To install java in windows system go to this link,
https://www.oracle.com/technetwork/java/javase/downloads/jdk10-downloads-4416644.html
Check Accept License Agreement and download the windows jdk-10.0.2_windows-x64_bin.exe file.
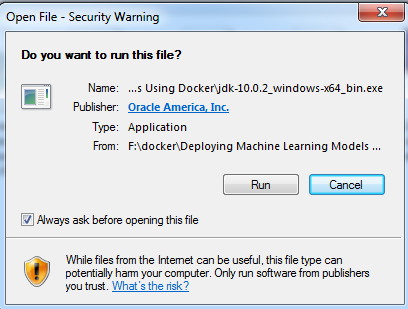
run the jdk-10.0.2_windows-x64_bin.exe file-How To Install Java In Windows
Run that executable file by double click on that.
It will open one small window.
do you want to allow this app to make changes to your pc(do you want to run this file click on run) click on yes.
It will open setup window click on next.

setup java jdk-10.0.2 home directory-How To Install Java In Windows
it will show you java jdk home path, here in my case it is showing C:\Program Files\Java\jdk-10.0.2\ iam keeping this default path only.
if you want to change java home click on change and select path of your java home directory.
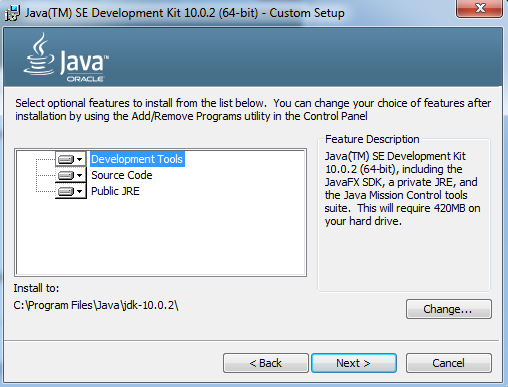
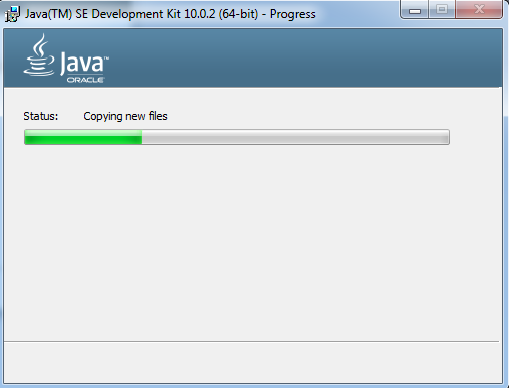
Click on next it will show you progress window.
click on next now it will show you custom setup window.
setup java jre-10.0.2 home directory-How To Install Java In Windows
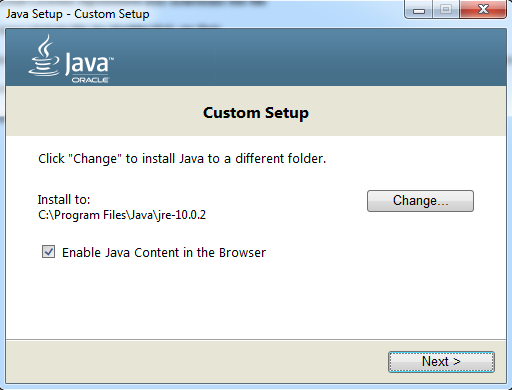
Here You can select your java jre home directory. But no need to change default it will show one path keep that only.
Here iam keeping c:\Program Files\Java\jre-10.0.2
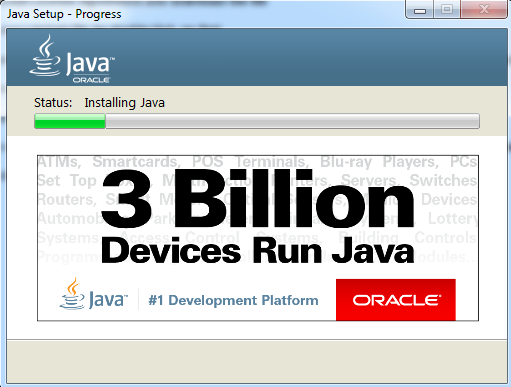
Click on next now java will install on your windows system.
After installing it will show complete window click on close.
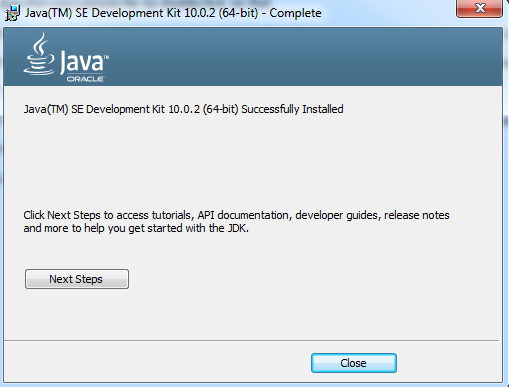
Now you succesfully installed java jdk on your windows machine.
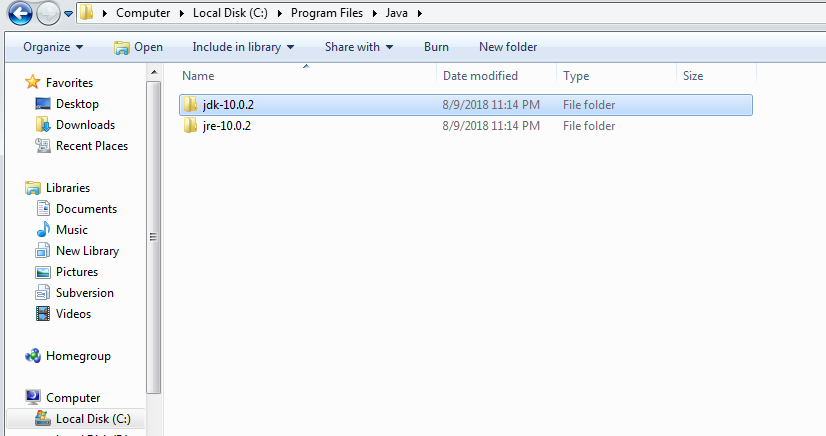
If you go to the java home directory C:\Program Files\Java You can see two folders like jdk-10.0.2, jre-10.0.2
after installing java in your winodws system, to run java commands you need to configure environment variables.
configuring environment variables-How To Install Java In Windows
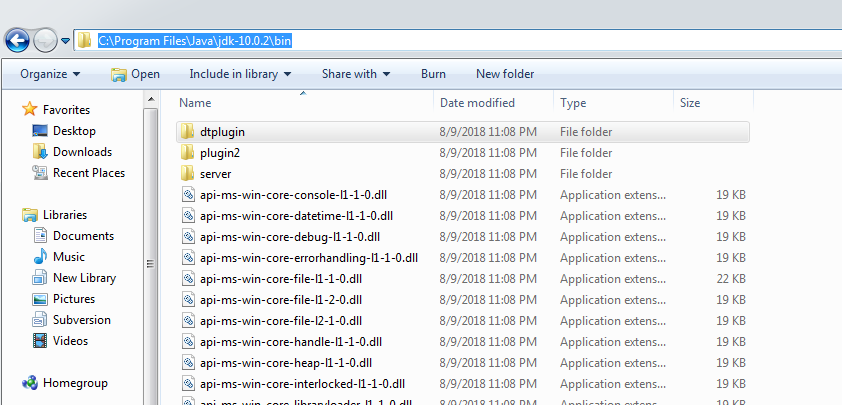
Now go inside into jdk-10.0.2 directory and go inside bin directory.
Then you need to copy the this bin path, we will use this path in the coming steps.
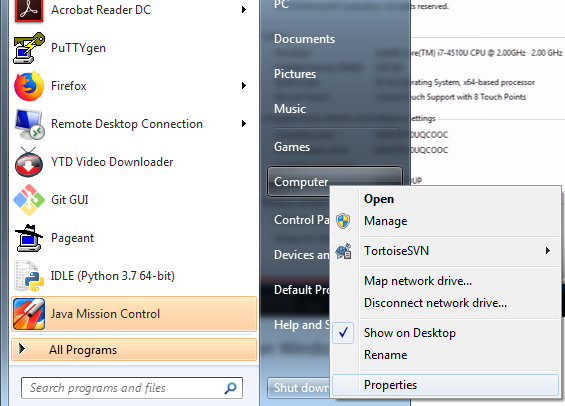
Right Click on computer and click on properties.
It will take you to this window Control Panel\System and Security\System
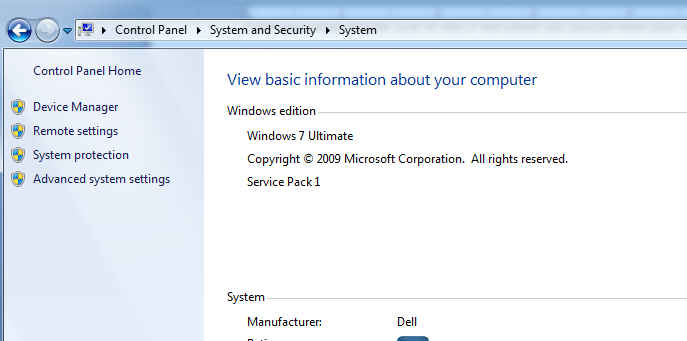
Click on advanced system settings it will open environment variables window.
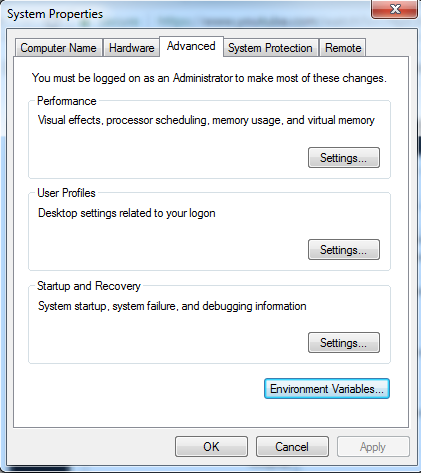
Click on environment variables you can see system variables.
Add new variable by clicking on new.
Adding PATH variable-How To Install Java In Windows
Now we are adding PATH variable
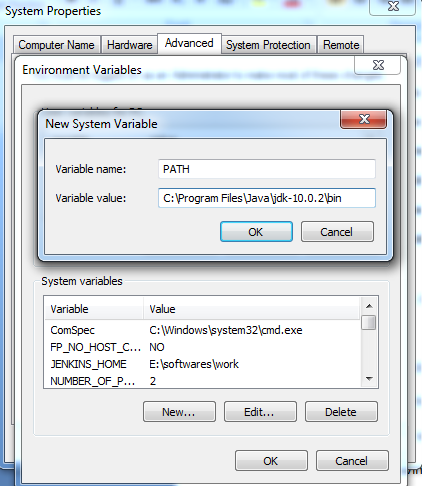
Variable name PATH
Variable value C:\Program Files\Java\jdk-10.0.2\bin
this value is above you copied from previous step
Adding JAVA_HOME variable-How To Install Java In Windows
Now we are adding JAVA_HOME variable
Variable name JAVA_HOME
Variable value C:\Program Files\Java\jdk-10.0.2
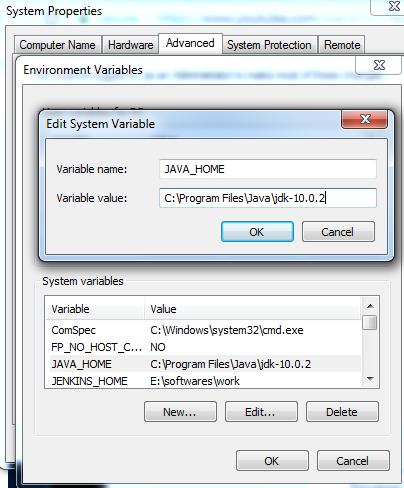
click on ok.
Now open your command prompt and enter.
java –version command
you can see java version.
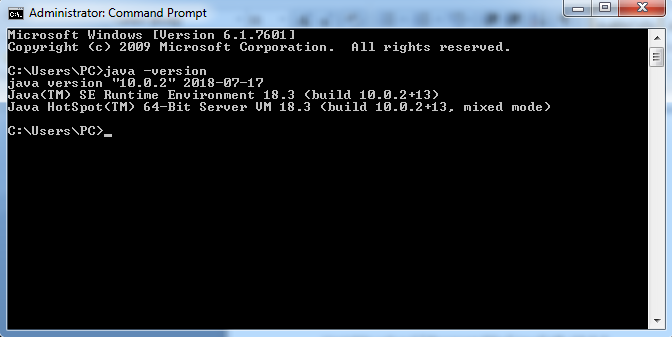
now successfully you can run java commands.