
Для запуска консоли JShell нужно выполнить следующие шаги:
- Установите
Java Development Kit (JDK)версии 9 или выше на ваш компьютер. Это необходимо, так какJShellявляется частьюJDK, начиная с версии 9. - Откройте терминал (или командную строку в
Windows) и введите командуjshell. После этого запустится консольJShell - В консоли
JShellвы можете вводить и выполнятьJava-код. Для этого просто введите выражение или команду и нажмитеEnter
Например, чтобы создать переменную с именем x и присвоить ей значение 42, введите следующий код:
int x = 42;
Затем нажмите Enter, и переменная x будет создана и инициализирована в JShell
Чтобы выйти из консоли JShell, введите команду /exit или нажмите Ctrl+D
Отметим, что консоль JShell также поддерживает автодополнение и историю команд, что может существенно упростить работу с ней.
How to Open Java Console: A Step-by-Step Guide
Introduction
The Java console, also known as the Java Development Environment (JDE) console, is a powerful tool used for developing, debugging, and testing Java applications. It provides a command-line interface for executing Java code, viewing output, and managing project files. In this article, we will guide you through the process of opening the Java console and using it to develop and debug your Java applications.
Step 1: Download and Install Java
Before you can open the Java console, you need to have Java installed on your computer. You can download the latest version of Java from the official Oracle website. Once you have downloaded and installed Java, you can proceed to the next step.
Step 2: Open the Command Prompt or Terminal
To open the Java console, you need to open a command prompt or terminal. Here are the steps to follow:
- On Windows:
- Click on the Start button and select Command Prompt or Command Line.
- Alternatively, you can search for Command Prompt or Command Line in the Start menu.
- On macOS or Linux:
- Open the Terminal application.
- You can find the Terminal application in the Applications/Utilities folder or by searching for it in the Terminal menu.
Step 3: Navigate to the Project Directory
Once you have opened the command prompt or terminal, you need to navigate to the project directory where your Java application is located. Here are the steps to follow:
- On Windows:
- Type
cdfollowed by the path to the project directory in the command prompt. - For example, if your project is located at
C:UsersYourUsernameDocumentsJavaProject, you would typecd C:UsersYourUsernameDocumentsJavaProject.
- Type
- On macOS or Linux:
- Type
cdfollowed by the path to the project directory in the terminal. - For example, if your project is located at
/Users/YourUsername/Documents/JavaProject, you would typecd /Users/YourUsername/Documents/JavaProject.
- Type
Step 4: Open the Java Console
Once you have navigated to the project directory, you can open the Java console by typing the following command:
- On Windows:
java -jar your-jar-file.jar(replaceyour-jar-file.jarwith the actual name of your Java jar file)
- On macOS or Linux:
java -jar your-jar-file.jar(replaceyour-jar-file.jarwith the actual name of your Java jar file)
Step 5: Run Your Java Application
Once you have opened the Java console, you can run your Java application by typing the following command:
- On Windows:
your-jar-file.jar(replaceyour-jar-file.jarwith the actual name of your Java jar file)
- On macOS or Linux:
your-jar-file.jar(replaceyour-jar-file.jarwith the actual name of your Java jar file)
Step 6: View Output and Manage Project Files
Once your Java application has started, you can view output and manage project files by using the following commands:
- On Windows:
your-jar-file.jar(replaceyour-jar-file.jarwith the actual name of your Java jar file)javap -h(to view the help menu)javap -v(to view the version number)
- On macOS or Linux:
your-jar-file.jar(replaceyour-jar-file.jarwith the actual name of your Java jar file)javap -h(to view the help menu)javap -v(to view the version number)
Tips and Tricks
- To exit the Java console, type
exitand press Enter. - To view the Java console output, type
your-jar-file.jar(replaceyour-jar-file.jarwith the actual name of your Java jar file) and press Enter. - To manage project files, use the
javapcommand to view the help menu and version number.
Common Issues and Solutions
- Java console not opening: Make sure that Java is installed on your computer and that the command prompt or terminal is open.
- Java console not displaying output: Check that the Java console is running and that the output is being displayed correctly.
- Java console not exiting: Check that you have typed
exitand pressed Enter to exit the Java console.
Conclusion
Opening the Java console is a crucial step in developing and debugging Java applications. By following the steps outlined in this article, you can easily open the Java console and use it to develop and debug your Java applications. Remember to always follow best practices and use the Java console responsibly to avoid any potential issues.
Table: Java Console Commands
| Command | Description |
|---|---|
java -jar your-jar-file.jar |
Open the Java console and run your Java application |
javap -h |
View the help menu |
javap -v |
View the version number |
exit |
Exit the Java console |
cd |
Navigate to the project directory |
cd / |
Navigate to the root directory |
cd .. |
Navigate to the parent directory |
cd .. |
Navigate to the parent directory on Windows |
cd ~ |
Navigate to the user directory |
cd ~ |
Navigate to the user directory on Windows |
Additional Resources
- Oracle Java Documentation: https://docs.oracle.com/javase/8/docs/api/
- Java Tutorials: https://docs.oracle.com/javase/tutorial/
- Java Console Tutorial: https://www.tutorialspoint.com/java/java_console.htm
Unlock the Future: Watch Our Essential Tech Videos!
- September 24, 2014
- Java, Windows

Last updated: January 15, 2019
You may need to diagnose Java implementation issues on your Windows computer. If so, it may be helpful to gather Java-related messages from your computer’s Java Console. A support team may request this information, which is also know as “output.” Below are the steps to enable the Java Console on Windows when there is a request for Java Console output, or you need to reference it:
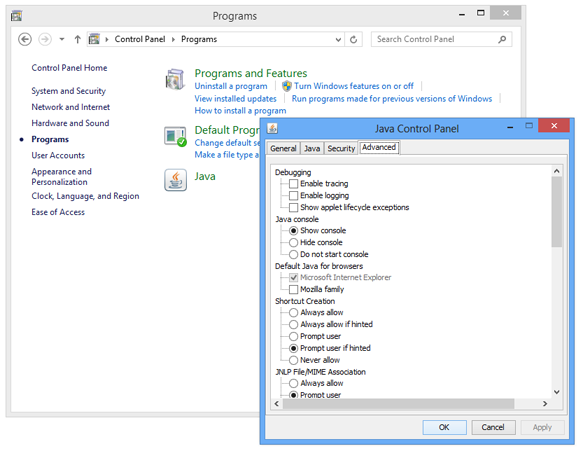
1. Open the Control Panel on your Windows computer. Click Programs, and then double-click the Java logo (which may also say Java (32-bit)) to load the Java Control Panel.

2. To always launch and display the Java Console when you encounter Java content in your web browser, select the Show console radio button under the Advanced tab.

When you select Show console, click the Apply button, then click the OK button. The Java Control Panel will close.
You may select Hide console to enable the Java Console only without launching it automatically when you encounter Java content in your web browser. The Java Console will only display when you select to launch it.
To disable the Java Console so it does not start when you encounter Java content in your web browser, select the Do not start console radio button. This is the option you would select when you no longer need to display the Java Console. Should an occasion arise when you need to reference the Java Console again, just select Show console again.
3. When you select Show console, your Java Console will launch when you encounter Java content in your web browser.

To provide the Java Console output to a support team, highlight the text within the Java Console window. Click the Copy button at the base of the Java Console window to add the highlighted text to your clipboard. From the clipboard, paste the Java Console output you copied into an email or document of your choice.
If you are using a Mac computer, please visit the How to Enable the Java Console on Mac article instead.
Thank you for visiting Tech Help Knowledgebase to learn how to enable the Java Console on Windows.
Tech Help Knowledgebase creates how-to articles and video tutorials for common issues, and provides technical support for the categories covered by our site.
Get Support.
- TagsJavaplug-inWindows
When ActiveX/Java Uploader is utilized in non-Internet Explorer browsers (Firefox, Safari, and etc.), it uses java applet as a
client-side application. Java applets provide a feature which is very useful when it is necessary to get additional information about some problem: special console
where the applet can trace various debug information. This topic describes how to get information from the Java console.
Using Java Console
Opening Java Console on Windows
- Open Control Panel, click Programs, then select Java.
- Switch to Advanced tab.
- Select Show Console.
- Click the Apply button and close the Java control panel.
- As soon as you run the browser with any Java applet, the console window will appear.
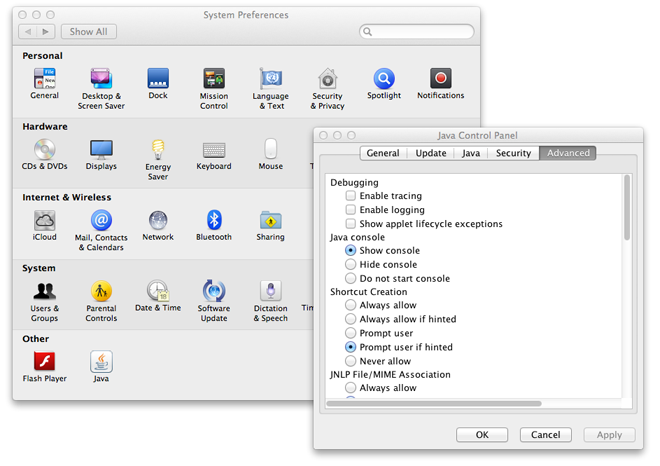
Opening Java Console on Mac OS X
- Open System Preferences and click Java.
- Switch to Advanced tab.
- Select Show Console.
- Click the Apply button and close the Java control panel.
- As soon as you run the browser with any Java applet, the console window will appear.
Java Console Usage
After you open Java console, use ActiveX/Java Uploader to reproduce the problem. Debug information will be automatically dumped into the console.
You can set the trace level — the parameter that determines how much debug information should be displayed. This value can be a number from
1 (brief) through 5 (most verbose).
To select a trace level, just type a number from 1 through 5 in the console.
Other console commands are displayed in the beginning of the console output. Moreover, you can display this list of commands by typing h in the console.
What Information Can Be Found?
ActiveX/Java Uploader writes various information into the console. Some information makes sense for developers only, but some information
can be useful for you as well, for instance:
- version number of the
Uploader8.jar - cookies which are recognized by ActiveX/Java Uploader and are about to be sent to the server
- additional POST fields which will be sent to the server
- HTTP response from the server (HTTP code as well as HTML generated by the upload processing page)
- and any other details
If you create a support case, the console output may help to find out the reason of the problem and its resolution.