
Modify the catalina.bat file so that the servlet engine can work with Java in Tomcat.
Catalina is Tomcat’s servlet container that implements specifications for JSP and servlets. It was introduced in Tomcat version 4.x and is a core component of getting your Tomcat server up and running.
This information is stored in the file catalina.bat. We will have to go in manually and add in a path to our JDK install via the JAVA_HOME environmental variable.
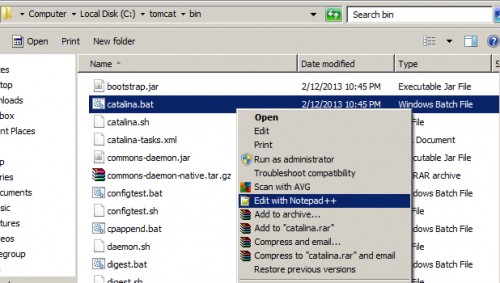
1. Navigate to the directory where Tomcat is installed, and go into the \bin folder (c:\tomcat\bin). Right-click the file catalina.bat, and then select Edit. (I used Notepad++, but regular Notepad is fine.)
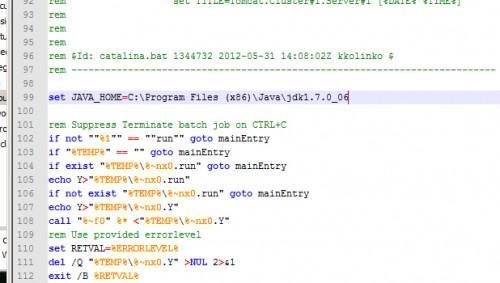
2. Scroll down in the code until you pass the end of the beginning “rem” comments, and insert the following code pointing to your JDK’s root directory:
set JAVA_HOME=C:\Program Files (x86)\Java\jdk1.7.0_06
Be sure you are pointing to YOUR computer’s location of the JDK, not the exact one listed above.
3. Save your changes, and restart Tomcat.
Catalina.bat is part of Tomcat, the open source web server and servlet container for rendering and displaying JSP/Servlet powered web pages. If you want to learn how to install Tomcat and stumbled upon this page first, please see our tutorial on installing Tomcat here.
Chris Luongo
Chris is a self-taught web designer and developer out of Atlanta, GA. This geek enjoys coffee, cold brews, bike riding, and twisting any form of tech into submission.
- Details
- Written by
- Last Updated on 05 August 2019 | Print Email
Basically, an installation of Tomcat is running under the default JRE which can be found based on environment variables (JAVA_HOME), or registry entries (on Windows) or the JRE is specified during installation (Tomcat is installed as a service). Sometimes we need to change the default JRE for Tomcat, either for testing purposes or to run Tomcat under a targeted version of JRE. In this article, we summarize different ways to change JRE for a Tomcat installation.
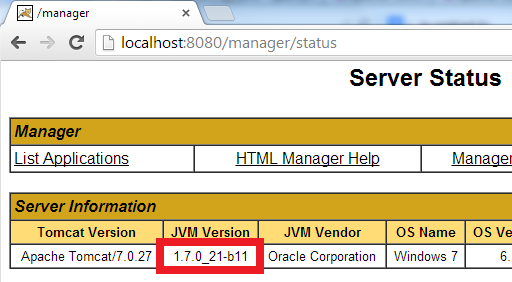
To know which JRE version is used for Tomcat, go to the following URL:
localhost:8080/manager/status
And look at the JVM Version column:
1. Changing JRE by updating JAVA_HOME or JRE_HOME
This way is very simple to implement but it works only for Tomcat installed from a zip distribution (in contrast to Tomcat installed as a service).
-
- If only the JAVA_HOME environment variable is set, Tomcat will run under the JRE as part of the JDK specified by the JAVA_HOME variable. Therefore, we change JRE for Tomcat by updating this variable.
- If both the JAVA_HOME and JRE_HOME environment variables are set, the JRE_HOME is preferred. Here’s an example of a valid value for the JRE_HOME variable (path on Windows):
JRE_HOME=C:\Program Files\Java\jre7
Notice that updating the JAVA_HOME or JRE_HOME environment variables will affect all the applications that depend on them, so if you want to look for a more independent approach, see the second way as described below.
2. Changing JRE by using “setenv” script
We can change the JRE for Tomcat by setting the JRE_HOME variable in a script file called setenv.bat (on Windows) or setenv.sh (on *nix). This file does not exist by default, so create such file and place it under CATALINA_BASE\bin directory (CATALINA_BASE is the Tomcat installation directory).
On Windows, create the setenv.bat file with the following content:
set "JRE_HOME=C:\Program Files\Java\jdk1.7.0_03\jre"
exit /b 0
On *nix, create the setenv.sh file with the following content:
JRE_HOME=/usr/java/jdk1.7.0_03/jre
CATALINA_PID="$CATALINA_BASE/tomcat.pid"
Note that this way only works with Tomcat installed from a zip distribution. It doesn’t apply for Tomcat installed as a service. Behind the scenes, the Tomcat’s start up script (startup.bat/startup.sh) will invoke the “setenv” script if it is present. One advantage of this way is that it doesn’t affect the system environment variables.
3. Changing JRE in Tomcat service manager
For a Tomcat installation which is installed as a service (on Windows), we can change the version of JRE that runs Tomcat by configuring the Java Virtual Machine setting in the Tomcat service manager program (e.g. Tomcat7w.exe), as shown in the following screenshot:
This way is very simple to perform, and it does not depend on the system environment variables JAVA_HOME or JRE_HOME.
4. Changing JRE in Eclipse IDE
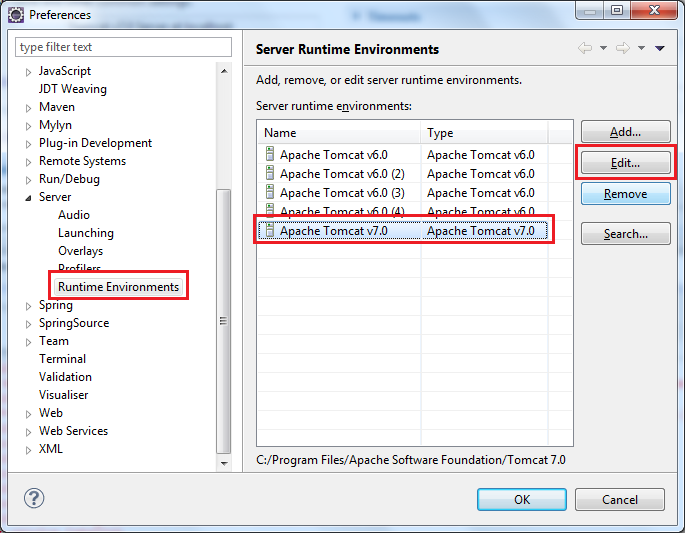
If you are using Tomcat inside Eclipse IDE, changing the JRE version for Tomcat is also pretty easy. By default, Tomcat is running under the same JRE as Eclipse (Workbench default JRE). To change JRE version for a Tomcat runtime in Eclipse, go to the menu Window > Preferences. In the Preferences dialog, open the Server > Runtime Environments node, select a Tomcat version in the list, and then click the Edit button:
The Edit Server Runtime Environment dialog appears, select the targeted JRE version under the JRE list:
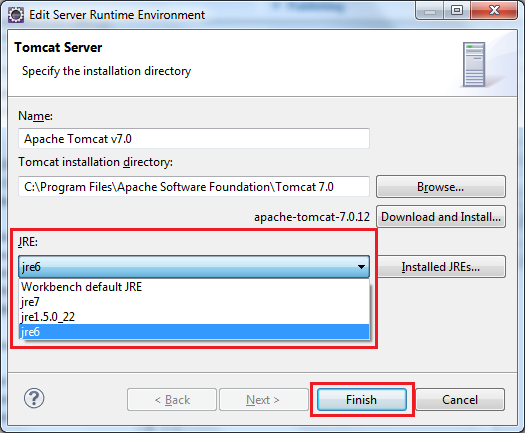
Click Finish to close this dialog, and click OK to close the Preferences dialog. Now restart Tomcat to see the effect. Note that we can spot the JRE version by looking at the Console view as shown below:

Other Tomcat Tutorials:
- How to deploy a Java web application on Tomcat
- How to Embed Tomcat Server into Java Web Applications
- How to Use Virtual Hosts in Tomcat
- Configuring JNDI DataSource for Database Connection Pooling in Tomcat
- How to set web application context path as server root in Tomcat
- How to configure session timeout in Tomcat
- Change Tomcat port numbers in server.xml file
- How to add Tomcat server in Eclipse IDE
- How to change server location and deploy path for Tomcat in Eclipse
About the Author:
Nam Ha Minh is certified Java programmer (SCJP and SCWCD). He began programming with Java back in the days of Java 1.4 and has been passionate about it ever since. You can connect with him on Facebook and watch his Java videos on YouTube.
Add comment
1. Overview
In this tutorial, we’re going to see to how set up environment variables for applications deployed in Apache Tomcat.
1. Set up Environment Variables For Apache Tomcat On Windows
One popular approach to set up environment variables for Apache Tomcat runs on Windows is to use an additional file called setenv.bat, and put the variables as pairs of key and value in the file. For example, let’s set JAVA_HOME and JAVA_OPTS for the Tomcat step by step as follows:
- Create a file setenv.bat in the CATALINA_HOME /bin
- Open the file with a text editor and put the following lines to the file:
|
set JAVA_HOME=PATH TO YOUR JDK set JAVA_OPTS=—Xms1G —Xmx1G |
Note that there is no Quotation Marks required for setting up environment for Apache Tomcat on Windows, and the file will be called automatically when the Tomcat is startup.
On Linux, to set up environment variables for Apache Tomcat, we can do the same approach with Windows’s. However, the file should be setenv.sh. Let’s set the same JAVA_HOME and JAVA_OPTS variables on Linux:
- Create a file setenv.sh in the folder CATALINA_HOME /bin
- Open the file and put the following lines to the file:
|
export JAVA_HOME=«PATH TO YOUR JDK» export JAVA_OPTS=«-Xms1G -Xmx1G» |
Note that for Linux environment, the quotation marks are required, and the file will be called automatically when the Tomcat is started.
3. Environment Variables Can Be Set In CATALINA_HOME/bin/setenv.sh
As stated in CATALINA_HOME /bin/catalina.sh, catalina.bat files the following environment variables can be set in CATALINA_HOME /bin/setenv.sh, catalina.bat. The setenv.bat and setenv.sh script are run on Tomcat startup. They are not present in standard Tomcat distribution, so they have to be created.
| Variable Names | Descriptions | ||
| CATALINA_HOME | Represents the root of your Tomcat installation | ||
| CATALINA_BASE | May point at your Catalina “build” directory | ||
| CATALINA_OUT | Full path to a file where stdout and stderr will be redirected. | ||
| CATALINA_OPTS | Java runtime options used when the “start” or “run” command is executed | ||
| CATALINA_TMPDIR | Directory path location of temporary directory the JVM should use (java.io.tmpdir) | ||
| JAVA_HOME | Must point at your Java Development Kit installation | ||
| JRE_HOME | Must point at your Java Runtime installation.Defaults to JAVA_HOME if empty | ||
| JAVA_OPTS | Java runtime options used when the “start”, “stop” or “run” command is executed | ||
| JAVA_ENDORSED_DIRS | Lists of of colon separated directories containing some jars in order to allow replacement of APIs created outside of the JCP (i.e. DOM and SAX from W3C). It can also be used to update the XML parser implementation. Defaults to $CATALINA_HOME/endorsed. | ||
| JPDA_TRANSPORT | JPDA transport used when the “jpda start” command is executed. The default is “dt_socket”. | ||
| JPDA_ADDRESS | Java runtime options used when the “jpda start” command is executed. The default is 8000. | ||
| JPDA_SUSPEND | Java runtime options used when the “jpda start” command is executed. Specifies whether JVM should suspend execution immediately after startup. Default is “n”. | ||
| JPDA_OPTS | Java runtime options used when the “jpda start” command is executed. If used, JPDA_TRANSPORT, JPDA_ADDRESS, and JPDA_SUSPEND are ignored. Thus, all required jpda options MUST be specified. The default is: -agentlib:jdwp=transport=$JPDA_TRANSPORT,address=$JPDA_ADDRESS,server=y,suspend=$JPDA_SUSPEND |
||
| CATALINA_PID | Path of the file which should contains the pid of the catalina startup java process, when start (fork) is used | ||
| LOGGING_CONFIG | Override Tomcat’s logging config file Example (all one line) | ||
| LOGGING_MANAGER | Override Tomcat’s logging managerExample (all one line) | ||
4.3
3
votes
Article Rating
Step 1: Right click on computer – > properties – > Advanced system settings – > Advanced – > Environment Variables – > User variables.
Step 2: Adding the new environment variable values
Create New and type as follows,
variable: JAVA_HOME
value : C:\Program Files\Java\jdk1.6.0
variable: JRE_HOME
value : C:\Program Files\Java\jre1.6.0
variable: PATH
value : C:\Program Files\Java\jre1.6.0;C:\Program Files\Java\jdk1.6.0\bin;C:\Program Files\Java\jre1.6.0\bin;C:\apache-tomcat-6.0.14\bin;
variable: CLASSPATH
value : c:\Program Files\Java\jdk1.6.0\jre\lib
Step 3: If tomcat server doesnot start then remove the end semicolon in JRE_HOME and JAVA_HOME.
Now start the server it will start successfully.
Revert me if you have any problems.
Thanks for reading this post…!!
Скачиваем Tomcat
разархивируем его на c:\Program Files\apache-tomcat-7.0.25\
Если запустить командную строку (cmd) и написать там:
c:\Program Files\apache-tomcat-7.0.25\bin>startup
То мы увидим следующий текст:
Neither the JAVA_HOME nor the JRE_HOME environment variable is defined
At least one of these environment variable is needed to run this program
c:\Program Files\apache-tomcat-7.0.25\bin>
Это говорит нам о том, что серверу Tomcat нужно указать, где находится установленный JRE/JDK
Есть несколько способов сделать это.
Способ 1
В c:\Program Files\apache-tomcat-7.0.25\bin\ создаем файл setenv.bat
Пишем в нем:
set «JRE_HOME=c:\Program Files\Java\jre7\»
exit /b 0
Будьте внимательны!
В официально документации c:\Program Files\apache-tomcat-7.0.25\RUNNING.txt
Написано, что нужно прописать такой текст:
set «JRE_HOME=%ProgramFiles%\Java\jre6»
exit /b 0
Это не верно для Windows x64, т.к. на диске C:\ существует две папки Program Files:
1) Program Files //первая служит для 64-х разрядных программ
2) Program Files (x86) //вторая служит для программ под 32-х разрядную Windows
Т.к. У меня Java (JRE/JDK) установлены под 64-bit, то они находятся в папке
1) Program Files
А строка set «JRE_HOME=%ProgramFiles%\Java\jre6» подразумевает папку 2) Program Files (x86)
Значит она не найдет и не запустит Tomcat. Поэтому я явно указал путь к Program Files
Далее в cmd пишем:
c:\Program Files\apache-tomcat-7.0.25\bin>setenv.bat
Получаем:
c:\Program Files\apache-tomcat-7.0.25\bin>set «JRE_HOME=C:\Program Files (x86)\Java\jre7\»
c:\Program Files\apache-tomcat-7.0.25\bin>exit /b 0
c:\Program Files\apache-tomcat-7.0.25\bin>
Если папки перепутаны, то при запуске setenv.bat мы получим
Далее запускаем файл startup
c:\Program Files\apache-tomcat-7.0.25\bin>startup
Ура! сервер запущен
Для проверки, в браузере вводим http://localhost:8080/
Способ 2
Открываем Пуск, кликаем правой кнопкой на Компьютер, Свойства
Дополнительные параметры системы
Переменные среды
Создать (та, что самая нижняя)
Пишем Имя переменной: JAVA_HOME
Значение переменной: C:\Program Files\Java\jdk1.7.0_02
Давим три раза ОК
Запускаем
c:\Program Files\apache-tomcat-7.0.25\bin>startup
И снова все работает =)
Способ 3
В папке c:\Program Files\apache-tomcat-7.0.25\bin\ есть файл catalina.bat
Нужно открыть его блокнотом и найти строки
rem Guess CATALINA_HOME if not defined
set «CURRENT_DIR=%cd%»
давайте вставим перед этими строками путь к JRE, чтобы получилось так:
set JAVA_HOME=c:\Program Files\Java\jre7\
rem Guess CATALINA_HOME if not defined
set «CURRENT_DIR=%cd%»
Запускаем
c:\Program Files\apache-tomcat-7.0.25\bin>startup
enjoy =)
Меняем порт с 8080 на 80
Открываем файл c:\Program Files\apache-tomcat-7.0.25\conf\server.xml
Находим там строку:
И меняем 8080 на 80
Создаем bat-файлы для быстрого запуска/остановки Tomcat
Создаем файл Start.bat:
cd c:\Program Files\apache-tomcat-7.0.25\bin\
startup
Создаем файл Stop.bat:
cd c:\Program Files\apache-tomcat-7.0.25\bin\
shutdown
Подключаем servlet-api.jar
Если мы будем компилировать наш сервлет в IDE, например Eclipse, то для этого мы просто подключим библиотеку c:\Program Files\apache-tomcat-7.0.25\lib\servlet-api.jar
Но если мы захотим компилировать проект в командной строке, с помощью javac, то у нас ничего не выйдет, т. к. компилятор не найдет библиотеки servlet-api.jar
Исправляем эту ситуацию:
Добавляем в Переменные среды:
Имя переменной: CLASSPATH
Значение переменной: c:\Program Files\apache-tomcat-7.0.25\lib\servlet-api.jar