
Java является одним из самых популярных языков программирования в мире информационных технологий. Этот универсальный язык используется для разработки приложений, работающих на самых разнообразных платформах, включая серверы Windows. Установка Java на операционной системе Windows Server может потребоваться для запуска различных приложений, веб-серверов, баз данных и многих других задач. В этой статье мы рассмотрим процесс установки Java на сервере, работающем под управлением Windows Server 2016.
Введение
Java — это объектно-ориентированный язык программирования, который стал всеобъемлющим языком и привлек внимание крупных организаций и компаний. Изобретателем языка Java является Джеймс Гослинг. Он пытался изобрести новый язык, который мог бы заменить язык программирования C++ и обладал бы большими возможностями. Язык программирования Java состоит из двух частей: интерфейсов прикладного программирования (API) и виртуальной машины Java (JVM).
Java остается одним из важнейших языков программирования, имеет огромное сообщество разработчиков и богатый экосистемный стек, что делает его мощным инструментом для создания разнообразных приложений и решений.
Основные характеристики Java это:
- Портативность — Java разработан с учетом идеи «Write Once, Run Anywhere» (Пиши один раз, запускай где угодно). Это означает, что программы, написанные на Java, могут выполняться на разных операционных системах без необходимости переписывать код. Это достигается благодаря использованию виртуальной машины Java (JVM), которая интерпретирует байт-код Java и адаптирует его для конкретной платформы.
- Безопасность — Java предоставляет множество механизмов безопасности, которые помогают защитить приложения от вредоносных атак и ошибок в коде.
- Многозадачность — Java поддерживает многозадачность, что означает, что вы можете создавать многопоточные приложения, которые выполняют несколько задач одновременно.
- Обширная библиотека — Java поставляется с богатой библиотекой классов и API, которые облегчают разработку различных видов приложений, включая веб-приложения, мобильные приложения, настольные приложения и многое другое.
- Общее использование — Java широко применяется в различных областях, включая веб-разработку, мобильное программирование (с использованием Android), корпоративные приложения, игровую индустрию и многое другое.
Установка JRE
JRE представляет собой окружение, необходимое для выполнения Java-приложений. Оно включает в себя виртуальную машину Java (JVM), классы библиотеки Java Standard Library и другие компоненты, необходимые для запуска Java-приложений. JRE устанавливается на компьютерах конечных пользователей и серверах, которые должны выполнять Java-приложения, но не разрабатывать их. Пользователи, которым нужно просто запустить Java-приложение, могут использовать JRE для этой цели.
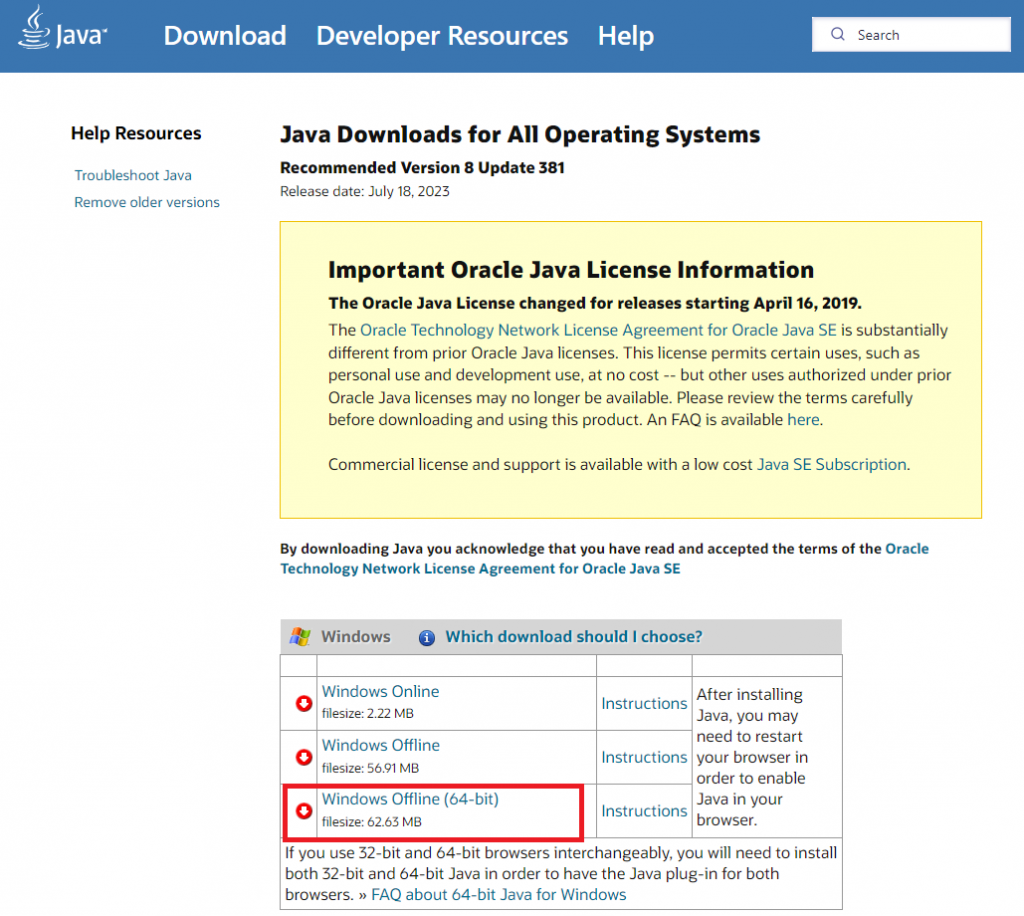
Для установки JRE откройте на вашем VDS удобный для вас брайзер и перейдите на страницу загрузки Java для Windows Server 2016. Здесь выберите для загрузки offline-дистрибутив для 64-х разрядной версии Windows.
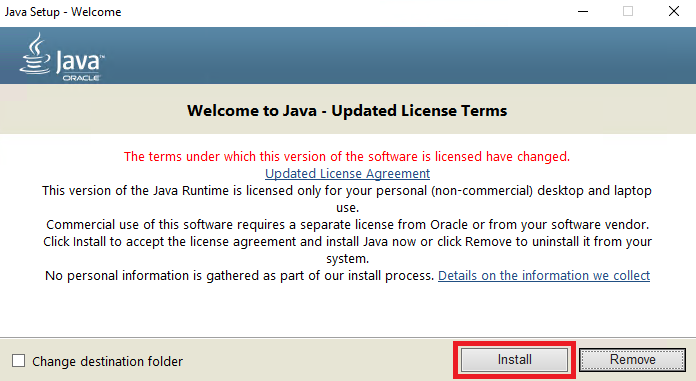
После окончания загрузки запустите установщик, где для начала инсталляции, нажмите Install.
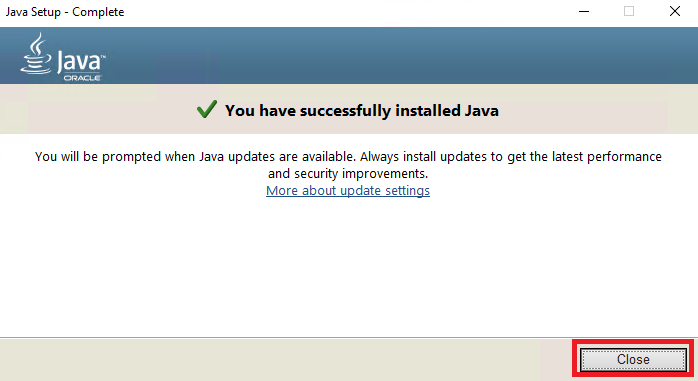
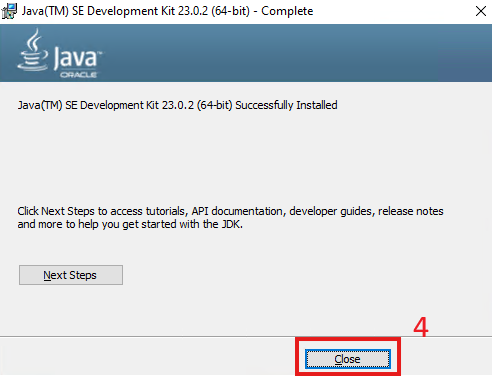
Когда установка завершится, нажмите Close для того, закончить работу мастера.
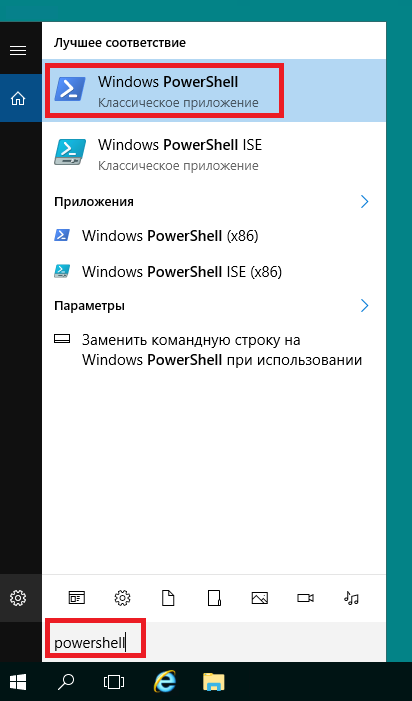
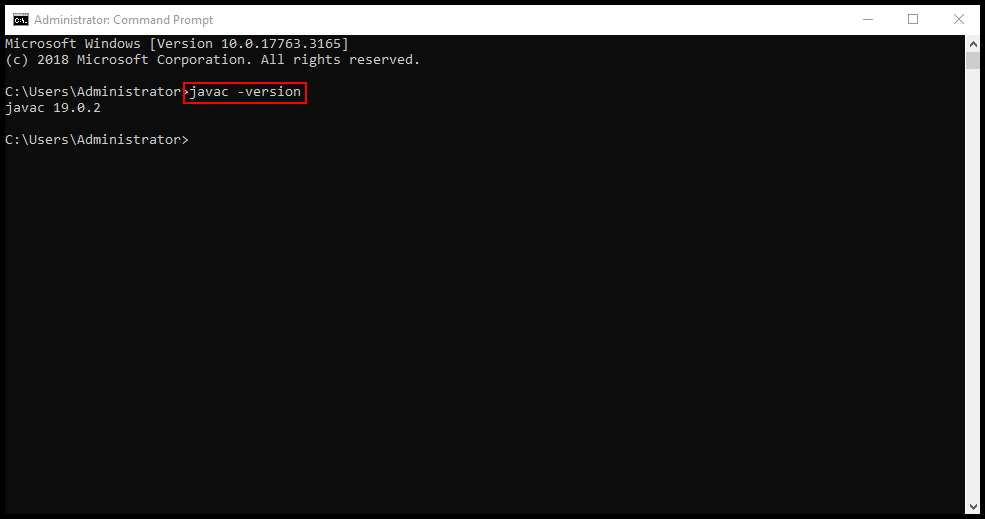
Чтобы проверить версию установленного пакета, запустите командную оболочку PowerShell, для чего в строке поиска наберите powershell.
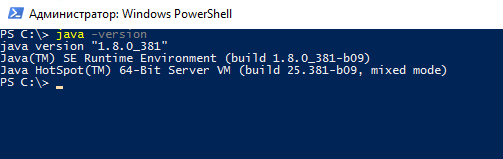
В командной строке оболочки наберите:
java -version
Настройка переменных окружения
Для того, чтобы оболочка Java была доступна для всех приложений и команд на сервере, необходимо добавить соответствующие переменные окружения. Это позволит обеспечить правильное выполнение Java-приложений и упростит управление версиями Java.
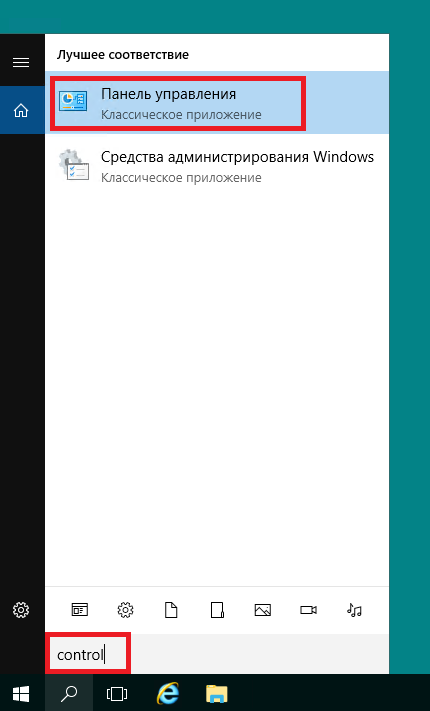
Чтобы произвести данную настройку, откройте Панель управления, для чего в строке поиска наберите control.
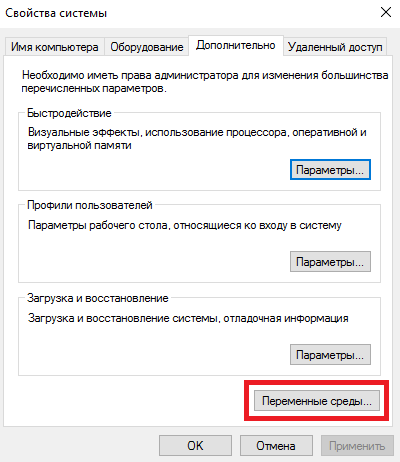
Далее перейдите Система и безопасность → Система → Дополнительные параметры системы. В открывшемся окне Свойства системы нажмите Переменные среды...
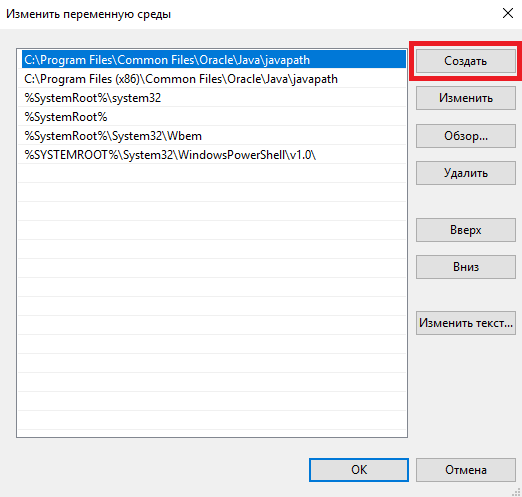
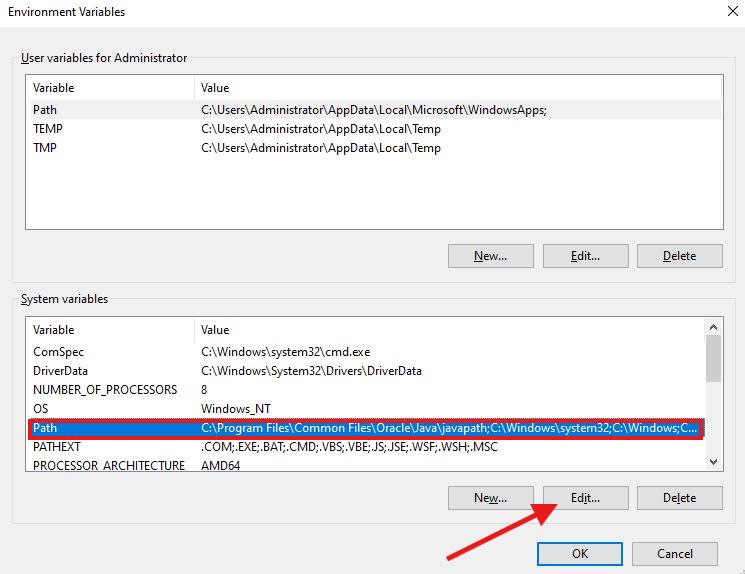
Здесь в разделе Системные переменные двойным кликом мыши откройте переменную Path.

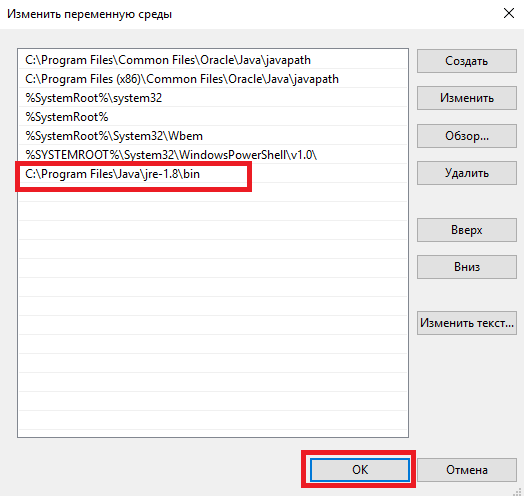
Теперь при помощи кнопки Создать добавьте значение переменной Path, содержащее путь к каталогу bin, который находится в папке установленного пакета JRE.
Для сохранения изменений нажмите ОК.
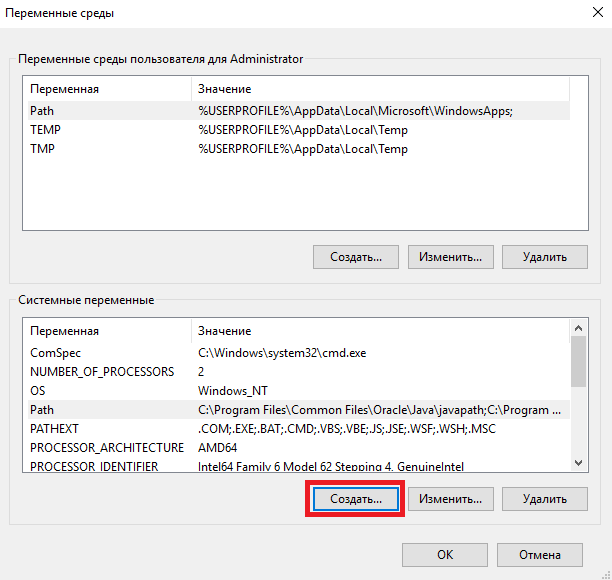
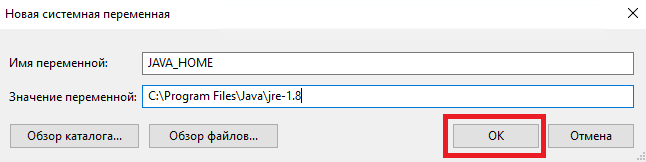
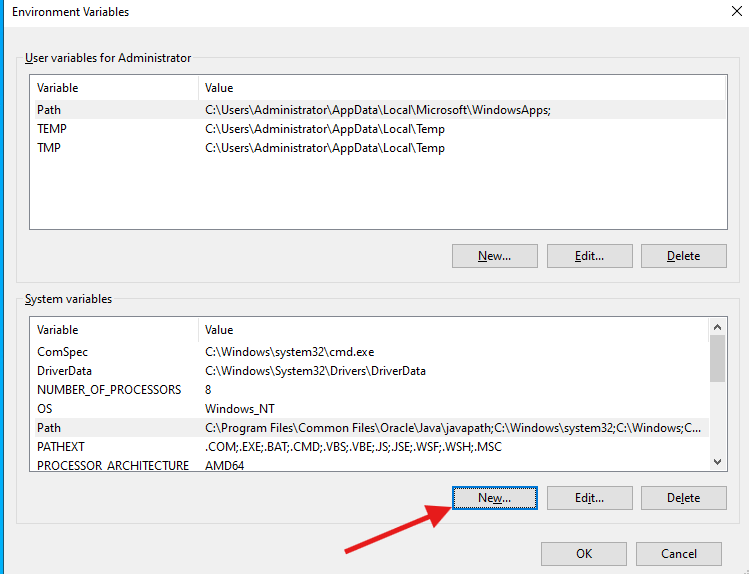
Затем с помощью кнопки Создать в разделе Системные переменные создайте новую переменную, имя которой будет JAVA_HOME, а её значение будет содержать путь к папке, в которую установлен JRE.
Для сохранения созданной переменной так же нажмите ОК.
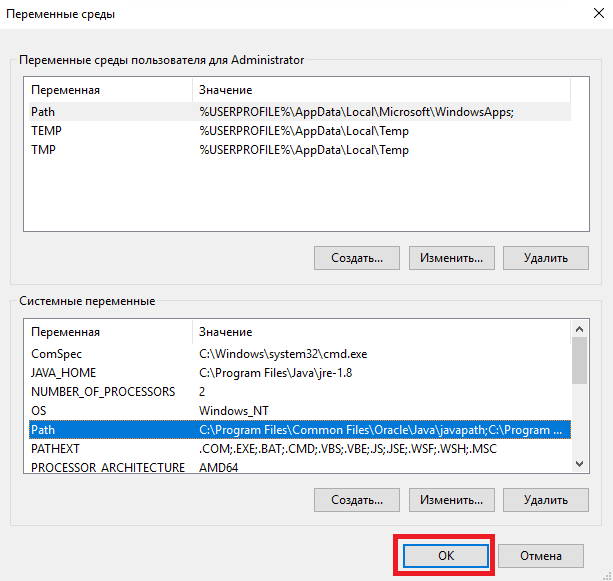
Чтобы все внесённые изменения в переменные окружения были сохранены, закройте окно при помощи кнопки ОК.
- Skip to content
- Accessibility Policy
Looking for other Java downloads?
Java 24, Java 21, and earlier versions available now
JDK 24 is the latest release of the Java SE Platform.
JDK 21 is the latest Long-Term Support (LTS) release of the Java SE Platform.
Earlier JDK versions are available below.
- JDK 24
- JDK 21
- GraalVM for JDK 24
- GraalVM for JDK 21
Java SE Development Kit 24.0.1 downloads
JDK 24 binaries are free to use in production and free to redistribute, at no cost, under the Oracle No-Fee Terms and Conditions (NFTC).
JDK 24 will receive updates under these terms, until September 2025, when it will be superseded by JDK 25.
- Linux
- macOS
- Windows
Release information
- Online Documentation
-
Installation
Instructions - Release Notes
- Documentation License
-
JDK 24 Licensing Information User Manual (includes
third-party licenses) - Certified System Configurations
- Readme
- Java Value Engineering
Java SE Development Kit 21.0.7 downloads
JDK 21 binaries are free to use in production and free to redistribute, at no cost, under the Oracle No-Fee Terms and Conditions (NFTC).
JDK 21 will receive updates under the NFTC, until September 2026, a year after the release of the next LTS. Subsequent JDK 21 updates will be licensed under the Java SE OTN License (OTN) and production use beyond the limited free grants of the OTN license will require a fee.
- Linux
- macOS
- Windows
Release information
- Online Documentation
-
Installation
Instructions - Release Notes
- Documentation License
-
JDK 21 Licensing Information User Manual (includes
third-party licenses) - Certified System Configurations
- Readme
- Java Value Engineering
GraalVM for JDK 24.0.1 downloads
GraalVM for JDK 24 binaries are free to use in production and free to redistribute, at no cost, under the
GraalVM Free Terms and
Conditions (GFTC).
GraalVM for JDK 24 will receive updates under these terms, until September 2025, when it will be superseded by GraalVM for JDK 25.
Oracle GraalVM uses the Graal just-in-time compiler and includes the Native Image feature as optional early adopter technology.
Native Image is extensively tested and supported for use in production, but is not a conformant implementation of the Java Platform. GraalVM for JDK 24 without the Native Image feature included is available for customers at My Oracle Support.
- Linux
- macOS
- Windows
Release information
- Online Documentation
- Installation Instructions
- Release Notes
- Licensing Information User Manual (includes third-party licenses)
- Certified System Configurations
- Java Value Engineering
GraalVM for JDK 21.0.7 downloads
GraalVM for JDK 21 binaries are free to use in production and free to redistribute, at no cost, under the
GraalVM Free Terms and
Conditions (GFTC).
GraalVM for JDK 21 will receive updates under the GFTC, until September 2026, a year after the release of the next LTS. Subsequent updates of GraalVM for JDK 21 will be licensed under the GraalVM OTN License Including License for Early Adopter Versions (GOTN) and production use beyond the limited free grants of the GraalVM OTN license will require a fee.
Oracle GraalVM uses the Graal just-in-time compiler and includes the Native Image feature as optional early adopter technology.
Native Image is extensively tested and supported for use in production, but is not a conformant implementation of the Java Platform. GraalVM for JDK 21 without the Native Image feature included is available for customers at My Oracle Support.
- Linux
- macOS
- Windows
Release information
- Online Documentation
- Installation Instructions
- Release Notes
-
Licensing Information User Manual (includes
third-party licenses) - Certified System Configurations
- Java Value Engineering
Protect your investment—and more
Java SE subscribers get support for JDK 17, receive updates until at least October 2029, are entitled to GraalVM, Java Management Service, and bundled patch releases (BPRs) with fixes not yet available to
nonsubscribers, and more.
Java SE subscribers have more choices
Also available for development, personal use, and to run other licensed Oracle products.
- Java 17
- GraalVM for JDK 17
- Java 11
- Java 8
- Java 8 Enterprise Performance Pack
Java SE Development Kit 17.0.15 downloads
The Oracle JDK 17 license changed in October 2024
The Oracle Technology Network License Agreement for Oracle Java SE used for JDK 17 updates 17.0.13 and greater is substantially different from prior Oracle JDK 17 licenses. This license permits certain uses, such as personal use and development use, at no cost — but other uses authorized under prior Oracle JDK licenses may no longer be available. Please review the terms carefully before downloading and using this product. FAQs are available here.
Commercial license and support are available for a low cost with Java SE Universal Subscription.
JDK 17.0.15 checksums and OL 8 GPG Keys for RPMs
- Linux
- macOS
- Windows
Release information
- Online Documentation
-
Installation
Instructions - Release Notes
- Documentation License
-
JDK 17 Licensing Information User Manual (includes
third-party licenses) - Certified System Configurations
- Readme
- Java Value Engineering
GraalVM for JDK 17.0.15 downloads
The Oracle GraaalVM for JDK 17 license changed in October 2024
GraalVM OTN License Including License for Early Adopter Versions (GOTN) used for JDK 17 updates 17.0.13 and greater is substantially different from prior Oracle GraaalVM for JDK 17 licenses. This license permits certain uses, such as personal use and development use, at no cost — but other uses authorized under prior Oracle GraaalVM for JDK licenses may no longer be available. Please review the terms carefully before downloading and using this product. FAQs are available here.
Commercial license and support are available for a low cost with Java SE Universal Subscription.
Oracle GraalVM uses the Graal just-in-time compiler and includes the Native Image feature as optional early adopter technology.
Native Image is extensively tested and supported for use in production, but is not a conformant implementation of the Java Platform. GraalVM for JDK 17 without the Native Image feature included is available for customers at My Oracle Support.
GraaalVM for JDK 17.0.15 checksums and OL 8 GPG Keys for RPMs
- Linux
- macOS
- Windows
Release information
- Online Documentation
-
Installation
Instructions - Release Notes
-
Licensing Information User Manual (includes
third-party licenses) - Certified System Configurations
- Java Value Engineering
Java SE Development Kit 11.0.27
Java SE subscribers will receive JDK 11 updates until at least
January 2032.
These downloads can be used for development, personal use, or to run Oracle licensed products. Use for other
purposes, including production or commercial use, requires a Java SE Universal Subscription or another Oracle license.
Commercial license and support are available for a low cost with
Java SE Universal Subscription.
JDK 11 software is licensed under the
Oracle Technology Network
License Agreement for Oracle Java SE.
JDK 11.0.27 checksums and OL 8 GPG Keys for RPMs
- Linux
- macOS
- Solaris
- Windows
Release information
- Online Documentation
- Installation instructions
- Release Notes
- Documentation license
-
Java SE 11 Licensing Information User Manual
(includes 3rd party licenses) -
Certified System
Configurations - Readme
- Java Value Engineering
- Linux
- macOS
- Solaris
- Windows
-
JRE 8
- Linux
- macOS
- Solaris
- Windows
-
Server JRE 8
- Linux
- Solaris
- Windows
Which Java 8 package do I need?
-
Software developers: Java SE Development Kit (JDK)
For Java developers. Includes a complete JRE plus tools for developing, debugging, and monitoring Java applications.
-
Running headless Linux workloads at or near your systems’ CPU or memory limits
Enterprise Performance Pack brings significant memory and performance improvements including modern garbage collection algorithms, reduced memory usage and many other optimizations.
Learn more
-
Administrators running applications on a server
Server Java Runtime Environment (Server JRE). For deploying Java applications on servers. Includes tools for JVM monitoring and tools commonly required for server applications, but does not include browser integration (Java plug-in), auto-update, or an installer.
Learn more
-
End user running Java on a desktop: Java Runtime Environment (JRE)
Covers most end-users needs. Contains everything required to run Java applications on your system.
Release information
- Online Documentation
- Installation Instructions
- Release Notes
-
Java SE Licensing Information User Manual (includes
third-party licenses) -
Certified System
Configurations - JDK ReadMe
- JRE ReadMe
- Demos and Samples Archive
- Java Value Engineering
- Linux
Estimated reading: 4 minutes
262 views
Introduction
The Java Development Kit (JDK) is an essential tool for Java developers. It includes a compiler to convert Java source code into bytecode, class libraries, API documentation, and the Java Runtime Environment (JRE) to execute Java applications.
This guide walks you through installing JDK on Windows.
1. System Requirements
Before installing JDK 21, ensure your system meets the following requirements:
- Windows 10,11 windows server 2019, 2022 or later
- An active internet connection
- Administrator privileges to install software
2. Check If Java Is Already Installed
If multiple Java versions are installed on your system, they may cause conflicts. Before installing a new version, check whether Java is already installed:
1. Type cmd in the Windows search bar.
2. Run the following command:
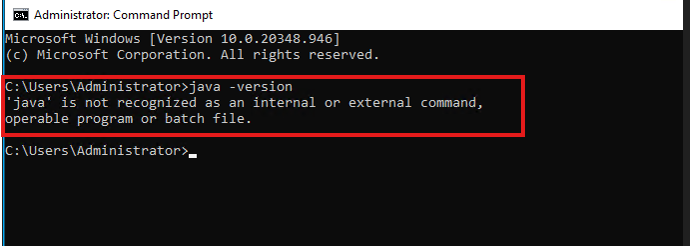
- If you see an error message like ‘java’ is not recognized as an internal or external command, Java is not installed. If an older version is installed, consider uninstalling it before proceeding.
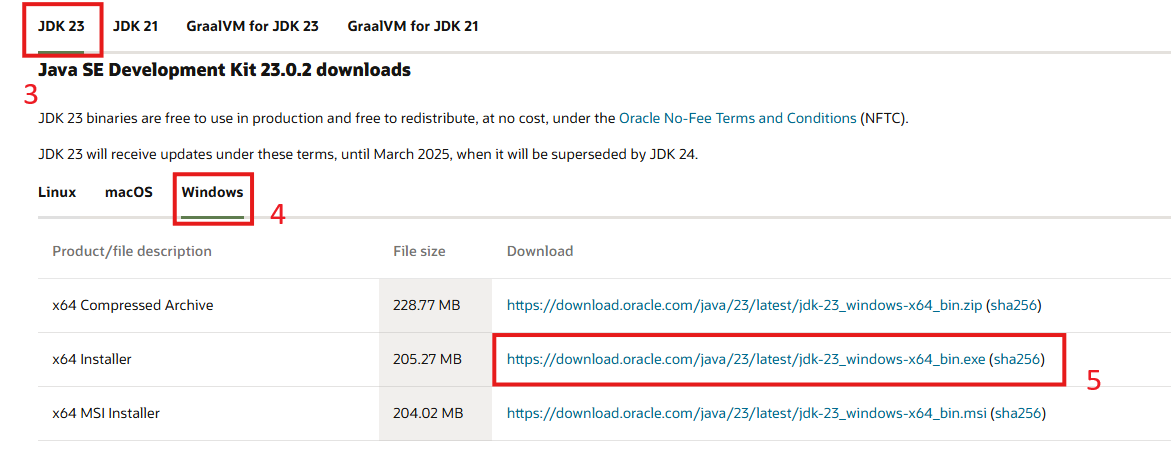
3. Download JDK
Java is available in two main distributions: Oracle JDK (commercial) and OpenJDK (open source). Choose Oracle JDK if you need commercial support, or OpenJDK for a free, community-supported version.
Download JDK 23:
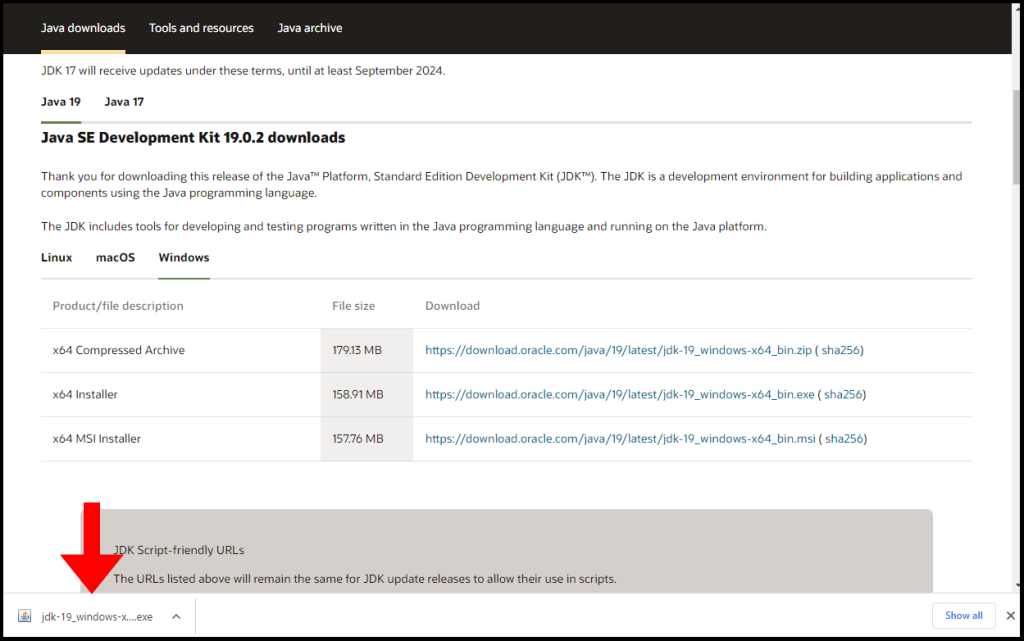
- Open your web browser and go to Oracle’s Java download page.
- Select the latest JDK version (JDK 23).
- Navigate to the Windows tab and download the x64 Installer file.
4. Install JDK on Windows
Once the installer is downloaded, follow these steps:
1. Double-click the installer file to start the installation.
2. Click Next on the welcome screen.
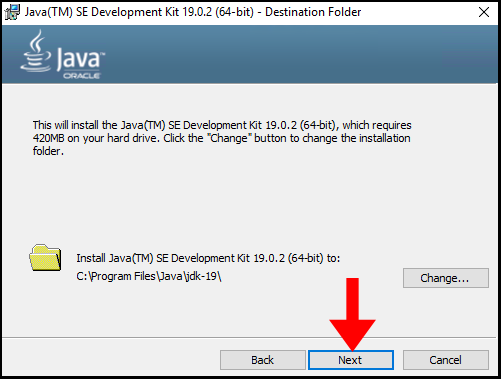
3. Choose the installation directory (or leave it as default) and click Next.
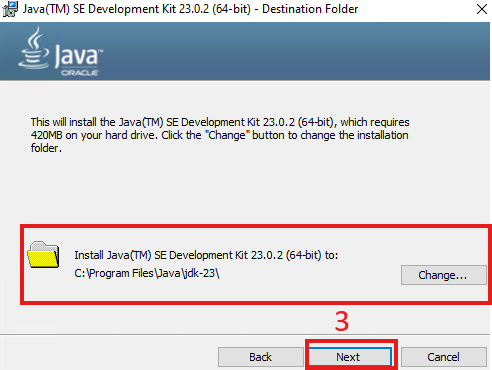
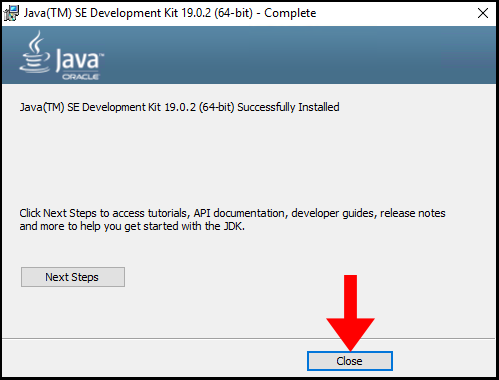
4. Wait for the installation to complete, then click Close to exit.
At this point, JDK 23 is installed on your system.
5. Configure Java Environment Variables
To use Java from any directory in Command Prompt, you need to configure environment variables.
Step 1: Add Java to System Variables
- Press
Windows + S, search for environment variables, and select Edit the system environment variables.
2. In the Advanced tab, click Environment Variables.
3. Under System variables, select Path, then click Edit.
4. Click New and add the path to the bin folder of the JDK installation:
Click OK to save changes.
Step 2: Set Up JAVA_HOME
Some applications require the JAVA_HOME variable to locate Java. Follow these steps to set it up:
- In the Environment Variables window, click New under System variables.
2. Enter JAVA_HOME as the Variable name.
3. Set the Variable value to the JDK installation directory (e.g., C:\Program Files\Java\jdk-23).
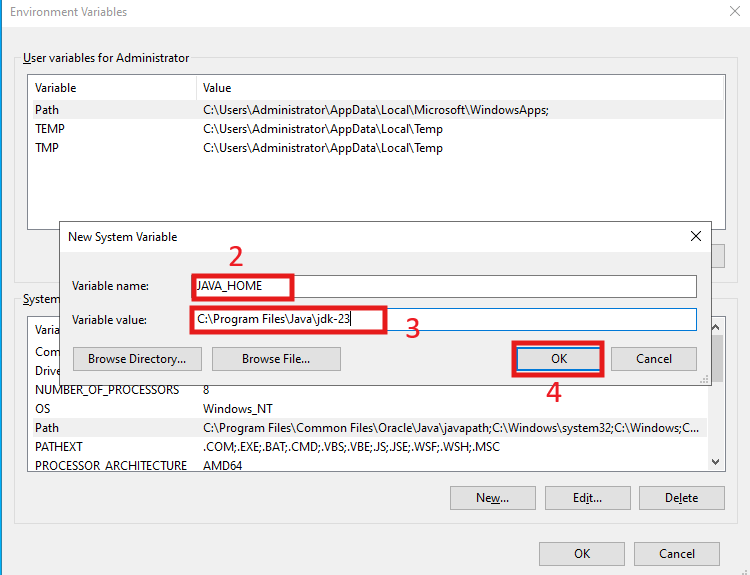
Click OK to save the changes.
6. Verify Java Installation
To confirm that Java is installed correctly, open Command Prompt and run:
If the installed Java version is displayed, the installation was successful.
7. Write and Run Your First Java Program
To test the Java compiler and runtime, create a simple Java program.
Step 1: Write the Code
- Open Notepad or a code editor like Notepad
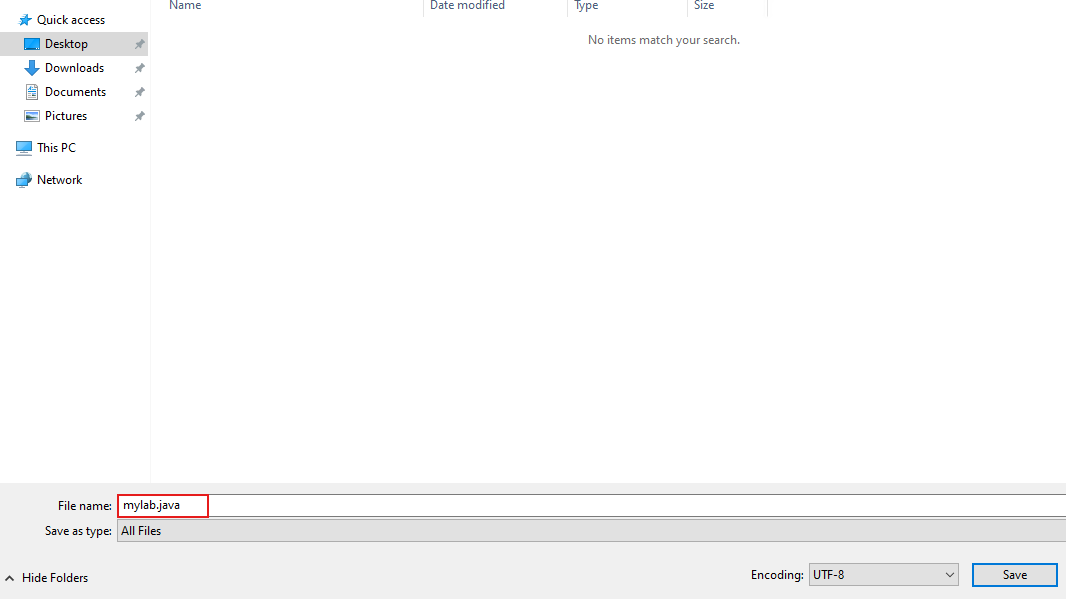
Enter the following code and save it as HelloWorld.java:
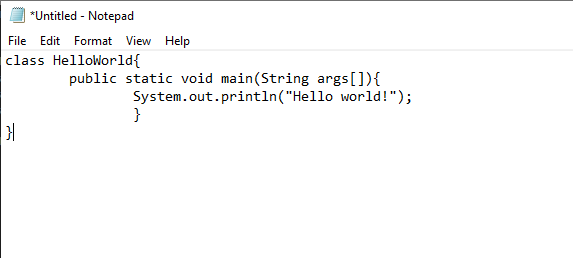
2. Ensure the file extension is .java.
Step 2: Compile and Run
- Open Command Prompt and navigate to the directory where you saved
HelloWorld.java.
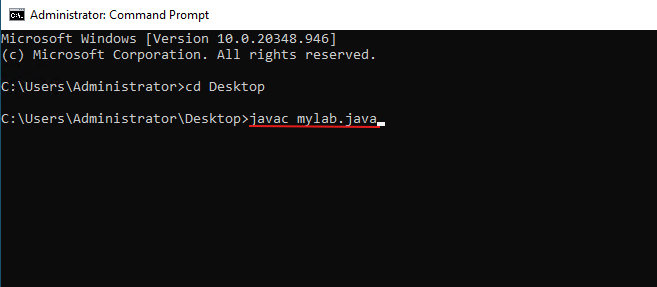
2. Compile the program using:
If successful, this generates a HelloWorld.class file.

3. Run the program:
If you see Hello, world!, Java is correctly installed.
Conclusion
In this tutorial, we covered the step-by-step process of installing the Java Development Kit (JDK) on a Windows system. We walked through downloading the appropriate JDK version, configuring system environment variables, and verifying the installation. Additionally, we provided an example Java script to ensure that the setup was successful. By following these steps, you should now have a fully functional Java development environment, allowing you to write, compile, and execute Java programs seamlessly.
Production servers and working environments require plenty of applications and programming engines on the server. To deploy and run Java-based projects on the server, you will need to install Java on the windows server.
1. To start, log in to your Windows VPS and open your internet browser of choice, in this case we will be using Google Chrome, and visit the website here. Then click Windows and click the download for x64 Installer.

3. Next, click on the download to run the installer as seen below.
4. The setup window for the installer will open and click Next to start.
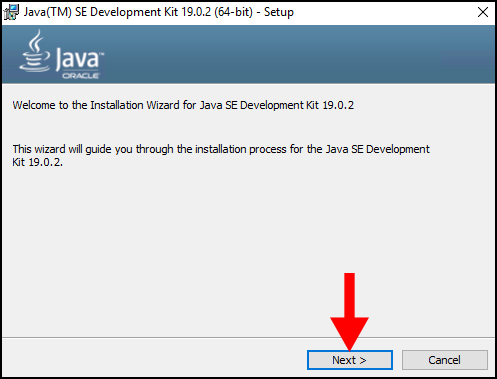
5. On the next page, click Next to proceed with the setup.
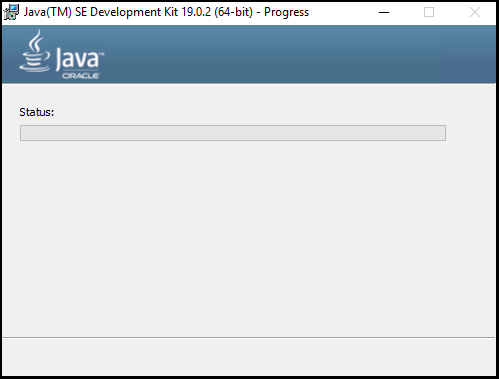
6. Now the installation will begin on this page with the Status and progress bar.
7. Once the installation is complete, you will see a similar screen as below and you can close out the wizard by clicking Close
9. To verify the Java installation version, open Command Prompt, and type in the following command. You should see a response with the Java version appear, similar to the image below. We have successfully gone through how to install Java on a Windows server.
javac -version
First download the Java 8 Server JRE.
Choose the Windows x64 edition. Once downloaded, unzip the content to a temporary folder on your server.
Installation
-
Create the folder C:\Program Files\Oracle Java Server on your server.
-
Browse to the expanded content in your temporary folder. Go one level deeper e.g. jdk1.8.0_XX (where XX is the current update version) and copy this content to the new folder on your server.
Command line:
md "C:\Program Files\Oracle Java Server"
xcopy D:\Temp\jdk1.8.0_31\*.* "C:\Program Files\Oracle Java Server" /s
(Make sure you change the update version number as appropriate).
Set JAVA_HOME environment variable
Finally we need to set an environment variable to point to our new Java installation:
- Open the control panel and choose the system applet
- Click the Advanced tab and the button Environment Variables
- Click New… at the System Variables
- Use JAVA_HOME as the name of the variable and the path C:\Program Files\Oracle Java Server as the value.
- Finish this job by clicking OK until your are back at the control panel.
Or using the command line:
setx JAVA_HOME "C:\Program Files\Oracle Java Server" /m
To check the environment variable has been set correctly:
- Open a new command prompt, type set and hit enter
- Scroll until you see the variable JAVA_HOME
Update
It is important to keep Java updated with the latest security patches. To do so, simply Stop your Tomcat-Service and repeat the installation steps from above, overwriting the existing files. Don’t forget to re-start Tomcat after the update.