
Microsoft has released a preview version of OpenJDK version 11.0.10.9. OpenJDK is a free-to-use open-source Java platform for developers to deploy on almost every OS. Microsoft states that this is a Long-Term Support release, which will be supported until at least 2024.
OpenJDK 11 includes binaries for Java 11, which was released back in 2018. Since this is a preview release, Microsoft expects the developers to provide feedback on OpenJDK 11 so that they can refine it before the stable release.
You can download and install OpenJDK 11 using the links and guide given below.
Download OpenJDK 11
Click on the links below to download OpenJDK for your operating system.
Microsoft OpenJDK 11.0.10.9 for Windows x64
Microsoft OpenJDK 11.0.10.9 for macOS x64
Microsoft OpenJDK 11.0.10.9 for Linux x64
You may find more downloadable content on Microsoft’s OpenJDK page.
Install OpenJDK 11 on Windows 10
To install OpenJDK 11 Preview on your Windows 10 PC, download it from the link provided above. Once downloaded, execute the package. The installation wizard will now appear. Click Next to continue.

On the next screen, agree to the terms and conditions by checking the box and then click Next.

Now, select which components you would like to install, and which you would not. To do so, click on the icons next to the components, and then select the option from the context menu, as in the image below. Click Next when done.

On the next screen, click Install to begin the installation process.

The installation process should not take very long. Once it is complete, click Finish on the final page of the wizard.

OpenJDK 11 Preview has now been successfully installed on your device.
What’s new in OpenJDK 11
OpenJDK 11 has fixed a number of backports and other security concerns raised by developers through feedback. You can read more about these backports and vulnerability fixes in the release notes.
These backport fixes allow Microsoft to expedite fixes and improvements in the future which shall be available to all Java developers everywhere in the world.
Closing words
OpenJDK 11 Preview brings an opportunity for the developers to test out their products on the new version before it is rolled out as a stable update. This allows them to get ahead in the game and be prepared for what 21st century Java technology has to offer.
if you are a Java developer, then you should definitely give this release a try and provide feedback to Microsoft on what you think about it, whether there are any glitches, and how they can make it even better.
OpenJDK (Open Java Development Kit) is a free and open-source implementation of the Java Platform, Standard Edition (Java SE).
OpenJDK 11 for Windows provides a distribution of OpenJDK that follows the Red Hat Enterprise Linux distribution of OpenJDK as closely as possible on the Microsoft Windows platform.
Windows builds use Red Hat Enterprise Linux RPM sources and apply all of the relevant RPM patches.
OpenJDK 11 for Windows includes OpenJDK, fonts, timezone data, and CA certificates from Red Hat Enterprise Linux.
1. Installing OpenJDK on Windows
1.1. Installing OpenJDK using the zip bundle
The easiest way to install the JDK on Windows is to unarchive the zip via the command prompt.
|
Note |
Extracting the contents of the zip bundle to a directory path that does not contain spaces is recommended. This is important as many scripts that reference the |
Procedure
-
Download the zip bundle of OpenJDK 11 for Windows.
-
Extract the contents of the zip bundle to a directory of your choice. See the note and caution above about spaces in the install path.
-
Update the
PATHas below:C:\> setx /m PATH "%PATH%;<YOUR_INSTALL_PATH>\bin"Note
The above command only works if you start the command prompt with
Run as administrator./m updates the value as a system wide setting, instead of the default local environment.
You have to restart the command prompt to check the setting by typing
path. -
Verify the OpenJDK 11 for Windows is installed by running:
java -versionin a newly opened command prompt and you should see the following:java version "1.8.0_181" Java(TM) SE Runtime Environment (build 1.8.0_181-b13) Java HotSpot(TM) 64-Bit Server VM (build 25.181-b13, mixed mode) or openjdk version "1.8.0_212-2-redhat" OpenJDK Runtime Environment (build 1.8.0_212-2-redhat-b04) OpenJDK 64-Bit Server VM (build 25.212-b04, mixed mode) or openjdk version "11.0.3-redhat" 2019-04-16 LTS OpenJDK Runtime Environment 18.9 (build 11.0.3-redhat+7-LTS) OpenJDK 64-Bit Server VM 18.9 (build 11.0.3-redhat+7-LTS, mixed mode)
-
The
%JAVA_HOME%environment variable must also be set to use some developer tools.Set the
%JAVA_HOME%environment variable asC:\> setx /m JAVA_HOME "<YOUR_INSTALL_PATH>"Note
JAVA_HOMEwill not work if thebindirectory is appended to your installation path.After restarting the command prompt, you can view your setting by typing
echo %JAVA_HOME%. -
Open Command Prompt as an administrator.
-
Set the value of the environment variable to your OpenJDK installation path:
C:\> setx /m JAVA_HOME "C:\Progra~1\RedHat\java-11-openjdk-11.0.1.13-1"
If the path contains spaces, use the shortened path name.
-
Restart Command Prompt to reload the environment variables.
1.2. Installing OpenJDK with the MSI Installer
The simplest way to install OpenJDK on Microsoft Windows.
Procedure
-
Download the MSI-based installer for OpenJDK 11 for Windows.
-
Run the installer for OpenJDK 11 for Windows.
-
Click
Nexton the Welcome Screen -
Check
I accept the terms in the License Agreement, then clickNext -
Click
Nextand accept the defaults, review the optional properties below if you wish to make changes. -
Click
Install -
Click
Yeson, «Do you want to allow this app to make changes to your device?». -
Verify the OpenJDK 11 for Windows is installed by running:
java -versionin a newly opened Command Prompt and you should see the following:java version "1.8.0_181" Java(TM) SE Runtime Environment (build 1.8.0_181-b13) Java HotSpot(TM) 64-Bit Server VM (build 25.181-b13, mixed mode) or openjdk version "1.8.0_212-2-redhat" OpenJDK Runtime Environment (build 1.8.0_212-2-redhat-b04) OpenJDK 64-Bit Server VM (build 25.212-b04, mixed mode) or openjdk version "11.0.3-redhat" 2019-04-16 LTS OpenJDK Runtime Environment 18.9 (build 11.0.3-redhat+7-LTS) OpenJDK 64-Bit Server VM 18.9 (build 11.0.3-redhat+7-LTS, mixed mode)
(Optional)
Select the desired extra environment settings if needed as described below
The OpenJDK 11 for Windows MSI-based installer includes the following components and sets the following properties:
Components
- JDK Files
-
Java Development Kit (JDK) OpenJDK 11 for Windows files.
Properties
| Setting | Default | JDK 8 | JDK 11 | Description |
|---|---|---|---|---|
|
OpenJDK Runtime — Windows Registry |
Yes |
Yes |
Yes |
The following registry keys are set HKLM\Software\JavaSoft\JDK, entries: |
|
OpenJDK Runtime — Path Variable |
Yes |
Yes |
Yes |
Adds the Runtime to the Path variable so it is available from the command line. |
|
OpenJDK Runtime — JAVA_HOME System Variable |
No |
Yes |
Yes |
JAVA_HOME is used by some programs to find the Java runtime. |
|
OpenJDK Runtime — REDHAT_JAVA_HOME System Variable |
No |
Yes |
Yes |
REDHAT_JAVA_HOME will be used in the future for Mission Control. |
|
OpenJDK Runtime — Jar Files Association |
No |
Yes |
Yes |
This enables Jar files to be run from within Windows Explorer. |
|
Web Start (Beta) — JNLP File Association |
No |
Yes |
No |
Enables the launching of JNLP files downloaded from the web. |
|
Web Start (Beta) — PATH Variable |
No |
Yes |
No |
Enables the launching of JNLP files downloaded from the web from the local file system. |
|
Web Start (Beta) — Keep Settings and Cache |
No |
Yes |
No |
Keeps settings and caches on the local file system. |
|
Mission Control — Path Variable |
No |
No |
Yes |
Adds Mission Control to the Path Variable so it is available from the command line. |
2. Updating OpenJDK on Windows
2.1. Updating OpenJDK for Microsoft Windows using the zip bundle
OpenJDK 11 for Windows can be manually update using the zip bundle.
Procedure
-
Download the ZIP bundle of 11.0.3.
-
Extract the contents of the ZIP bundle to a directory of your choice.
Note
Extracting the contents of the zip bundle to a directory path that does not contain spaces is recommended.
-
On the command prompt, update
JAVA_HOMEenvironment variable as follows: -
Open Command Prompt as an administrator.
-
Set the value of the environment variable to your OpenJDK installation path:
C:\> setx /m JAVA_HOME "C:\Progra~1\RedHat\java-11-openjdk-11.0.1.13-1"
If the path contains spaces, use the shortened path name.
-
Restart Command Prompt to reload the environment variables.
-
Set the value of path variable if it is not set already:
C:\> setx -m PATH "%PATH%;%JAVA_HOME%\bin";
-
Restart the command prompt to reload the environment variables.
-
Verify that
java -versionworks without supplying the full path.C:\> java -version openjdk version "11.0.3" 2019-04-16 LTS OpenJDK Runtime Environment (build 11.0.3+7-LTS) OpenJDK 64-bit Server VM (build 11.0.3+7-LTS, mixed mode)
3. Configuring OpenJDK for Windows
3.1. Selecting a specific JDK from the installed versions for an application
You can select a specific JDK from the installed versions on Microsoft Windows for an application.
Prerequisites
-
More than one JDK is already installed on the system.
Procedure
-
Log in as a Windows system administrator.
-
On the command line, set the prompt to
C:/. -
Enter
dir /b /s java.exeto list all of the installed JDKs on the system. -
Set the value of the environment variable to your JDK (or JRE) installation path:
setx -m JAVA_HOME "Path to Java"
If the path contains spaces, use the shortened path name.
-
Restart the command prompt to reload the environment variables.
-
Retrieve the value of the path variable:
-
Set the value of path variable:
setx -m PATH "%PATH%;%JAVA_HOME%\bin";
3.2. Setting up JDK Mission Control for Windows
This procedure describes how to install and set up JDK Mission Control for Microsoft Windows.
Prerequisites
-
Installation of OpenJDK 11 for Microsoft Windows.
Procedure
-
Unarchive the zip
-
In the
missioncontroldirectory, open the JMC client executable file. -
On the command line, start the JMC Client by entering
jmcor the the full path to the JMC executable.JAVA_HOME\missioncontrol\jmc.exe
-
On the JMC Client screen, create a new connection from the File Menu, choose your JVM, and start JMX console.
-
The result should give you an overview page with Processors, Memory consumption, Java heap use, JVM CPU usage, etc.
3.3. Configuring OpenJDK to run with customized heap size
OpenJDK 11 for Windows can be configured to use a customized heap size.
Prequisites
-
Installed Java Runtime
Procedure
-
Run the application by adding maximum heap size option to your java command line. For example to set the maximum heap size to 100 megabytes use the
-Xmx100moption.$ java -Xmx100m<your-main-class>
Revised on 2019-06-04 11:00:20 EDT
Last Updated :
09 Jan, 2025
We all know that Java is one of the most popular programming languages and comes under the top 10 most used programming languages. Now, if you are starting your Java learning, then you need to install the Java Development Kit (JDK) on your machine. OpenJDK is a free and open-source version of the Java Platform Standard Edition.
This step-by-step guide is one place to know how to install OpenJDK in a Windows system, how to verify the installation, and how to run your first Java program. Also, the procedure you are following in this article is applicable on Windows 10 and Windows 11 also.
System Requirements to Install OpenJDK in Windows
- OS: Windows 10 (version 1903) and Windows 11 all versions
- Processor: Minimum 1 GHz processor (Recommended 2 GHz processor)
- Disk Space: Minimum 300 MB free space
- RAM: Minimum 2 GB of RAM (Recommended 4 GB)
How to Install OpenJDK (Free Java) in Windows
In this section we are going to discuss the step-by-step process to install OpenJDK in Windows 10 and 11. So, follow the steps and complete the installation process by yourself.
Step 1: Download OpenJDK
- Open your web browser and go to the official OpenJDK website or visit a trusted distributor like Adoptium or Amazon Corretto.
- Look for the latest version of OpenJDK that matches your requirements.
- Download the Windows installer or the ZIP file for the 64-bit version of OpenJDK. Ensure you choose the correct version for your system.
Step 2: Install OpenJDK
If you downloaded the installer
- Once download is completed double-click on the downloaded installer file.
- Follow the instructions in the installation wizard.
- Select the installation directory or use the default one provided.
- Click “Install” and wait for the installation to complete.
If you downloaded the ZIP file
- Locate the downloaded ZIP file and extract it to a folder on your computer. For example, you can extract it to C:\Program Files\OpenJDK.
- Remember the folder path where you extracted OpenJDK, as you will need it later.
Step 3: Set Up Environment Variables
You need to set up environment variables to run Java programs from the command prompt.
- Open the Start menu and search for “Environment Variables”.
- Click on “Edit the system environment variables”.
- In the System Properties window, click on the “Environment Variables” button.
- Under “System Variables”, find the “Path” variable and select it, then click “Edit”.
- Click “New” and add the path to the
binfolder inside your OpenJDK installation directory. For example,C:\Program Files\OpenJDK\bin. - Click “OK” to save the changes.
Step 4: Verify the Installation
- Open the command prompt by pressing
Win + R, typingcmd, and pressing Enter. - Type the following command to check the Java version:
java -version - If OpenJDK is installed correctly, you will see the version details displayed in the command promt
Step 5: Run a Java Program
- Now that OpenJDK is installed and configured, you can run your first Java program.
- Create a new file named
HelloWorld.javausing a text editor like Notepad. - Write the following code in the file:
public class HelloWorld {public static void main(String[] args) {System.out.println("Hello, World!");}}
- Save the file in a folder, for example,
C:\JavaProjects. - Open the command prompt and navigate to the folder where you saved the file using the
cdcommand.
cd C:\JavaProjects- Compile the program using the following command:
javac HelloWorld.java- Run the program using the command:
java HelloWorld- If everything is set up correctly, you will see the message “Hello, World!” displayed in the command prompt.
Conclusion
You have successfully installed OpenJDK on your Windows computer and run your first Java program. OpenJDK provides a free and reliable way to work with Java, making it an excellent choice for developers. Now you can start learning and building Java applications with ease.
- Details
- Written by
- Last Updated on 23 September 2020 | Print Email
In this post, I will guide you to setup Java 11 on Windows operating system by downloading and installing Java Development Kit (JDK) version 11 from Oracle. You know, Oracle released Java 11 builds under two different licenses: Oracle JDK (commercial build with Oracle Technology Network license) and OpenJDK (open source build with GNU General Public license).
Oracle JDK 11 is the first LTS (Long Term Support) Java Development Kit since Oracle changed Java release cadence to every 6 months. According to Oracle, JDK 11 will be supported (commercial support) until September 2026.
Head to Java SE Development Kit 11 Downloads page and choose the download file appropriate to your operating system. Oracle JDK 11 comes with installers for Linux (rpm and deb), macOS (dmg), Windows (exe) and archive files (tar.gz and zip).
For Windows, I recommend to download the file jdk-11.0.7_windows-x64_bin.exe. Note that you must have an Oracle account to be able to download JDK 11 installer. If not, creating one is free.
Run the downloaded file, and you will see the JDK 11 setup program appears:
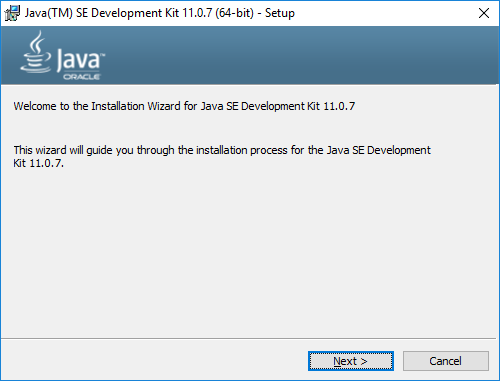
Just click Next twice to proceed installation with the defaults.
Note that Oracle JDK 11 does not update system environment variables, so you have to manually update PATH and/or JAVA_HOME after installation. Open Command Prompt window under administrator privilege and type the following command:
setx -m JAVA_HOME «C:\Program Files\Java\jdk-11.0.7»
If the PATH environment variable does not contain an entry to JAVA_HOME\bin, type the following command:
setx -m PATH «%JAVA_HOME%\bin;%PATH%»
Then open another command prompt window and type java –version, you will see:

That means you have successfully installed and configured Oracle JDK 11 on your computer.
You can also watch the video below:
2. Download and Install OpenJDK 11
OpenJDK 11 is the open source distribution of JDK 11, licensed under GNU General Public License version 2 (GPLv2).
To download OpenJDK 11, you have to go to OpenJDK Archive download page. Then scroll down a little bit to find the version 11.0.2. OpenJDK is distributed in only zip or tar.gz file. For Windows, download the zip file for Windows 64-bit, i.e. openjdk-11.0.2_windows-x64_bin.zip file.
Extract the downloaded zip file to a directory. Then type the following command to update JAVA_HOME (in Command Prompt with administrator right):
setx -m JAVA_HOME «g:\JDK\OpenJDK\jdk-11.0.2»
Then open another command prompt and type java –version, you will see:

That means you have successfully setup OpenJDK 11 on your computer.
You can also watch the video below:
Related Tutorials:
- Download and Install JDK 14
- Download and Install JDK 13
- Download and Install JDK 12
- How to check Java version
- How to set environment variables for Java using command line
- Java SE versions history
- What are JVM, JRE and JDK
About the Author:
Nam Ha Minh is certified Java programmer (SCJP and SCWCD). He began programming with Java back in the days of Java 1.4 and has been passionate about it ever since. You can connect with him on Facebook and watch his Java videos on YouTube.
Add comment
Java is required by many applications that are built over it to run properly. Apart from that developers who are working on some projects that require Java also need to install JDK on their system. Hence in this article, we talk about how we can use the command prompt or Powershell to install a particular Java 11 version on Windows 11 or 10. Using the command line method to install some software is quite straightforward as compared to manually visiting its website to download and install it.
1. Open Command Prompt or PowerShell2. Update Winget Source3. Command to Install JAVA 11 on Windows 11 or 104. Check Version5. Java 11 Uninstallation
Why Java 11?
The reason for using particularly the Java 11 version is basically either due to the demand of an application to run or a developer needs that for a project. Otherwise, there are the latest LTS (Long Term Support) versions of Java available to use.
Prerequisites
- Windows 11 or 10 running system
- Command line access with Administrator rights
- An active Internet connection
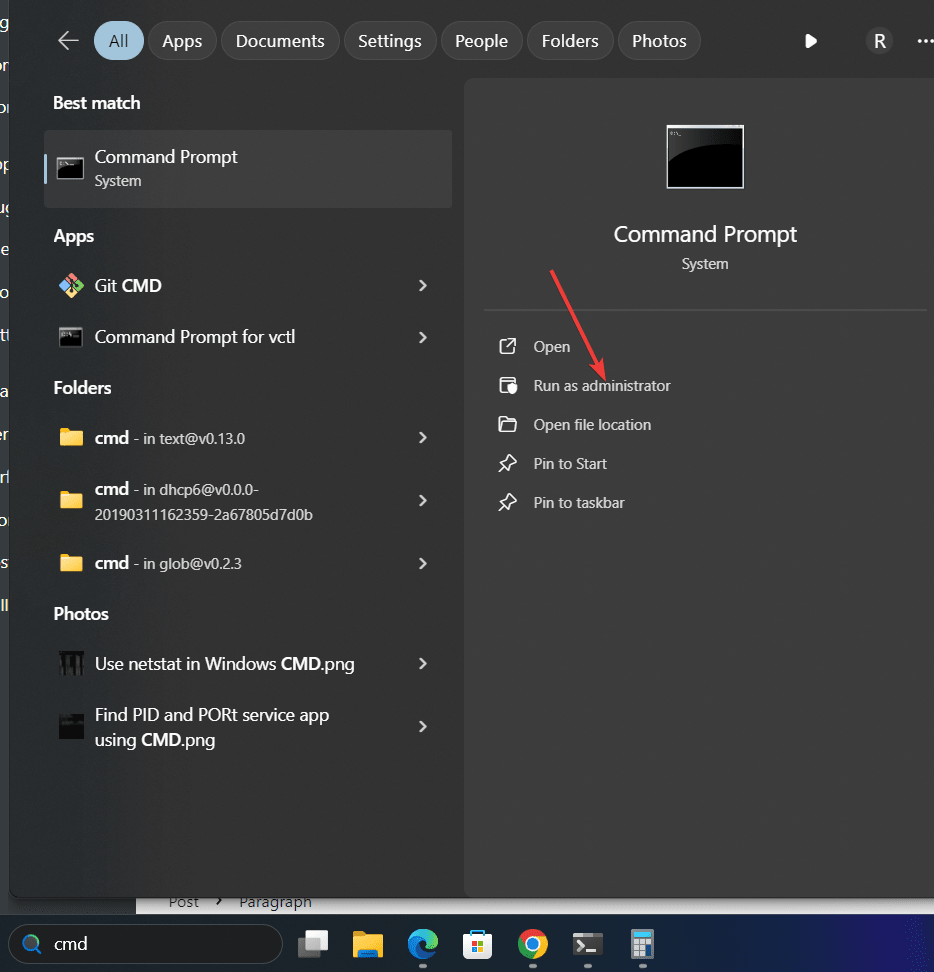
1. Open Command Prompt or PowerShell
This article especially uses the command line to guide how to install applications or programming languages such as JAVA. Therefore, click on your Windows Start button, and in the search box type – Command Prompt, as it appears select the “Run as Administrator” option.
2. Update Winget Source
Winget is the default package manager in Microsoft Windows 10 and 11 operating systems. It allows users to install various popular applications and packages using the command just like we do in the Linux system. Some of the packages are installed through the Winget repository while others are from MSstore.
Before using it let’s update its package source:
winget source update3. Command to Install JAVA 11 on Windows 11 or 10
Next, we run the Winget command to install the OpenJDK 11 on Windows. The given syntax can also be used to get the other versions of OpenJDK, just change the version number:
winget install ojdkbuild.openjdk.11.jdkWhereas to get only the JRE 11, you can use:
winget install ojdkbuild.openjdk.11.jre
To search for other versions you can use the:
wignet search openjdk
4. Check Version
To confirm we have OpenJDK 11 successfully on our system, we can use the given command, It will fetch the details of the installed Java version.
java --version
5. Java 11 Uninstallation
Winget command on Windows is not just to install the applications, we can use it to remove them as well. Therefore, in the future, if you want to uninstall the Java 11 version from your Windows 10 or 11 system, then here is the command to follow:
winget remove ojdkbuild.openjdk.11.jdkConclusion
You have now successfully installed Java 11 on Windows 11 using the command line. Using this tutorial, Windows users can install other popular software applications such as Chrome browser, FireFox, CCleaner, etc.
Other Articles:
- How to use WMIC Command to Uninstall software in Windows 11 or 10
- Uninstall Windows 11 Software not showing in Control Panel
- Single Command to install Android Studio on Windows 11 or 10
- Install Docker Desktop on Windows 11 or 10 via PowerShell