
Все способы:
- Шаг 1: Редактирование системного реестра
- Шаг 2: Изменение звука запуска системы
- Вариант 1: Значок звука в трее
- Вариант 2: Раздел «Персонализация»
- Вариант 3: «Панель управления»
- Если после выбора звука включения нет
- Вопросы и ответы: 5
Шаг 1: Редактирование системного реестра
Мелодия включения в «десятке» отличается от предыдущих ОС, но всегда есть возможность изменить ее, поставив собственный звук или из Windows 7 или XP.
Прежде чем менять звук в Windows 10, может потребоваться активировать данную функцию через «Редактор реестра», поскольку она может быть отключена по умолчанию. В отличие от предыдущих ОС, в этой доступна возможность смены только звука включения, а когда ПК выключается или выходит из сна – изначально системой никаких настроек для этого не предусмотрено.
Если вас интересует только звук запуска, то переходите к Шагу 2. Для активации возможности менять мелодию выключения внесите некоторые изменения в системном реестре.
Читайте также: Инструкция по созданию точки восстановления Windows 10
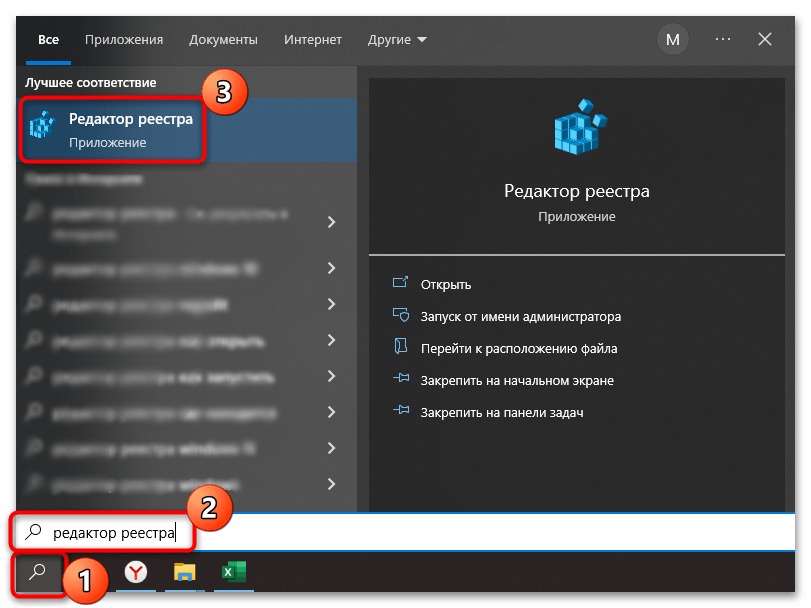
- Вызовите «Редактор реестра», отыскав приложение в меню «Пуска» через строку поиска.
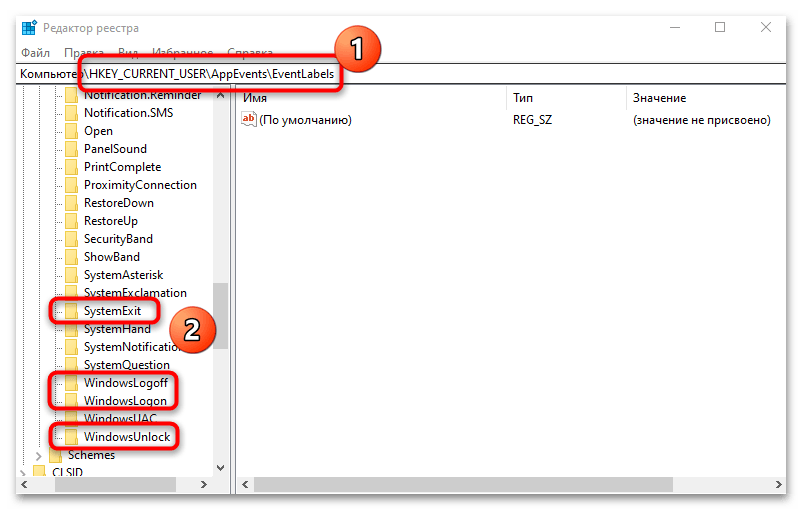
- Перейдите по пути
HKEY_CURRENT_USER\AppEvents\EventLabels. На панели слева обратите внимание на 4 раздела, которые соответствуют разным действиям в системе:
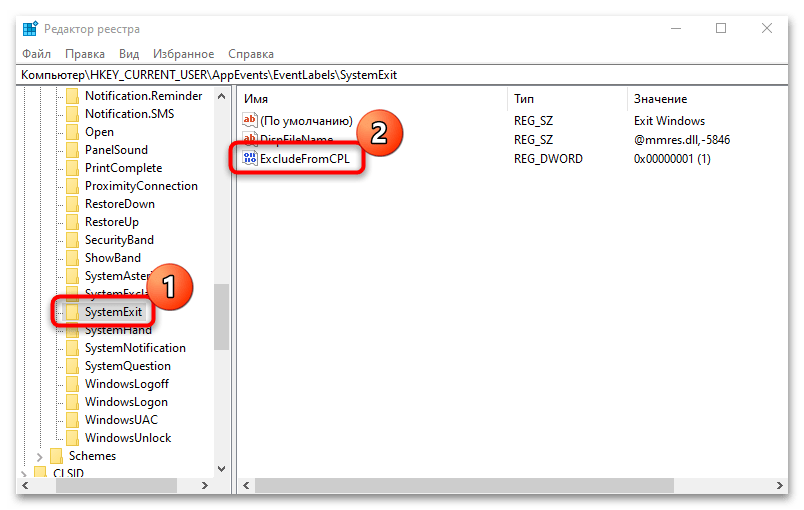
Название раздела Функция «SystemExit» Завершение работы Windows 10 «WindowsLogoff» Выход из системы «WindowsLogon» Вход в систему «WindowsUnlock» Разблокировка ОС - В каждом каталоге проделайте одну и ту процедуру с параметром под названием «ExcleudeFromCPL»: дважды щелкните по нему левой кнопкой мыши, чтобы перейти в окно с настройкой.
- В строке «Значение» пропишите «0» и сохраните настройки.
После этого при выборе мелодии в Шаге 2 станут доступны звуки не только для запуска, но и входа-выхода из системы, а также разблокировки.
Шаг 2: Изменение звука запуска системы
Звук старта Windows 10 меняется в одном и том же окне – «Звуки», но попасть в него можно несколькими способами. Разберем все, чтобы вы смогли выбрать наиболее предпочтительный.
Вариант 1: Значок звука в трее
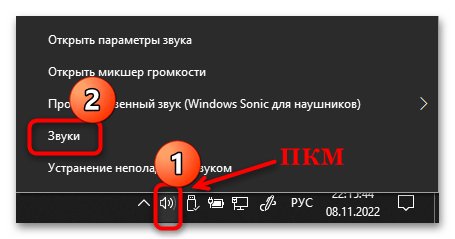
Самый быстрый и простой метод перейти в настройки звуков – это контекстное меню значка в виде динамика, который расположен в трее. Кликните по нему правой кнопкой мыши и в появившемся меню нажмите на «Звуки».
На одноименной вкладке выделите тип события в поле «Программные события» и отметьте галочкой пункт «Проигрывать мелодию запуска Windows», затем из выпадающего меню выберите другой звук, если нужно. Его можно прослушать, нажав на соответствующую кнопку.
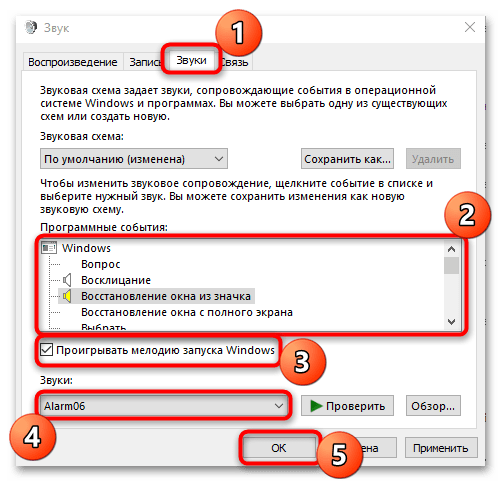
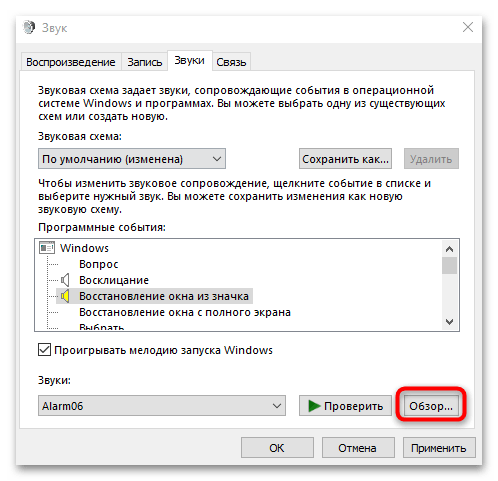
Настройки предусматривают возможность установить собственную мелодию, если стандартные варианты не устраивают: кликните по кнопке «Обзор» и выберите файл через интерфейс встроенного «Проводника».
Если иконки на области уведомлений нет, возможно, ее отображение отключено. Чтобы включить:
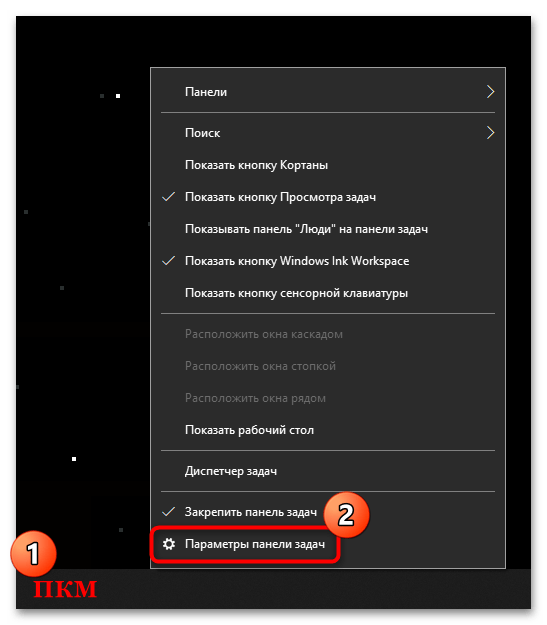
- Щелкните по свободной области панели задач правой кнопкой мыши, затем на пункт «Параметры панели задач».
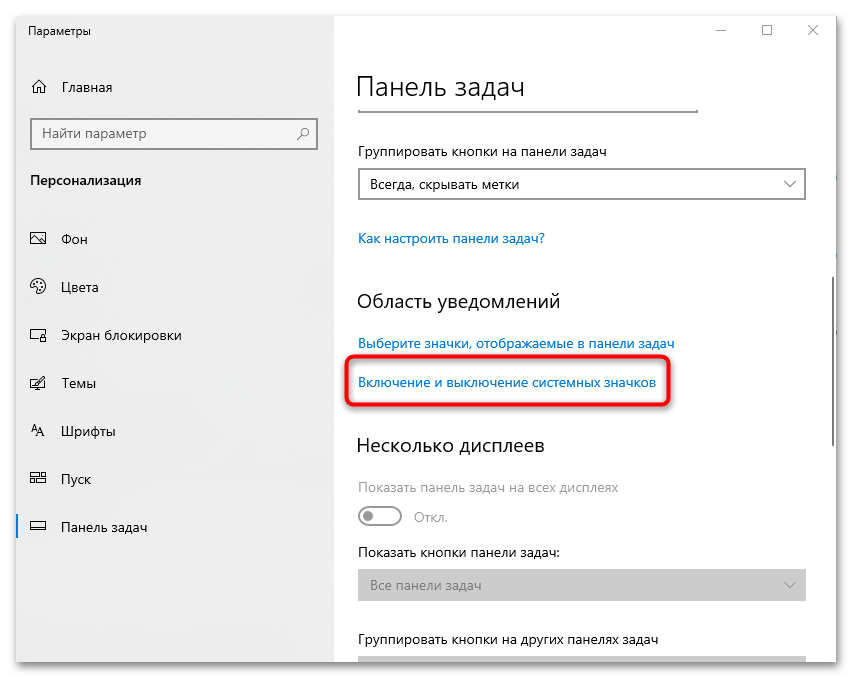
- Найдите блок «Область уведомлений» и кликните по строке «Включение и выключение системных значков».
- В новом окне переведите тумблер у параметра «Громкость» в активное состояние, если тот выключен.
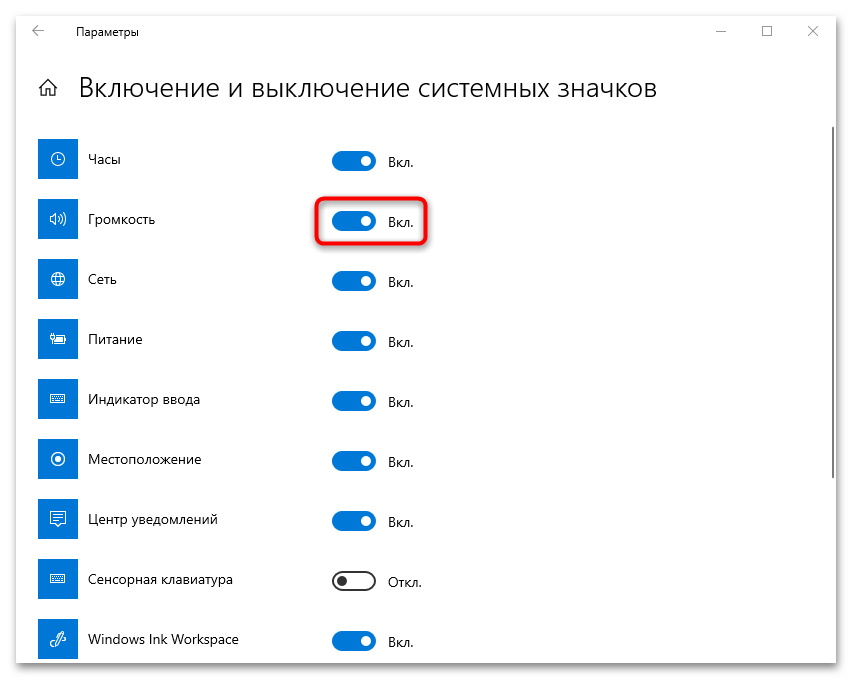
После этого в трее появится нужная иконка, через контекстное меню которой осуществляется быстрый переход в окно со звуками.
Вариант 2: Раздел «Персонализация»
Изменить звук включения в Windows 10 можно через приложение «Параметры» и раздел «Персонализация»:
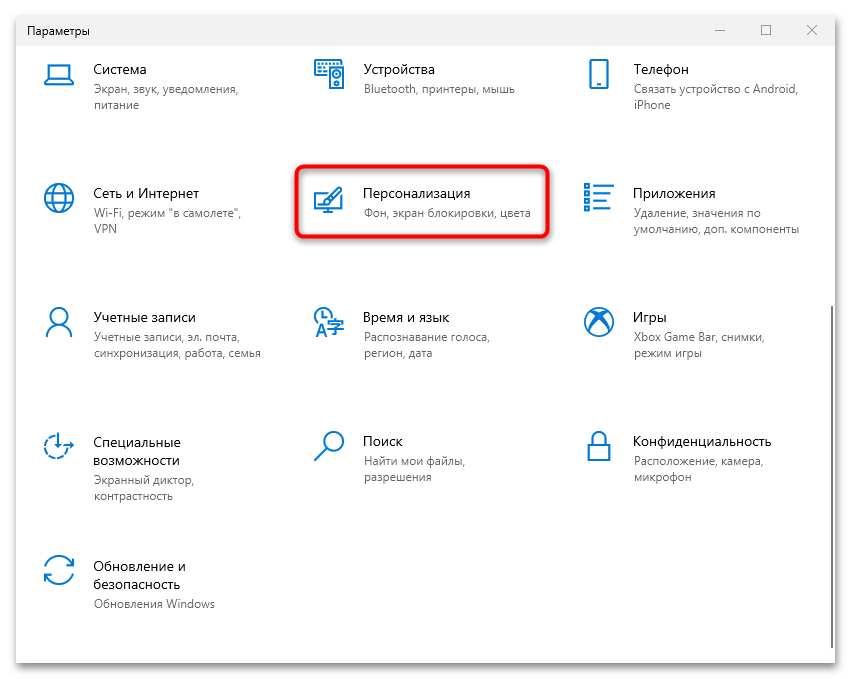
- Вызовите приложение «Параметры» через главное меню.
- Перейдите в раздел «Персонализация».
- Нажмите на вкладку «Темы» слева, затем в центральном окне на строку «Звуки».
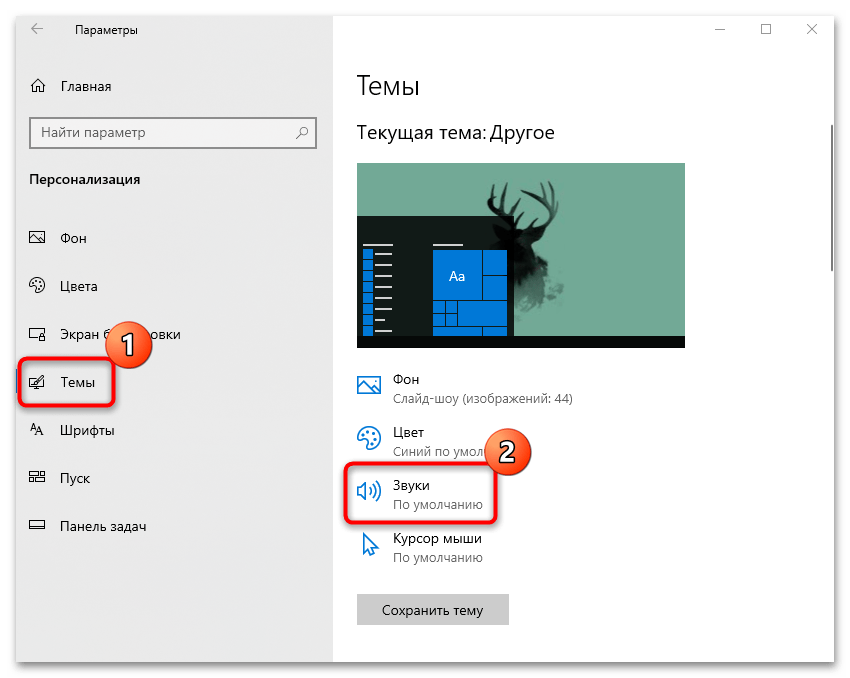
Вы попадете в то самое окно с настройкой звуков, где можно задать мелодию для запуска Windows 10, как уже было показано чуть выше.
Перейти в окно с персонализацией можно и через контекстное меню рабочего стола, щелкнув по свободной области правой кнопкой мыши.

Следует отметить, что настройки персонализации недоступны, если используется не активированная версия операционной системы. В такой ситуации вам помогут инструкции из Варианта 1 или 3.
Вариант 3: «Панель управления»
Также есть вариант изменить звук, используя интерфейс классической «Панели управления»:
- Откройте инструмент, вызвав для этого «Пуск» и введя в нем соответствующий запрос.
- В меню «Просмотр» из выпадающего меню выберите отображение разделов как мелкие или крупные значки. Нажмите на раздел «Звук».

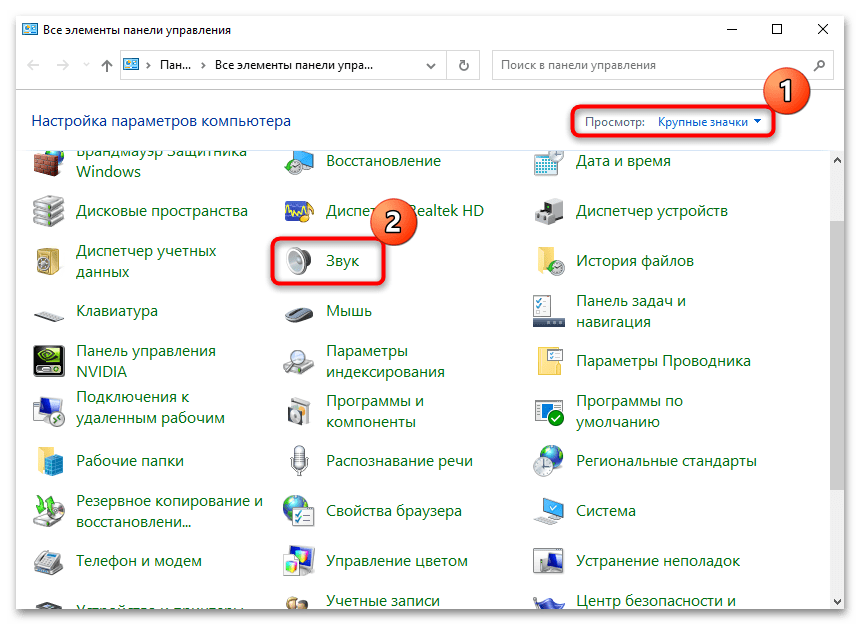
После этого откроется окно, где нужно перейти на вкладку «Звуки» и задать понравившуюся мелодия для старта Windows 10.
Читайте также: Открытие «Панели управления» на компьютере с Windows 10
Если после выбора звука включения нет
Активная функция быстрого запуска может стать причиной того, что при включении компьютера никаких звуков вовсе не слышно, даже если они выбраны и настроены. Это происходит по разным причинам, и чаще всего из-за конфликтов, вызванных сохранением части предыдущего сеанса для реализации этого самого быстрого запуска.
Чтобы исправить проблему со звуком при включении ПК, попробуйте отключить быстрый запуск с помощью настроек электропитания в «Панели управления» или посредством редактирования системного реестра. Об этом более детально можно узнать из нашей отдельной инструкции.
Подробнее: Отключение быстрого запуска в Windows 10

Наша группа в TelegramПолезные советы и помощь
Item Preview
preview.jpg
2,155
Views
6
Favorites
1
Review
DOWNLOAD OPTIONS
Uploaded by
Unknown
on
SIMILAR ITEMS (based on metadata)
If you are looking for a way to customize your startup sound on Windows, you should give Startup Sound Changer a try.
Startup Sound Changer is a simple program designed to allow you to modify the default startup sound played by your Windows OS. Featuring a simple and easy-to-use interface, thanks to it you will be able to apply the WAV file of your choice and quickly tune it to your liking.
What are the key features of Startup Sound Changer?
- Simple: Thanks to the very easy-to-use interface, there are no complicated notions to learn. Just choose among the Play, Replace, or Restore actions and you’re good to go.
- Play: You can play the current startup sound. It is pretty handy to check if your modifications have been applied correctly.
- Replace: You can replace the current startup sound with any other WAV file you have and pimp your startup.
- Restore: If you want to revert your modifications and restore the default startup sound.

How to use Startup Sound Changer?
Note the administrator’s permission is required before the sound changes are applied:
- Once launched, click on Play, Replace, or Restore to play, change the current sound, or revert the modifications.
- Once done, you can exit the program.
Is Startup Sound Changer free?
Yes, it is totally free to use.
Is Startup Sound Changer safe?
It is safe, as no malware has been detected so far.
Sound Booster 1.12.0.538
Sound Booster – утилита, способная усилить громкость звука в операционной системе до 500% по сравнению с обычным звучанием…
Equalizer APO 1.4.1
Параметрический многополосный эквалайзер для Windows, использующий технологию Audio Processing Object…
PC Equalizer 1.3.3.3
Графический интерфейс пользователя для Equalizer APO, параметрического эквалайзера для Windows. PC…
FxSound 1.1.27.0
FxSound позволяет значительно улучшить качество звучания ваших любимых программ и…
NVIDIA RTX Voice 0.5.12.6
Приложение, которое предназначено для полного подавления любого типа шума микрофона в…
MorphVOX Pro 5.1.58.24928
С помощью данной программы вы можете до неузнаваемости изменить свой голос, применив…
Download Article
Download Article
Want to change the sound you hear when you boot up your older PC? We’ll show you how to replace the boring startup chime with something more dynamic in Windows 8, 7, and Windows XP.
-

This utility is created by Windows enthusiasts, as there is no easy way to change the Windows 8, 7, or Vista startup sound normally. You can download the utility from Winaero.
-
Double-click the downloaded ZIP file and drag the StartupSoundChanger.exe file onto your desktop.
Advertisement
-
You will be shown a small menu of options.
-
It must be in WAV format.
- You can restore the original sound by running the utility and clicking «Restore.»
-
You can search for this or find it in the Start menu.
-
Sounds tab.
-
Apply.
- Note: You won’t be able to hear the startup sound in Windows 8 unless you perform a full shutdown (see next section).


Advertisement
-
Microsoft made many changes to the underlying Windows architecture to boost performance for Windows 8. One of the features that got cut was the sounds that play when Windows starts up and shuts down. You can re-enable these using the Windows Registry, but thanks to another Windows 8 feature (Fast Boot), you’ll only hear them when you perform a full manual shutdown.
- Note: This method will only change the Logon sound.
-
You can do this by pressing the ⊞ Win key and typing regedit.
-
HKEY_CURRENT_USER → AppEvents → EventLabels.
-
WindowsLogon folder.
-
ExcludeFromCPL key.
-
1 to 0. Click OK.
-
This includes WindowsLogoff and SystemExit.
-
You can search for it or press ⊞ Win+X and select it from the menu.
-
Sounds tab.
-
-
Browse… to search your computer for a replacement sound. It must be in WAV format.
-
To hear your logon sound, you must boot up from a full shutdown. Performing a regular shutdown will enable Fast Boot when you turn your computer on again, skipping the sound.
- Press ⊞ Win+X
- Select «Shut down or sign out» → «Shut down.»
-
You should hear your new logon sound once the computer logs into Windows.


Advertisement
-
-
-
-
-
It must be in WAV format.
-


Advertisement
- This method was tested to be working smoothly in Windows 8 & 10. If you have PowerShell and Task Scheduler, but you are not running Windows 8 or 10, then this will also work.
- Enabling this requires fast boot to be disabled.
-
1
Pull up the Task Scheduler by going to the Search menu and then typing «taskschd.msc» without quotation marks. When a result related to “schedule and manage tasks” appear, right click and run the program as an administrator.
-
2
On the left side bar, go to Task Scheduler Library or any of its sub-directories.
-
3
Once you have selected the Task Scheduler Library, select «Create Task» on the right side bar.
-
4
On the New Task window, set the name anything related to «Windows Start-Up Sound.»
-
5
Hit on «Change User and Group» and type in the user «SYSTEM.» In this way, the system software can handle it automatically even without you logging in. Click Alt+C to verify that you have typed correctly. If it is, what you have typed should be underlined. Click «OK» to close the window and save your changes.
-
6
Select «Hidden» found on the left side of the «Configure for» drop-down menu.
-
7
Go to the Triggers menu. In this menu, you will dictate when the task will start. In this case, it is when the system starts up.
-
8
Hit «New…» (or Alt+N). This will create a new trigger settings window.
-
9
On the first drop-down menu that appears on the that window, select «At startup.»
-
10
Then, hit the «OK» button on the window to close and save your changes for that trigger.
-
11
Go to the «Actions» pane. This is where the magic will happen — the playing of the startup sound.
-
12
Create a new action by hitting «New…» on-screen or Alt+N on your keyboard to launch a New Action window.
-
13
On the dropdown menu of the resulting window, make sure that it is set to start a program.
-
14
On the Program/Script textbox, type «PowerShell.» This will launch PowerShell on the background to play the startup sound when the task is run.
-
15
On the textbox beside «Add Arguments (optional),» type in the following: -c (New-Object Media.SoundPlayer ‘C:\Windows\Media\Windows Start.wav’).PlaySync();
- Replace «C:\Windows\Media\Windows Start.wav» to the directory of your audio file. Do not add extra spaces than the path to the file.
- The audio file should be a WAV file. If you do not have a WAV file, check out online conversion tools that will help you convert your file to a WAV file.
-
16
Click «OK» to save your changes in the action, and go to the Conditions panel. You will need to disable some settings so that the task will play properly.
-
17
Disable «Start the task only if the computer is on AC power.»
- In this way, you will get to hear the startup sound no matter if your PC is charging or not.
- This will also disable «Stop if the computer switches to battery power.»
-
18
Select the Settings pane of the Create Task window.
-
19
Enable «Run task as soon as possible after a scheduled start is missed.» This can reduce the chances of not hearing the startup sound at all, unless your driver card is disabled or you are in safe mode.
-
20
Finally, save your changes by clicking «OK» in the Create Task window!
-
21
To test if you have gotten it right, ensure that your newly created task’s status should be set as «Ready,» and the trigger should be «at system startup.» To test further, select your task and hit «Run» on the right side bar. If you heard something, you’ve got it right! Optionally, restarting can also be another test if your startup sound task worked.
Advertisement
Add New Question
-
Question
What if XP fails to accept a .wav file that otherwise works?
Use a different file extension, for example .mp4. You can convert from a .wav to a .mp4 using certain software available online.
-
Question
Can I do this in Windows 10? If so, how?
Cameron Paxton
Community Answer
No, sadly that feature was removed after Windows 7. I hear the option will make an appearance again, but I haven’t had any luck finding out when that is.
-
Question
Does the Windows 8 technique work with Windows 10, too?
If you mean method two, then yes. It works for both Windows 8 and 10.
Ask a Question
200 characters left
Include your email address to get a message when this question is answered.
Submit
Advertisement
Thanks for submitting a tip for review!
About This Article
Thanks to all authors for creating a page that has been read 425,031 times.