
IN THIS TASK
-
SUMMARY
-
Change the logon screen saver
-
Change the logon screen saver timeout time
-
Disable the logon screen saver
-
Summary
Important This section, method, or task contains steps that tell you how to modify the registry. However, serious problems might occur if you modify the registry incorrectly. Therefore, make sure that you follow these steps carefully. For added protection, back up the registry before you modify it. Then, you can restore the registry if a problem occurs. For more information about how to back up and restore the registry, click the following article number to view the article in the Microsoft Knowledge Base:
322756 How to back up and restore the registry in Windows This step-by-step article describes how to change the default logon screen saver. When you start Windows, a Begin Logon dialog box prompts you to press CTRL+ALT+DEL to log on. By default, if you do not press a key for 15 minutes, the Windows logon screen saver (Logon.scr) starts.
Change the logon screen saver
-
Click Start, click Run, type regedt32, and click OK.
-
Locate the following registry key:
HKEY_USERS\.DEFAULT\Control Panel\Desktop
-
In the Details pane, double-click theSCRNSAVE.EXE string value item.
-
In the Value data box, type the path and name of the screen saver, and then click OK.
Important Make sure that you specify the path correctly to the screen saver. If the screen saver is located in %SystemRoot%\System32, the explicit path is not required.
You have now changed the logon screen saver.
Change the logon screen saver timeout time
You can also change the amount of time that elapses before the logon screen saver starts. The default is 900 seconds (15 minutes).
To change the length of time before the logon screen saver starts, follow these steps:
-
Click Start, click Run, type regedt32, and then clickOK.
-
Locate the following registry key:
HKEY_USERS\.DEFAULT\Control Panel\Desktop
-
In the Details pane, double-click theScreenSaveTimeOut string value item.
-
In the Value data box, type the number of seconds, and then click OK.
You have now changed the length of time that elapses before the logon screen saver starts.
Disable the logon screen saver
To disable the logon screen saver, follow these steps:
-
Click Start, click Run, type regedt32, and then clickOK.
-
Locate the following registry key:
HKEY_USERS\.DEFAULT\Control Panel\Desktop
-
In the Details pane, double-click theScreenSaveActive string value item.
-
In the Value data box, replace the number 1 with the number 0, and then click OK.
You have now disabled the logon screen saver.
Need more help?
Want more options?
Explore subscription benefits, browse training courses, learn how to secure your device, and more.
Параметры экранной заставки для текущего пользователя можно править из системного реестра, для чего:
Запустите редактор реестра «regedit.exe»
Найдите ветку HKCU\Software\Policies\Microsoft\Windows\Control Panel\Desktop\
HKCU – это current user 🙂
В этой ветке есть такие параметры:
NoDispScrSavPage – не отображать заставку (1 – да, 0 нет)
SCRNSAVE.EXE – исполнемый файл заставки (например C:\WINDOWS\system32\mypics.scr)
ScreenSaveTimeOut – время до появления заставки (в секундах)
ScreenSaverIsSecure – после появление заставки текущий сеанс блокируется, то есть требуется введение пароля (0-нет,1-да)
Экранная заставка Windows
Это все, может кому-то пригодиться…
on December 1, 2010
We can change screen saver on a computer by changing the settings in display properties. We also have a registry hack to change screen saver settings. These screen saver settings are stored under the following registry key.HKEY_CURRENT_USER\Control Panel\Desktop
Registry values that control screen saver behavior:
- ScreenSaveActive
- SCRNSAVE.EXE
- ScreenSaveTimeOut
- ScreenSaverIsSecure
To disable or enable screen saver using registry key
Set the value of the registry value ScreenSaveActive to 0. From command line you can run the below command for doing this.
Reg add "HKEY_CURRENT_USER\Control Panel\Desktop" /v ScreenSaveActive /t REG_SZ /d 0 /f
To enable screen saver:
Reg add "HKEY_CURRENT_USER\Control Panel\Desktop" /v ScreenSaveActive /t REG_SZ /d 1 /f
To change timeout for activating the screen saver
Set the data in the registry value ScreenSaveTimeOut to the timeout limit in seconds. For example if you want to set the time out to 20 minutes you need to change the value of this registry key to 1200.
From command line you can run the below command to change screen saver timeout limit.
Reg add "HKEY_CURRENT_USER\Control Panel\Desktop" /v ScreenSaveTimeOut /t REG_SZ /d 0 /f
To enable or disable password protection when the session is resumed
You can password protection by setting the data in ScreenSaverIsSecure to 1. If you set this to 0, you will not be asked to provide password when you interrupt the screen saver to resume the user session.
From windows command line you can run the below command to enable password for the screen saver.
Reg add "HKEY_CURRENT_USER\Control Panel\Desktop" /v ScreenSaverIsSecure /t REG_SZ /d 1 /f
To disable password protection:
Reg add "HKEY_CURRENT_USER\Control Panel\Desktop" /v ScreenSaverIsSecure /t REG_SZ /d 0 /f
To change screen saver using registry key
Read the post Change screen saver from windows command line using registry key
The above registry keys apply to Windows XP, Server 2003, Vista and Windows 7.

The Screensaver is a very good feature that allows the users of a computer to be able to display images or wallpaper automatically when the system is at rest or idle. Some organizations make use of the screensaver to disseminate information to staff or for some form of adverts. But sometimes the screensaver of your computer can get turned on earlier or a bit late, in this guide, I will be showing you how to configure screen saver timeout in Windows. Please see how to Enable or Disable Screen Saver on Windows.
Note that the screensaver in Windows 10 is turned off by default and you will need a simple configuration to turn it on which I will be demonstrating in this video through the Personalization settings and Registry Editor.
If you need guides on Windows screensaver you can read these: How to prevent Windows Users from changing the Screen Saver via the Registry Settings, how to set Desktop Wallpaper, Prevent access to Registry Editing tools, enable Screen Saver Timeout via Group Policy.
1: Configure Screensaver timeout through Personalization settings
Follow the steps below to configure your screensaver timeout. See how to perform this task via group policy: How to enable or disable Screen Saver in Windows 10 or Windows 11 via Windows Settings or Group Policy.
In the Start menu type “screensaver” or locate the Appearance and Personalization. Click on any of the options to open the screen saver settings.

On the screen saver settings, you can change the screen saver type, preview, Settings, and waiting time, and you can decide to display the lock screen on your resume.

Now go to the wait section and change the time there to the time you want the screen to wait before changing to the screensaver. After this is completed you can click the OK button.
Please see MsSQL Connection timeout and timeout period expired, Group Policy: Desktop Wallpaper and Screen Saver Management, and Exploring the Reasons to use or not use Screensavers in Windows.
2. Configure Screensaver timeout through Registry Editor
Another method you can use to change the Screensaver timeout settings is by using the Registry Editor. Follow these steps:
Open the Registry Editor by typing regedit.exe in the search box or command prompt.
Navigate to: Computer\HKEY_CURRENT_USER\SOFTWARE\Microsoft\Windows
Right-click Windows and select New>Key.
Name the key “Control Panel” right-click it and click New > Key and then name it “Desktop”.

Click on the Desktop key and right-click on the empty space in the right pane and select New > String Value and then type “ScreenSaveTimeOut” in the box and hit Enter to save it.

Right-click the ScreenSaveTimeOut string value to access the option to Modify. Follow these steps on how to configure screensaver timeout in Windows 10: Set the desired data value and click OK.
After completing these steps, verify if the Screensaver activates as intended. Please see How to disable automatic screen lock in Ubuntu Linux.

FAQs
Is there a way to enable or disable the screen saver using Command Prompt?
You can use the regedit command to modify the Windows Registry. Here’s an example to disable the screen saver: Press Win + R to open the Run dialog.
– Type regedit and press Enter to open the Registry Editor.
– Navigate to HKEY_CURRENT_USER\Control Panel\Desktop.
– Find the ScreenSaveActive entry on the right side and double-click it.
– Change the value to 0 disable the screen saver.
Note: Modifying the registry can have system-wide effects. Exercise caution!
How Can I Disable the Screen Saver on Windows?
To disable the screen saver, follow these steps: Right-click on the desktop and select “Personalize.”
– Click on “Lock screen” in the left sidebar. Scroll down and click “Screen saver settings.”
– In the Screen Saver Settings dialog box, choose “None” from the drop-down menu.
– Click “Apply” and then “OK” to save the changes.
The screen saver will be disabled, and your screen will not enter screen saver mode anymore.
I hope you found this blog post on how to configure screen saver timeout in Windows 10 interesting and helpful. In case you have any questions, do not hesitate to ask in the comment section.
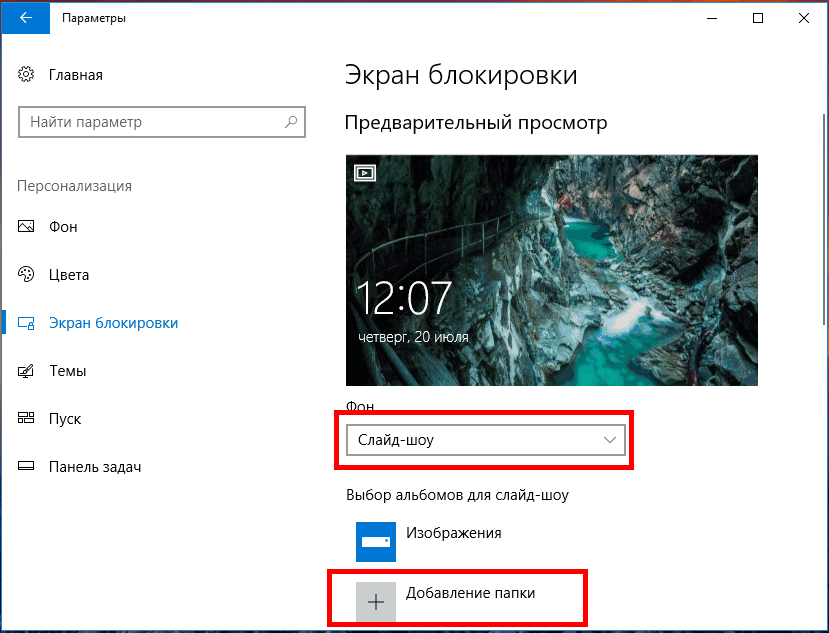
В Windows 10 есть три режима управления изображениями экрана блокировки — Spotlight, Фото и Слайд-шоу. Несомненным плюсом третьего режима является возможность выбора пользователем каталога с произвольными изображениями, которые будут сменять друг друга через определённый промежуток времени. К сожалению, в последних версиях Windows 10 нет настройки, которая позволяла бы задавать этот самый временный промежуток циклической смены фонов.
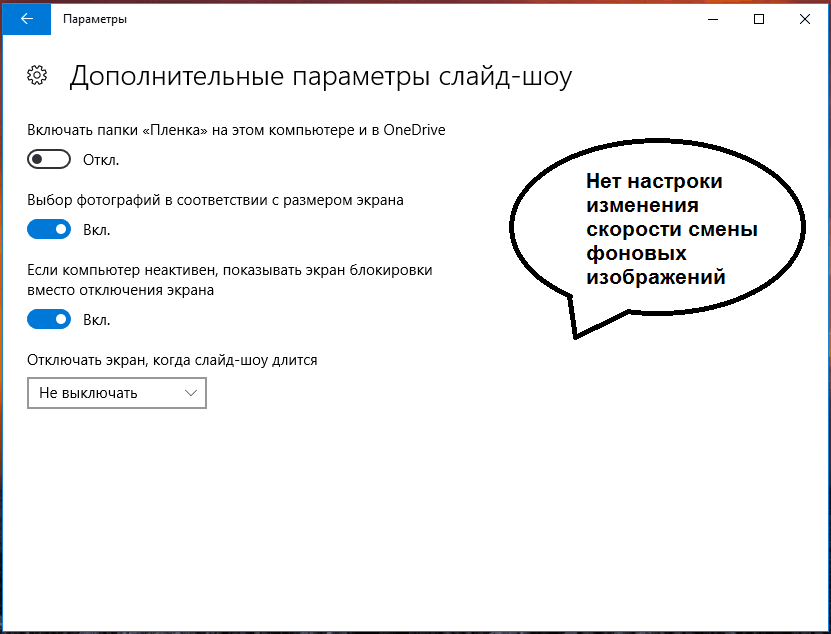
Если вы зайдёте в дополнительные параметры слайд-шоу, то найдёте там только четыре настройки: подключение папки «Плёнка» и «OneDrive», выбор фото в соответствии с размером экрана, действие при отсутствии активности и отключение экрана.
И всё же настроить временной цикл смены фонов в Windows 10 возможно, применив несложный твик реестра.
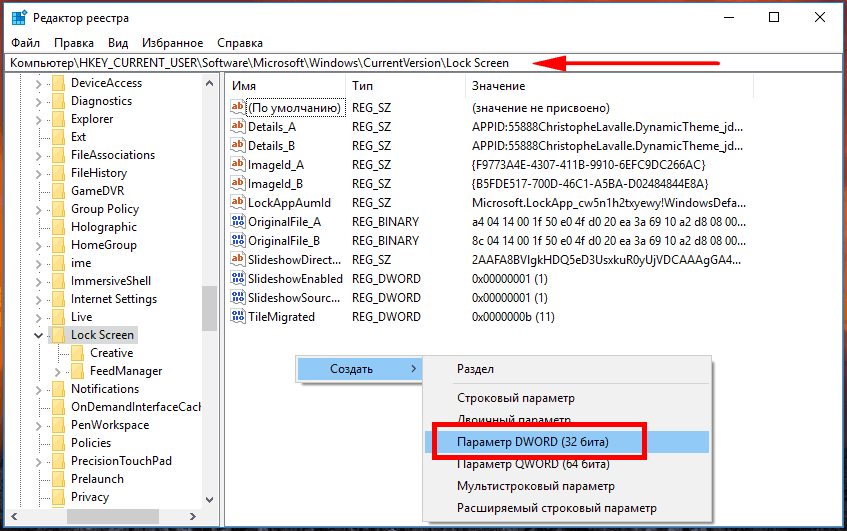
Для этого откройте командой regedit редактор реестра и разверните эту ветку:
HKEY_CURRENT_USER\Software\Microsoft\Windows\CurrentVersion\Lock Screen
В правой колонке окна редактора создайте новый 32-битный параметр типа DWORD и назовите его SlideshowDuration.
Кликните по нему два раза и установите в открывшемся окошке число в миллисекундах, которое будет соответствовать промежутку времени между сменой фоновых изображений. Например, если вы желаете, чтобы картинки сменяли друг друга через одну минуту, установите значение 60000.
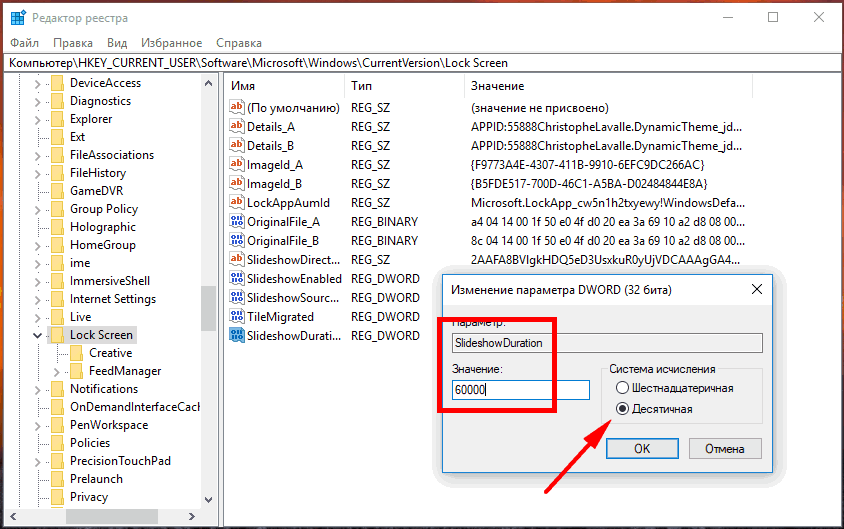
Формула расчета проста. Одна секунда содержит 1000 миллисекунд, в одной минуте 60 секунд, умножаем 60 на 1000 и получаем 60000. Это всё, обратите только внимание, что значение SlideshowDuration должно быть установлено в десятичной системе счисления.