
В Windows для подключения к рабочему столу удаленного компьютера по протоколу RDP (Remote Desktop) по-умолчанию используется порт TCP 3389. В этой статье мы рассмотрим, как изменить номер стандартного порта для службы RDP на другой (применимо как к дестопным версиям Windows, так и к Windows Server).
Содержание:
- Изменить номер RDP порта в Windows
- PowerShell скрипт для смены номера RDP порта в Windows
После того, как вы включили RDP доступ в Windows, служба TermService (Remote Desktop Services) начинает слушать на порту 3389.
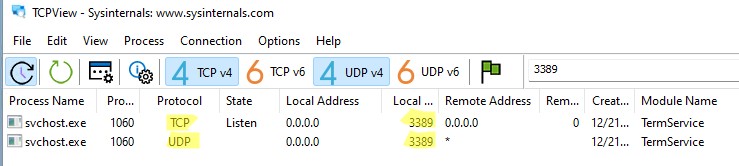
В современных версиях Windows для подключений удаленного рабочего стола также используется протокол UDP с тем же номером порта 3389. При использовании VPN, транспортный UDP протокол может вызывать проблемы с зависанием RDP сессий.
Для чего может понадобиться замена стандартного RDP порта 3389 на другой?
- Чаще всего это используется, чтобы спрятать RDP/RDS хост от автоматических сканеров портов, которые ищут в Интернете хосты Windows с открытым дефолтным RDP портом 3389.
- Смена RDP порта позволит уменьшить вероятность эксплуатации RDP уязвимостей, уменьшить количество попыток удалённого подбора паролей по RDP (не забывайте периодически анализировать логи RDP подключений), SYN и других типов атак.
- Обычно смена RDP порт используется на компьютерах с прямым подключением к интернету (VPS/VDS), или в сетях, где пограничный маршрутизатор перенаправляет порт 3389/RDP в локальную сеть на компьютер/сервер с Windows.
Несмотря на смену порта, не рекомендуется выставлять открытый RDP порт в Интернет. Сканеры портов по сигнатуре ответа могут понять, что на новом порту находится RDP Listener. Если вы хотите открыть внешний RDP доступ к компьютеру в локальной сети, лучше использовать такие технологии подключения, как VPN, RD Web Access, шлюз RD Gateway и другие.
При смене номера RDP порта на нестандартный, нежелательно использовать номера портов в диапазоне от 1 до 1023 (известные порты). Выберите неиспользуемый порт в пользовательском диапазоне (1024 до 49151) или из RPC (49152 — 65535). Проверьте, что выбранный порт не слушается другими процессами (например, порт 1350).
netstat -aon | findstr ":1350" | findstr "LISTENING"
Изменить номер RDP порта в Windows
В нашем примере мы изменим номер порта, на котором ожидает подключения служба TermService на 1350.
Для быстрой замены номера RDP порта на указанный, достаточно выполнить следующие команды с правами администратора:
set p=1350
reg add "HKLM\SYSTEM\CurrentControlSet\Control\Terminal Server\WinStations\RDP-Tcp" /v PortNumber /t REG_DWORD /d %p% /f
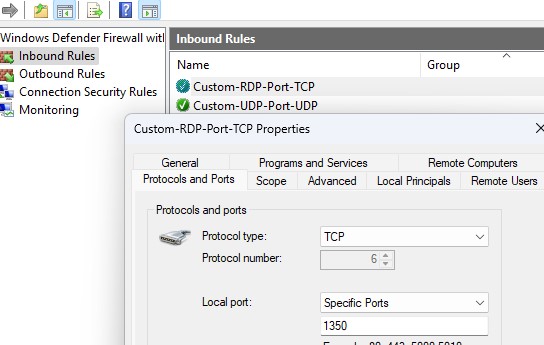
netsh advfirewall firewall add rule name="Custom-RDP-Port-TCP" protocol=TCP localport=%p% action=allow dir=IN
netsh advfirewall firewall add rule name="Custom-UDP-Port-UDP" protocol=UDP localport=%p% action=allow dir=IN
net stop TermService /y
net start TermService

Этот набор команд изменит номер RDP порта, создаст разрешающие правила для нового порта в файерволе и перезапустит службу TermService.
Рассмотрим, что делают эти команды и как изменить дефолтный номер RDP порта вручную.
- Откройте редактор реестра (
regedit.exe
) и перейдите в ветку HKEY_LOCAL_MACHINE\System\CurrentControlSet\Control\Terminal Server\WinStations\RDP-Tcp - Найдите DWORD параметр реестра с именем PortNumber. В этом параметре указан порт, на котором ожидает подключения служба Remote Desktop. Значение по умолчанию 3389 (decimal)
- Измените значение этого порта. Я изменил RDP порт на 1350 в десятичном значении (Decimal);

хalert] Можно изменить значение параметра реестра с помощью PowerShell:
Set-ItemProperty -Path "HKLM:\System\CurrentControlSet\Control\Terminal Server\WinStations\RDP-Tcp\" -Name PortNumber -Value 1350
[/alert] - Создайте новые правила в Windows Firewall, разрешающие входящие подключения на новый номер RDP порта (если вы перенастраиваете удаленный сервер через RDP, создайте разрешающее правило в файерволе до перезапуска службы TermService, иначе вы потеряете доступ к хосту). Вы можете создать разрешающее входящее правило для нового TCP/UDP порта RDP вручную из консоли Windows Firewall with Advanced Security (
wf.msc
) или с помощью PowerShell команд:
New-NetFirewallRule -DisplayName "NewRDPPort-TCP-In" -Direction Inbound -LocalPort 1350 -Protocol TCP -Action allow
New-NetFirewallRule -DisplayName "NewRDPPort-UDP-In" -Direction Inbound -LocalPort 1350 -Protocol UDP -Action allow
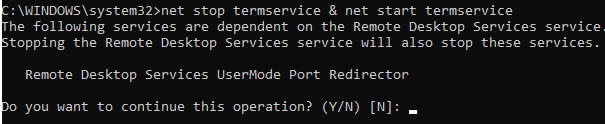
- Перезагрузите Windows или перезапустите службу удаленных рабочих столов командой:
net stop termservice & net start termservice
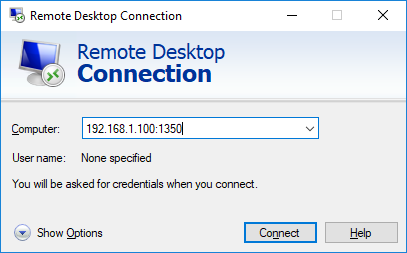
- Теперь для подключения к данному Windows компьютеру по RDP, в клиенте mstsc.exe нужно указывать порт RDP подключения через двоеточие следующим образом:
Your_Computer_Name:1350
или по IP адресу
192.168.1.100:1350
или из командной строки:
mstsc.exe /v 192.168.1.100:1350
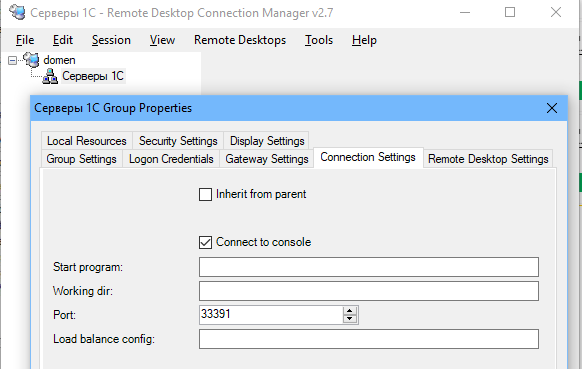
Если для управления RDP подключений вы используете менеджер RDCMan, новый номер RDP порта подключения указывается на вкладке “Connection Settings”.
- В результате вы должны успешно подключитесь к рабочему столу удаленного компьютера по новому номеру RDP порта (с помощью команды
netstat –na | Find "LIST"
убедитесь, что служба RDP теперь слушает на другом порту).


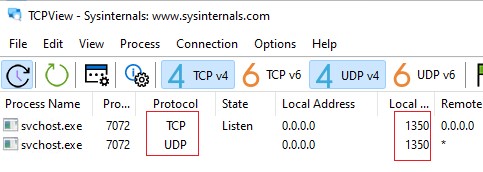
Обратите внимание, что номер UDP порта RDP также изменился на 1350 (проще всего проверить это с помощью утилиты TCPView).
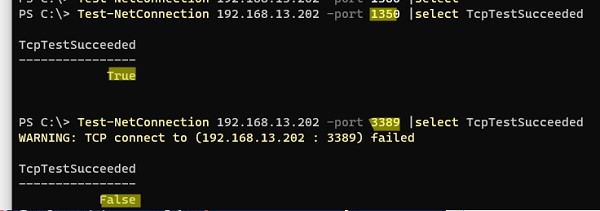
С помощью команды Test-NetConnection, проверьте что старый RDP порт теперь закрыт (
TcpTestSucceeded : False
):
Test-NetConnection 192.168.13.202 -port 3389 |select TcpTestSucceeded
Если вы хотите изменить номер RDP порта сразу на нескольких компьютерах в домене, можно воспользоваться групповыми политиками. Создайте новую GPO, которая распространит параметр реестра PortNumber с новым значением RDP порта на компьютеры домена.
PowerShell скрипт для смены номера RDP порта в Windows
Полный код PowerShell скрипта для смены номера RDP порта, создания правила в брандмауэре и перезапуска службы RDP может выглядеть так:
Write-host "Укажите номер нового RDP порта: " -ForegroundColor Yellow -NoNewline;$RDPPort = Read-Host
Set-ItemProperty -Path "HKLM:\SYSTEM\CurrentControlSet\Control\Terminal Server\WinStations\RDP-TCP\" -Name PortNumber -Value $RDPPort
New-NetFirewallRule -DisplayName "NewRDPPort-TCP-In-$RDPPort" -Direction Inbound –LocalPort $RDPPort -Protocol TCP -Action Allow
New-NetFirewallRule -DisplayName "NewRDPPort-UDP-In-$RDPPort" -Direction Inbound –LocalPort $RDPPort -Protocol UDP -Action Allow
Restart-Service termservice -force
Write-host "Номер RDP порта изменен на $RDPPort " -ForegroundColor Magenta
Если на удаленном компьютере включен WinRM, вы можно изменить номер порта RDP удаленно с помощью командлета Invoke-Command:
Invoke-Command -ComputerName PC1name -ScriptBlock {Set-ItemProperty -Path "HKLM:\SYSTEM\CurrentControlSet\Control\Terminal Server\WinStations\RDP-TCP\" -Name PortNumber -Value 1350}
Есть ситуации, когда необходимо изменить порт для подключения к серверу терминалов в Windows Server 2008 R2. Здесь я расскажу как это сделать.
1. Изменение порта в реестре
Заходим на сервер с правами администратора и запускаем редактор реестра (Для этого нажимаем «Пуск» , в строке поиска пишем «regedit» и запускаем regedit.exe из появившегося списка)

Делаем, на всякий случай, экспорт реееста. А затем, в редакторе реестра, в дереве слева, идем по пути:
HKEY_LOCAL_MACHINE\SYSTEM\CurrentControlSet\Control\Terminal Server\WinStations\RDP-Tcp
выделяем папку «RDR-Tcp» и справа находим параметр «PortNumber» . Кликаем по нему 2 раза и в открывшемся окне выбираем десятеричную систему счисления. Теперь текущее значение порта 3389 меняем на то, которое вам надо (В моем примере это 3394). Нажимаем «ОК» и закрываем редактор.

2. Добавление правила в Бредмауэр.
Теперь, когда мы изменили порт для RDP, надо добавить правило в бредмауэр для нового порта. Для этого заходим «Пуск» — «Панель управления» — «Система и безопасность» — «Бредмауэр Windows» . Слева нажимаем на «Дополнительные параметры» , откроется оснастка «Бредмауэр в режиме повышенной безопасности», заходим в ветку «Правила для входящих подключений» и нажимаем «Создать правило» .

Запустится «Мастер создания правила для нового входящего подключения», выбираем правило «Для порта», нажимаем «Далее» .

Указываем номер нашего нового порта (у меня 3394), жмем 3 раза «Далее», вводим название правила, и нажимаем «Готово» .

Чтобы все изменения вступили в силу, необходимо перезагрузить сервер.
Все, на этом настройка закончена. Теперь можно заходить на сервер через новый порт. Для этого при подключении к удаленному рабочему столу в поле «Компьютер» надо написать IP-адрес сервера, двоеточие и номер порта.

Запись опубликована в рубрике Windows Server 2008 R2 с метками RDP, Windows Server 2008. Добавьте в закладки постоянную ссылку.
Windows · September 28, 2024
Changing the default Remote Desktop Protocol (RDP) port on Windows Server 2008 can enhance security by making it less predictable for potential attackers. By default, RDP uses port 3389, which is widely known and often targeted. This article will guide you through the steps to change the RDP port, ensuring that your server remains secure while allowing remote access.
Why Change the RDP Port?
Changing the default RDP port can help mitigate the risk of unauthorized access. Attackers often scan for open ports, and by altering the default port, you can reduce the likelihood of automated attacks. Additionally, it can help in environments where multiple services are running on the same server, allowing for better organization and management of network traffic.
Prerequisites
- Administrative access to the Windows Server 2008 machine.
- Basic understanding of Windows Registry and networking concepts.
- Backup of the system or registry before making changes.
Steps to Change the RDP Port
Step 1: Modify the Windows Registry
To change the RDP port, you will need to edit the Windows Registry. Follow these steps:
- Press
Windows + Rto open the Run dialog box. - Type
regeditand pressEnterto open the Registry Editor. - Navigate to the following key:
- In the right pane, locate the
PortNumberentry. - Right-click on
PortNumberand selectModify. - Change the base to
Decimaland enter your desired port number (e.g., 3390). - Click
OKto save the changes.
HKEY_LOCAL_MACHINESystemCurrentControlSetControlTerminal ServerWinStationsRDP-TcpStep 2: Configure Windows Firewall
After changing the port in the registry, you must configure the Windows Firewall to allow traffic on the new port:
- Open the Control Panel and navigate to
System and Security. - Select
Windows Firewall. - Click on
Advanced settingson the left pane. - In the Windows Firewall with Advanced Security window, click on
Inbound Rules. - Select
New Rule...from the right pane. - Choose
Portand clickNext. - Select
TCPand specify the new port number you set in the registry. - Allow the connection and complete the wizard by naming the rule (e.g., RDP Port 3390).
Step 3: Restart the Server
For the changes to take effect, you will need to restart your Windows Server 2008. After the restart, the RDP service will listen on the new port.
Step 4: Connect Using the New Port
To connect to your server using the new RDP port, you will need to specify the port number in your Remote Desktop Connection client:
- Open Remote Desktop Connection.
- In the Computer field, enter your server’s IP address followed by a colon and the new port number (e.g.,
192.168.1.1:3390). - Click
Connectand enter your credentials when prompted.
Conclusion
Changing the RDP port on Windows Server 2008 is a straightforward process that can significantly enhance your server’s security. By following the steps outlined above, you can effectively change the default port and configure your firewall accordingly. Always remember to back up your system before making any changes to the registry or firewall settings.
For those looking for reliable and secure hosting solutions, consider exploring USA VPS Hosting options that provide robust performance and security features tailored to your needs.
SolVPS
|
Published: December 3, 2014
Port 3389 is the default port for RDP on Windows systems, but you may wish to change this due to your network configuration, or for security.
After logging in to your Windows VPS with remote desktop, follow the steps below to update the RDP (remote desktop protocol) connection port:
- Start Registry Editor by using Start > regedit
- Navigate to the following registry subkey in the browser:
HKEY_LOCAL_MACHINE\System\CurrentControlSet\Control\TerminalServer\WinStations\RDP-Tcp\PortNumber
- On the Edit menu, click Modify, and then click Decimal.
- Enter your desired port number. It should be a high number, not greater than 65536.
- Quit Registry Editor.
- Restart the VPS. You can restart from inside Windows.
After restarting, you should be able to connect to RDP on the alternate port. Enter the Server IP Address into your RDP client with the port number appended, like this: 104.104.104.104:10905
This guide applies to:
- Windows Server 2012, Server 2008, Server 2003
- Windows 8, 7, Vista, XP
This entry was posted in Guides & How To’s, Tech Support, VPS Hosting, Windows Server, Windows VPS and tagged rdc, rdp, security, server2012, windows. Bookmark the permalink. Trackbacks are closed, but you can post a comment.
As a security practice, it is recommended to update your Windows server’s RDP port (used for managing the server via Remote Desktop Conneciton). To update the RDP port from the default 3389, follow the steps below:
- Start the Registry Editor by navigating to Start > Run > regedit
- Locate the registry key HKEY_LOCAL_MACHINE\System\CurrentControlSet\Control\TerminalServer\WinStations\RDP-Tcp\PortNumber
- Click the subkey PortNumber, find the Edit menu, choose Modify, then select Decimal.
- Type your desired port number. It should be xxxx or xxxxx, and should not conflict with another running service (choose a high port number).
- Click OK. Exit Registry Editor. Restart the system.
The port accepted by the server for RDP connections will now be updated.
NOTE: To connect to the server on the new port, you will need to specify the port in Remote Desktop Connection or your RDP application of choice. This is usually done by entering the server’s IP address and port in the following format: 0.0.0.0:33994 (Where «0.0.0.0» is the server’s IP address, and «33994» is the RDP port number.)