
Download Windows Speedup Tool to fix errors and make PC run faster
Internet Server Time is used to keep your system clock accurate and thus it is very important to keep your internet time updated. Your Windows PC uses the clock to update and modify your files. While the Date & Time settings for Windows are pretty easy to access, to access the Timer Server settings, one has to go through the control panel. In this post, we see how to change Time Server in Windows 11/10. We will also see how to add new Time Servers of your choice to your Windows 10 system.
Type “Control Panel” in Start search and hit Enter to open the Control Panel of your Windows 11/10 PC.
Type “Date and Time” in the search box and click on the result.
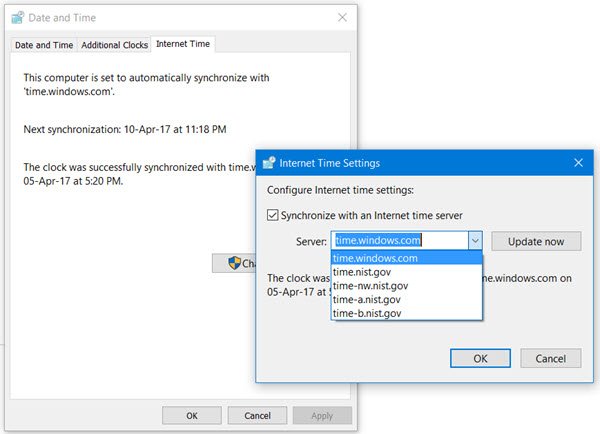
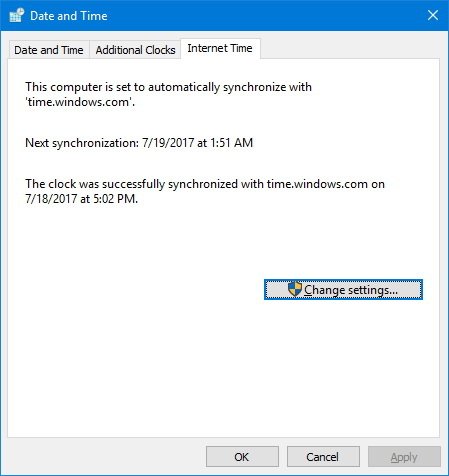
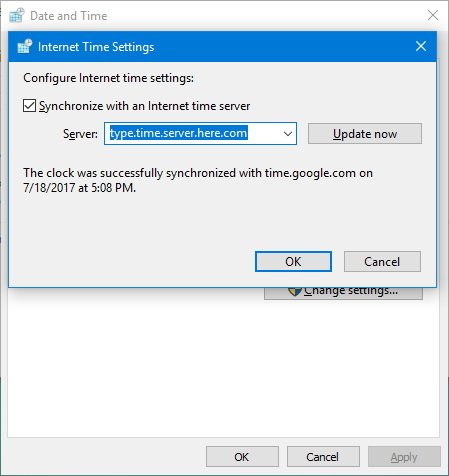
Click on the ‘Internet Time’ tab and hit on the ‘Change Settings’ button.
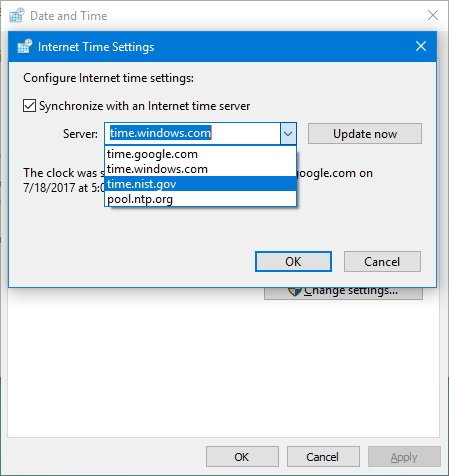
From the drop-down menu, select, say, time.nist.gov as the Server and hit the ‘Update now’ button.
If you receive any error, try using pool.ntp.org as your time server and then hit the Update Now button.
Make sure you select the checkbox saying, Synchronize with an internet time server.
Add new Time servers to Windows 11/10
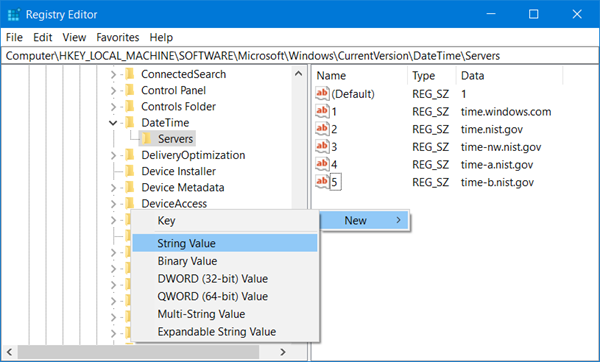
If you want to add more time servers to the drop-down list, open Registry Editor and go to the below path-
HKEY_LOCAL_MACHINE\SOFTWARE\Microsoft\Windows\CurrentVersion\DateTime\Servers
This will show you the list of current servers available-time.windows.com
- time-nist.gov
- time-nw.nist.gov
- time-a.nist.gov
- time-b.nist.gov
If you wish to add Time Servers, you could use the following for instance, or any other one of your choice:
- pool.ntp.org
- isc.org
Just select the server you want to add, right-click anywhere on the right side and select New > String Value. Enter the next number and give the Time server’s address in the Value field.
Once done, go back to the Date and Time settings, select your server and click on Update Now button.
Force Windows to sync Time using CMD
You can also force Windows to sync Time using W32tm.exe. W32tm.exe is a command prompt line used to configure, monitor or troubleshoot the Windows Time Service in Windows 11/10.
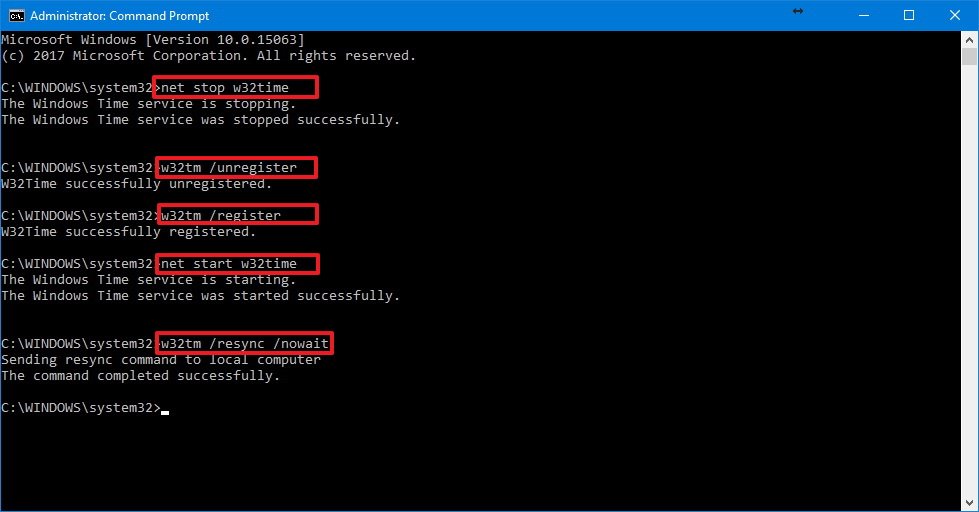
To do this, open an elevated command prompt and type the following commands one after the other:
net stop w32time
w32tm /unregister
w32tm /register
net start w32time
w32tm /resync
Reboot your computer and see if it has helped.
Also read: Windows Clock Time is wrong.
Anand Khanse is the Admin of TheWindowsClub.com, a 10-year Microsoft MVP (2006-16) & a Windows Insider MVP (2016-2022). Please read the entire post & the comments first, create a System Restore Point before making any changes to your system & be careful about any 3rd-party offers while installing freeware.
Reader Interactions
Changing the Windows 10 time server is a simple process that you can do in just a few steps. To change the time server, follow these steps:
1. Right-click on the clock in your taskbar and select “Adjust date/time” from the menu.
2. In the Date & Time window, click on “Internet Time” tab then click on “Change settings…” button at bottom of window
3. Checkmark “Synchronize with an Internet time server” checkbox then type in or choose different time servers from drop down list (for example; pool.ntp.org)
4. Click Update Now to synchronize your PC’s clock with new time server
5. Finally click OK to save changes
How do I change my NTP server?
Changing the time server in Windows 10 can be done through the Command Prompt (cmd). To do this, follow these steps:
1. Open cmd by typing “cmd” into the search bar and pressing enter.
2. Type in “net time /setsntp:” and replace with an internet-based SNTP server such as time.windows.com or pool.ntp.org .
3. Once you have entered your desired server name, press Enter to set it as your current system time source.
4. You can also type in “w32tm /config /update” to make sure that changes are applied immediately without having to restart your computer for them to take effect..
5
How do I find the time server on Windows 10?
To find the time server on Windows 10, you can follow these steps:
1. Open Control Panel by searching for it in the Start menu.
2. Click on Clock and Region and select Date & Time from the sidebar.
3. On this page, click Internet Time and then Change Settings to open up a dialog box containing a list of time servers you can use as your source of accurate time information.
4. Select one of them (Microsoft recommends using ‘time.windows.com’), choose Update Now to synchronize with that server, and then press OK to save your settings when finished.
What is the default Windows time server?
The default Windows time server is time.windows.com, which is an internet-based network time protocol (NTP) server provided by Microsoft to keep the system clock synchronized with accurate date and time information. To synchronize your system with this server, you can use the following steps:
1. Open Control Panel > Date & Time > Internet Time
2. Select Change Settings
3. Check Synchronize with an Internet Time Server
4. Type in “time.windows.com” as the Server address
5. Click Update Now
6 Click OK twice to save settings and close window
Where is NTP server settings?
The Network Time Protocol (NTP) server settings can be configured by logging into the system or network’s administrative control panel. Depending on your operating system, you may need to access a different menu or use different steps than what is outlined below.
For Windows systems, NTP server settings are adjusted through the Control Panel. To begin making changes:
1. Open the Control Panel window and select “System and Security” from the list of options available;
2. Select “Date and Time” from within System and Security;
3. In Date & Time Settings, select “Internet time” tab;
4. Click Change Setting to enable setting synchronization with an internet time source;
5. Enter the address for your preferred NTP server in Server field (e.g., 0x12345678); 6 Finally click Update Now button to synchronize your computer’s clock with the specified NTP server immediately and OK to save all changes made before exiting this page of configuration options..
How do I force NTP to sync Windows 10?
To force NTP to sync Windows 10, you can use the w32tm utility. This tool is available on all versions of Windows since XP and allows you to manually synchronize your computer’s clock with an internet time server. Here are the steps for using this utility:
1. Open a Command Prompt as administrator by searching for “cmd” in the Start Menu and selecting “Run as Administrator”.
2. In the command prompt type “w32tm /resync” then press enter. The computer will attempt to contact a network time server and update its clock accordingly.
3. If successful, you should get a message saying that it successfully synchronized with the specified time server. Otherwise, please make sure that your PC has access to an internet connection or try another time server from this list (https://tfedorov-devopsbloggerstagingcontentblobsserviceprodwindowsazurecomappveyorkfcjh7szsthkxlslnntpserverspdf).
Can I set my PC as an NTP server?
Yes, you can set your PC as an NTP server. To do this, there are a few steps to follow. Firstly, you will need to install the Network Time Protocol (NTP) daemon on your computer and configure it properly. This can be done by editing the configuration file of the daemon according to your requirements. Secondly, you will need to open up certain ports in the firewall for incoming requests from other computers that want to synchronize their clocks with yours. Lastly, ensure that your system clock is accurate and synchronized with an external time source such as a public NTP pool or another NTP server on the local network.
How do I fix windows server time?
To fix the time on a Windows Server, there are several steps that you can take. Firstly, open the Control Panel by either searching or navigating to it. From here, select “Date and Time” which will be under Clock, Language and Region. Here you can double check that your system is set to the correct date and time as well as ensuring that automatic synchronization with an internet time server is enabled. If this does not resolve your issue then you may need to restart the Windows Time service on your server by opening up services in Administrative Tools from Control Panel. Select “Windows Time” from the list of services (it should have a status of Started) then click Restart from the left side menu bar at top of window followed by OK in confirmation dialog box when prompted. This usually resolves any issues related to incorrect time being displayed on windows servers but if problems persist then further investigation may be required such as checking for any third party applications installed on server which could interfere with setting correct date/time values within Windows OS or inspecting event logs for errors related to Windows Time service running incorrectly etc..
{“@context”:”https://schema.org”,”@type”:”FAQPage”,”mainEntity”:[{“@type”:”Question”,”name”:”How to change time server in Windows 10 cmd?”,”acceptedAnswer”:{“@type”:”Answer”,”text”:”nnChanging the time server in Windows 10 can be done through the Command Prompt (cmd). To do this, follow these steps: n1. Open cmd by typing u201ccmdu201d into the search bar and pressing enter. n2. Type in u201cnet time /setsntp:u201d and replace with an internet-based SNTP server such as time.windows.com or pool.ntp.org . n3. Once you have entered your desired server name, press Enter to set it as your current system time source. n4. You can also type in u201cw32tm /config /updateu201d to make sure that changes are applied immediately without having to restart your computer for them to take effect.. n5″}},{“@type”:”Question”,”name”:”How do I find the time server on Windows 10?”,”acceptedAnswer”:{“@type”:”Answer”,”text”:”nnTo find the time server on Windows 10, you can follow these steps: n1. Open Control Panel by searching for it in the Start menu. n2. Click on Clock and Region and select Date & Time from the sidebar. n3. On this page, click Internet Time and then Change Settings to open up a dialog box containing a list of time servers you can use as your source of accurate time information. n4. Select one of them (Microsoft recommends using ‘time.windows.com’), choose Update Now to synchronize with that server, and then press OK to save your settings when finished.”}},{“@type”:”Question”,”name”:”What is the default Windows time server?”,”acceptedAnswer”:{“@type”:”Answer”,”text”:”nnThe default Windows time server is time.windows.com, which is an internet-based network time protocol (NTP) server provided by Microsoft to keep the system clock synchronized with accurate date and time information. To synchronize your system with this server, you can use the following steps: n1. Open Control Panel > Date & Time > Internet Time n2. Select Change Settings n3. Check Synchronize with an Internet Time Server n4. Type in u201ctime.windows.comu201d as the Server address n5. Click Update Now n6 Click OK twice to save settings and close window”}},{“@type”:”Question”,”name”:”Where is NTP server settings?”,”acceptedAnswer”:{“@type”:”Answer”,”text”:” nnThe Network Time Protocol (NTP) server settings can be configured by logging into the system or networku2019s administrative control panel. Depending on your operating system, you may need to access a different menu or use different steps than what is outlined below. nnFor Windows systems, NTP server settings are adjusted through the Control Panel. To begin making changes: n1. Open the Control Panel window and select u201cSystem and Securityu201d from the list of options available; n2. Select u201cDate and Timeu201d from within System and Security; n3. In Date & Time Settings, select u201cInternet timeu201d tab; n4. Click Change Setting to enable setting synchronization with an internet time source; n5. Enter the address for your preferred NTP server in Server field (e.g., 0x12345678); t6 Finally click Update Now button to synchronize your computer’s clock with the specified NTP server immediately and OK to save all changes made before exiting this page of configuration options..”}},{“@type”:”Question”,”name”:”How do I force NTP to sync Windows 10?”,”acceptedAnswer”:{“@type”:”Answer”,”text”:”nnTo force NTP to sync Windows 10, you can use the w32tm utility. This tool is available on all versions of Windows since XP and allows you to manually synchronize your computer’s clock with an internet time server. Here are the steps for using this utility: n1. Open a Command Prompt as administrator by searching for “cmd” in the Start Menu and selecting “Run as Administrator”. n2. In the command prompt type u201cw32tm /resyncu201d then press enter. The computer will attempt to contact a network time server and update its clock accordingly. n3. If successful, you should get a message saying that it successfully synchronized with the specified time server. Otherwise, please make sure that your PC has access to an internet connection or try another time server from this list (https://tfedorov-devopsbloggerstagingcontentblobsserviceprodwindowsazurecomappveyorkfcjh7szsthkxlslnntpserverspdf).”}},{“@type”:”Question”,”name”:”Can I set my PC as an NTP server?”,”acceptedAnswer”:{“@type”:”Answer”,”text”:”nnYes, you can set your PC as an NTP server. To do this, there are a few steps to follow. Firstly, you will need to install the Network Time Protocol (NTP) daemon on your computer and configure it properly. This can be done by editing the configuration file of the daemon according to your requirements. Secondly, you will need to open up certain ports in the firewall for incoming requests from other computers that want to synchronize their clocks with yours. Lastly, ensure that your system clock is accurate and synchronized with an external time source such as a public NTP pool or another NTP server on the local network.”}},{“@type”:”Question”,”name”:”How do I fix windows server time?”,”acceptedAnswer”:{“@type”:”Answer”,”text”:”nnTo fix the time on a Windows Server, there are several steps that you can take. Firstly, open the Control Panel by either searching or navigating to it. From here, select u201cDate and Timeu201d which will be under Clock, Language and Region. Here you can double check that your system is set to the correct date and time as well as ensuring that automatic synchronization with an internet time server is enabled. If this does not resolve your issue then you may need to restart the Windows Time service on your server by opening up services in Administrative Tools from Control Panel. Select u201cWindows Timeu201d from the list of services (it should have a status of Started) then click Restart from the left side menu bar at top of window followed by OK in confirmation dialog box when prompted. This usually resolves any issues related to incorrect time being displayed on windows servers but if problems persist then further investigation may be required such as checking for any third party applications installed on server which could interfere with setting correct date/time values within Windows OS or inspecting event logs for errors related to Windows Time service running incorrectly etc..”}}]}

Windows 10 uses the Network Time Protocol (NTP) to connect with time servers on the internet to provide accurate system time. Otherwise, if the clock is not correctly synchronized, you could experience network issues, and documents and other files you create may end with incorrect time stamps.
Although for the most part, the default time server is reliable, there will be times when you may need to change it, such as if your current configuration causes your device to display the wrong time, you just prefer to use a different service, or your company uses a specific configuration.
Whatever the reason, on Windows 10 it’s possible to switch time providers, and you can even add custom time servers to the list as necessary.
In this Windows 10 guide, we walk you through the steps to use different time servers to make sure that your computer is getting the correct time using Control Panel.
- How to change the time server on Windows 10
- How to add new time servers on Windows 10
- How to troubleshoot time server synchronization problems
How to change the time server on Windows 10
- Open Control Panel.
- Click on Clock, Language, and Region.
- Click on Date and Time.
- Click on the Internet Time tab.
- Click the Change settings button.
- Check that the Synchronize with an internet time server option is selected.
- Use the drop-down menu to select a different server.
- Click the Update now button to synchronize the time with the new server.
- Click OK.
- Click Apply.
- Click OK.
After completing the steps, Windows 10 will keep the time synchronized over the internet with the server you selected.
How to add new time servers on Windows 10
If you prefer to use a different time server that isn’t in the list, it’s also possible to include any NTP server you want.
- Open Control Panel.
- Click on Clock, Language, and Region.
- Click on Date and Time.
- Click on the Internet Time tab.
- Click the Change settings button.
- Check that the Synchronize with an internet time server option is selected.
- Click the drop-down menu, and next to «Server,» and type the new address of the time server.
- Click the Update now button to resynchronize.
- Click OK.
- Click Apply.
- Click OK.
After adding the new configuration, you can quickly verify everything is working as expected by checking the Internet Time tab, which now should include a «The clock was successfully synchronized» message with the link to the NTP server and date and time of the synchronization.
All the latest news, reviews, and guides for Windows and Xbox diehards.
Adding new time servers using the Registry
Using Control Panel, you can change the Internet Time settings to anything, but the list only allows you to store one extra entry. If you want to add multiple addresses to the list, you’ll need to use the Registry.
Warning: This is a friendly reminder that editing the Registry is risky, and it can cause irreversible damage to your installation if you don’t do it correctly. It’s recommended to make a full backup of your PC before proceeding.
- Use the Windows key + R keyboard shortcut to open the Run command.
- Type regedit, and click OK to open the Registry.
- Browse the following path:
HKEY_LOCAL_MACHINE\SOFTWARE\Microsoft\Windows\CurrentVersion\DateTime\Servers - On the right side, right-click on the Servers (folder) key, select New, and click on String Value.
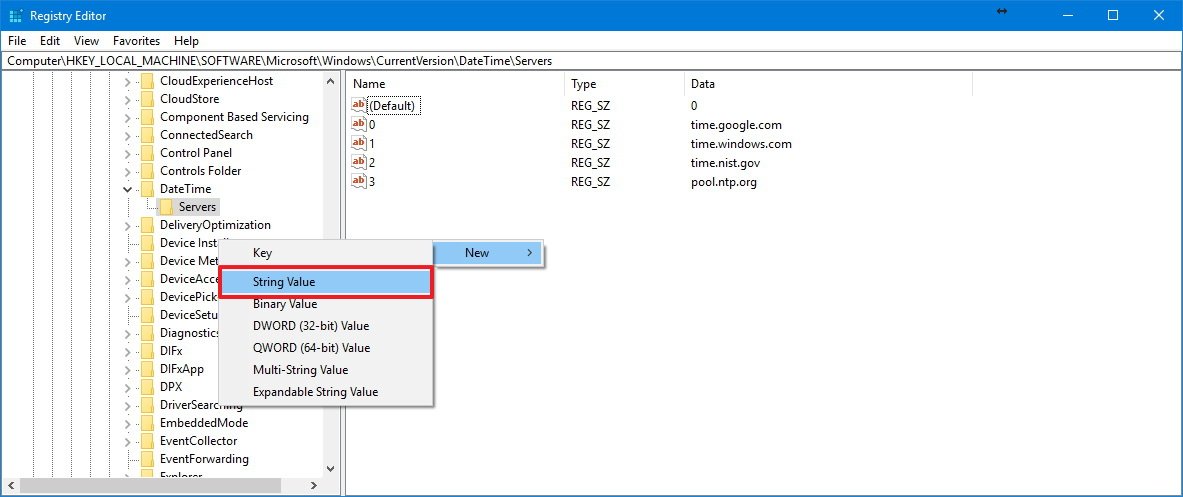
- Type a number that corresponds to the position of the new entry in the server drop-down menu in Control Panel.
- Double-click the newly created String Value.
- Type the address of Network Time Protocol (NTP) server. For example, if you want to use the Google Public NTP server, you can enter time.google.com.
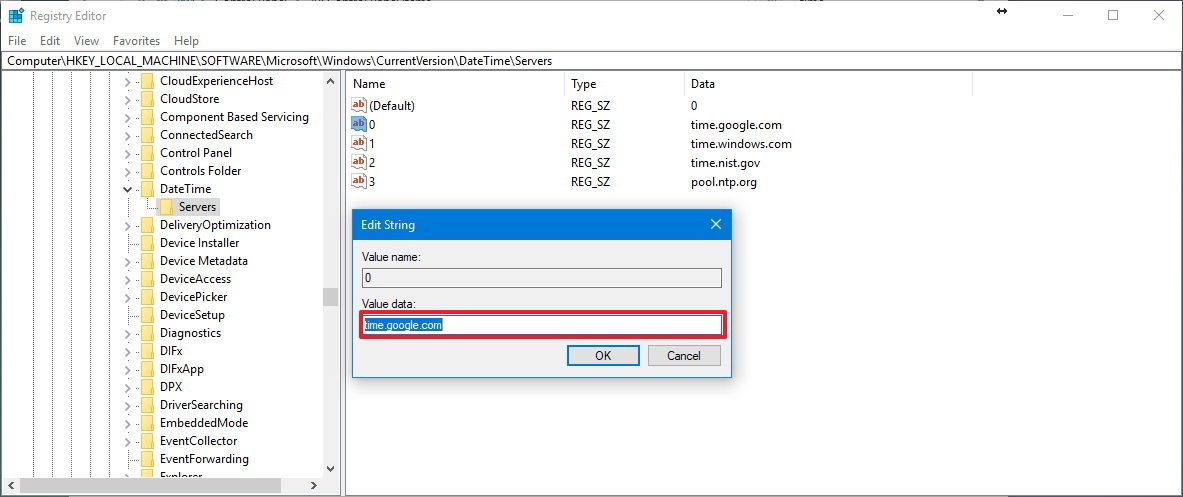
- Click OK.
Once you completed the steps, you can use the instructions to change the time server, but on step No. 6 select the newly added server and don’t forget to click the Update now button.
How to troubleshoot time server synchronization problems
If after changing the settings, your device still has problems connecting to the NTP server, you can reset the Windows Time service configurations using Command Prompt.
- Open the Start menu.
- Search for cmd.exe, right-click the result, and select Run as administrator.
- Type the following command to disable the Windows Time service and press Enter:
net stop w32time - Type the following command to unregister the Windows Time service and to remove all settings information from the registry and press Enter:
w32tm /unregister - Type the following command to register the Windows Time service and to load the default settings to the registry and press Enter:
w32tm /register - Type the following command to start the Windows Time service and press Enter:
net start w32time - Type the following command to force your computer to synchronize your computer without waiting and press Enter:
w32tm /resync /nowait
- Restart your computer.
Once you completed the steps, your device should now synchronize with its clock over the internet.
More Windows 10 resources
For more helpful articles, coverage, and answers to common questions about Windows 10, visit the following resources:
- Windows 10 on Windows Central – All you need to know
- Windows 10 help, tips, and tricks
- Windows 10 forums on Windows Central
Mauro Huculak has been a Windows How-To Expert contributor for WindowsCentral.com for nearly a decade and has over 15 years of experience writing comprehensive guides. He also has an IT background and has achieved different professional certifications from Microsoft, Cisco, VMware, and CompTIA. He has been recognized as a Microsoft MVP for many years.
The other day I got a client asking for help syncing time across all Windows 10 thin clients with their NTP server. After taking a walk around NYC and witnessing many hanging shoes I refreshed my head I found a useful way to check Windows NTP configuration using the command prompt.
Using w32tm To Check and configure NTP using the Command Prompt
In Windows 10 open your command prompt and type the below command to check your current NTP configuration:
w32tm /query /configurationThe above gives you the current time configuration.
w32tm /query /statusThe above shows you many more details, such as: stratum, precision, last sync, NTP server and etc..
time /TThis last one shows the current time.
At some Windows10 machines I got the below error:
The following error occurred: The service has not been started. (0x80070426)This means the time service has is not running or disabled. I made sure to enabled accordingly either using the command prompt:
net start w32timeor at the services window when the above did not work:


There’s also a way to set and start Windows NTP configuration using the command prompt this way:
w32tm /config /manualpeerlist:10.0.0.5 /syncfromflags:manual /reliable:yes /updateThen, as usual Windows stays problematic. I had to run the below commands in sequence:
w32tm /unregister
w32tm /register
net start w32timeI did all these because I found out by running:
net time /querysntpI got the deprecated error:
The /QUERYSNTP and /SETSNTP options have been deprecated. Please use w32tm.exe to configure the Windows Time Service.At the end of the config you might need to run:
w32tm /config /update
w32tm /resync /rediscover
To make Windows 10 rediscover its NTP settings. Play around, research the official Windows documentation. You can also place all these command on a batch file and deploy it to all your clients.
Good luck! Contact me if you have any questions. Remember to check out my IT Handyman shop for cool T-Shirts and coffee mugs I designed once in a while.

Your computer has an internal battery that can keep track of the time, even when it’s powered off. But those batteries and the PC’s internal clock can sometimes fall behind.
That’s why Windows, like most other operating systems, can be configured to occasionally check and calibrate for the correct time with one of several special time servers around the world (these are called NTP — “Network Time Protocol” — servers).
By default, Windows 10 will check with Microsoft’s own time server (time.windows.com) to ensure that your PC’s clock is accurate. However, it’s possible to change the server that your PC connects to, allowing you to use a time server from a competing company like Google, or one of several time servers run by various national governments and scientific organizations. Here’s how to change the time server in Windows 10.
Change the Time Server
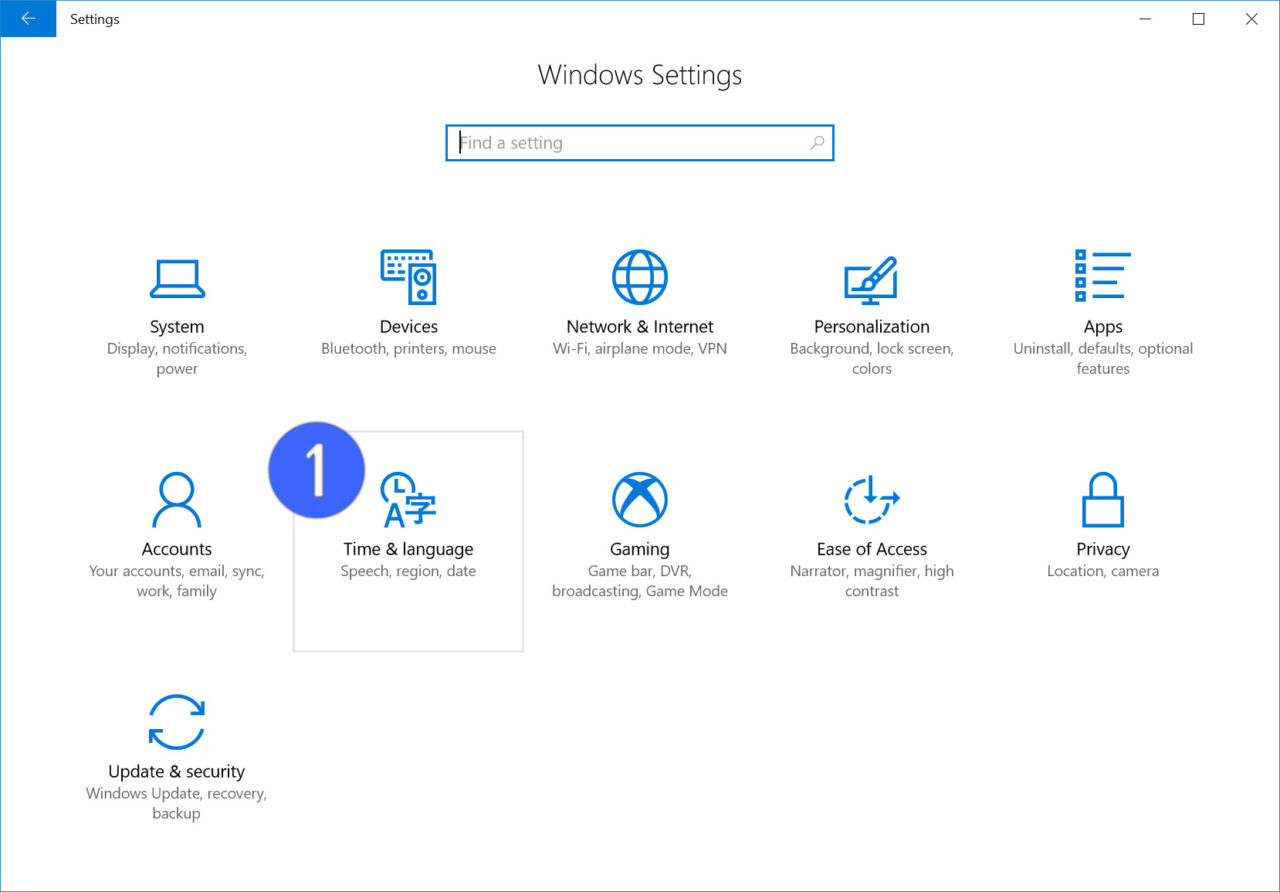
To get started, first launch the Windows 10 Settings app, accessible via the gear icon in the Start Menu or by searching for “Settings” via Cortana. From Settings, select Time & Language.
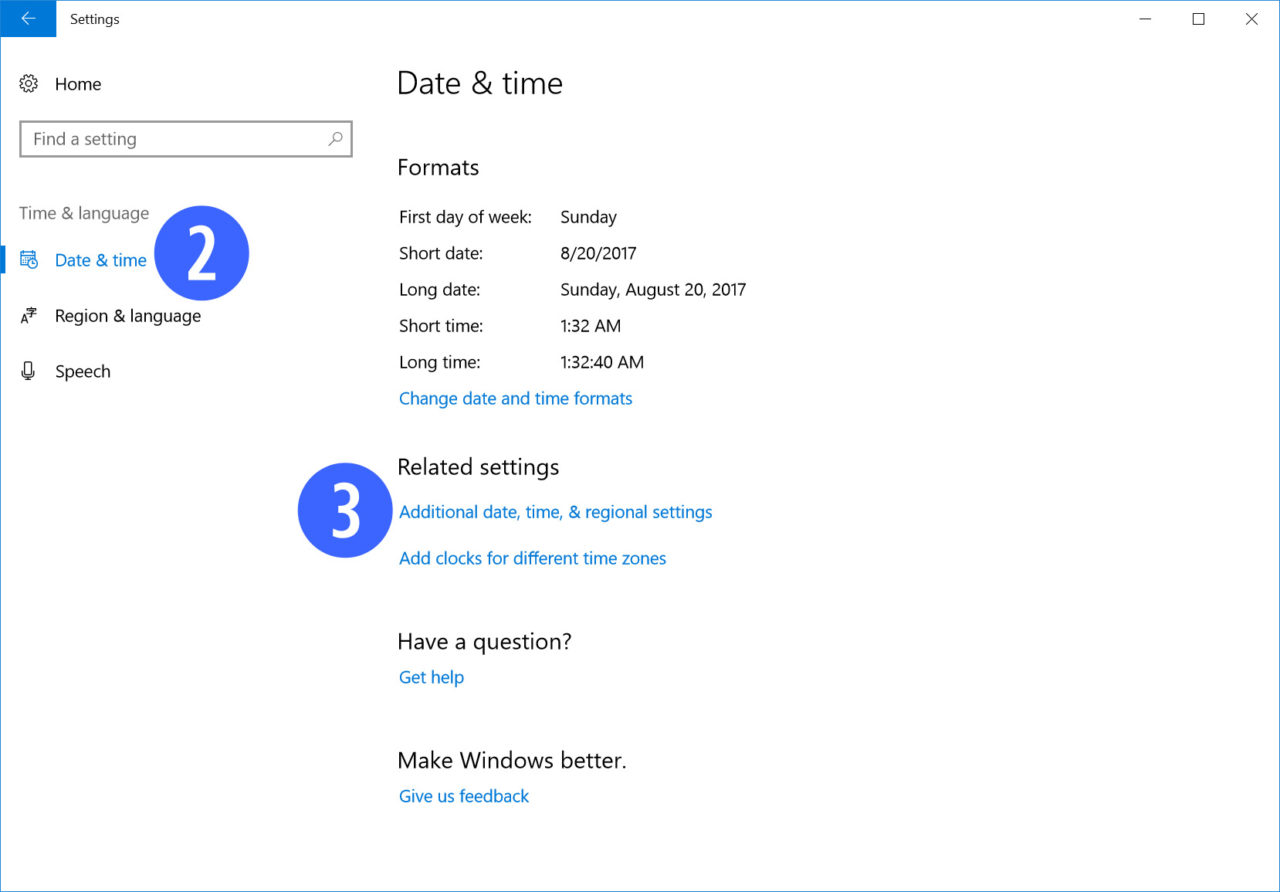
Next, select Date & Time from the sidebar on the left side of the window, and then scroll down to the Related Settings section on the right side of the window. Click on Additional date, time, & regional settings.
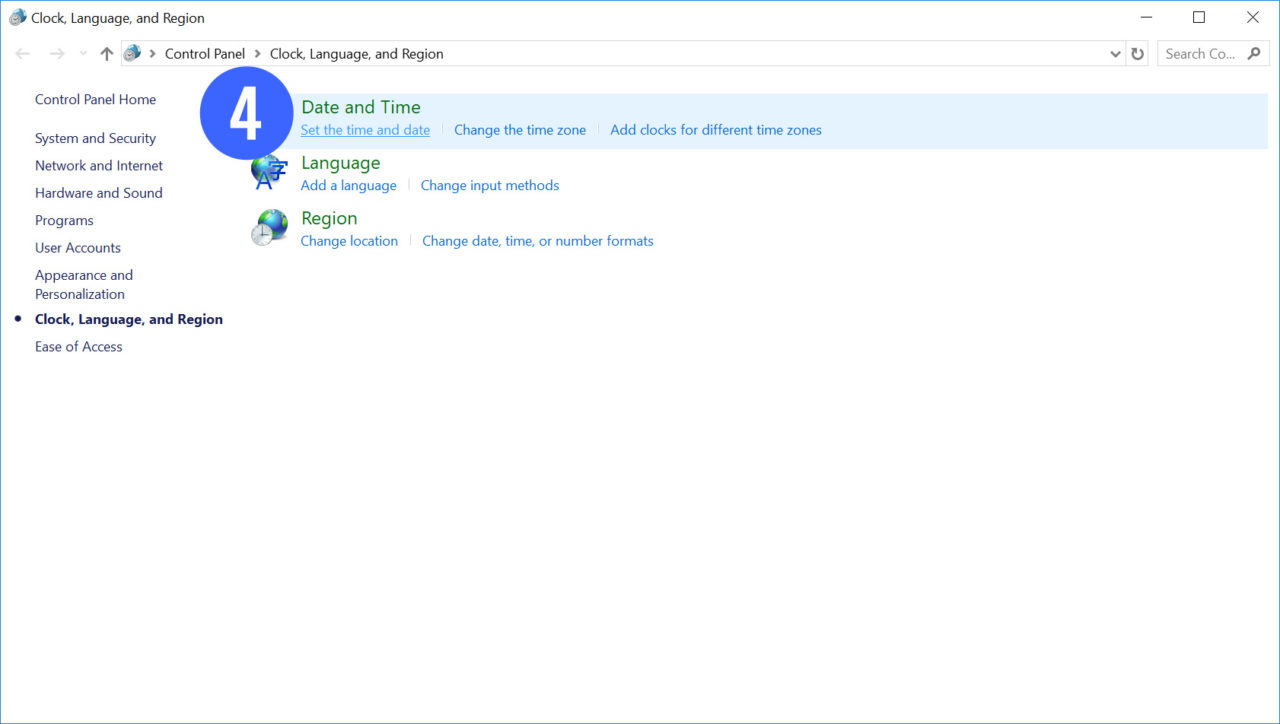
This will launch the Control Panel. Select Set the time and date in the Date and Time section.
Finally, from the Date and Time window that appears, click on the tab labeled Internet Time.
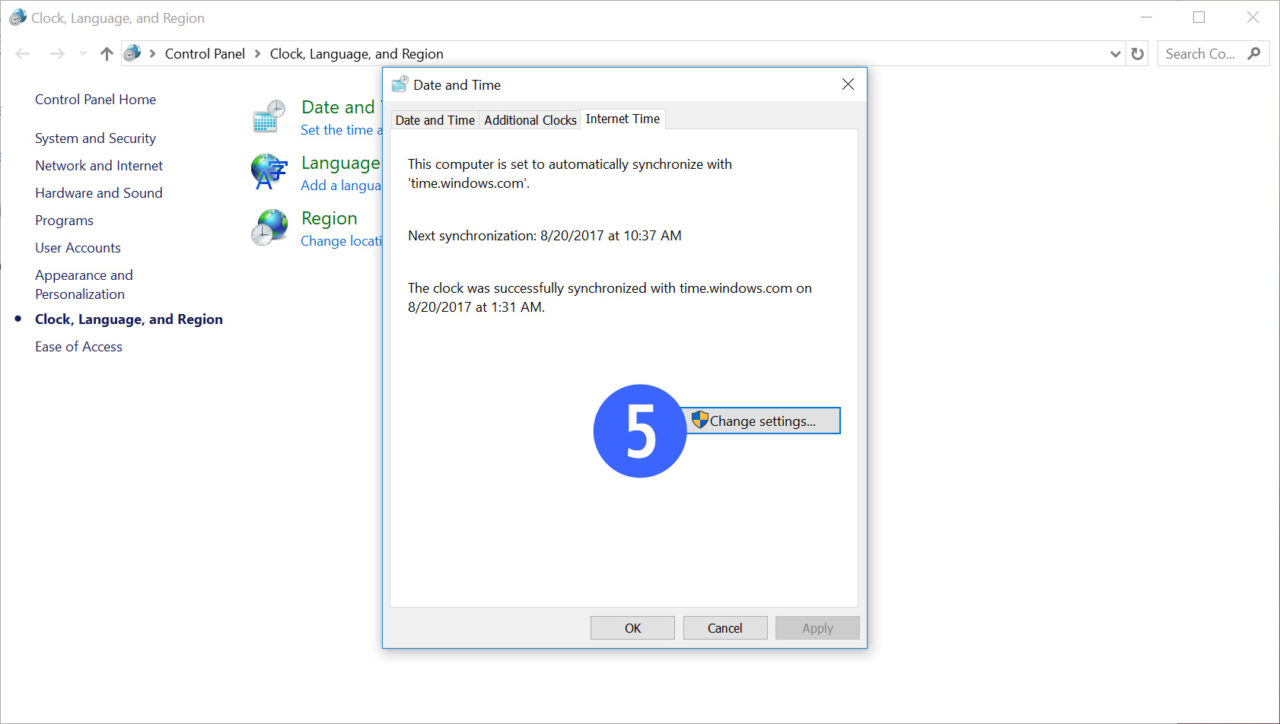
If your PC is currently configured to synchronize with an online time server, this window will tell you which sever is currently selected and the time and date of the previous and next synchronization. To change your time server, click Change Settings.
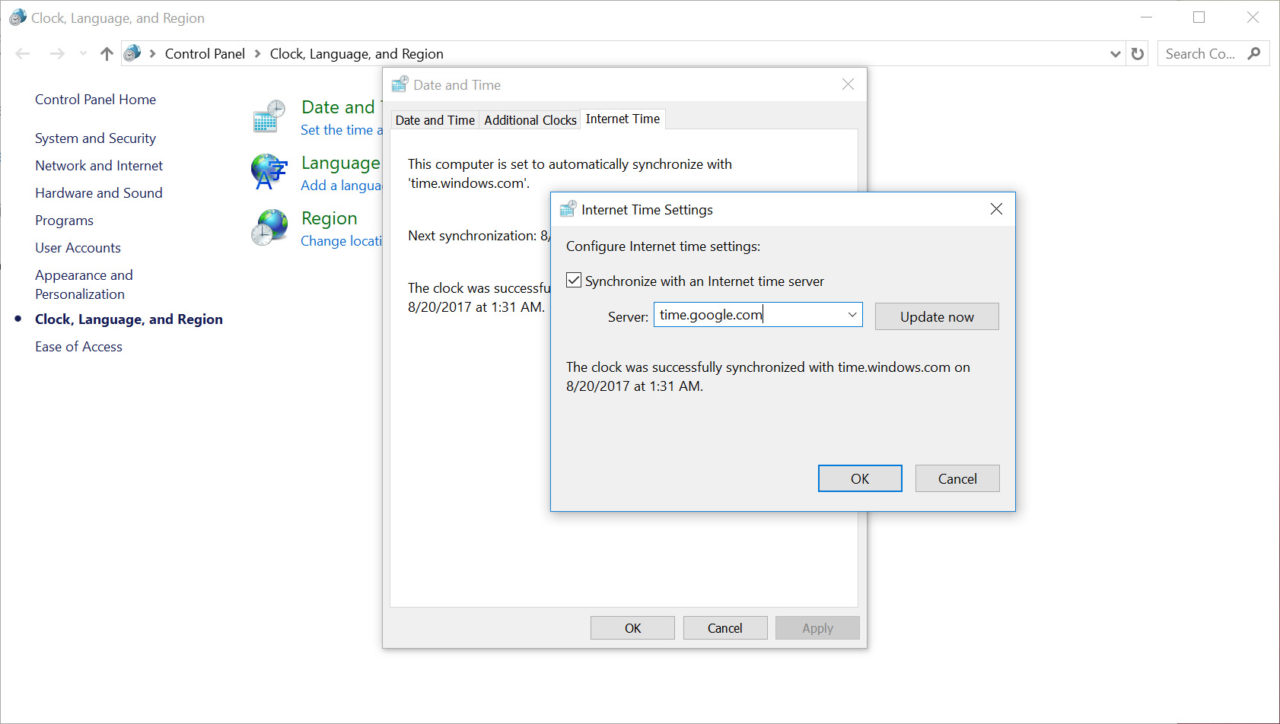
As mentioned, the default time server is time.windows.com, but you can erase that and add the compatible time server of your choosing. A couple to consider are time.google.com (Google’s own in-house time server) and time.nist.gov (a rotating list of time servers throughout the United States administered by the National Institute of Standards and Technology. Of course, if you’ve received instructions from your organization to use a particular time server, you’d enter that address instead.
Once you’re done, click OK to save the change and close the window. You can also click Update Now to force a time synchronization immediately, or just wait and let Windows handle it on its own schedule.
How To Root Your Samsung Galaxy S8 And Galaxy S8 Plus
Read Next