
Windows 11 and Windows 10 both have some exciting new options that allow you to change the mouse pointer size and color. Have you grown tired of the dull white or black mouse pointer? Are you having trouble seeing the standard size mouse cursor on your screen? Would you prefer one in a lively color, maybe one that matches your wallpaper? How about making it up to three times bigger or making it thicker when typing? Here is how to get to the mouse size settings and how to change your pointer’s size and color in Windows:
NOTE: We wrote this tutorial using the initial release of Windows 11 (version 21H2 build 22000), as well as Windows 10 (version 21H2 build 19044). If you’re using an older version of Windows 10, you might have to install the latest updates to get access to all the features presented.
How to access the mouse size settings in Windows
First, we’ll show how this is done in Windows 11 and then in Windows 10. Scroll to the section that fits your version of Windows.
1. Go to the “Mouse pointer and touch” settings in Windows 11
In Windows 11, in order to change the mouse pointer size, color, or thickness, you’ll need to first get to the appropriate page from the Settings app. Fortunately, that’s easy to do: open Settings (press Windows + I on your keyboard), select Accessibility on the left sidebar, and click or tap on “Mouse pointer and touch” on the right side of the window.
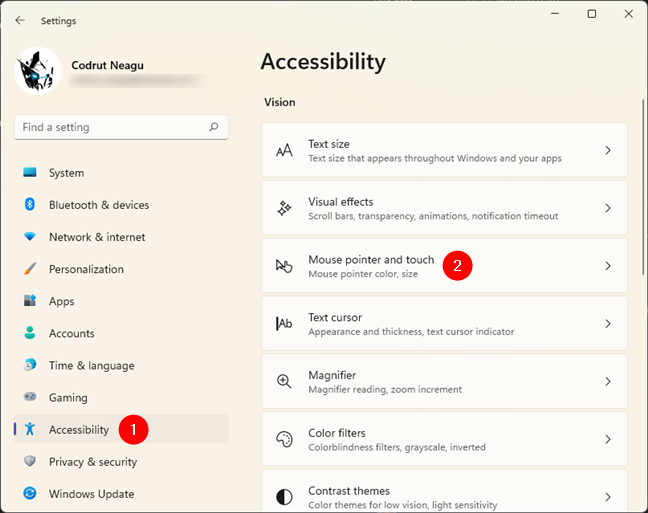
Mouse pointer and touch in the Settings app
2. Go to the “Mouse pointer” in Windows 10
If you’re using Windows 10, open the Settings app on your Windows 10 PC or device. A quick way to do that is to press Windows + I on your keyboard. In Windows Settings, click or tap Ease of Access.
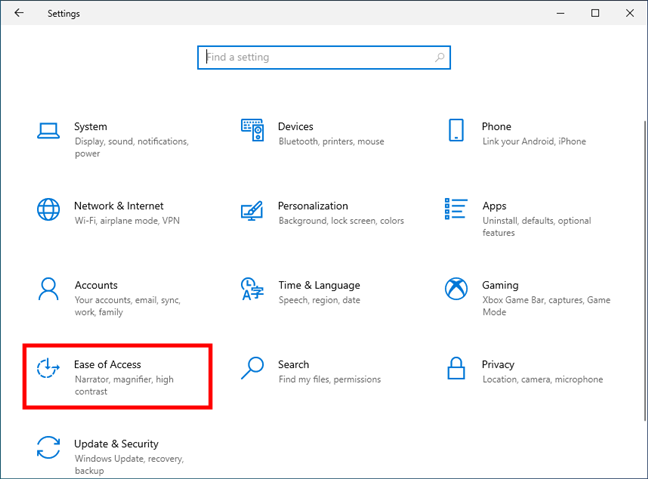
The Ease of Access section of the Settings app
Select Mouse pointer in the list of options on the left.
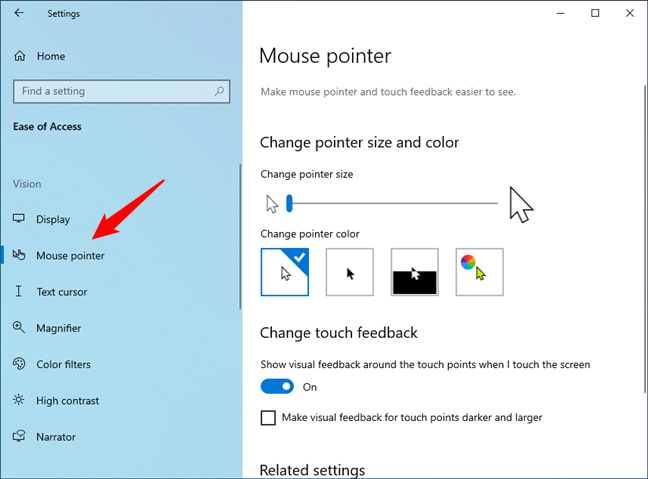
Windows 10’s Mouse pointer settings
NOTE: From here on, the steps to change the pointer size, color, and thickness are similar (almost identical) in Windows 11 and Windows 10.
How to change the size of the mouse pointer
If you’re on Windows 11, look at the Mouse pointer area from the Mouse pointer and touch settings page. There, you’ll find a slider called simply Size. In Windows 10, the slider is called “Change pointer size” and is found in the “Change pointer size and color” section from the Mouse pointer page. By default, both Windows 11 and Windows 10 use the smallest pointer size available, but you can use the aforementioned slider to choose any dimension from 1 to 15, which can make your pointer up to three times bigger than the standard size.
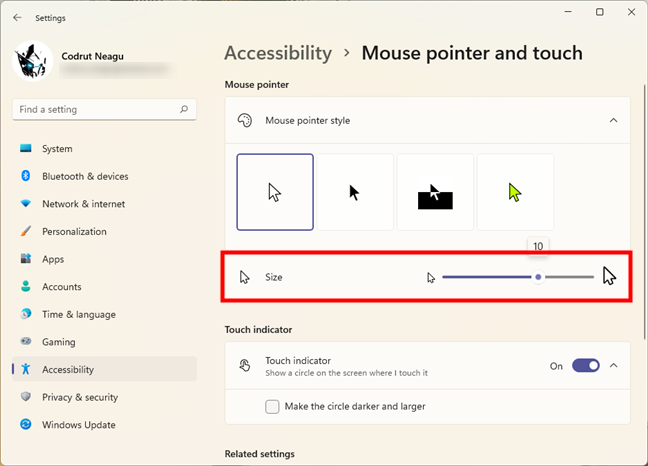
Use the slider to change the pointer’s size
As indicated by the graphics, moving the slider to the right makes the pointer bigger, while dragging it to the left turns it into a smaller one.
How to change the mouse pointer color
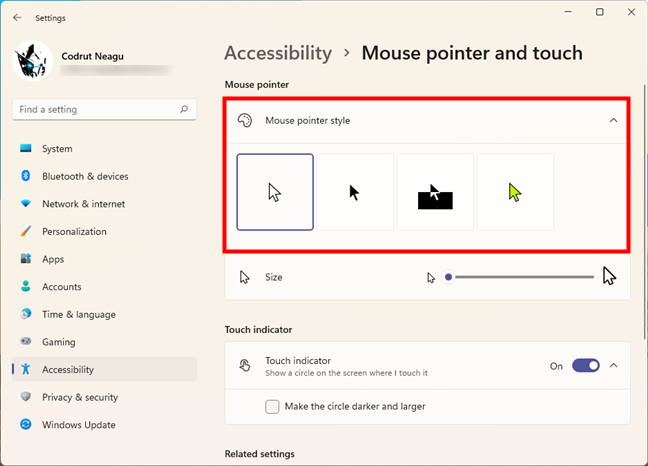
Don’t close the Settings app yet: on the same page, you’ll also find the color options for your mouse pointer. In Windows 11, it’s called “Mouse pointer style,” while in Windows 10, it’s called “Change pointer color.” It’s the same thing, even if the naming is slightly different. All you have to do to change your mouse cursor color is to choose one of the four available options.
Change the pointer color in Windows
As indicated by the graphics used, the first two options are white with a black border (which is the default) and black with a white border. The third, illustrated as black on a white background and white on a black background, has an inversion effect, ensuring your mouse pointer is always visible, by changing it to a color complementary to the color you’re hovering over. This does not just happen for black and white: hovering with your pointer on a blue background makes it turn orange, a red background turns it cyan, and so on.
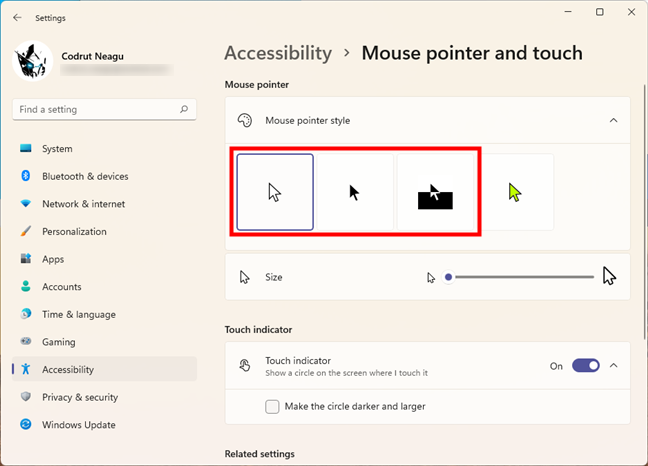
The first three mouse pointer styles are predefined
The fourth and last mouse pointer style adds a black border to the color of your choice. Clicking or tapping on it reveals a rainbow of recommended pointer colors you can choose from. If you like a color from the list, click or tap on it.
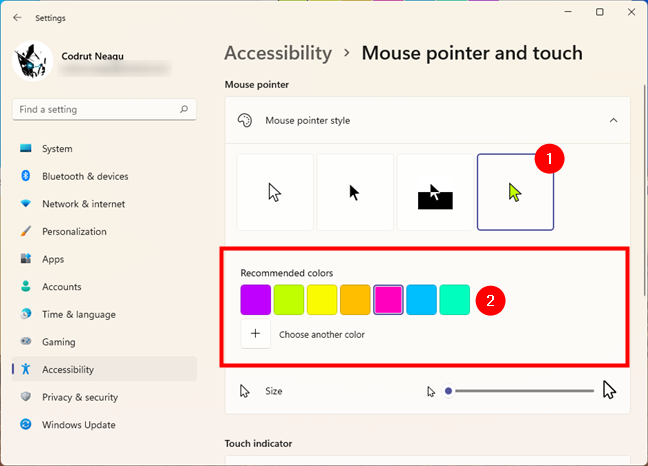
Choose one of the recommended pointer colors for a fun cursor
If you have a different color in mind, click or tap the plus button under the recommended colors. In Windows 11, it’s called “Choose another color,” while in Windows 10 it’s named “Pick a custom pointer color.”
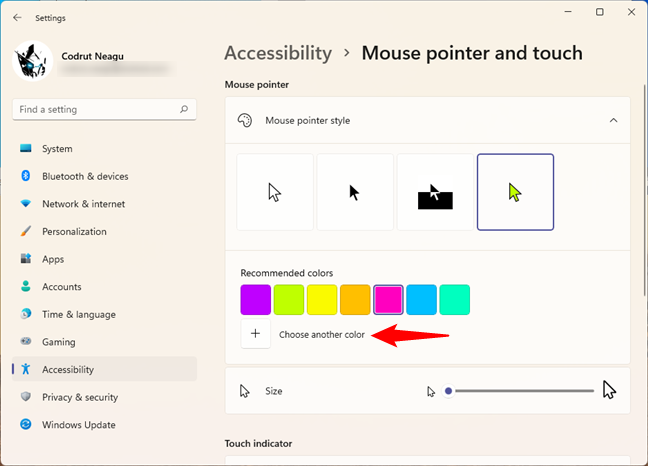
Choose another color for the mouse pointer
In the new color selection window that pops up, choose any color you like from the whole RGB spectrum. You have absolute freedom in your choice, and a slider at the bottom helps you fine-tune the color you choose.
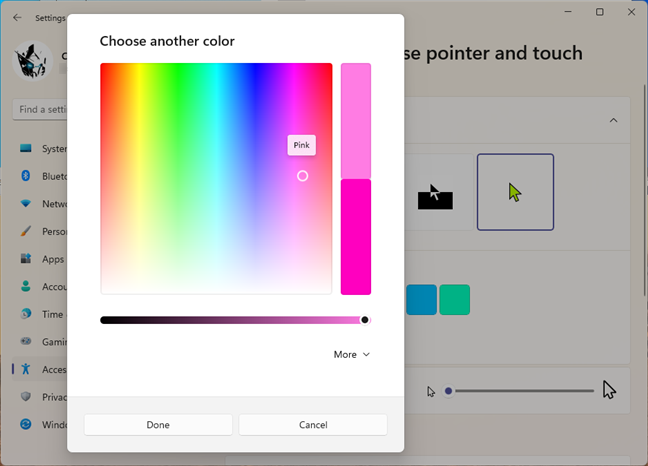
Click or tap anywhere to select a color and see its name
If you need to be accurate, and you already know the RGB code of the color that you want to use, click or tap More.
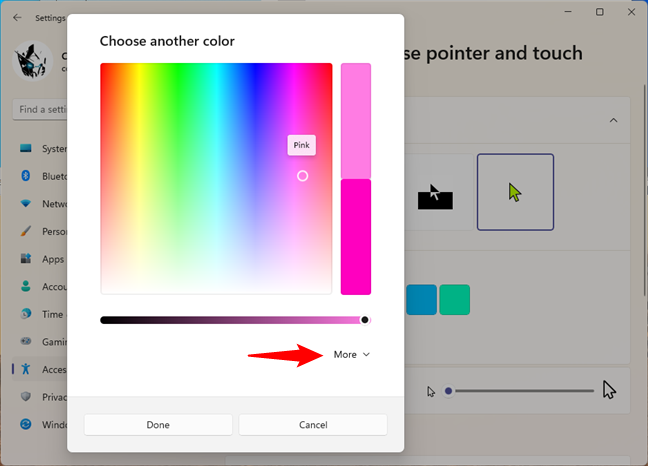
Pick a custom mouse pointer color
Additional options are shown, where you can enter the code of the color that you want to use. Your changes are displayed in real-time, so, when you are satisfied, press Done and enjoy your new pointer.
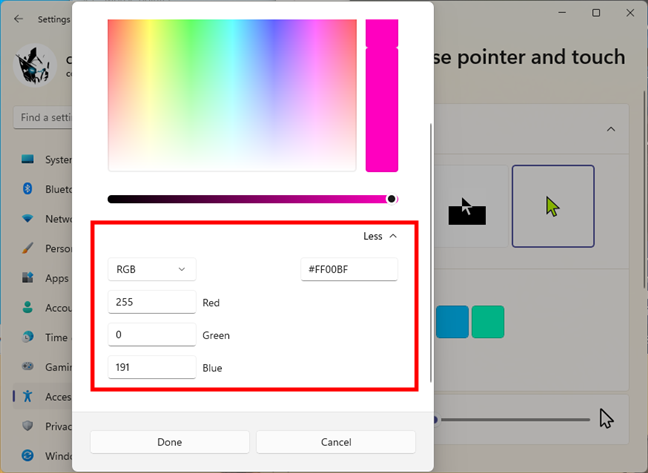
Enter the code for a custom mouse pointer color
NOTE: If you are not satisfied with your pointer’s appearance, see how to use custom mouse cursors and pointers in Windows. And, if you want to learn more about personalizing your mouse, read: How to configure the mouse in Windows.
How to change the text cursor thickness when typing
There is one other pointer setting that you might want to customize, and it’s important, especially if you spend time writing on your Windows computer or device: the blinking cursor used when typing text. If you spend a substantial amount of time in the company of letters or numbers, as we do, you might appreciate the option to make this cursor more visible, by adjusting its thickness.
In the Settings app, go back to the Accessibility section in Windows 11, or Ease of Access in Windows 10. Then, click or tap on Text cursor.

Open the Text cursor settings
In either operating system, scroll on the right side of the Settings window until you find the slider called “Text cursor thickness.” Move the slider and watch the preview box to make your decision.
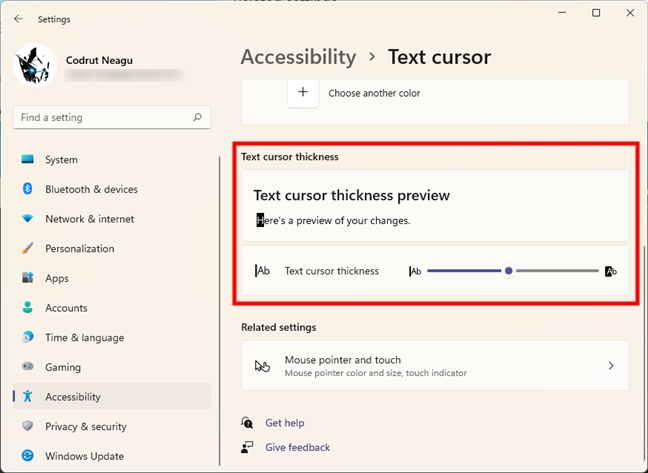
Move the slider to adjust the cursor’s thickness
From now on, the mouse cursor while typing will be as thick or thin as you’ve decided, hopefully making it easier for you to write on your computer.
Bonus for old-school users: How to change the mouse pointer size and color from the Control Panel
You can also customize your pointer from the more limiting options available from the Control Panel, although these are less useful than those from the Settings app. To customize the mouse cursor’s size and color, open the Control Panel and go to the “Ease of Access” section.
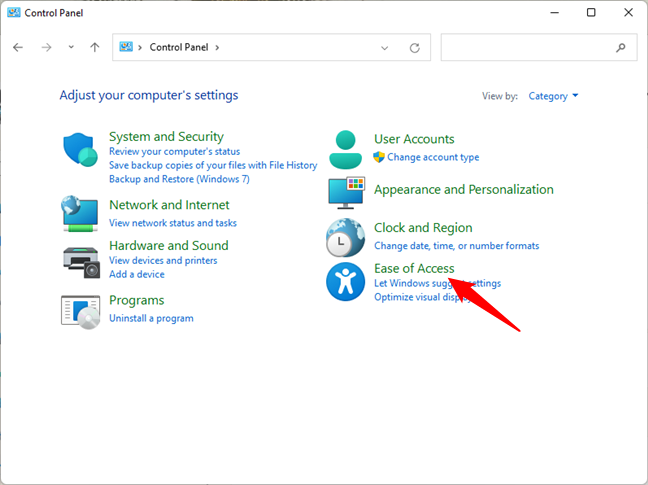
The Windows 11 Control Panel
In the section called “Ease of Access Center,” click or tap on the “Change how your mouse works” link.
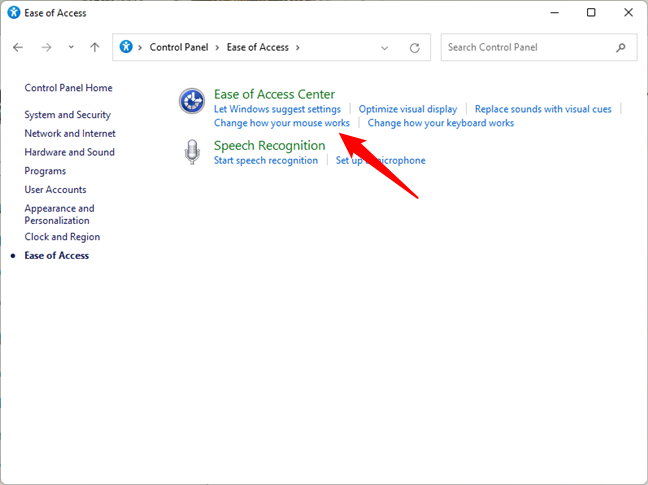
Ease of Access settings
A window named “Make the mouse easier to use” opens. Here you can find a series of mouse-related settings, starting with the size and color of your mouse pointer. In the Mouse pointers section, you can choose from three different mouse cursor colors and from three different sizes for each color. The third one has an inversion effect, which changes your mouse color for maximum visibility, depending on what color you are hovering over. Choose the size and the color that you want to use.
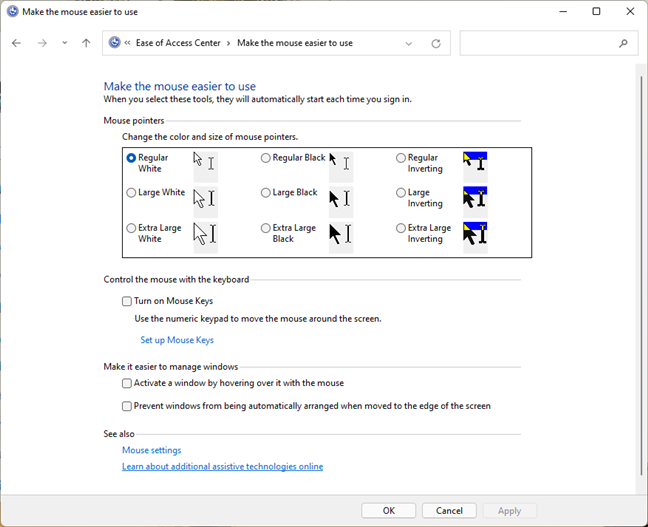
Make the mouse easier to use in Windows
Do not forget to press OK or Apply for your changes to take effect. You can now close the Control Panel and enjoy using your new mouse pointer.
What mouse pointer size and color do you use?
While writing this tutorial, I was pleasantly surprised by Windows’ option to turn the cursor the opposite color of the background, thus ensuring maximum visibility at all times. I decided to stick with it for now. What about you? How did you customize your mouse pointer? Did you choose a cheerful color or a larger pointer size? Let me know in a comment below.
Applies ToWindows 11 Windows 10
Использование буфера обмена
При копировании содержимого на компьютер оно автоматически копируется в буфер обмена для вставки. Вы можете вставить несколько элементов из журнала буфера обмена, а также закрепить элементы, которые вы, как правило, используете все время, и синхронизировать журнал буфера обмена с облаком.
Ниже приведены ответы на некоторые вопросы, связанные с буфером обмена.
Открытие параметров буфера обмена
Чтобы включить буфер обмена в первый раз, выберите клавиши с логотипом Windows + V, а затем выберите Включить.
Чтобы синхронизировать элементы буфера обмена с компьютером, необходимо убедиться, что функция синхронизации включена.
-
Выберите Пуск > Параметры > системный > буфер обмена .
-
Установите переключатель журнал буфера обмена на всех устройствах в значение Вкл.
Примечание: Функция синхронизации привязана к вашей учетной записи Майкрософт или рабочей учетной записи, поэтому не забудьте использовать одни и те же данные для входа на всех устройствах.
Вы можете быстро очистить все, кроме закрепленных элементов, на устройстве и в облаке.
-
Выберите Пуск > Параметры > системный > буфер обмена .
-
В области Очистить данные буфера обмена выберите Очистить.
Вы также можете очистить журнал буфера обмена устройства, выбрав клавиши с логотипом Windows +V, а затем выбрав параметр Очистить все в верхней части экрана.
Вы можете очистить любой конкретный элемент в буфере обмена.
-
Выберите Клавиша с логотипом Windows + V.
-
Рядом с рассматриваемым элементом выберите Дополнительные сведения (…), а затем — Удалить .
Устранение неполадок с буфером обмена
Убедитесь, что вы включили журнал буфера обмена. Чтобы включить буфер обмена в первый раз, выберите клавиши с логотипом Windows + V и выберите Включить.
Журнал буфера обмена очищается при каждом перезапуске компьютера, за исключением закрепленных элементов.
Вы можете настроить автоматическую синхронизацию скопированных элементов с другими устройствами.
Примечание: Функция синхронизации привязана к вашей учетной записи Майкрософт или рабочей учетной записи, поэтому не забудьте использовать одни и те же данные для входа на всех устройствах.
-
Выберите Пуск > Параметры > системный > буфер обмена .
-
В разделе Журнал буфера обмена на устройствах установите переключатель в значение Вкл.
-
Выберите Автоматически синхронизировать текст, который я копируем.
Примечание: Параметр Вручную синхронизировать текст, который я копируем, означает, что вам нужно открыть журнал буфера обмена (клавиша с логотипом Windows + V) и вручную нажать кнопку синхронизации в элементе буфера обмена. Затем текст будет отправлен в облако и синхронизирован с другими устройствами.
Размеры элементов не должны превышать 4 МБ. Поддерживаются форматы файлов text, HTML и bitmap.
Журнал буфера обмена рассчитан не более чем на 25 скопированных записей. Система автоматически удаляет старые элементы(если они не закреплены), чтобы освободить место для новых.
Нужна дополнительная помощь?
Нужны дополнительные параметры?
Изучите преимущества подписки, просмотрите учебные курсы, узнайте, как защитить свое устройство и т. д.
Всё, что нужно знать о полезной функции для более продуктивной работы.
Что такое журнал буфера обмена
Стандартный буфер, который все привыкли использовать через контекстное меню «Скопировать» и «Вставить» или через сочетания Ctrl + C, Ctrl + V, имеет лишь одну «ячейку памяти». Чего бывает очень мало. Начиная с Windows 10 Microsoft внедрила журнал буфера обмена, который умеет запоминать до 25 элементов. Копировать и вставлять при этом можно текст, ссылки, изображения и другой контент.
Как включить журнал буфера обмена Windows 10 и Windows 11
По умолчанию функция неактивна. Её можно активировать следующим образом.

Удерживая клавишу Win (с символом «окошка»), нажмите V на клавиатуре. Вы увидите предложение включить журнал буфера обмена с помощью соответствующей кнопки.

Если при нажатии Win + V ничего не происходит, то активировать функцию можно в настройках. Для этого сделайте правый клик по меню «Пуск» и выберите «Параметры». Далее в разделе «Система» → «Буфер обмена» включите тумблер как на скриншоте выше.
Как просмотреть буферы обмена Windows 10 и Windows 11
После включения система начнёт хранить всё, что вы копируете или вырезаете, в буфере обмена.

Для просмотра журнала нажмите Win + V. На экране отобразится плавающее окошко со списком сохранённых элементов, которое можно переместить в удобное место. Запомнить сочетание легко — как обычная вставка, только вместо Ctrl используется клавиша Win.
Как вставить куда-то скопированный элемент

Для вставки элемента в документ или, например, в строку поиска достаточно кликнуть по нужному тексту, ссылке или изображению в списке, после чего буфер автоматически закроется. Помимо этого можно использовать стрелки клавиатуры для навигации и Enter для вставки.
Как закрепить нужный элемент
Если вам часто приходится вставлять одинаковые данные вроде реквизитов, ссылок или номеров телефонов, можно закрепить их в буфере, чтобы они всегда были под рукой.

Для этого просто кликните по значку иголки напротив нужного элемента.
Как очистить журнал буфера обмена
Как упоминалось выше, в памяти буфера всего 25 ячеек. При их заполнении во время записи новых элементов самые старые стираются.

Каждую из них можно удалить по отдельности, кликнув на троеточие в списке и выбрав значок корзины. Для освобождения места во всём буфере используется кнопка «Очистить всё».
При этом буфер автоматически очищается после перезагрузки и выключения компьютера. Из памяти исчезают все элементы, кроме закреплённых.
Последняя версия Windows 10 включает в себя новые возможности изменения параметров указателя мыши или курсора, которые могут быть интересны пользователям, желающим настроить оформление системы по своему усмотрению.
В этой краткой инструкции о том, где находятся новые настройки оформления указателя мыши и что именно они предлагают. Старые способы, позволяющие менять цвет, внешний вид и другие настройки также до сих пор доступны в системе, о них в статье Как изменить курсор мыши в Windows, в ней же присутствует информация о создании собственного указателя мыши.
Новые настройки указателя мыши Windows 10
Новые настройки мыши можно найти в разделе «Параметры» (клавиши Win+I) — «Специальные возможности» — «Курсор и указатель».
По сравнению с предыдущими версиями Windows 10 настройки указателя мыши стали более гибкими и позволяют настроить его желаемым образом:
- Появились дополнительные настройки цвета указателя мыши: он может быть белым (стандартно), черным, инвертировать изображение под собой, а также быть цветным: можно выбрать один из предложенных цветов или же указать свой собственный.

- Диапазон доступных размеров мыши тоже расширился: несмотря на то, что в параметрах самый большой вариант не выглядит огромным, если его выбрать, фактический размер указателя оказывается очень большим, а некоторым пользователям это пригождается (например, при использовании большого ТВ в качестве монитора), пример очень большого размера — на скриншоте ниже (зеленый указатель слева).


В общем-то это всё, на что я хотел обратить внимание: не слишком объемно, но легко не заметить, хотя функции могут быть и полезными. На этой же странице параметров вы можете открыть старые настройки мыши, нажав по ссылке «Дополнительные параметры мыши», а на следующем экране — ещё раз по такой же ссылке (это же окно можно открыть и через Панель управления — Мышь).

Ну и, чтобы статья не была слишком короткой, небольшой ликбез: несмотря на то, что у меня в статье и большинством пользователей используется слово «курсор» для обозначения указателя мыши, в сегодняшних формулировках это не вполне верно (хотя ранее было именно так). Сейчас для обозначения «стрелки» мыши используется «указатель мыши» (pointer), а под «курсором» (cursor) подразумевается индикатор позиции ввода.

- To change mouse size on Windows 10, open Settings > Ease of Access > Cursor & pointer, and choose the pointer size.
- You can also use the Control Panel using the “Mouse” properties.
On Windows 10, the mouse pointer is an essential feature that helps us to navigate the desktop more efficiently. However, if the pointer is too small or too big, depending on your requirements or screen resolution, you can change the size in a few ways.
The easiest way to complete this configuration is through the Settings app, but it’s possible to change the mouse settings from the Control Panel.
In the guide, I’ll explain the steps to change the mouse pointer size using the Settings app and Control Panel on Windows 10.
- Change pointer size on Windows 10 from Settings
- Change pointer size on Windows 10 from Control Panel
Change pointer size on Windows 10 from Settings
To change the mouse pointer size on Windows 10, use these steps:
-
Open Settings on Windows 10.
-
Click on Ease of Access.
-
Click on Cursor & pointer.
-
Choose the pointer size with the slider under the “Change pointer size and color” section.


Once you complete the steps, the pointer will automatically switch to your selected size.
Change pointer size on Windows 10 from Control Panel
To change the pointer size through the Control Panel on Windows 10, use these steps.
-
Open Control Panel.
-
Choose the Large icons option from the “View by” menu on the top right.
-
Click on Mouse.

-
Under the ” Scheme ” section, select the pointer size by choosing one of the mouse schemes, including the system scheme (small), large, or extra large.

-
Click the Apply button.
-
Click the OK button.


After completing the steps, the new mouse pointer size will apply to your computer.
Mauro Huculak is a
Windows How-To Expert and founder of
Pureinfotech
(est. 2010). With over 21 years as a technology writer and IT Specialist,
Mauro specializes in Windows, software, and cross-platform systems such as Linux, Android, and macOS.
Certifications:
Microsoft Certified Solutions Associate (MCSA),
Cisco Certified Network Professional (CCNP),
VMware Certified Professional (VCP),
and
CompTIA A+ and Network+.
Mauro is a recognized Microsoft MVP and has also been a long-time contributor to Windows Central.
You can follow him on
YouTube,
Threads,
BlueSky,
X (Twitter),
LinkedIn and
About.me.
Email him at [email protected].