
Здравствуйте админ! Попросил своего приятеля установить мне на ноутбук Windows 10 и он присвоил неблагозвучное имя моей учётной записи. Уже самостоятельно изменил имя учётной записи, но в проводнике имя папки пользователя осталось прежним. В сети говорят, что сделать ничего нельзя. Что же мне делать, переустанавливать операционную систему?
Как изменить имя учётной записи и папку пользователя в Windows 10
Автор Владимир!
При установке Windows мы создаём профиль пользователя: Имя, а также пароль (необязательно), при этом создаётся папка пользователя c именем, которое мы ввели.
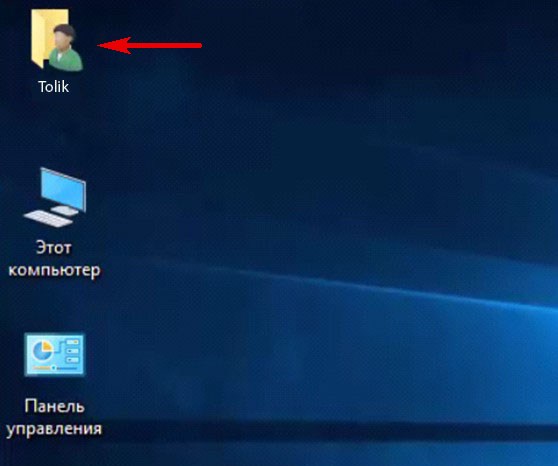
Можно иконку папки пользователя разместить на рабочем столе.
Иногда по тем или иным причинам нужно изменить имя пользователя. Сделать это можно, но что-то может пойти не так. Поэтому перед работой с папкой создадим точку восстановления.
Теперь можно изменить имя и переименовать папку пользователя в Windows 10.
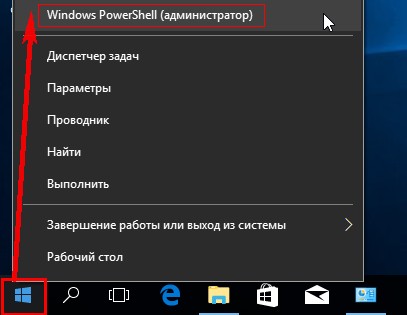
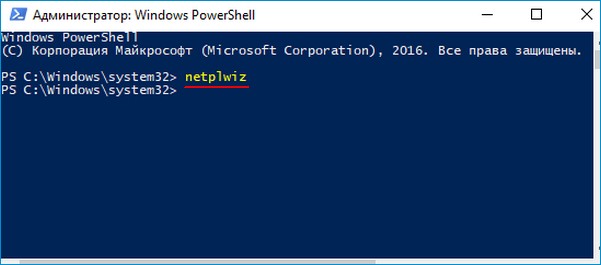
Запускаю командную строку от имени администратора или Windows PowerShell, ввожу команду netplwiz
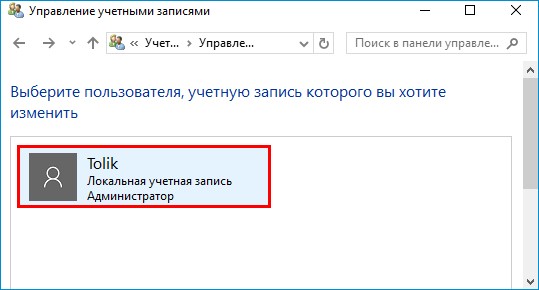
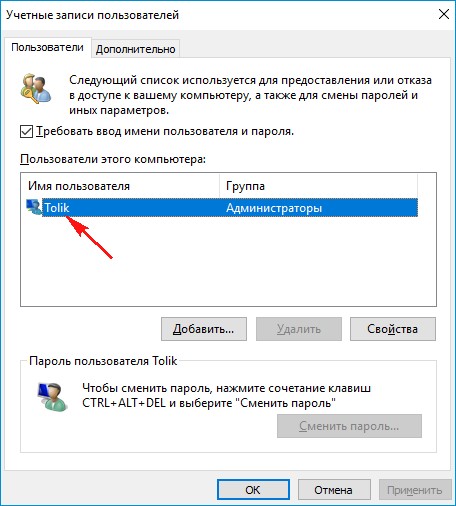
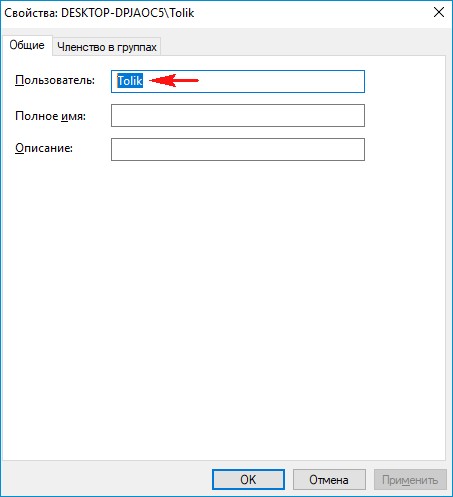
Щёлкаем двойным щелчком левой мыши на имени пользователя и переименовываем его.
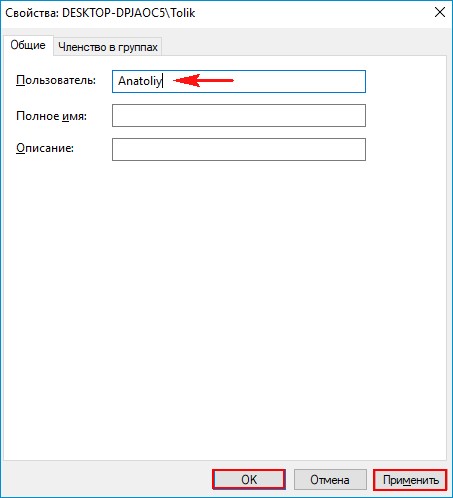
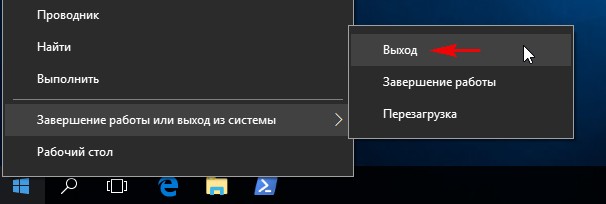
После этого выходим из системы или перезагружаемся и заходим с новым именем и старым паролем.
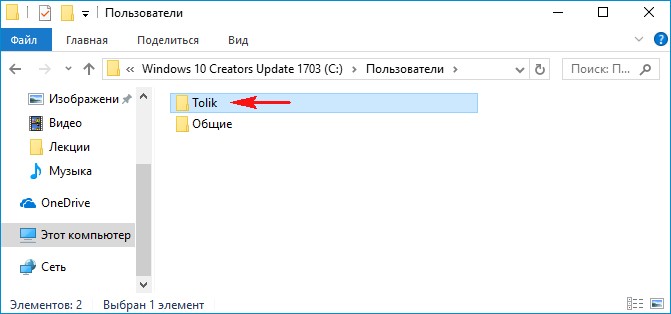
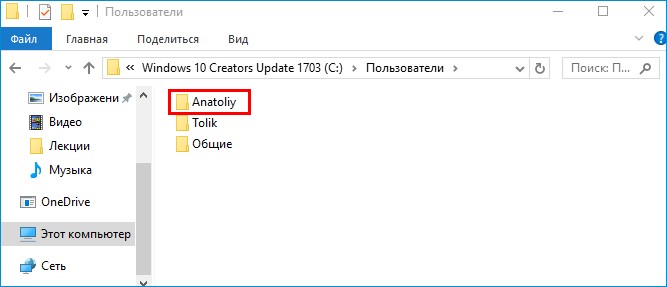
Имя папки на рабочем столе тоже изменилось,

но имя папки в проводнике осталось прежним.
Имя этой папки можно изменить, но есть программы, которые используют путь к этой папке. Например если у вас установлена виртуальная машина и в ней по умолчанию установлен путь к папке пользователя C:\Users\Ваше имя пользователя\VirtualBox, то после переименования сама виртуальная машина перестанет корректно работать. Так что имейте ввиду, что переименование папки может иметь негативные последствия. Править реестр в этом случае занятие муторное и можно наисправлять так, что OS совсем рухнет. Без проблем эту папку можно переименовать в том случае, если мы только что установили Windows и перепутали букву при написании имени.
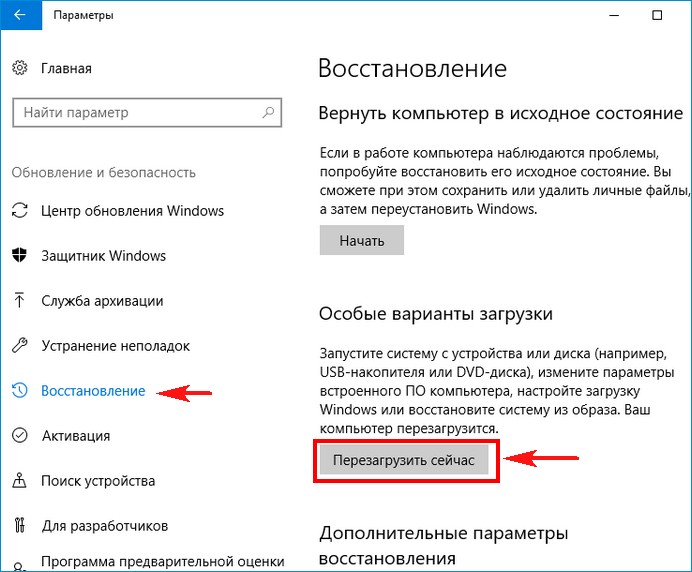
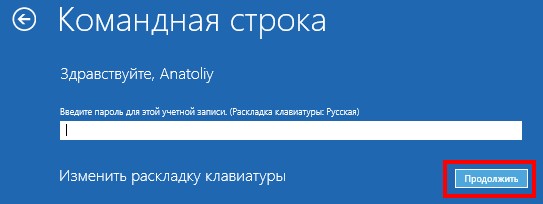
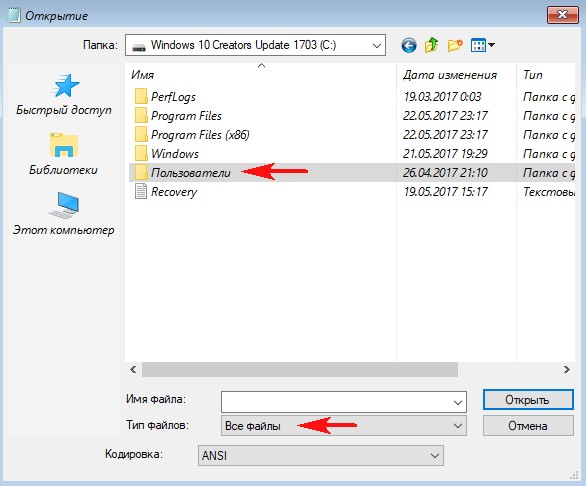
Для переименовании папки заходим в среду восстановления и выбираем командную строку

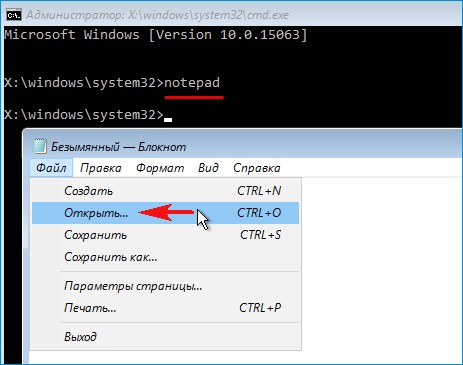
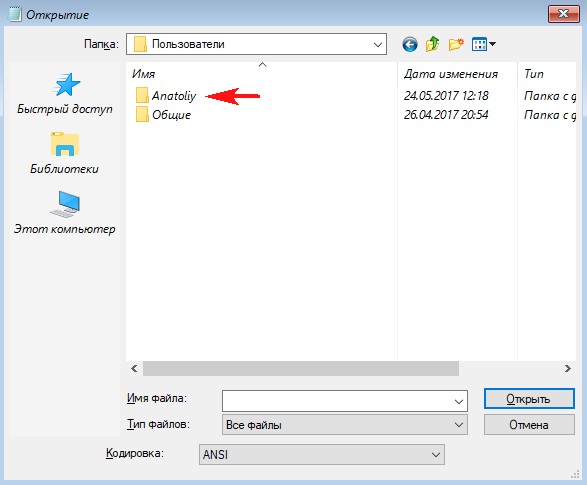
В командной строке вводим «notepad» и переименовываем папку,
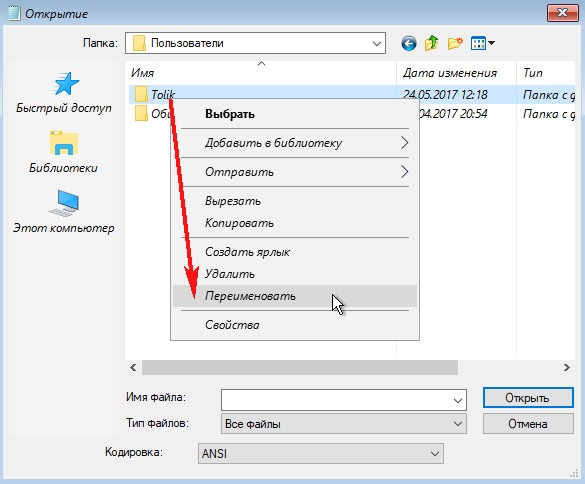
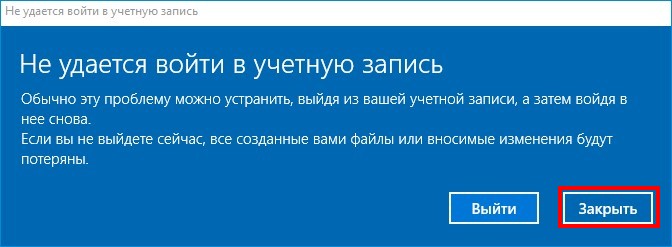
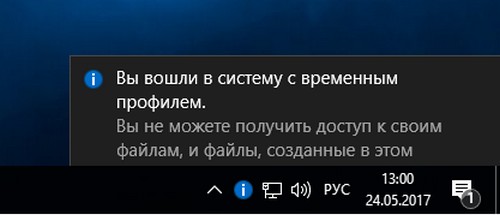
после этого перезагружаемся и входим в систему с временным профилем.

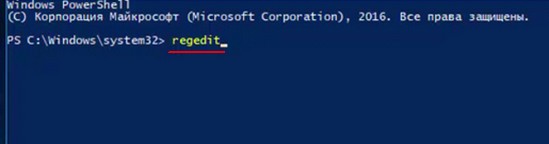
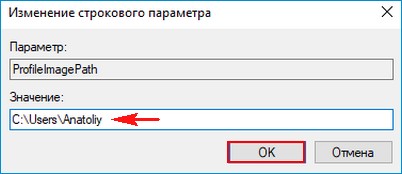
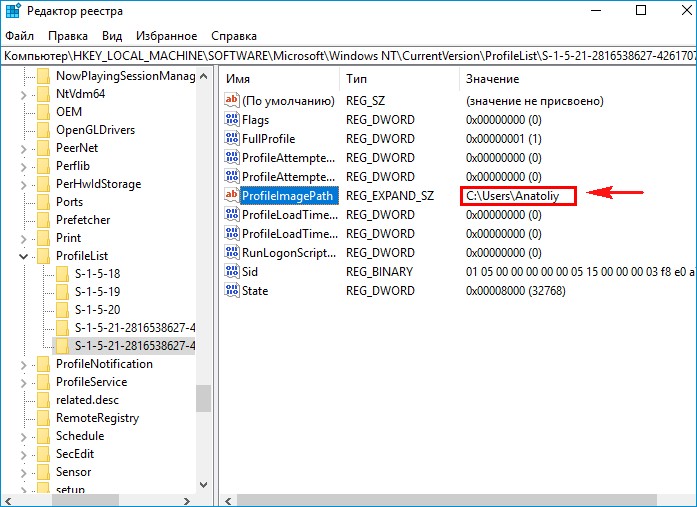
Запускаю командную строку от имени администратора или Windows PowerShell, ввожу команду regedit
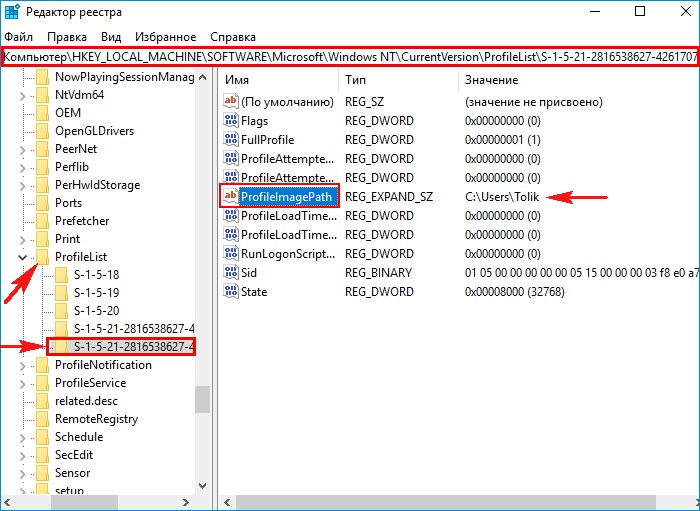
Открываем куст реестра:
HKEY_LOCAL_MACHINE\ SOFTWARE\ Microsoft\ Windows NT\ CurrentVersion\ ProfileList
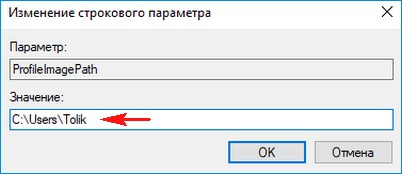
то что нам нужно обычно в последней строчке, открываем и редактируем.
После этого выходим из системы и заходим в систему.
Если ОС будет из-за переименования папки плохо работать, то делаем откат с помощью точки восстановления.
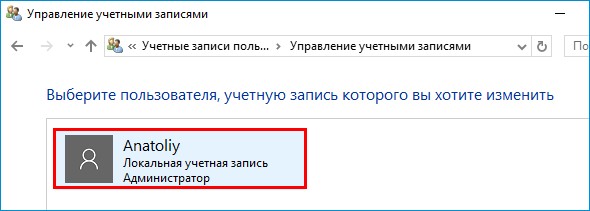
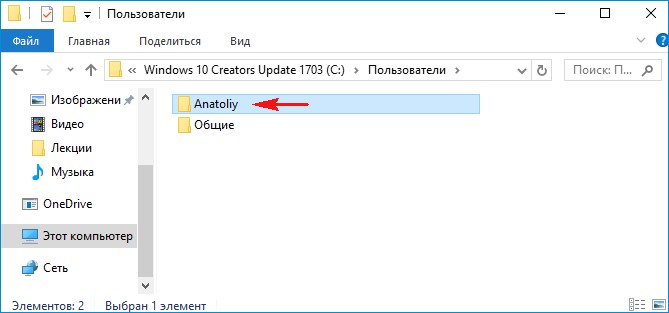
После восстановления папка Anatoliy останется, но в реестре записей о ней уже не будет и её можно удалить за ненадобностью.
- Если вы завели учётную запись Microsoft, то имя пользователя изменить невозможно. Можно изменить только имя папки.
Внимательный читатель, прочитав статью, может заметить, что изменить имя пользователя в Windows 10 можно ещё с помощью панели управления. Да, это так но,
Contents
Folks on Internet often ask how to rename the profile folder in C:\Users. If you are using thge Microsoft account the folder name is usually shortened in a random way and very often looks weird. For instance for the user Tunecomp.net we have the path C:\Users\Tunec\. So let’s see how to change the name of this folder in Windows 10 Pro and Home.
This method works with any edition of Windows 10: Home, Pro or Enterprise but can cause damage to your system.
Make sure to create a full system backup before your try this method!
1. Ensure that you have another admin account. If you do not have such you can temporarily activate the built-in user called Administrator:
net user administrator /active:yes
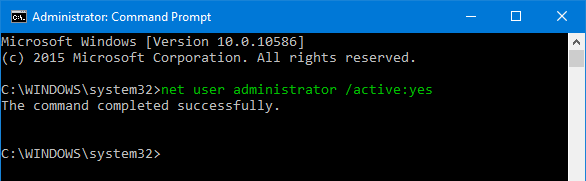
Note, that if you have non-English version of Windows 10, your Administrator account name will differ. For example, in French version the built-in administrative account has the username “Administrateur”, in Spanish – “Administrador”. Thus, you should specify your exact username otherwise you will get the error “The user name could not be found“! To find out the correct user name type net user in the command line window and hit Enter.
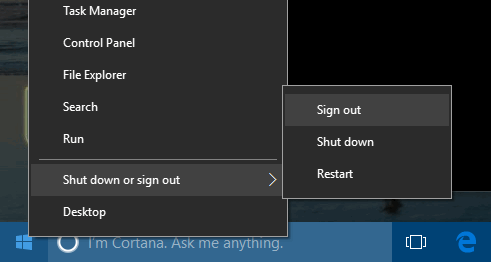
2. Sign out or reboot your PC:
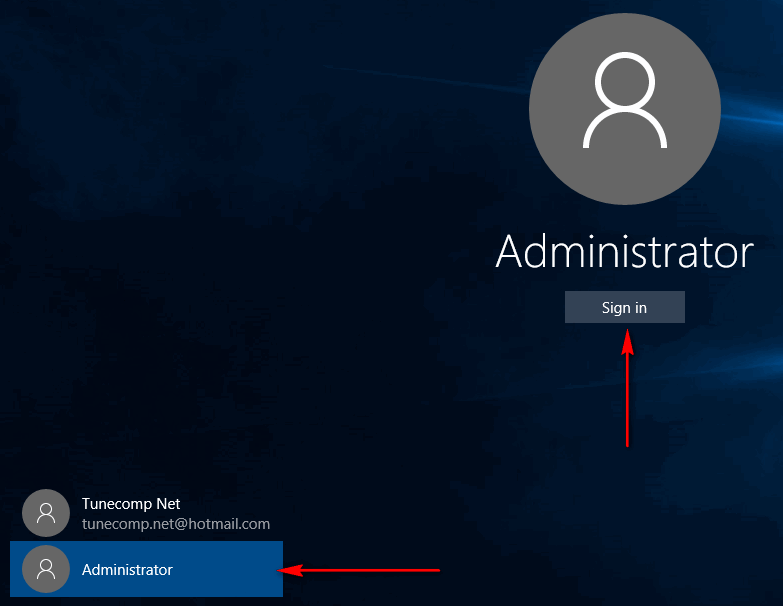
3. Log in to another account:
4. Go to the Users folder (C:\Users by default) and rename the profile folder to whatever you like:

5. Launch the registry editor:
Navigate to:
HKEY_LOCAL_MACHINE\Software\Microsoft\Windows NT\CurrentVersion\ProfileList\
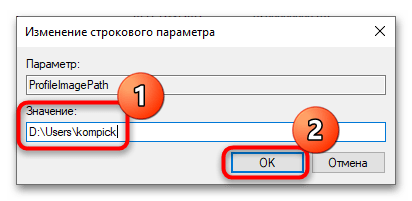
Find the key related to the account the profile of which you have just renamed, find the ProfileImagePath value and rename the path in it to the new one:

6. An extra step. Perform it if you encounter errors after you changed the path to your profile. Search the registry for ‘old account name’. If you find the values with the old path change it the the new one. Hit “F3” in the registry editor until you correct all entries containing the old path.
Video: How to change the name of the user profile path in Windows 10
Все способы:
- Варианты и ограничения переноса
- Вариант 1: Перенос конкретного профиля
- Вариант 2: Перенос всех профилей
- Вопросы и ответы: 4
Варианты и ограничения переноса
Способ переноса папок профиля пользователя будет отличаться в зависимости от того, переносится на другой раздел/диск папка с именем пользователя или папка «Users» («Пользователи»), в которой находится конкретный профиль. Также следует учитывать, что перенос профильных каталогов пользователей имеет определенные ограничения. Так, профиль может быть перенесен на раздел или диск, на котором нет другой установленной Windows и который имеет файловую систему NTFS.
Если в папке профиля имеются символические ссылки, после переноса они по-прежнему будут перенаправлять обращения в старое расположение, что, впрочем, не критично для Windows 10 и новых приложений. Кроме того, после переноса каталогов профиля в работающей Windows могут возникнуть проблемы с обновлением операционной системы до новых версий, что в свою очередь приведет к необходимости применения дополнительных решений.
Вариант 1: Перенос конкретного профиля
Этот вариант переноса является наименее затратным и более безопасным, чем вариант с переносом папки «Users» с одним, двумя или более профилями.
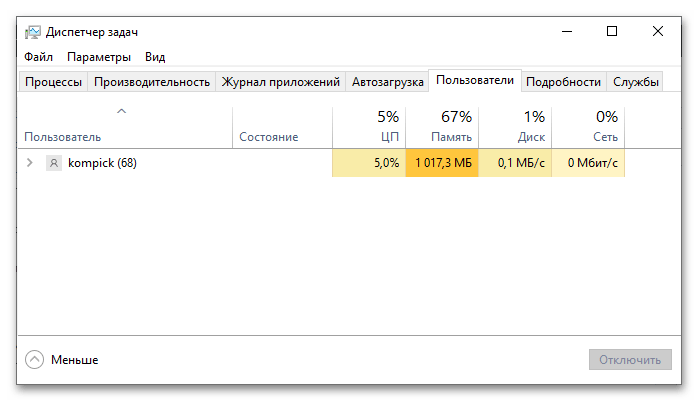
- Первым делом откройте «Диспетчер задач», переключитесь на вкладку «Пользователя» и убедитесь, что переносимый профиль данный момент не используется.

Если в системе имеется только один профиль, рекомендуется создать дополнительную учетную запись администратора и работать из-под нее.
Подробнее: Создание учетной записи администратора в Windows 10
- Создайте в нужном расположении каталог, в который хотите перенести профиль пользователя.
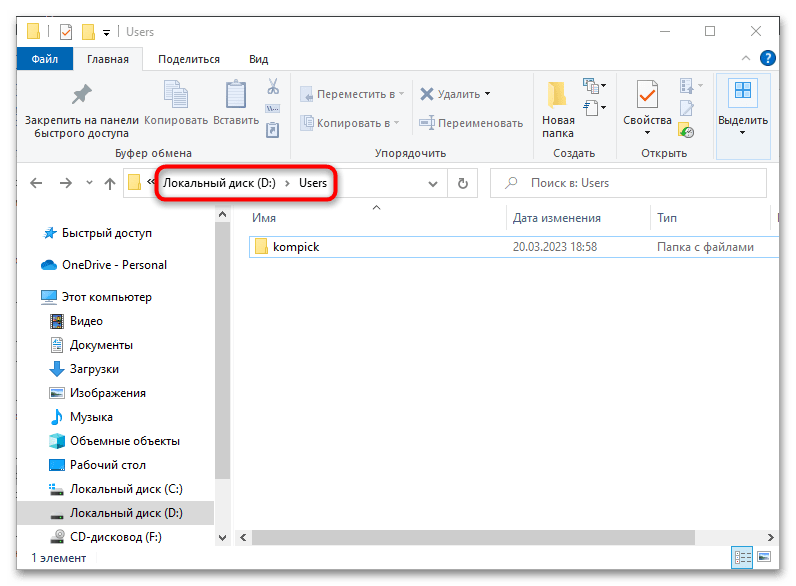
- Перейдите в расположение
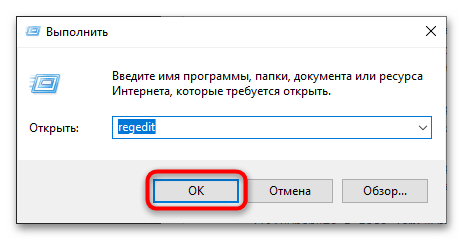
C:\Usersи скопируйте каталог профиль пользователя в созданную папку. - Откройте «Редактор реестра», для чего вызовите нажатием Win + R диалоговое окошко быстрого запуска, введите в него команду
regeditи нажмите кнопку «OK». - Разверните в редакторе ветку
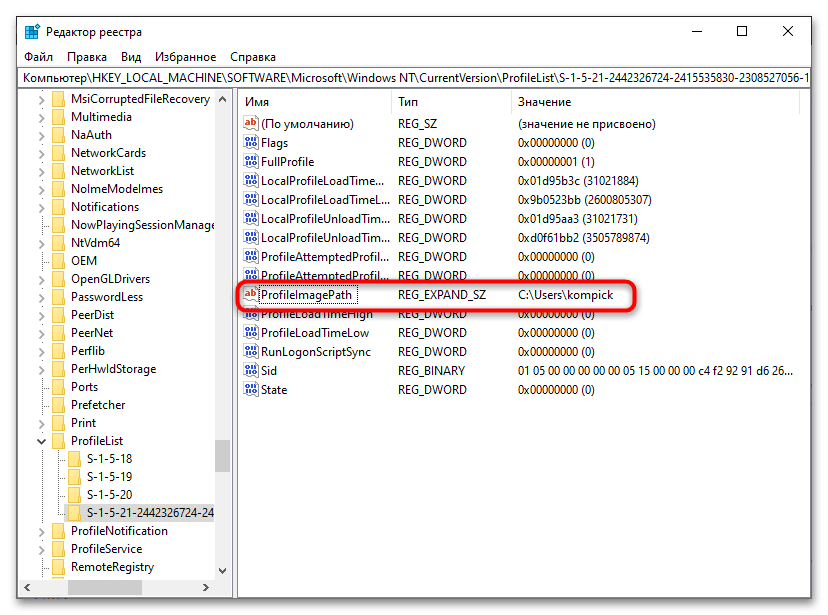
HKEY_LOCAL_MACHINE\SOFTWARE\Microsoft\Windows NT\CurrentVersion\ProfileListи отыщите подраздел с GUID переносимого профиля. Определить его нетрудно: в нем имеется параметр «ProfileImagePath», в качестве значения которого указан текущий путь к папке профиля. - Откройте окошко редактирования параметра двойным кликом и замените старый путь новым, ведущим к скопированной ранее папке профиля пользователя.
- Закройте «Редактор реестра», откройте свойства папки профиля пользователя в новом расположении, переключитесь на вкладку «Безопасность» и нажмите кнопку «Изменить».
- Выберите в поле «Группы или пользователи» владельца профиля и предоставьте ему полные права на каталог.
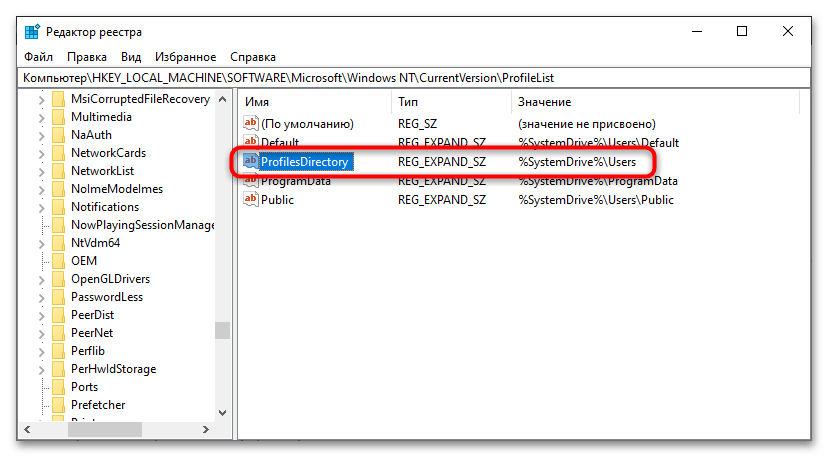
Также можно сделать, чтобы все новые профили создавались в новом расположении. Для этого в «Редакторе реестра» необходимо развернуть ветку HKEY_LOCAL_MACHINE\SOFTWARE\Microsoft\Windows NT\CurrentVersion\ProfileList и изменить значение параметра «ProfilesDirectory», указав в качестве его значения путь к новой папке хранения профилей.
Вариант 2: Перенос всех профилей
Если необходимо перенести сразу несколько профилей разных учетных записей, используйте этот способ. В целом он безопасен, тем не менее перед выполнением операции рекомендуется создать резервную копию системы.
Читайте также: Создание резервной копии Windows 10
К сожалению, после переноса описанным ниже методом система не сможет больше обновляться до новых версий. Учитывайте это обстоятельство.
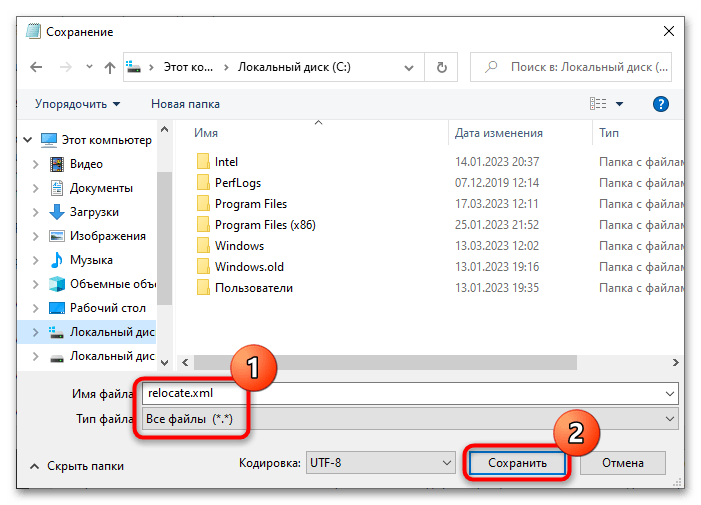
- Первым делом необходимо создать файл ответов, который будет использоваться встроенной утилитой «Sysprep». Создайте «Блокнотом» текстовый файл и вставьте в него следующий код:
<?xml version="1.0" encoding="utf-8"?>

<unattend xmlns="urn:schemas-microsoft-com:unattend">

<settings pass="oobeSystem">

<component name="Microsoft-Windows-Shell-Setup" processorArchitecture="amd64" publicKeyToken="31bf3856ad364e35" language="neutral" versionScope="nonSxS" xmlns:wcm="http://schemas.microsoft.com/WMIConfig/2002/State" xmlns:xsi="http://www.w3.org/2001/XMLSchema-instance">

<FolderLocations>

<ProfilesDirectory>D:\Users</ProfilesDirectory>

</FolderLocations>

</component>

</settings>

</unattend>
Если Windows 10 – 32-битная, в качестве значения «processorArchitecture» следует указать x86 вместо amd64. Между тегами «ProfilesDirectory» указывается путь к новой папке, в которой будут храниться каталоги профилей.
- Сохраните файл с именем «relocate.xml» (не забудьте выставить «Тип файла» как «Все файлы») в корень системного либо пользовательского раздела.
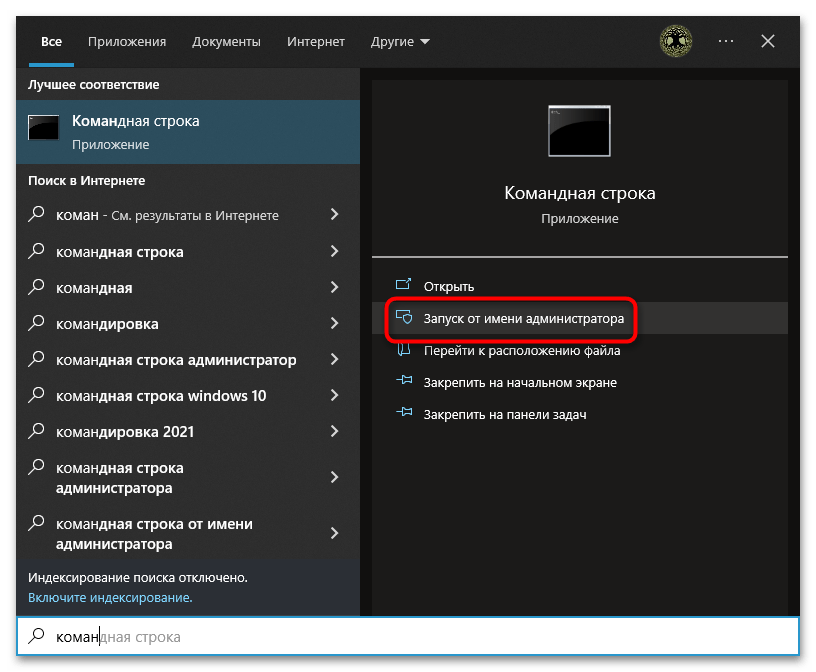
- Запустите из поиска Windows классическую «Командную строку» от имени администратора.
- Выполните одну за другой следующие команды:
net stop wmpnetworksvc%windir%\system32\sysprep\sysprep.exe /oobe /reboot /unattend:C:\relocate.xml

Если файл ответов «relocate.xml» был размещен в корне диска D, соответственно, букву C в команде необходимо заменить на D.


В результате Windows 10 будет загружена в режиме аудита на этапе первичной настройки. Далее необходимо будет проделать шаги, которые традиционно выполняются при установке системы: выбрать параметры сети и создать учетную запись.

Последняя необходима, чтобы завершить настройку системы, затем эту временную учетную запись можно будет удалить. По завершении настройки перезагрузите компьютер и войдите в перенесенную учетную запись.
Наша группа в TelegramПолезные советы и помощь
,
This tutorial contains instructions to rename the user profile folder in Windows OS. As you may know, when you rename a user in Windows, the name of the user’s profile folder (which contains all it’s files and settings), remains unchanged.
For example, if you rename an account from «Mike» to «John», the profile folder under the «C:\Users\» directory will still named «Mike» (C:\Users\Mike) and not «John» (C:\Users\John). This is happened because by Windows design, the profile folder name doesn’t changed automatically when you change the username.
This tutorial contains instructions to change the name of the Profile folder Windows 10, 8/8.1 & 7 OS.
- Related article: How to change user account name in Windows.
How to Change the User Profile Folder Name for a Local Account *
* Note: If you ‘re using Windows 10 with a Microsoft account, then the only way to change the name of the user profile folder, is to create a new local Administrator account (with the desired name) and then to connect the new account with your Microsoft account.
To Change the Name of the Profile folder:
Important: Proceed and change the current account name (if you have not already done so), before you continue below.
Step 1. Enable the Hidden Administrator Account
1. Open Command Prompt as Administrator. To do that:
a. In the Search box type: cmd (or command prompt).
b. Right click on the command prompt (result) and select Run as Administrator.
2. Inside the command prompt window, type the following command and press Enter:
- net user administrator /active:yes

3. After that you should view a message that says that your command was completed successfully.
4. Close Command prompt.
Step 2. Change the User Profile folder path in Registry.
1. Sign Out from the current account and Sign-In as Administrator.
2. Open Registry Editor. To do that:
1. Simultaneously press the Win + R keys to open the run command box.
2. Type regedit and press Enter to open Registry Editor.
3. Inside Windows Registry, navigate (from the left pane) to this key:
- HKEY_LOCAL_MACHINE\SOFTWARE\Microsoft\Windows NT\CurrentVersion\ProfileList
4. Right click at the «ProfileList» key and select Export.

5. Type a name for the exported registry key (e.g. «ProfileList») and save the file to your desktop. *
* Note: If something goes wrong at the end of the process, just click at the exported registry file to restore the registry settings back.

6. In registry editor, double click at «ProfileList» key to expand its contents.
7. Now, under the ‘ProfileList’ registry key you should see two (or more) subkeys named «S-1-5-21» followed by a long number (e.g. ‘S-1-5-21-1001432958-3492499226-3494023764-1001).
8a. Click each «S-1-5-21-xxxxxxx» subkey and look at the right pane, at «ProfileImagePath» value, to find out which «S-1-5-21-xxxxxxx» subkey shows the path of the user folder that you want to rename. *
* e.g. Let’s suppose that you want to change the name of the profile folder «Mike» to «John». At this case we look for this value «C:\Users\Mike» in «ProfileImagePath»

8b. Once you find which «S-1-5-21-xxxxxxx» subkey, contains the path (location) for your profile, double click at «ProfileImagePath» value and change the current folder path (e.g. «C:\Users\Mike») to the new one (e.g. «C:\Users\John»).
8c. When done, click OK.

9. Close Registry Editor and restart your computer.
Step 3. Rename User Folder in Windows Explorer.
1. After restart, Sign Out from the Administrator account and sign in using the new account name (e.g. John»). *
* Attention: After sign-in, you will think that all your files & settings are lost. This is happened because you have signed into a temporary user profile (without your files & settings). Don’t Panic and continue below to fix this issue.
2. Open Windows Explorer and navigate to «C:\Users» folder. *
* Note: If you ‘re using Windows 10, ignore (close) the «Can’t sign in to your account» message.
3. Right-click at the user profile folder that you want to rename (e.g. from «Mike» to «John») and select Rename.

4. Type the new name (e.g. «John») for the profile folder and press Enter. *
* Important: The new name must be the same with the name in the «ProfileImagePath» value in registry (e.g. «C:\Users\John«).

5. At «Folder Access Denied» window, click Continue to rename the user account folder. *
* Note: If you cannot rename the folder, then apply this step in Windows Safe Mode, by using the Administrator account.

6. Restart your computer.
7. After restart, you should sign in to your normal profile, with all your personal files and settings in place!
8. Continue to the next step.
Step 4. Replace Registry References to the Old Folder Name.
After you rename the user folder to the desired name, you have to modify also the registry values that refers to the old name, in order to avoid search or other problems. To modify the registry paths: *
* Notes:
1. If you cannot change a registry value, because of «An Access Denied» or similar error, then skip to modify the next registry value.
2. To make your life easier, you can use one of the following Free registry editors, that offers a «Find and Replace» function (Search and Replace).
- Advanced Regedit
- Registry Finder
1. Simultaneously press the Windows + R keys to open run command box.
2. Type regedit and press Enter.

3. From the Registry menu, click Edit > Find.
4. At ‘Find what’ box, type the old name of the profile folder. (e.g. «Mike») and click Find Next.

5. Then double click at any registry entry found that contains the old name, and replace it with the new name and click OK. *
* e.g. Change «C:\Users\Mike» to «C:\Users\John«.

6. When done, press the F3 key to find the next value(s) and make the same change.
7. Perform the same step to changes all the values that refers to the old name and when done, proceed to the last step below.
Step 5. Rebuild Search Index.
Finally, follow the below procedure to rebuild the search index:
1. Open Windows Control Panel.
2. Open Indexing Options.
3. At ‘Indexing Options’ click Advanced.

4. Click Rebuild.
5. Click OK at the information message.
6. When the Indexing is completed, you ‘re done!. *
* NOTE FOR WINDOWS 10 USERS: If the Store apps are not working after the folder rename, then open PowerShell as Administrator and give this command:
- Get-AppxPackage | Foreach {Add-AppxPackage -register «$($_.InstallLocation)\appxmanifest.xml» -DisableDevelopmentMode}
That’s it! Let me know if this guide has helped you by leaving your comment about your experience. Please like and share this guide to help others.
If this article was useful for you, please consider supporting us by making a donation. Even $1 can a make a huge difference for us in our effort to continue to help others while keeping this site free:
- Author
- Recent Posts
Konstantinos is the founder and administrator of Wintips.org. Since 1995 he works and provides IT support as a computer and network expert to individuals and large companies. He is specialized in solving problems related to Windows or other Microsoft products (Windows Server, Office, Microsoft 365, etc.).