
В мире информационных технологий серверы считаются сердцем сети, и их идентификация среди множества других серверов — важный аспект. Имя хоста, присвоенное вашему виртуальному серверу, играет ключевую роль в этой идентификации. Однако, в процессе развития вашей инфраструктуры ситуация может изменяться, и возможно, вам потребуется переименовать ваш VPS. В этой статье мы рассмотрим три основных способа того, как изменить имя хоста в Windows Server 2016, которые должны помочь вам успешно выполнить эту операцию.
В общем смысле, имя хоста — это простое название, присваиваемое устройствам, подключённым к сети. Это имя используется для идентификации устройств в различных электронных средствах связи, таких как интернет. Хост — это метка, присвоенная устройству, которая отличает одно устройство от другого в определённой сети.
Способ первый: Диспетчер Серверов
Для изменения имени сервера с применением графической оболочки Windows необходимо будет воспользоваться Диспетчером Серверов — Server Manager. Чтобы запустить его, откройте стартовое меню и кликните по иконке Server Manager.

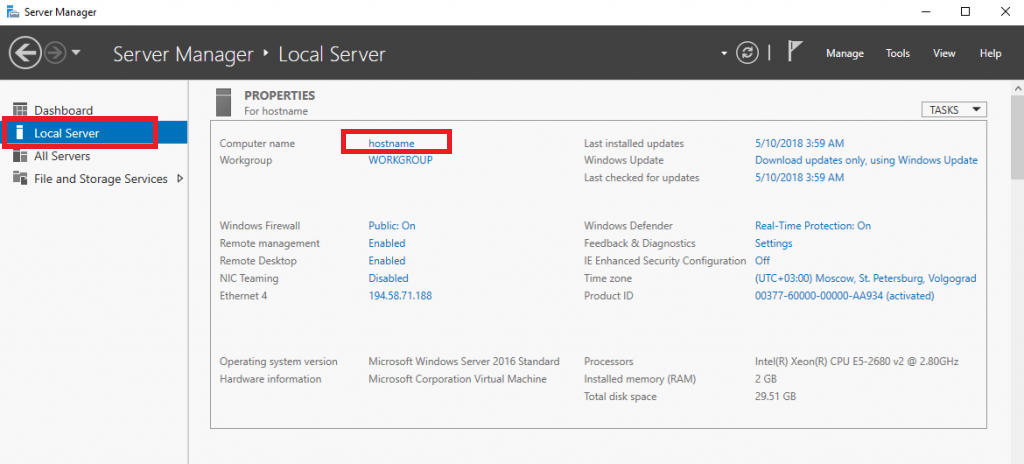
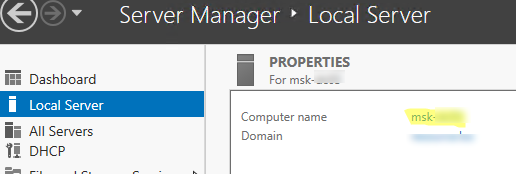
В правой части окна диспетчера перейдите в раздел Local Server и затем уже в основном окне кликните в имя сервера в строке Computer name.
Далее, в открывшемся окне нажмите кнопку Change.
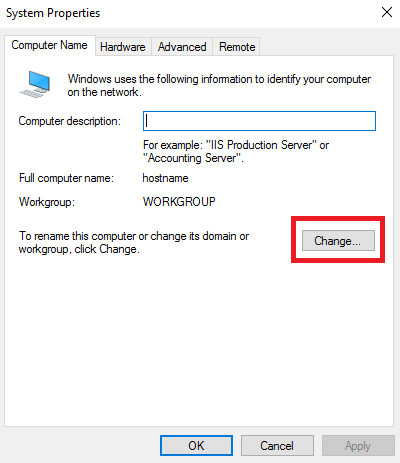
И в следующем окне внесите новое имя сервера в строку Computer name. После чего нажмите ОК.
Система предупредит вас о том, что внесённые изменения вступят в силу только после перезагрузки сервера.
В результате ваш VPS изменит своё имя после того, как вы его перезапустите.
Способ второй: PowerShell
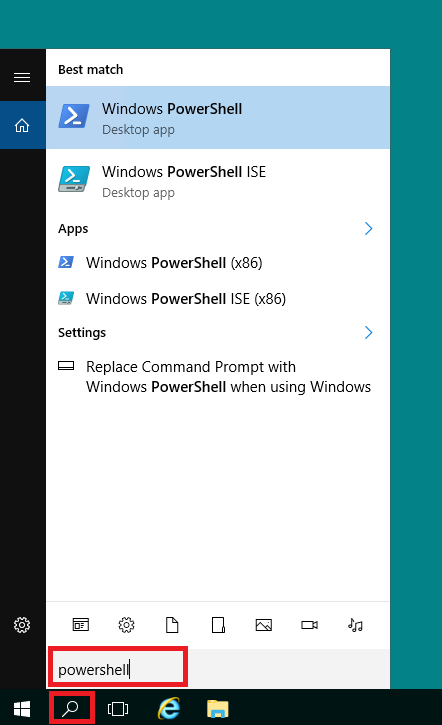
Для изменения имени сервера можно также воспользоваться командной оболочкой PowerShell. Чтобы запустить данную оболочку с строке поиска наберите powershell.
Текущее имя вашего VDS отобразится в PowerShell, если вы наберёте в командной строке следующую команду:
$env:computername
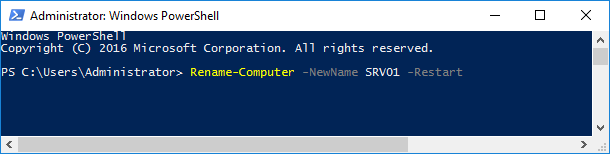
Чтобы изменить имя хоста, введите команду, которая содержит новое имя сервера и перезагружает его:
Rename-Computer -NewName "WINDOWS-SERVER" -Restart
Здесь WINDOWS-SERVER — новое имя VPS.
После того, как виртуальная машина перезагрузится, проверьте её имя при помощи знакомой уже команды:
$env:computername
Способ третий: параметры сервера
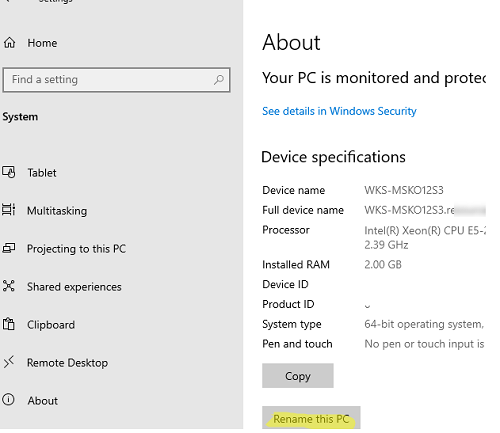
Ещё один способ изменения имени хоста — это использование параметров сервера. Что внести изменения в параметры, в стартовом меню перейдите в Settings.
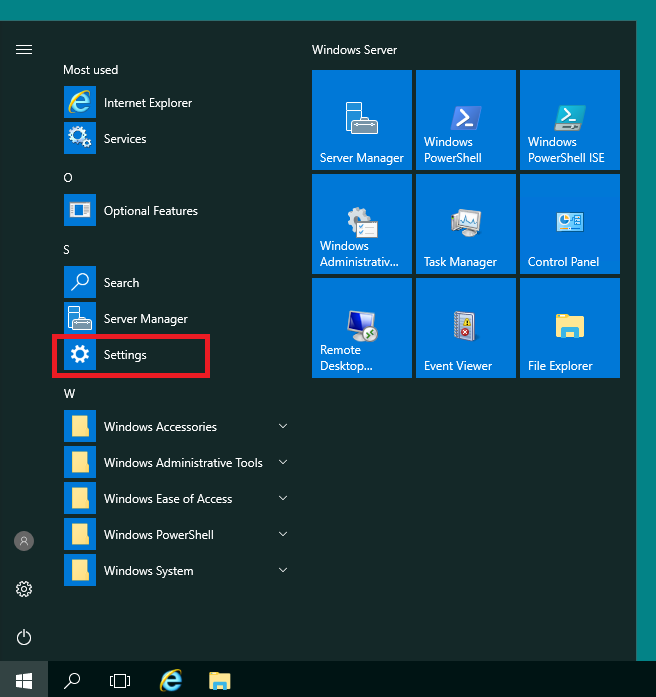
Далее, кликните в значок System.
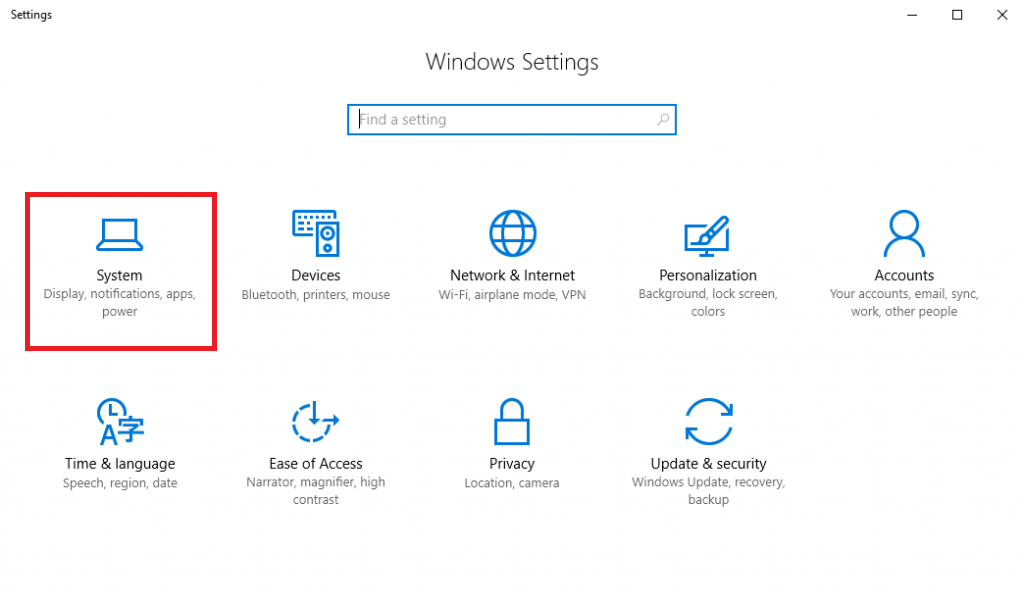
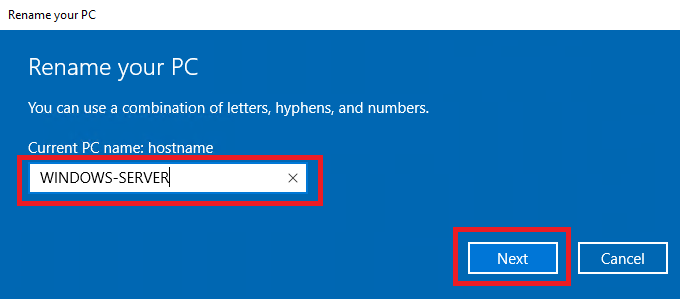
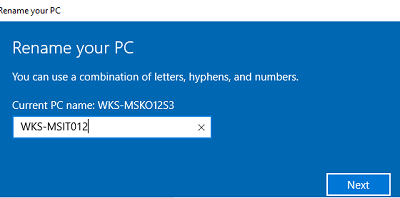
После чего перейдите в раздел About и нажмите на кнопку Rename PC.
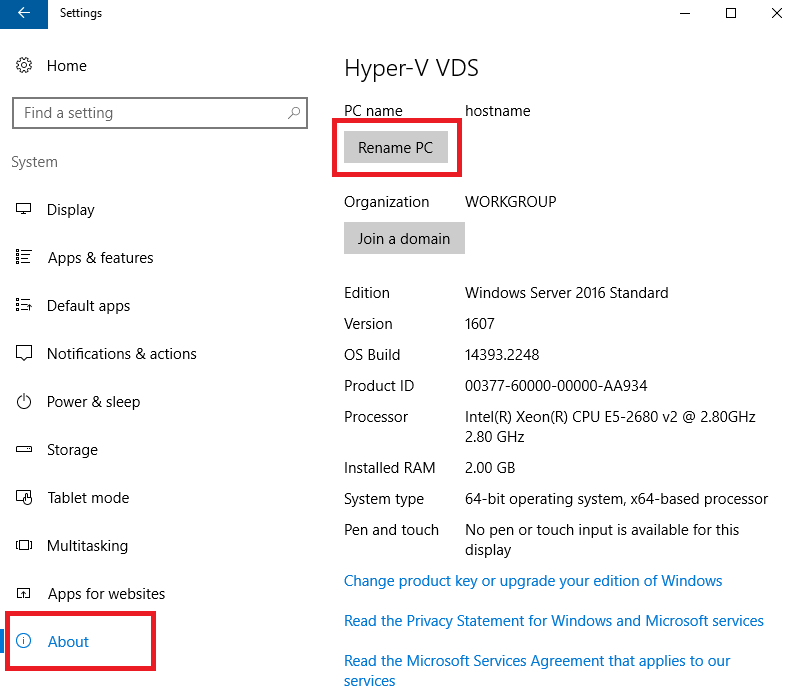
В открывшемся окне введите новое имя сервера в соответствующую строку, после чего нажмите Next.
Для того, чтобы изменение имени хоста вступило в силу, необходимо перезагрузить VPS. Сделать это можно сразу же, для чего нажмите на Restart now.

Заключение
Таким образом, в статье мы показали несколько простых способов того, как изменить имя хоста в Windows Server, что является неотъемлемым этапом администрирования серверной среды. В дальнейшем применяйте любой из них на ваше усмотрение. Правильное выполнение этой процедуры поможет улучшить идентификацию сервера и его интеграцию в сеть, что в свою очередь содействует более эффективной работе вашего предприятия.
Changing a computer name to either a Windows Server or a Windows client is one of the first steps you will need after the installation of the operating system. Microsoft has chosen to automatically give a computer name consisting of a sequence of letters and numbers that for most people makes no sense to the role of the server or client.
In today’s article, you will see how to change the computer name in Windows Server 2016 by using the classic method through the GUI as well as the most ‘fast’ methods through the command line and of course Powershell.
Rename Windows Server 2016 from the GUI
Right-click the Start icon, and then click System.

In the new window, click Change settings, next to the computer name, as shown in the figure below.

Then click the Change button.

In the Computer name field, type the new computer name you want your server to have and click OK.
To complete the renaming of the server, you will need to restart it. When you close the System properties window, a new window will appear to give you this option.
Rename Windows Server 2016 from command prompt
First, you will need to know the name of the computer you are about to rename. Open the command line with Administrator rights and type the following command to see the current computer name.

Next, we will use the netdom command to change the name. The command will look like this.
netdom renamecomputer <current computer name> /newname:<new computer name> /reboot <seconds>
That is, to change the name from WIN-IMLI1SK9BV9 to SRV01 we will use the following command.
netdom renamecomputer WIN-IMLI1SK9BV9 /newname:SRV01 /reboot 0

Confirm your action by pressing Y (for Yes) and Enter.
Rename Windows Server 2016 from Powershell
Open Powershell with Administrator privileges. Here, we will use the Rename-Computer cmdlet that will have the following format.
Rename-Computer -NewName <new computer name> -Restart
That is, in our case, it will be something like that.
Rename-Computer -NewName SRV01 -Restart
Rename Windows Server 2016 from SConfig tool
Open Powershell with Administrator privileges and type the sconfig command to enter the system configuration environment through Powershell.
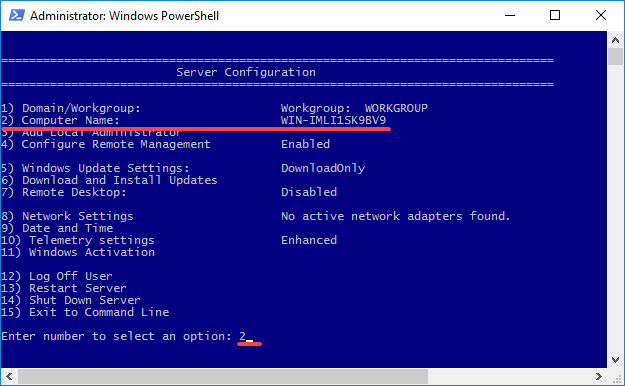
Here, press 2 to change the computer name.
After you type the new computer name you will be prompted to restart it to complete the process.

После установки Windows Server или дестопной Windows 10/11, вам нужно изменить имя компьютера, заданное по-умолчанию. Чаще всего в имени компьютер рекомендуется указывать его местоположение или роль, например:
msk-dc01
,
wks-mskIT12
,
MRKTG021
и т.д. Можно использовать серийный или инвентарный номер устройства в качестве имени компьютера.
Содержание:
- Переименовать компьютер из графического интерфейса Windows
- Изменить имя компьютера с помощью PowerShell
При установке Windows сама генерирует имя компьютера формата, например,
DESKTOP-P2FHTKQ
. Имя содержит 15 символов, первые семь берутся из имени организации, остальные символы генерируются случайным образом. Для домашнего компьютера имя обычно не имеет особого значение, но если ваш компьютер находится в организации и работает в составе рабочей группы или домена AD, желательно задать осмысленное имя компьютера. В этой статье мы покажем, как переименовать компьютер Windows.
Имя компьютера должно соответствовать следующим требованиям:
- Длина не более 15 символов
- Не должно содержать специальных символов (< > ; : » * + = \ | ? ,)
- Можно использовать тире и нижнее подчеркивание
- Не должно состоять только из цифр
- Имя компьютера регистр независимо
- Если компьютер будет добавлен в домен Active Directory, имя компьютера должно быть уникальным в пределах домена.
Переименовать компьютер из графического интерфейса Windows
В современных версиях Windows 10 и 11 вы можете переименовать компьютер с помощью панели Settings.
- Нажмите
Win+I
и перейдите в раздел System -> About (можно использовать URI команду
ms-settings:about
для быстрого доступа к разделу Settings);
- Нажмите на кнопку Rename this PC;
- Укажите новое имя компьютера и нажмите Next;
- Перезагрузите компьютер, чтобы применить изменения.
Также вы можете изменить имя компьютера из классического интерфейса System Properties в Windows:
- Нажмите
Win+R
на клавиатуре и выполните команду
sysdm.cpl
или
systempropertiescomputername
; - Здесь отображается текущее имя компьютер и имя вашего домена или рабочей группы;
- Нажмите на кнопку Change, укажите новое имя компьютера и сохраните изменения.
- Перезагруите Windows
В Windows Server вы можете изменить имя компьютера через Server Manager. Выберите раздел Local Server и нажмите по имени в поле Computer Name.
Изменить имя компьютера с помощью PowerShell
Вы можете переименовать компьютер из командной строки с помощью PowerShell командлета Rename-Computer.
Откройте консоль PowerShell с правами администратора. Чтобы узнать текущее имя компьютера, выполните команду:
$env:computername
Или:
Hostname
Если вам нужно получить FQDN компьютера:
$env:computername.$env:userdnsdomain

Чтобы изменить имя компьютера, выполните:
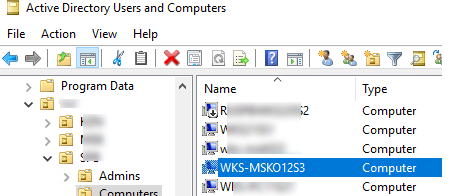
Rename-Computer -NewName "WKS-MSKO12S3"
Теперь можно перезагрузить компьютер с помощью команды Restart-Computer (или можно добавить опцию перезагрузки прямо в команду смены имени хоста):
Rename-Computer -NewName "WKS-MSKO12S3" –Restart -Force

После перезагрузки проверьте, что имя компьютера сменилось успешно.
Если этот компьютер был добавлен в домен AD перед сменой имени и находился в определенной OU (Organization Unit), его учетная запись но уже с новым именем по прежнему будет находится в том же самом контейнере. Можете проверить это с помощью консоли ADUC. Для переименования компьютера в AD вашей учетной записи должны быть делегированы разрешения на создание и удаление объектов Computers в этой OU.
Командлет Rename-Computer позволяет сменить имя удаленного компьютера. Используйте команды:
Rename-Computer -ComputerName "msk-test" -NewName "msk-preprod02" -DomainCredential Contoso\Admin01 –Force
Для подключения к удаленному компьютеру используется WMI, поэтому если он отключен на удаленном хосте или сетевые порты заблокированы, появится ошибка:
Rename-Computer : Cannot establish the WMI connection to the computer ‘priorauthdes’ with the following error message: Access is denied. (Exception from HRESULT: 0x80070005 (E_ACCESSDENIED)).
Можно использовать командлеты PowerShell Remoting для подключения к удаленному компьютеру. Если вы включили на удаленном компьютере WinRM вручную или настроили его с помощью GPO, можно использовать командлет Invoke-Command для запуска команды на удаленном компьютере. Чтобы переименовать удаленный компьютер, выполните:
Invoke-Command -ComputerName msk-test -ScriptBlock { Rename-Computer -NewName msk-preprod02 –Restart -Force}
Также для переименования компьютера ранее использовалась утилита netdom:
- Переименовать локальный компьютер:
netdom renamecomputer localhost /newname msk-preprod02 /reboot - Сменить имя удаленного компьютера:
netdom renamecomputer msk-test /newname:msk-preprod02 /userd:CONTOSO\Admin01 /password:*
В Windows Serve Core можно использовать встроенную псевдографическую команду sconfig для переименования компьютера.
Если вы устанавливаете ваш эталонный образ Windows на компьютеры с помощью автоматизированных средств установки (WDS, SCCM или по сети с помощью PXE), вы можете добавить в них небольшой скрипт для автоматического переименования компьютера в соответствии с политиками именования вашей организации.
Introduction:
In the dynamic landscape of server administration, occasionally, it becomes necessary to modify the computer name on your Windows Server 2016 or a later version. Whether you’re reorganizing your network, implementing a new naming convention, or just looking to enhance system identification, changing the computer name is a straightforward yet crucial task. In this comprehensive guide, we’ll explore two methods to accomplish this: using the System Properties and leveraging the power of PowerShell.
Method 1: Changing Computer Name Using Server Manager
- Open Server Manager by clicking Start then Server Manager

- From the left pane, click on Local Server

- From the middle pane, click on the Machine Name

- The System Properties windows will open, click on the Change button

- The current computer name is written under the Computer Name text box, type the new computer name and then click OK
The Current Computer Name is : ELMAJPC
Thew new Computer Name will be : ELMAJDAL-DC2

Once you write the new computer name and click OK, a new windows will open informing you that you must restart your computer to apply these changes . Click OK

- You will return to the System Properties window, you can notice the new computer name and a message at the bottom to restart your pc to apply the changes. Click Close

- A Window with a message : You must restart your computer to apply these changes will open, click Restart Now and your computer will be restarted. If you don’t wish to reboot instantly, click Restart Later. However, your computer name will not be changed until you reboot your PC/Server.


Lets see another method.
Method 2: Changing Computer Name using Windows Settings
- Click Start and then Settings

- The Windows Settings will open, click on System

- From the left pane, click About

- Click Rename this PC

- The Rename you PC window will open, type the new name for the PC and click Next

- Click Restart now so that the changes take effect.

Let’s see a third method to change the computer name.
Method 3: Changing Computer Name Using PowerShell
Conclusion:
Changing the computer name in Windows Server 2016 and above is a routine administrative task, but it’s crucial to understand the potential implications, especially in a server environment. Whether opting for the user-friendly Server Manager, System Properties or the scriptable PowerShell method, these steps empower administrators to maintain an organized and efficient server infrastructure. Always exercise caution, plan ahead, and ensure you have the necessary permissions before making any alterations to your server configuration.
Tarek Majdalani is an accomplished Windows Expert-IT Pro MVP, honored by Microsoft for eight consecutive years from 2007-2015. Holding a B.E. in Computer Engineering from the Lebanese American University, he pursued further education while working, earning various certificates showcased in his MVP profile. Tarek is currently serving as the Director of Engineering & Technology at Alrai Media Group in Kuwait. Since 2006, he has been actively contributing to the community by writing tutorials featuring tips and tricks, amassing over 300 tutorials on diverse systems.
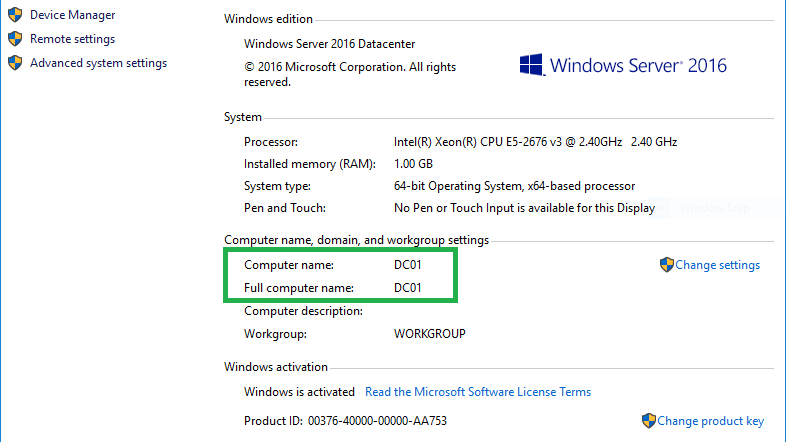
Every time I launch a Windows Server on AWS or Google Cloud it always provides a random Computer Name. As a good practice I always want my computers to be named descriptively.
In this case I would like to update my Windows Server 2016 Computer Name to DC01, which means Domain Controller 01, since I will be using this server for Active Directory.
Below is a step by step guide on how to rename my Windows Computers to a more descriptive name.
- Renaming the Computer
- Checking the renamed Computer
Renaming the Windows Computer
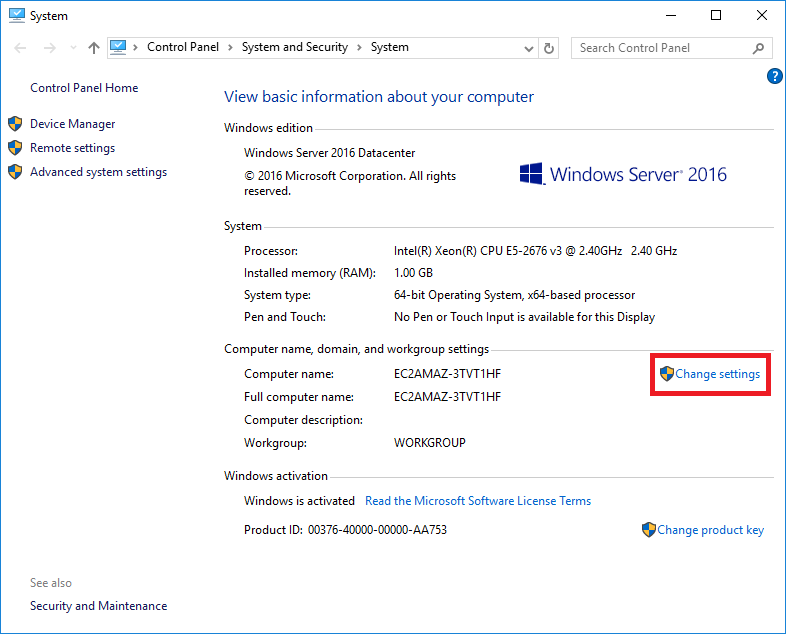
Right-click on the Window Icon on the lower-left of the screen. Then click on System.
On the System Information Window, under Computer name, domain, and workgroup settings click on Change settings.
On the Systems Properties Windows under the Computer Name Tab click on Change…
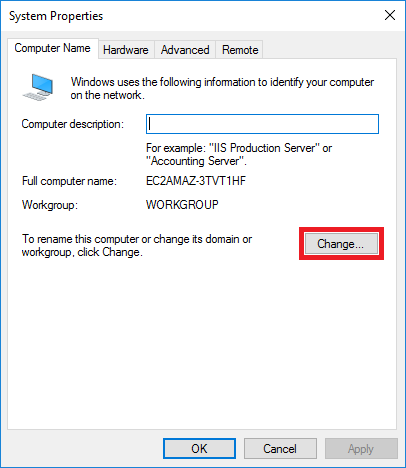
Type your desired Computer name then click OK.
On the window that says You must restart your computer to apply these changes click OK.
On the System Properties Window click Close.
Note: It now has a warning above the Close button saying Changes will take effect after you restart this computer.
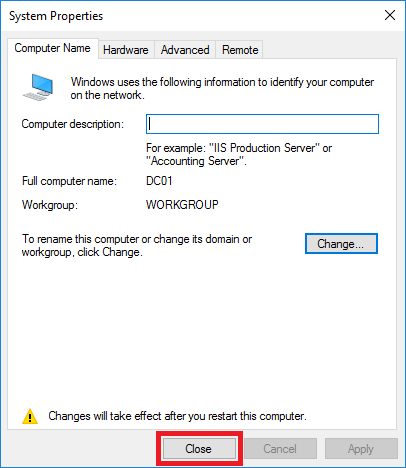
Another window that will tell you to restart to apply the changes click Restart Now.
The computer will then log you off and will restart the Windows Server.
Checking the renamed Windows Computer
Once you log back in and check the System Information you will see that the Computer Name of Windows Server 2016 is now updated to your desired name.

I also rename my local computers running Windows 10. This is the same procedure that I use to update the Computer Name.
For me, this is the very first step on building a Windows Active Directory as I want my Domain Controller to be name like DC01.domain.com instead of EC2AMAZ-3TVT1HF.domain.com.
This is the first of my Windows Active Directory Setup series. I am slowly releasing the posts and will share them soon.
If you have any comments, suggestions, improvements or corrections on the updating the Computer Name of Windows Server 2016 let me know in the comments below.