
В этой небольшой статье мы покажем, как правильно изменить имя домена Active Directory с
test.com
на
resource.loc
. Вообще говоря, переименование домена Active Directory это не всегда самая лучшая идея. Для больших и сложных инфраструктур AD лучше выполнить постепенную миграцию пользователей, компьютеров и серверов в новый домен. Но и процедура переименования домена вполне рабочая.
Прежде чем начать, убедитесь, что:
- У вас есть актуальная резервная копия контроллеров домена;
- В вашем домене корректно работает репликация и нет критических ошибок контроллеров домена или DNS (проверка здоровья домена Active Directory);
- В вашем домене нет Exchange. Нельзя переименовать домен AD с развёрнутым в нем Exchange (кроме Exchange 2003);
- Для переименования домена нужен уровень не менее Windows Server 2003 (в моем примере функциональный уровень домена и леса – Windows Server 2016).
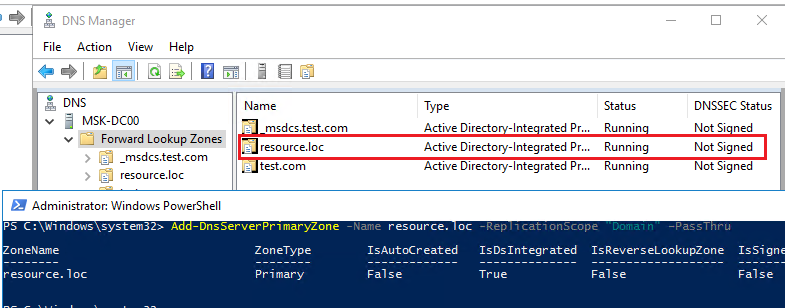
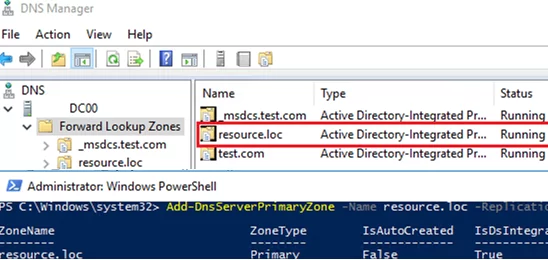
Сначала нужно создать DNS зону нового домена на контроллерах домена. Для этого откройте консоль
dnsmgmt.msc
, создайте новую первичную зону типа Forward Lookup Zone с именем resource.loc и реплицируйте ее по всем DNS серверам в старом домене test.com.
Можно создать новую зону DNS с помощью PowerShell:
Add-DnsServerPrimaryZone -Name resource.loc -ReplicationScope "Domain" –PassThru
Дождитесь окончания репликации новой зоны по всем DC.
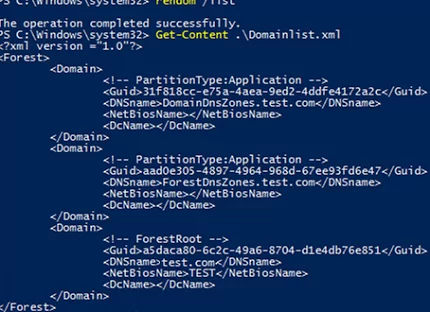
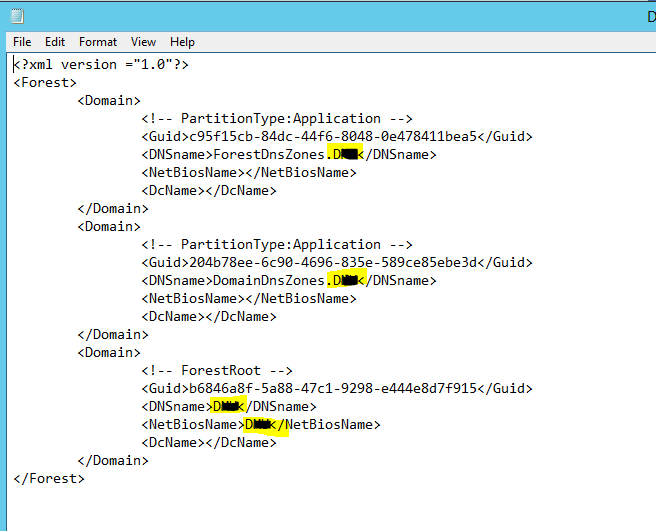
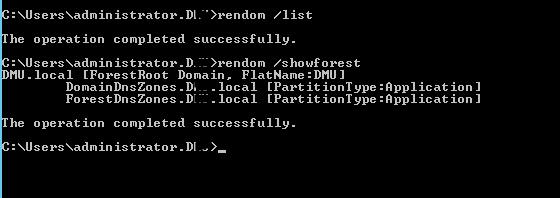
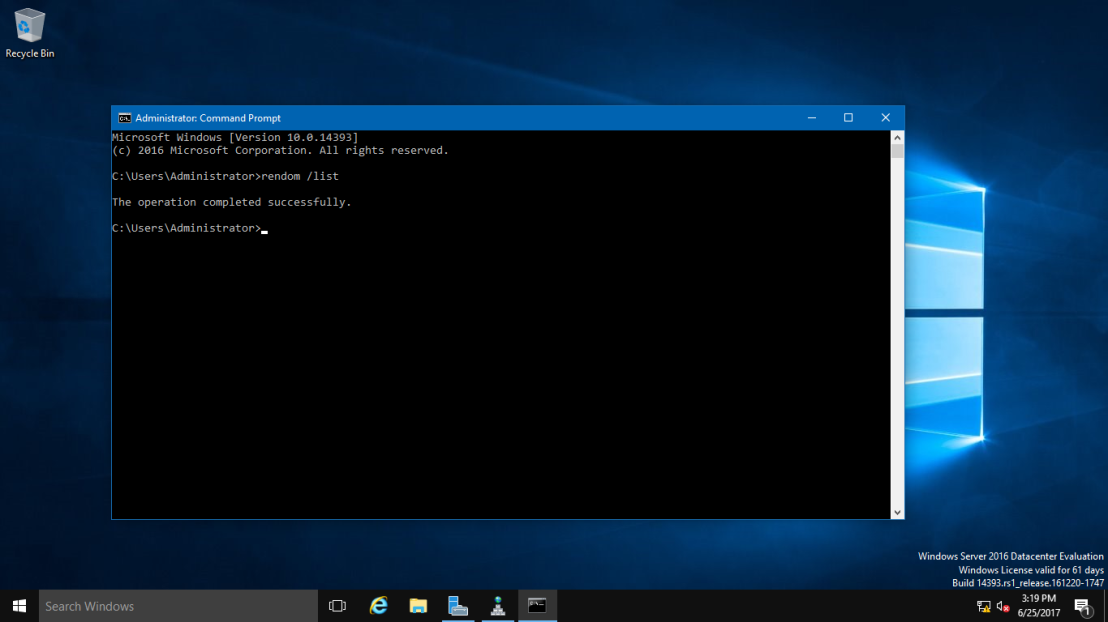
Выполните команду
rendom /list
чтобы сгенерировать файл Domainlist.xml с текущей конфигурацией леса AD.
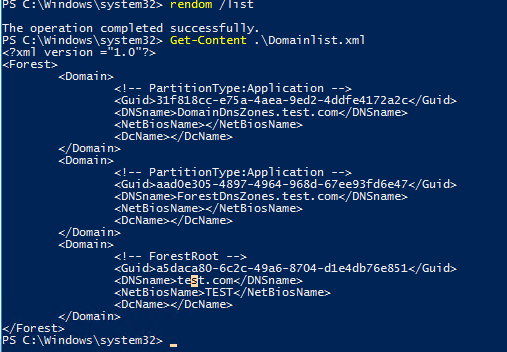
Get-Content .\Domainlist.xml
<Forest>
<Domain>
<!-- PartitionType:Application -->
<Guid>31f818cc-e75a-4aea-9ed2-4ddfe4172a2c</Guid>
<DNSname>DomainDnsZones.test.com</DNSname>
<NetBiosName></NetBiosName>
<DcName></DcName>
</Domain>
<Domain>
<!-- PartitionType:Application -->
<Guid>aad0e305-4897-4964-968d-67ee93fd6e47</Guid>
<DNSname>ForestDnsZones.test.com</DNSname>
<NetBiosName></NetBiosName>
<DcName></DcName>
</Domain>
<Domain>
<!-- ForestRoot -->
 <Guid>a5daca80-6c2c-49a6-8704-d1e4db76e851</Guid>
<DNSname>test.com</DNSname>
<NetBiosName>TEST</NetBiosName>
<DcName></DcName>
</Domain>
</Forest>
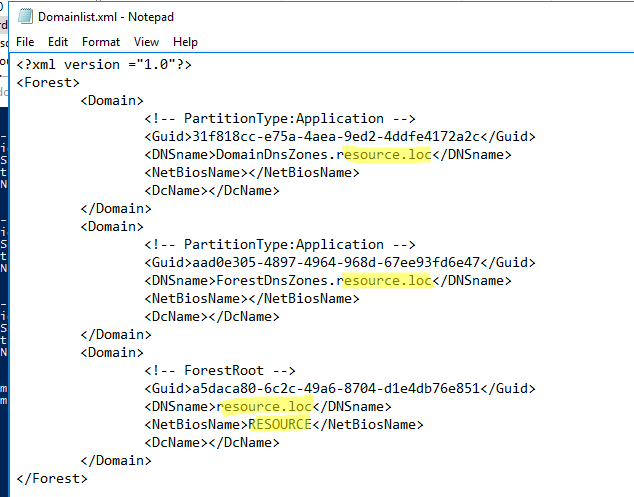
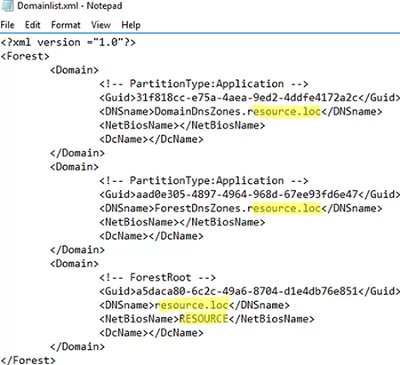
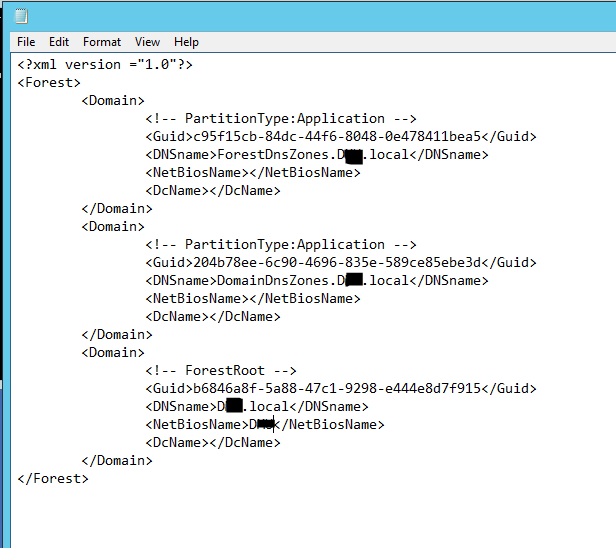
Откройте файл Domainlist.xml на редактирование и замените все имена старого домена на новый:
Notepad .\Domainlist.xml
Сохраните файл и выполните команду:
rendom /showforest
Данная команда покажет какие изменения будут внесены в конфигурацию.

Следующая команда загрузит файл Domainlist.xml с новой конфигурацией разделов AD на контроллер домена с FSMO ролью Domain naming master:
rendom /upload
После этого блокируются любые изменении в конфигурация леса AD
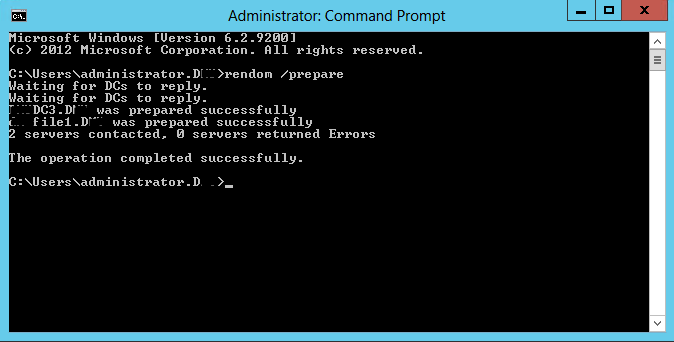
Следующая команда
rendom /prepare
проверит доступность всех DC в лесу и проверить их готовность к переименованию.
Убедитесь, что эта команда не вернула ошибок.
Waiting for DCs to reply.
msk-dc02.test.com was prepared successfully
msk-dc00.test.com was prepared successfully
The operation completed successfully.
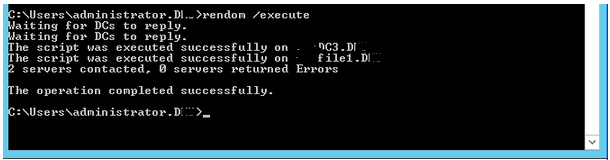
Следующая команда выполнит переименование домена (контроллеры домена некоторое время будут недоступны и автоматически перезагрузятся, чтобы применить новые настройки):
rendom /execute
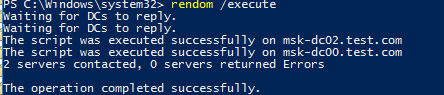
Waiting for DCs to reply.
The script was executed successfully on msk-dc02.test.com
The script was executed successfully on msk-dc00.test.com
2 servers contacted, 0 servers returned Errors
The operation completed successfully.
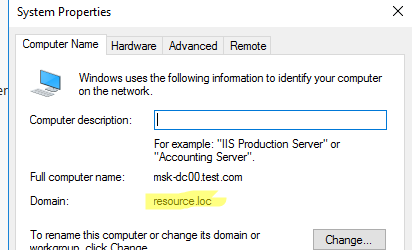
Проверьте, что в свойствах DC теперь указано новое имя домена. Обратите внимание, что полное имя компьютер осталось старым.
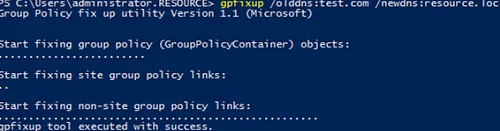
Выполните следующую команду, чтобы обновить привязки GPO:
gpfixup /olddns:test.com /newdns:resource.loc
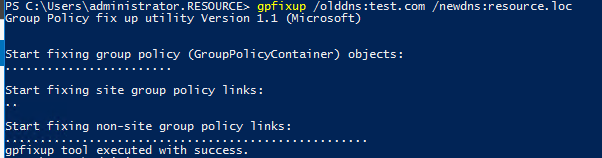
Group Policy fix up utility Version 1.1 (Microsoft)
Start fixing group policy (GroupPolicyContainer) objects:
Start fixing site group policy links:
Start fixing non-site group policy links:
gpfixup tool executed with success.
Затем обновите NetBIOS имя домена:
gpfixup /oldnb:TEST /newnb:RESOURCE
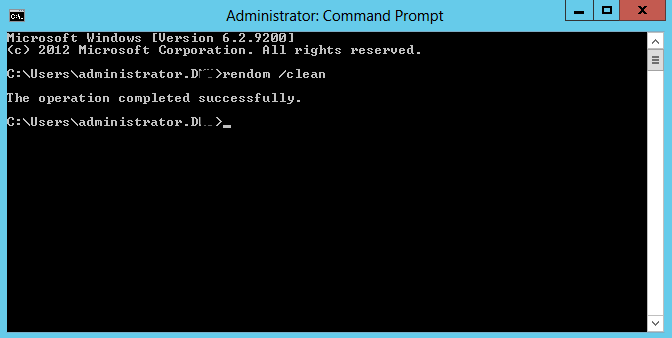
Следующая команда удалит из AD ссылки на старый домен:
rendom /clean
Разблокируйте конфигурацию домена:
rendom /end
Теперь нужно вручную добавить новые имена на каждом контроллере домена и сделать их основными:
netdom computername %COMPUTERNAME%.test.com /add:%COMPUTERNAME%.resource.loc
netdom computername %COMPUTERNAME%.test.com /makeprimary:%COMPUTERNAME%.resource.loc
И перезагрузить DC:
Shutdown –f –r –t 0
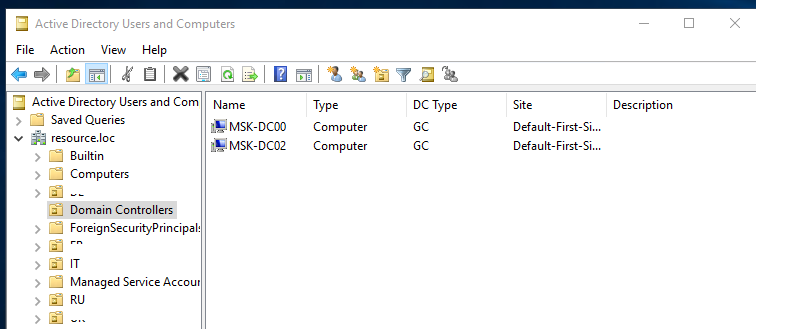
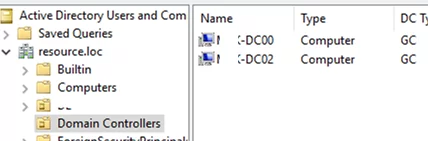
Запустите консоль ADUC (dsa.msc) и проверьте, что она подключилась к новому имени домена, а вся структура OU, пользователи и компьютеры остались на месте.
Осталось сменить “Full computer name” на всех компьютерах и серверах в домене. Для добавления компьютеров в домен можно использовать команды выше.
Обратите внимание, что для перенастройки некоторых сервисов (CA, Failover Clusters) на новый домен придется выполнить дополнительные шаги.
После окончания процедуры переименования домена обязательно проверьте состояние репликации и ошибки на DC (ссылка была выше).
In this short article, we will show you how to properly change an Active Directory domain name from test.com to resource.loc. In fact, it is not the best idea to rename an Active Directory domain. In large and complex AD infrastructure, it is better to migrate users, computers, and servers to a new domain. However, for simple and small AD environments (test, pre-prod, or DMZ ), you can easily rename your AD domain according to this guide
Before you start, make sure that:
- You have an up-to-date backup of your domain controllers;
- Replication works correctly in your domain and there are no critical errors of domain controllers or DNS (How to check Active Directory health);
- There is no Exchange in your domain. You cannot rename an AD domain if Exchange is deployed in it (except for Exchange Server 2003);
- To rename a domain, you need Windows Server 2003 or newer (in my example, the functional level of my AD domain and forest is Windows Server 2016).
First of all, create a DNS zone for your new domain on your current domain controllers. To do it, open the dnsmgmt.msc snap-in, create a new primary Forward Lookup Zone with the name resource.loc and replicate it on all DNS servers in your old test.com domain.
You can create a new DNS zone using PowerShell:
Add-DnsServerPrimaryZone -Name resource.loc -ReplicationScope "Domain" –PassThru
Wait till the new DNS zone is replicated on all DCs.
Run the rendom /list command to generate a Domainlist.xml file with the current AD forest configuration.
Get-Content .\Domainlist.xml
<Forest>
<Domain>
<!-- PartitionType:Application -->
<Guid>6944a1cc-d79a-4bdb-9d1b-411fd417bbbc</Guid>
<DNSname>DomainDnsZones.test.com</DNSname>
<NetBiosName></NetBiosName>
<DcName></DcName>
</Domain>
<Domain>
<!-- PartitionType:Application -->
<Guid>bb10d409-4897-4974-9781-77dd94f17d47</Guid>
<DNSname>ForestDnsZones.test.com</DNSname>
<NetBiosName></NetBiosName>
<DcName></DcName>
</Domain>
<Domain>
<!-- ForestRoot -->
<Guid>b91bcb80-7cbc-49b7-8704-11d41b77d891</Guid>
<DNSname>test.com</DNSname>
<NetBiosName>TEST</NetBiosName>
<DcName></DcName>
</Domain>
</Forest>
Open the Domainlist.xml and replace all old domain names with the new ones:
Notepad .\Domainlist.xml
Save the file and run this command:
rendom /showforest
The command will show the changes to be made in the configuration.

The following command will upload Domainlist.xml with the new configuration of AD partitions to the domain controller with the Domain naming master FSMO role:
rendom /upload
After that, you won’t be able to make changes to the AD forest configuration because it will be locked.
The rendom /prepare command will check the availability of all DCs in the forest and if they are ready to be renamed.
Make sure that the command has not returned any errors.
Waiting for DCs to reply.
mun-dc02.test.com was prepared successfully
mun-dc00.test.com was prepared successfully
The operation completed successfully.
The command below will rename the domain (domain controllers will be unavailable for some time and restarted automatically to apply new settings):
rendom /execute
Waiting for DCs to reply.
The script was executed successfully on mun-dc02.test.com
The script was executed successfully on mun-dc00.test.com
2 servers contacted, 0 servers returned Errors
The operation completed successfully.
Make sure that the new domain name is displayed in the domain properties. Note that the full computer name did not change.
You must provide an account name in the format newdomain\username to login to the DC.
To get to the DC, specify the account from the domain. On Windows Core domain controllers you can specify a different username by pressing ESC several times.

Run the following command to update GPO bindings:
gpfixup /olddns:test.com /newdns:resource.loc
Group Policy fix up utility Version 1.1 (Microsoft)
Start fixing group policy (GroupPolicyContainer) objects:
Start fixing site group policy links:
Start fixing non-site group policy links:
gpfixup tool executed with success.
Then update the NetBIOS domain name:
gpfixup /oldnb:TEST /newnb:RESOURCE
Then add new names on each domain controller manually and make them primary ones:
netdom computername %COMPUTERNAME%.test.com /add:%COMPUTERNAME%.resource.loc
 netdom computername %COMPUTERNAME%.test.com /makeprimary:%COMPUTERNAME%.resource.loc
Restart the DCs:
Shutdown –f –r –t 0
Only domain controllers need to be manually renamed. The rest of the computers and servers can be rebooted twice and they will automatically switch to the new domain.
This must be done after /execute and BEFORE executing the rendom /clean command.
Or you can use the commands above to rejoin computers to the new domain.
The command below will remove links to your old domain from AD:
rendom /clean
Unlock the domain configuration:
rendom /end
Open the ADUC (dsa.msc) console and make sure that it has connected to the new domain name and all OU structure, users and computers remain in place.
Note that you will have to do some extra steps to re-configure some services (CA, Failover Clusters) to a new domain.
After renaming your domain, check the AD replication state and errors on the DCs (see the link above).
Changing the domain name in Windows Server 2019 is a straightforward process. To get started, you will need to log into your server as an administrator and open the Server Manager. From here, click on “Local Server” and then look for “Computer Name”. You can then change the domain name by entering it in the provided field. Once done, click the “OK” button at the bottom of this window and reboot your server to apply these changes. If you are using Active Directory (AD) Domain Services, you may also have to update DNS records accordingly before logging back in with your new domain name.
How do I change my domain name on my server?
Can you change a Windows domain name?
Yes, it is possible to change a Windows domain name. In order to do this, you will need to follow a few steps:
1. Make sure that your network environment meets the requirements for changing an Active Directory Domain Name. These include making sure all workstations have their DNS configured correctly and have joined the domain they are in. You can check this by running the following command from an elevated Command Prompt: ipconfig /all | find “DNS”
2. Backup any important files stored on your server and create a system state backup of your Active Directory database using Windows Server Backup or other third-party software such as Acronis True Image if available.
3. Run ADPrep /forestprep from the installation media of your current version of Windows Server (e.g., Windows Server 2012 R2). This step updates permissions within active directory so that it knows about its new name when you rename it later on during this process.
4. Now we are ready to begin renaming our domain! To do so, run “netdom renamecomputer /newname:” where oldname is what you currently use as a computer name and newname is what you would like to use instead – make sure they both match up with each other in terms of their domains (e.g., olddomainoldcomputer should be changed over to newdomainnewcomputer)
5 Finally, restart all computers affected by this change including servers and clients which must be joined back into the updated domain once rebooted successfully before being able to access resources again properly on them again without issue!
Finding the domain name in Windows Server 2019 is a straightforward process. To begin, open the Control Panel and select “System” from the list of options. On the System window, you will see a section labeled “Computer Name, Domain, and Workgroup Settings”. Here you will find your domain name listed under “Domain”. Alternatively, you can use PowerShell to quickly retrieve your domain name by running this command: (Get-WmiObject Win32_ComputerSystem).Domain
How do I rename a domain name in Active Directory?
Renaming a domain name in Active Directory requires careful planning and execution. It is important to understand the process before attempting it so that you can avoid any potential issues.
To begin, you will need to identify all of the components in your domain environment that are dependent on the existing domain name and make sure they are compatible with the new one. This includes server names, client computer names, user accounts, shared folders, mapped drives and other resources such as DNS records or Group Policy objects (GPOs). Once this has been done, follow these steps:
1. Backup your entire Active Directory infrastructure including system state data from all of the Domain Controllers in your environment using a reliable backup tool such as Windows Server Backup or Symantec’s System Recover software.
2. Create an additional Domain Controller for redundancy purposes if needed so that there is no single point of failure during the renaming operation. Make sure it contains an exact copy of the same information stored on existing DC’s which can be used if necessary for recovery purposes later down the line.
3. Install and configure Microsoft’s Rename Domain Name Tool (RenameRef) onto each DC via command prompt with administrative privileges; this tool allows for safe replication between servers after changing their name without causing conflicts due to mismatched data sets across domains .
4 Next add any new DNS records required by changing or adding entries into DNS Manager Console depending on whether you have split-brain DNS configured or not . You may also need to update DHCP scopes if applicable at this time as well – again depending upon your configuration .
5 Finally use RenameRef to rename each Domain Controller one at a time , beginning with those holding flexible single master operations roles first followed by others in order of importance until all have been completed successfully – migration should now be complete !
Is it difficult to change domain name?
Changing a domain name can be a complicated process. Depending on the size and complexity of your website, it may require significant preparation and planning in order to minimise disruption to existing users or customers. However, with careful execution and communication, you can migrate from one domain name to another without any major issues. In this article we’ll outline some steps that you should take when changing your domain name.
How do I change my custom domain?
Changing your custom domain is a fairly straightforward process, but it’s important to make sure that you follow the steps carefully in order to ensure a smooth transition. Here are the steps for how to change your custom domain:
1. Log into your hosting provider and locate their control panel.
2. Find the DNS settings page and select “Edit”.
3. Select the option for changing nameservers or modifying existing ones as appropriate.
4. Enter the new nameserver information provided by your registrar (domain name provider) when you purchased the new domain name and save changes.
5. Once complete, wait 24-48 hours before attempting any further configuration; this will allow time for all of the records on both accounts to be updated properly with no interruption in service or loss of data associated with either account/domain name combination..
6 Lastly, log back into your original hosting provider control panel and find the “Domain Redirection” section which should appear under “Advanced Features” if available on that particular host, then enter in all required fields (e.g., destination URL) accordingly so that all traffic from old domain gets redirected automatically to its respective pages on newly acquired one after successful switchover has been completed successfully at step 4 above!
What will happen if I change the domain name?
If you change the domain name of your website, there are a few things to consider. First, any existing links or bookmarks pointing to the old domain will no longer work and visitors may have difficulty finding your new site. Additionally, search engines may take time to reindex content under the new domain name. To minimize disruption, it is important to ensure that 301 redirects are in place so that visitors using the old URL can be automatically redirected to the proper page on your new website. Additionally, it is recommended that you update any external sites linking back to yours with your new URL as well as submitting an updated sitemap for search engine indexing purposes.
How do I create a domain in Windows Server 2019?
To create a domain in Windows Server 2019, you will need to use the Active Directory Domain Services (AD DS) role. This guide provides step-by-step instructions for creating an AD DS domain using the graphical user interface (GUI).
1. Login to the server with administrator privileges and open Server Manager.
2. On the Manage menu, select Add Roles and Features.
3. Select Role-based or feature based installation and click Next.
4. Tick Active Directory Domain Services from the list of roles available and click Next twice more to confirm your selection of this role only (no additional features are necessary).
5. Click Install on the confirmation page to begin installing AD DS onto your server; once complete, check ‘Restart if required’ box then click Close when prompted by Installation Results window that pops up soon after installation is completed successfully .
6. After rebooting, launch Server Manager again; then on Dashboard tab search for “Promote this server…” link which should be located at bottom left side of page – clicking it opens new wizard window titled “Deployment Configuration” where we can choose between two options: either adding new forest or joining existing one so pick whichever suits best according needs – once done hit next button until final screen appears containing summary information about selected configuration settings; here make sure all details shown correspond correctly before pressing promote button which will start process automatically while displaying progress bar along way until successful completion message appears indicating domain has been created successfully!
{“@context”:”https://schema.org”,”@type”:”FAQPage”,”mainEntity”:[{“@type”:”Question”,”name”:”Can you change a Windows domain name?”,”acceptedAnswer”:{“@type”:”Answer”,”text”:”nnYes, it is possible to change a Windows domain name. In order to do this, you will need to follow a few steps: n1. Make sure that your network environment meets the requirements for changing an Active Directory Domain Name. These include making sure all workstations have their DNS configured correctly and have joined the domain they are in. You can check this by running the following command from an elevated Command Prompt: ipconfig /all | find u201cDNSu201dn2. Backup any important files stored on your server and create a system state backup of your Active Directory database using Windows Server Backup or other third-party software such as Acronis True Image if available. n3. Run ADPrep /forestprep from the installation media of your current version of Windows Server (e.g., Windows Server 2012 R2). This step updates permissions within active directory so that it knows about its new name when you rename it later on during this process. n4. Now we are ready to begin renaming our domain! To do so, run u201cnetdom renamecomputer /newname:u201d where oldname is what you currently use as a computer name and newname is what you would like to use instead – make sure they both match up with each other in terms of their domains (e.g., olddomain\oldcomputer should be changed over to newdomain\newcomputer) n5 Finally, restart all computers affected by this change including servers and clients which must be joined back into the updated domain once rebooted successfully before being able to access resources again properly on them again without issue!”}},{“@type”:”Question”,”name”:”How do I find my domain name in Windows Server 2019?”,”acceptedAnswer”:{“@type”:”Answer”,”text”:”nnFinding the domain name in Windows Server 2019 is a straightforward process. To begin, open the Control Panel and select u201cSystemu201d from the list of options. On the System window, you will see a section labeled u201cComputer Name, Domain, and Workgroup Settingsu201d. Here you will find your domain name listed under “Domain”. Alternatively, you can use PowerShell to quickly retrieve your domain name by running this command: (Get-WmiObject Win32_ComputerSystem).Domain”}},{“@type”:”Question”,”name”:”How do I rename a domain name in Active Directory?”,”acceptedAnswer”:{“@type”:”Answer”,”text”:”nnRenaming a domain name in Active Directory requires careful planning and execution. It is important to understand the process before attempting it so that you can avoid any potential issues. nnTo begin, you will need to identify all of the components in your domain environment that are dependent on the existing domain name and make sure they are compatible with the new one. This includes server names, client computer names, user accounts, shared folders, mapped drives and other resources such as DNS records or Group Policy objects (GPOs). Once this has been done, follow these steps: nn1. Backup your entire Active Directory infrastructure including system state data from all of the Domain Controllers in your environment using a reliable backup tool such as Windows Server Backup or Symantecu2019s System Recover software. nn2. Create an additional Domain Controller for redundancy purposes if needed so that there is no single point of failure during the renaming operation. Make sure it contains an exact copy of the same information stored on existing DCu2019s which can be used if necessary for recovery purposes later down the line. nn3. Install and configure Microsoft’s Rename Domain Name Tool (RenameRef) onto each DC via command prompt with administrative privileges; this tool allows for safe replication between servers after changing their name without causing conflicts due to mismatched data sets across domains . n4 Next add any new DNS records required by changing or adding entries into DNS Manager Console depending on whether you have split-brain DNS configured or not . You may also need to update DHCP scopes if applicable at this time as well – again depending upon your configuration . nn 5 Finally use RenameRef to rename each Domain Controller one at a time , beginning with those holding flexible single master operations roles first followed by others in order of importance until all have been completed successfully – migration should now be complete !”}},{“@type”:”Question”,”name”:”Is it difficult to change domain name?”,”acceptedAnswer”:{“@type”:”Answer”,”text”:”nnChanging a domain name can be a complicated process. Depending on the size and complexity of your website, it may require significant preparation and planning in order to minimise disruption to existing users or customers. However, with careful execution and communication, you can migrate from one domain name to another without any major issues. In this article we’ll outline some steps that you should take when changing your domain name.”}},{“@type”:”Question”,”name”:”How do I change my custom domain?”,”acceptedAnswer”:{“@type”:”Answer”,”text”:”nnChanging your custom domain is a fairly straightforward process, but it’s important to make sure that you follow the steps carefully in order to ensure a smooth transition. Here are the steps for how to change your custom domain: n1. Log into your hosting provider and locate their control panel. n2. Find the DNS settings page and select “Edit”. n3. Select the option for changing nameservers or modifying existing ones as appropriate. n4. Enter the new nameserver information provided by your registrar (domain name provider) when you purchased the new domain name and save changes. n5. Once complete, wait 24-48 hours before attempting any further configuration; this will allow time for all of the records on both accounts to be updated properly with no interruption in service or loss of data associated with either account/domain name combination.. n6 Lastly, log back into your original hosting provider control panel and find the u201cDomain Redirectionu201d section which should appear under u201cAdvanced Featuresu201d if available on that particular host, then enter in all required fields (e.g., destination URL) accordingly so that all traffic from old domain gets redirected automatically to its respective pages on newly acquired one after successful switchover has been completed successfully at step 4 above!”}},{“@type”:”Question”,”name”:”What will happen if I change the domain name?”,”acceptedAnswer”:{“@type”:”Answer”,”text”:”nnIf you change the domain name of your website, there are a few things to consider. First, any existing links or bookmarks pointing to the old domain will no longer work and visitors may have difficulty finding your new site. Additionally, search engines may take time to reindex content under the new domain name. To minimize disruption, it is important to ensure that 301 redirects are in place so that visitors using the old URL can be automatically redirected to the proper page on your new website. Additionally, it is recommended that you update any external sites linking back to yours with your new URL as well as submitting an updated sitemap for search engine indexing purposes.”}},{“@type”:”Question”,”name”:”How do I create a domain in Windows Server 2019?”,”acceptedAnswer”:{“@type”:”Answer”,”text”:”nnTo create a domain in Windows Server 2019, you will need to use the Active Directory Domain Services (AD DS) role. This guide provides step-by-step instructions for creating an AD DS domain using the graphical user interface (GUI). nn1. Login to the server with administrator privileges and open Server Manager. n2. On the Manage menu, select Add Roles and Features. n3. Select Role-based or feature based installation and click Next. n4. Tick Active Directory Domain Services from the list of roles available and click Next twice more to confirm your selection of this role only (no additional features are necessary). n5. Click Install on the confirmation page to begin installing AD DS onto your server; once complete, check u2018Restart if requiredu2019 box then click Close when prompted by Installation Results window that pops up soon after installation is completed successfully . n6. After rebooting, launch Server Manager again; then on Dashboard tab search for u201cPromote this serveru2026u201d link which should be located at bottom left side of page u2013 clicking it opens new wizard window titled u201cDeployment Configurationu201d where we can choose between two options: either adding new forest or joining existing one so pick whichever suits best according needs u2013 once done hit next button until final screen appears containing summary information about selected configuration settings; here make sure all details shown correspond correctly before pressing promote button which will start process automatically while displaying progress bar along way until successful completion message appears indicating domain has been created successfully!”}}]}
In a Windows Server 2012 domain you don’t have to separately install “Rendom” utility.
This tools gets installed as part of “Active Directory Domain Services” role when you promote a server to the DC role. It can be found: %windir%system32rendom.exe.
The existing domain is D and I will rename it to D.LOCAL.
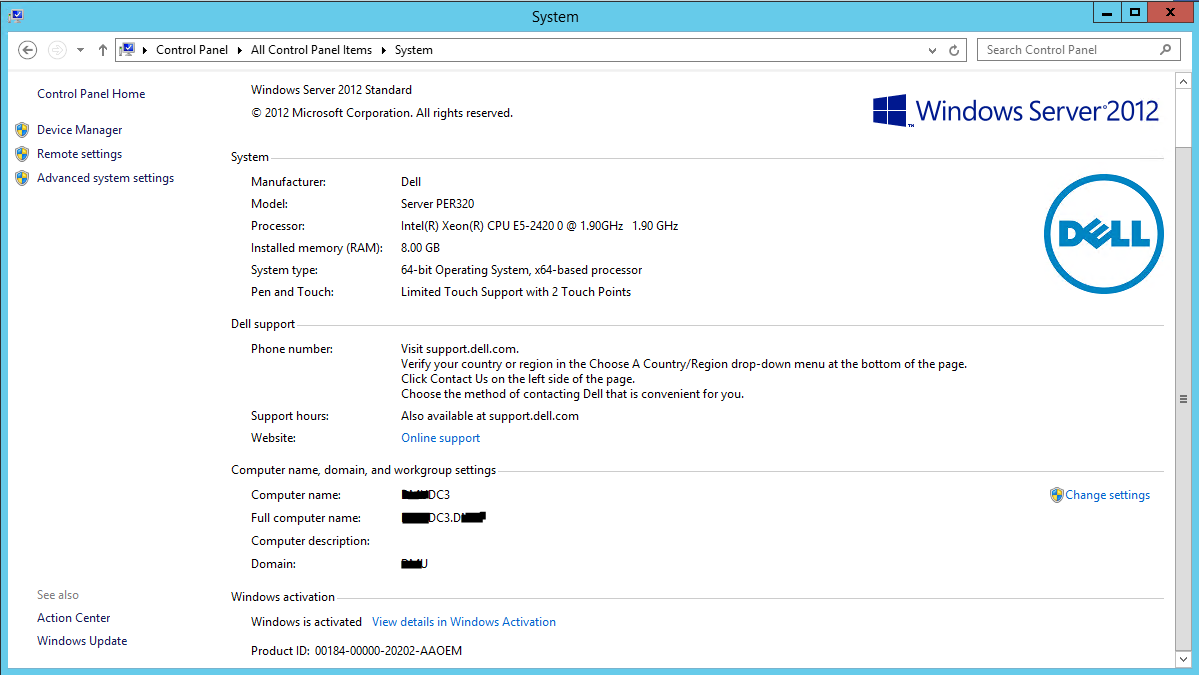
Open your System Properties and check the existing domain name. This domain name is D. This will be changing to d.local.
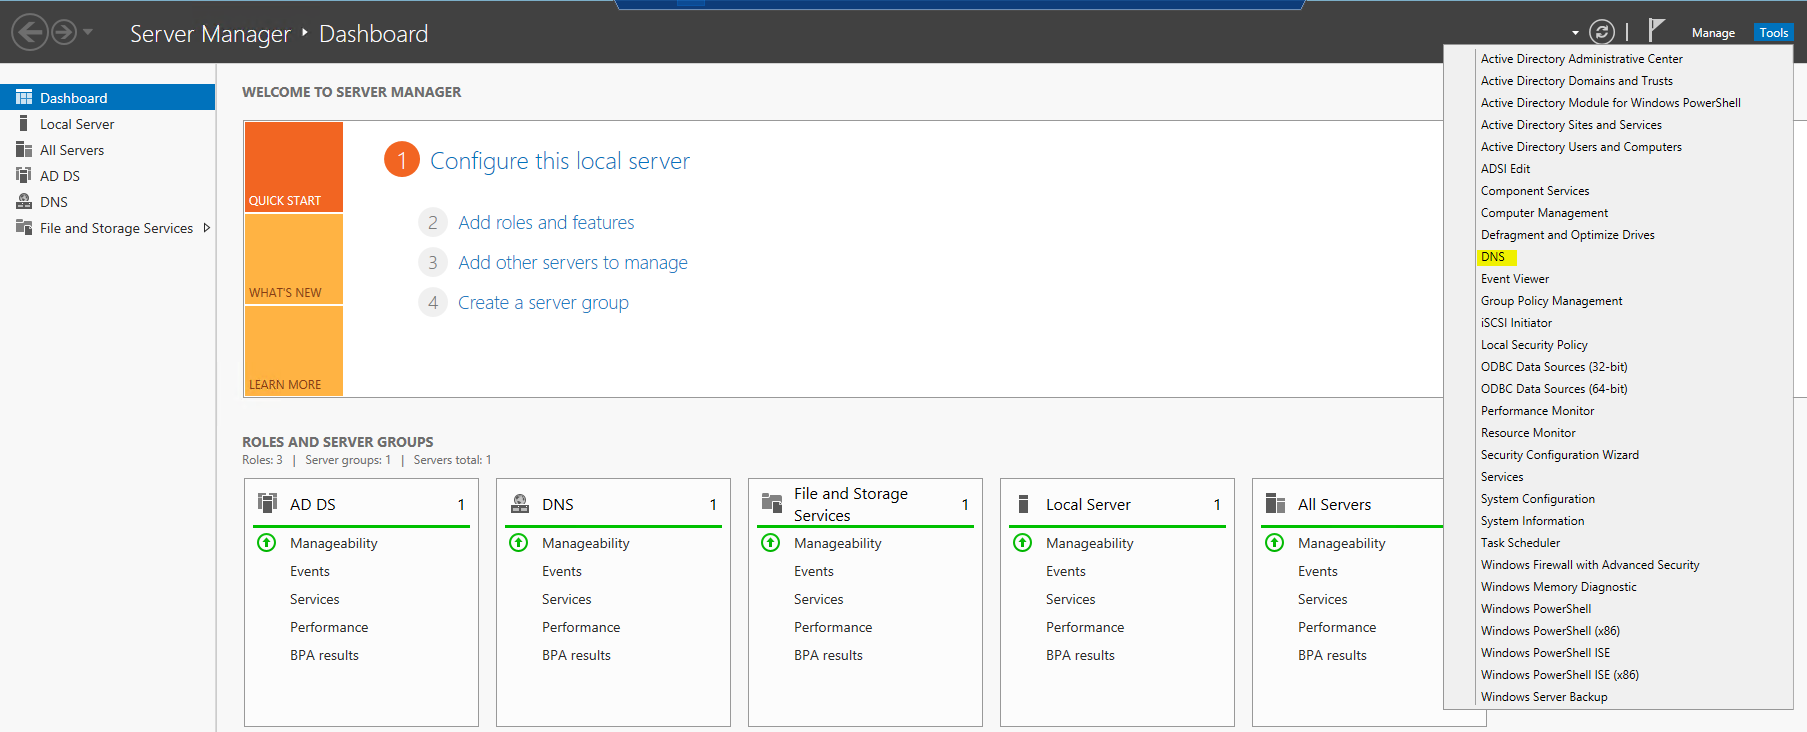
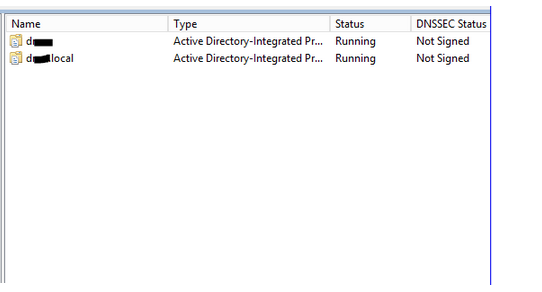
Open your Server Dashboard, then go to Tools & click DNS to open DNS Manager..
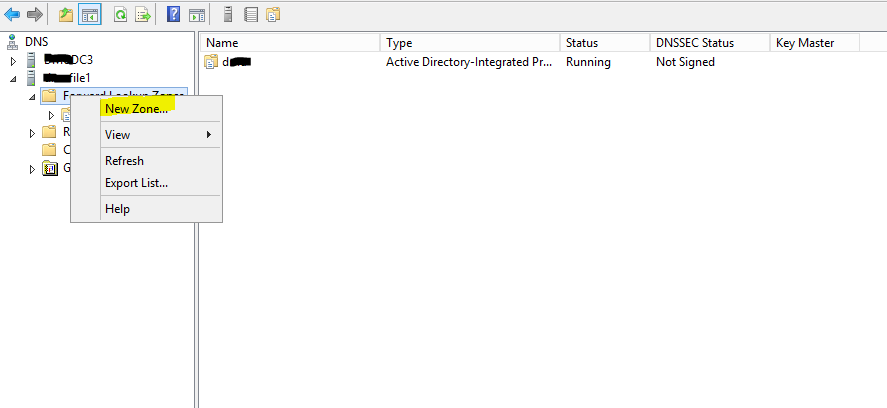
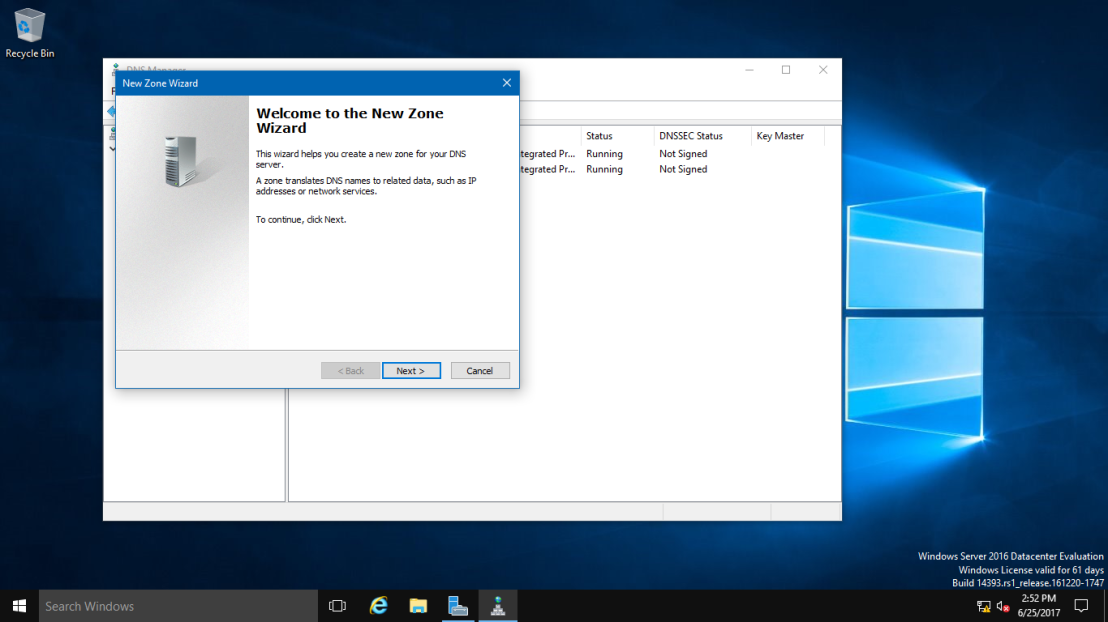
In the DNS Manager, you need to create the New DNS Zone (d.local), this is to make sure that after whole process successfully, your member servers and Windows clients can join to new domain.
On the Welcome to the New Zone Wizard, click Next
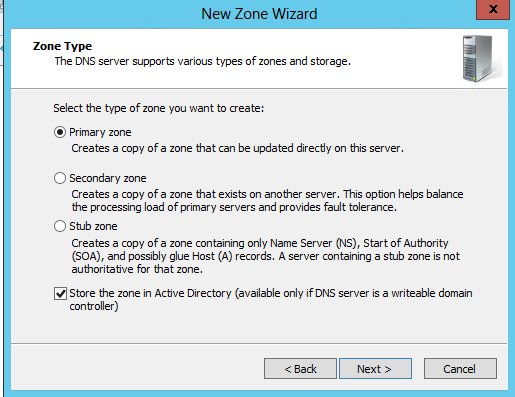
On the Zone Type, Click Primary Zone and Next
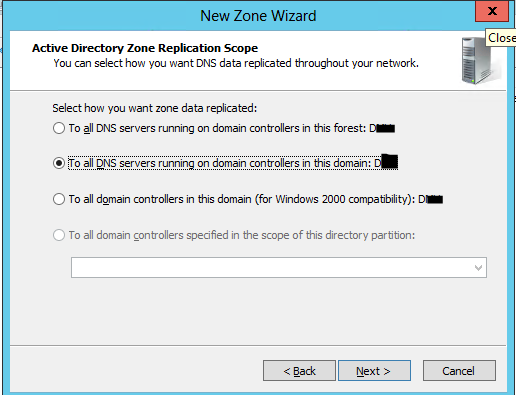
On the Active Directory Zone Replication Scope, click button To all DNS servers running on domain controllers in this domain:D.local then Next
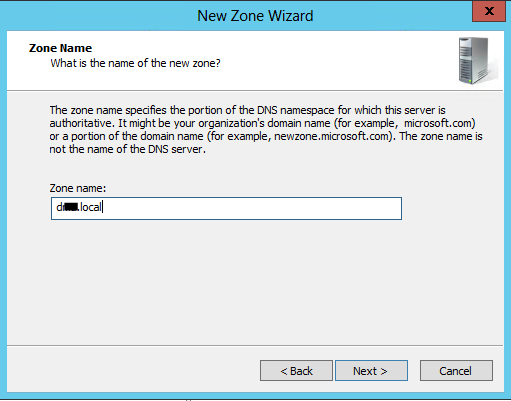
In the Zone Name, key in your new Domain Name, my new Domain Name
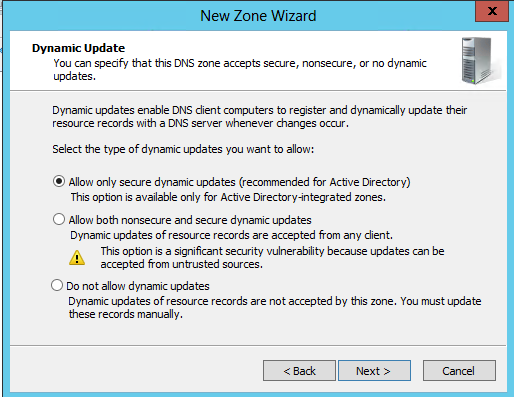
On the Dynamic Update, Click Allow only secure dynamic updates (recommended for Active Directory) then Next
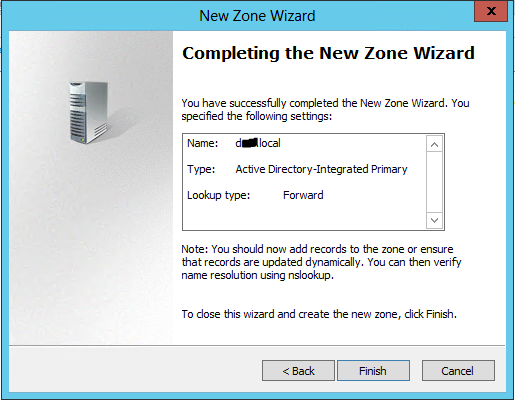
Completing the New Zone Wizard, click Finish
Open DNS Manager, you can view the new DNS name
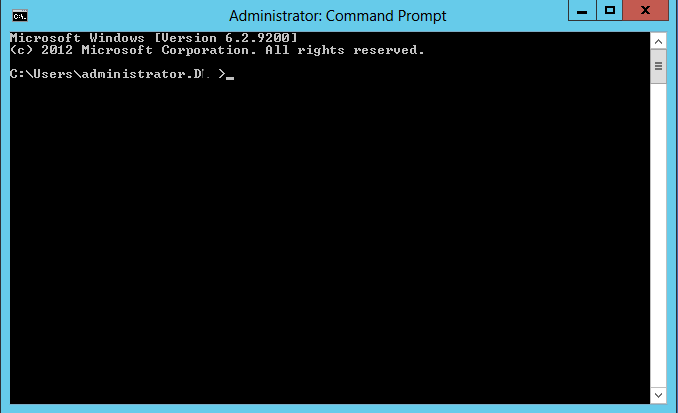
Next, open Command Prompt as Administrator
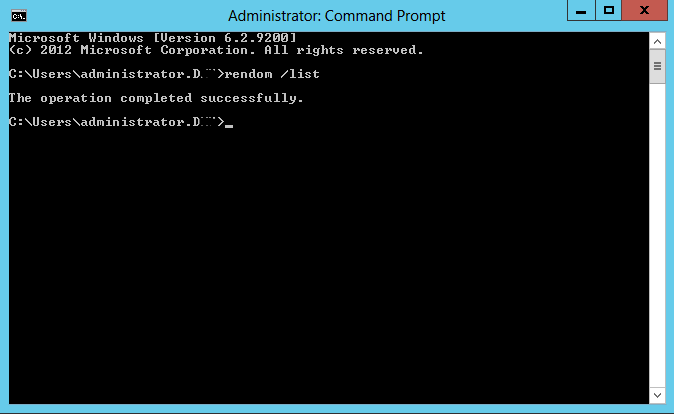
In the prompt , type rendom /list enter – this command is used to generate a state file named Domainlist.xml on the current domain. This file contains the current forest configurations.
Next open the computer in explorer and go to the C:UsersAdministrator folder
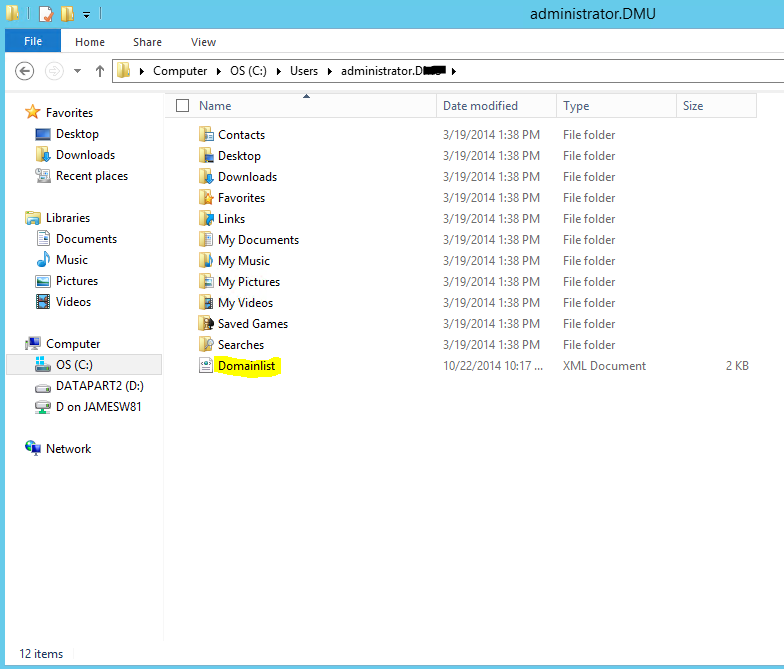
Open the Domainlist.xml file. Right click the file name & click Edit.
With the Domainlist.xml open, change this existing domain name to new domain
SAVE the Domainlist.xml file
Close the file and return to prompt. Within the prompt, type rendom /showforest. This with show you the potential changes. This step does not make any modifications.
Type rendom /upload. This will upload the Domainlist.xml to the configuration directory partition on the domain controller.

Type rendom /prepare. This will verify the readiness of each DC in the forest.
Type rendom /execute. This will verify all the DC’s and then performs the rename task
** Remember also there will be an interruption during this process. Once the process has completed, your DC will be rebooted.
Once the DC(s) has reboot, log into the domain controller(s) with the administrator user .
After you successfully log into the system(s), open System Properties and check the Domain Name.

Open the prompt and type gpfixup /olddns:d /newdns:d.local. This is to refresh all intradomain references and links to group policy objects.

** If you are not changing the NetBIOS name skip this step.
type gpfixup /oldnb:d /newnb:d
Type rendom /clean. This will remove all the references of the old domain within AD.
Type rendom /end. This is to unfreeze the forest configuration and allow further changes. The forest was frozen during the rendom /upload.
Open DNS Manager, select the new domain (d.local), here you can see your IP listed.
This will conclude the renaming of the domain. If you reboot the desktop computers 3-5 times the domain change should migrate. If the changes do not migrate you will need to un-join these computers from the domain and re-join then back on to the network.
** If you have DHCP running on one of your domain controllers. You may need to stop and start the DHCP service.
Feel free to leave comments.
You can use the domain rename process to change the names of your domains, and you can also use it to change the structure of the domain trees in your forest. This process involves updating the Domain Name System (DNS) and trust infrastructures as well as Group Policy and service principal names (SPNs).
The ability to rename domains provides you with the flexibility to make important name changes and forest structural changes as the needs of your organization change. Using domain rename, you cannot only change the name of a domain, but you can change the structure of the domain hierarchy and change the parent of a domain or move a domain residing in one domain tree to another domain tree. The domain rename process can accommodate scenarios involving acquisitions, mergers, or name changes in your organization, but it is not designed to accommodate forest mergers or the movement of domains between forests.
Note:
Domain rename is intended to be a supported method for renaming domains when domain renames are necessary; it is not intended to make domain rename a routine operation.The domain rename process is complex, and it requires a great deal of care in planning and execution. In addition, the time that is required for a complete domain rename operation is directly proportional to the size of an Active Directory forest in terms of its number of domains, domain controllers, and member computers. Therefore, although domain rename is possible, it should not be undertaken lightly.The domain rename operation is not supported in Microsoft Exchange Server 2007 or Exchange Server 2010. DNS domain rename is supported in Exchange Server 2003. However, renaming of the NetBIOS domain name is not supported in any version of Exchange Server. Other non-Microsoft applications might also not support domain rename.
For this time easy Guide, I will show you all how to rename domain name in Windows Server 2016, the process is straightforward. but as usual. backup any necessary information and Server before you proceed & I always advice, please do this exercises in LAB Environment (Hyper-V). Don’t simply take any risk by doing this is production environment unless you have to. 😦
The existing domain is Windows.ae and I will rename it to Sifad.local
So, let get started.
1 – Open your System Properties and check your existing domain name, if you see from my Windows Server 2016 system properties, my existing domain name is Windows.ae. This will be change to Sifad.local in the short while.

2 – Next, open your Server Dashboard, go to Tools & click DNS to open DNS Manager.

3 – on the DNS Manager, you must create the New DNS Zone (Sifad.local), this is to make -sure that after whole process successfully, your member server and Windows clients can join to new Domain name.
“to create new DNS Zone, Right Click Forward Lookup Zone, and click New Zone”

4 – On the Welcome to the New Zone Wizard, just click Next button.
5 – On the Zone Type, Click Primary Zone and click Next.

6 – On the Active Directory Zone Replication Scope, click button To all DNS servers running on domain controllers in this domain: Windows.ae and click Next.

7 – In the Zone Name, key in your New Domain Name, my new Domain Name is Sifad.local.

8 – On the Dynamic Update, Click Allow only secure dynamic updates (recommended for Active Directory), and click Next.

9 – On the completing the New Zone Wizard, click Finish to complete the process.

10 – On DNS Manager, you can see my new Domain Name is listed (sifad.local).

11 – Next, open Command Prompt, run as administrator.

12 – In CMD, type rendom /list and press enter – this command use to generate a state file named Domainlist.xml. This file contains the current forest configuration.
13 – Next, open computer and browse to C:\Users\Administrator folder to get your Domainlist.xml.

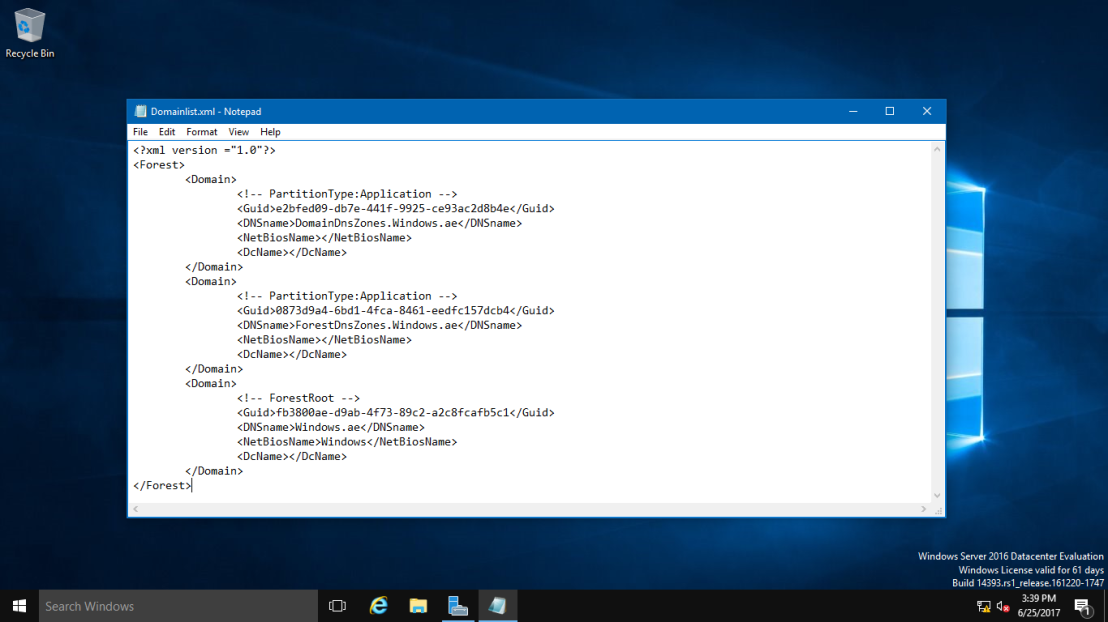
14 – Once you see the Domainlist.xml, right click the file name & choose Edit. I going to change the DNSname and NetBiosName in this Domainlist.xml file.

15 – Once the Domainlist.xml open, you can see there are few existing Domain name, change this existing domain name to new domain name. (Refer to picture)
16 – once you change to new Domain name, make sure you save the Domainlist.xml file.

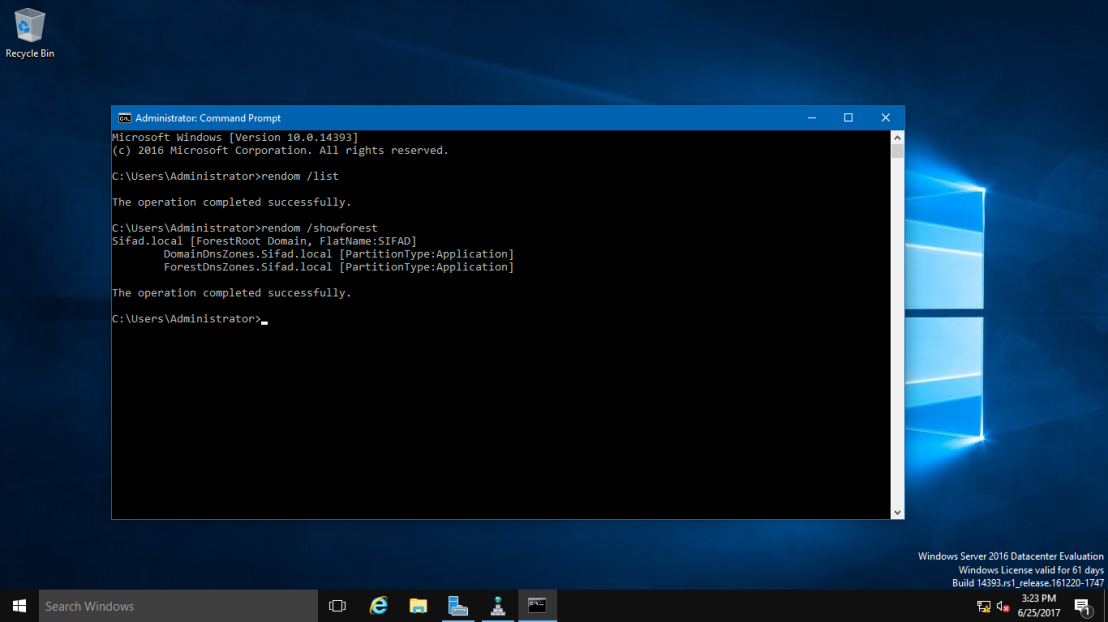
17 – After you save the Domainlist.xml file, On the CMD, type rendom /showforest. This is to show the potential changes; this step does not make any changes.
18 – Next, type rendom /upload. This is to upload the rename instructions (Domainlist.xml) to the configuration directory partition on the domain controller holding the domain naming operations master role.

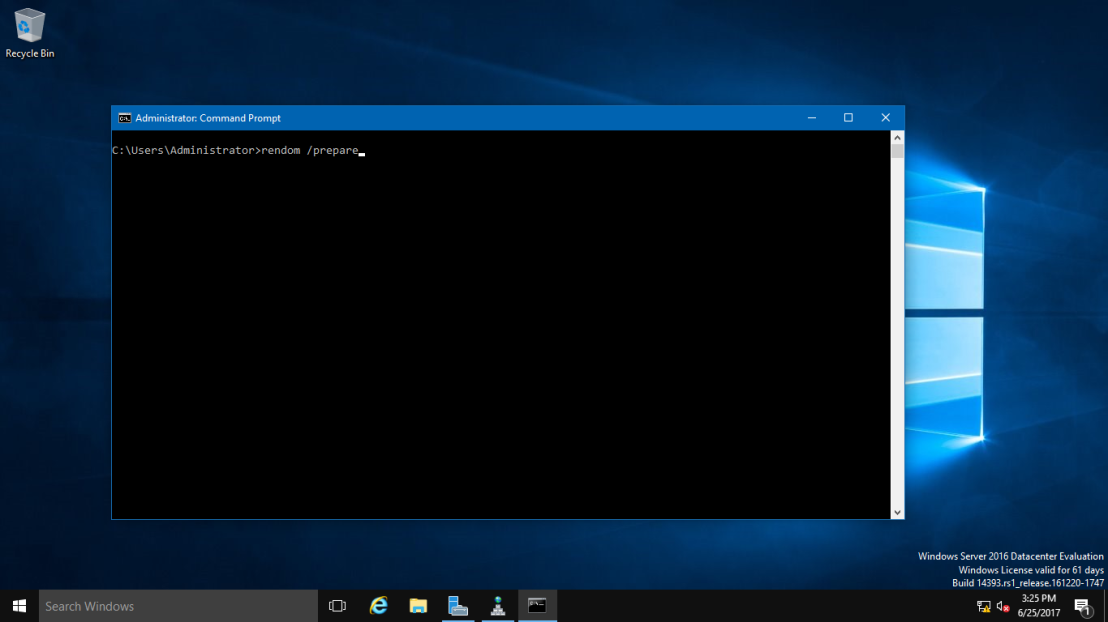
19 – Next, type rendom /prepare. This use to verify the readiness of each DC in the forest to carry out the rename instructions. This should contact all DC’s successfully and return no errors before proceed to next process.
20 – Next, type rendom /execute. This is to verifies readiness of all DC’s and then preforms the rename action on each one.
“Remember also there will be a service interruption during this process. Once the process successful, your DC Server will be restarted.”
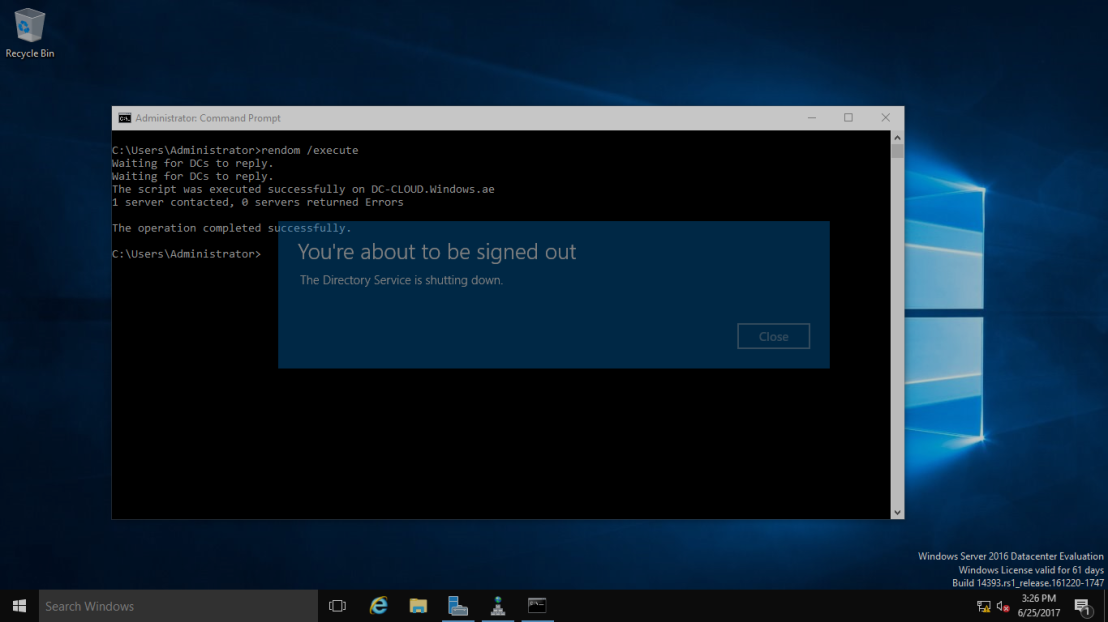
21 – Once your DC Server restarted, log in using the new Domain name as Administrator.

22 – Next, after you successfully log in, open System Properties and check your old Domain Name is now gone. replace by new Domain name.

23 – Next, open CMD again, and type gpfixup /olddns:windows.ae /newdns:sifad.local This is to refresh all intra Domain references and links to group policy objects.

24 – Next, type gpfixup /oldnb:DC-CLOUD /newnb:sifad.

25 – Next, type rendom /clean. This is to remove references of the old domain name from AD.

26 – Next, type rendom /end. This is to unfreeze the forest configuration and allow further changes. This was frozen during the rendom /upload step.

27 – Next, Open DNS Manager, click your new created domain (Sifad.local), here you can see your own IP listed but we still have long way to go to make sure this DNS Zone is working.

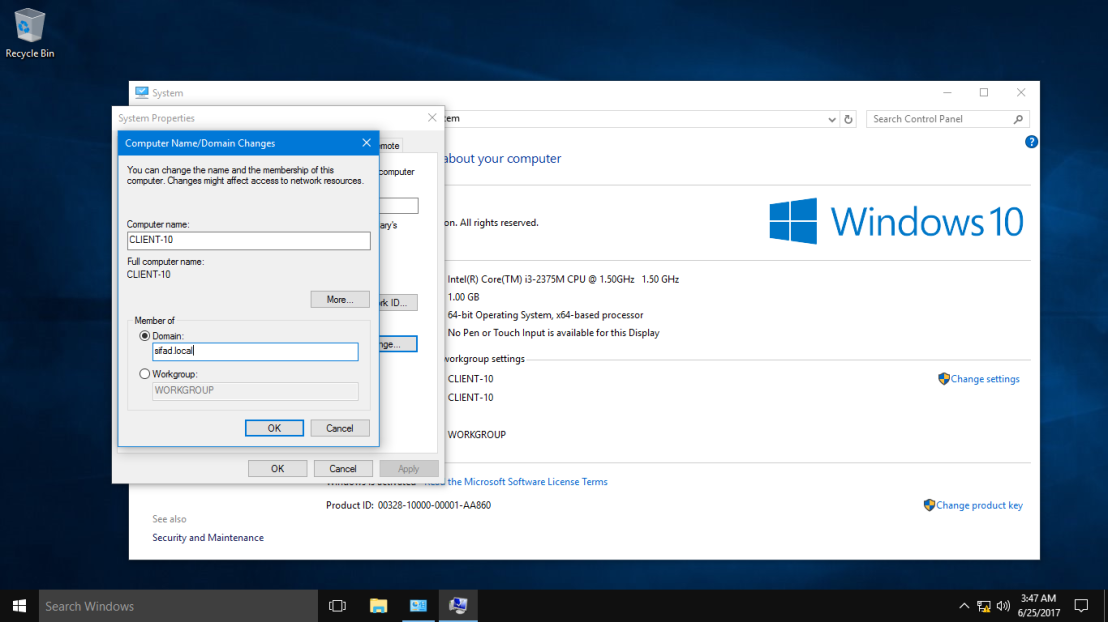
28 – Next, turn on your client PC, for this exercise I’m using Windows 10 as a client. Open System Properties and join to new Domain (sifad.local). Windows Security box will show up and now key in administrator and domain password and click OK (Welcome to the sifad.local domain). (Refer pictures)


29 – After your Windows 10 restart, log in as a domain administrator.

30 – Once you log in, double check Windows 10 System Properties. Now your Windows 10 successfully join in to new Domain (Sifad.local).

31 – Now, go to the Server 2016 and open DNS Manager, you can see now your Windows 10 Client is listed in DNS.

32 – You can also check in Active Directory Users & Computers that your Windows 10 Client now also listed.

This ends the rename process and we have a dc now with a new domain name.
that’s all for now.., any Doubts type a commend.. 🙂