
Начиная с Windows 10 версии 1903, операционная система получила новую светлую тему, которая изменяет цвет на белый в меню «Пуск», панели задач и Центра действий с акриловыми эффектами. Выбрав опцию «Настраиваемый» в разделе «Параметры» → «Персонализация» → «Цвета», вы можете применить «Светлую» или «Темную» тему отдельно для системы и отдельно для приложений.

Сегодня рассмотрим, как добавить в контекстное меню рабочего стола две опции которые в один клик позволяют переключатся между темным или светлым режимом операционной системы и приложений.
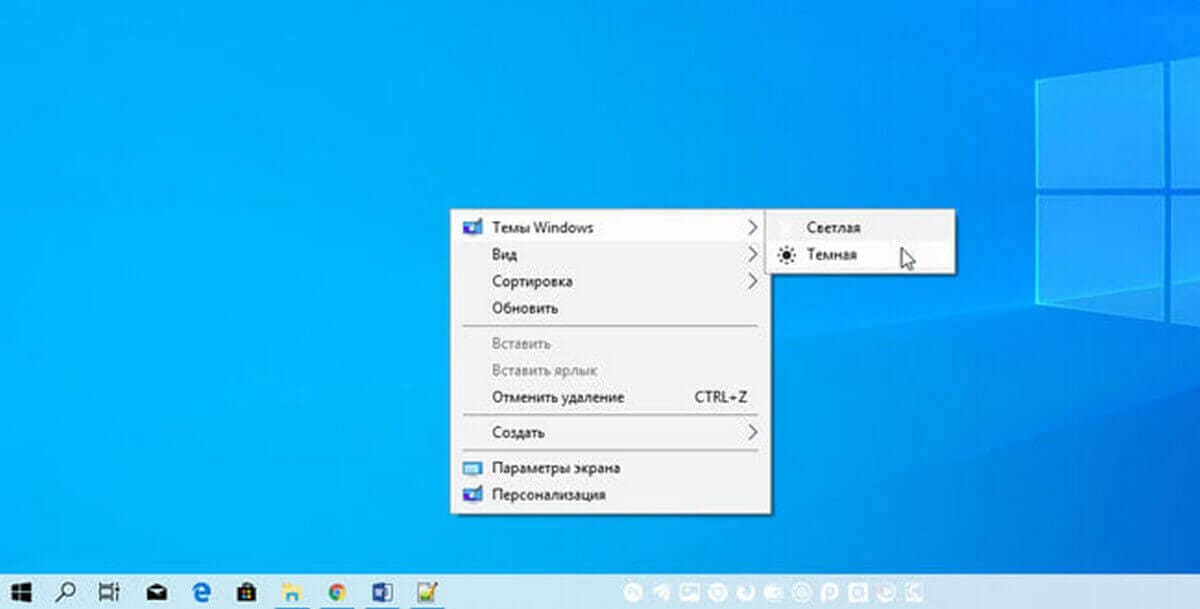
Чтобы быстро переключатся межу темной и светлой темой Windows, вы можете добавить команду в контекстное меню, которая позволит переключать цветовой режим одним кликом, не открывая приложение «Параметры». Это можно сделать с помощью простой настройки реестра.
Добавить в контекстное меню Windows 10, возможность изменить цветовой режим (тему) для системы.
Шаг 1: Загрузите следующие файлы реестра: Загрузите файлы реестра.
Шаг 2: Распакуйте ZIP-архив, который вы загрузили, в любое место. Вы можете поместить их прямо на Рабочий стол.
Шаг 3: Дважды кликните файл «add-windows-theme-context-menu.reg» и подтвердите операцию слияния.
Чтобы удалить контекстное меню, дважды кликните предоставленный файл «remove-windows-theme-context-menu.reg».
Как это работает.
За переключение между Темной и Светлой темами в Windows, отвечает параметр DWORD (32 бита) с именем SystemUsesLightTheme
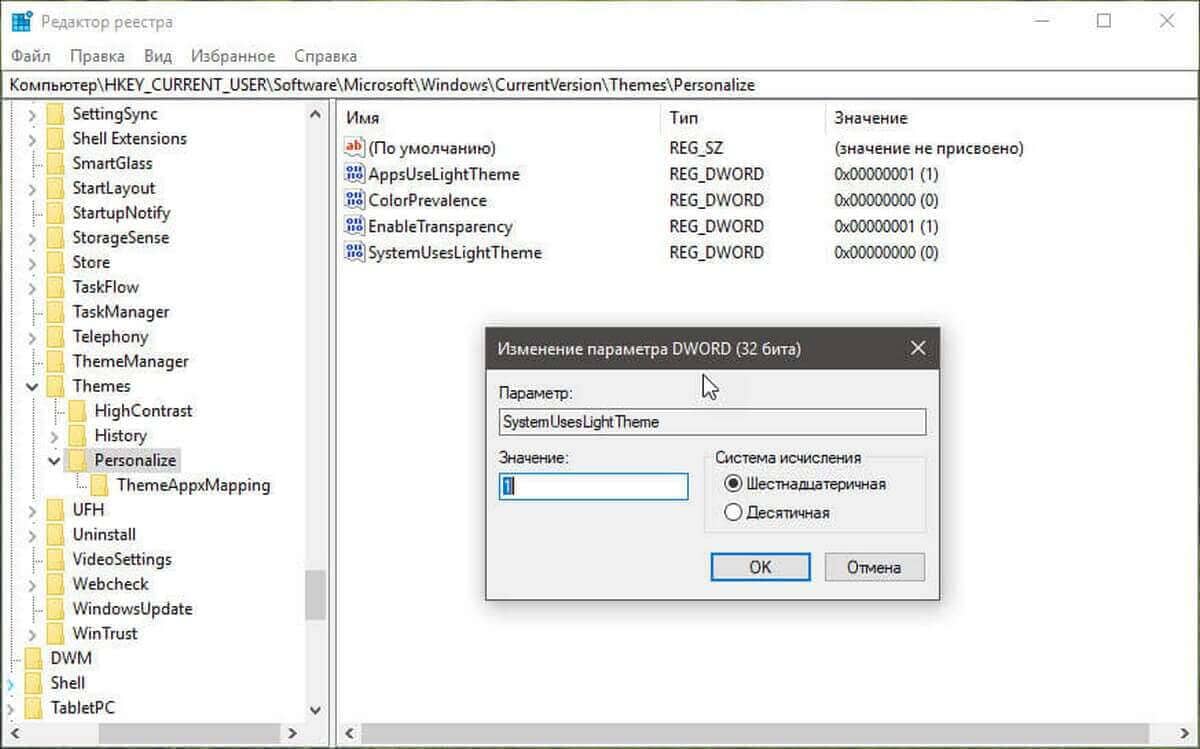
Который находится в разделе реестра:
HKEY_CURRENT_USER\SOFTWARE\Microsoft\Windows\CurrentVersion\Themes\Personalize
Он поддерживает следующие значения:
- 1 — Windows будет использовать тему «Светлая».
- 0 — Windows будет использовать тему «Темная» (по умолчанию).
Кроме того, вы можете добавить подобное меню для переключения темного и светлого режима по умолчанию только для приложений.
Чтобы переключать темы для приложений «Темная» или «Светлая» одним кликом мыши выполните следующие действия:
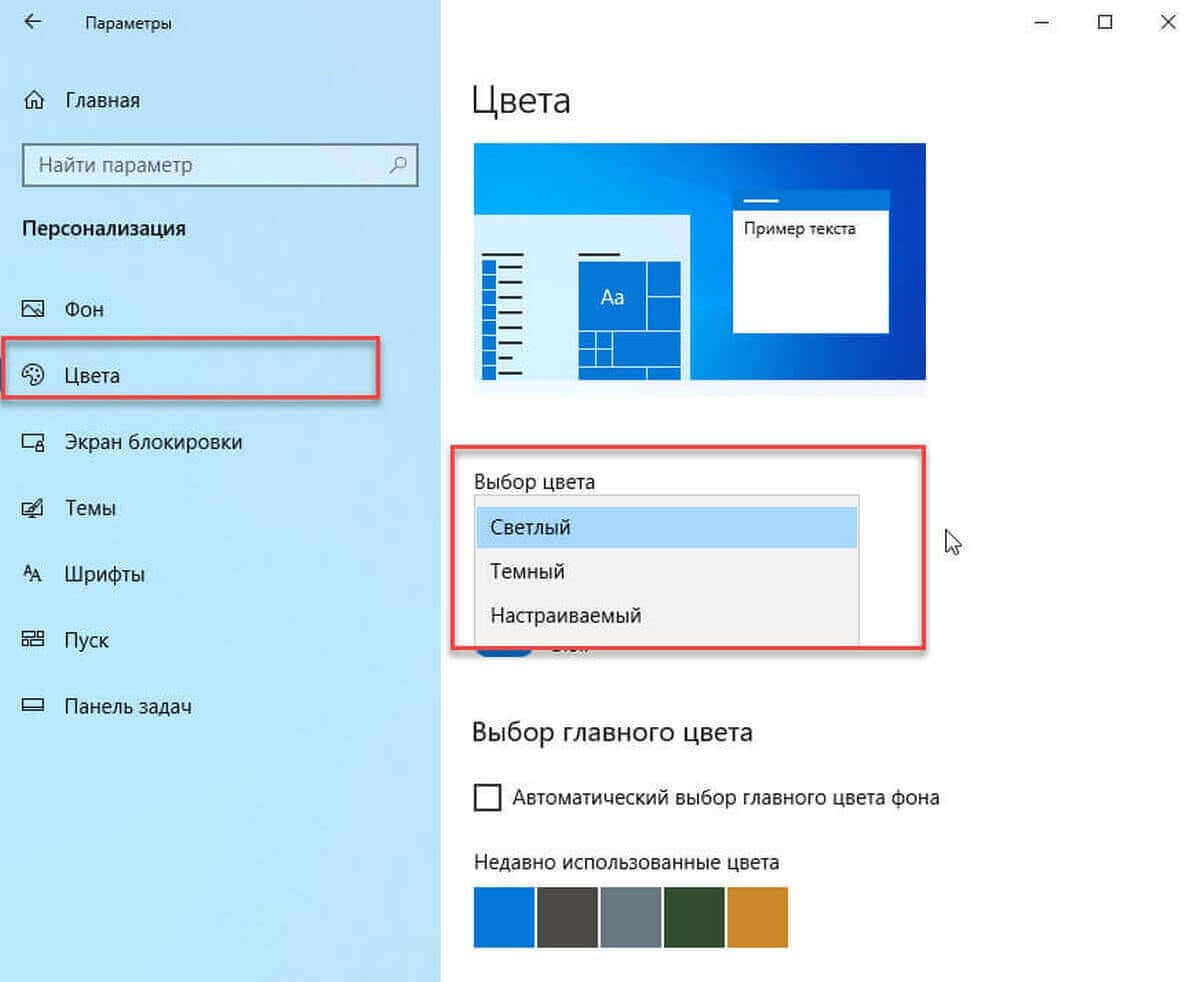
Применить темную тему к вашим приложениям, вы можете использовать «Параметры» → «Персонализация» → «Цвета». См. Следующий снимок экрана:
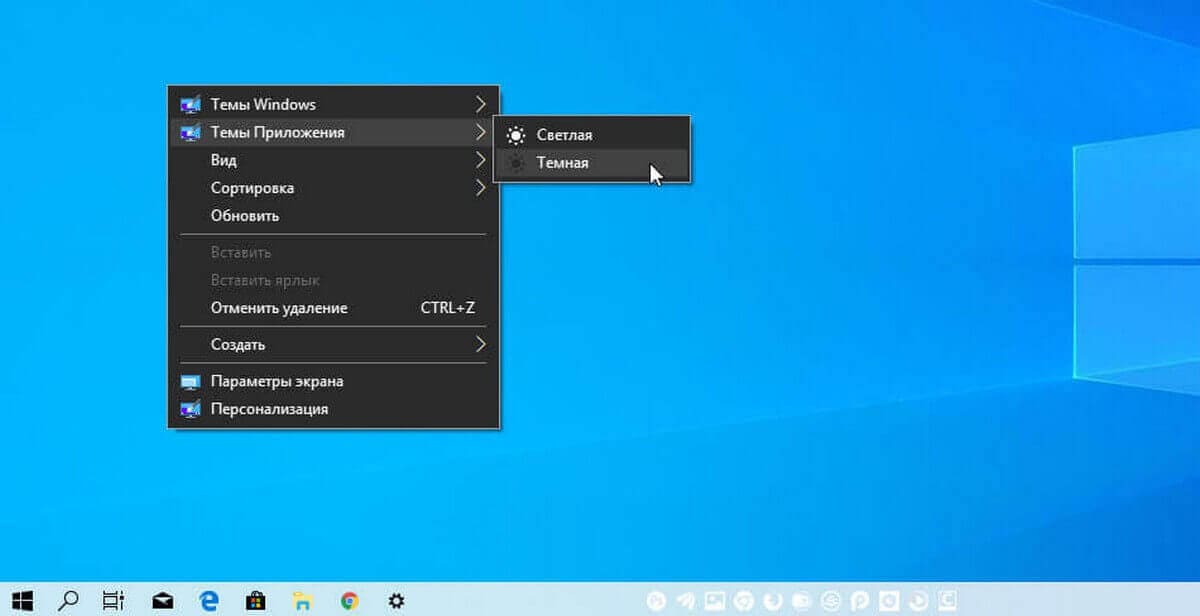
С помощью простой настройки реестра вы можете добавить в контекстное меню рабочего стола темный и светлый режим приложений и включить нужную тему одним кликом мыши:
Шаг 1: Загрузите следующие файлы реестра: Загрузите файлы реестра.
Шаг 2: Извлеките ZIP-архив, который вы загрузили, в любое место. Вы можете поместить их прямо на Рабочий стол.
Шаг 3: Дважды кликните файл «add-app-theme-context-menu.reg» и подтвердите операцию импорта.
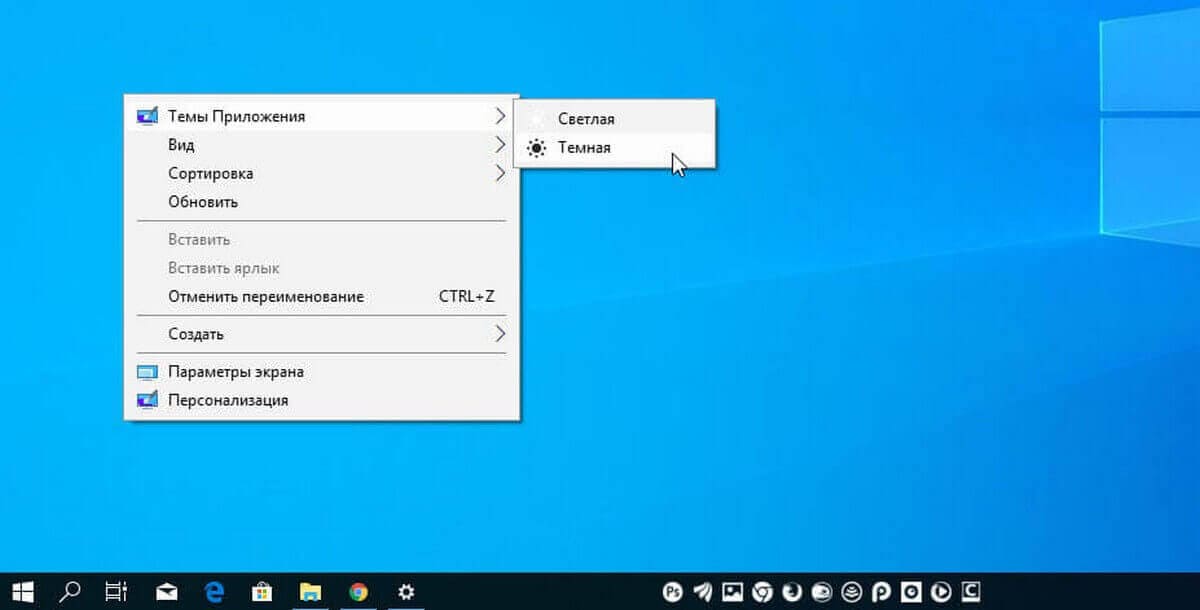
Это добавит на рабочий стол следующее контекстное меню:
Чтобы удалить контекстное меню, дважды щелкните предоставленный файл «remove-app-theme-context-menu.reg».
Если вам интересно посмотреть содержимое твика, вот как он выглядит:
Windows Registry Editor Version 5.00


[HKEY_CLASSES_ROOT\DesktopBackground\Shell\AppMode]

"MUIVerb"="App mode"

"Icon"="themecpl.dll,-1"

"Position"="Top"

"SubCommands"=""


[HKEY_CLASSES_ROOT\DesktopBackground\Shell\AppMode\shell\01Light]

"MUIVerb"="Light"


[HKEY_CLASSES_ROOT\DesktopBackground\Shell\AppMode\shell\01Light\command]

@="reg add HKCU\\SOFTWARE\\Microsoft\\Windows\\CurrentVersion\\Themes\\Personalize /v AppsUseLightTheme /t REG_DWORD /d 1 /f"


[HKEY_CLASSES_ROOT\DesktopBackground\Shell\AppMode\shell\02Dark]

"MUIVerb"="Dark"


[HKEY_CLASSES_ROOT\DesktopBackground\Shell\AppMode\shell\02Dark\command]

@="reg add HKCU\\SOFTWARE\\Microsoft\\Windows\\CurrentVersion\\Themes\\Personalize /v AppsUseLightTheme /t REG_DWORD /d 0 /f"
Вы можете скопировать его в «Блокнот» и изменить в соответствии с вашими предпочтениями. Например, вы можете настроить положение меню. Попробуйте изменить строку «Position» = «Top» на «Middle» или «Bottom». После внесения изменений сохраните файл как * .REG и запустите его двойным кликом.
Чтобы удалить меню вручную, откройте редактор реестра и удалите параметр
HKEY_CLASSES_ROOT\DesktopBackground\Shell\AppMode
Как и в первом способе, где мы добавляем переключение темы только для системы, настройка изменяет 32-параметр DWORD AppsUseLightTheme и изменяет его значение с 0 (режим по умолчанию) на 1, чтобы включить темный режим.
В качестве альтернативы.
Хотя вы можете включить светлый или темный режим непосредственно в «Параметрах» или с помощью контекстного меню, вы заметите что, не можете автоматически включать режимы в зависимости от времени суток.
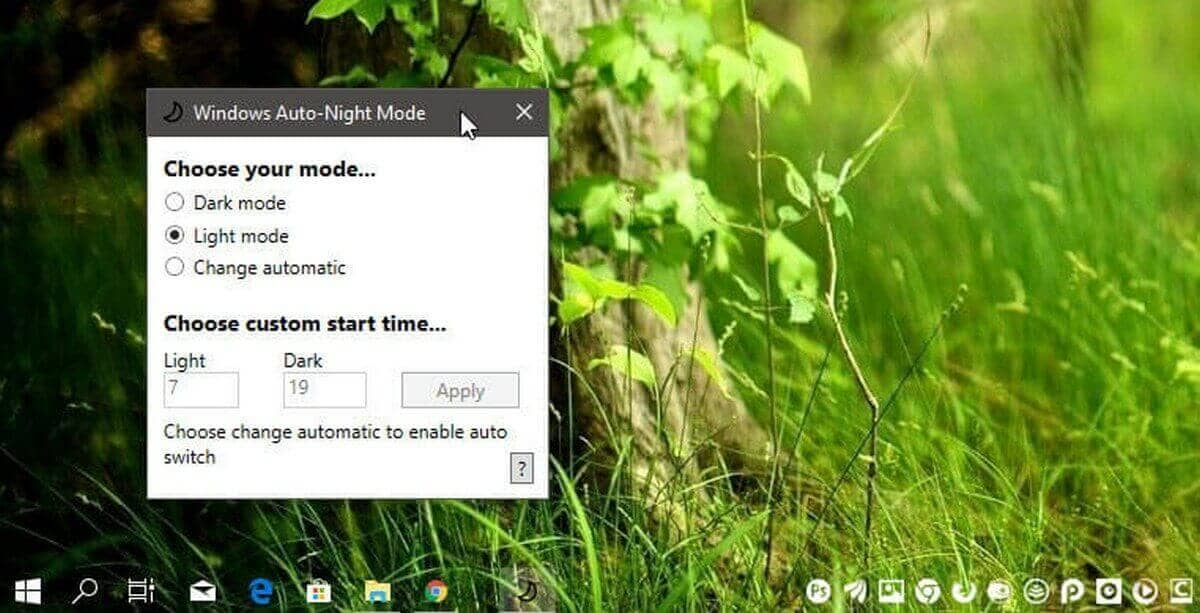
В этом поможет «Auto Dark Mode» — бесплатная программа с открытым исходным кодом для автоматического переключения между светлым и темным режимами.
Примечание: При загрузке программы вы можете получить предупреждение безопасности Smartscreen.
При запуске меню выбора приложения отображает текущий режим, светлый или темный, а также имеет возможность переключения в «Автоматический режим», который позволит переключается между темным и светлым режимами в зависимости от времени суток. Просто установите время начала для светлого и темного режима, например, светлый режим с 7 часов утра и темный с 19 часов. Это создаст новую задачу, которая автоматически изменяет настройки в зависимости от выбранного вами времени.
Кроме того, вы можете быстро переключаться между светлым и темным режимами, кликнув правой кнопкой мыши значок автоматического ночного режима на панели задач и затем выбрать соответствующий параметр.
Получить данное приложение вы можете на странице github.
Все!
Рекомендуем: Как сделать панель задач прозрачной в Windows 10.
Download Windows Speedup Tool to fix errors and make PC run faster
While looking for desktop customization apps, I came across this interesting software Moo0 Transparent Menu, which lets you customize the right-click context menu background on your Windows 10 PC. As the name suggests, this free software helps you adjust the transparency levels of your menu, add new colors, and change the system-wide context menu skins.
The tool, however, in no way improves upon the functionality in any way, but yes, it looks good and helps you see what’s behind a menu. Transparent Menu is a simple program that gets installed on your computer system in real-time – and the icon lands in your System Tray.

While installing the Transparent Menu program on your Windows PC, you can select whether or not to create a desktop shortcut. Right-click on the icon in your System Tray and adjust the settings. You can adjust the Menu Transparency, System-wide menu skins and language of the tool, by right-clicking on the icon. It comes with 28 system-wide context menu skins.
The tool comes with a default transparency of 10%, and you can adjust it to 0-50%. While changing the menu skins, remember that it will change the entire system’s colors. It supports multiple languages, and you can also set it to run automatically at system startup. Moo0 Transparent Menu is a very lightweight tool that uses a minimal amount of CPU and RAM for your system.
We didn’t really face any issues in installing or using the program, except that it brings along some other programs like Moo0 video downloader and Moo0 Disk Cleaner. So you need to be careful here during installation. Opt out of such offers and remember to create a system restore point first.
Overall, this tool gives you the pleasure of customizing and personalizing your desktop and context menu it is semitransparent – and also allows you to change its color scheme. This simple program can be used even by a novice computer user.
Moo0 Transparent Context Menu free download
You can download Moo0 Transparent Menu here and customize your right-click context menu.
If you want to customize the context menu, here are a few of our freeware that may interest you:
- Context Menu Editor is a freeware tweaking utility to add/delete application shortcuts, Win32 commands, files, and website URLs to your desktop and folder context menu.
- Right-Click Restart Explorer is a simple tool that adds Restart explorer to your right-click context menu.
- RightClick ReplaceThis allows you to replace files in Windows easily. It is also helpful in cases where Windows will not allow you to replace files that are being used.
- Right-Click Extender for Windows is a freeware utility that allows you to add some important items to the right-click context menu. It allows you to add or remove many additional options to a Drive, File, Folder, Computer and Desktop’s Right Click Context Menu.
Anand Khanse is the Admin of TheWindowsClub.com, a 10-year Microsoft MVP (2006-16) & a Windows Insider MVP (2016-2022). Please read the entire post & the comments first, create a System Restore Point before making any changes to your system & be careful about any 3rd-party offers while installing freeware.

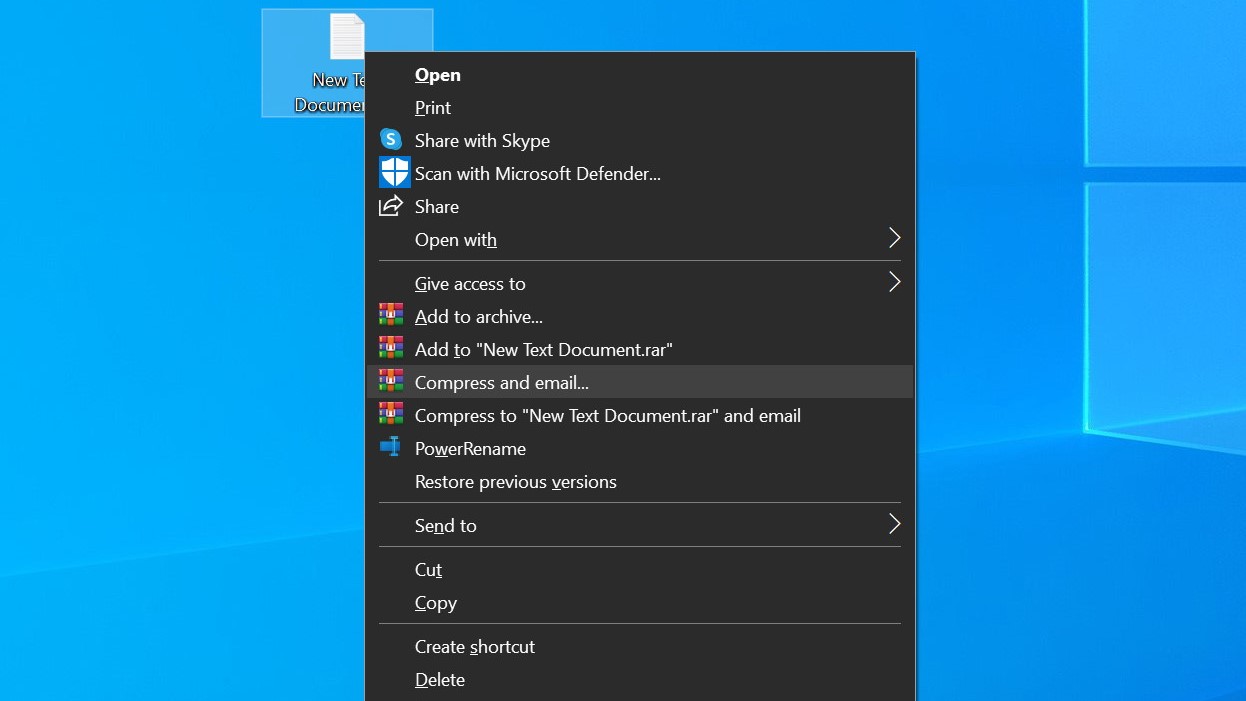
The menu that appears when you click on a shortcut, an icon, or an element of the Windows interface is called the context menu. It’s called this because the options you see contained within this menu are contextual and not always the same. Right click on the Start button, and you will see different options than if you right click on a Microsoft Word document, for example.
But even though the very idea of a Windows 10 context menu is to provide you with options that are applicable to the item you’ve right-clicked on, you may feel that there are some options missing. Conversely, there may be options listed that you never use and you would like to get rid of in the name of keeping things streamlined.
This could be because there are things you simply never do with files and applications, or it might be that software you have uninstalled hasn’t properly tidied up after itself, leaving you with menu entries that do not serve any purpose.
Here we’re going to look at both of these scenarios as we show you have to tweak the context menu to your liking. With tweaking and customization remaining as popular as ever with Windows users, you’ll probably not be surprised to learn that there are numerous apps that can be used to customize things.
We’re going to take a look at the appropriately named Easy Context Menu. The program is a portable app, meaning that it does not even need to be installed – you can just download it and run it.
Be sure to visit our other Windows 10 tutorials. We’ll show you how to screenshot on Windows 10, perform a password reset, and more. If you still haven’t switched, here’s how to upgrade to Windows 10 for free.
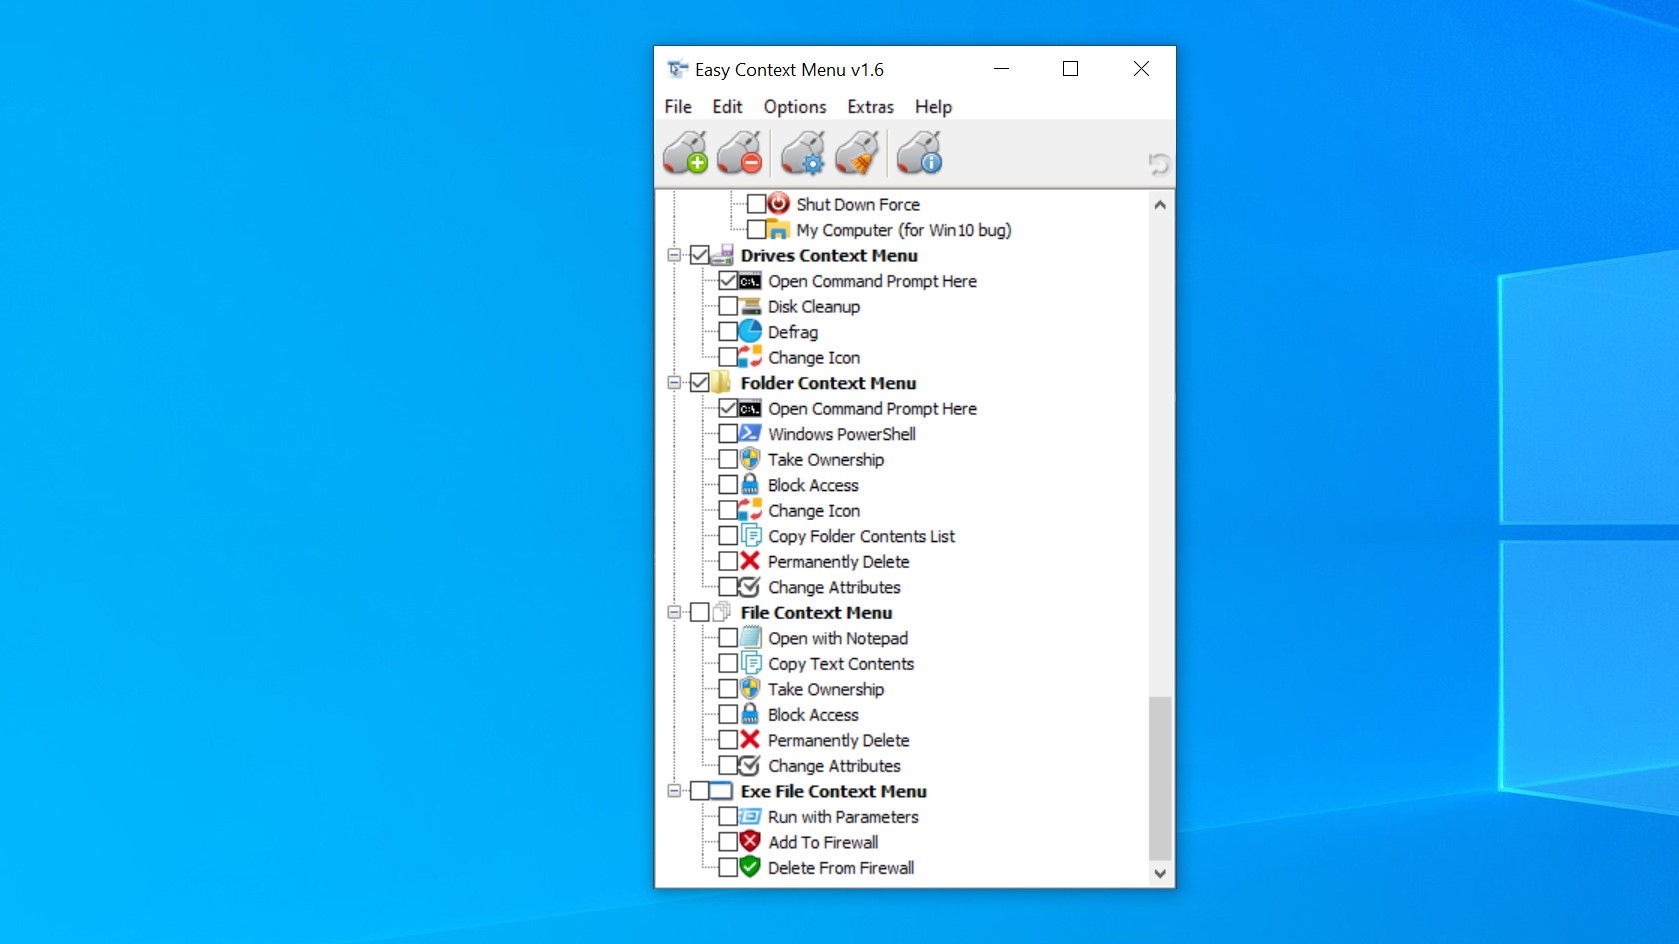
If your context menu is littered with shortcuts and entries for programs that you no longer have installed, or that you simply do not use, Easy Context Menu can be used to get rid of them. Start by either clicking the fourth toolbar button (depicting a mouse and a broom), or click File > ContextMenu Cleaner.
Sign up for breaking news, reviews, opinion, top tech deals, and more.
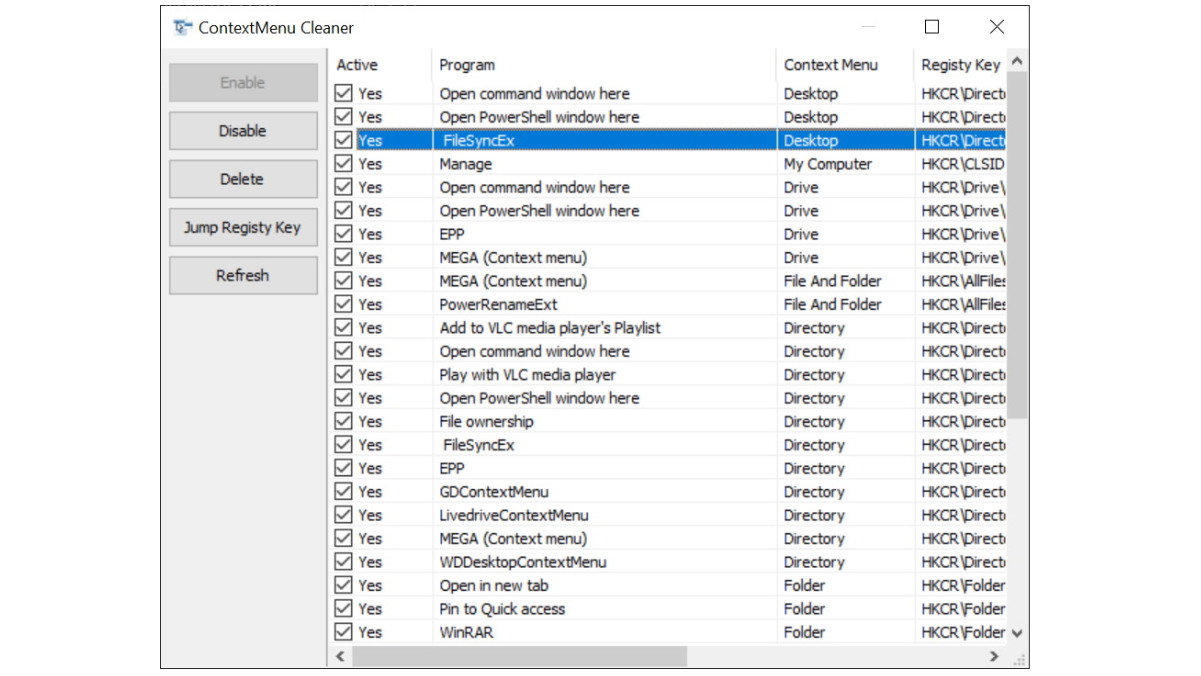
You’ll be presented with a list of what is currently displayed in the context menu (not all of which you will recognize – the menu it contextual, after all!). If you spot anything you would rather was not cluttering up the menu, just select it can click the Delete button to the right. Alternatively, if you would like the option of easily re-adding an entry you are removing, click the Disable button instead.
Add custom options
Tidying up your menu is great, but Easy Context Menu really comes into its own when it comes to adding new options to the right click menu. This includes shortcuts to frequently used Windows tool such as the Registry Editor, Command Prompt or the Device Manager, but also options such as adding a shut down link or a shortcut to show/hide file extensions.
There are lots of pre-configured menu entries for you to work through here, and adding them to your context menu is a simple matter of ticking the relevant check box. You will notice that the various options are broken down into numerous categories, such as System Tools and so on, and these will be included any time you right click on anything. There are other options which appear under the headings Folder Context Menu, File Context Menu, and so on, that will only appear when you right click on certain objects. For instance, it makes sense to only display the Open With Notepad option on files and not folders.
When you have made all of the changes you want, click the first toolbar button, or select Apply Changes from the File menu.
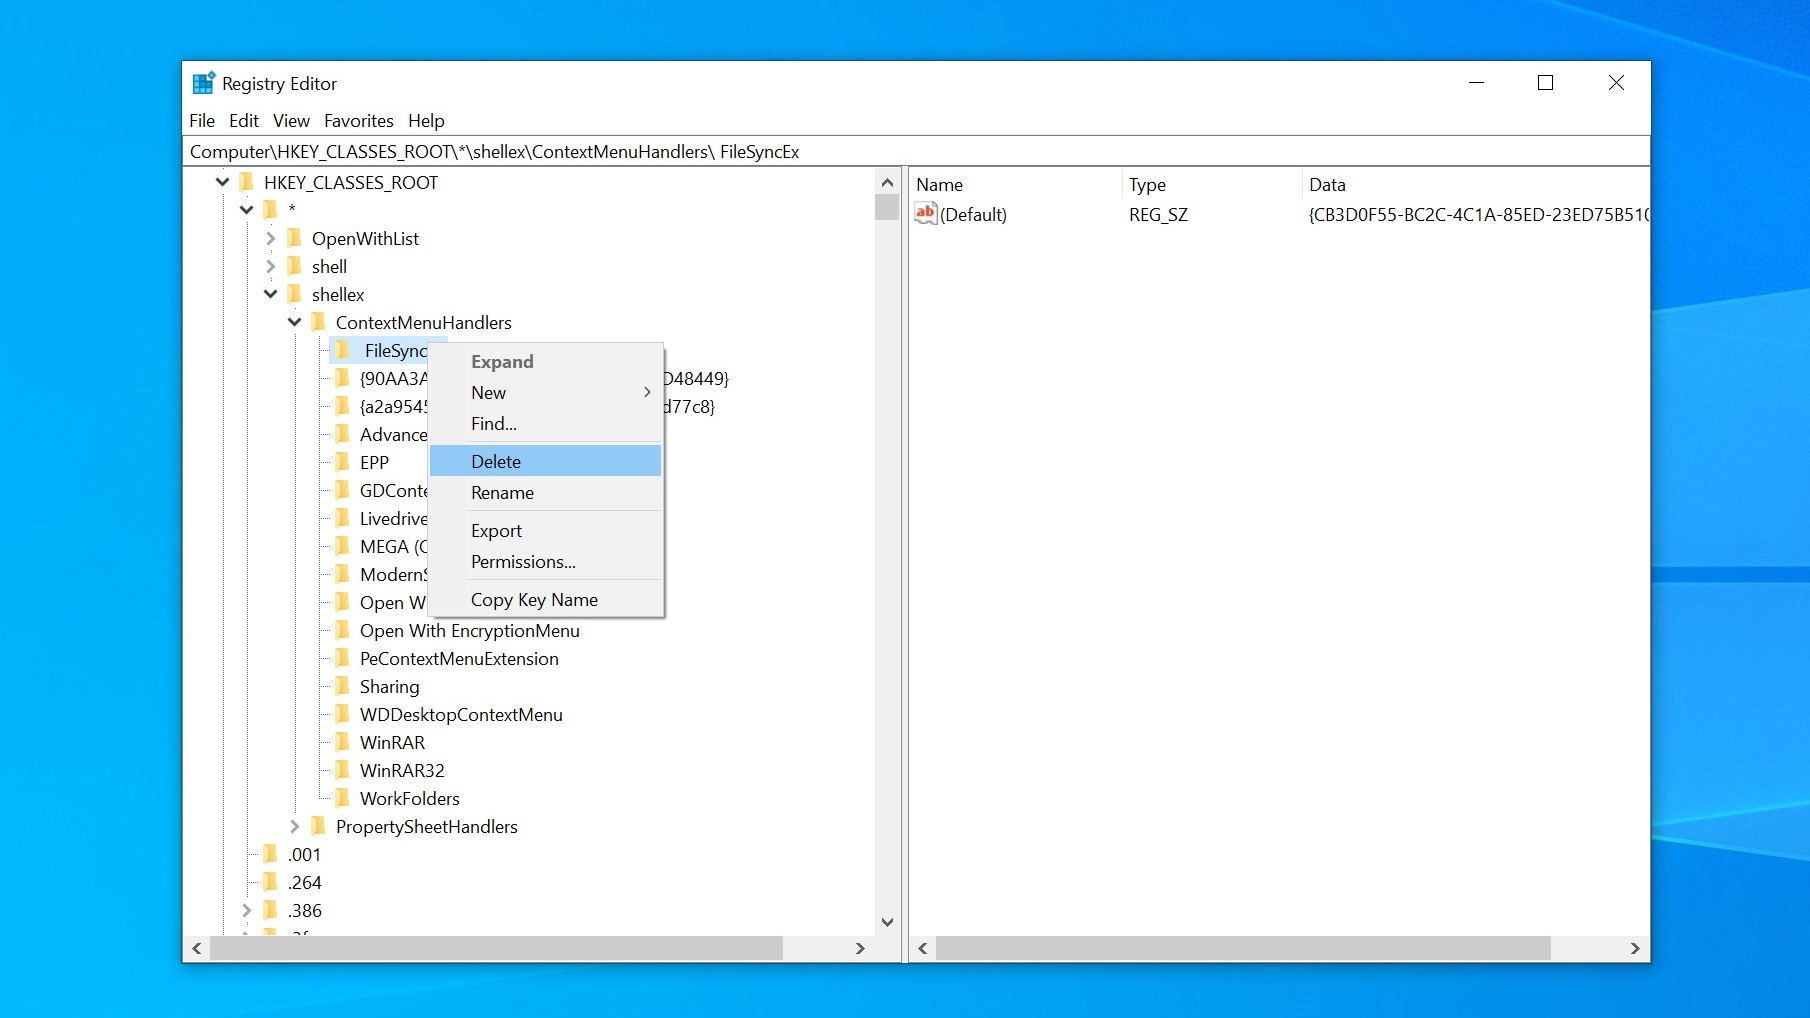
Edit the registry
If you prefer the idea of doing things in a completely manual fashion, you can indulge in a little registry editing. This go with the usual warning associated with delving into the registry; it’s possible to seriously mess up your system by making the wrong edits, so make sure you have a reliable backup that you can fall back on just in case the worst should happen. With the necessary safeguards in place, you’re ready to jump in and get started.
Press the Windows key and R simultaneously, type regedit and press Enter. Navigate to HKEY_CLASSES_ROOT\*\shellex\ContextMenuHandlers and you will see a series of keys that related to existing menu entries. It is easy to delete any you no longer need access to – just right click a key and select Delete.
Adding entries is possible in the registry, but it is a little trickier and you need to know precisely the right parameters for every menu item you would like to add.
With the potential for things to go wrong, and the awkwardness of adding new entries, editing the context menu via the registry isn’t something that everyone will be comfortable with. It’s fine for quickly removing entries without the need for additional software, but for anything more advanced it is a good idea to turn to the likes of Easy Context Menu.
- Tune up your PC with our guide to free PC optimization software
Sofia is a tech journalist who’s been writing about software, hardware and the web for nearly 25 years – but still looks as youthful as ever! After years writing for magazines, her life moved online and remains fueled by technology, music and nature.
Having written for websites and magazines since 2000, producing a wide range of reviews, guides, tutorials, brochures, newsletters and more, she continues to write for diverse audiences, from computing newbies to advanced users and business clients. Always willing to try something new, she loves sharing new discoveries with others.
Sofia lives and breathes Windows, Android, iOS, macOS and just about anything with a power button, but her particular areas of interest include security, tweaking and privacy. Her other loves include walking, music, her two Malamutes and, of course, her wife and daughter.
You can find her on Twitter and Mastodon.
The Windows context menu is the small box that appears when you make a right-click on specific items in the Windows 10 operating system. This small box that appears provides users with a list of with further options that can be carried out with a file or folder. The most common context menu used is when the users make a right-click on the desktop and get options like View, Screen Resolution, Personalize etc.
Windows context menu is designed to provide the user with a bunch of options in a single click. This makes it easy to use Windows features and saves time and effort. But the default context menu provided by Windows may not necessarily have all the options that you require. And also many applications installed in your system create a self-shortcut in the context menu, whether you need them or not.
In this article, we will discuss how to use a Windows 10 Context Menu Editor to customize the context menu and make it more convenient to get on with our tasks.
How To Use A Windows 10 Context Menu Editor?
Windows Context Menu can be modified with items in the list added or deleted as per user’s discretion. Unlike Apple, Microsoft does not provide any options to do so, and we will have to use a free third-party tool that will ease things for us. The tool I recommend and have been using for months now without any issues is the Ultimate Windows Context Menu Customizer.
Download Now: Ultimate Windows Context Menu Customizer.
Ultimate Windows Context Menu Customizer is a free and easy to use, lightweight tool that allows users to add, remove, edit, enable and disable items from the Windows context menu. Once you download and install this program, you can launch it, and the user interface will display six types of Windows Context Menu in your computer namely, Computer, Desktop, Drivers, Files, Folder and Desktop and Folders.
Also Read: How To Fix Windows 10 Spotlight Images Not Working?
How To Remove Items From The Windows Context Menu.

Once you have launched the application, you can click on each menu from six options to check the existing contents and remove or disable them. Here are the steps to remove items from the Windows context menu:
Step 1: Open the application and click on any menu item in the Windows context menu location and then click on any of the options in the next box labelled as context menu items.
Step 2: Once you click on the item you wish to remove, you can then click on “Disabled” to keep the item, but it will disappear from the context menu. You can enable it by removing the checkmark next to the disabled box.
Step 3: Else you can click on Remove Item at the bottom of the application window to obliterate the item. You will not be able to add this item again.
The following image will make things more evident where I have taken a specific entry of “ Add to VLC media player’s playlist” that appears every time, I make a right-click on any folder in my computer.

Note: The option of Add to VLC media player‘s list has been disabled and hence is not visible in the second image.
Also Read: 10 Best Context Menu Editors for Windows 10
How To Add Items To The Windows Context Menu.
Before we start on adding important shortcuts to the context menu, it is essential to know about the specific fields that we must complete to add an item in the Windows context menu. The list of entries includes:
Text: Add a name of the entry you wish to add in the context menu.
Command: Click on the three dots button to select the executable file of the program you wish to add.
Icon: This is to select the icon that will be displayed in the context menu against the newly added item.
Position: Select the position as to where the new item would be placed: Top, Middle, and Bottom.
Also Read: How to Boot into Windows 10 Safe Mode
Steps To Add Item In Windows Context Menu
Step 1: Click on one of the six items available in the top left window labelled as Windows Context menu.
Step 2: Enter the information in the four fields described above.
Step 3: Click on Add Item button at the bottom of the application window.

That’s it! Close the application and check the context menu for the new addition. You will be surprised to find that the changes will reflect almost instantly.
Also Read: How To Backup, Restore And Edit Files Using The Registry Editor Windows 10?
The Final Word On How To Customize Windows Context Menu
The Windows Context Menu is an important feature that can provide shortcuts to launch specific applications and functions in the Windows Operating System. Microsoft should have allowed customization of this tool to the users and permitted them to make customizations through an inbuilt tool. There are a few Registry tweaks that can allow a user to make customizations in the right-click menu without having to use the Windows 10 Context Menu Editor, but those hacks or tweaks are way too complicated.
Follow us on social media – Facebook, Twitter, LinkedIn, and YouTube. For any queries or suggestions, please let us know in the comments section below. We would love to get back to you with a solution. We post regularly on the tips and tricks along with solutions to common issues related to technology.
Next Read:
How To Change A Desktop Background On A Windows Computer
How To Solve No Sound Problem In Windows 10