
Если при попытке изменить, открыть или удалить папку или файл в Windows вы получаете сообщения о том, что вам отказано в доступе, «Нет доступа к папке», «Запросите разрешение на изменение этой папки» и аналогичные, то вам следует изменить владельца папки или файла, о чем и поговорим.
Есть несколько способов стать владельцем папки или файла, основные среди которых — использование командной строки и дополнительные настройки безопасности ОС. Есть также и сторонние программы, позволяющие изменить владельца папки в два клика, на одного из представителей которых тоже посмотрим. Все описанное ниже подходит для Windows 11, Windows 10 и предыдущих версиях системы.
Использование команды takeown для изменения владельца объекта
Для того, чтобы стать владельцем того или иного элемента с использованием способов ниже, вы должны иметь права администратора на компьютере. Кроме этого, не следует изменять владельца для всего системного диска — это может повлечь нестабильную работу Windows. Если вы хотите стать владельцем папки для того, чтобы удалить ее, а иначе она не удаляется, потребуется также предоставить необходимые права соответствующему пользователю (простого назначения владельца может быть недостаточно).
Изменение владельца папки или файла возможно с помощью командной строки. Имеются две команды, первая из них — takeown. Для ее использования, запустите командную строку от имени Администратора, в Windows 11 и Windows 10 это можно сделать через поиск в панели задач с последующим выбором пункта «Запуск от имени администратора». В командной строке, в зависимости от того, владельцем какого объекта вам нужно стать, введите одну из команд:
- takeown /F «полный путь к файлу» — стать владельцем указанного файла. Чтобы сделать всех администраторов компьютера владельцами, используйте параметр /A после пути к файлу в команде.
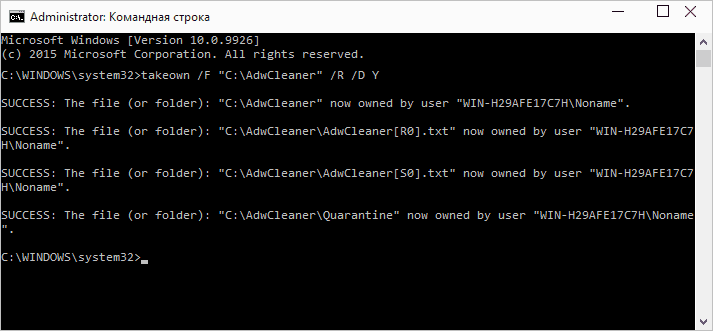
- takeown /F «путь к папке или диску» /R /D Y — стать владельцем папки или диска. Путь к диску указывается в виде D: (без слэша), путь к папке — C:\Folder (также без слэша).
При выполнении данных команд вы получите сообщение о том, что вы успешно стали владельцем конкретного файла или отдельных файлов в указанной вами папке или на диске (см. скриншот).
Как было отмечено ранее, простое изменение владельца объекта, не обязательно означает, что вы сможете удалить, переименовать или иным образом изменить его. Для этого также нужно предоставить необходимые права пользователю, о чём в следующих двух частях инструкции.
Команда icacls
Еще одна команда, которая позволяет получить доступ к папке или файлам (изменить их владельца) и получить необходимые права — icacls, использовать которую следует так же, в командной строке, запущенной от имени администратора.
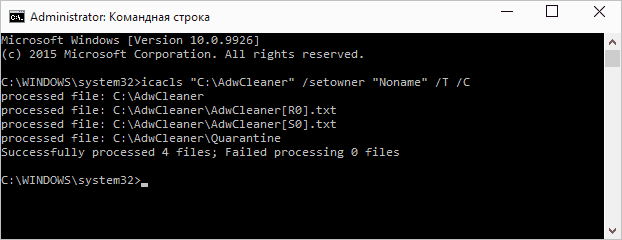
Для установки владельца используйте команду в следующем виде (пример на скриншоте):
icacls "путь к файлу или папке" /setowner "Имя_пользователя" /T /C
Пути указываются аналогично предыдущему способу.
Команды из первой и второй части можно сочетать. Например, следующие две команды сделают вас владельцем папки и предоставят полные права доступа к ней для группы Администраторы:
takeown /F D:\ПУТЬ /R /A
icacls D:\ПУТЬ /T /Inheritance:e /grant Администраторы:F
И общий пример для того, чтобы предоставить полный доступ пользователю к какой-либо папке или файлу с помощью ICACLS:
ICACLS "ПУТЬ_К_ПАПКЕ" /grant:r "имя_пользователя":(OI)(CI)F
Получение доступа с помощью настроек безопасности
Ещё один способ — использовать лишь мышь и интерфейс Windows, не обращаясь к командной строке.
- Кликните правой кнопкой мыши по файлу или папке, доступ к которому нужно получить (стать владельцем), в контекстном меню выберите пункт «Свойства».
- На вкладке «Безопасность» нажмите кнопку «Дополнительно».
- Напротив пункта «Владелец» нажмите «Изменить».

- В открывшемся окне нажмите кнопку «Дополнительно», а в следующем — кнопку «Поиск».

- Выберите в списке пользователя (или группу пользователей), которого нужно сделать владельцем элемента. Нажмите Ок, затем — снова Ок.
- Если вы изменяете владельца папки или диска, а не отдельного файла, отметьте также пункт «Заменить владельца подконтейнеров и объектов».

- Нажмите Ок.
- Вернитесь на вкладку «Безопасность» в свойствах папки или файла, нажмите кнопку «Изменить» под списком пользователей и групп и предоставьте необходимый уровень доступа нужным пользователям или их группам (которых можно добавить в список аналогично тому как мы делали на 4-м шаге), например — полный доступ.


На этом вы стали владельцем указанного объекта Windows, а также получили права на доступ к нему. Сообщения о том, что нет доступа к папке или файлу вас не должны больше потревожить.
Другие способы стать владельцем папок и файлов
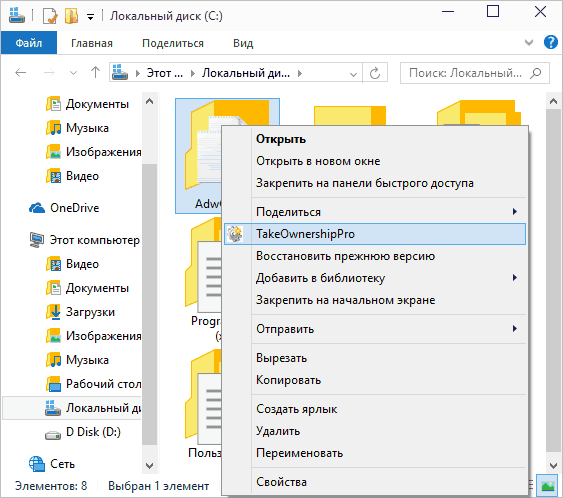
Есть и другие способы решить проблему «отказано в доступе» и быстро стать владельцем, например, с помощью сторонних программ, встраивающих пункт «Стать владельцем» в контекстное меню проводника. Одна из таких программ — TakeOwnershipPro, бесплатная и, насколько я могу судить, без чего-то потенциально нежелательного. Аналогичный пункт в контекстное меню можно добавить и путем редактирования реестра Windows. Есть и другие похожие утилиты, подробнее: Как добавить пункт Стать владельцем в контекстное меню папок и файлов Windows.
Однако, с учетом того, что подобная задача возникает сравнительно редко, я не рекомендую устанавливать стороннее ПО или вносить изменения в систему: на мой взгляд, лучше изменить владельца элемента одним из способов «вручную».
## How to Change Folder Permissions on Windows 10 Command Line?
Changing folder permissions on Windows 10 can be done using various methods, including the Command Line interface. The Command Line provides a powerful way to manage and modify your system settings quickly and efficiently. In this tutorial, we will guide you through the steps to change folder permissions on Windows 10 using the Command Line.
Step 1: Open the Command Prompt:
– Press the Windows key on your keyboard.
– Type “Command Prompt” in the search bar.
– Click on the “Command Prompt” app in the search results.
Step 2: Navigate to the desired directory:
– Use the “cd” command followed by the directory path to navigate to the folder you want to change permissions for.
– For example, if the folder is located at “C:UsersYourUsernameDocuments”, type “cd C:UsersYourUsernameDocuments” and press Enter.
Step 3: View current folder permissions:
– Type “icacls foldername” and press Enter to view the current permissions for the specified folder.
– Replace “foldername” with the actual name of the folder you want to change permissions for.
Step 4: Modify folder permissions:
– Use the “icacls” command followed by the folder name, the “/grant” option, and the desired permission settings to modify folder permissions.
– For example, to grant full control to a user named “John” for the specified folder, type “icacls foldername /grant John:(F)” and press Enter.
Step 5: Verify the folder permissions:
– Repeat Step 3 to confirm that the permissions have been successfully modified.
| Pros | Cons |
|---|---|
| 1. Provides granular control over folder permissions, allowing you to set specific access levels for different users. | 1. Modifying folder permissions through the Command Line can be complex for inexperienced users. |
| 2. Offers a quick and efficient method for managing permissions across multiple folders. | 2. Misconfiguring folder permissions can lead to unintended security risks or restricted access to files. |
| 3. Command Line access provides flexibility and automation options for advanced users. | 3. It may require administrative privileges to change folder permissions. |
Video Tutorial: How to do chmod 400 in windows?
How do I change permissions on a file in terminal?
To change permissions on a file in the terminal, you can use the `chmod` command. Here are the steps:
1. Open the terminal application on your device.
2. Navigate to the directory where the file is located using the `cd` command, for example: `cd /path/to/directory`.
3. To change the permissions of a file, use the `chmod` command followed by the permission code and the filename. The syntax for the `chmod` command is: `chmod permission_code filename`, where the permission code is a three-digit number representing the permissions for the owner, group, and others.
The permission code consists of three digits:
– The first digit represents the owner’s permissions.
– The second digit represents the group’s permissions.
– The third digit represents the permissions for others (everyone else).
Each permission is assigned a value:
– Read permission: 4
– Write permission: 2
– Execute permission: 1
To assign permissions, you need to calculate the sum of the desired values and assign it as the permission code. For example, 7 represents read, write, and execute permissions (4 + 2 + 1).
4. Determine the permission code you want to assign to the file. For example, if you want to give read and write permissions to the owner, and only read permissions to the group and others, you can use the code 644.
– Owner: read and write permission (4 + 2 = 6)
– Group: read permission (4)
– Others: read permission (4)
5. Execute the `chmod` command. For example: `chmod 644 filename`. Replace `filename` with the name of the file you want to change the permissions for.
After executing the command, the permissions for the specified file will be changed accordingly. Remember to be cautious when modifying permissions, as incorrect changes may affect the functionality and security of the file.
How do I give 777 permission to a folder recursively?
To give 777 permission to a folder recursively, you can follow these steps:
1. Open the terminal application on your system.
2. Navigate to the parent directory of the folder for which you want to set the permissions recursively.
3. Use the chmod command along with the -R option to modify the permissions recursively. Type the following command:
“`
chmod -R 777 folder-name
“`
Replace “folder-name” with the actual name of the folder you want to modify.
4. Press Enter to execute the command.
5. The system will recursively apply the 777 permission to all files and subdirectories within the specified folder.
It’s important to note that setting permissions to 777 allows read, write, and execute access for all users on the system. This may not be the most secure option, so use it judiciously and consider potential security risks.
Please note that these instructions are applicable to Unix-like systems, such as macOS and Linux. If you’re working on a different platform, the steps may vary slightly.
How to set chmod 777 to file?
To set the chmod 777 permissions to a file, follow these steps:
Step 1: Open the terminal or command prompt: On macOS or Linux, you can use Terminal, while on Windows, you can use PowerShell or Command Prompt.
Step 2: Navigate to the directory where the file is located: Use the “cd” command to change the current directory to the one where your file is located. For example, if your file is in the “Documents” folder, use the command: “cd Documents”.
Step 3: Set the desired permissions using the chmod command: Once you are in the correct directory, use the chmod command followed by the numeric value 777 and the filename. For example, if your file is called “myfile.txt”, the command would be: “chmod 777 myfile.txt”.
Step 4: Verify the permissions: You can use the “ls -l” command to list all the files in the current directory along with their permissions. Locate your file in the list and verify that it has the desired permissions set as “rwxrwxrwx” (or “rw-rw-rw-” for a file without execute permissions).
Important note: Setting the permissions to 777 allows read, write, and execute permissions for the owner, group, and everyone else. This can be a security risk, as it grants potentially unnecessary access to the file. Make sure you understand the implications before setting such permissive permissions.
Remember to adjust the steps accordingly based on your operating system and its specific command syntax.
How do I change folder permissions recursively in CMD?
To change folder permissions recursively in CMD (Command Prompt), you can follow these steps:
1. Open the CMD: Press the Windows key + R combination, type “cmd” in the Run dialog box, and press Enter. This will open the Command Prompt.
2. Navigate to the root folder: Use the “cd” command to navigate to the root folder where the desired folder and subfolders are located.
3. Change folder permissions: Use the “icacls” command to change the folder permissions recursively. The syntax for the “icacls” command is as follows:
`icacls /grant : /t`
Replace “ with the path of the folder for which you want to change permissions.
Replace “ with the username or group name for which you want to grant permissions.
Replace “ with the desired permissions (e.g., F – Full Control, M – Modify, RX – Read & Execute, R – Read, W – Write).
For example, if you want to grant Full Control permission to a user named “John” for a folder named “Data” located in “C:Files”, the command would be:
`icacls C:FilesData /grant John:F /t`
This will apply the permission recursively to all files and subfolders within the “Data” folder.
Note: Use caution when altering folder permissions, as it can have security implications.
4. Verify the changes: After running the command, you can verify the changes by checking the permissions on the folder and its subfolders.
Remember to adjust the commands based on your specific folder paths, user or group names, and desired permissions. Also, make sure you have the necessary administrative privileges to modify folder permissions.
To change NTFS permissions using the command line, you can follow these steps:
1. Open the Command Prompt: Press the Windows key + R, type “cmd,” and hit Enter.
2. Navigate to the target location: Use the “cd” command to change directory to the location where the file or folder resides. For example, if the target file is in the “Documents” folder, type: `cd Documents` and hit Enter.
3. View current permissions: To see the current permissions on a file or folder, use the `icacls` command with the path to the file or folder. For example, `icacls myfile.txt` will display the current permissions for `myfile.txt`.
4. Grant or revoke permissions: To grant permissions, use the `icacls` command followed by the path to the file or folder, and then the /grant switch followed by the desired permission. For example, `icacls myfile.txt /grant Users:(CI)(OI)F` grants full control to the “Users” group for `myfile.txt`. To revoke permissions, use the /remove switch instead of /grant.
5. Replace permissions: To replace all existing permissions with new permissions, use the `icacls` command followed by the path to the file or folder, and then the /reset switch. For example, `icacls myfile.txt /reset` will remove all existing permissions and give the file a default set of permissions.
6. Allow or deny specific permissions: To allow or deny specific permissions while preserving other existing permissions, use the `icacls` command followed by the path to the file or folder, and then the /grant or /deny switch followed by the desired permission. For example, `icacls myfile.txt /deny Users:(CI)(OI)W` denies write access to the “Users” group for `myfile.txt`.
7. Verify changes: To verify that the permissions have been successfully changed, repeat step 3 to view the updated permissions.
Remember, when using the command line to change NTFS permissions, you need to have administrative privileges.
Please note that the steps provided are for Windows systems using the NTFS file system. The exact commands and options may vary slightly depending on the Windows version and any specific requirements or scenarios. It’s advisable to refer to the official Microsoft documentation or consult with an expert if you encounter any issues or need more advanced instructions.
How do I give chmod 777 to all files in a folder?
To give chmod 777 permissions to all files in a folder, you can follow these steps:
1. Open the terminal or command prompt on your computer.
2. Navigate to the folder directory where you want to apply the chmod 777 permissions.
3. Once you are inside the desired folder, execute the following command:
“`
chmod -R 777 ./*
“`
– Explanation: The `chmod` command is used to change file permissions, and the `-R` option means to apply the changes recursively to all files and subdirectories within the specified folder. `777` denotes full permissions for the owner, group, and others.
– Note: Be cautious when applying `777` permissions, as it grants unrestricted read, write, and execute access to all users. Consider whether it is genuinely necessary, as it can pose security risks.
4. After executing the command, the permissions of all files and subdirectories within the folder will be changed to `777`.
Remember to exercise discretion and avoid using broad permissions for security reasons. It’s generally recommended to assign the most restrictive permissions necessary to maintain system integrity.
{“@context”:”https://schema.org”,”@type”:”FAQPage”,”mainEntity”:[{“@type”:”Question”,”name”:”How do I change permissions on a file in terminal?”,”acceptedAnswer”:{“@type”:”Answer”,”text”:”To change permissions on a file in the terminal, you can use the `chmod` command. Here are the steps:nn1. Open the terminal application on your device.n2. Navigate to the directory where the file is located using the `cd` command, for example: `cd /path/to/directory`.n3. To change the permissions of a file, use the `chmod` command followed by the permission code and the filename. The syntax for the `chmod` command is: `chmod permission_code filename`, where the permission code is a three-digit number representing the permissions for the owner, group, and others.nnThe permission code consists of three digits:n- The first digit represents the owner’s permissions.n- The second digit represents the group’s permissions.n- The third digit represents the permissions for others (everyone else).nnEach permission is assigned a value:n- Read permission: 4n- Write permission: 2n- Execute permission: 1nnTo assign permissions, you need to calculate the sum of the desired values and assign it as the permission code. For example, 7 represents read, write, and execute permissions (4 + 2 + 1).nn4. Determine the permission code you want to assign to the file. For example, if you want to give read and write permissions to the owner, and only read permissions to the group and others, you can use the code 644.n – Owner: read and write permission (4 + 2 = 6)n – Group: read permission (4)n – Others: read permission (4)nn5. Execute the `chmod` command. For example: `chmod 644 filename`. Replace `filename` with the name of the file you want to change the permissions for.nnAfter executing the command, the permissions for the specified file will be changed accordingly. Remember to be cautious when modifying permissions, as incorrect changes may affect the functionality and security of the file.”}},{“@type”:”Question”,”name”:”How do I give 777 permission to a folder recursively?”,”acceptedAnswer”:{“@type”:”Answer”,”text”:”To give 777 permission to a folder recursively, you can follow these steps:nn1. Open the terminal application on your system.n2. Navigate to the parent directory of the folder for which you want to set the permissions recursively.n3. Use the chmod command along with the -R option to modify the permissions recursively. Type the following command:n “`n chmod -R 777 folder-namen “`n Replace “folder-name” with the actual name of the folder you want to modify.n4. Press Enter to execute the command.n5. The system will recursively apply the 777 permission to all files and subdirectories within the specified folder.nnIt’s important to note that setting permissions to 777 allows read, write, and execute access for all users on the system. This may not be the most secure option, so use it judiciously and consider potential security risks.nnPlease note that these instructions are applicable to Unix-like systems, such as macOS and Linux. If you’re working on a different platform, the steps may vary slightly.”}},{“@type”:”Question”,”name”:”How to set chmod 777 to file?”,”acceptedAnswer”:{“@type”:”Answer”,”text”:”To set the chmod 777 permissions to a file, follow these steps:nnStep 1: Open the terminal or command prompt: On macOS or Linux, you can use Terminal, while on Windows, you can use PowerShell or Command Prompt.nnStep 2: Navigate to the directory where the file is located: Use the “cd” command to change the current directory to the one where your file is located. For example, if your file is in the “Documents” folder, use the command: “cd Documents”.nnStep 3: Set the desired permissions using the chmod command: Once you are in the correct directory, use the chmod command followed by the numeric value 777 and the filename. For example, if your file is called “myfile.txt”, the command would be: “chmod 777 myfile.txt”.nnStep 4: Verify the permissions: You can use the “ls -l” command to list all the files in the current directory along with their permissions. Locate your file in the list and verify that it has the desired permissions set as “rwxrwxrwx” (or “rw-rw-rw-” for a file without execute permissions).nnImportant note: Setting the permissions to 777 allows read, write, and execute permissions for the owner, group, and everyone else. This can be a security risk, as it grants potentially unnecessary access to the file. Make sure you understand the implications before setting such permissive permissions.nnRemember to adjust the steps accordingly based on your operating system and its specific command syntax.”}},{“@type”:”Question”,”name”:”How do I change folder permissions recursively in CMD?”,”acceptedAnswer”:{“@type”:”Answer”,”text”:”To change folder permissions recursively in CMD (Command Prompt), you can follow these steps:nn1. Open the CMD: Press the Windows key + R combination, type “cmd” in the Run dialog box, and press Enter. This will open the Command Prompt.nn2. Navigate to the root folder: Use the “cd” command to navigate to the root folder where the desired folder and subfolders are located.nn3. Change folder permissions: Use the “icacls” command to change the folder permissions recursively. The syntax for the “icacls” command is as follows:n n `icacls /grant : /t`nn Replace “ with the path of the folder for which you want to change permissions.n Replace “ with the username or group name for which you want to grant permissions.n Replace “ with the desired permissions (e.g., F – Full Control, M – Modify, RX – Read & Execute, R – Read, W – Write).nn For example, if you want to grant Full Control permission to a user named “John” for a folder named “Data” located in “C:Files”, the command would be:n n `icacls C:FilesData /grant John:F /t`nn This will apply the permission recursively to all files and subfolders within the “Data” folder.nn Note: Use caution when altering folder permissions, as it can have security implications.nn4. Verify the changes: After running the command, you can verify the changes by checking the permissions on the folder and its subfolders.nnRemember to adjust the commands based on your specific folder paths, user or group names, and desired permissions. Also, make sure you have the necessary administrative privileges to modify folder permissions.”}},{“@type”:”Question”,”name”:”How to change NTFS permissions command line?”,”acceptedAnswer”:{“@type”:”Answer”,”text”:”To change NTFS permissions using the command line, you can follow these steps:nn1. Open the Command Prompt: Press the Windows key + R, type “cmd,” and hit Enter.n2. Navigate to the target location: Use the “cd” command to change directory to the location where the file or folder resides. For example, if the target file is in the “Documents” folder, type: `cd Documents` and hit Enter.n3. View current permissions: To see the current permissions on a file or folder, use the `icacls` command with the path to the file or folder. For example, `icacls myfile.txt` will display the current permissions for `myfile.txt`.n4. Grant or revoke permissions: To grant permissions, use the `icacls` command followed by the path to the file or folder, and then the /grant switch followed by the desired permission. For example, `icacls myfile.txt /grant Users:(CI)(OI)F` grants full control to the “Users” group for `myfile.txt`. To revoke permissions, use the /remove switch instead of /grant.n5. Replace permissions: To replace all existing permissions with new permissions, use the `icacls` command followed by the path to the file or folder, and then the /reset switch. For example, `icacls myfile.txt /reset` will remove all existing permissions and give the file a default set of permissions.n6. Allow or deny specific permissions: To allow or deny specific permissions while preserving other existing permissions, use the `icacls` command followed by the path to the file or folder, and then the /grant or /deny switch followed by the desired permission. For example, `icacls myfile.txt /deny Users:(CI)(OI)W` denies write access to the “Users” group for `myfile.txt`.n7. Verify changes: To verify that the permissions have been successfully changed, repeat step 3 to view the updated permissions.nnRemember, when using the command line to change NTFS permissions, you need to have administrative privileges.nnPlease note that the steps provided are for Windows systems using the NTFS file system. The exact commands and options may vary slightly depending on the Windows version and any specific requirements or scenarios. It’s advisable to refer to the official Microsoft documentation or consult with an expert if you encounter any issues or need more advanced instructions.”}},{“@type”:”Question”,”name”:”How do I give chmod 777 to all files in a folder?”,”acceptedAnswer”:{“@type”:”Answer”,”text”:”To give chmod 777 permissions to all files in a folder, you can follow these steps:nn1. Open the terminal or command prompt on your computer.n2. Navigate to the folder directory where you want to apply the chmod 777 permissions.n3. Once you are inside the desired folder, execute the following command:n “`n chmod -R 777 ./*n “`n – Explanation: The `chmod` command is used to change file permissions, and the `-R` option means to apply the changes recursively to all files and subdirectories within the specified folder. `777` denotes full permissions for the owner, group, and others.n – Note: Be cautious when applying `777` permissions, as it grants unrestricted read, write, and execute access to all users. Consider whether it is genuinely necessary, as it can pose security risks.nn4. After executing the command, the permissions of all files and subdirectories within the folder will be changed to `777`.nnRemember to exercise discretion and avoid using broad permissions for security reasons. It’s generally recommended to assign the most restrictive permissions necessary to maintain system integrity.”}}]}
Одной из типовых задач администратора Windows при настройке доступа пользователей – управление NTFS разрешениями на папки и файлы файловой системы. Для управления NTFS разрешениями можно использовать графический интерфейс системы (вкладка Безопасность/Security в свойствах папки или файла), или встроенную утилиту командной строки iCACLS. В этой статье мы рассмотрим примеру использовании команды iCACLS для просмотра и управления разрешениями на папки и файлы.
Утилита iCACLS позволяет отображать или изменять списки управления доступом (Access Control Lists (ACLs) к файлам и папкам файловой системы. Предшественником у утилиты iCACLS.EXE является команда CACLS.EXE (доступна в Windows XP).
Чтобы просмотреть действующие разрешения на конкретную папку (например, C:\PS), откройте командную строку и выполните команду:
icacls c:\PS
Данная команда вернет список всех пользователей и групп пользователей, которым назначены разрешения на данную папку. Попробуем разобраться в синтаксисе разрешений, которые вернула команда iCACLS.
c:\PS BUILTIN\Администраторы:(I)(OI)(CI)(F)
NT AUTHORITY\СИСТЕМА:(I)(OI)(CI)(F)
BUILTIN\Пользователи:(I)(OI)(CI)(RX)
NT AUTHORITY\Прошедшие проверку:(I)(M)
NT AUTHORITY\Прошедшие проверку:(I)(OI)(CI)(IO)(M)
Успешно обработано 1 файлов; не удалось обработать 0 файлов
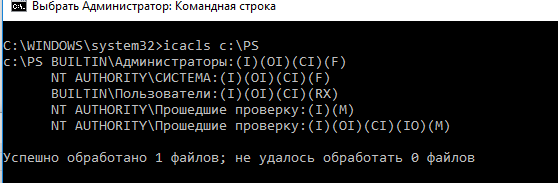
Напротив каждой группы и пользователя указан уровень доступа. Права доступа указываются с помощью сокращений. Рассмотрим разрешения для группы BUILTIN\Администраторы.
(OI) -  Object inherit – права наследуются на нижестоящие объекты
(CI) - Container inherit – наследование каталога
(F) – Full control– полный доступ к папке
(I) — Inherit   права наследованы с вышестоящего каталога
Это означает, что у данной группы есть права на запись, изменение данных в данном каталоге и на изменения NTFS разрешений. Данные права наследуются на все дочерние объекты в этом каталоге.
Ниже представлен полный список разрешений, которые можно устанавливать с помощью утилиты icacls.
Права наследования:
(OI) — object inherit
(CI) — container inherit
(IO) — inherit only
(NP) — don’t propagate inherit
(I) — Permission inherited from parent container
Список основных прав доступа:
D — право удаления
F — полный доступ
N — нет доступа
M — доступ на изменение
RX — доступ на чтение и запуск
R — доступ только на чтение
W — доступ только на запись
Детальные разрешения:
DE — Delete
RC — read control
WDAC — write DAC
WO — write owner
S — synchronize
AS — access system security
MA — maximum allowed
GR — generic read
GW — generic write
GE — generic execute
GA — generic all
RD — read data/list directory
WD — write data/add file
AD — append data/add subdirectory
REA — read extended attributes
WEA — write extended attributes
X — execute/traverse
DC — delete child
RA — read attributes
WA — write attributes
С помощью утилиты icacls вы можете сохранить текущие списки доступа к объекту в файл, а затем применить сохраненный список к этому же или другим объектам (своеобразный способ создания резервной копии текущего списка доступа — ACL).
Чтобы выгрузить текущие ACL папки C:\PS и сохранить их в текстовый файл export_ps_acl.txt, выполните команду:
icacls C:\PS\* /save c:\backup\export_ps_acl.txt /t
Данная команда сохраняет ACLs не только на сам каталог, но и на все вложенные папки и файлы. Полученный текстовый файл можно открыть с помощью блокнота или любого текстового редактора.

Чтобы применить сохраненные списки доступа (восстановить разрешения на каталог и все вложенные объекты), выполните команду:
icacls C:\PS /restore :\backup\export_ps_acl.txt
Таким образом процесс переноса прав доступа с одной папки на другую становится намного легче.
С помощью команды icacls вы можете изменить списки доступа к папке. Например, вы хотите предоставить пользователю aivanov право на редактирование содержимого папки. Выполните команду:
icacls C:\PS /grant aivanov:M
Удалить все назначенные разрешения для учетной записи пользователя aivanov можно с помощью команды:
icacls C:\PS /remove aivanov
Вы можете запретить пользователю или группе пользователей доступ к файлу или папке так:
icacls c:\ps /deny "MSKManagers:(CI)(M)"
Имейте в виду, что запрещающие правил имеют больший приоритете, чем разрешающие.
С помощью команды icacls вы можете изменить владельца каталог или папки, например:
icacls c:\ps\secret.docx /setowner aivanov /T /C /L /Q
Теперь разберемся, что это за параметры используются в каждой команде.
- /Q – сообщение об успешном выполнении команды не выводится;
- /L – команда выполняется непосредственно над символической ссылкой, а не конкретным объектом;
- /C – выполнение команды будет продолжаться несмотря на файловые ошибки; при этом сообщения об ошибках все равно будут отображаться;
- /T – команда используется для всех файлов и каталогов, которые расположены в указанном каталоге;
Вы можете изменить владельца всех файлов в каталоге:
icacls c:\ps\* /setowner aivanov /T /C /L /Q
Также при помощи icacls можно сбросить текущие разрешения на объекты,
icacls C:\ps /T /Q /C /RESET

После выполнения команды все текущие разрешения на папку будут сброшены и заменены на разрешения, наследуемые с вышестоящего объекта (каталога).
Для управления NTFS разрешениями в Windows можно использовать встроенную утилиту iCACLS. Утилита командной строки icacls.exe позволяет получить или изменить списки управления доступом (ACL — Access Control Lists) на файлы и папки на файловой системе NTFS. В этой статье мы рассмотрим полезные команды управления ntfs разрешениями в Windows с помощью icacls.
Содержание:
- Просмотр и изменения NTFS прав на папки и файлы с помощью icacls
- Бэкап (экспорт) текущих NTFS разрешений каталога
- Восстановление NTFS разрешений с помощью iCacls
- Сброс NTFS разрешений в Windows
- Копирование NTFS прав между папками
Просмотр и изменения NTFS прав на папки и файлы с помощью icacls
Текущие права доступа к любому объекту на NTFS томе можно вывести так:
icacls 'C:\Share\Veteran\'
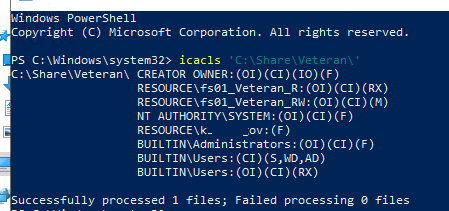
Команда вернет список пользователей и групп, которым назначены права доступа. Права указываются с помощью сокращений:
- F – полный доступ
- M – изменение
- RX – чтение и выполнение
- R – только чтение
- W – запись
- D – удаление
Перед правами доступа указаны права наследования (применяются только к каталогам):
- (OI)— наследование объектами
- (CI)— наследование контейнерами
- (IO)— только наследование
- (I)– разрешение унаследовано от родительского объекта
С помощью icacls вы можете изменить права доступа на папку.
Чтобы предоставить группе fs01_Auditors домена resource права чтения и выполнения (RX) на каталог, выполните:
icacls 'C:\Share\Veteran\' /grant resource\fs01_Auditors:RX

Чтобы удалить группу из ACL каталога:
icacls 'C:\Share\Veteran\' /remove resource\fs01_Auditors
С помощью icacls вы можете включить наследование NTFS прав с родительского каталога:
icacls 'C:\Share\Veteran\' /inheritance:e

Или отключить наследование с удалением всех наследованных ACEs:
icacls 'C:\Share\Veteran\' /inheritance:r
Также icacls можно использовать, чтобы изменить владельца файла или каталога:
icacls 'C:\Share\Veteran\' /setowner resource\a.ivanov /T /C /L /Q

Бэкап (экспорт) текущих NTFS разрешений каталога
Перед существенным изменением разрешений (переносе, обновлении ACL, миграции ресурсов) на NTFS папке (общей сетевой папке) желательно создать резервную копию старых разрешений. Данная копия позволит вам вернуться к исходным настройкам или хотя бы уточнить старые права доступа на конкретный файл/каталог.
Для экспорта/импорта текущих NTFS разрешений каталога вы также можете использовать утилиту icacls. Чтобы получить все ACL для конкретной папки (в том числе вложенных каталогов и файлов), и экспортировать их в текстовый файл, нужно выполнить команду
icacls 'C:\Share\Veteran' /save c:\ps\veteran_ntfs_perms.txt /t /c
Примечание. Ключ /t указывает, что нужно получить ACL для всех дочерних подкаталогов и файлов, ключ /c – позволяет игнорировать ошибки доступа. Добавив ключ /q можно отключить вывод на экран информации об успешных действиях при доступе к объектам файловой системы.
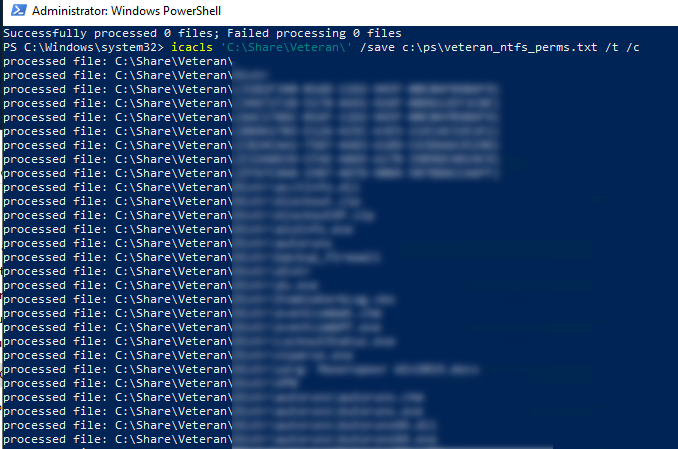
В зависимости от количества файлов и папок, процесс экспорта разрешений может занять довольно продолжительное время. После окончания выполнения команды отобразится статистика о количестве обработанных и пропущенных файлов.
Successfully processed 3001 files; Failed processing 0 files
Откройте файл veteran_ntfs_perms.txt с помощью любого текстового редактора. Как вы видите, он содержит полный список папок и файлов в каталоге, и для каждого указаны текущие разрешения в формате SDDL (Security Descriptor Definition Language).
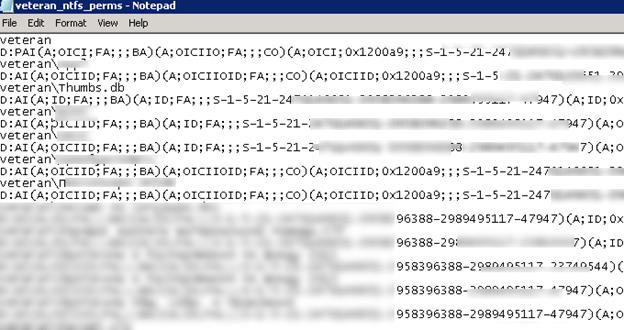
К примеру, текущие NTFS разрешения на корень папки такие:
D:PAI(A;OICI;FA;;;BA)(A;OICIIO;FA;;;CO)(A;OICI;0x1200a9;;;S-1-5-21-2340243621-32346796122-2349433313-23777994)(A;OICI;0x1301bf;;;S-1-5-21-2340243621-32346796122-2349433313-23777993)(A;OICI;FA;;;SY)(A;OICI;FA;;;S-1-5-21-2340243621-32346796122-2349433313-24109193)S:AI
Данная строка описывает доступ для нескольких групп или пользователей. Мы не будем подробно углубляться в SDDL синтаксис (при желании справку по нему можно найти на MSDN, или вкратце формат рассматривался в статье об управлении правами на службы Windows). Мы для примера разберем небольшой кусок SDDL, выбрав только одного субъекта:
(A;OICI;FA;;;S-1-5-21-2340243621-32346796122-2349433313-24109193)
A – тип доступа (Allow)
OICI – флаг наследования (OBJECT INHERIT+ CONTAINER INHERIT)
FA – тип разрешения (SDDL_FILE_ALL – все разрешено)
S-1-5-21-2340243621-32346796122-2349433313-24109193 – SID учетной записи или группы в домене, для которой заданы разрешения. Чтобы преобразовать SID в имя учетной записи или группы, воспользуйтесь командой:
$objSID = New-Object System.Security.Principal.SecurityIdentifier ("S-1-5-21-2340243621-32346796122-2349433313-24109193")
$objUser = $objSID.Translate( [System.Security.Principal.NTAccount])
$objUser.Value

Или командами:
Get-ADUser -Identity SID
или
Get-ADGroup -Identity SID
Таким образом, мы узнали, что пользователь corp\dvivan обладал полными правами (Full Control) на данный каталог.
Восстановление NTFS разрешений с помощью iCacls
С помощью ранее созданного файла veteran_ntfs_perms.txt вы можете восстановить NTFS разрешения на каталог. Чтобы задать NTFS права на объекты в каталоге в соответствии со значениями в файле с резервной копией ACL, выполните команду:
icacls C:\share /restore c:\PS\veteran_ntfs_perms.txt /t /c
Примечание. Обратите внимание, что при импорте разрешений из файла указывается путь к родительской папке, но не имя самого каталога.
По окончанию восстановления разрешений также отобразится статистика о количестве обработанных файлов:
Successfully processed 114 files; Failed processing 0 files

С учетом того, что в резервной копии ACL указываются относительные, а не абсолютные пути к файлам, вы можете восстановить разрешения в каталоге даже после его перемещения на другой диск/каталог.
Сброс NTFS разрешений в Windows
С помощью утилиты icacls вы можете сбросить текущие разрешения на указанный файл или каталог (и любые вложенные объекты):
icacls C:\share\veteran /reset /T /Q /C /RESET
Данная команда включит для указанного объекта наследование NTFS разрешений с родительского каталога, и удалит любые другие права.

Копирование NTFS прав между папками
Вы можете использовать текстовый файл с резервной копией ACL для копирования NTFS разрешений с одного каталога на другой/
Сначала создайте бэкап NTFS разрешений корня папки:
icacls 'C:\Share\Veteran' /save c:\ps\save_ntfs_perms.txt /c
А замет примените сохраненные ACL к целевой папке:
icacls e:\share /restore c:\ps\save_ntfs_perms.txt /c
Это сработает, если исходная и целевая папка называются одинаково. А что делать, если имя целевой папки отличается? Например, вам нужно скопировать NTFS разрешения на каталог E:\PublicDOCS
Проще всего открыть файл save_ntfs_perms.txt в блокноте и отредактировать имя каталога. С помощью функции Replace замените имя каталога Veteran на PublicDOCS.
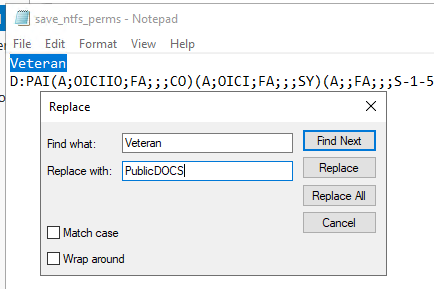
Затем импортируйте NTFS разрешения из файла и примените их к целевому каталогу:
icacls e:\ /restore c:\ps\save_ntfs_perms.txt /c