
Здесь будет рассказано как изменить политику паролей в Windows Server 2008. По умолчанию все пароли в Windows должны отвечать политике безопасности, а именно:
- Не содержать имени учетной записи пользователя или частей полного имени пользователя длиной более двух рядом стоящих знаков.
- Иметь длину не менее 6 знаков.
- Содержать знаки трех из четырех перечисленных ниже категорий:
- Латинские заглавные буквы (от A до Z)
- Латинские строчные буквы (от a до z)
- Цифры (от 0 до 9)
- Отличающиеся от букв и цифр знаки (например, !, $, #, %)
Чтобы изменить политику паролей надо зайти в «Пуск» — «Администрирование» — «Локальная политика безопасности»

В открывшейся оснастке раскрываем ветку «Политика учетных записей» и «Политику паролей». Здесь мы можем изменять несколько параметров, в частности отключить политику «Пароль должен отвечать требованиям сложности»

Все, теперь можно использовать любые пароли, но нужно помнить, что это небезопасно.
Запись опубликована в рубрике Windows Server 2008 R2 с метками Windows Server 2008. Добавьте в закладки постоянную ссылку.
Most organizations have password policies in place to ensure the security and integrity of their networks and systems. These policies define the rules and requirements for creating and managing passwords. In this tutorial, we will guide you through the steps to change the password policy on a Windows Server 2008 R2.
Step 1: Log in to the Windows Server 2008 R2 using an account with administrative privileges.
Step 2: Open the «Group Policy Management» console. You can do this by clicking on the Start button, selecting «Administrative Tools,» and then choosing «Group Policy Management.«
Step 3: Expand the «Forest» and «Domains» folders to navigate to the desired domain where you want to change the password policy.
Step 4: Right-click on the domain and select «Create a GPO in this domain, and Link it here…» from the context menu.
Step 5: Enter a name for the new Group Policy Object (GPO), such as «Password Policy,» and click «OK.«
Step 6: Right-click on the newly created GPO and select «Edit» from the context menu. This will open the Group Policy Management Editor.
Step 7: In the Group Policy Management Editor, navigate to «Computer Configuration» -> «Policies» -> «Windows Settings» -> «Security Settings» -> «Account Policies» -> «Password Policy.«
Perform the desired changes to the password policy settings, such as password length, complexity requirements, and password expiration settings.
Once you have made the necessary changes, close the Group Policy Management Editor and exit the Group Policy Management console. The new password policy will now be in effect for the designated domain.
| Pros | Cons |
|---|---|
| 1. Improved security by enforcing stronger password policies. | 1. User resistance to change and possible increase in help desk calls for password-related issues. |
| 2. Helps protect against unauthorized access and unauthorized use of user accounts. | 2. Increased complexity may lead to higher chance of forgotten passwords. |
| 3. Enables compliance with industry regulations and best practices. | 3. Requires proper communication and user education to ensure understanding of the new password policy. |
Changing the password policy on Windows Server 2008 R2 is a crucial step towards reinforcing network security. By following the steps outlined in this tutorial, you can easily modify the password policy settings to suit your organization’s needs and enhance the overall security posture. Remember to communicate the changes effectively to the users and provide any necessary support during the transition period.
Video Tutorial:How to give admin privileges in Windows Server 2008 R2?
How to edit Group Policy in Windows Server 2008 R2?
When it comes to editing Group Policy in Windows Server 2008 R2, there are a few steps you can follow to accomplish this task. Here’s a professional point of view on how to edit Group Policy:
1. Open the Group Policy Management console: To edit Group Policy on Windows Server 2008 R2, you need to open the Group Policy Management console. This console allows you to create, edit, and manage Group Policy Objects (GPOs).
2. Navigate to the desired Group Policy Object: Once the Group Policy Management console is open, you will see a hierarchical listing of the different GPOs in your environment. Locate the specific GPO you want to edit and select it. You can also create a new GPO if needed.
3. Edit the Group Policy settings: Right-click the selected GPO and choose «Edit» from the context menu. This will open the Group Policy Object Editor, where you can modify and configure various policy settings.
4. Make the necessary changes: Within the Group Policy Object Editor, you’ll see a tree view of the different policy settings available. Expand the sections to find the specific policy setting you want to edit. Double-click the setting to modify its value or properties.
5. Apply the changes: After making the desired changes to the policy settings, click «OK» or «Apply» to save them. The Group Policy Object Editor will then implement the changes in the selected GPO.
6. Test and deploy the updated Group Policy: Before deploying the modified Group Policy, it’s wise to test it in a controlled environment. This ensures that the changes will have the desired effect on the target systems. Once validated, you can proceed with deploying the updated GPO to the appropriate organizational units (OU) or domains.
Remember, Group Policy is a powerful tool for managing and configuring Windows systems in an enterprise environment. Exercise caution when making changes to Group Policy, as incorrect configurations can have adverse effects on system behavior. It’s recommended to thoroughly test changes before deploying them in a production environment.
By following these steps, you should be able to edit Group Policy in Windows Server 2008 R2 effectively. Always consult the official Microsoft documentation or seek expert advice if you encounter specific issues or complex scenarios while working with Group Policy.
How to turn off User Account Control Windows Server 2008?
When it comes to turning off User Account Control (UAC) on Windows Server 2008, there are a few steps you can follow. Here’s a guide to help you through the process:
1. Log in to your Windows Server 2008 with an administrator account.
2. Click on the Start button, and then go to the Control Panel.
3. In the Control Panel, locate and click on the «User Accounts» option.
4. Within the User Accounts window, click on the «Turn User Account Control on or off» link.
5. If prompted by the UAC, provide the necessary administrator credentials to continue.
6. Uncheck the box labeled «Use User Account Control (UAC) to help protect your computer» and click on the OK button.
7. You may be asked to restart your server for the changes to take effect. If prompted, go ahead and restart the server.
By following the steps above, you should be able to disable User Account Control on your Windows Server 2008.
It’s worth mentioning that disabling UAC can potentially reduce the security level of your server, as it helps protect against unauthorized system changes and malware. Therefore, it’s recommended to exercise caution and only disable UAC if you have a specific reason to do so.
How do I find my Password Policy in Windows Server?
Finding the Password Policy in Windows Server involves a few steps. Here’s how you can locate it:
1. Open the Group Policy Management Console: You can access this console by typing «gpmc.msc» in the Run dialog box (Win+R).
2. Expand the «Forest» and «Domains» nodes: In the Group Policy Management window, expand «Forest» and then «Domains» by clicking on the respective arrows.
3. Locate the Group Policy Object (GPO): Look for the GPO that you want to manage the password policy for under the «Domains» node.
4. Edit the GPO: Right-click on the desired GPO and select «Edit» from the context menu.
5. Navigate to the Password Policy settings: In the Group Policy Management Editor window, go to «Computer Configuration» -> «Windows Settings» -> «Security Settings» -> «Account Policies» -> «Password Policy«.
6. Review and modify the Password Policy: Once in the Password Policy settings, you will find options such as password complexity requirements, password minimum length, and password expiration settings. You can revise these settings as per your organization’s requirements.
Remember to analyze and consider the security needs of your network before adjusting the password policy settings. Additionally, it is advisable to consult with your organization’s IT department or network administrator before making any changes to ensure compliance with company policies and industry standards.
How to change local security policy in Windows Server 2008 R2?
To change the local security policy in Windows Server 2008 R2, you can follow these steps:
1. Log in to the Windows Server 2008 R2 system using an account with administrative privileges.
2. Click on the «Start» button and open the «Administrative Tools» folder.
3. From within the «Administrative Tools» folder, locate and open the «Local Security Policy» tool.
4. In the Local Security Policy window, you’ll see a hierarchical list of security settings on the left-hand side. Expand the categories and subcategories to find the specific setting you want to change.
5. Once you have located the desired security setting, double-click on it to open its properties.
6. In the property window, you can modify the setting according to your requirements. There may be various options available, such as enabling or disabling a feature, setting access levels, or configuring specific values. Choose the appropriate option or value based on your needs.
7. After making the necessary changes, click on «Apply» or «OK» to save the new setting.
8. You can repeat these steps for any other security settings you wish to modify.
It’s important to note that changing the local security policy on a Windows Server should be done with caution, as it can have significant implications for the system’s security. It’s recommended to thoroughly understand the implications of any changes and ensure they align with your organization’s security requirements and best practices.
Please make sure to back up the system or create a restore point before making any changes to the local security policy to mitigate the risk of unintended consequences.
What is the command to change local security policy?
To change the local security policy on a Windows computer, you can follow these steps:
Step 1: Open the Local Security Policy Editor
– Press the Windows key + R to open the Run dialog box.
– Type «secpol.msc» (without quotes) and press Enter.
– The Local Security Policy Editor window will open.
Step 2: Navigate to the desired policy category
– In the left-hand pane of the Local Security Policy Editor, you’ll find various categories of security policies, such as Account Policies, Local Policies, Event Log, etc.
Step 3: Access the specific security policy settings
– Expand the category that contains the policy you want to modify (e.g., Account Policies).
– Double-click on the desired policy to open its properties window.
Step 4: Modify the security policy
– In the properties window, you’ll find various options and settings related to the selected policy.
– Make the necessary changes to the policy according to your requirements.
Step 5: Apply and save the changes
– After modifying the policy, click the Apply button if available, and then click OK to save the changes.
Please note that changing security policies requires administrative privileges. It’s crucial to exercise caution while modifying security policies, as incorrect changes can impact system stability and security.
Парольная политика в домене Active Directory задает базовые требования безопасности к паролям учетных записей пользователей такие как сложность, длину пароля, частоту смены пароля и т.д. Надежная политика паролей AD позволяет снизить возможность подбора или перехвата паролей пользователей.
Содержание:
- Настройка политики паролей в Default Domain Policy
- Основные параметры политики паролей в домене
- Управление параметрами политики паролей AD с помощью PowerShell
- Несколько парольных политик в домене Active Directory
Настройка политики паролей в Default Domain Policy
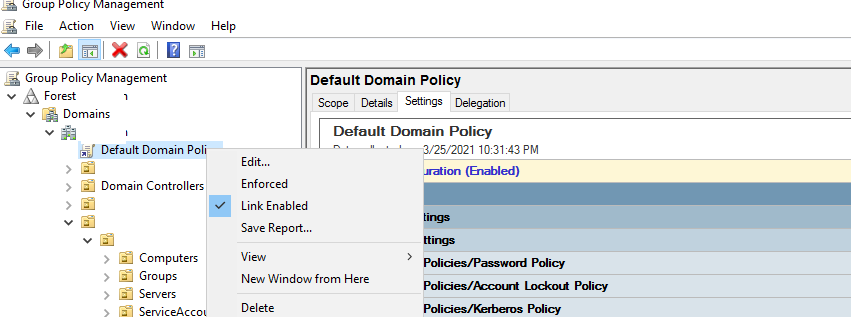
Настройки политика паролей пользователей в домене AD по умолчанию задаются через групповую политику Default Domain Policy. Вы можете просмотреть и изменить настройки парольной политики в домене с помощью консоли управления консоль управления доменными GPO
- Откройте консоль
gpmc.msc
и выберите Default Domain Policy, которая назначена на корень домена; - Щелкните правой кнопкой по Default Domain Policy и выберите Edit;

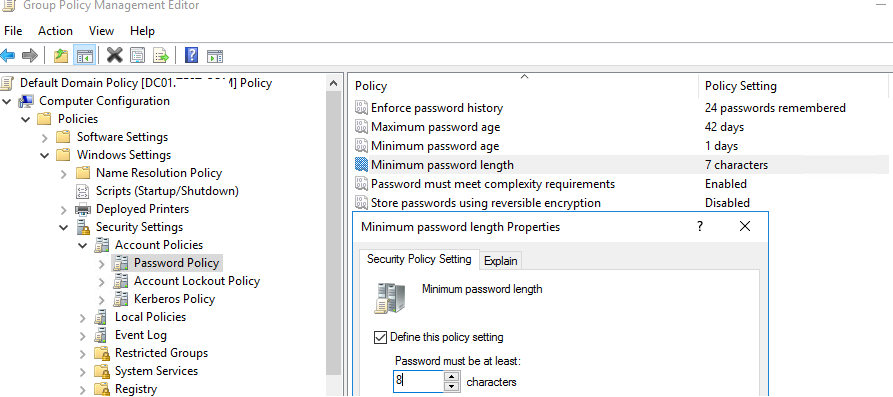
- Разверните Конфигурация компьютера -> Политики -> Конфигурация Windows -> Параметры безопасности -> Политики учетных записей -> Политика паролей (Computer configuration -> Policies -> Windows Settings -> Security Settings -> Account Policies -> Password Policy
- В этом разделе есть шесть параметров политики паролей (описаны ниже);
- Чтобы изменить настройки параметра, дважды щелкните по ней. Чтобы включить политику, отметьте галку Define this policy settings и укажите необходимую настройку (в примере на скриншоте я задал минимальную длину пароля пользователя 8 символов). Сохраните изменения;
- Новые настройки парольной политики применяться ко всем пользователям домена после обновления настроек GPO на контролере домена с FSMO ролью PDC Emulator.
Основные параметры политики паролей в домене
Всего доступно шесть параметров политики паролей:
- Вести журнал паролей (Enforce password history) – задать количество старых паролей, которые хранятся в AD. Пользователь не сможет повторно использовать старый пароль (однако администратор домена или пользователь, которому делегированы права на сброс пароля в AD, может вручную задать для аккаунта старый пароль);
- Максимальный срок действия пароля (Maximum password age) – срок действия пароля в днях. После истечения срока действия пароля Windows потребует у пользователя сменить его. Обеспечивает регулярность смены пароля пользователями;
- Минимальный срок жизни пароля (Minimum password age) – как часто пользователи могут менять пароль. Этот параметр не позволит пользователю несколько раз подряд сменить пароль, чтобы вернуться к старому паролю, перезатерев пароли в журнале Password History. Как правило тут стоит оставить 1 день, чтобы пользователь мог самостоятельно сменить пароль в случае его компрометации;
- Минимальная длина пароля (Minimum password length) – не рекомендуется делать пароль короче, чем 8 символов (если указать тут 0 – значит пароль не требуется);
- Пароль должен отвечать требование сложности (Password must meet complexity requirements) – при включении этой политики пользователю запрещено использовать имя своей учетной записи в пароле (не более чем два символа подряд из
username
или
Firstname
). Также в пароле должны использоваться 3 типа символов из следующего списка: цифры (0 – 9), символы в верхнем регистре, символы в нижнем регистре, спец символы ($, #, % и т.д.).Чтобы исключить использование пользователями простых паролей (из словаря популярных паролей) рекомендуется периодически выполнять аудит паролей в домене.
- Хранить пароли, использую обратимое шифрование (Store passwords using reversible encryption) – пароли пользователей в базе AD хранятся в зашифрованном виде, но иногда нужно предоставить доступ некоторым приложениям к паролю. При включении этой политики пароли хранятся в менее защищенной виде (по сути, в открытом виде), что небезопасно (можно получить доступ к базе паролей при компрометации DC). При включении этой опции нужно дополнительно защищать пароли привилегированных пользователей на удаленных площадках с помощью внедрения Read-Only контроллеров домена (RODC).
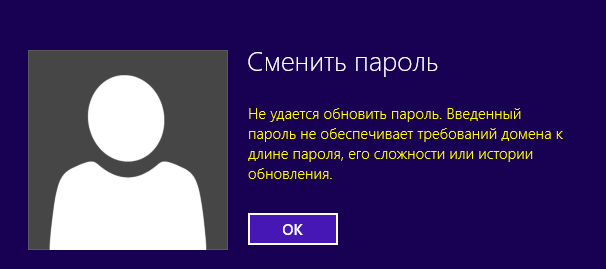
Если пользователь попытается задать пароль, которые не соответствует политике паролей в домене, Windows выдаст ошибку:
Не удается обновить пароль. Введенный пароль не обеспечивает требований домена к длине пароля, его сложности или истории обновления.
Unable to update the password. The value provided for the new password does not meet the length, complexity, or history requirements of the domain.
Обычно вместе с политикой паролей нужно настроить параметры блокировки пользователей при неправильном введении пароля. Эти настройки находятся в разделе GPO: Политика блокировки учетной записи (Account Lockout Password):
- Пороговое значение блокировки (Account Lockout Threshold) – через сколько попыток набрать неверный пароль учетная запись пользователя будет заблокирована;
- Продолжительность блокировки учетной записи (Account Lockout Duration) – длительность блокировки учетной записи, в течении которой вход в домен будет невозможен;
- Время до сброса счетчика блокировки (Reset account lockout counter after) – через сколько минут счетчик неверных паролей (Account Lockout Threshold) будет сброшен.
Если учетные записи блокируются слишком часто, вы можете найти компьютер/сервер источник блокировки так.
Настройки парольных политик домена Active Directory по-умолчанию перечислены в таблице:
| Политика | Значение по-умолчанию |
| Enforce password history | 24 пароля |
| Maximum password age | 42 дня |
| Minimum password age | 1 день |
| Minimum password length | 7 |
| Password must meet complexity requirements | Включено |
| Store passwords using reversible encryption | Отключено |
| Account lockout duration | Не определено |
| Account lockout threshold | 0 |
| Reset account lockout counter after | Не определено |
Управление параметрами политики паролей AD с помощью PowerShell
Для просмотра настроек и изменения конфигурации политики паролей в AD можно использовать командлеты PowerShell из модуля Active Directory:
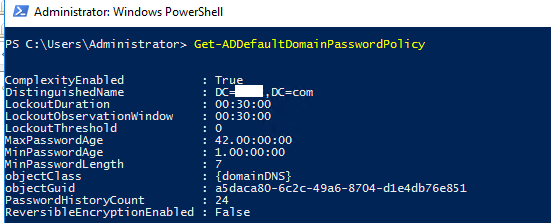
Вывести настройки дефолтной политики паролей:
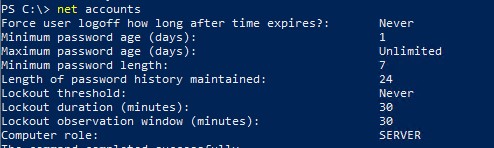
Get-ADDefaultDomainPasswordPolicy
ComplexityEnabled : True
DistinguishedName : DC=winitpro,DC=ru
LockoutDuration : 00:30:00
LockoutObservationWindow : 00:30:00
LockoutThreshold : 0
MaxPasswordAge : 42.00:00:00
MinPasswordAge : 1.00:00:00
MinPasswordLength : 7
objectClass : {domainDNS}
objectGuid :
PasswordHistoryCount : 24
ReversibleEncryptionEnabled : False
Или с помощью команды:
net accounts
Также вы можете узнать текущие настройки политики паролей AD на любом компьютере в отчете результирующей политики, сгенерированном с помощью консольной утилиты gpresult.
Вывести информацию о том, когда пользователь менял пароль последний раз, и когда истекает его пароль:
net user aivanov /domain
Изменить параметры политики паролей AD:
Set-ADDefaultDomainPasswordPolicy -Identity winitpro.ru -MinPasswordLength 14 -LockoutThreshold 10
Несколько парольных политик в домене Active Directory
С помощью групповых политик на домен можно назначить только одну политику, которая будет действовать на всех пользователей без исключения. Даже если вы создадите новую GPO с другими парольными настройками и примените ее к OU с пользователями, эти настройки фактически не применяться.
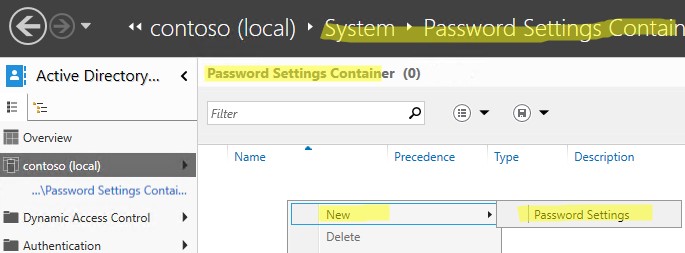
Начиная с версии Active Directory в Windows Server 2008 с помощью гранулированных политик паролей Fine-Grained Password Policies (FGPP) можно применять индивидуальный параметры политики паролей для конкретных пользователей или групп. Например, вы хотите, чтобы пользователи из группы Server-Admins использовали пароли с минимальной длиной 15 символов.
- Откройте консоль Active Directory Administrative Center (
dsac.exe
); - Перейдите в раздел System -> Password Settings Container и создайте новый объект PSO (Password Settings Object);

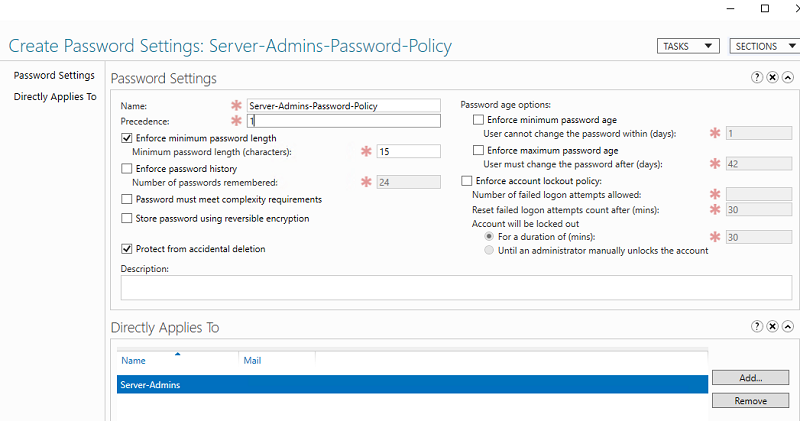
- В открывшемся окне укажите название политики паролей и ее приоритет. Включите и настройте параметры парольной паролей, которые вы хотите применить. В разделе Directly Applies to нужно добавить группы или пользователей, для которых должны применяться ваши особые настройки политики паролей.

Чтобы проверить, применяются ли к конкретному пользователю особая политика паролей, выполните команду:
Get-ADUserResultantPasswordPolicy -Identity aivanov
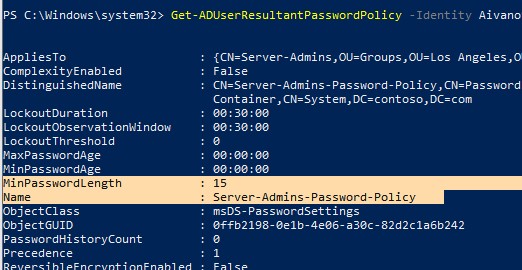
Команда выведет результирующие настройки политики паролей, которые дейсвтуиют на пользователя.
Политика паролей является первоосновой в безопасной IT-инфраструктуры компании. Пароли должны содержать прописные и заглавные буквы, цифры и спецсимволы, иметь определенный срок действия и состоять минимум из восьми символов.
Как изменить политику паролей:
- Открываем нужную нам групповую политику.
- Нам нужна ветка Конфигурация компьютера -> Политики -> Конфигурация Windows -> Параметры безопасности -> Политика паролей (Рис.1).
Здесь мы можем изменять следующие параметры:
- Вести журнал паролей — сохраняет определенное количество паролей в журнале, дабы избежать повторяющиеся пароли;
- Максимальный срок действия пароля — тут все и так понятно;
- Минимальная длина паролей — определяет минимальное количество знаков, из которых должен состоять пароль.
- Минимальный срок действия пароля;
- Пароль должен отвечать требованиям сложности — пароль должен состоять из прописных и заглавных букв, цифр и спецсимволов;
- Хранить пароли, используя обратимое шифрование — тут все ясно.

Рис.1.
Успехов!
Before Windows Server 2008, organizations had to rely on third-party products to define different password and account lockout policies for different sets of users in a domain. In Server 2000 and 2003, there could be only one password and account lockout policy in a domain, and it was specified in the Default Domain Policy, unless third-party products were utilized. In Windows Server 2008 and newer, organizations can define more than one password and account lockout policy in a single domain, and apply those policies to different sets of users, by using the fine-grained password policies feature.
Limitations of fine-grained password policies
- Can only be applied to users and global security groups, which means they can not be applied to OUs.
- Domain functional level must be Windows Server 2008
- By default only Domain Admins can set fine-grained password policies on users and groups, but this ability can be delegated to other users
1. Create a PSO
Fine-grained password policies are defined by creating Password Settings Objects, and then applying those to users and groups. There are several methods to create PSOs. Here we will look at two of them.
Its important to keep in mind that a user can only have one effective password and account lockout policy. So if more than one PSO is applied to a user, either directly or through group membership, the precedence value of that PSO will determine whether it will be the winning PSO or not. The PSO with the lowest precedence will have higher rank, so the PSO with the lowest precedence will be the effective PSO for a user. An exception to this rule is that PSOs directly applied to users, always prevail over PSOs applied to groups (which are again obviously applied to users through group membership).
If no PSOs are applied to a user, the Default Domain Policy will be applied to that user.
1.1 Create a PSO using ADSI Edit
1.1.1 Click Start → Administrative Tools→ ADSI Edit
1.1.2 In the ADSI Edit snap-in, right-click ADSI Edit, and then click Connect to.
1.1.3 Since the Default naming context will connect you to the domain naming context of your domain, just click ok
1.1.4 Double-click Default naming context, then double click DC=contoso,DC=com (the name of your domain)
1.1.5 Double-click CN=System

1.1.6 Right-click CN=Password Settings Container, choose new – Object

1.1.7 Click Next

1.1.8 Give the PSO a name, then click Next. On each setting, the Description of the setting will pretty much explain what the setting is

1.1.9 Give the PSO a precedence, this value must be greater than 0

1.1.10 This setting must be either FALSE or TRUE (usually its obviously FALSE)

1.1.11 How many passwords will be remembered, value must be 0 through 1024

1.1.12 This setting must be either FALSE or TRUE

1.1.13 Value must be 0 through 1024

1.1.14 Value must be entered in d:hh:mm:ss format (that’s days:hours:minutes:seconds)

1.1.15 Value must be entered in d:hh:mm:ss format (that’s days:hours:minutes:seconds)

1.1.16 Value must be 0 through 65535

1.1.17 Value must be entered in d:hh:mm:ss format (that’s days:hours:minutes:seconds)

1.1.18 Value must be entered in d:hh:mm:ss format (that’s days:hours:minutes:seconds)

1.1.19 Click Finish, you can apply the PSO to a user or group by clicking More Attributes and then defining users and groups the PSO will apply to. But its much easier to apply it using AD Users and Computers

1.2 Create a PSO using PowerShell
1.2.1 First import the Active Directory Module

1.2.2 Then use the New-ADFineGrainedPasswordPolicy cmdlet, the following example creates a PSO named PSO2, with exactly the same settings as we defined in the PSO we created with ADSI Edit. The parameters for the cmdlet are pretty much self-explanatory.
New-ADFineGrainedPasswordPolicy -Name “PSO2” -Precedence 10 -ComplexityEnabled $true -Description “PSO
Number 2”-DisplayName “PSO2” -LockoutDuration “0.00:30:00” -LockoutObservationWindow “0.00:30:00” –
LockoutThreshold 3 -MaxPasswordAge “5.00:00:00” -MinPasswordAge “1.00:00:00” -MinPasswordLength 5 –
PasswordHistoryCount 7 -ReversibleEncryptionEnabled $false
2. Apply PSO to user or group
2.1 Apply PSO using AD Users and Computers
2.1.1 Open AD Users and Computers, click on view and choose Advanced Features, so you can view the System container

2.1.2 Expand the System container, and then click on the Password Settings Container, to view the PSOs we created earlier.

2.1.3 Right-click a PSO and choose properties

2.1.4 Click the Attribute Editor tab, and then choose the msDS-PSOAppliesTo attribute, then click Edit

2.1.5 Click Add Windows Account

2.1.6 Select the users and groups you want to apply the PSO to, then click OK. Here I am applying it to the Sales group

2.1.7 Click OK twice, and the PSO will be applied to the selected users and groups
2.2 Apply PSO using PowerShell
2.2.1 Import the Active Directory module
2.2.2 Use the Add-ADFineGrainedPasswordPolicySubject cmdlet to apply PSOs to users and groups. The following example will apply PSO2 to the Data and Managers groups
Add-ADFineGrainedPasswordPolicySubject PSO2 -Subjects Data,Managers
3. View a Resultant PSO for a user
Liked I explained earlier, a user can only have one effective password and account lockout policy, so if more than one PSO is applied to a user, the one with the lowest precedence number will be the effective
PSO for that user. Obviously if there are PSOs directly applied to a user, they will prevail regardless, over PSOs applied to a user through group membership.
3.1 Viewing the resultant PSO for a user in AD Users and Computers
Right-click the user, choose properties. In the properties of the user choose the Attribute Editor tab, then click filter, and make sure these four check boxes are selected

Now choose the msDS-ResultantPSO attribute, and you can view which PSO will be the effective PSO for that user.

3.2 Viweing the resultant PSO for a user in PowerShell
First the Active Directory module has to be imported (import-module activedirectory), then you can use the Get-ADUserResultantPasswordPolicy cmdlet, the following example gets the resultant PSO for the same user (rjones)
Get-ADUserResultantPasswordPolicy rjones
Additional Resoruces
Technet: AD DS Fine-Grained Password and Account Lockout Policy Step-by-Step Guide
Technet: AD DS: Fine-Grained Password Policies