
I have just downloaded the latest itunes but now my iphone comes up with the above unknown error. It was OK up until now.
Any ideas what the problem is?
Windows Vista
Posted on Jun 3, 2009 2:19 PM
Jun 3, 2009 2:57 PM in response to Shaunyboydotcom
Hi,
If the iPhone is not recognized after updating iTunes 8.2, try the general troubleshooting tips in one of the articles below:
If you have a PC, take a look at this article:
http://support.apple.com/kb/TS1495
If you have a Mac, take a look at this article:
http://support.apple.com/kb/TS1591
Also make sure the iPhone is directly connected to a high-speed USB2 port on the computer, using the cable that came with it.
-Jason
Jun 8, 2009 3:45 PM in response to Shaunyboydotcom
Shaunyboydotcom wrote:
Is there any number to ring Apple about this?
Yes, you can call U.K. iPhone, iPod and Mac technical support at: 0870 876 0753
This article:
http://www.apple.com/uk/support/iphone/service/faq/ provides answers to frequently asked questions about iPhone service options in the UK.
-Jason
Jun 16, 2009 11:58 AM in response to Shaunyboydotcom
Shaunyboydotcom wrote:
Error still here.
Not happy with the situation at all.
Do you see the same issue when plugging the iPhone into another computer?
You may want to contact U.K. iPhone, iPod and Mac technical support at: 0870 876 0753 again or make a reservation with a Genius here:
http://www.apple.com/uk/retail/geniusbar/
-Jason
Jun 16, 2009 3:20 PM in response to Shaunyboydotcom
Shaunyboydotcom wrote:
Hi Jason,
I haven’t plugged my iphone in another computer.
My old nano works OK on my computer though.
I have tried Apple Support and they told me to remove itunes, Quicktime and the other connected things and to re-install them which I have done a few times but nothing has changed the error is still there.
I have just booked to see a genius tomorrow in Manchester so fingers crossed.
The Genius can generally replace the iPhone on the spot, if there is a hardware issue.
iTunes uses the iPod Service to recognize the iPod Nano and the Apple Mobile Device Service to recognize the iPhone/iPod touch. This could be caused by a conflict with the security software on the PC. You can generally bypass the security software by putting the PC into a Selective Startup Mode as described here:
http://support.apple.com/kb/HT2292 or by removing the security software.
-Jason
Jun 5, 2009 12:22 PM in response to Varkias42
I spent about an hour on the phone with Apple support yesterday, and they weren’t able to figure out what was wrong either. Said I was the first call, and that there wasn’t anything in their database about this error message. Great.
Here’s hoping they find a fix soon!
Jun 8, 2009 7:40 AM in response to Shaunyboydotcom
Here is what I have found in my log files:
6/8/09 9:36:44 AM [0x0-0x25025].com.apple.iTunes[387] MobileDevice: store
dict
osx: Could not create /var/db/lockdown//8a0825c089bb3dad5717af304254a7b3e85c8bf0.plist: No such file or directory
Hopefully this help someone. I tried creating a lockdown directory under /var/db/ but it didn’t help. I have also tried uninstalling and reinstalling itunes, no luck!!!
Jun 9, 2009 8:38 AM in response to Shaunyboydotcom
Same issue here. Im using the «Restore» feature to see if that fixes the issue. My only regret is that I’ll lose all my iphone files, music, and apps. I hope after restore it works, and I can reload my apps properly.
SNOW LEOPARD v.10A335
iTunes upgraded to 8.2 — This was the beginning of my inability to sync in the first place…
Jun 9, 2009 9:18 AM in response to Paullyg22
OK folks, the restore worked!… BUT, and it’s a big BUT… I had to switch back to my OS X10.5.7 partition and restore from there (good thing I had backed up my iPhone too!).
So basically, the iTunes 8.2 and OS X 10.5.7 were compatible, but the OS X 10.6 build 10A335 and iTunes 8.2 were a BUST!
Well, back to the drawing board. I hope this helps those of you out there with the same problem…
Jun 16, 2009 2:07 PM in response to Jason L
Hi Jason,
I haven’t plugged my iphone in another computer.
My old nano works OK on my computer though.
I have tried Apple Support and they told me to remove itunes, Quicktime and the other connected things and to re-install them which I have done a few times but nothing has changed the error is still there.
I have just booked to see a genius tomorrow in Manchester so fingers crossed.
Jun 17, 2009 8:32 AM in response to Shaunyboydotcom
Just fixed this problem on a laptop at work. Check the permissions on /var/db. Permissions were wrong when it was having a problem they should be 711. The command would be sudo chmod 711 /var/db
Hope this helps someone.
Jun 18, 2009 1:07 PM in response to Shaunyboydotcom
After trying the following the problem still persists:-
1. Uninstalling and re-installing itunes.(tried this about 5 times in total now)
2. Went to Genius Bar in Manchester. He said it was a Windows Error number and to ask Microsoft about it. Could be compatibility issue between itunes and security software.
3. Left message on Microsoft Support site. Someone replied saying it is an itunes 8.2 issue.
4. Disabling my security software to stop any security conflicts.
5. Uninstalling itunes 8.2 and re-installing itunes 8.1
6. Had a look on other forums and can see that this is also an issue with ipod touches as well but there does not seem to be any way to sort it. Left some forum messages on there.
Can anyone suggest anything else?
Jun 20, 2009 8:17 AM in response to Shaunyboydotcom
OK.
So today I decide to reset my iphone to factory settings to see whether this will fix the problem.
However, now I don’t have a functioning phone or anything as the problem persists. Things are getting worse not better for me here.
Not sure what my next step could be.
Any ideas anyone?
Jun 21, 2009 4:28 AM in response to Shaunyboydotcom
Desperate times call for desperate measures.
Last night I re-installed my Windows Vista. After a few squeaky bum moments everything now seems to be OK with my iphone. I even managed to update to 3.0.
So, basically I solved my own problem with no help from Apple whatsoever. So yes the question has been answered by myself!
I’ve no idea why the problem started but hopefully it has gone for good.
Fingers Crossed
Jun 21, 2009 9:55 AM in response to deggie
No, it was my problem with using an Apple product on a Microsoft run computer.
I have learnt my lesson not to download the latest itunes when the one I have works perfectly well.
This is a lesson hard learnt.
This thread has been closed by the system or the community team.
You may vote for any posts you find helpful, or search the Community for additional answers.
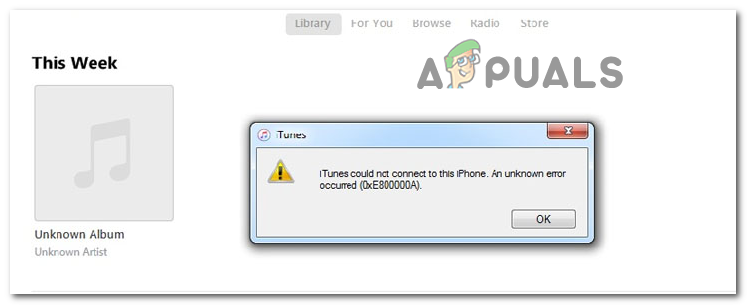
Error: 0xE800000A
-
Главная страница >
- iTunes Проблемы и Решения >
- 13 простых способов устранения ошибки iTunes 0xE80000A
Нередки случаи, когда вы запустили iTunes, подключили iPhone к компьютеру, и появляется сообщение «iTunes не может подключиться к этому iPhone. произошла неизвестная ошибка 0xE80000A». Большинство пользователей не могут понять, откуда берется эта ошибка и как ее устранить.
Ошибка 0xE80000A в iTunes может возникать по ряду причин и препятствовать использованию программы на компьютере. Она указывает на сбой связи между вашим устройством и компьютером, что затрудняет работу с iTunes.
В данной статье мы подготовили для вас эффективные способы устранения этой ошибки. Продолжайте читать, чтобы узнать, как исправить проблему и восстановить нормальную работу iTunes.
- Почему iTunes показывает ошибку 0xE80000A?
- Каково обычное решение для ошибки iTunes 0xE80000A?
- Лучшее решение для устранения ошибки iTunes — Tenorshare ReiBootHOT
- Другие распространенные ошибки iTunes и соответствующие решения
Часть 1: Почему iTunes показывает ошибку 0xE80000A?
Прежде чем приступить к исправлению возникшей ошибки, давайте разберемся с чем это может быть связано:
- Поврежденный кабель или порт USB.
- Неполная установка iTunes.
- Устаревшая версия iTunes/Windows/macOS.
- Ваш iPhone заблокирован.
- Несовместимые драйверы iPhone.
- Конфликт антивирусных программ.
- Неправильные настройки iTunes.
- Повреждение системных файлов на вашем ПК/Mac.
- Любые другие программные и аппаратные ошибки.
Часть 2: Каково обычное решение для ошибки iTunes 0xE80000A?
Существуют следующие решения:
- Смените USB-порт/кабель и перезагрузите компьютер: Иногда ошибка может возникать из-за неподходящего USB-кабеля во время подключения к компьютеру. Попробуйте сменить кабель и сделайте перезагрузку ПК.
- Обновление iTunes/iOS/Windows: Зачастую старая версия iTunes на компьютере вызывает конфликты с iPhone. Чтобы этого не допустить, убедитесь, что у вас установлена актуальная версия.
- Обновить драйверы iPhone: Перейдите в Диспетчер устройств, затем выберите из списка ваше устройство и кликните правой кнопкой мыши. В появившемся меню выберите «Обновить драйверы».
- Отключите антивирус: Если ошибка 0xE80000A iTunes, то попробуйте отключить антивирус и снова запустить iTunes.
- Перезапустите службу мобильных устройств Apple: Запустите командную строку, введя services.msc.
- Остановите связанный с iTunes процесс: Закройте iTunes и отсоедините iPhone, затем через панель управления войдите в «Администрирование» и выберите «Службы» и остановите службу.
- Переустановите iTunes: Попытайтесь удалить и снова скачать программу iTunes.
- Восстановите настройки iTunes по умолчанию: Перейдите в «Правки», затем в «Настройки» и нажмите на панель настроек.
- Сброс настроек местоположения и конфиденциальности: На устройстве отключите геолокацию в разделе «Конфиденциальность и безопасность» > «Службы геолокации».
- Сброс блокировки папки: Сбросьте папку «Lockdown», которая находится на системном диске.
- Обратитесь за помощью в центр поддержки Apple: Вы можете обратиться в службу поддержки Apple через официальный сайт.
Часть 3: Лучшее решение для устранения ошибки iTunes — Tenorshare ReiBoot
Если вышеуказанные способы не помогли вам устранить ошибку 0xE80000A iTunes, то Tenorshare ReiBoot будет для вас отличным помощником. Вот шаги, чтобы воспользоваться программой:
Часть 4: Другие распространенные ошибки iTunes и соответствующие решения
Какие еще бывают ошибки iTunes? Давайте рассмотрим их.
- Ошибка 54 iTunes: Объедините медиафайлы на компьютере.
Медиафайлы в приложении «Музыка» или медиатеке iTunes могут храниться в нескольких местах. Попробуйте объединить файлы в одну медиатеку. - Ошибка 77 iTunes:
1. Временно отключите антивирус.
2. Загрузите телефон в режиме восстановления (в разных моделях по-разному) и нажмите клавишу option при нажатии на опцию Update, чтобы выбрать загруженный файл 12.4.1. - Ошибка 1667/2003/2005 iTunes:
1. Проверьте USB-кабель.
2. Отключите брандмауэр Windows. - Ошибка 3194 iTunes:
Чаще всего такая ошибка связана с повреждением устройства.
1. Отредактируйте файл «hosts».
2. Сбросьте настройки устройства. - Ошибка 3259 iTunes:
Проблемы файла iTunes Error -3259 в большинстве случаев связаны с повреждением, отсутствием или заражением файлов iTunes. Основной способ решить эти проблемы вручную — заменить файл Apple Inc. - Ошибка 4000/4010/4013/4014 iTunes:
1. Отключите брандмауэр Windows.
2. Переведите телефон в режим восстановления.
3. Временно отключите пароль блокировки экрана на телефоне перед обновлением с помощью iTunes на Windows. - Ошибка 0xe8000015 iTunes:
Исправьте неизвестную ошибку 0xe8000015, сбросив папку Lockdown.
Найдите папку Lockdown в соответствии с операционной системой вашего компьютера и удалите ее:- Mac OS (все версии): /private/non-functional/db/lockdown/
- Windows 10/8 / 8.1 / 7: C:\ProgramData\Apple\Lockdown
- Windows XP: C:\Documents and Settings\All Users\Application Data\Apple\Lockdown
- Windows Vista: C:\Users\USERNAME\AppData\Roaming\Apple Computer\Lockdown
Заключение
Ошибка 0xE80000A iTunes может стать препятствием при подключении устройства к программе. В этой статье мы рассмотрели несколько решений, и если они не сработают, Tenorshare ReiBoot поможет вам устранить проблему быстро и эффективно.
Выскажите своё мнение
Оставить комментарий
Оставьте свой отзыв о статьях Tenorshare
Some Windows users are reporting that iTunes is suddenly no longer able to recognize their iPad or iPhone device and shows Unknown error 0xE800000A whenever they attempt to sync the content. This problem is only reported to occur on Windows.
One of the most popular reasons why Windows users are seeing this error is because they are either using an outdated iTunes version or their iTunes version will not update itself automatically because the Windows version is outdated. In this case, you need to start by updating Windows to the latest build available and then update iTunes using the built-in auto-update function.
However, the 0xE800000A error can also be caused by some type of corruption rooted in the iTunes folder. In this case, you will need to reinstall the application completely and clear out any temporary data that might still cause this behavior on a new iTunes installation.
In case you encounter this error on Windows 7, this problem can appear due to a couple of files located in the Lockdown folder of iTunes. If this scenario is applicable, you can navigate to this location manually and remove the two files to restore the syncing ability of your iTunes installation.
But under some circumstances, this problem might also be facilitated by a connectivity issue. A bad cable or a broken USB controller are also potential culprits. To make sure that’s not the case, replace the cable you’re currently using to connect your iOS device and reinstall the USB controller.
Updating Windows to the latest build
As it turns out, one reason that might contribute to the apparition of this issue is an outdated Windows version that is preventing the iTunes app from auto-updating itself.
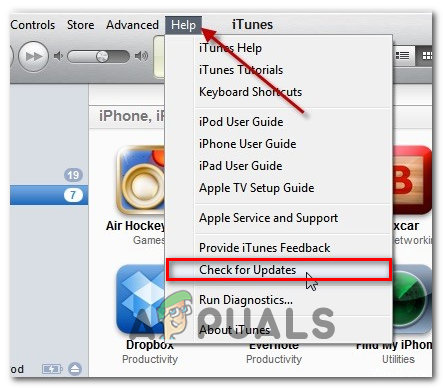
And while you’re at it, it’s worth a shot to try and force iTunes to update itself. To do this, go to Help and click on Check for Updates. If a new version is available, the updating process will end up overriding some potentially corrupted files that might be causing the 0xE800000A.
Keep in mind that on Windows (just like on macOS), the iTunes app will also check on your OS build. If your Windows build is outdated, the application will not update itself and refuse to work in order to prevent security vulnerabilities.
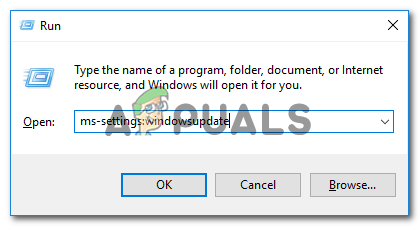
If this scenario is applicable and you’re not using the latest build available, follow the instructions below to install every pending update and bring your Windows version to the latest:
- Open up a Run dialog box by pressing Windows key + R. Next, type “ms-settings:windowsupdate” and hit enter to open up the Windows Update screen.

Opening the Windows Update screen: Note: In case you’re not having this issue on Windows 10, use the ‘wuapp’ command instead.
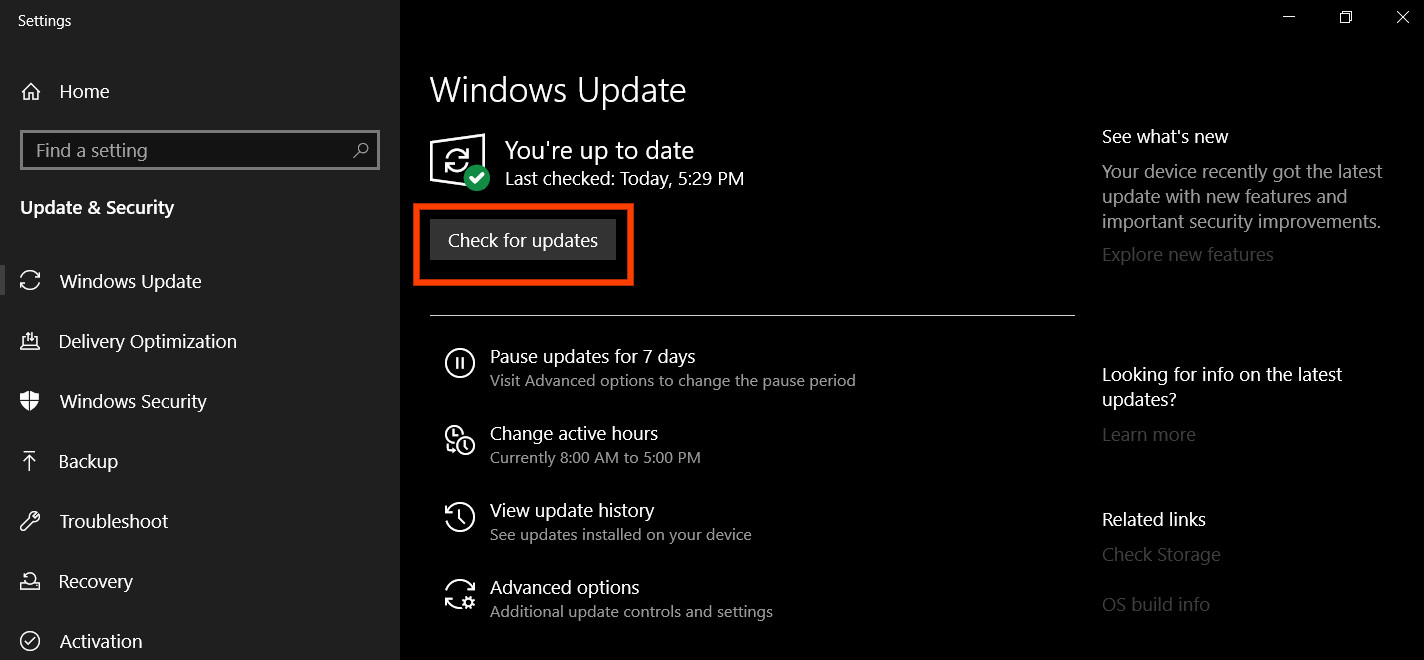
- Once you’re inside the Windows Update screen, click on Check for Updates, then click the Download button in whichever order until you install every pending update.

Check For Updates on Windows 10 Note: There is no need to prioritize between updates since the ultimate goal is to install them all (aside from Optional Updates). If you have a big number of pending updates that are waiting to be installed, your OS will eventually ask you to restart (before every update is installed). If this happens, do the reboot as instructed, but make sure to return to the same update screen and complete the installation of the remaining updates.
- Once every Windows Update is installed, open iTunes again, ensure that it’s running on the latest version also and connect your iOs device to see if the problem has been fixed.
In case you still end up seeing the 0xE800000A error when you connect your iPad or iPhone device, move down to the next potential fix.
Reinstalling iTunes
As it turns out, this particular issue can very well be caused by some type of corruption originating from the iTunes folder. In order to fix it, you should be able to fix the issue by reinstalling the iTunes app completely along with any support applications that Apple installs automatically.
In most documented instances, this problem seems to occur after Windows Defender or a different 3rd party tool ends up quarantining some items belonging to iTunes or the Bonjour program. But as some affected users have confirmed, you should be able to fix this issue by reinstalling iTunes along with any associated sub-components and then redownloading & installing the latest version.
However, keep in mind that the steps of doing so will be different depending on the version of iTunes that you’re using. In case you have the desktop version, you will need to do the uninstallation from the Classic Control Panel interface and if you have the UWP (Universal Windows Platform), the version you’ll need to do it from the Settings app.
Important: This operation will not affect your iTunes media library.
But regardless of your particular scenarios, we’ve covered both approaches so you know exactly what you have to do. Feel free to follow whichever guide is applicable to your iTunes version.
Reinstalling the UWP version of iTunes
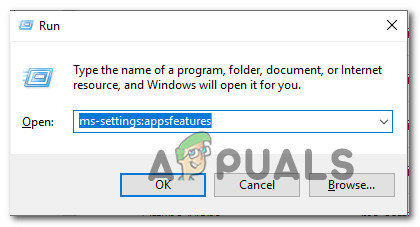
- Press Windows key + R to open up a Run dialog box. Next, type ”ms-settings:appsfeatures” and press Enter to open up the Apps & Features tab of the Settings app.
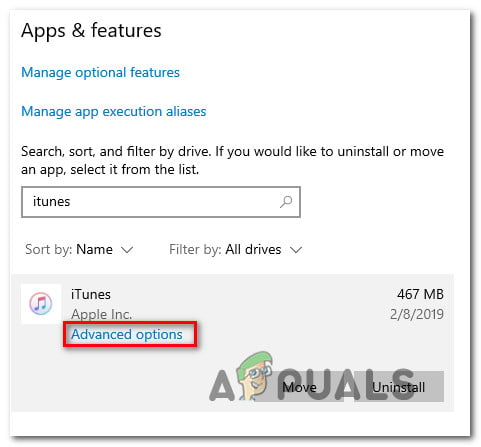
Accessing the Apps & Features Menu - From the Apps & Features menu, use the search function to search for ‘iTunes’. Next, click on iTunes from the list of results and click on Advanced Options from the newly appeared context menu.

Accessing the Advanced Options menu of iTunes - Once you’re inside the next menu, go to the Reset tab and click on the Reset button to initiate the reinstallation procedure. When asked to confirm, do so, and wait for the procedure to complete.
- As soon as the operation is complete, open iTunes and follow the on-screen instructions to update the UWP app to the latest version.
- Retry to connect your iOS device and see if you still end up seeing the 0xE800000A error.
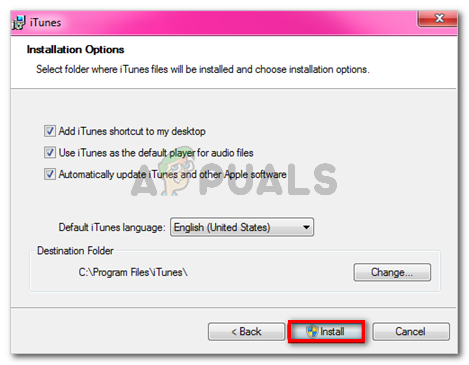
Reinstalling the Desktop version of iTunes
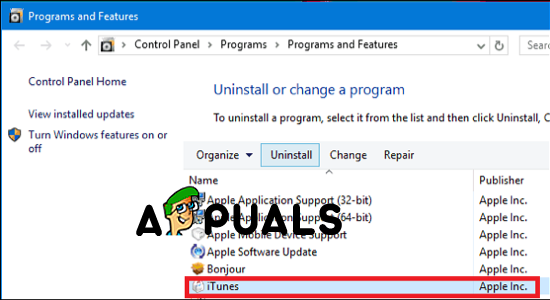
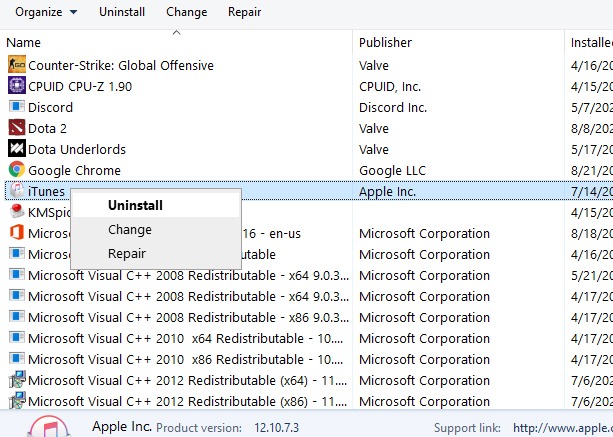
- Open up a dialog box by pressing Windows key + R. At the next screen, type ‘appwiz.cpl’ inside the text box and press Enter to open up a Programs and Features menu.
Type appwiz.cpl and Press Enter to Open Installed Programs List - Once you’re inside the Programs and Features screen, scroll down through the list of applications, then right-click on the iTunes app and click on Uninstall from the newly appeared context menu.

Uninstalling iTunes - Keep in mind that uninstalling the main iTunes application is not enough – You will also need to uninstall the reset of Apple’s supporting software. You can ensure that you uninstall every relevant item by clicking on Publisher and then uninstalling everything signed by Apple Inc.
- After you manage to uninstall everything that’s Apple-related, restart your computer and wait for the next startup to complete.
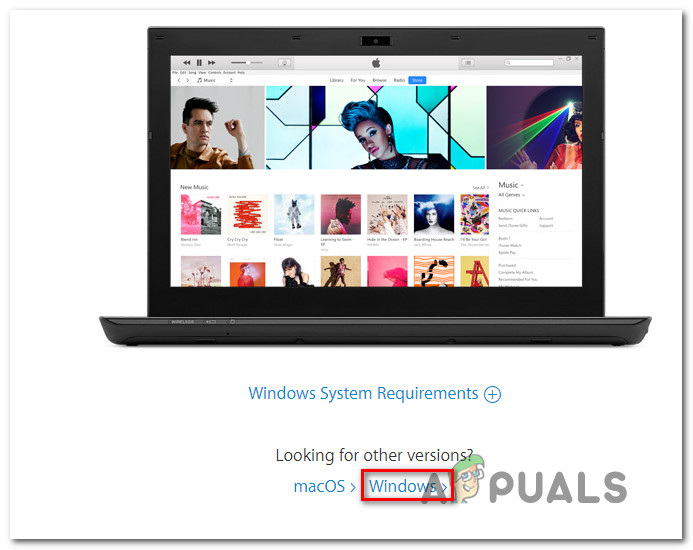
- Once the next startup procedure is complete, access this link (here), scroll down to the Looking for other versions section, and click on Windows to download the latest desktop version of iTunes.

Downloading the desktop version of iTunes - After the download is complete, open the installation executable and follow the on-screen instructions to install the latest version of iTunes on your computer.

Installing iTunes on your computer - When you’re prompted by the User Account Control window, click Yes to allow the installer to install iTunes with admin access.
- After the installation is complete, restart your computer once again and repeat the action that was previously causing the 0xE800000A error once the next startup is complete.
Deleting Apple Lockdown files (Windows 7)
As it turns out, the 0xE800000A error can also be rooted inside in a couple of files that can be found in the Lockdown folder (program data\apple\lockdown). As some affected users have reported, this particular issue can be fixed by navigating to that location manually and deleting every file present in the Lockdown folder.
After you do this, you should be able to reconnect your iPhone or iPad device without encountering the same error code.
Here’s a short guide that will guide you through the process of uninstalling the problematic files:
- Ensure that iTunes is completely close and none of its background processes are running in the background.
- Open File Explorer and navigate to the following location:
X:\ProgramData\Apple\Lockdown
Note 1: Keep in mind that X is simply a placeholder. Replace it with the letter corresponding to your OS drive. You can either navigate to that location manually or you can paste it directly into the navigation bar and pressing Enter.
Note 2: The ProgramData folder is hidden by default, so if you can’t see it, access the View tab, and ensure that the box associated with Hidden Items is enabled.
View Hidden Items option is checked - Once you manage to land in the correct location, press Ctrl + A to select everything inside, then press Ctrl + D to delete every file present in the lockdown folder.
- After you manage to delete the contents of the Lockdown folder, reboot your machine and see if the 0xE800000A error is fixed.

In case this method didn’t allow you to fix the issue, move down to the next potential fix below.
Using a Different USB Cable
If you didn’t try this until you, do some investigations to ensure you’re not actually dealing with a faulty micro-USB cable. You might be dealing with a corroded or non-congruent cable that might end up causing various inconsistency issues including the 0xE800000A error.
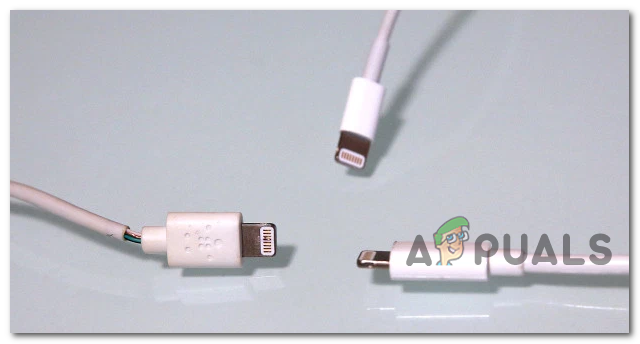
If you suspect you might be dealing with a faulty cable, replace it and see if you are still encountering the same error message.
In case the same problem is still occurring, it’s likely that the problem lies with the USB controller – in this case, move down to the final fix below.
Reinstalling every USB controller
If none of the potential fixes above have allowed you to fix the 0xE800000A error, you might be dealing with a USB port issue that’s preventing the connection to be established between your iOS device and your PC.
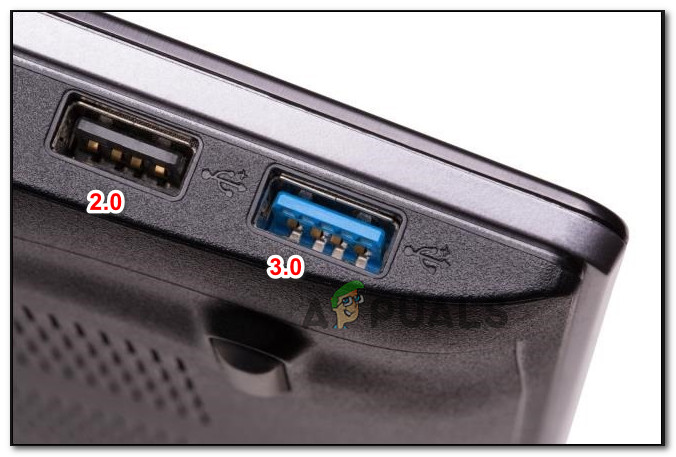
To verify this theory, try connecting your iOS device to a different port and see if you’re still seeing the same error. If possible go for a USB 3.0 port.
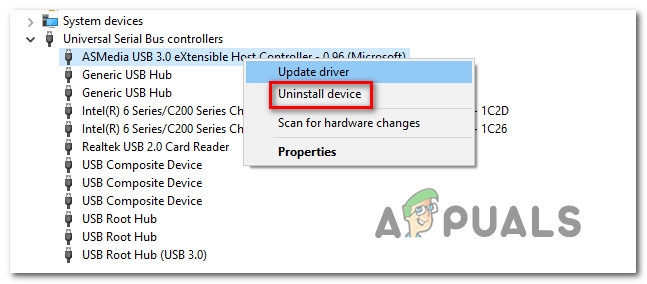
However, it’s also possible that the problem occurs due to a software glitch having to do with the Universal Serial Bus (USB) controller. In this case, you will need to uninstall it in order to get the issue fixed.
To do this, follow the instructions below:
- Open up a Run dialog by pressing Windows key + R. Next, type ‘devmgmt.msc’ inside the text box and press Enter to open up Device Manager.
Running the Device Manager - Once you’re inside Device Manager, scroll down through the list of installed devices and expand the drop-down menu associated with Universal Serial Bus controller. Next, go ahead and right-click every Host controller and click Uninstall until every entry is uninstalled.

Uninstalling every available host controller - After you manage to do this, reboot your machine and wait for the next startup to complete.
Note: During the next startup, your OS will detect that the USB controller is missing and automatically install the required drivers once again. - Launch iTunes and see if the problem is now resolved.
Apple users all around the world have encountered iTunes error 0xe800000a on their new iPhone 11,XS, XMax, and XR. And it is really frustrating. People don’t even know what this error means and hence they have no idea how to fix it.
The error states that iTunes could not connect to this iPhone. But donot know why and when this error occurs. Here is some basic information about the error that might help you to understand it and further resolve it somehow.
Symptoms of the Unkonwn Sync Error 0xe800000a
- Unknown error 0xe800000a usually appears on the screen and crashes the active window program.
- The error will be displayed on the screen again and again.
- The system will freeze unexpectedly for a few seconds or more.
- The system will become sluggish and response time will increase to keyboard and mouse input.
You might have to run troubleshooting to resolve this error. But make sure that you keep a track when and where the error keeps appearing to fix it afterward.
Why Does iTunes Error 0xE800000A Occur
Just like any other error, the main cause of this unknown error 0xE800000A is usually corruption. Corruption in the download of iTunes software or incomplete installation might lead to this issue. Sometimes other programs mistakenly delete the iTunes registry files and corruption in Windows registry might also cause this error.
As this is a runtime error, there are various other factors too that can affect the working of iTunes. But you don’t need to worry, whatever the reason is, we are here to help you resolve this recurring error permanently.
Methods to Resolve iTunes Error 0xE800000A
The various methods that can help the users to repair iTunes or iPhone errors are given below.
1: Repair iTunes to Fix iTunes Unknown Error Occurred (0xE800000A)
The most plausible recommendation we can provide is TunesCare-Free iTunes Repair. This software is specially designed so that it can be used to resolve multiple errors that arise while using iTunes. Whether we are trying to update our iPhone, restore, or backup, some kind of error often occurs which interrupts the operation. And sometimes, none of the common methods seems to resolve the errors. But TunesCare can do that easily.
Download and install this program on your computer, and then connect your device to the computer. From the main interface, you can firstly try «Fix iTunes Sync Problems», this feature is 100% free and can be used to fix the problems that iTunes cannot read the contents of your device, or iTunes cant sync with your phone.
It is one-click operation to repair iTunes library.
However, if this does not fix the error 0xE800000A, you can use the advanced feature «Fix All iTunes Issues» to repair iTunes thoroughly.
It will download the latest iTunes drivers and rebuild iTunes on your computer.
After this, if the error happens because iTunes is corrupted, it should be resolved now.
2. Fix Error 0xe800000a Caused by iPhone System
If you’ve tried connecting your device with multiple devices and you realize that the error is happening due to some problem in the iPhone system, then you can use ReiBoot – Professional iOS System Repair software.
With this system recovery tool, you can simply resolve all kinds of known and unknown errors in your iPhone without deleting your device data. It not only boosts the performance of your device but also make sure that the problem will cease to exist permanently.
Step 1 After installing the program on your computer, launch it and connect your device to the computer. Select Repair Operating System.
Step 2 Click Start Repair and then Download to download the latest firmware package.
Step 3 With the firmware file, this program will use it to repair iPhone system.
After the system recovery, the iPhone is refresh and iOS is up to date. You can connect it to iTunes for file transfer, sync or backup.
3. Other Possible Tips to fix the iTunes Error 0xE800000A
Few other methods that you can try out to resolve the iTunes error 0xe800000a on your device are given below. These common methods may or may not work for you, but there is no harm in trying them out. If you are lucky enough then maybe the error will be fixed in the simplest way possible.
Tip 1: Update iTunes
One possible solution for this error may be the old version of iTunes installed on your computer. The old version not only degrades the performance of the software but also leads to unknown error 0Xe800000a.
- To update iTunes on Windows PC, you will have to open the Help menu. There you will see the Check for Updates option. Click on it and download the latest version of iTunes on your PC.
- If you are using Mac PC, then you might have to update the MacOS first. Click on the Apple icon on the desktop screen and open System Preferences. Then choose the Software Update option.
You can also get the latest version of iTunes from the App Store window. From the App Store, you can directly install the new version instantly.
Tip 2: End Certain Apple Processes in Task Manager
You might have to end all processes running on your system to fix the error 0xe800000a. To do this, open the Task Manager by pressing the Ctrl + Alt + Delete keys simultaneously. If there are lots of processes running at the same time, then you will have to kill or end every process that begins with Apple. Make sure that two processes are closed entirely:
- iTunesHelper.exe
- AppleMobileDeviceHelper.exe
Once these processes are closed, the problem will be fixed immediately. Open iTunes and verify whether the problematic error is really fixed or not.
The Bottom Line
In the end, you will be able to successfully fix the unknown error 0xe800000a. Whether it is iTunes or iPhone system which is working maliciously, TunesCare and ReiBoot can handle all related issues. You might want to try out the common methods, but in case they don’t seem to work, you can always ask for help from Tenorshare.
Getting greeted with an 0xE800000A error code whilst connecting your Apple device to iTunes?
iTunes is a great companion for Apple users in managing content on their devices. However, there are occasions where problems occur, and it can be a little annoying, especially if you need to move or copy media files to your Apple device.
There have been several reports from users who are experiencing connection problems with a 0xE800000A error code when they try to connect their device using the lightning cable. On the other hand, users have also reported experiencing this error code when they try to restore a previous backup from an old device to a new one.
Now fret not, as this problem can be fixed if you know the right solutions. Lucky for you, you have come to the right place. Today, we are going to show you a few techniques that you can do to try and fix the iTunes error 0xE800000A code which we’ve found to be effective.
Let’s get started.
- 1. Restart Your Computer.
- 2. Check Your USB Cable.
- 3. Use Another USB Slot.
- 4. Update iTunes.
- 5. Update Your iOS Device.
- 6. Disable Third-Party Antivirus Software.
- 7. Reset Location & Privacy Settings on Your iOS Device.
- 8. Reset Lockdown Folder.
- 9. Reinstall iTunes on Your Computer.
1. Restart Your Computer.
When programs on your computer are not running properly, the first thing that you should do is to restart your operating system.
It is possible that some of its system files did not load properly or it encountered a temporary glitch while running, which caused the error code on iTunes.
To rule this out, you can try restarting your computer so that the operating system has a fresh start.
- On your keyboard, press on the Windows key to open the Start menu.
- Next, click on the Power button on the Start menu to open the Power Options menu.
- Lastly, hit the Restart button to begin the rebooting process of your operating system.
Wait for your computer to complete rebooting, then run iTunes once again and try connecting your Apple device to see if the 0XE800000A error code would still appear on your computer.
However, if the issue still occurs when connecting your Apple device, you can proceed to the next method below to try and fix the problem on iTunes.
2. Check Your USB Cable.
If the error on iTunes occurs when you try to connect your Apple device, then you can try checking the USB cable that you are using.
USB cables contain separate wires for delivering current for charging and data for your computer to read. It is possible that your cable still works perfectly for charging, but not for transferring data.
To verify this, you can try checking for any physical damage on the wires. See if there are any exposed wires, then inspect the actual USB connector and lightning connector for any damages.
Another great tip that ended up fixing the solution for us was to use another USB cable to see if the error code would still occur on your computer.
3. Use Another USB Slot.
After checking your USB cable for any damages, you can try using a different USB slot on your computer to see if the error code 0xE800000A would still occur.
It is likely that a specific USB port on your computer is not working properly or your device’s drivers were not installed correctly.
Hence what you can do is unplug the USB cable from the port and try connecting it to other ports on your computer. Repeat the process until you tested all the ports on your computer.
Also, try to use the USB ports from the back of your motherboard instead of the ports on your computer case’ front panel. Front panel ports carry out less voltage which may not be enough for your Apple device compared to the USB ports at the back of your motherboard.
4. Update iTunes.
If you are sure that none of the physical connections on your computer is the cause of the error, then the next thing that you should do is check for an update on iTunes.
Running an outdated version of iTunes which your device no longer supports or your current version can contain bugs that cause the 0xE800000A error code. Chances are by the time you’re reading this post that Apple may have released newer versions of iTunes to address this matter.
To check for an update on iTunes, you can follow the steps below:
- On your Desktop, double-click on the iTunes icon to launch the program.
- After that, click on the Help tab on the menu bar located at the top of your screen.
- Lastly, click on the Check for Updates button, and it will automatically search for any updates available for the current version of iTunes installed on your computer.
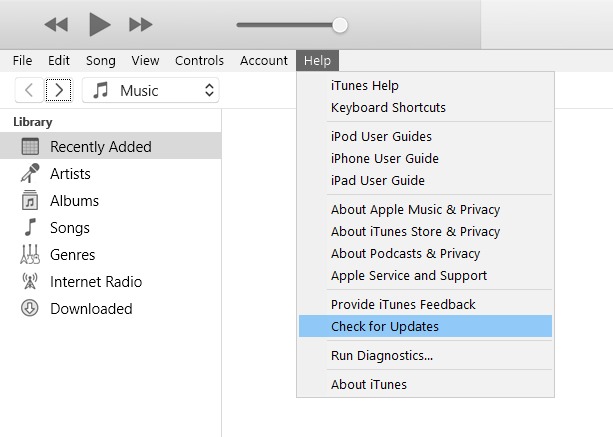
If available, follow the on-screen prompts to download and install the update. Now, after updating iTunes, try connecting your Apple device once again to see if the 0xE800000 error code is already fixed.
5. Update Your iOS Device.
After updating iTunes, the next thing to do is to update your iOS device. In this case, the issue may be the other way around, and your iOS device is the one that is outdated and not supported by iTunes, which causes the problem.
In this case, you can try updating your device by doing the following steps below:
- On your iOS device, go to the main screen and tap on Settings to open it.
- Next, inside the Settings, tap on the General tab.
- Lastly, tap on Software Update. Your device will start checking for any update available for the current version of iOS installed on your device.
If available, you can follow the on-screen prompts on how to download and install the update to your iOS device. Once the update is done, connect your device to your computer and see if the error code 0xE800000A would still occur on iTunes.
On the other hand, if the problem still occurs, you can try doing the next method below to try and fix the issue.
6. Disable Third-Party Antivirus Software.
Antivirus software can also be the cause of the 0xE800000A error on iTunes when you try to connect with your Apple device.
Oftentimes, antivirus software can flag your device as suspicious whenever it doesn’t recognize it.
The workaround for this is to temporarily disable your antivirus software when you are connecting your device to your computer to prevent it from interfering with the connection from your device to iTunes.
Although there is only a small chance of this scenario from happening, it wouldn’t hurt to try it out.
7. Reset Location & Privacy Settings on Your iOS Device.
The next thing that you can do to try and fix the 0xE800000A error on iTunes is to reset the ‘Location & Privacy’ settings on your iOS device. You may have mistakenly hit the ‘Don’t Trust’ prompt on your iOS device which blocks any form of connection to your computer.
To rule this out, you can try resetting your Location & Privacy settings by following the steps below:
- Open the Settings app on your iOS device.
- After that, click on the General tab inside the Settings main menu.
- Next, scroll down and tap on the Reset tab.
- Lastly, click on Reset Location & Privacy and tap on Reset Settings when a prompt pops-up.
Wait for your iOS device to complete the process, then try connecting it to your computer once again to see if the 0xE800000A error code would still occur on iTunes.
If you are prompted once again with the ‘Trust This Computer’ on your Apple device, then make sure to choose the Trust option.
8. Reset Lockdown Folder.
iTunes creates a subfolder on your computer’s hard drive, which is used to store essential security files for communicating with Apple devices that are connected to your computer.
It is possible that the files related to the Apple device that you are connecting got corrupted, which causes the connection problem between your device and iTunes.
To fix this, you can try resetting the ‘Lockdown’ folder on your hard drive. Check out the steps below to guide you through the process:
- On your computer, press on the Windows key + R to open the Run Command Box.
- After that, type %ProgramData% and hit Enter to open the Program Data folder on your computer.
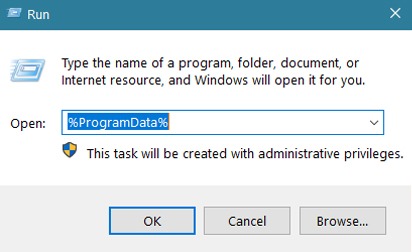
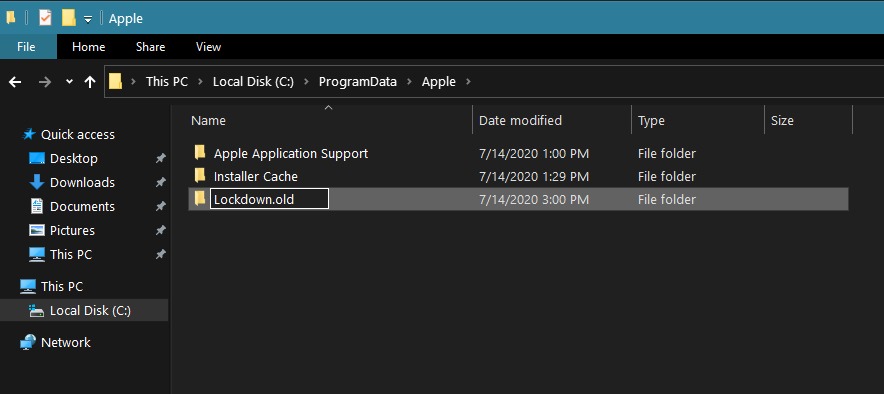
- Next, find the folder named Apple from the list and open it.
- Inside the Apple folder, right-click on the Lockdown folder and click on Rename.
- Lastly, rename the Lockdown folder to Lockdown.old.
Now, open iTunes once again and try to connect your iOS device to see if the error code 0xE800000A would still occur on your computer.
However, if the issue still occurs on iTunes when you try to connect an Apple device, then you can proceed to the last method below to try and fix the problem with iTunes.
9. Reinstall iTunes on Your Computer.
The last thing that you can do to try and fix the problem with iTunes is to reinstall the whole program on your computer.
In this case, it is best that you remove the iTunes program on your computer and install it back again so that you are sure that you have a working copy of the program on your computer.
We will show you step-by-step on how to reinstall iTunes on your computer, below:
- First, press on the Windows key + S on your keyboard and search for Control Panel.
- Next, click on Open to launch the Control Panel.
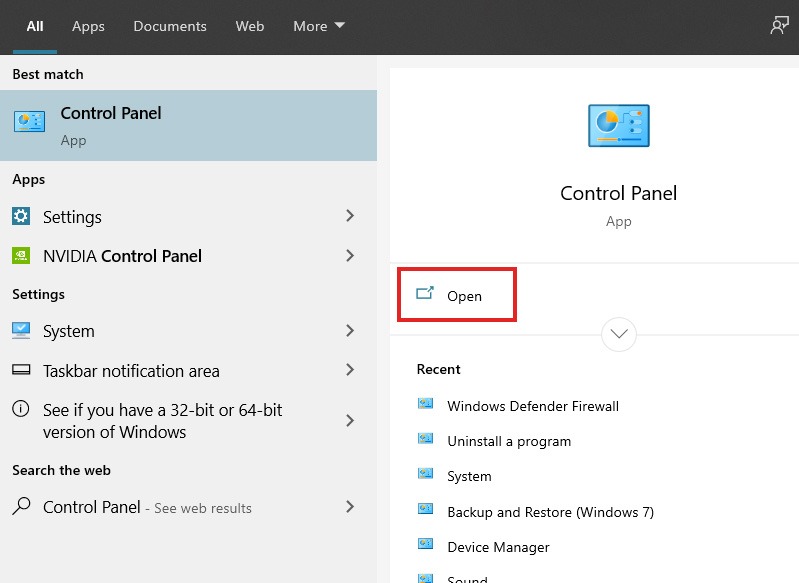
- After that, click on Uninstall a Program.

- Lastly, find and right-click on iTunes from the list of programs installed on your computer and select Uninstall.
Follow the on-screen prompts to remove the program on your computer. Now, restart your computer and go to Apple’s official website and download the latest version of iTunes to your computer.
This ends our guide on how to fix iTunes 0xE800000A error code on your computer. If you know other methods that you’ve found helpful besides the ones listed in this article, kindly share it in the comment section below, and we would give you credit for the solution once this article gets updated. 😀
If this guide helped you, please share it. 🙂
-
John is a staff writer at Saint and comes from a SAP ABAP development background. He has a Bachelors in IT and has been writing since 2018, with over 500 posts published. He loves to build PCs and has a deep curiosity in understanding how different components and configurations work. John spends hundreds of hours at a time, researching and testing the software and apps, before he proceeds to write about it. LinkedIn
X (Twitter)
Website
View all posts