
«I just installed the new update for iTunes last night, and after it finished downloading, I was unable to access iTunes at all. It popped up with iTunes error 7 windows error 127 and said that the entry point could not be found in iTunes. I can’t figure out how to fix it.»
-Apple Discussions
This iTunes error 7 Windows error 127 problem can be quite familiar with Windows iTunes users, but most of them don’t know how to fix. In this article we will introduce you the most useful three ways to repair iTunes error 7 Windows error 127/126/193, etc.
Note: When iTunes is damaged, the backup in it is likely becomes unavailable. You can back up your iPhone data with Tenorshare iCareFone to avoid such unpleasant situation.
Causes of iTunes Error 7
For those runtime errors like «Error 7 (Windows Error 127)» can be caused by a variety of factors. And the following list can be the major reasons of this error:
- Incorrect or failed installation or uninstallation of software that may have left invalid entries in your Windows registry
- Corrupt download or incomplete installation of iTunes software
- Virus or malware infection that has corrupted Windows system files or iTunes-related program files
- Improper system shutdown due to a power failure or another factor
- Someone with little technical knowledge accidentally deleting a necessary system file or registry entry
How to Fix iTunes Error 7 (Windows Error 127)
Here we prepared the best three methods for to fix and repair iTunes Error 7(Windows error 127), and you will soon get your iTunes out of trouble.
- Method 1: 1-Click to Repair iTunes Error 7 with Tenorshare TunesCare (Free & Easy)
- Method 2: Update Microsoft NET Framework to Solve Windows Error 126/127/193
- Method 3: Uninstall iTunes and Reinstall to Fix iTunes Error 7
Method 1: 1-Click to Repair iTunes Error 7 with Tenorshare TunesCare
Tenorshare TunesCare, an all-in-one iTunes repair tool to fix iTunes sync issues and all iTunes errors you may encounter during sync, update or restore process.
Method 2: Update Microsoft NET Framework
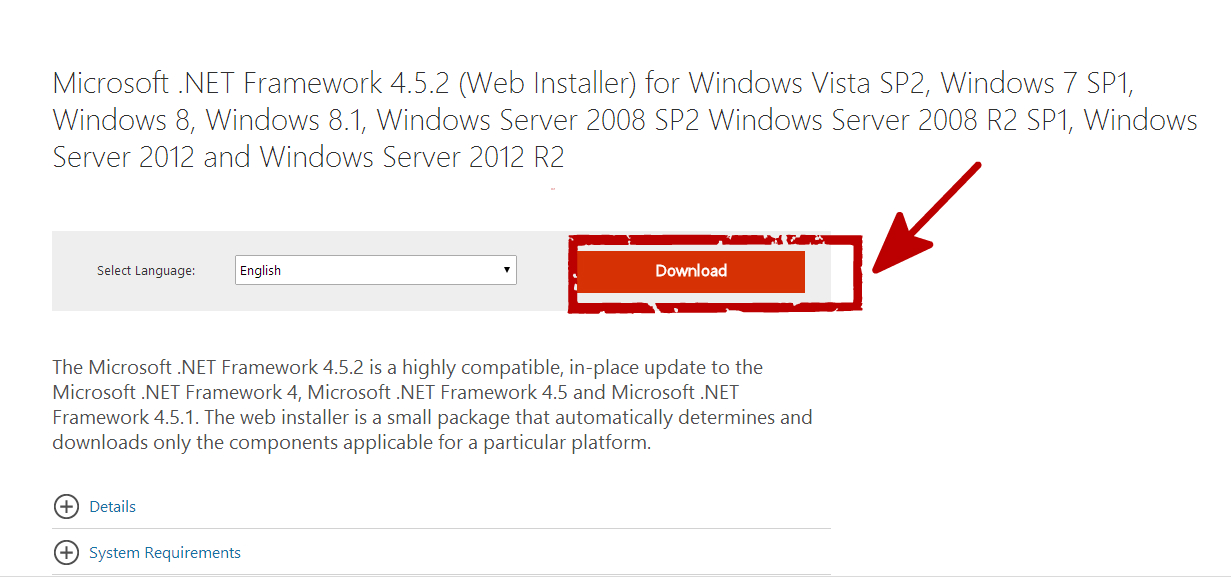
Sometimes iTunes error 7 occurs as a result of framework, you can get this error fixed by install the latest version of Microsoft NET framework.
- Step 1: Go to Microsoft to find the latest version of framework.
- Step 2: Download and install the latest version of Microsoft NET Framework on your computer.
- Step 3: After installation, restart your computer and have another try.
Method 3: Uninstall iTunes and Reinstall
To correct error 7 by this way, you need to uninstall all the tools which are related to the Apple before repairing process.
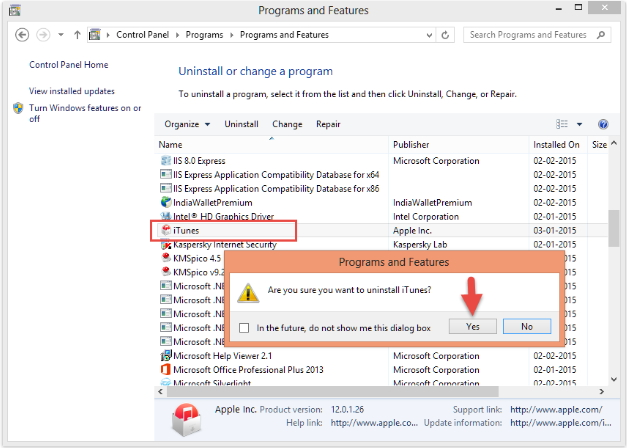
- Step 1: Go to the Add/Remove Programs option from the control panel and select and remove one by one all of the Apple relate product.
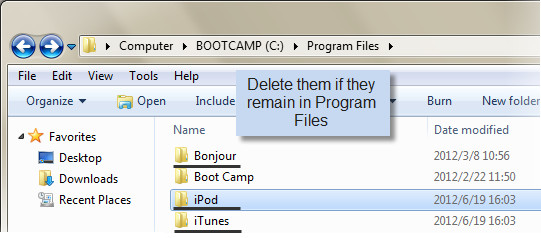
- Step 2: After you uninstalled all the software from the control panel, Go to My Computer > C: Drive > Programs.
- Step 3: Check the folders given below and delete them.
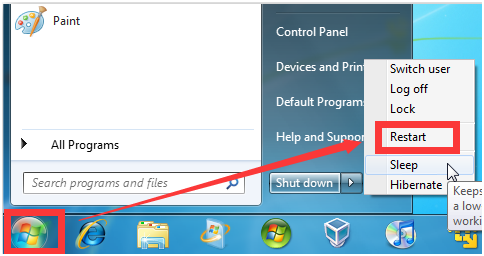
- Step 4: Restart your computer and Try to reinstall iTunes again to get this issue repaired.
Tip: Don’t forget to restart computer after every uninstallation. Run antivirus software during the process to keep windows in a stable condition.
C:\Program Files\Bonjour
C:\Program Files\Common Files\Apple
C:\Program Files\iTunes
C:\Program Files\iPod
C:\Program Files\QuickTime
C:\Windows\System32\QuickTime
C:\Windows\System32\QuickTimeVR
Done! Hope the methods above can help you remove this annoying issue completely and fix iTunes error 7. If you have more questions, feel free to leaves us comments.
After installing iTunes 64-bit for Windows (latest build), I get an error pop-up saying:
iTunes was not installed correctly. Please reinstall iTunes
Error 7 (Windows error 127)
I’ve gone thru the uninstall, reboot and reinstall process three or four times now. Still nothing.
Furthermore, after clicking okay to the error, it continues to pop up on it’s own every 45 seconds or so.
There was one other error I came across after trying to launch iTunes after installation.
See both error messages here:
http://screencast.com/t/DSg4PpKF5BeX
Многие пользователи iTunes рано или поздно сталкиваются с ошибкой под номером 7. iTunes, вне всякого сомнения — чрезвычайно полезное приложение, позволяющее пополнять, организовывать и воспроизводить цифровую музыкальную коллекцию на вашем компьютере, а также синхронизировать её с мобильными устройствами.

Кроме того, оно может осуществлять автоматическое резервное копирование при подключении iPhone. Тем не менее, ряд причин может обусловить возникновение ошибок, которые могут нарушить работу iTunes или Windows. Для таких случаев существуют специальные программы, среди которых особенно выделяется TunesCare от компании Tenorshare. В этой статье мы посоветуем, что можно сделать при столкновении с такой ситуацией и как наладить работу iTunes после провалившейся установки или удалении программы.
Внимание: После прекращения нормальной работы iTunes резервные копии внутри iPhone в большинстве случаев становятся недоступными. Чтобы предотвратить подобные происшествия, делайте резервные копии с помощью iCareFone.
Причины
Ошибки времени выполнения вроде «iTunes установлена неправильно. Пожалуйста переустановите iTunes. Ошибка 7 (Windows Error 127)» (iTunes was not installed correctly. Please reinstall iTunes. Error 7 (Windows error 127)) могут быть вызваны множеством факторов; поэтому важно учесть все возможности и принять необходимые меры, чтобы предотвратить их возобновление. Вот список основных причин появления этой ошибки:
- Неправильная установка или удаление программного обеспечения, которые могут оставить некорректные записи в реестре Windows.
- Повреждённые файлы или незаконченная установка iTunes.
- Заражение вредоносным ПО, повреждающим системные файлы Windows или iTunes.
- Неправильное выключение компьютера из-за перебоев питания или других причин.
- Случайное удаление необходимых файлов или записей в реестре некомпетентным пользователем.
Решение
Существует три простейших способа устранить ошибку 127 в iTunes 7 под Windows. Наиболее предпочтительным является первый, использующий бесплатную утилиту TunesCare. Два других метода позволяют вам вручную восстановить функциональность iTunes без применения сторонних программ.
Способ 1: одно нажатие в TunesCare
TunesCare — простое и универсальное средство для исправления различных ошибок, связанных с синхронизацией, обновлением и восстановлением iTunes.
- Установите TunesCare и соедините устройство на iOS с компьютером при помощи кабеля USB.

- Нажмите «Исправить проблему „синхронизация с iTunes“», чтобы выполнить автоматическое исправление неполадок.

- Если это не решило проблему, попробуйте использовать продвинутый режим, выбрав «Устранить все iTunes ошибки». Он позволяет исправить все проблемы iTunes путём удаления повреждённой библиотеки и пересборки.

Способ 2: обновление Microsoft NET Framework
Иногда причиной ошибки бывает сбой в инсталляции Microsoft NET Framework. В таком случае вам должен помочь следующий способ:
- Зайдите на сайт Microsoft и загрузите последнюю версию фреймворка.
- Выполните установку.
- Перезагрузите компьютер и проверьте результат.
Способ 3: удаление и переустановка iTunes
Чтобы воспользоваться этим методом, вам понадобится удалить все инструменты Apple, прежде чем начать устранение ошибки.
- Откройте «Программы и компоненты» в панели управления и удалите все продукты Apple по одному.

- Внимание: не забывайте перезагружать компьютер после каждого удаления. Держите антивирус запущенным, чтобы сохранять стабильность Windows.
- Запустите Проводник и перейдите в раздел с операционной системой.
- Проверьте и удалите следующие директории:
- C:Program FilesBonjour
- C:Program FilesCommon FilesApple
- C:Program FilesiTunes
- C:Program FilesiPod
- C:Program FilesQuickTime
- C:WindowsSystem32QuickTime
- C:WindowsSystem32QuickTimeVR

- Перезагрузите компьютер и установите iTunes заново.
Готово! Перечисленные способы должны помочь вам справиться с проблемой возникновения ошибки 7 в iTunes. Если у вас остались какие-то вопросы, вы можете задать их в комментариях ниже.
Скачать TunesCare можно по ссылке.
iTunes
2,744 views
How to fix iTunes Error 7(Windows Error 127)
When using iTunes, you may see alter message that include specific error numbers. So if you could know the meaning of the code , you will understand the problems that you are facing. And you can seek for the right ways to solve them.
- What is iTunes Error 7 and the Causes this Error
- How to fix iTunes error 7
What is iTunes Error 7 and the Causes this Error
If you open iTunes on some Windows-based computers, you might get the following information in the interface:” iTunes was not installed properly. Please re-install iTunes. (Error 7).” However, what is the meaning of “Error 7 ”? What really causes the problem?

This is a common iTunes error. Actually , this error message occurred due to data corruptions. It means the iTunes that you installed is improper and you should reinstall it . iTunes Error 7 occurs due to the many reasons like bad installation, damage iTunes, deletion of system registry entries from the computer registry, and makes your Windows runs sluggishly and responds slowly to mouse or keyboard input.
«Error 7 (Windows Error 127)» can also be caused by a variety of other factors, so it is important that you troubleshoot each of the possible causes to prevent it from recurring. Here we present to you the major causes of this error.
Causes of iTunes error 7
- Incorrect or failed installation or uninstallation of software that may have left invalid entries in your Windows registry.
- Corrupt download or incomplete installation of iTunes software.
- Virus or malware infection that has corrupted Windows system files or iTunes-related program files.
- Improper system shutdown due to a power failure or another factor.
- Someone with little technical knowledge deleting a necessary system file or registry entry.
Of course, no matter what the cause is, we are going to need a solution for the problem. So we’ve prepared these three methods for you to tackle the problem.
3.1 Update Microsoft NET framework.
Sometimes iTunes error 7 occurs as a result of framework, you can get this error fixed by install the latest version of Microsoft NET framework.

Step 1: Go to Microsoft on internet.

Step 2: Find the latest version of framework for your computer.

Step 3: Download it. And then install the latest version of Microsoft NET Framework on your computer.
Step 4: After installation, restart your computer and then operate the iTunes. Maybe you will find that your iTunes now can work.
3.2 Uninstall and reinstall iTunes.
First of all, to fix this problem, you have to uninstall all the tools which are related to the Apple.
Step 1: Click Start>Control Panel on your computer and open Programs and Features from the control panel. Find out all the related Apple component, and then remove them . Of course, don’t forget to uninstall the destructive iTunes.
Step 2: After those above steps, next, you should go to the step of My Computer > C: Drive > Programs.
Step 3: Check if the bellow given folders have been removed from the system:
- C:\Program Files\Bonjour
- C:\Program Files\Common Files\Apple
- C:\Program Files\iTunes
- C:\Program Files\iPod
- C:\Program Files\QuickTime
- C:\Windows\System32\QuickTime
- C:\Windows\System32\QuickTimeVR

Step 4: Now, please restart your computer. Then reinstall iTunes.
If the iTunes starts to work again; it means that now you can reinstall iCould and QuickTime applications. Of course, it also means that you can use the iTunes normally.
Now, if you did encounter the iTunes error 7(Windows error 127), this post would be of great help to you.
Any 3rd-party product names, trademarks, logos and images occasionally mentioned on this site belong to their owners. These might include but not be limited to YouTube, Apple, Amazon, Adobe, Netflix, etc. Leawo Software is independent of all of these property owners.
Attention Before you read this post, I highly recommend you check out my resources page for access to the tools and services I use to not only maintain my system but also fix all my computer errors, by clicking here!
For clarification purposes, both the Windows error 127 and iTunes error 7 refer to the same computer incident. It is essentially the same error referred to by two different names, and it relates to the bad installation, data and registry corruption of iTunes and other apple related products.
Both QuickTime and iTunes are two related applications that people most commonly install and use on their systems. However, despite its widespread use and efficiency, there are times when problems can occur, such problems typically occur when an update fails or an associated file is accidently deleted. Reinstallation of iTunes or QuickTime in many situations may not be sufficient in rectifying this problem, and although the program(s) may load up and work as it is supposed to, you may still experience random Windows error 127 error message pop ups.
Common Causes for This Error
There are numerous kinds of error messages that you could be presented with, depending on the situation that lead to your iTunes fault. Below are a number of the most common symptoms and associated error messages:
- “Error 7 (Windows Error 127)” this error dialog box will appear, blocking you from accessing the application window.
- The “Error 7 (Windows Error 127)” occurs randomly crashing your operating system every time you attempt to start iTunes.
- Your operating system runs significantly slower, with a delayed reaction to your keyboard and mouse input.
- Your computers performance becomes intermittent with frequent freezing.
Keeping track of when you experience the Windows error 127 is extremely important when it comes to solving the problem, as the error can occur at any time, due to a plethora of different reasons.
If you’ve received any of the above error messages along with the specified symptoms, then it’s more than likely that you have a damaged iTunes installation. The exact reason why this may have occurred is plentiful, however the most common reasons are as follows:
- You downloaded a corrupted iTunes installation file or the installation process didn’t fully complete.
- You made changes to an application associated with iTunes, which adversely affected the program.
- A virus or malware infection has caused irreparable damage to a Windows file or a file iTunes requires for smooth functionality.
- The installation of an Apple related program, resulted in the removal of a file iTunes requires.
Although there may be other reasons that caused the Windows Error 127, the reasons outlined above tend to be the most common.
Note: Another titbit relates to the corefoundation.dll which you may or may not see references to in your error messages, in addition to various other DLL files that are copied to your system during the iTunes installation process.
The reason why references may be made to these files is because of the Apple Application Support program, which may also have become corrupted (in addition to iTunes). Corruption to an associated DLL file is enough to adversely affect an Apple application. This is because single DLL files are shared amongst all of Apple’s products such as QuickTime, iTunes, Mobile Me etc, a programming method that was adopted for efficiency, but also has its flaws, especially when problems occur.
Windows Error 127 Solution
When it comes to solving this problem, there are a number of things that you will have to do. Thus, it’s very important that you follow the process I’ve laid out below in its entirety.
Note: Make sure you follow all the steps below, as adopting one or two of the methods will NOT sufficiently tackle Windows error 127.
Uninstall Apple Applications
The first thing you will need to do is remove all programs on your computer that were developed by Apple. This is a fairly simple process, that you should be able to do using the operating systems uninstaller. Anyway, the step by step instructions are as follows.
1. First ensure that you have logged into your system with administration rights.
2. Then click on Start -> Run, [Windows Vista/7: Press + R], type appwiz.cpl and click on OK.
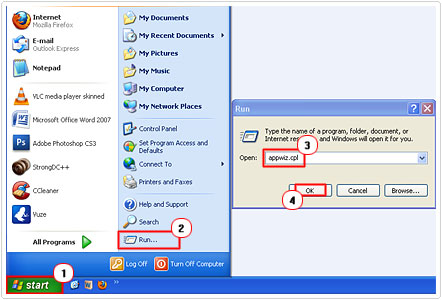
3. This will bring up the Add or Remove Programs [Windows Vista/7: Uninstall or change a program] applet, from here you will need to click on the Apple Application, and then click on Remove. [Windows Vista/7: Uninstall]
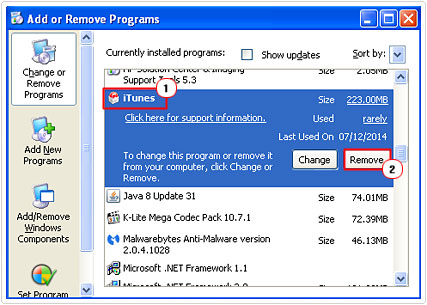
Note: The Apple applications that you will need to uninstall are as follows:
- Bonjour
- iTunes
- iPod Drivers
- QuickTime
- Apple Application Support
- Apple Mobile Device Support
- Apple Software Update
So you will need to repeat the uninstall process for each of these applications. Be sure not to restart your system until you have removed all of the applications first.
Verify Uninstallation
The next step is to verify that the application folders have been totally removed from your computer, as it is quite common for the uninstaller to leave remnants of the application behind.
Keep in mind, it’s very important that these applications are completely removed from your system, before you reinstall them, otherwise the reinstalled applications will inherit the attributes of the old install.
Anyway, to verify its removal, you will need to access your Programs Files and Windows folder and check to see whether the following applications folders are still present and delete them:
- C:\Program Files\iTunes
- C:\Program Files (x86)\iTunes
- C:\Program Files\iPod
- C:\Program Files (x86)\iPod
- C:\Program Files\Bonjour
- C:\Program Files (x86)\Bonjour
- C:\Program Files\Common Files\Apple
- C:\Program Files (x86)\Common Files\Apple
- C:\Program Files\QuickTime
- C:\Program Files (x86)\QuickTime
- C:\Windows\System32\QuickTime
- C:\Windows\System32\QuickTimeVR
For a step by step tutorial on how to do this, I suggest you check out my post on fixing uninstall issues.
Run Virus Scan
Once you’ve successfully removed the Apple applications from your computer, the next thing you will want to do is run a Virus and Malware scan of your computer. This is because of the possibility that your problem may have been brought about by a virus. Thus, it’s important that it be removed before you begin any reinstallation procedures.
Anyway, for this procedure I recommend running both an antivirus and anti-malware scan. I’m going to assume you already have an antivirus program on your computer, but in the event that you do not, I highly recommend you check out my post on the very best antivirus tools.
1. For the anti-malware scan, I recommend you use SpyHunter to carry out this task. You can download this program from here:
CLICK HERE TO CHECK OUT SPYHUNTER
2. Once you have downloaded the program, install and run it, and it should automatically scan your system, but in the event that it does not, simply click on Malware/PC Scan, then un-tick the box next to Quick Scan, then click on Start Scan.
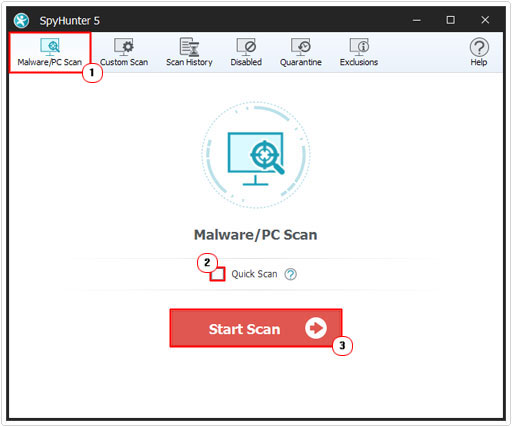
Note: If SpyHunter requires updating prior to scanning your system, it should do that, automatically.
Run Registry Cleaner
The next thing you will need to do is run a registry scanner in order to remove any registry entries that are linked to any of the Apple programs that you have recently uninstalled.
There are a number of applications around that can do this for you, but I personally recommend Advanced System Repair Pro, and that’s because of its efficiency, and proven track record, anyway you can access this tool here:
CLICK HERE TO CHECK OUT ADVANCED SYSTEM REPAIR PRO
Repair Microsoft .NET Framework
Once you’ve successfully removed all the Apple applications and all references to it, on your operating system, the next step you will need to take is to repair the .Net framework on your computer, which can be done by doing the following.
1. First visit the following Microsoft page: http://www.microsoft.com/en-us/download/details.aspx?id=17718
2. Then download and install the most up-to-date version of Microsoft .NET Framework onto your computer.
3. Once the installation process has completed, restart your system, and you are done.
Reinstall iTunes
Once you have successfully removed, scanned and updated your computer, you should now be in the position to reinstall iTunes.
1. You can download and install the latest version of iTunes from here: http://www.apple.com/itunes/
2. Once you have it running, verify that it is working correctly, and then proceed to reinstall all the other Apple applications you previously uninstalled.
Are you looking for a way to repair all the errors on your computer?
If the answer is Yes, then I highly recommend you check out Advanced System Repair Pro.
Which is the leading registry cleaner program online that is able to cure your system from a number of different ailments such as Windows Installer Errors, Runtime Errors, Malicious Software, Spyware, System Freezing, Active Malware, Blue Screen of Death Errors, Rundll Errors, Slow Erratic Computer Performance, ActiveX Errors and much more. Click here to check it out NOW!