
This short guide describes all steps required in order to create bootable USB with the latest Windows 10 in Linux Mint. Several different options are described — as the one which is working best is WoeUSB.
Step #1: Requirements
- A 8GB or larger USB stick/flash drive
- Microsoft Windows 10 image
- Linux Mint/Ubuntu machine with admin rights
- Writing program:
- WoeUSB — the only one working fine with the latest November edition of Windows 10
- Etcher — not able to create bootable USB for Windows 10 November with language pack, but working fine for older images.
- USB Image Writer — included by default in Linux Mint Cinnamon
Step #2: Download Windows 10
The first steps is to get the latest Windows 10 from the official website (or any other image if you need a custom image. The official download link for Windows 10 is: Download Windows 10 Disc Image (ISO File). You need to
- select the edition (in this case) and confirm:
- Windows 10 November 2019 Update
- Select the product language
- English and confirm
- The final selection is to chose:
- 64-bit Download
- 32-bit Download
The file will be download for several minutes and it will be something like:
Win10_1909_Bulgarian_x64.iso
Note 1: In most cases — 64-bit Download should be preferred option unless there is special need for 32-bit version.
Note 2: The link will be valid 24 hours as the warning shows:
Links are valid for 24 hours from time of creation.
Links expire: 1/15/2020 12:37:56 PM UTC
Note 3: On this link Windows FAQ you can find more information about the image, edition and versions.
Step #3: Back up and format the USB ( 8 GB or bigger)
At this step you need to have USB which is 8 GB or more. If you have data on the USB you can do a back up. The size of the Windows Bootable USB will differ depending on the edition, version and the language pack. In my case the size is 5.3 GB.
The USB should be formatted and not in use for the next step — creation of the bootable Windows 10 flash — otherwise errors will appear or the USB will not work.
Step #4: Creating a Bootable Windows 10 USB in Linux Mint
At this step 3 options are available. The one which was working best is WoeUSB (even if error was raised during the flashing).
4.1 Create the bootable USB with WoeUSB
WoeUSB is considered as alternative of Rufus for Windows. For Linux Mint and Ubuntu it can be installed by:
sudo add-apt-repository ppa:nilarimogard/webupd8
sudo apt update
sudo apt install woeusb
The github repo is: WoeUSB and the Ubuntu package is maintained by: WebUpd8
Once the program is installed you can do:
- Start it from the menu by typing WoeUSB
- From a disk image(iso) — select the downloaded image
- Select the file system — FAT or NTFS — I used NTFS due to error related to FAT
- Select the target device — the USB which you are going to use.
- The USB should be formatted before the installation and should not be in use — otherwise errors might appear!
- Install
The process of:
Coping files from the source media…
will take some time(for me 50 minutes+).
The writing process could end with error like:
The command «exit 0» failed with exit status «1», program is prematurely aborted
And there is an open issue for it: The command «exit 0» failed with exit status «1», program is prematurely aborted
It’s interesting that despite the error the bootable USB with Windows 10 works fine and Windows is installed without any problems.
4.2 Create the bootable USB with Etcher
The USB created with Etcher will work on some laptops and mostly for older Windows 10 images. If you face problems with Etcher I recommend to try with WoeUSB. Etcher is good option when you need to create SD cards or USB in Ubuntu and Linux Mint — but for the latest versions of Windows is not working well. You can find more information here: etcher. The process of the creation is simple:
- Select image
- Select Drive
- Flash!
You can download the program from the above site. After that you need to unarchive it and execute it. The rest is to follow the steps described above.
It’s advertised as: Flash OS images to SD cards & USB drives, safely and easily.
**Note: **You have warning in case of writing Windows image. There is also an issue for such cases like: Warn against flashing Windows images
It looks like you are trying to burn a Windows image,
Unlike other images, Windows images require special processing to be made bootable
We suggest you use a tool specially designed for this purpose, such as Rufus..
4.3 Create the bootable USB with USB Image Writer
The last option for this step is to open the program called USB Image Writer. This can be done by:
- right click on the downloaded file —
Win10_1909_Bulgarian_x64.iso - Make bootable USB stick
- to — select the USB device to be used( from the right side). On the left site — Write Image — you should see the selected image file.
- Write
The process of writing will take several minutes. And the Windows 10 bootable USB is created in several minutes without additional software or programs.
Bonus Step #1: Test the bootable USB
The last step is to test the bootable USB. This can be done with any laptop or desktop PC. Enter the newly created USB and ensure that USB is part of the boot order. Start or restart the machine. That’s all.
If the USB is not loaded then you can check in the BIOS settings for:
- Ensure Secure Boot is disabled.
- Ensure Legacy mode is enabled.
- Save the UEFI/BIOS changes.
Sometimes it’s needed to shutdown the computer using the power button.
Note: In order to enter the BIOS you can try(it will depends on the laptop brand and model):
- Dell — open BIOS menu for Lenovo, Dell, Acer
- F9 — open boot options for HP
- F8 — open BIOS menu for HP
- F10 — open boot options for Lenovo, Dell, Acer
- F2 — open BIOS menu for Lenovo, Dell, Acer
- Escape — open BIOS menu for HP
For more information you can try to find information specific for you machine/laptop. For example this is what the documentations say for HP:
- HP PCs — Secure Boot (Windows

- HP Notebook PCs — Cannot Start Notebook Computer From a Bootable CD or DVD

Note: If you wonder whether you can use the you can use the USB as live Windows 10 USB then the answer is no. Because Windows ISO is only an installer. Mint ISO is an actual bootable operating system with an installer.
image.
Unlike other images, Windows images require special processing to be made bootable. We suggest you use a tool specially designed for this purpose, such as Rufus (Windows), WoeUSB (Linux), or Boot Camp Assistant (macOS).
он типо пишет что не может загрузочный window записать ?
1
ответов
Похожие вопросы
The Disc Image Burner Not Found error appears when burning an ISO file or when the CD drive is not functioning properly. If you are facing a similar issue this minor problem can be solved using the fixes discussed in this article.
CDs and DVDs seem like a thing of the past. However, you might find it interesting that they are still used to install software and operating systems. The most common use of a CD/DVD writer is found when dealing with games, operating systems, and, more importantly, ISO files on a Windows PC. Therefore, when the disk image error occurs, things might get complicated. Here are the ways to troubleshoot them.
Reasons for A disc burner wasn’t found error
- DVD ROM doesn’t have read-write capabilities.
- A glitch in Windows.
- Executable is stuck.
- Corrupt DVD writer driver.
- Cannot copy a mounted ISO on a flash drive with native burning utility.
Best Ways to Deal with Disc Image Burner Not Found Error on Windows
The disc image burner error occurs for many reasons. However, let’s not get ahead of ourselves and deviate from the main issue.
Note : If you want to create a bootable Pendrive or transfer IOS data to your removable disk, you can do that too, but that process is different than using a Disc Image burner. It is also why you should start the troubleshooting process by checking whether the hardware you use supports disc image burning.
Solution 1 – Check the Writing Capabilities of Your Disc Drive
It is important to know whether the disc drive you use has the capabilities to write or is just read-only hardware. Sometimes, old PC owners, without having proper hardware, try writing a disc image. To check whether your CD drive supports disc burning and data writing, use the following steps –
- Open File Explorer and Navigate to This PC
- Look for the Devices and drives.

- Check whether the DVD driver name says RW or R in the name of the device.
RW stands for Read & Write, while R stands for Read. If you see R, it means you cannot write the disc, either due to incompatible hardware or the unavailability of the disc image burner. To fix it, upgrade your hardware.
However, if your PC supports CD/DVD writing and is still not allowing you to write or burn a disc or the error keeps appearing, here are some other fixes you can try.
Solution 2 – Restart File Explorer
When you leave your Windows 10 PC idle for a while, it often lags on reuse. Due to this, the issue of the disc burner not being found occurs.
If you have inserted the disc, but the PC is not detecting it, try restarting File Explorer. Here’s how to do it –
- Press Ctrl+Shift+Esc to bring up the Task Manager on your PC

- In the Task manager, look for File Explorer in running processes.
- Click on it and click the End task button.
- This will stop all the File Explorer processes and close all open and running applications.
- Now, press Windows + R to open the Run window.
- In Run, type cmd and hit enter. This will give you access to your command prompt window.

- In the Command Prompt, type explorer.exe and hit enter to start the explorer again.

These steps will help you process the disc you have inserted. Once the computer detects that you have a writable disc inserted, it will initiate the burner without any issues.
Solution 3 – Update Your DVD Drivers
For the smooth functioning of connected hardware, drivers are important. Since the DVD writer is also hardware, updating drivers is required to work in sync with the PC.
Most users cannot do it because they do not know how to update drivers automatically on Windows. When searching for a way to do so, many find themselves stuck in the long process of using device management tools.
You can use a driver updater tool if you are also stuck in a similar situation. It is a dedicated program that automatically updates outdated drivers for you in no time.
Advanced Driver Updater is one of the best tools to update drivers. Here’s how it works –
1. Download the tool today from the link given below. It is easy and takes 5 minutes to install.
2. Run the application to find options for scanning your PC for outdated drivers.

3. Click on start scan to initiate the scan.

4. The scanner will go through every driver your PC has and highlight the outdated ones, and you can update all outdated drivers at once.

5. Once you have the results, choose the update option, and the application will do the rest.
It simply takes 5 easy steps to update your DVD writer drivers. Once you have updated the drivers, reboot your PC for the changes to take effect. Try using the disc image burner again, which will work if the issue is related to drivers.
These two are concrete fixes that you can opt for. Besides these, consider upgrading your DVD writer hardware as it is an older technology, and you might be using it for a while. Also, ensure that the disc you are using is compatible with the writer and is not damaged or scratched.
Fixed – A Disc Burner wasn’t Found
That brings us to the end of this post. All in all, the drivers might be causing the disc image burner to stop working. You can update your drivers using Advanced Driver Updater and ensure that you have the best hardware and software to finish the tasks you aim for.
I hope the information you found in the blog assists you with the disc image burner not found error. Good luck, and share your experience with the fixes in the comments below!
Recommended-
Fixed “RTC Connecting Discord” Server Error
How to Download & Update DVD & CD Drivers
How to Fix the “This Installation Is Forbidden by System Policy” Error On Windows
This full review introduces the meaning, user instruction, alternative, as well as error solutions for Microsoft Windows Disc Image Burner. Instead, it also indicates a way to directly create a bootable disk relying on the current running system. Read the below content created by MiniTool organization and learn more details.
What Is Windows Disc Image Burner?
Windows Disc Image Burner is an ISO file-burning software that can help you burn any ISO files into an optical disc and install the ISO file on other computers. It is developed by Microsoft and embedded in Windows 11, Windows 10, Windows 8.1, as well as Windows 8 as isoburn.exe.
Microsoft and many other companies usually deliver applications or programs in the form of ISO files such as Windows operating system (OS) and Microsoft Office. This kind of ISO file is an exact copy of a CD/DVD version of the software. The different aspect is that relying on ISO, you can distribute apps directly via the Internet without physical media.
However, sometimes, when there is no network connection, you have to rely on the traditional method to transfer the program file. Also, putting the installation files on a physical disk is a safer way for carriage or storage. Then, you will need to copy the ISO files onto a physical disc like a DVD or CD.
Furthermore, it is invalid to directly copy the ISO file to a DVD/CD. You should make use of a professional tool to “burn” the ISO file onto the target disc and make the disc an installation disc that can directly be used to install the program it contains.
In general, it is very easy to burn an ISO file into a CD/DVD. Just follow the following instructions based on Windows 10 to complete the task.
1. Connect the disc, DVD-R, DVD+R, DVD-RW, DVD+RW, CD-R, or CD-RW to your computer.
2. Find the .iso file that you want to burn into a disc in Windows File Explorer.
3. Right-click on the ISO file and select Burn disc image. Then, a new small window will pop up.
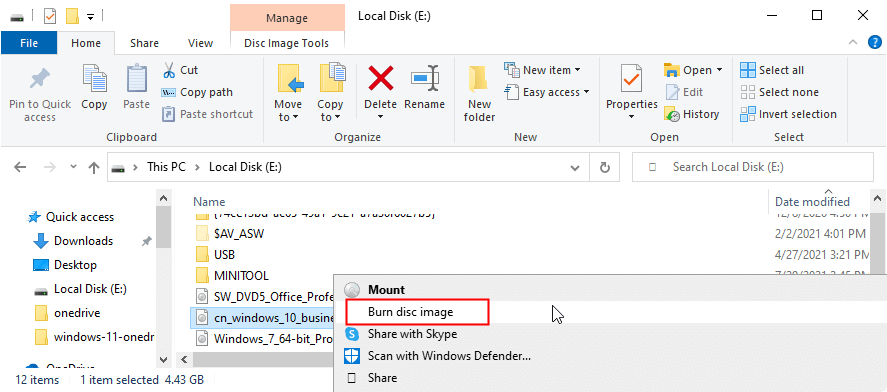
4. In the new popup, it will automatically select the disc you insert as the target disc burner. If a disc burner is not found, make sure that your burner is installed properly and you have the appropriate permissions to burn a disc.
You can check Verify disc after burning to verify the integrity of the burned disc.
5. Finally, click the Burn button to start the burning process. Then, just wait for the success.
How to Burn ISO to DVD in Windows 11?
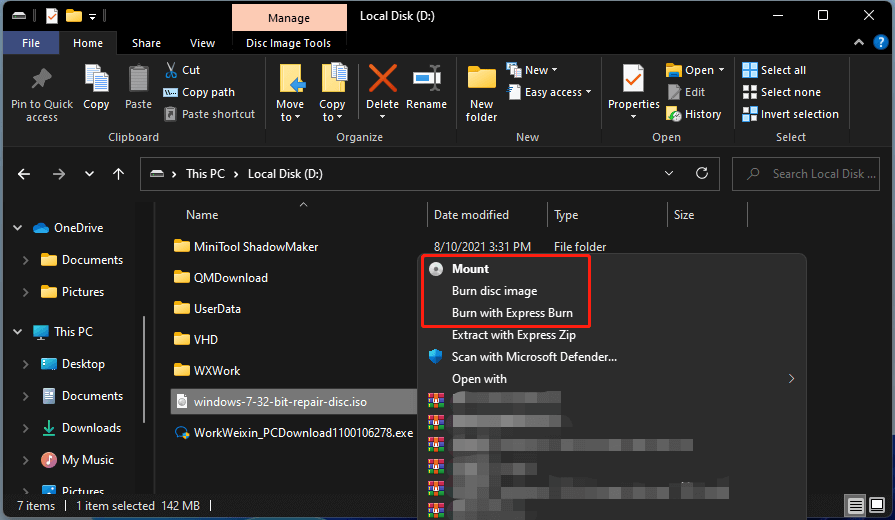
The operations for burning an ISO file into a disc in Win11 are the same as those of in Win10 if you still make use of Windows Disc Image Burner. Yet, in my situation, in Windows 11, there is an extra option that allows you to burn ISO files.
1. When I right-click on the ISO file, there is an option called Burn with Express Burn.
2. I choose the option and it informs me about the install-on-demand component. I click Run Express Burn.
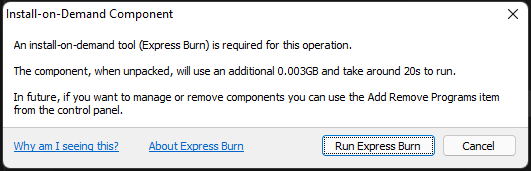
3. Then, it installed Express Burn Disc Bruning and NCH Suite these two items on my computer.
4. Then I go back to right-click on my ISO file and select Burn with Express Burn. The Express Burn app will open itself and the Burn target ISO Disc window will appear.
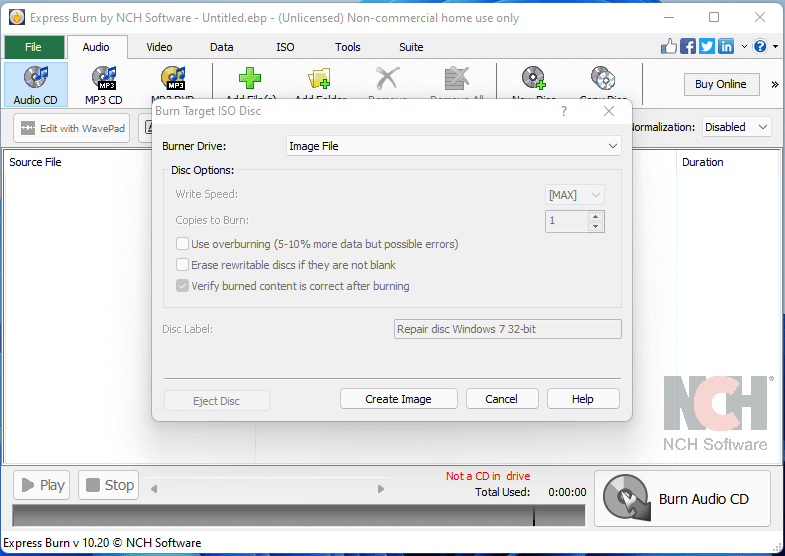
5. Then, just select the target disc and burn your iso file into it.
Besides, I found that after installing the Express Burn, when right-clicking on an ISO file, the only option I get to burn it is Burn with Express Burn and the previous Burn disc image option disappears. Maybe this is why some users can’t find access to Windows Disc Image Burner.
If you can’t reach Windows Image Disc Burner, just check if you have other third-party disc burning app(s) installed on your machine. If yes, just uninstall it and you will get the Burn disc image option back! Yet, you won’t see the Burn with Express Burn option again if you uninstall Express Burn app.
How to Mount an ISO File?
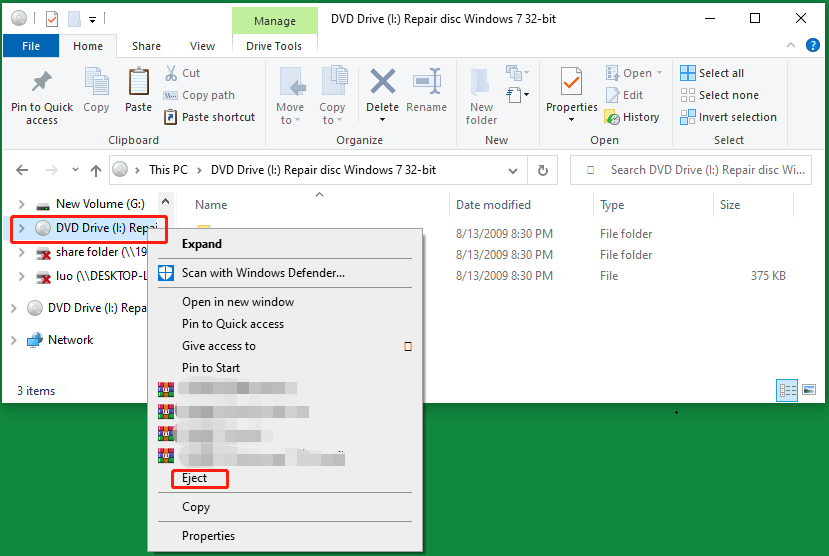
No matter you are running Windows 10 or Windows 11, you can easily mount your ISO files with just one step! Generally, right-click on the target ISO file and select Mount in the drop-down menu. Then, you will see a DVD Drive appear in your Windows Explorer and you can check its contents.
If you want to remove or dismount the DVD Drive from your explorer, just right-click on it in the left panel and choose Eject. Immediately, the drive will disappear. How easy it is!
How to Fix Windows Disc Image Burner Errors?
You may encounter some errors while trying to burn ISO to CD/DVD etc. disc. The following are some examples of error messages.
The disk image didn’t burn successfully because an error occurred. (Error code 0X80004005)
Error 0xC0AA0301: Windows Disc Image Burner has encountered a problem and needs to close. We are sorry for the inconvenience.
The disc image didn’t burn successfully because an error occurred. The write failed because the drive returned error information that could not be recovered.
Yet, you can solve the problem with one of the below methods.
Solutions for windows disc image burner error code 0x80004005
- Disable your antivirus, firewall, etc. temporarily for burning the ISO.
- Uncheck the “Verify disc after burning” option.
- Uninstall other ISO burning program(s).
- Use another ISO burning tool like IMGBurn, Rufus, and UltraISO.
- Update your system.
- The below solutions for error code 0xc0aa0301.
Solutions for Windows Disc Image Burner Error Code 0xc0aa0301
- Update, reinstall, or degrade your disc, chipset, or other hardware drivers.
- Update CD/DVD-ROM drive firmware.
- Delete the registry of HKEY_LOCAL_MACHINE\SYSTEM\CurrentControlSet\Control\Class\{4d36e965-e325-11ce-bfc1-08002be10318}.
- Use another blank and compatible disc.
- Clean boot your computer.
- Disable User Account Control.
Directly Create Bootable Disk with Your Current OS
If you just want to build a bootable media to boot up other crashed machines, you can avoid trouble by directly making a bootable device based on your working system with the help of MiniTool ShadowMaker, which supports Windows XP, Vista, 7, 8, 10, and Windows 11.
MiniTool ShadowMaker TrialClick to Download100%Clean & Safe
1. Download, install, and launch MiniTool ShadowMaker on your computer. Connect a disc or USB flash drive to the machine and make sure there isn’t any important data on the disc or USB for they will be overwritten in the following operations.
2. If it asks for purchase, just click on the Keep Trial option on the upper right.
3. In its main interface, click the Tools option in the top menu bar.
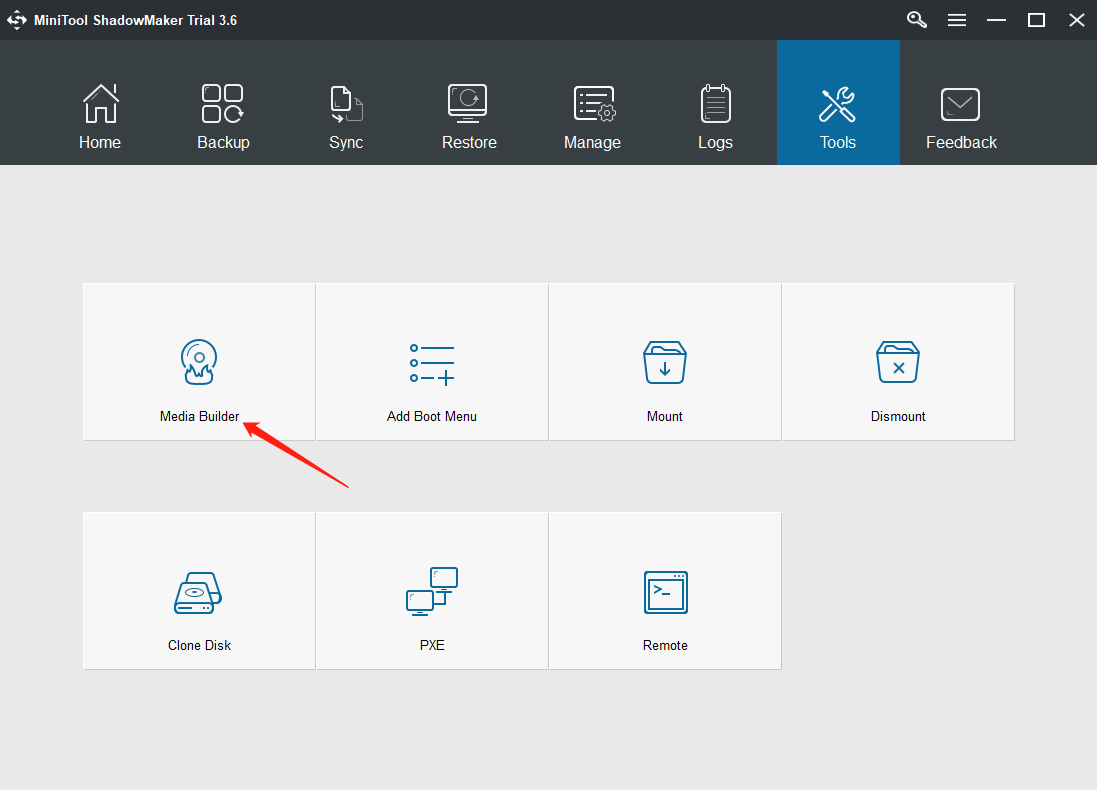
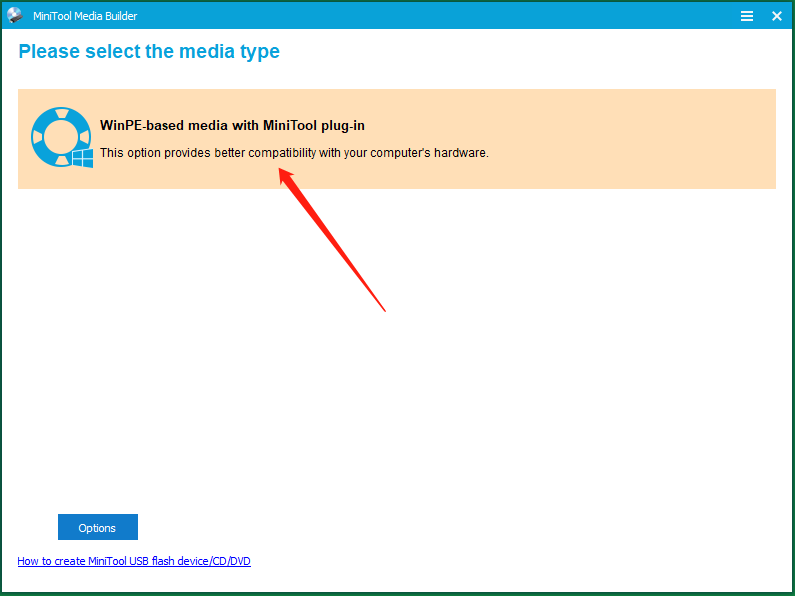
4. In the new popup, select WinPE-based media with MiniTool plug-in.
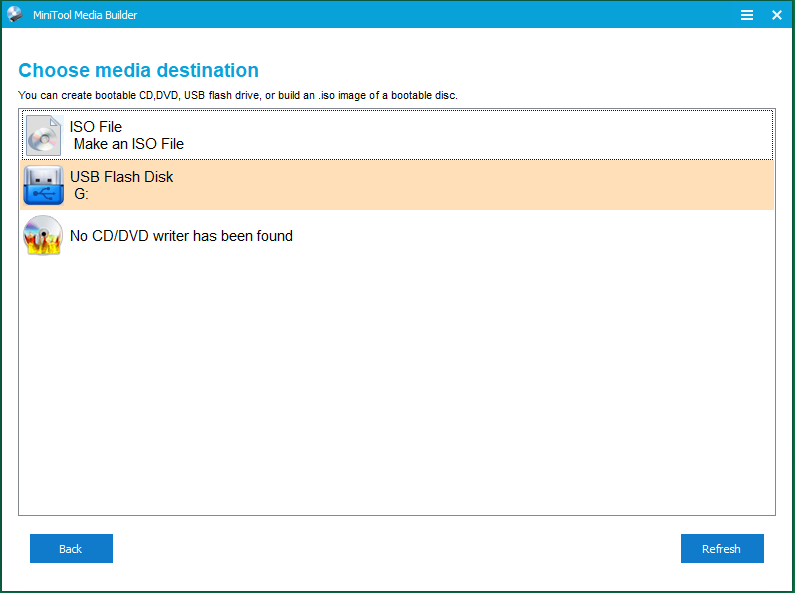
5. Next, choose what kind of bootable media you’d like to create, CD/DVD, USB, or ISO file.
6. If you choose to create physical media, it will warn you about data erase. Just confirm it and start the process.
Besides creating bootable media, MiniTool ShadowMaker can also back up your important files/folders, partitions/volumes, system, or the entire hard disk. Most importantly, many useful features are free of charge!
,
The following issue may appear if you try to perform a clean installation or a repair upgrade of Windows 10 from an installation media: «It looks like you started an upgrade and booted from installation media. If you want to continue with the upgrade, remove the media from your PC and click Yes. If you want to perform a clean installation instead, click No».

The above error message means that you have interrupted the Windows 10 upgrade once its started. As the message indicates, if you want to perform a clean installation of Windows 10, you have to select «No» to continue, otherwise, remove the installation media and click «Yes» to continue the Windows 10 upgrade.
In general, the above message isn’t a problem, but becomes a big problem if the Windows update fails to install or if Windows 10 stuck on loop after trying to install updates, and you want to repair the Windows 10 by booting from an installation media.
In this tutorial you ‘ll find detailed instructions, on how to bypass the «It looks like you started an upgrade and booted from installation media» message, by canceling the currently running update process of Windows 10, in order to perform a Windows 10 repair upgrade from the installation media.
How to Cancel Windows 10 Update in Progress if Windows Cannot Boot *
* Important: If you can boot to Windows 10, but you cannot install the update from the Windows environment, apply the following actions first:
1. Navigate to Start > Settings > Update and security and click «Restart Now», to start the update process.
2. After the first restart, leave the «Working on updates» progress to go to 1-2%.
3. When this done, press the Power button for 10-15 seconds, to fully shut down your PC.
4. Plug the Windows installation media and Power On you PC.
5. Follow the rest steps below to cancel the update in progress.
Step 1. Cancel the Windows Update Pending Actions.
1. Boot your system from a Windows installation media.
2. When the «It looks like you started an upgrade and booted from installation media…» message appears, press the SHIFT + F10 keys to launch command prompt.

3. At command prompt, get a list of all drives, on your system with this command:
- wmic logicaldisk get name

4. Then find out which drive contains the «Windows» folder, by typing this command: *
- dir DriveLetter:
* e.g. To see the contents of the C: drive, type: «dir C:» (without quotes). If you cannot see the «Windows» folder on the C: drive, then continue to the next drive letter (e.g. «dir D:», «dir E:», etc.), until you see the «Windows» folder on one of the listed drives (from the above command).
e.g.: As you can see at the screenshot below, the Windows folder (at this example) is located at the D: drive.]

5. Once you find on which drive the «Windows» drive is located (e.g. at drive «D:» in this example), navigate to that drive by typing DriveLetter: + Enter.
6. Then create a scratch folder on the Windows drive by typing this command:
- mkdir D:\Scratch

7. Then give the below command to revert the pending actions of the update in progress:
- DISM /Image:D:\ /ScratchDir:D:\Scratch /Cleanup-Image /RevertPendingActions
* Note: Change the drive letter D according to your case.
8. Once the above DISM command is executed, you should receive the following message on screen:
«Reverting pending actions from the image….
The operation completed. Revert of pending actions will be attempted after the reboot.
The operation completed successfully.»

9. Close the command prompt window, remove the installation media and let Windows to boot normally.
10. After reboot, you should see the following message on your screen: «Undoing changes made to your computer.» When this process is end, Windows should start normally.

Step 2. Remove the Upgrade Files with Disk Cleanup.
After booting in Windows 10, you must prepare Windows 10 for the USB repair/upgrade, by deleting the already downloaded updates with the Disk Cleanup tool. To do that:
1. Open File explorer, right click on drive C: and select Properties.
2. Click the Disk Cleanup button.
3. Then click Clean up system files.
4. Now check to remove the following files and click OK:
-
-
- Windows Update Cleanup.
- Windows Defender Antivirus.
- Downloaded Program Files.
- Temporary Internet files.
- Previous Windows Installations.
- Recycle bin.
- Temporary Files.
- Temporary Windows Installation files
-
5. When asked, Delete files.
6. When the cleanup, is completed, close the disk properties and continue to the next step.
Step 3. Delete the ‘SoftwareDistribution’ Folder.
The «C:\Windows\SoftwareDistribution» folder, is the location where Windows store the Windows Updates. Many times, this folder becomes corrupted and you must re-create it in order to re-download the updates from scratch. So, proceed as follows:
1. Stop the Windows Update Service: To do that:
a. Press Windows + R keys to open the run command box.
b. In the Search box, type: services.msc & click OK.

c. In Services control panel locate the «Windows Update» service.
d. Right-click on Windows Update service and select «Stop«.

2. Delete the SoftwareDistribution folder.
a. Open Windows Explorer and navigate to: C:\Windows folder.
b. Find and Delete the «SoftwareDistribution» folder (or rename it. e.g. to «SoftwareDistributionOLD») .

3. Restart your computer to apply changes.
Step 4. Upgrade Windows 10 from the installation media.
Now, you ‘re ready to repair-upgrade Windows 10 from an installation media. To do that:
1. Reboot your computer and boot from the Windows USB (or DVD) installation media.
2. At Windows Setup wizard, press Next and then click Install Now.
3. Accept the ‘License agreement’.
4. When asked, select Upgrade: Install Windows and keep files, settings, and applications.

5. Then follow the on-screen instructions to upgrade Windows 10.
That’s all folks! Did it work for you? Please leave a comment in the comment section below or even better: like and share this blog post in the social networks to help spread the word about this solution.
If this article was useful for you, please consider supporting us by making a donation. Even $1 can a make a huge difference for us.
- Author
- Recent Posts
Konstantinos is the founder and administrator of Repairwin.com. Since 1995 he works and provides IT support as a computer and network expert to individuals and large companies. He is specialized in solving problems related to Windows or other Microsoft products (Windows Server, Office, Microsoft 365, etc.).