
Sign in to your MUO account
Windows keeps logs of everything that happens on your computer. And within these logs is a detailed documentation of when USB devices are connected and disconnected.
There are numerous reasons why you might need to see a record of your USB connection history. These include troubleshooting your connected peripherals and checking if someone has attached a storage device without your knowledge. Here are four different ways you can view the USB device history on your Windows PC.
Why Does Windows Log USB Connections?
Windows keeps a record of every USB device that is connected to and unplugged from the computer it is installed on. It does this so that future connections of the same device are recognized and can be completed quickly, without having to install the device every time.
t isn’t there to enable you to see the USB devices that have been connected, but when you know how to view these system records, the information is there for you to find.
Using USBDeview to View USB Connections
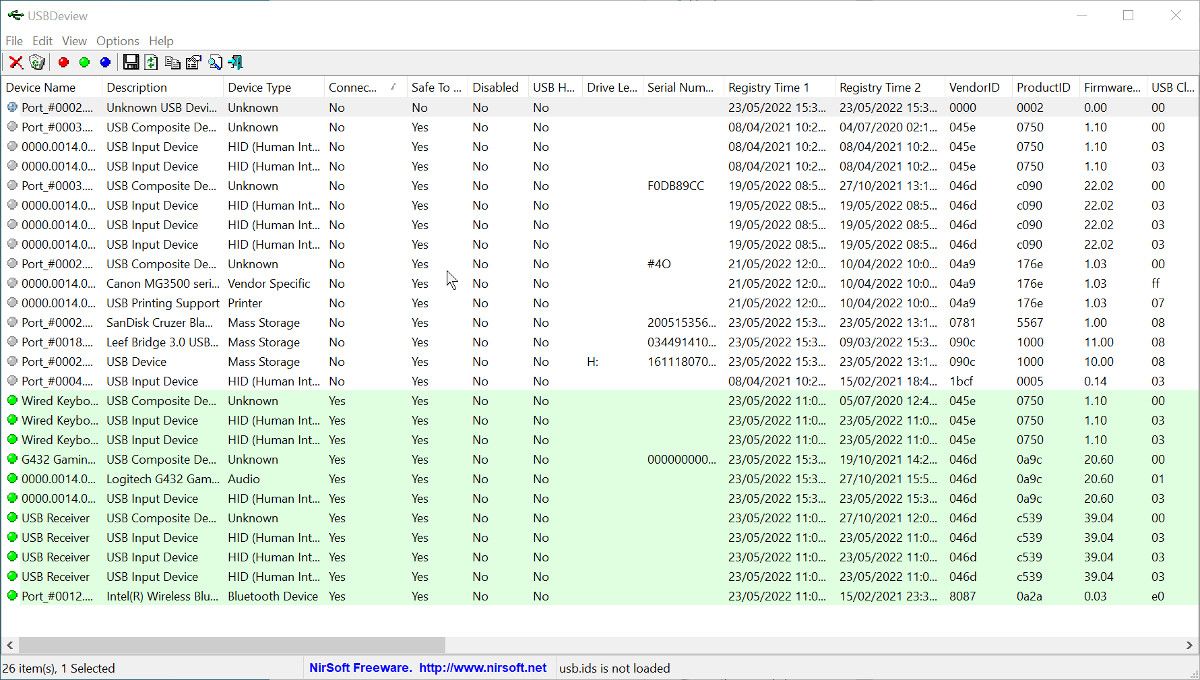
USBDeview is a small and portable utility that allows you to quickly view the USB connection history of any computer it is running on. As well as showing device history, it will also display all of your currently connected USB devices. You can download USBDeview free of charge from the NirSoft website.
- After downloading the software, extract it from the zipped folder. USBDeview is a portable application so you don’t need to install it before using it.
- Double-click the USBDeview application file to run the app. It may take a few seconds to populate the list.
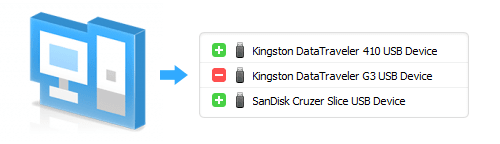
- When the list of USB connections updates, currently connected devices are highlighted in green. Historic connections are left in white.
- You can click the Connected tab to separate and sort the different connections.
- Running the app as Administrator allows you to see the time and date the devices were last connected and removed. To see this information, look in the last two data columns.
Viewing USB Connection History Using PowerShell
If you prefer not to use third-party software to see your USB device history, you can use PowerShell instead. You can use PowerShell to query the system registry and produce a list of all USB storage devices currently connected, as well as those previously connected.
If you have never used PowerShell before, you can read more about this useful tool in our guide to Windows PowerShell.
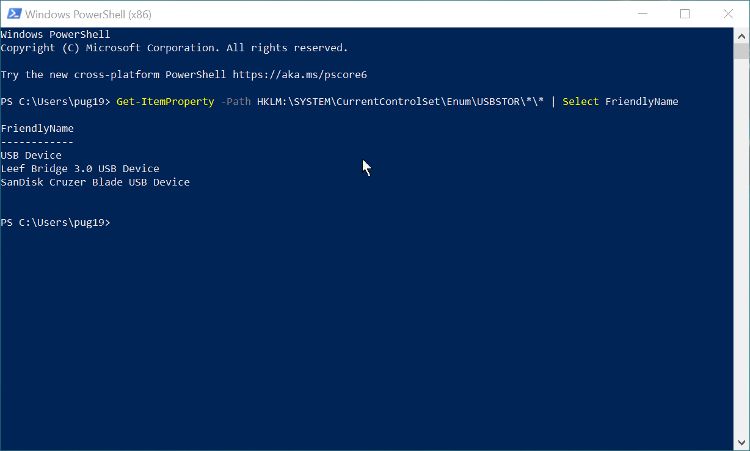
- Open PowerShell from the main Windows app list. You don’t need to open as an administrator, but you can if you wish.
-
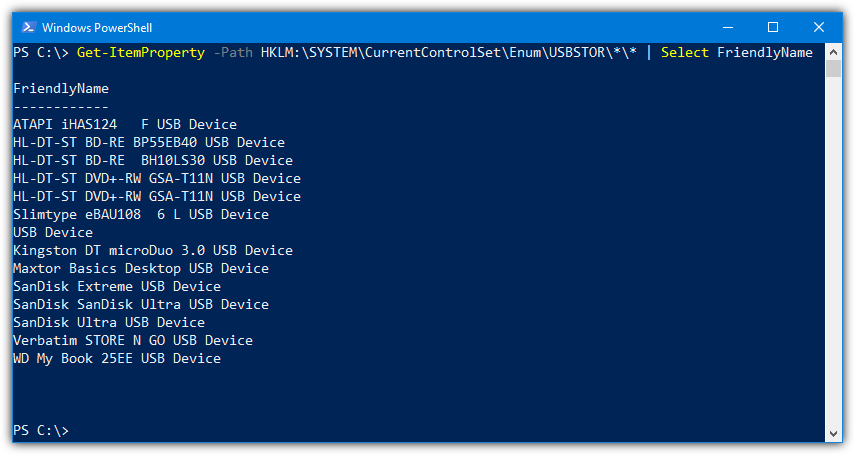
To see a user-friendly list of the USB storage devices, enter the command: Get-ItemProperty -Path HKLM:\SYSTEM\CurrentControlSet\Enum\USBSTOR\*\* | Select FriendlyName

- You can also see the devices listed with a bit more information, but in a less user-friendly way, by typing: Get-ChildItem HKLM:\SYSTEM\CurrentControlSet\Enum\USBSTOR | Select PSChildname
Bear in mind that these methods query the USBSTOR section of the registry, so only devices that are recognized as USB storage will be shown.
Viewing USB Connection History in the Registry
The PowerShell commands detailed above query the Windows Registry, but if you prefer you can go into the Registry and manually find the information about USB storage connections. This has the benefit of providing more information, which can be useful if you are troubleshooting.
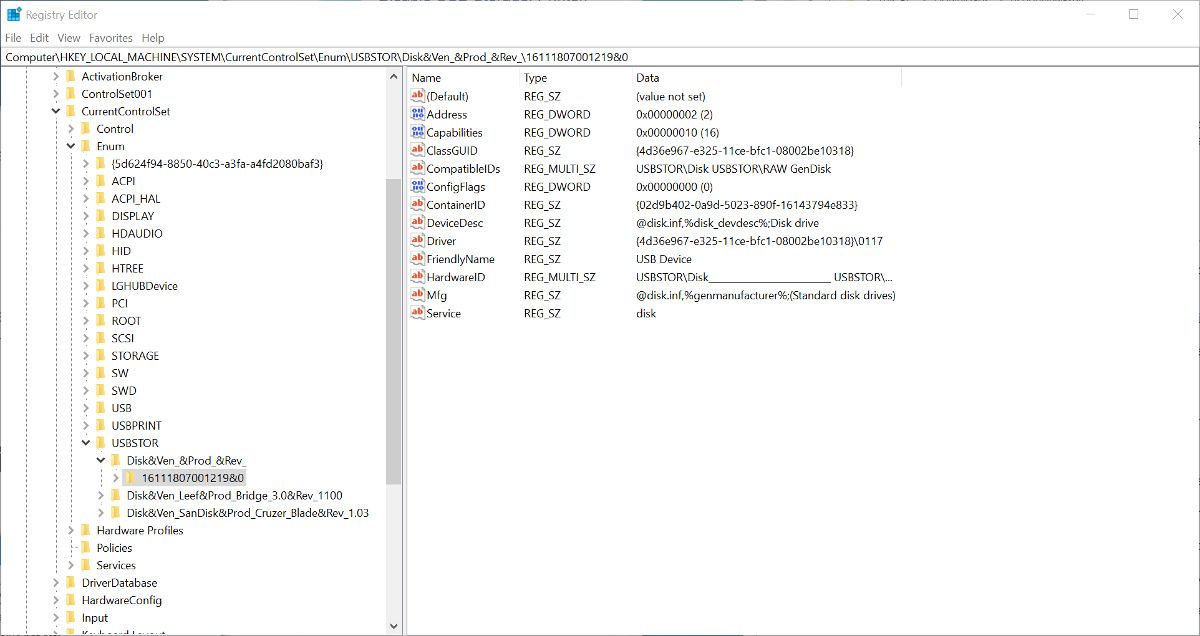
- Open the Registry Editor by searching for Regedit using Windows Search.
- Once the Registry Editor is open, you need to navigate to the following address in the sidebar: HKEY_LOCAL_MACHINE\SYSTEM\CurrentControlSet\Enum\USBSTOR
- The USB devices will be listed in the sidebar. If you expand each one you can find more information about them.
The problem with both this and the PowerShell method is that you won’t be able to see when the USB devices were connected or disconnected. But you can see this information in the Windows Event logs.
Viewing USB Connection History With Event Logs
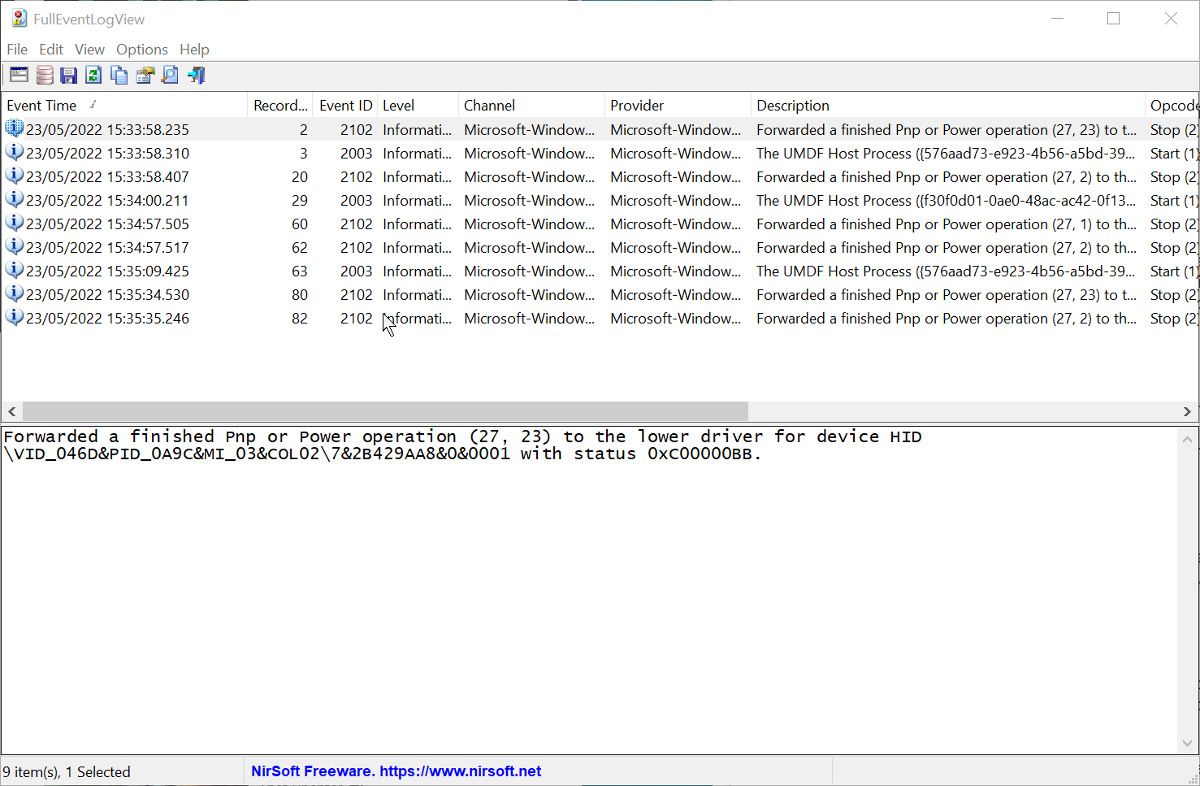
Windows has a built-in event viewer which can be used to view USB connection history. However, it is easier to use a third-party app called FullEventLogView. This small and portable app shows the same information as you would see in the Windows Event Viewer but displays it in a much more user-friendly way. FullEventLogView is a portable app, meaning it doesn’t need to be installed before you can use it.
- Run the app by double-clicking the application file in the downloaded folder.
- The first time you use the app, it will take several seconds to scan all the event logs that are available.
- To show only the USB connection events, click Options > Advanced options.
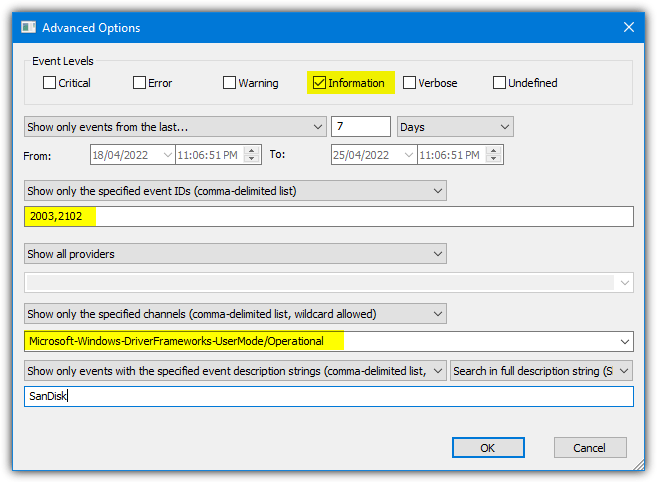
- In the new window that opens, deselect all Event Levels apart from Information. Then select the date range you want to view logs for.
- Change Show all event IDs to Show only the specified event IDs and enter 2003,2102. These event IDs are for when USB devices were connected and when they were ejected.
- Change Show all channels to Show only the specified channels and enter: Microsoft-Windows-DriverFrameworks-UserMode/Operational
- Click Ok and any events that match your settings will be displayed as a list. The event time column shows when the USB devices were connected and ejected.
- You can click on any of the events to see a bit more information.
Viewing USB Connection History of Computers on Your Local Network
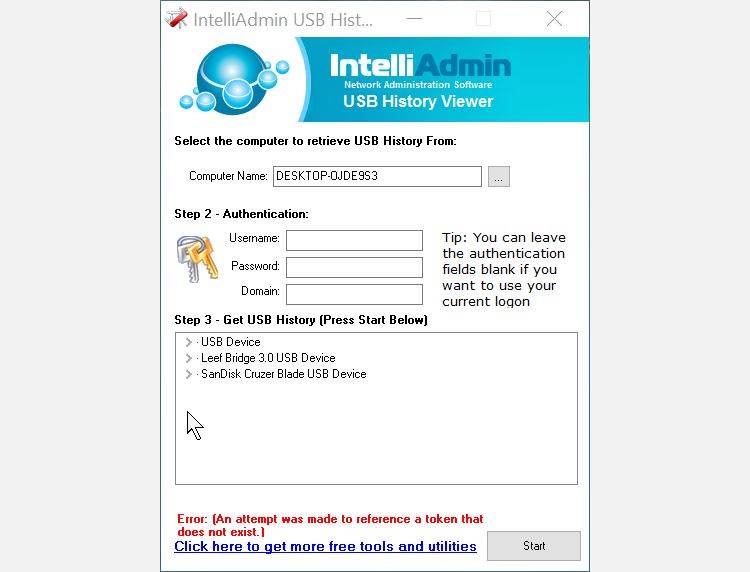
All the methods detailed above only allow you to see the USB connection history of devices on a single computer. If you want to see the connection history of all computers on a local network, USB History Viewer from intelliAdmin could be the answer.
- After downloading the app, double-click the EXE file to open it.
- You need to enter the name of your computer before you can view the USB history. If you don’t know the name of your computer, go to Settings > System > About. Your computer name is shown at the top.
- Click the Start button to see the USB history. You can then expand the results to see details such as the time and date it was last used.
- If you want to see the USB history of another PC on your local network, you will need to enter the username and password of the computer, as well as its domain on the network. If you are not sure how to find the domain of a computer on your local network, check out these useful networking commands.
Viewing USB Connection History, Made Easy
There are several ways to see the history of USB devices that have been connected and disconnected from your computer. Not all the methods here provide the same amount of information, but each has the potential to be useful for different situations. If you need to see which USB connections have been made, one of these methods is sure to help.
Время прочтения: 3 мин.
Любое устройство,
подключаемое к системе – оставляет свои следы в реестре и лог файлах.
Существует несколько способов
определить — какие USB-Flash-накопители подключались к устройству:
- С использованием специальных программ.
Если нужно знать, что
именно копировалось с/на компьютер – используем этот способ. При условии
соблюдения политик безопасности и с помощью специального софта можно не только
отследить, что в компьютер вставлялся USB
flash диск, но и логировать имена файлов, которые
копировались с/на диск, и содержимое этих копируемых файлов.
С помощью специальных
программ можно проконтролировать доступ не только к USB flash-дискам, но и ко
всему спектру съемных устройств, принтеров и сканеров.
Специализированного софта по данной теме можно перечислить много, например – SecureWave Sanctuary Device Control / Lumension Device Control, DeviceLock, GFi EndPointSecurity, InfoWatch Device Monitor и т.п. Выбор конкретного софта зависит от конкретных условий применения.
2. Ручной – самостоятельно просматриваем реестр
Все данные о подключениях USB хранятся в реестре в этих ветках:

В первой (USBSTOR) отображаются устройства-носители (как правило флеш-накопители), во- второй (USB) – телефоны, камеры, мышки и т.д.
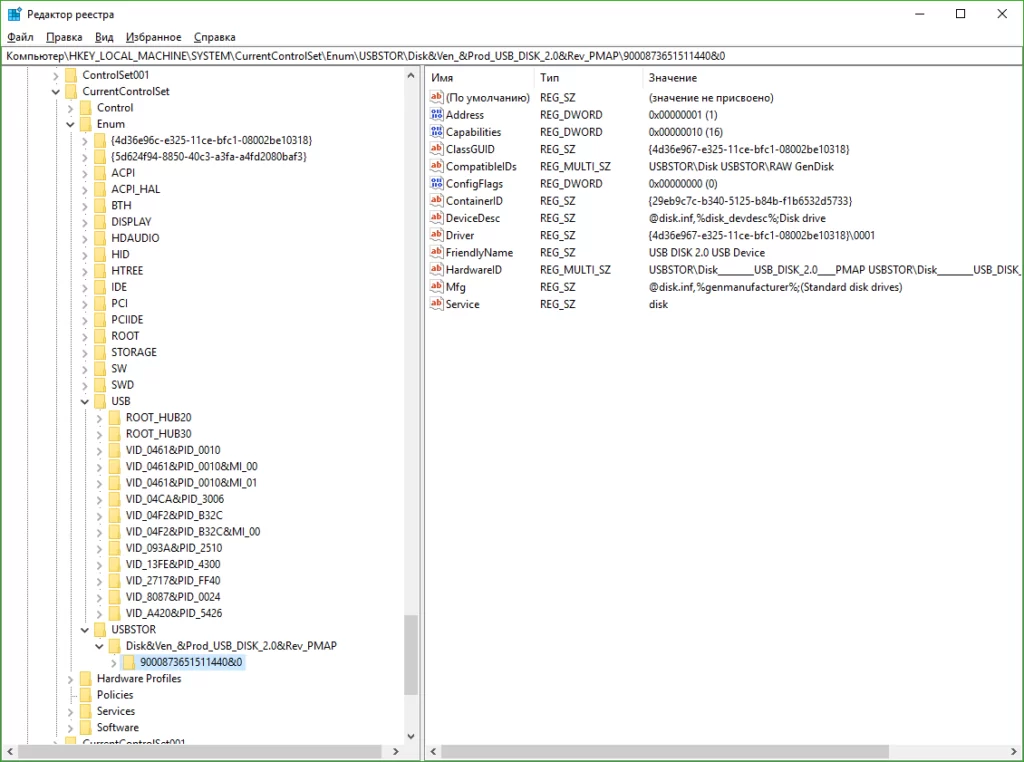
Для того, чтобы узнать дату и время подключения можно экспортировав нужный раздел в файл с расширением txt.
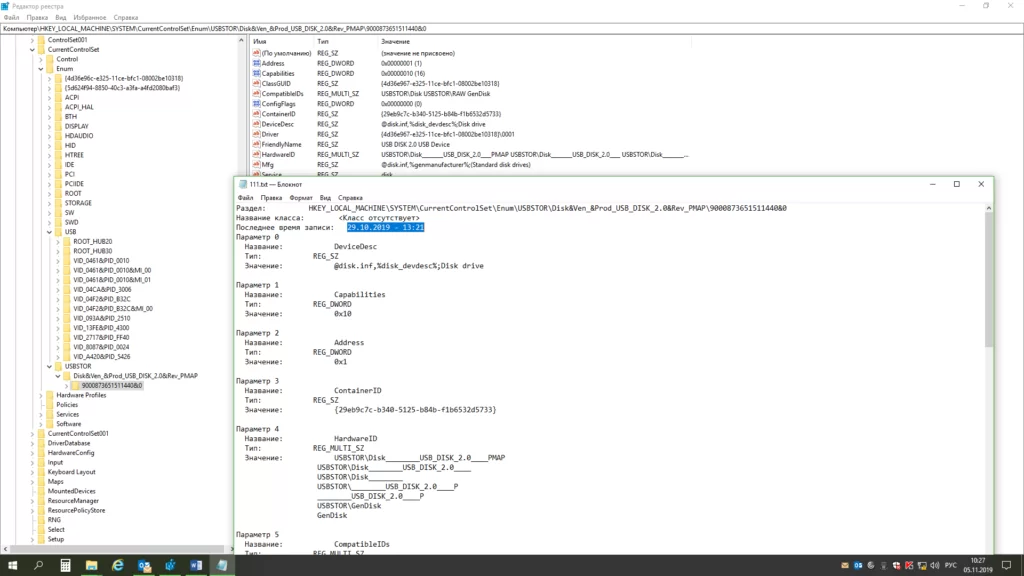
В данном примере флешка
была вставлена в USB порт 29.10.2019 — 13:21.
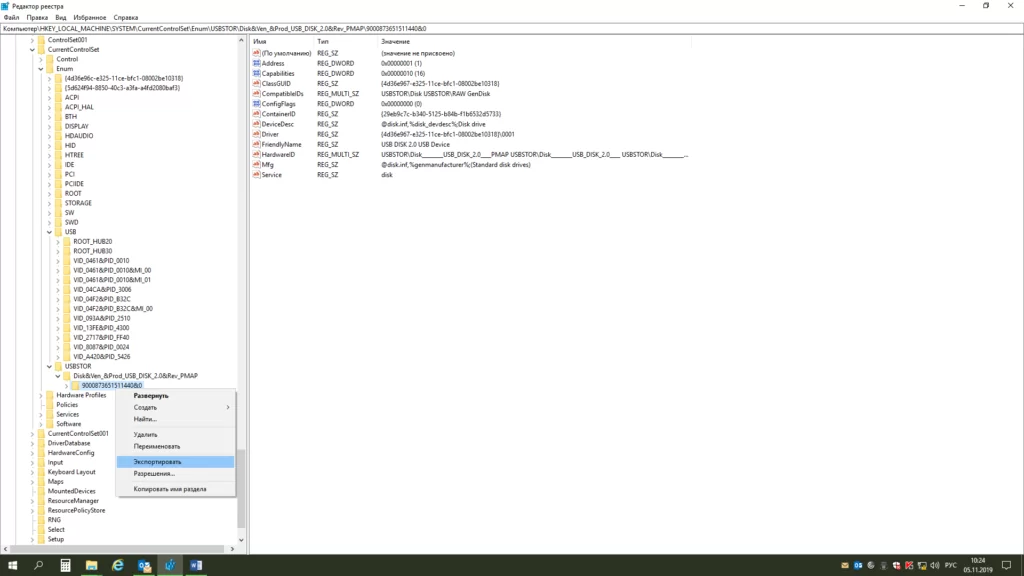
Так же можно экспортировать раздел USBSTOR в файл с расширением txt.
Затем запускаем поиск устройств MTP (латинскими).
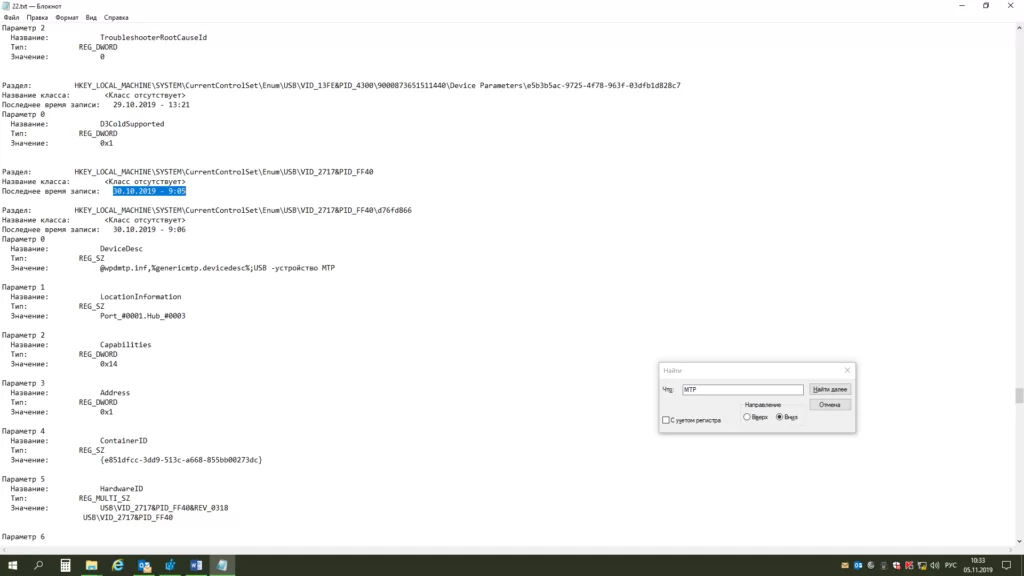
Находим дату и время
подключения мобильного телефона (в данном примере) к USB компьютера. Так же
по поиску устройств MTP могут находиться фотоаппараты и планшеты.
Из практики: Те, кто хоть как-то связан с кибербезопасностью, наверняка не раз слышали поучительную истории о флешках, разбросанных по парковкам. Это был обычный эксперимент, проведенный в студенческом кампусе Университета штата Иллинойс, с несколькими сотнями утерянных флешек, на которых был записан безобидный скрипт, сообщающий о подключении USB-накопителя к компьютеру. Итог – 45% утерянных флешек были подключены в течении 10 часов после начала эксперимента (подробнее об этой истории — на сайте ).
Еще одно событие,
произошедшее в прошлом году. В изолированную сеть атомной электростанции попало
вредоносное ПО. Причина – сотрудник, для решения задач предприятия, использовал
USB со
скачанным для семейного просмотра фильмом.
Помните, что даже личные накопители сотрудников
(флешки, карты памяти) способны нанести компании урон не меньший, чем внешняя
атака.
Содержание статьи:
- Смотрим устройства
- Подключенные в настоящее время
- Которые когда-то подключали к USB, но сейчас они отключены от компьютера
- Что делать, если компьютер не видит устройство: флешку, телефон и т.д.
- Вопросы и ответы: 4
Всем здравия!
Сегодняшняя заметка будет посвящена одной «простой» задаче — просмотру подключенных устройств к ПК (телефоны, флешки, адаптеры, принтеры и т.д. и т.п.).
Вообще, большинство пользователей привыкло получать эту информацию в «Моем компьютере». Однако, ряд устройств — там не отображается (я уж не говорю о тех устройствах, которые в настоящее время уже отключены от USB-порта, скажем (а ведь про них тоже можно кое-что узнать!)).
Примечание: ниже я затрону только универсальные способы решения вопроса, которые актуальны для разных версий Windows Vista*, 7, 8, 10.
👉 Близко к теме!
Как узнать характеристики компьютера, ноутбука — см. инструкцию
*
Смотрим устройства
Подключенные в настоящее время
Вариант 1: мой компьютер + панель управления
Как сказал выше, это наиболее очевидный и простой вариант (правда, в «Моем компьютере» можно увидеть только флешки, диски, телефоны… (принтеров и сканеров, например, здесь нет)).
Чтобы открыть вкладку «Мой компьютер» («Этот компьютер») — просто запустите проводник (сочетание кнопок Win+E) и откройте одноименную вкладку в меню слева (пример на скриншоте ниже 👇).

Телефон подключен к USB-порту!
Чтобы «найти» подключенные джойстики, МФУ, наушники и т.д. — нам понадобится 👉 панель управления Windows (не путайте с параметрами системы!).
В ней необходимо открыть раздел «Оборудование и звук» — там прежде всего интересны 2 вкладки: «Устройства и принтеры» и «Звук».
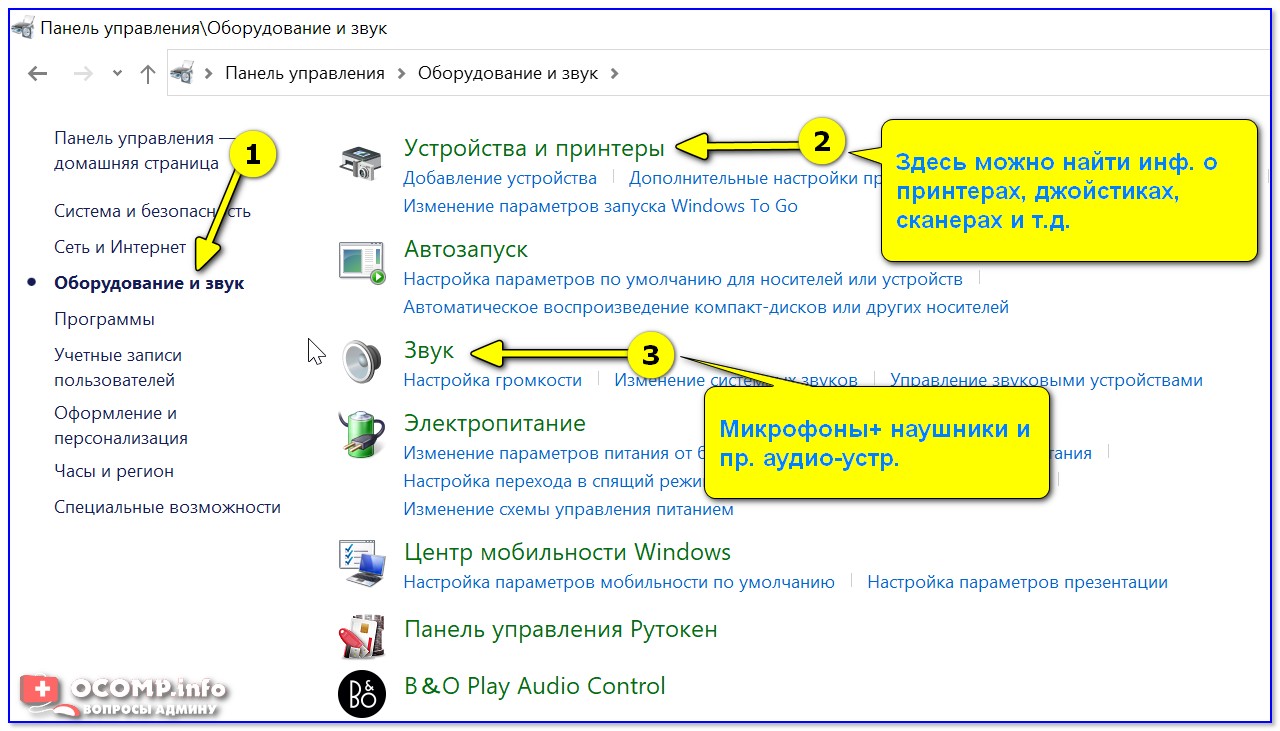
Панель управления — находим джойстики, принтеры, сканеры и т.д.
Во вкладке «устройства и принтеры» можно увидеть все подключенные принтеры, сканеры, мышки, джойстики, и др. устройства мультимедиа.
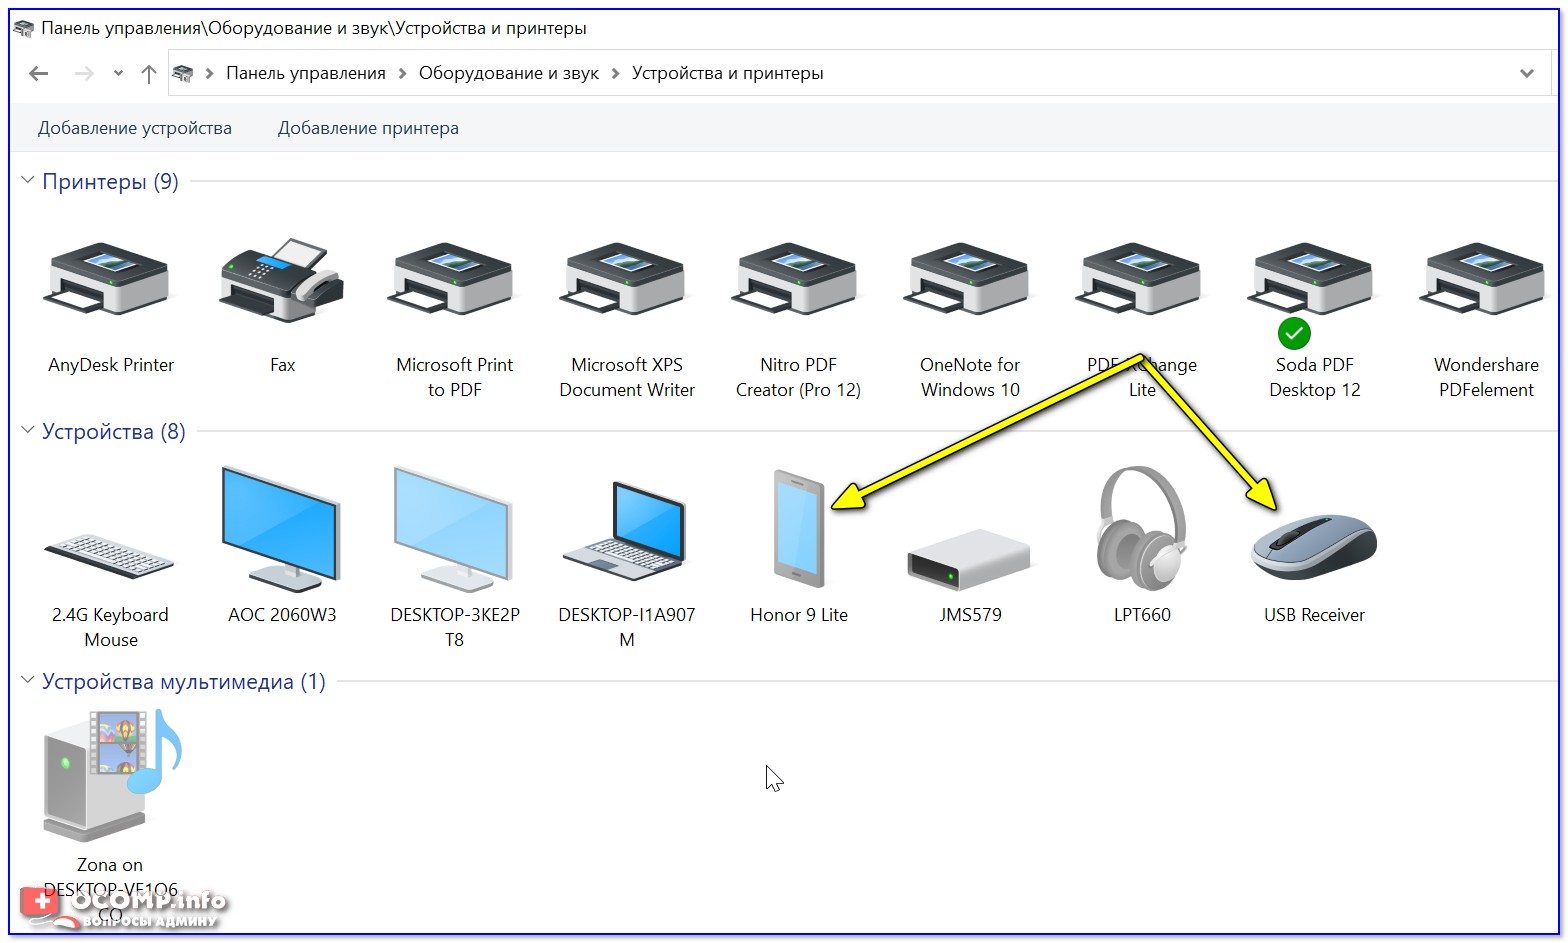
Устройства и принтеры
Что касается каких-нибудь аудио-карт, микрофона и пр. — то их можно найти во вкладках «Воспроизведение» и «Запись». Причем, в этой же вкладке эти устройства можно настроить: задать чувствительность, громкость, убрать шумы и т.д.
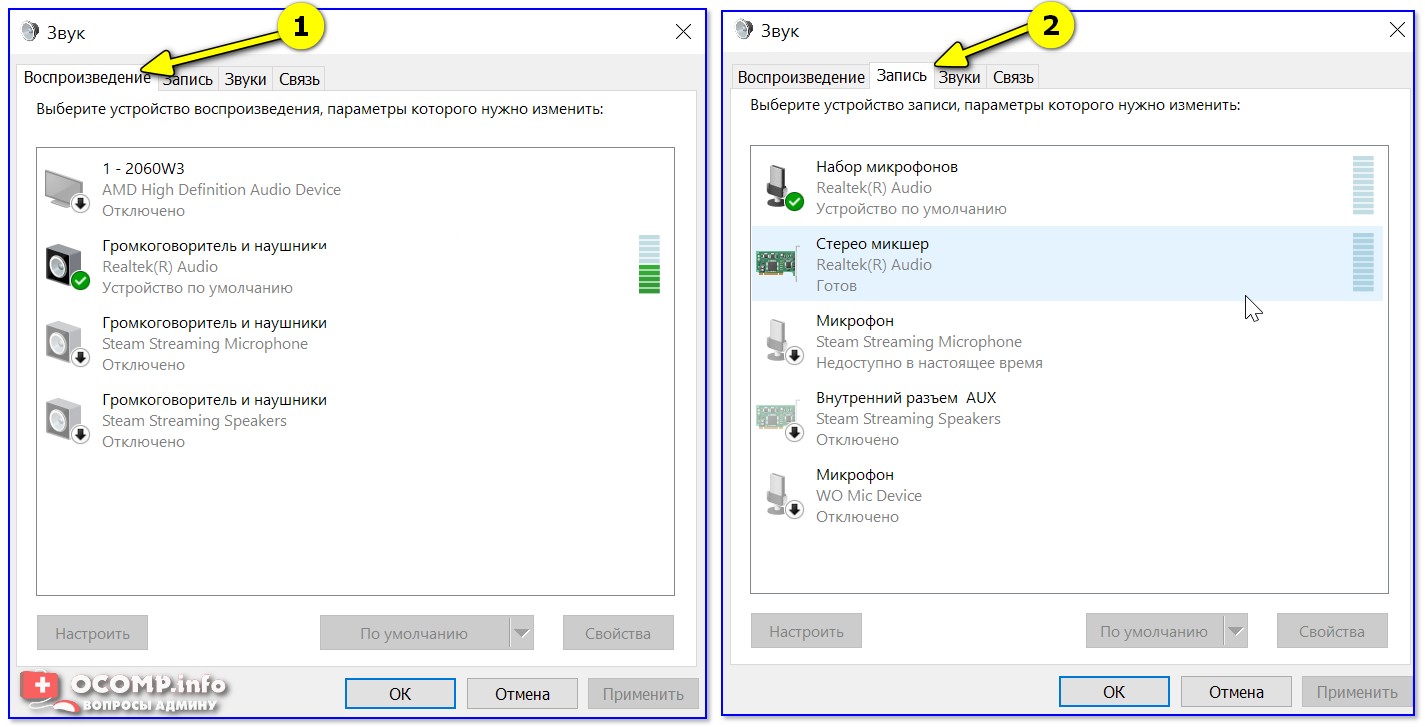
Воспроизведение, запись
*
Вариант 2: диспетчер устройств
Диспетчер устройств — это системная программа Windows, которая отображает всё подключенное оборудование. Кроме этого, в нем есть:
- возможность отключить (и настроить) любое* из устройств;
- возможность обновить драйвер (или выбрать один наиболее стабильный из нескольких);
- диагностировать и устранить* конфликты меж разными устройствами, и многое другое.
*
Чтобы открыть диспетчер устройств: нажмите Win+R, и в окно «Выполнить» введите команду devmgmt.msc (👇).
👉 В помощь!
Как открыть диспетчер устройств, даже если он был заблокирован (для всех* версий Windows)

Запуск диспетчера устройств — devmgmt.msc
Обратите внимание, что в диспетчере устройств десятки вкладок, и все устройства рассортированы по ним. Чтобы найти одно из них — вам нужно сначала раскрыть соответствующую вкладку, в которой оно расположено (👇).
Примечание: устройство, для которого не установлен драйвер — обычно располагается во вкладке «Другие устройства».
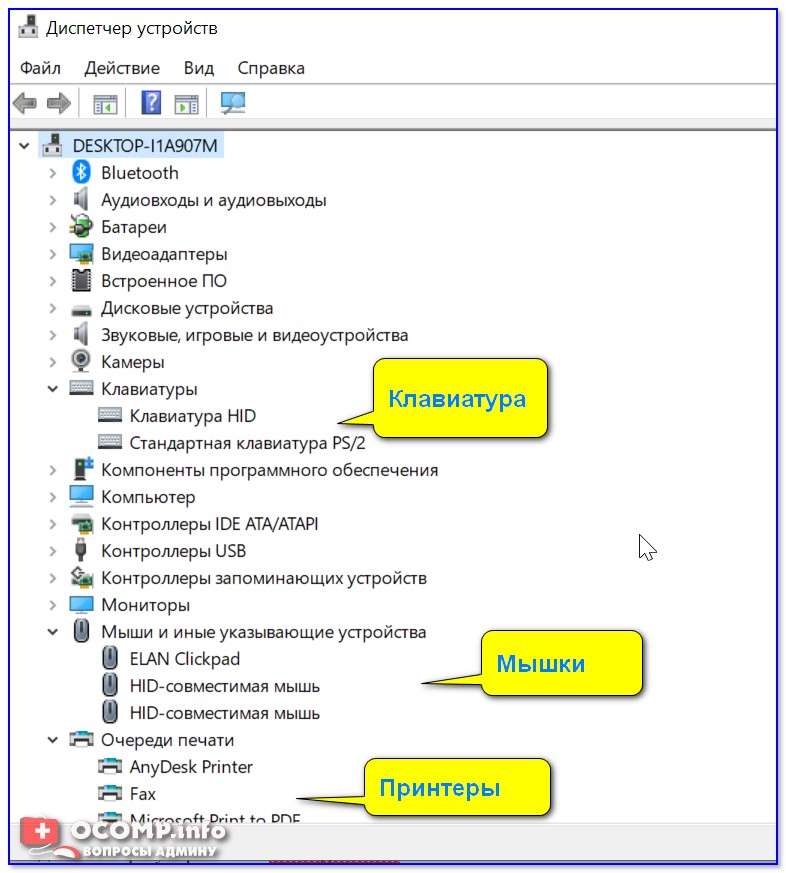
Диспетчер устройств!
*
Которые когда-то подключали к USB, но сейчас они отключены от компьютера
Не многие пользователи знают, что Windows запоминает все те устройства, которые вы когда-либо подключали к компьютеру (дату, их модель, тип и т.д.).
Нас в первую очередь интересуют USB-устройства — информация о них хранится в двух ветках реестра:
- HKLM\SYSTEM\CurrentControlSet\Enum\USBSTOR
- HKLM\SYSTEM\CurrentControlSet\Enum\USB
Для того, чтобы просмотреть их — можно воспользоваться как обычным редактором реестра (но это не очень удобно), так и спец. софтом. Я рекомендую выбрать 👉 утилиту USBDeview (ссылка на офиц. сайт).
*
USBDeview (линк)
«Маленькая» утилита, которая выводит список всех USB-устройств, которые когда-либо подключали к вашему ПК.
Разумеется, по каждому устройству можно будет посмотреть: дату и время, тип, идентиф. номера и т.д.
*
Кстати, USBDeview позволяет не только заниматься «просмотром», но также есть опции для деинсталляции устройства, его запрета, подготовки отчета и др.
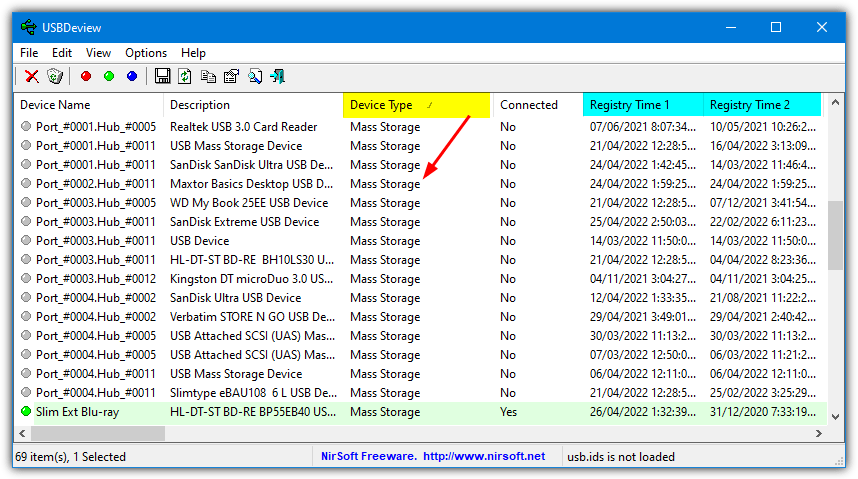
В качестве примера — см. скрин ниже 👇: на нем я нашел флешку, которую подключал уже довольно давно (несколько месяцев назад!). Примечание: тип устройства у флешек и дисков — «Mass Storage».
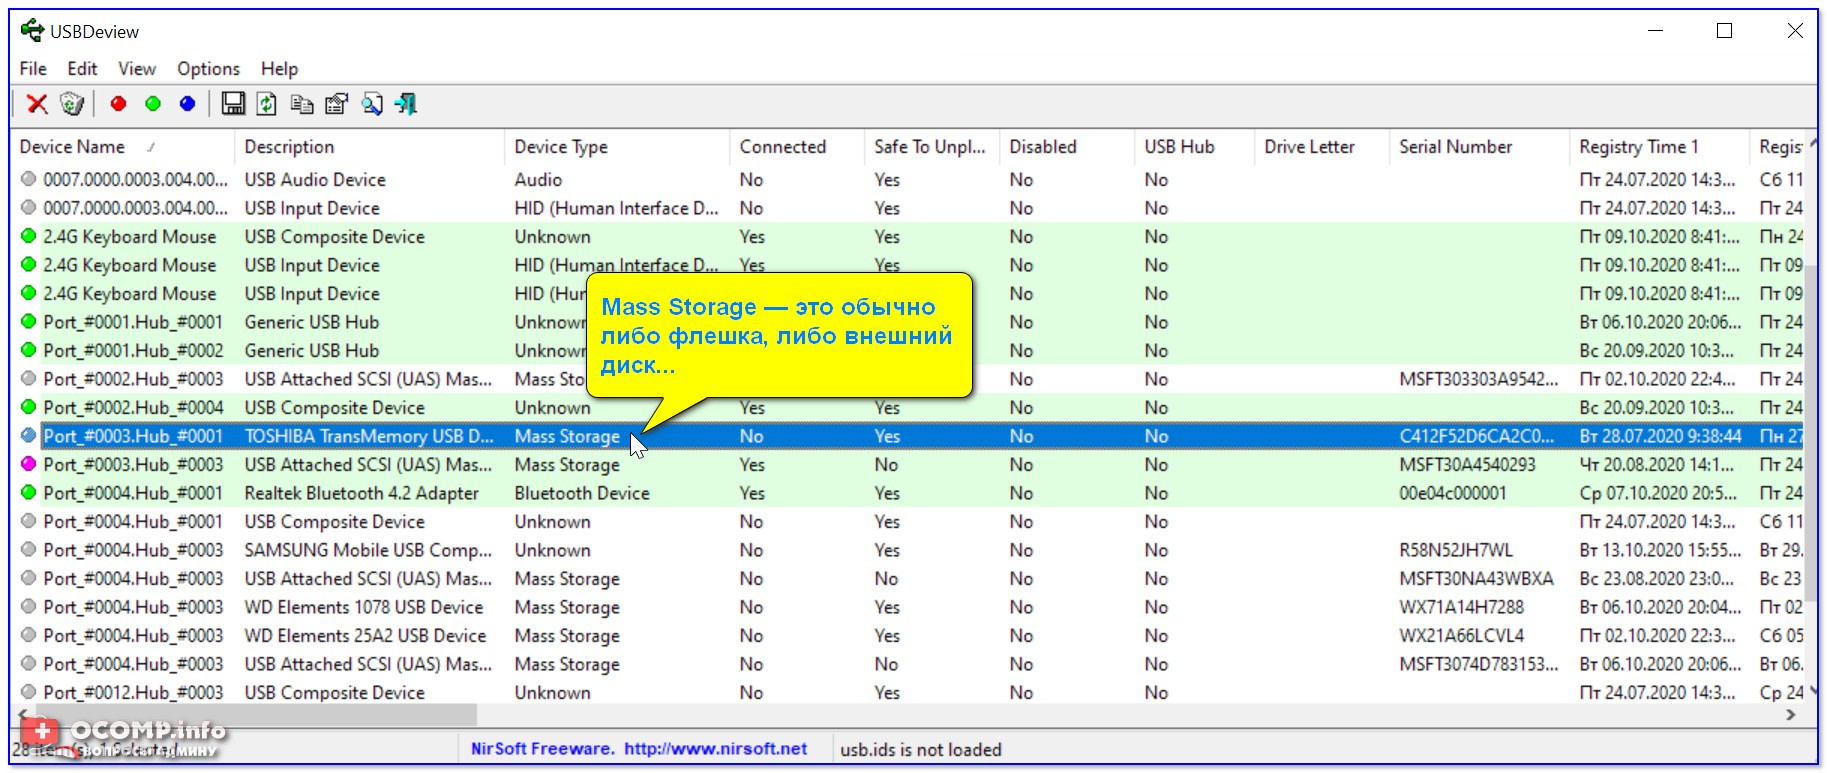
USBDeview — смотрим, когда подключалась флешка к компьютеру
Кстати, если раскрыть свойства конкретного устройства — то здесь достаточно много информации о нем: имя, его тип, дата подкл., ID-производителя, класс и пр.
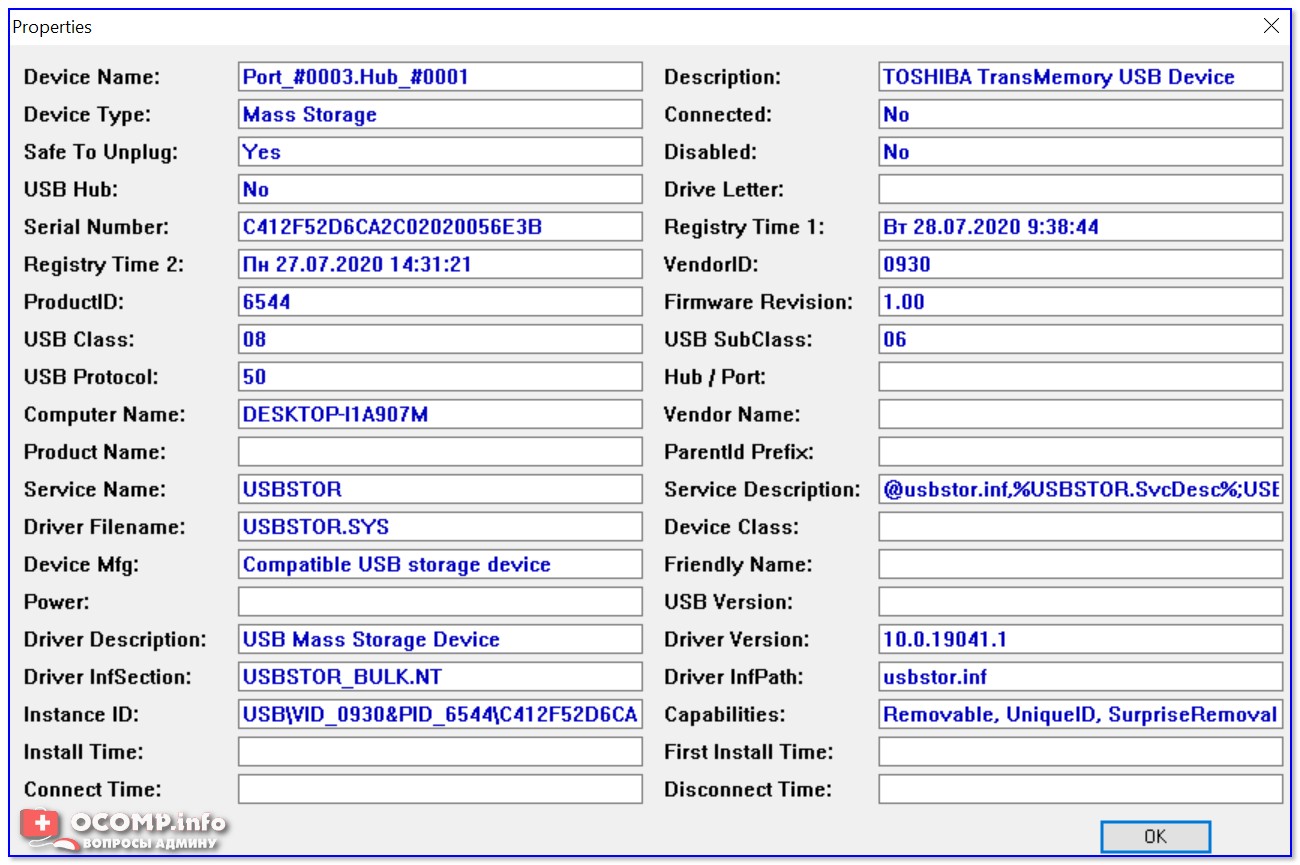
Имя устройства, дата подключения и пр.
*
Что делать, если компьютер не видит устройство: флешку, телефон и т.д.
Это вопрос популярный, но не однозначный (и причин этому десятки!). Здесь я укажу лишь общие моменты, с которых нужно начать диагностику.
- сначала проверьте само устройство (телефон, флешку, карту памяти и т.д.) на другом ПК. Работает ли оно там?
- далее проверьте USB-порт проблемного компьютера — видит ли он другие устройства? Если USB-порт не работает — ознакомьтесь с этим;
- если вы используете удлинители, различные разветвители, адаптеры USB и пр. — на время диагностики отключите их;
- попробуйте задействовать USB-порты не только на передней панели системного блока, но и на задней (это для ПК);
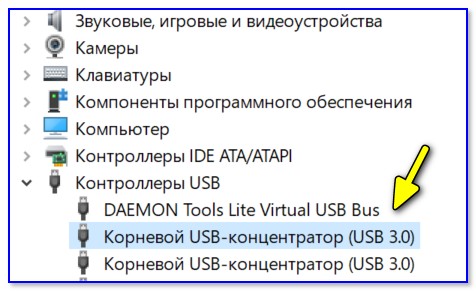
- посмотрите, есть ли в диспетчере устройств контроллеры USB;

Корневой USB-концентратор
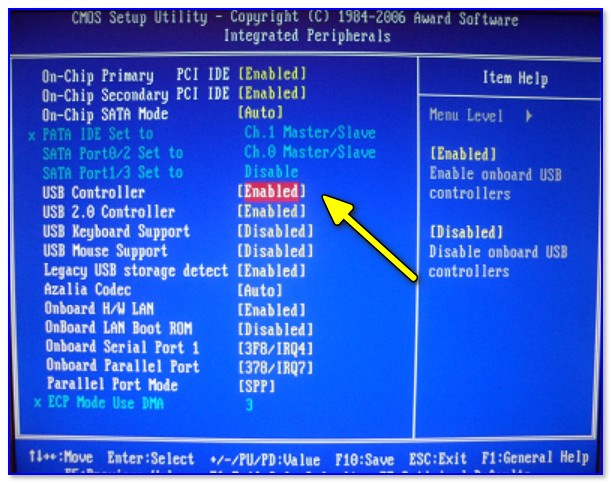
При отсутствии — проверьте, что у вас в BIOS/UEFI включен USB-контроллер!

Настройки BIOS
- на время диагностики отключите антивирус и др. защитные утилиты, если они предустановлены (при усл. проверки флешки на вирусы на др. ПК);

Отключение антивируса Avast на 1 час
- ознакомьтесь с более конкретными инструкциями, из-за которых компьютер может не видеть: 👉 телефон (при подкл. через USB), 👉 фотоаппарат (через USB), 👉 флешку, 👉 внешний диск, 👉 карту памяти, 👉 принтер (МФУ).

*
Дополнения по теме — всегда приветствуются!
Всем успехов!
👋
TL;DR
USB history viewers are crucial for tracking connected devices and enhancing system security. Tmanual methods.
However, USB also poses a security risk because someone can easily copy data from your computer just by plugging in a USB flash drive.
For instance, if someone has used your computer in your absence and you want to check if they have plugged in a USB flash drive at any point, it’s not immediately easy to see. Thankfully, Windows does keep a history of all connected USB devices. Besides that, a lot of users and IT professionals are using USB monitoring software to keep systems safe.
Let’s check out the best USB history viewers:
Best USB history checkers (quick overview)
- USBDeview: Portable tool for viewing detailed USB device history, including troubleshooting options.
- USB History Viewer: Tracks USB connections across multiple computers in a network.
- Small USB History Viewer: Compact tool that allows exporting device lists to CSV.
- PowerShell: Built-in Windows method to query USB device history using commands.
- Windows Registry: Manual method to access detailed USB connection data.
Check the descriptions below for more in-depth info
Best USB history viewer to use in 2025
1. USBDeview
NitSoft’s USBDeview is a portable tool that offers tons of information on USB devices that are currently and previously connected to your computer. Unlike the other tools listed here, USBDeView is still actively developed and updated with new functions and features still periodically being added.
If you want to look for connected USB flash drives or external hard drives, sort the list by the Device Type column and look for “Mass Storage” entries. Double click on a listed device to see the date and time of when it was first connected (Registry Time 2) and the last time it was connected (Registry Time 1) to the computer. The dates are also available in the main window if you view/scroll to the right.
USBDeview can also be used for troubleshooting USB connection problems. Right click on the problematic USB device and select “Uninstall Selected Devices”. Uninstalling the device will clean up the traces so that it can be reinstalled. Other useful functions include creating enable/disable device desktop shortcuts, changing drive letters, disconnecting all devices at once, reloading a USB hub, and viewing remote computer USB data.
Download USBDeview
2. USB History Viewer
USB History Viewer is a free tool that is designed to show the history of connected USB mass storage devices such as a flash drive or an external hard disk. A possible advantage of USB History Viewer is it also supports other computers on the local network if you provide a valid authentication. The tool is also portable so installation is not required.
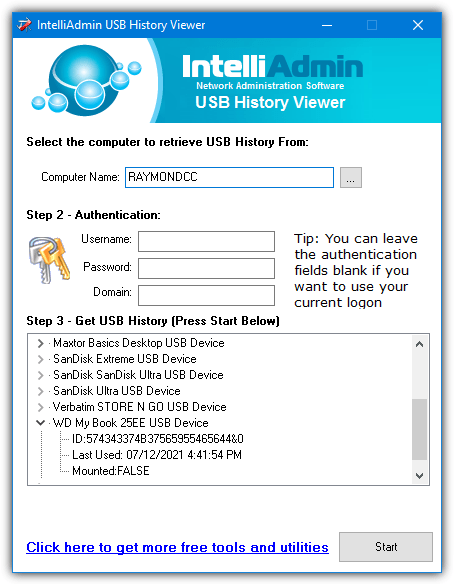
When you first run USB History Viewer, it will default the computer name to LOCALHOST. However, this will not work and you have to add your computer’s name. You will need to either specify your computer name manually or click on the browse button to select your computer from the list (it may take a few seconds). Once you’ve provided the computer name, click on the Start button and the history will be displayed in a few seconds.
Download USB History Viewer
Read more:
- 5 Free USB Flash Drive Tester & Checker Tools
3. Small USB History Viewer
Small USB History Viewer lives up to its name as it’s less than 20KB in size and is obviously portable. There are not really any notable features apart from the ability to export the list of devices to a comma delimited text file (CSV).
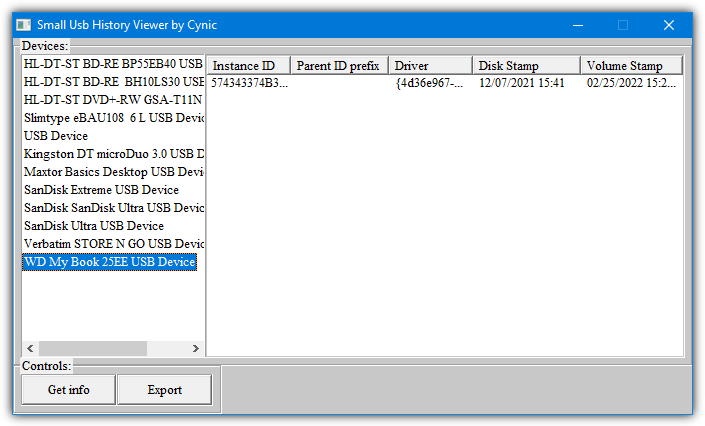
After launching the program, press the “Get info” button. Then double click on any of the devices in the list to populate the table on the right. Not much information is displayed so you probably won’t get much from it. The Disk Stamp column gives you an idea of when the device was first used on the computer but it won’t tell you the last time it was used.
Download Small USB History Viewer
4. Check Previously Connected USB Devices Using PowerShell
A rather simple method built into Windows is listing USB devices using PowerShell. All it does is query the system registry and list all current and previous devices listed in the USBSTOR key. To get a list of more friendly names that will be easy for everyone to read, enter the following in a PowerShell console.
Get-ItemProperty -Path HKLM:\SYSTEM\CurrentControlSet\Enum\USBSTOR\*\* | Select FriendlyName
If you want to get a list of device names that might come in more useful for troubleshooting, use a different command.
Get-ChildItem HKLM:\SYSTEM\CurrentControlSet\Enum\USBSTOR | Select PSChildname
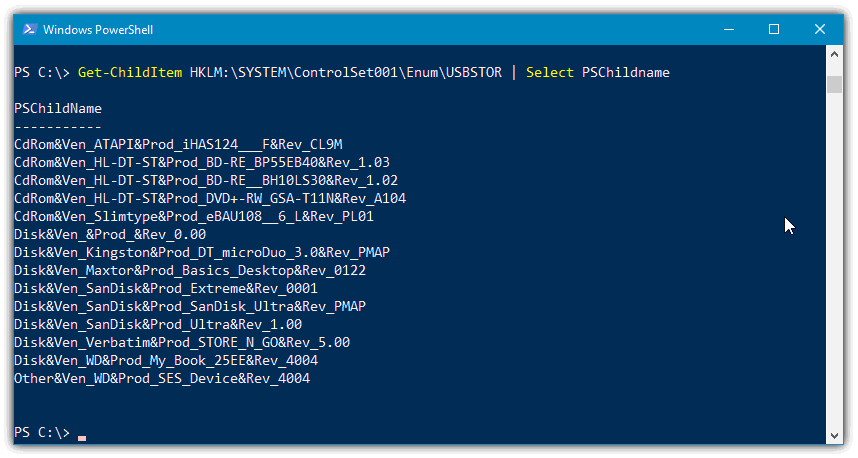
These commands will also show devices that have been previously but are no longer attached to the system.
5. Manually Find USB Devices In The Registry
As we mentioned above, the PowerShell commands query the system registry to gather information about current and previous USB devices. However, you can manually go into the registry yourself and view the same basic data plus more advanced information.
After opening Regedit, navigate to the following registry key:
HKEY_LOCAL_MACHINE\SYSTEM\CurrentControlSet\Enum\USBSTOR
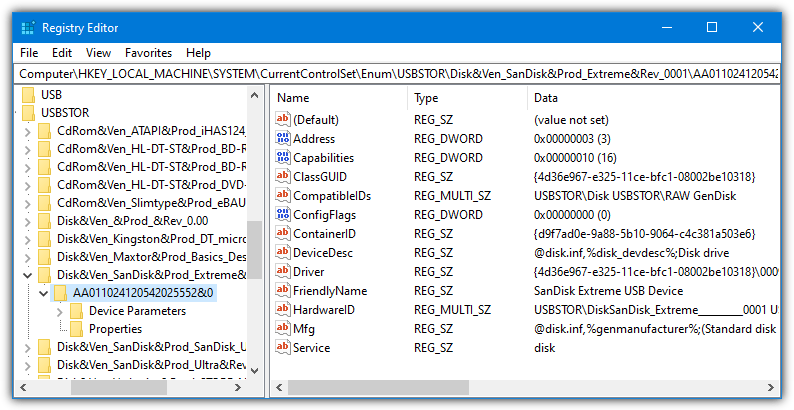
This key will list all devices using their long name IDs, expand any of the keys and click on the subkey (which is the device serial number). More information, such as the aforementioned friendly name, will be available.
6. Finding Out When USB Devices Were Inserted or Ejected
In addition to finding the names of USB devices like flash drives that have been previously connected to your computer, it might be useful to see the times and dates when they were attached to the system. The Windows Event log will offer some help here as it records the time and date of USB device and driver activity. The first tool, USBDeview, can display some connected dates but not as many as the event log.
Although the Windows Event Viewer could be used for this task, we found the developer of USBDeView, Nirsoft, has another tool called FullEventLogView that is easier to use. After launching FullEventLogView, press F9 or go to Options > Advanced Options to configure a filter to show only the data required. Edit the following values in the window:
Event levels – Check only information
Date/Time – Optionally change from the last 7 days to a date range of your choice
Show All Event IDs – Change to “Show only the specified event IDs” and enter “2003, 2102” into the box
Show All Channels – Change to “Show only the specific channels” and select “Microsoft-Windows-DriverFrameworks-UserMode/Operational” from the list
Show all events with any event description string – This can be used to narrow down the listed devices. For example, “Sandisk” will display the insert and eject events for only SanDisk devices.
When you see the results, entries with an Event ID of 2003 will be when the device was inserted, and 2102 will show two entries when it was ejected.
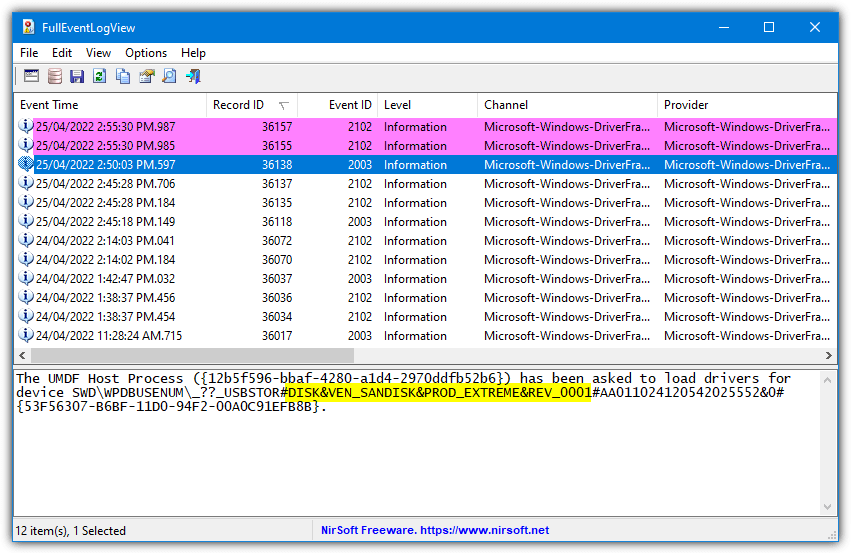
As we can see from the image above, among several other SanDisk device inserts and ejects, a Sandisk Extreme Flash drive was inserted at 2:50 PM (Event ID 2003) and then ejected five minutes later (Event ID 2102).
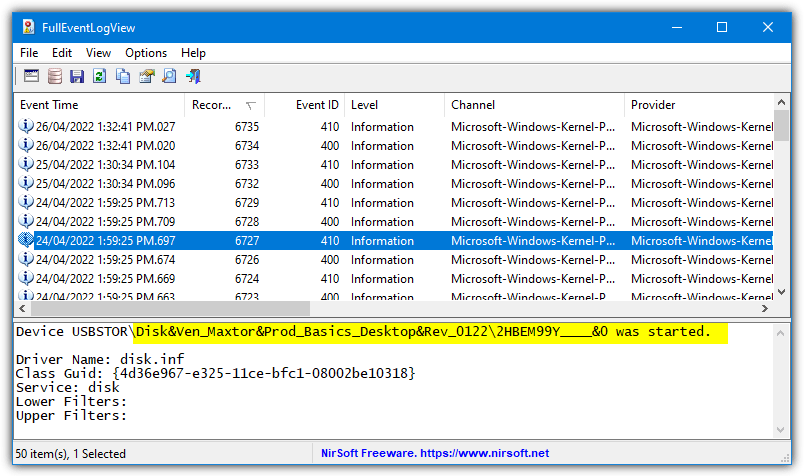
It’s possible to use other Event IDs to help get some information on when a drive was inserted. These IDs will also better help with identifying USB hard drive activity. The changes from the above settings are as follows.
Show All Event IDs – Change to “Show only the specified event IDs” and enter “400,410” into the box
Show All Channels – Change to “Show only the specific channels” and select “Microsoft-Windows-Kernel-PnP/Configuration”
An alternative method would be to simply enter a search string of a possible known inserted USB drive and search the entire event log. While this is obviously more complete in terms of shown information, it will take quite a while to search and might show too much data for all but the most diligent users to look through.
09
Янв, 2018
Как посмотреть историю подключения флешек в сети
Компьютерные флешки обладают очевидными плюсами – функциональность, небольшой размер, легкость в использовании. Однако, этот съемный носитель также является источником проблем для безопасности персональных данных. Чтобы обезопасить предприятие от утечки конфиденциальной информации, необходимо систематически выполнять поиск сведений про USB-накопители в сети.
Все данные об активности сохраняются в реестре операционной системы. Отслеживать изменения в реестре можно самостоятельно, однако без должной подготовки сделать это достаточно затруднительно. Верным решением станет использование специальных программ, которые помогают просмотреть и проанализировать историю подключения флешек и других USB-устройств к сети.
Зачем нужно знать, кто подключал флешку в локальной сети
При подключении любого устройства к компьютеру, операционная система его инициализирует, и сохраняет сведения об использовании внешнего жесткого диска, смартфона или других носителей информации в специальных файлах. Благодаря наличию таких артефактов можно выявить факт неправомерного использования рабочего компьютера в личных целях.
Большие компании дорожат корпоративной безопасностью, поэтому не разрешают подключать своим работникам домашние флэшки или собственные смартфоны к компьютерам и другой технике, находящейся на балансе корпорации. В случае ненадлежащего контроля со стороны компании за USB портами есть вероятность, что какой-то сотрудник может просто скопировать засекреченные материалы на свой носитель.
Еще одним возможным вариантом развития событий является потеря управления корпоративной безопасностью вследствие заражения системы вирусом. Служащий может случайно или специально принести флешку, на которой находится вредоносный файл, поэтому, важно контролировать любые подключения через USB к локальной сети.
Сетевые детекторы USB-накопителей
История USB подключений в сети является важным элементом при анализе сбоев в системе безопасности фирмы. Существует большое количество специализированного софта для выявления даты подключения, серийного номера устройства, имени устройства и т.д. Такие программы легки в использовании и не требуют особых навыков.
На что стоит обращать внимание при выборе утилит, благодаря которым становится доступной история подключения флешек в локальной сети:
- возможность сохранения отчета в разных текстовых форматах;
- удобство в работе (язык программы, функционал);
- количество информации, которую может предоставить приложение об устройствах, подключенных к сети (от запрета на использование определенных портативных носителей до даты последнего подключения).
История подключения флешек в сети с помощью Total Network Inventory
Программа для инвентаризации и учета компьютеров Total Network Inventory собирает исчерпывающую информацию о каждом просканированном устройстве. Сканирование можно выполнять удаленно, для этого достаточно знать только пароль администратора.
Хранилище программы создается пользователем на жестком диске. Чтобы быстро найти определенную информацию по конкретному компьютеру, достаточно воспользоваться живым поиском.
Плюсы утилиты Total Network Inventory:
- возможность установки как на рабочей станции, так и на сервере;
- обслуживание корпоративных сетей любых масштабов;
- отслеживание установок ПО;
- возможность создания резервной копии, восстановления данных программы, переноса утилиты на другой компьютер;
- регулярное обновление программы;
- формирование отчетов по разным категориям данных;
- гибкая настройка табличных отчетов по инвентаризации.
Скачать Total Network Inventory можно по ссылке. Есть возможность воспользоваться бесплатной пробной версией софта.