
Утилита Sysprep используется для подготовки эталонного образа Windows и его обезличивания, удаляя из системы все уникальные идентификаторы (SID-ы, GUID-ы), что необходимо для его корректного разворачивания в корпоративной сети. В некоторых случаях, когда вы выполняете команду sysprep /generalize /oobe /shutdown при создании образа Windows 10, программа Sysprep.exe может вернуть следующую ошибку:
Sysprep не удалось проверить установку Windows. Дополнительные сведения см. в файле журнала %Windows%\System32\Sysprep\Panther\setupact.log. После устранения проблемы снова проверьте установку с помощью Sysprep.
Sysprep was not able to validate your Windows installation. Review the log file at %windir%\system32\Sysprep\panther\setupact.log for details. After resolving the issue use Sysprep to validate your installation again.
Чтобы исправить ошибку «Sysprep не удалось проверить установку Windows», перейдите в каталог C:\Windows\System32\Sysprep\Panther и откройте с помощью любого текстового редактора (например, блокнота) файл с журналом утилиты sysprep — setupact.log.
Начните просматривать содержимое файл setupact.log снизу вверх и ищите строку с ошибками. В зависимости от найденной ошибки, вам нужно будет выполнить определенные действия для ее исправления. Рассмотрим возможнее ошибки Sysprep:
- Отключите BitLocker для запуска Sysprep
- Не удается удалить современные приложения у текущего пользователя
- Sysprep не работает на обновленной ОС
Содержание:
Отключите BitLocker для запуска Sysprep
Error SYSPRP BitLocker-Sysprep: BitLocker is on for the OS volume. Turn BitLocker off to run Sysprep. (0x80310039)
Error [0x0f0082] SYSPRP ActionPlatform::LaunchModule: Failure occurred while executing 'ValidateBitLockerState' from C:\Windows\System32\BdeSysprep.dll
If you run manage-bde -status command it will show the following:
Disk volumes that can be protected with
BitLocker Drive Encryption:
Volume C: [OSDisk]
Эта ошибка в основном возникает на планшетах и ноутбуках с Windows 10, поддерживающих шифрование InstantGo (на основе BitLocker.) Чтобы исправить эту ошибку нужно отключить шифрование для системного тома с помощью следующей команды PowerShell:
Disable-Bitlocker –MountPoint “C:”

Не удается удалить современные приложения у текущего пользователя
Если в журнале setupact.log встречаются ошибки:
Error SYSPRP Package AppName_1.2.3.500_x64__xxxxxxxxx was installed for a user, but not provisioned for all users. This package will not function properly in the sysprep image.
Error SYSPRP Failed to remove apps for the current user: 0x80073cf2.
Это означает, что вы вручную устанавливали приложения (Modern / Universal Apps) из Windows Store, или некорректно удалили предустановленные приложения.
Попробуйте удалить данный пакет с помощью команд PowerShell:
Get-AppxPackage –Name *AppName* | Remove-AppxPackage
Remove-AppxProvisionedPackage -Online -PackageName AppName_1.2.3.500_x64__xxxxxxxxx
Кроме того, чтобы Microsoft Store не обновлял приложения, необходимо отключить ваш эталонный компьютер с образом Windows 10 от Интернета и отключить автоматическое обновление в режиме аудита перед тем как вы создаете образ.
Также удалите все локальные профили пользователей.
Sysprep не работает на обновленной ОС
В том случае, если вы обновили операционную систему в вашем образе до Windows 10 с предыдущей версии (Windows 8.1 или Windows 7 SP1), то при попытке выполнить Sysprep в журнале setupact.log должна содержаться следующая ошибка:
Error [0x0f0036] SYSPRP spopk.dll:: Sysprep will not run on an upgraded OS. You can only run Sysprep on a custom (clean) install version of Windows.
Microsoft не рекомендует выполнять Sysprep образа, который был проапгрейжен с предыдущей версии Windows, рекомендуется использовать чистую установку Windows 10. Однако есть способ обойти это требования.
- Откройте редактор реестра и перейдите в раздел HKEY_LOCAL_MACHINE\SYSTEM\Setup.
- Найдите параметр с именем Upgrade и удалите его.
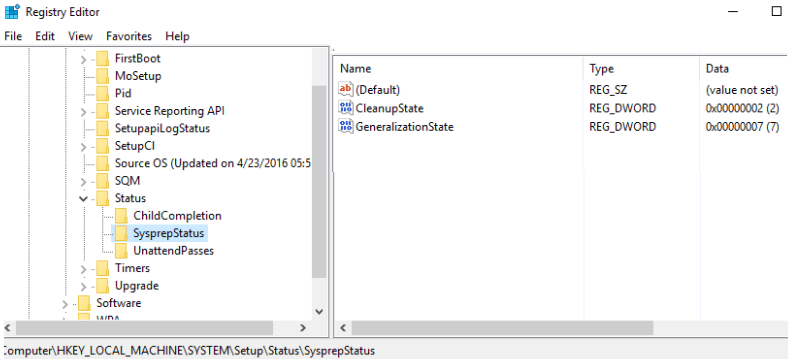
- Затем перейдите в ветку HKEY_LOCAL_MACHINE\SYSTEM\Setup\Status\SysprepStatus и измените значение ключа CleanupState на 7.

- Тем самым, вы заставите Sysprep считать, что данная копия Windows установлена в режиме чистой установки.
Перезагрузите компьютер и запустите Sysprep еще раз.
You may receive a ‘Sysprep was not able to validate your Windows installation‘ error when you try to generalize the Windows image using the sysprep.exe tool. This guide covers several ways to fix common SysPrep image validation errors on current versions of Windows 10/11 and Windows Server 2022/2019.
The SysPrep (System Preparation Tool) is used to prepare a reference Windows image and depersonalize it by removing all unique identifiers (SID, GUID) from the operating system. This prepared Windows image can then be captured for deployment to multiple corporate computers (see our guide on how to use Sysprep in Windows).
How to troubleshoot the Sysprep validation errors on Windows
If the SysPrep failed to validate current Windows installation, the generalization will fail with an error:
System Preparation Tool 3.14
Sysprep was not able to validate your Windows installation. Review the log file at %windir%\system32\Sysprep\panther\setupact.log for details. After resolving the issue use Sysprep to validate your installation again.

In this case, check the sysprep log file (setupact.log) for the cause of the error. This file is located in the C:\Windows\System32\Sysprep\Panther directory and contains a detailed description of the error. Open the sysprep log file in any text editor. For example:
notepad %windir%\system32\Sysprep\panther\setupact.log
Scroll through the setupact.log file and look for the most recent errors. Depending on the error found, you may need to take one of the suggested actions to fix it.

Here are the most common causes of the Sysprep error:
- BitLocker encryption enabled on the system drive;
- Some additional Microsoft Store (UWP) apps installed;
- Removed built-in Microsoft Store apps;
- You are using a Windows image that has been upgraded from an earlier version. (for example, from Windows 10 to Windows 11);
- Pending Windows updates installation
Turn off BitLocker for OS Volume to Run Sysprep
Check the setupact.log log for a BitLocker-related error:
Error SYSPRP BitLocker-Sysprep: BitLocker is on for the OS volume. Turn BitLocker off to run Sysprep. (0x80310039)
Error [0x0f0082] SYSPRP ActionPlatform::LaunchModule: Failure occurred while executing ‘ValidateBitLockerState’ from C:\Windows\System32\BdeSysprep.dll
This error means that the Bitolcker-enabled drive is being used. Open the command prompt as administrator and run the command:
manage-bde -status
It should return the following info:
Disk volumes that can be protected with
BitLocker Drive Encryption:
Volume C: [OSDisk]
Conversion Status: Encryption in Progress
This error mostly occurs on Windows 10/11 tablets and laptops that support InstantGo (compliant devices automatically enable full BitLocker device encryption). You can fix this error by using PowerShell to turn off the encryption for the Windows system volume:
Disable-Bitlocker –MountPoint ‘C:’
Wait for the drive to decrypt. Check the status:
manage-bde -status

Sysprep can now be applied to your Windows image.
SYSPRP Failed to Remove Microsoft Store Apps for the Current User
SysPrep may fail after you install, update, or remove one of the provisioned Microsoft Store apps.
In this case, the setupact.log will contain the following error:
Error SYSPRP Package SomeAppName_1.2.3.500_x64__8we4y23f8b4ws was installed for a user, but not provisioned for all users. This package will not function properly in the sysprep image.
Error SYSPRP Failed to remove apps for the current user: 0x80073cf2.Exit code of RemoveAllApps thread was 0x3cf2
SysPrep checks the status of Microsoft Store applications on Windows. If any of the APPX/MSIX packages have been deprovisioned from the Windows image but not removed for a particular user, or if provisioned Appx have been updated by one of the users, the SysPrep will fail.
Hint. SysPrep also fails if any of the built-in Store applications have been updated (manually or automatically) with a new version from the online Microsoft Store. To prevent automatic updates of APPX packages, open the local GPO editor console (gpedit.msc) and enable the Turn off Automatic Download and Install of updates policy in Computer Configuration > Administrative Templates > Windows Components > Store. Disconnecting your reference Windows device from the Internet can also prevent Microsoft Store apps from updating.

Copy the APPX ID of the application that is preventing SysPrep from completing from the setupact.log file.
Open the PowerShell console as Administrator and remove this app from any user profiles that have it installed:
Get-AppxPackage 'SomeAppName_1.2.3.500_x64__8we4y23f8b4ws' -AllUsers| Remove-AppPackage –AllUsers -verbose
Then remove this provision package from the Windows image:
Get-AppxProvisionedPackage -online | where-object {$_.PackageName -like 'SomeAppName_1.2.3.500_x64__8we4y23f8b4ws'}| Remove-AppxProvisionedPackage -online –Verbose
You can also delete all the local user profiles, leaving only the local Administrator profile in place. Use the netplwiz snap-in to delete additional user accounts.
Reboot the computer and try running Sysprep again.
The next time Sysprep might fail in another Microsoft Store app. Delete it also as described above.
Removing some of the built-in Microsoft Store applications may also prevent Sysprep from validating the Windows image. In this case, the following error will appear in setupact.log:
SYSPRP Package SomeAppName_1.2.3.500_x64__8we4y23f8b4ws was installed for a user, but not provisioned for all users. This package will not function properly in the sysprep image.
You must use the PowerShell one-liner to reinstall all built-in UWP apps:
Get-AppxPackage -AllUsers| Foreach {Add-AppxPackage -DisableDevelopmentMode -Register “$($_.InstallLocation)\AppXManifest.xml”}
Sysprep Will Not Run on an Upgraded OS
If your operating system has been upgraded from an earlier version of Windows (Windows 10, Windows 8.1, or Windows 7 SP1), you may see the following error in the setupact.log file when you try to run Sysprep.
Error [0x0f0036] SYSPRP spopk.dll:: Sysprep will not run on an upgraded OS. You can only run Sysprep on a custom (clean) install version of Windows.
Using sysprep with a Windows image you have after a clean installation is the recommended scenario. However, there is a way to bypass this restriction:
- Open the Registry Editor (regedit.exe) and go to the registry key HKEY_LOCAL_MACHINE\SYSTEM\Setup;
- Delete the registry parameter named Upgrade;
- Then navigate to the key HKEY_LOCAL_MACHINE\SYSTEM\Setup\Status\SysprepStatus and change the value of CleanupState to 7.


This causes Sysprep to assume that this copy of Windows is being installed cleanly from scratch. Restart the computer and run Sysprep again.
Sysprep Fails Due to Pending Windows Update Installation
Another SysPrep error occurs when Windows updates are installed in the background:
Error SYSPRP Sysprep_Clean_Validate_Opk: Audit mode can’t be turned on if there is an active scenario.; hr = 0x800F0975
Error SYSPRP Sysprep_Clean_Validate_Opk:
There are one or more Windows updates that require a reboot. To run Sysprep, reboot the computer and restart the application.[gle=0x000036b7]
This error caused the pending updates installation. In this case, reboot the computer, scan again for updates, reboot after installing all the required updates, and then run sysprep again.

In some cases, stopping Windows Update as described above does not completely clear the Reserved Storage. This means that you cannot use SysPrep at this time, because your Windows image is locked by some changes. This can be caused by installing security updates, adding Windows features, system programs, antivirus, etc.
In this case, another error will appear in the sysprep log:
Error SYSPRP Sysprep_Clean_Validate_Opk: Audit mode cannot be turned on if reserved storage is in use. An update or servicing operation may be using reserved storage.; hr = 0x800F0975
To fix this issue:
- Open the Registry Editor (regedit.exe) and go to HKLM\Software\Microsoft\Windows\CurrentVersion\ReserveManager;
- Change the value of the ShippedWithReserves parameter from 1 to 0;
- Then change ActiveScenario to 0;
- And disable Reserved Storage in Windows using the command:
DISM.exe /Online /Set-ReservedStorageState /State:Disabled
Cyril Kardashevsky
I enjoy technology and developing websites. Since 2012 I’m running a few of my own websites, and share useful content on gadgets, PC administration and website promotion.
Sysprep (System Preparation Tool) is a Microsoft Command line utility which users use to prepare a generalized Windows system image for deploying, duplicating and testing the Operating System.
In this process, you need to generalize the Windows installing by using the command sysprep /generalize /shutdown /oobe and remove any data specific to your PC for privacy purposes. However, Sysprep can’t execute this process if it fails to validate the system and returns the “Sysprep was not able to validate your Windows installation” error message.
This issue can happen because of various reasons, which we have mentioned in this article along with their solutions.
Causes for Sysprep Was Not Able to Validate Your Windows Installation
Here are the potential causes for “Sysprep was not able to validate your Windows installation” error:
- Running Sysprep on an upgraded Windows OS.
- Device Encryption or BitLocker enabled.
- Unprovisioning UWP apps for a user.
- Presence of an active scenario such as pending system updates.
- Corrupt
Spopk.dllfile.
Fixes for Sysprep Was Not Able to Validate Your Windows Installation
First, make sure to disconnect the internet to avoid any automatic processes, such as updates while generalizing your Windows installation.
Then, apply the possible solutions we have provided below to troubleshoot your issue.
Check Log File
The Sysprep error message also shows where you can review the error log message. So, the first thing you should do is check the log file to narrow down the exact reason for the issue.
- You can open Run (Win + R) and enter
notepad %windir%\system32\Sysprep\panther\setupact.logto open this file using the notepad.
After looking through the log, move on to the corresponding solutions depending on the nature of your error.
Disable Upgrade Registry Key and Entry
Sysprep won’t be able to validate your Windows installation if you try running the processs after upgrading your system. The log should show the following or a similar error message in such a scenario:
SYSPRP spopk.dll:: Sysprep will not run on an upgraded OS. You can only run Sysprep on a custom (clean) install version of Windows.
As the message says, Microsoft doesn’t support running Sysprep on an upgraded Windows system and instead recommends users to clean install Windows first. However, you can avoid this issue by changing some registry values. Here’s how you can do so:
- Press Win + R to open Run.
- Enter
regeditto open the Registry Editor. - Navigate to
Computer\HKEY_LOCAL_MACHINE\SYSTEM\Setup\ - Delete both the Upgrade key and the Upgrade DWORD Value.

- Now, go to
Computer\HKEY_LOCAL_MACHINE\SYSTEM\Setup\Status\SysprepStatus. - Double-click on CleanupState and set its Value data to 7.

This process fools the Windows OS into believing that you have a custom install version of Windows instead of an upgraded one.
Disable BitLocker
You can’t run Sysprep when your system is encrypted. If you try to do so, the error log usually shows the error message below:
SYSPRP BitLocker-Sysprep: BitLocker is on for the OS volume. Turn BitLocker off to run Sysprep. (0x80310039)
You may also get other messages, but they will contain the word BitLocker.
To resolve the issue, you need to disable the process. Here’s how you can do so:
- Open Run
- Type
cmdand press Ctrl + Shift + Enter to open the Elevated Command Prompt. - Enter the following commands:
manage-bde -status(It shows whether BitLocker is encrypting your device or not)
Disable-Bitlocker –MountPoint ‘C:’

Disable TPM and PTT

Sometimes your system thinks BitLocker is enabled even when it’s actually off. So, you’ll still get the above error. It happens because sometimes the BDE goes into a waiting state when TPM is detected.
There are two ways to resolve the issue. You can either enable BitLocker and then turn it off again.
Or you can go to your BIOS and disable TPM (Trusted Platform Module), which is the device your system uses for encryption. You can usually find the option under Advanced, Security, or Trusted Computing in the BIOS or UEFI. You may also need to disable PTT (Intel Platform Trust Technology) in some devices.
Reinstall or Remove UWP App Packages
If you unprovisioned any Universal Windows Platform (UWP) app that is installed on one of your user accounts, the source files for the app won’t be present on your user profile. In such cases, Sysprep can’t validate the installation and you’ll usually find the following error message in the log file:
SYSPRP Package <App Name>_1.2.3.500_x64__8we4y23f8b4ws was installed for a user, but not provisioned for all users. This package will not function properly in the sysprep image.
You need to remove the apps from the user or remove all users with unprovisioned apps to resolve such issues.
First, try re-registering the default Windows apps in case there’s some other issue with the app. To do so:
- Open Run.
- Type
powershelland press Ctrl + Shift + Enter to open the Elevated Windows PowerShell. - Enter the command:
Get-AppxPackage -AllUsers| Foreach {Add-AppxPackage -DisableDevelopmentMode -Register “$($_.InstallLocation)\AppXManifest.xml”}

Run Sysprep again and check if you still encounter the issue. If you do, you need to remove the UWP apps and their provisioning. You also need to manually remove the apps if the error log shows something like:
SYSPRP Failed to remove apps for the current user: 0x80073cf2.
Here are the necessary steps:
- Open the Elevated Windows PowerShell.
- Enter the following commands:
Import-Module AppxImport-Module DismGet-AppxPackage -AllUsers | Where PublisherId -eq 8wekyb3d8bbwe | Format-List -Property PackageFullName,PackageUserInformation
- If you manually provisioned some non-UWP apps, you need to run
Get-AppxPackage -AllUsers | Format-List -Property PackageFullName,PackageUserInformation - Check all users that show Installed. If they are local accounts, remove these accounts. You can do so by using these steps:
- Open Run and enter
netplwiz. - Click on the accounts and select Remove > Yes.
- Open Run and enter
- Then, run the commands below to remove an app and its provisioning while replacing the <package name> with the app’s package name:
Remove-AppxPackage -Package \<package name>Remove-AppxProvisionedPackage -Online -PackageName <package name>
- Do so for all the apps the Sysprep’s log shows.


Complete Pending Updates and Then Pause Updates
Your can’t enable the Sysprep audit mode if there’s an active scenario such as updates. Such processes use your reserved storage, which locks your Windows OS. In this case, the log file shows an error message similar to:
SYSPRP Sysprep_Clean_Validate_Opk: Audit mode cannot be turned on if reserved storage is in use. An update or servicing operation may be using reserved storage.; hr = 0x800F0975
To resolve the issue, you need to install all pending cumulative updates and then pause your updates. You don’t need to install the optional updates.
Make sure to install the necessary updates and restart your PC to complete all pending operations. Then, pause your updates using the instructions below:
- Open Run and enter
ms-settings:windowsupdate. - Click on Pause or Pause for x week/s button.


Disconnect your internet and try running Sysprep again.
Replace Spopk.dll File
Spopk.dll is a type of OPK Sysprep Plugin file that helps in Sysprep’s Windows installation validation. Sometimes this DLL file can become corrupt causing issues while running Sysprep.
In such cases, the log shows an error message similar to,
SYSPRP ActionPlatform::LaunchModule: Failure occurred while executing ‘Sysprep_Clean_Validate_Opk’ from C:\Windows\System32\spopk.dll; dwRet = 0x975
First, remove provisioning for the store apps, then install cumulative updates or pause updates and retry running Sysprep. If you still encounter the issue, you need to replace the Spopk.dll file. Here’s how you can do so:
- Open the Elevated Command Prompt.
- Enter the following command to take ownership and change permissions for
spopk.dll:takeown /f %WinDir%\System32\spopk.dllicacls %WinDir%\System32\spopk.dll /Grant Administrators:f
- Open Run and enter
%windir%\System32to open the directory in the File Explorer. - Download the
spopk.dllfile or transfer it to the System32 folder from the same location in another computer. - Confirm if you get the prompt to replace the file.
This post describes how to fix the error:
Sysprep was not able to validate your Windows installation.
Review the log file at
%WINDIR%\System32\Sysprep\Panther\setupact.log for details. After resolving the issue, use Sysprep to validate your installation again.

which can occur when you run the System Preparation Tool 3.14 on Windows 11.
I’ve identified two potential causes for this error.
Open the Panther folder in the Sysprep directory, copy the setupact.log file out of that directory to open it, then scroll to the bottom to see the error.
Package Provisioning
Error
If the error is as follows:
Error SYSPRP Failed to remove apps for the current user: 0x80073cf2.
Cause
Just above this, you can see a potential cause, in this case it’s the Microsoft.OneDriveSync package:
SYSPRP Package Microsoft.OneDriveSync_21196.921.7.0_neutral__8wekyb3d8bbwe was installed for a user, but not provisioned for all users. This package will not function properly in the sysprep image.
Resolution
I removed the packages causing sysprep to error in PowerShell ISE by running the following script:
Get-AppxPackage Microsoft.OneDriveSync | Remove-AppxPackage
Get-AppxPackage MicrosoftWindows.Client.WebExperience | Remove-AppxPackage
Get-AppxPackage Microsoft.LanguageExperiencePacken-GB | Remove-AppxPackage

EDIT: Added 2nd potential error, cause and resolution
Windows Update
Error
If the error is as follows:
SYSPRP Sysprep_Clean_Validate_Opk: Audit mode can’t be turned on if there is an active scenario.; hr = 0x800F0975
SYSPRP ActionPlatform::LaunchModule: Failure occurred while executing ‘Sysprep_Clean_Validate_Opk’ from C:\Windows\System32\spopk.dll; dwRet = 0x975
SysprepSession::Validate: Error in validating actions from C:\Windows\System32\Sysprep\ActionFiles\Cleanup.xml; dwRet = 0x975
RunPlatformActions:Failed while validating Sysprep session actions; dwRet = 0x975
RunDlls:An error occurred while running registry sysprep DLLs, halting sysprep execution. dwRet = 0x975
WinMain:Hit failure while pre-validate sysprep cleanup internal providers; hr = 0x80070975
Cause
The cause could be that Windows Update is running or is part way through an installation.
Resolution
Ensure Windows Update is complete and is not running then try again.
Fix
Sysprep should now run successfully:
Related Posts
,
On a Windows 8.1 based machine the following error appears when running sysprep: «sysprep was not able to validate your Windows installation«. The above error happens because sysprep cannot run on an upgraded Windows installation.
For example, if you have already downloaded apps on a Windows 8.1 or 10 machine where you want to run the sysprep command, the sysprepact log file (setupact.log) which is created under C:\Windows\System32\sysprep\Panther folder displays the following error(s):
«[0x0f0036] SYSPRP spopk.dll:: Sysprep will not run on an upgraded OS. You can only run Sysprep on a custom (clean) install version of Windows.
[0x0f0082] SYSPRP ActionPlatform::LaunchModule: Failure occurred while executing ‘Sysprep_Clean_Validate_Opk’ from C:\Windows\System32\spopk.dll; dwRet = 0x139f
SYSPRP SysprepSession::Validate: Error in validating actions from C:\Windows\System32\Sysprep\ActionFiles\Cleanup.xml; dwRet = 0x139f
SYSPRP RunPlatformActions:Failed while validating SysprepSession actions; dwRet = 0x139f
[0x0f0070] SYSPRP RunExternalDlls:An error occurred while running registry sysprep DLLs, halting sysprep execution. dwRet = 0x139f
[0x0f00d8] SYSPRP WinMain:Hit failure while pre-validate sysprep cleanup internal providers; hr = 0x8007139f] «

To fix the «Sysprep was not able to validate your Windows installation» error while trying to run sysprep on a upgraded Windows 8, 8.1 or Windows 10 machine, follow the steps below:
How to resolve «Sysprep was not able to validate your Windows installation» error (Windows 10, 8.1, 

Step 1: Remove the «UPGRADE» key from Windows Registry.
1. Open Windows Registry Editor. To do that:
- Press “Windows” + “R” keys to load the Run dialog box.
- Type “regedit” and press Enter.

2. Inside Windows Registry, navigate (from the left pane) to this key:
HKEY_LOCAL_MACHINE\SYSTEM\Setup\

3. At the right pane, DELETE the Upgrade key.

4. Press YES at the warning window.

5. Close Registry Editor and restart your computer.
6. Now run SYSPREP again. Sysprep should run successfully now and without problems.
- Note: Always run «SYSPREP» command as Administrator and uninstall any security software before running the command.
That’s it!
If this article was useful for you, please consider supporting us by making a donation. Even $1 can a make a huge difference for us in our effort to continue to help others while keeping this site free:
- Author
- Recent Posts
Konstantinos is the founder and administrator of Wintips.org. Since 1995 he works and provides IT support as a computer and network expert to individuals and large companies. He is specialized in solving problems related to Windows or other Microsoft products (Windows Server, Office, Microsoft 365, etc.).
Konstantinos Tsoukalas
Konstantinos is the founder and administrator of Wintips.org. Since 1995 he works and provides IT support as a computer and network expert to individuals and large companies. He is specialized in solving problems related to Windows or other Microsoft products (Windows Server, Office, Microsoft 365, etc.).