
Время на прочтение1 мин
Количество просмотров12K
Понадобилось мне восстановить MBR на Windows 7. Но вот незадача: на Windows XP решалось это путём загрузки в консоль восстановления и вбитии команды fixmbr. В 7-ке такой фокус не прокатил — fixmbr нету. Но где наша не пропадала. 
Ну что же, лезем в Google и путём недолгих поисков находим вот эту статью. Для тех кому лень переводить:
1. Грузимся с DVD. Вводим первичные данные (всё как при установке).
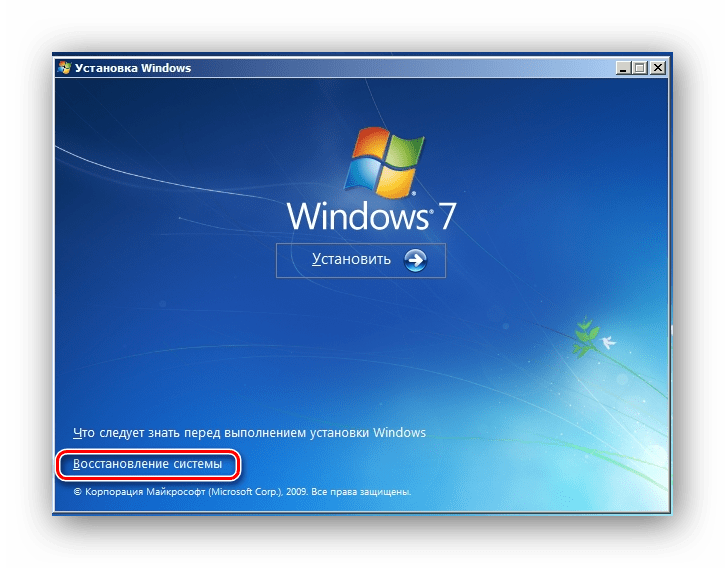
2. Когда доходим до окна с кнопкой «Установить», устремляем свой взгляд в нижнюю часть окна. Там нажимаем на «Восстановление системы».
3. Выползает окно с разными вариантами. Нам необходим самый нижний пункт «Командная строка».
4. Видим стандартную консоль. Далее вводим bootsect /NT60 C: /MBR (Это если система установлена на диск C). И перезагружаемся.
Всё, MBR восстановлена.
Если эта публикация вас вдохновила и вы хотите поддержать автора — не стесняйтесь нажать на кнопку
Если у вас возникли проблемы с запуском ОС и вы предполагаете, что виной тому испорченный загрузчик Windows, здесь вы найдете способ исправить эту проблему вручную.
Восстановление загрузчика Windows 7 может потребоваться (или его хотя бы стоит попробовать) в следующих случаях: при возникновении ошибок Bootmgr is missing или Non system disk or disk error; кроме этого, если компьютер заблокирован, при этом сообщение с требованием денег появляется еще до начала загрузки Windows, восстановление MBR (Master Boot Record) также может помочь. Если же ОС начинает загружаться, но происходит сбой, то дело не в загрузчике и решение стоит поискать здесь: Не запускается Windows 7.
Загрузка с диска или флешки с Windows 7 для восстановления
Первое, что следует сделать, загрузиться с дистрибутива Windows 7: это может быть загрузочная флешка или диск. При этом, это не обязательно должен быть тот же диск, с которого устанавливалась ОС на компьютер: для восстановления загрузчика подойдет любая из версий Windows 7 (т.е. не важно Максимальная или Домашняя базовая, например).

После загрузки и выбора языка, на экране с кнопкой «Установить», нажмите ссылку «Восстановление системы». После этого, в зависимости от используемого дистрибутива, вам может быть предложено включить сетевые возможности (не потребуются), переназначить буквы дисков (как хотите) и выбрать язык.
Следующим пунктом будет идти выбор Windows 7, загрузчик которой следует восстановить (перед этим будет непродолжительный период поиска установленных операционных систем).
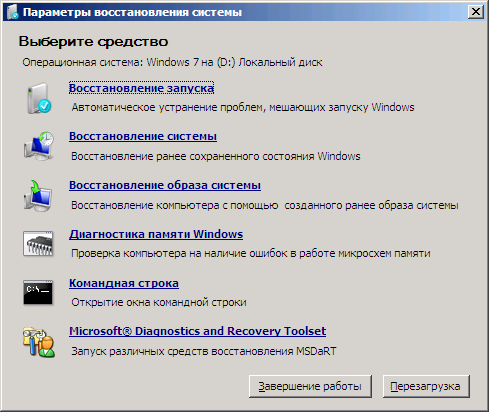
После выбора появится список средств для восстановления системы. Тут есть и автоматическое восстановление запуска, но оно не всегда срабатывает. Я не буду описывать автоматическое восстановление загрузки, да и описывать особо нечего: нажать и ждать. Будем использовать ручное восстановление загрузчика Windows 7 с помощью командной строки — ее и запустите.
Восстановление загрузчика (MBR) Windows 7 с помощью bootrec
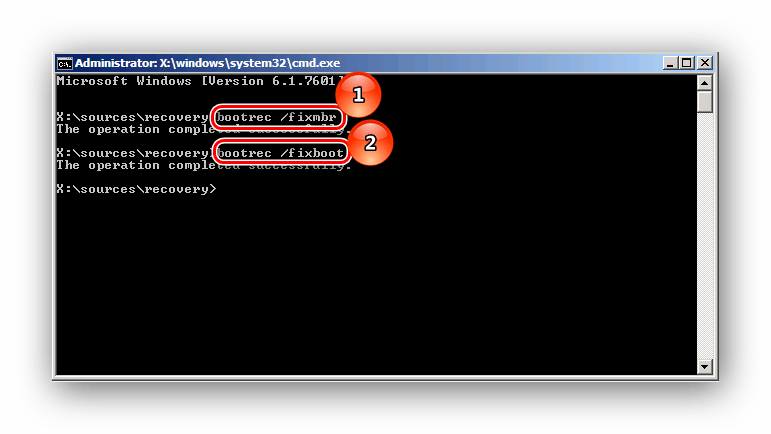
В командной строке введите команду:
bootrec /fixmbr
Именно эта команда перезаписывает MBR Windows 7 на жестком диске или SSD. Однако, этого не всегда бывает достаточно (например, в случае с вирусами в MBR), а потому следом за этой командой обычно используют еще одну, которая записывает новый загрузочный сектор Windows 7 на системный раздел:
bootrec /fixboot

После этого можно закрыть командную строку, выйти из программы установки и загрузиться с системного жесткого диска — теперь все должно работать. Как видите, восстановить загрузчик Windows довольно просто и, если вы правильно определили, что проблемы с компьютером вызваны именно этим, остальное — дело нескольких минут.
Главной загрузочной записью (MBR) называется раздел жесткого диска, находящийся на первом месте. В нём находятся таблицы разделов и небольшая программа для загрузки системы, которая считывает в этих таблицах информацию о том, с каких секторов винчестера происходит запуск. Далее данные передаются в кластер с действующей операционной системой для её загрузки.
Восстанавливаем MBR
Для процедуры восстановления загрузочной записи нам понадобится установочный диск с ОС или загрузочная флешка.
Урок: Инструкция по созданию загрузочной флешки на Windows
- Настраиваем свойства BIOS так, чтобы загрузка происходила с DVD-привода или флеш-накопителя.
Подробнее: Как настроить BIOS для загрузки с флешки
- Вставляем установочный диск с или загрузочную флешку с Виндовс 7, доходим до окна «Установка Windows».
- Переходим в пункт «Восстановление системы».
- Выбираем нужную ОС для восстановления, жмём «Далее».
- Откроется окно «Параметры восстановления системы», выбираем раздел «Командная строка».
- Появится панель командной строки cmd.exe, в ней вводим значение:
bootrec /fixmbrДанная команда выполняет перезапись MBR в Виндовс 7 на системном кластере винчестера. Но этого может не хватить (вирусы в корне MBR). И поэтому следует использовать еще одну команду, обеспечивающую запись нового загрузочного сектора «Семерки» на системный кластер:
bootrec /fixboot - Вводим команду
exitи перезапускаем систему с жесткого диска.


Процедура восстановления загрузчика Виндовс 7 является очень простой, если вы всё сделаете по инструкции приведенной в этой статье.
Наша группа в TelegramПолезные советы и помощь
Привет, друзья. Как восстановить загрузчик Windows на диске со стилем разделов MBR? У нас на сайте есть множество статей, посвящённых процедуре реанимации системного загрузчика – от простой операции по восстановлению файлов загрузки до серьёзной процедуры по пересозданию загрузочного раздела, когда приходится удалять раздел «Зарезервировано системой» и создавать его заново. В этой публикации я решил собрать воедино различные способы по восстановлению MBR-загрузчика Windows и предложить вам их в формате ещё одной статьи, раскрывающей потенциал реанимационного LiveDisk’а для системщиков от Сергея Стрельца, которому у нас на сайте посвящён целый цикл публикаций. На борту этого LiveDisk’а имеются автоматизированные средства восстановления загрузки Windows, так что мы пойдём от простого к сложному.
Восстановление MBR-загрузчика Windows с помощью Live-диска by Sergei Strelec
Примечание: друзья, если у вас компьютер с активным BIOS UEFI, и у вас Windows установлена на диске со стилем разделов GPT, то на сайте есть аналогичная статья с подборкой способов реанимации загрузчика дисках с этим стилем разделов — «Восстановление загрузчика EFI-систем Windows с помощью Live-диска by Sergei Strelec». Ну а мы вернёмся к решению проблем с MBR-загрузчиком. Итак, загрузчик Windows повреждён, что делать?
Первым делом подготавливаем реанимационный LiveDisk.
1. LiveDisk by Sergei Strelec
Live-диск от Сергея Стрельца – функциональный реанимационный «живой диск» на базе WinPE для восстановления Windows после критического сбоя. Это не только подборка средств для восстановления системы, это сборник с более чем сотней годных программ для выполнения различных операций. Как скачать ISO-образ LiveDisk’а, смотрим здесь. Скачиванием, записываем ISO-образ на флешку, можно утилитой Rufus.
***
Если повреждения загрузчика несерьёзные, т.е. цел раздел загрузчика, не повреждены его файлы, а проблемы возникли только с хранилищем загрузки (файлом BCD) в части его конфигурации, либо же из меню загрузки исчезли какие-то Windows, если их на компьютере установлено несколько, с задачей можно попытаться справиться с помощью функций восстановления MBR-загрузки Windows, присутствующих в составе менеджеров дисков и профильной программы для редактирования BCD — EasyBCD.
2. Восстановление MBR-загрузчика программой AOMEI Partition Assistant
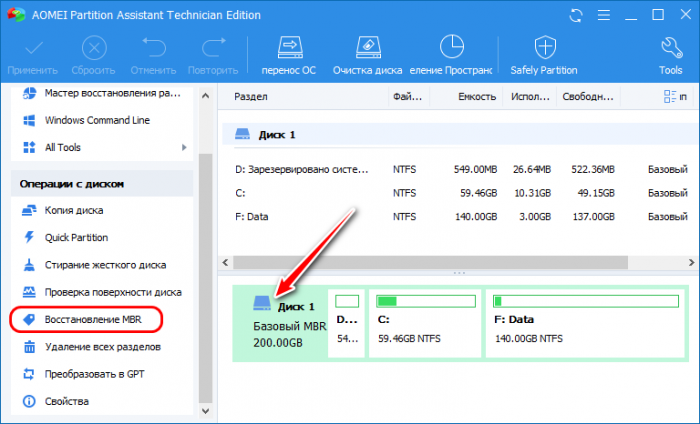
Функция автоматического восстановления загрузчика есть в составе менеджера дисков AOMEI Partition Assistant. Запустить программу можно в меню «Пуск» LiveDisk’а по пути:
- Программы WinPE – Жёсткий диск
Работает автовосстановление загрузчика очень просто: в окне программы кликаем жёсткий диск, где стоит загрузчик, на панели операций слева нажимаем «Восстановление MBR».
Выбираем MBR-загрузчик Windows 7, 8.1, 10.
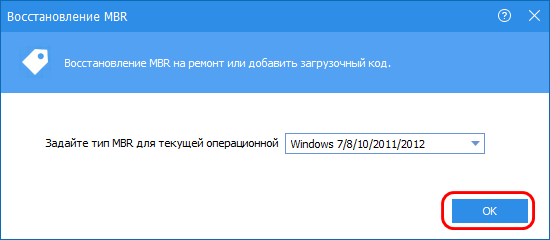
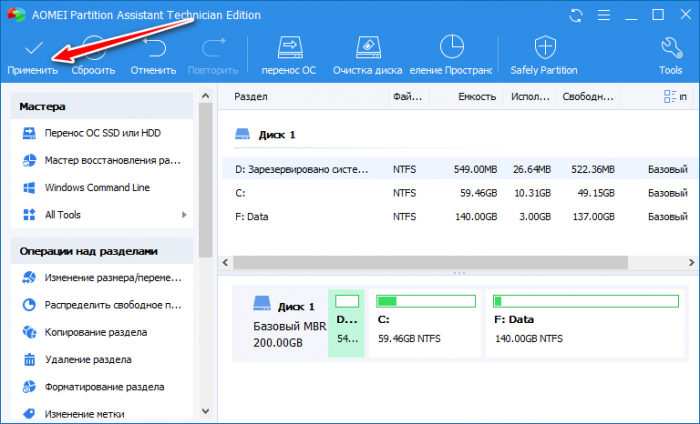
Применяем операцию.
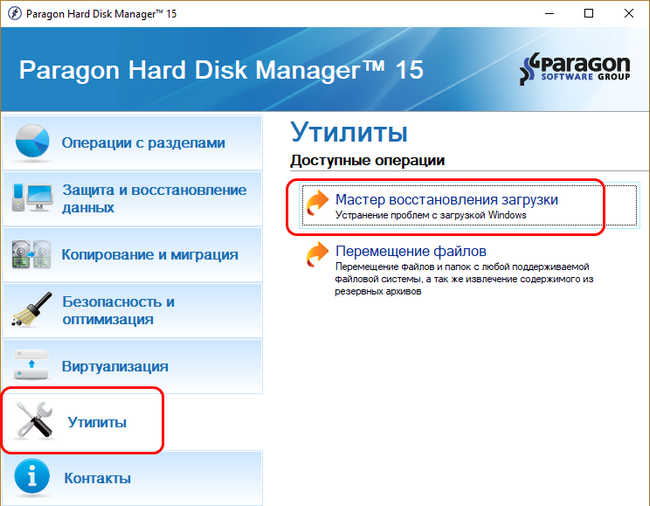
3. Восстановление MBR-загрузчика программой Paragon Hard Disk Manager
Восстанавливать MBR-загрузчик умеет другой функциональный менеджер дисков – программа Hard Disk Manager, на борту LiveDisk’а Стрельца есть её 15-я версия. Запускаем её в меню «Пуск» LiveDisk’а по пути:
- Программы WinPE – Жёсткий диск
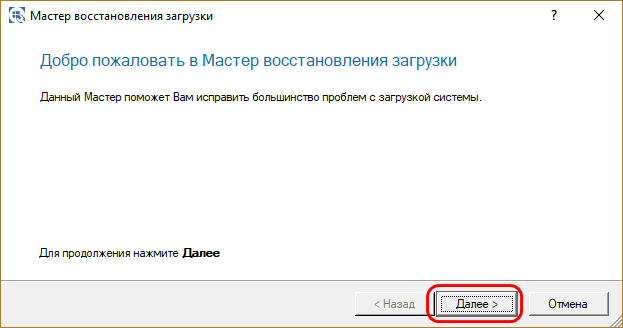
Выбираем раздел «Утилиты», в правой части окна кликаем «Мастер восстановления загрузки».
Жмём «Далее».
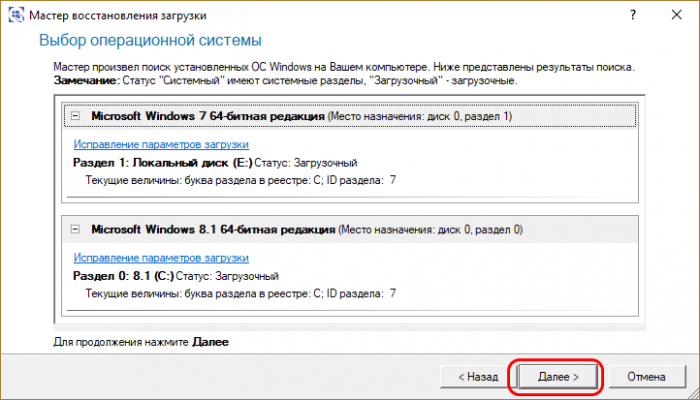
Выбираем один из типов восстановления MBR-загрузчика и следуем пошаговому мастеру.

Если вопрос стоит в восстановлении записи о загрузке исчезнувшей из меню загрузчика Windows, выбираем операцию «ОС Windows для корректирования». Программа произведёт поиск имеющихся на компьютере систем Windows и добавит их в меню загрузчика. Просто жмём «Далее».
И применяем изменения.
Затем жмём «Готово».
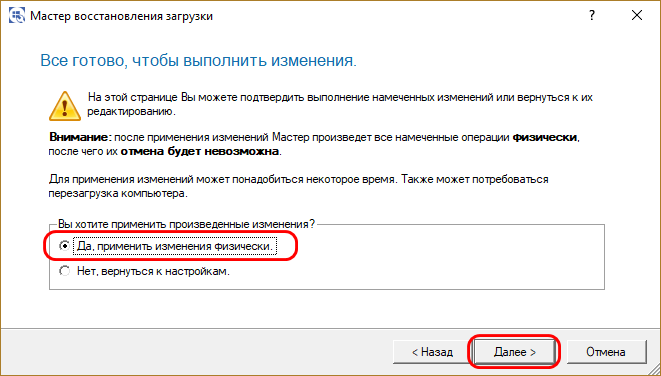
Если Windows — одна система, установленная на компьютере, и нужно просто восстановить её загрузку, первично пробуем операцию «Исправление параметров загрузки». Далее, как и в предыдущем случае, на запрос, хотим ли мы применить изменения, отвечаем «Да». Жмём «Далее», затем — «Готово».
Если операция исправления параметров загрузки не помогла, пробуем операцию «Исправление Master Boot record (MBR)». Она перезаписывает код MBR. Указываем нужный жёсткий диск с загрузчиком, в нашем случае диск один. Жмём «Далее».
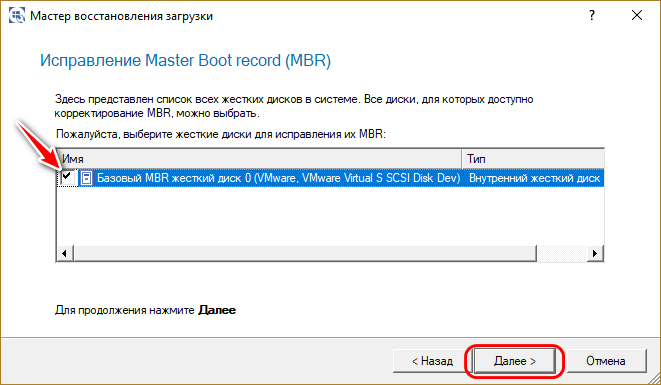
И, как и в первой операции, в окошке запроса на применение изменений отвечаем «Да». В итоге кликаем «Готово».
4. Восстановление MBR-загрузчика программой EasyBCD
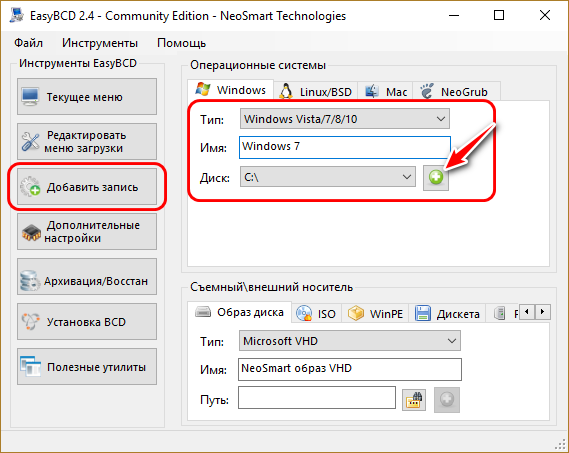
Ещё одна программа на борту LiveDisk’а Сергея Стрельца, которую можно использовать для починки MBR-загрузчика – EasyBCD. Она примечательна в первую очередь для тех, у кого на компьютере стоит несколько Windows. EasyBCD являет собой удобный GUI-интерфейс для добавления в меню загрузки нескольких Windows и редактирования параметров этого меню. Запускаем EasyBCD в меню «Пуск» LiveDisk’а по пути:
- Программы WinPE – Редакторы BCD
Чтобы добавить Windows в меню загрузки, в разделе программы «Добавить запись» в графе «Диск» указываем путь к нужной операционной системе. В графе «Имя» задаём ей удобное для нас имя. И жмём зелёную кнопку-плюсик для добавления записи о загрузке.
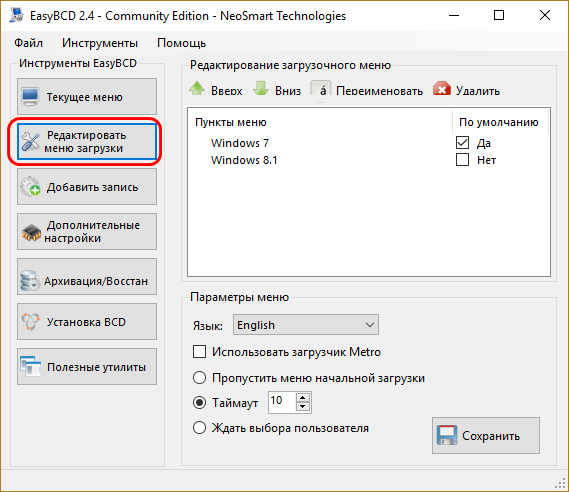
При необходимости корректируем меню загрузчика в разделе «Редактировать меню загрузки».
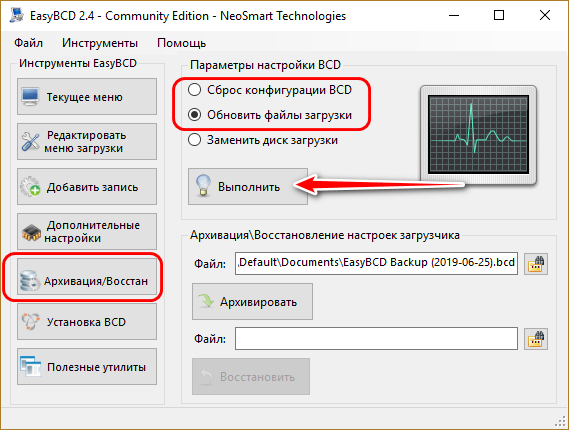
С помощью EasyBCD также можно попытаться восстановить повреждённый загрузчик Windows. Идём в раздел программы «Архивация/Восстановление». И пробуем параметры настройки BCD – сброс конфигурации BCD и обновление файлов загрузки. Пробуем эти параметры поочерёдно, задействуем их кнопкой «Выполнить».
5. Восстановление загрузчика Windows программой Dism++
Друзья, простейший юзабильный способ восстановления MBR-загрузчика может предложить программа Dism++, присутствующая в числе арсенала LiveDisk by Sergei Strelec. С её помощью можно выбирать, диск «приписки» Windows — т.е. жёсткий диск, если их несколько, и на каждом из них есть свой MBR-загрузчик. Читайте по этой программе отдельную статью «Восстановление загрузчика Windows программой Dism++».
***
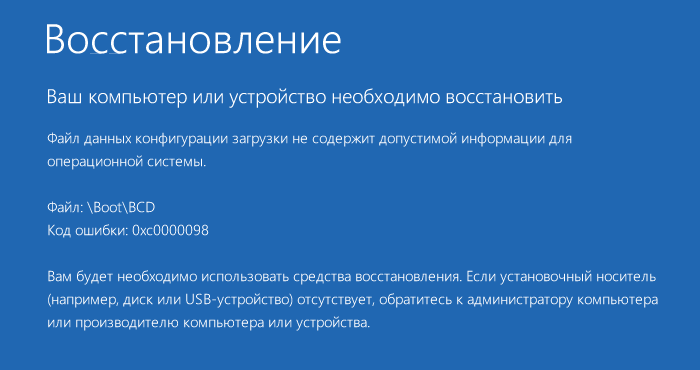
Вот такие на борту LiveDisk by Sergei Strelec имеются автоматизированные программные средства, с помощью которых можно попытаться восстановить загрузчик Windows на диске со стилем разметки MBR, не прибегая к процедуре его пересоздания. Но они, увы, не помогут, если с MBR-загрузчиком возникли серьёзные проблемы – отсутствуют его какие-то файлы, повреждён или удалён непосредственно его раздел. Например, когда мы видим на экране надписи типа:
- «BOOTMGR is missing» или
- «An operating system wasn’t found. Try disconnecting any drives that don’t contain an operating system.».
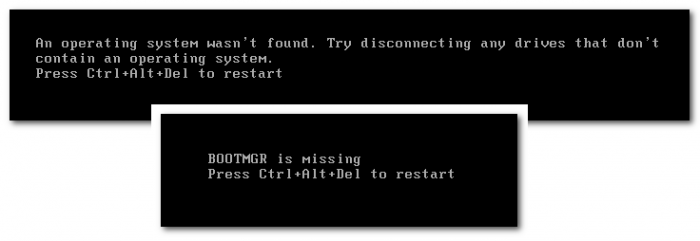
В таком случае загрузчик нужно только пересоздавать.
6. Пересоздание загрузчика
Пересоздание MBR-загрузчика – это пересоздание его раздела и создание заново файлов загрузчика. В части случаев достаточно будет лишь последней операции. Но мы будем смотреть на ситуацию универсально, с учётом тех случаев, когда имеет место быть повреждение раздела загрузчика. Первый этап процедуры мы выполним с помощью программы AOMEI Partition Assistant. На втором этапе задействуем командную строку WinPE LiveDisk’а Стрельца. Поехали…
Запускаем AOMEI Partition Assistant в меню «Пуск» LiveDisk’а по пути:
- Программы WinPE – Жёсткий диск
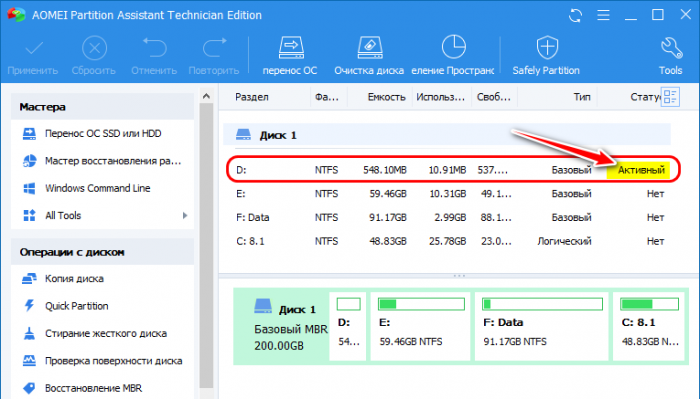
В окне программы смотрим карту дисков, находим раздел загрузчика. Это обязательно раздел со статусом «Активный», обычно это первый раздел MBR-диска, называется он «Зарезервировано системой» (англ. System Reserved). Объём его может быть разным – 100, 350, 500 Мб. Кликаем этот раздел и удаляем.
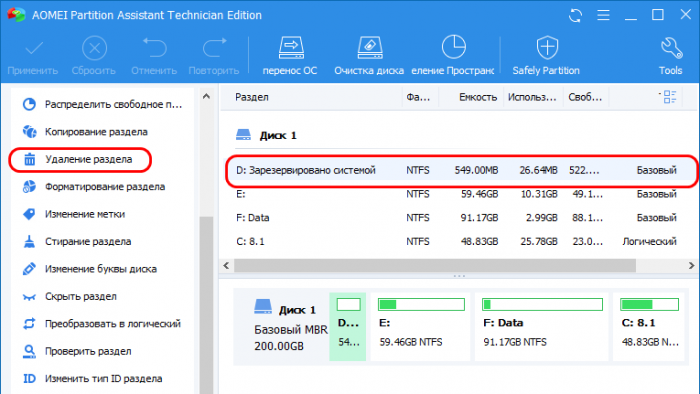
Далее на его месте кликаем образовавшееся нераспределённое пространство. И выбираем операцию «Создание раздела».

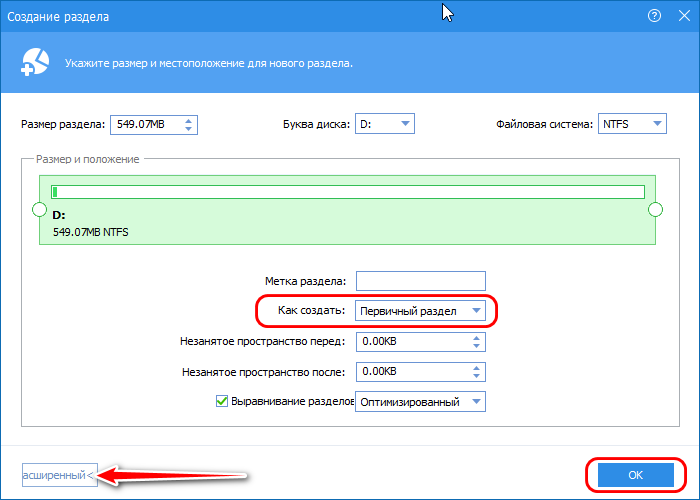
В форме создания раздела жмём кнопку «Расширенный». И в графе «Как создать» выбираем «Первичный раздел». Жмём «Ок».
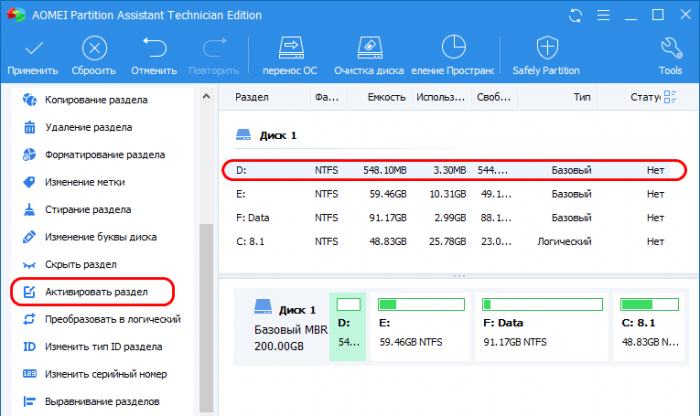
Кликаем новосозданный раздел и запускаем операцию «Активировать раздел».
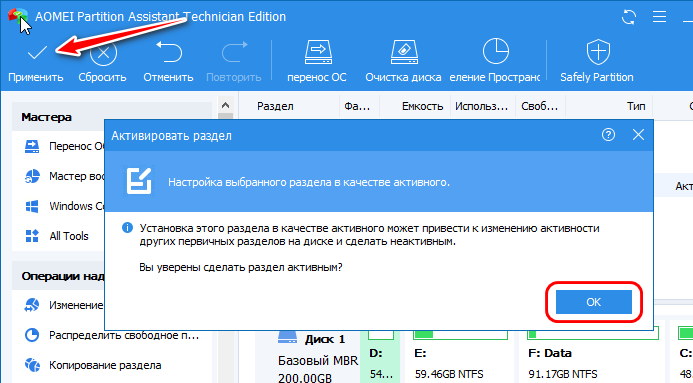
Подтверждаем настройку раздела в качестве активного. По итогу жмём кнопку «Применить» для запуска всех операций, которые мы только что назначили к выполнению.
По итогу должен получиться активный базовый раздел с файловой системой NTFS.
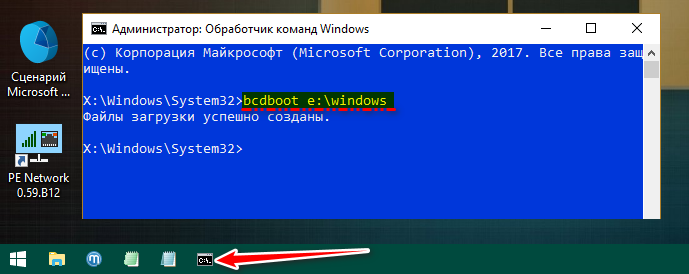
Раздел загрузчика пересоздан, теперь запускаем командную строку WinPE. В неё вписываем команду типа:
Только каждый в ней подставляет свою букву раздела вместо нашей E, ибо, как видим на карте дисков AOMEI Partition Assistant, именно под такой буквой раздел с Windows определился в среде WinPE.
Вот, собственно, и всё.
7. Работа с Windows без загрузчика
Если восстановить загрузчик Windows не получается, не стоит, друзья, расстраиваться, LiveDisk Сергея Стрельца – это такая замечательная штука, он сам может быть системным загрузчиком. На стартовом экране LiveDisk’а есть пункт загрузки «Search & Start Windows 7/8», который может запустить Windows в принципе без раздела загрузки, лишь бы с её системными файлами было всё в порядке. Подробнее об этом читайте в статье «Как запустить Windows без загрузчика: используем Live-диск by Sergei Strelec».
8. Переустановка Windows
Использование LiveDisk’а Стрельца для загрузки Windows – временное решение, хоть и длится оно может бесконечно долго, по сути, до тех пор, пока нам не понадобится флешка для иных нужд. Однако рано или поздно решать вопрос с загрузчиком надо, и если это не получилось сделать даже путём его пересоздания, остаётся последний вариант — переустановка Windows. Если в старой системе нет ничего важного, это можно сделать, как говорится, не отходя от кассы, прямо в среде LiveDisk’а Стрельца. С помощью присутствующего на его борту браузера можем зайти в Интернет и скачать дистрибутив любой нужной нам версии, редакции и сборки Windows. И установить систему с помощью утилиты 78Setup, являющей собой, по сути, родной процесс установки системы. Подробнее об этом читайте в статье «Как установить Windows с помощью Live-диска от Sergei Strelec».
MBR is one to boot your windows computer, it’s a small file which initiates the booting process, if you have ever caught message, MBR Missing Press Ctrl+Alt+Delete to Restart, here we’ll learn how to repair and restore MBR without Deleting your Data.
Hi everyone, welcome back to Intelligent Computing, today we’ll make you learn Boot Manager repair process, but before that, I’ll make you aware of MBR? What is MBR and why it stops your Windows to start.
Introduction to MBR (Master Boot Record)
Master boot record is the first ever sector in your hard drive which will initiate the loading process of windows in your RAM and thus your windows will boot up. It will hardly contain the list of files to be loaded to initiate the loading process of windows.
Below there is image (Image source: scx010c066.blogspot.com) shows you the partition on your windows computer drive. Where C drive start, where MBR is located and all.
The process of Booting of windows operating system involves the following: POST (Power On Self test) NTLDR (New Technology Loader: for Windows) MBR (Master Boot record) Windows Loading
Let’s Begin How to repair/Fix the MBR in Windows 7 or Windows 8 I assume you are seeing a Black screen having Message
MBR is Missing/Compressed/Dmanaged Press Ctrl+Alt+Del to restart
All you need to have a Bootable DVD or Windows 7/Windows 8 whatever OS you’ve installed.
Step 1 Insert the DVD in Optical drive and Press Ctrl+Alt+Del to restart your System.
Step 2 Once its being start, just start pressing the F12 key continuously, this will show you option to choose the drive to boot from, Select the DVD drive and Hit Enter
Step 3 You’ll be seeing message «Press any Key to Boot from CD/DVD…» Press any Key, Enter, Space or anything on keyboard.
Step 4 Windows will load the files to the temp drive and show you install option, don’t select install, and select the repair option from lower part of the Small windows there.
This will scan your drive and will ask you which OS is to repair, if you have one OS, it will be selected by default, Press Next.
Step 5 In next option, it will show options like Startup repair Systems restore System Image Recovery Windows memory Diagnostics Command prompt
From there select the Command Prompt option.
Step 6 In command prompt, Issue the following command
Bootrec /FixMbr // If you have Damaged MBR
Bootrec /Fixboot // If you’r MBR is having problem or Missing.
Bootrec /Rebuild //If you’re MBR is Compressed or unable to repair
After this command you’ll see message like this
Scanning all disks for Windows installations.
Please wait, since this may take a while…
Successfully scanned Windows installations. Total identified Windows installations: 0 The operation completed successfully.
After this you’re MBR is repaired or Rebuild, you can exit the command prompt and press restart, your computer will be starting as normal. Share this with your friends, link to this post on Forum and Facebook twitter and solve the problem of those your love once. Have great time don’t forget to be intelligent.
Whether caused by a virus, a new operating system or by simple mistake, being faced with an «Operating System not found» or similar error during your computer system’s boot up can be a nerve rattling experience. Assuming you have Microsoft’s Window 7 installed however, do not fear, such a boot error can often be resolved in just a few simple steps.
First, check your BIOS and hardware
In many cases, having Windows 7 fail to boot may be as simple as having your BIOS set with an incorrect boot order sequence. It can be quite common if you have more than one hard drive installed in your computer and your BIOS gets reset. Usually you can access your BIOS seconds after your computer turns on by pressing the Delete button or by pressing a specific function key. Once in the BIOS, check to see that your system drive is listed appropriately in the boot order sequence; you may need to refer to your motherboard manual for help.
Another possible reason for Windows not being detected upon start up is a hardware issue. If your BIOS is unable to detect your system drive, check to make sure all the cables are plugged in properly. If your hard drive is making an odd noise, such as a clicking sound, your hard drive may be broken. Finally, it is possible that the hard drive is having data corruption issues, which has damaged important system data, such as the Master Boot Record (MBR). If you suspect a faulty hard drive, it may be a good idea to backup and scan your hard drive for errors from another computer and possibly consider buying a replacement. Trying to repair a boot problem on a damaged drive can possibly lead to even more data loss, so backup your data before attempting anything.
The MBR and other important boot data can also be damaged by trying to install an earlier version of Windows, such as Windows XP, alongside Windows 7 and by third-party programs, such as viruses. In the case of a virus, it is recommended that you run a virus scan of the drive before attempting any repairs as otherwise it could lead to more data loss. It is further possible to achieve the appearance of damaged boot data by having the wrong drive partition set to active, which can be the outcome of an overly curious Windows user with administrative permissions.
Fixing the MBR and other start up problems in Windows 7 is most quickly accomplished by using the Windows 7 Installation DVD. If you do not have a Windows 7 Installation DVD however, you can alternatively use a Windows 7 System Recovery Disc, which we will show you how to create further down in this article. If you do not yet have either a Windows 7 Installation DVD or a recovery disc, do yourself a big favor and make a recovery disc right away to avoid any unnecessary headaches down the road.
Fixing the Master Boot Record (MBR)
Step one: Turn your computer on, booting from either your Windows 7 Installation DVD or Windows 7 System Recovery Disc. Remember, you may need to change the boot order inside your BIOS to have the your DVD drive boot first.
Step two: After the installation or recovery disc loads, if prompted, select your language settings and then continue. If you are using the installation DVD, when prompted by the following screen select Repair your computer.
Step three: The computer will take a moment now to scan itself for any Windows installations, after which you will likely be given a choice to select which installation you wish to repair. Select the appropriate Windows installation from the list and then continue. If by chance a problem is detected in one of your Windows installations at this initial stage, the system may also ask you if it can try to repair the problem automatically. It is up to you if you wish to let the system try to repair itself, but otherwise just select No.
Step four: Once you have reached the System Recovery Options screen, as shown below, you will be faced with a list of choices that can aid you in repairing a damaged Windows 7 operating system. If you wish to try the Startup Repair option first, it is often successful in automatically fixing many different start up issues, but in this article we will be using the Command Prompt option to resolve our problems manually. So, click Command Prompt to continue.
Step five: Now sitting at the command prompt, enter the following command and then press enter:
If successful, you should be greeted with the message The operation completed successfully. That’s it! Your Master Boot Record has been repaired.
While the above command does fix the MBR, and sometimes that is enough, there still might be an error with the system partition’s boot sector and Boot Configuration Data (BCD). This might occur if you have tried to install another operating system alongside Windows 7, such as Windows XP. To write a new boot sector, try the following command:
If you are still faced with your Windows 7 installation not being detected during start up, or if you wish to include more than one operating system choice to your system’s boot list, you can try the following command to rebuild your BCD:
The above command will scan all your disks for other operating systems compatible with Windows 7 and allow you to add them to your system’s boot list. If this fails, you may need to backup the old BCD folder* and create a new one in its place with the following commands:
*Some users also find simply deleting the boot folder and retrying the above steps effective at resolving boot issues, but it is not recommended.
How to change active partitions
Upon purposely changing the active partition on my system drive, I was faced with a BOOTMGR is missing error during my system’s start up that prevent Windows from starting. It is a common mistake to make when playing with partitions on a system drive and it can be a headache to solve if not prepared. To change your active partition back using the Windows 7 recovery disc or Installation DVD, follow the steps below.
Step one: Follow steps one to four in the above guide. This should take you to the Command Prompt in the Windows Recovery Environment.
Step two: Type DiskPart and then press Enter.
Step three: Type List Disk now and then press Enter. This command will list all disks attached to your computer and assign them a disk number.
Step four: Type Select Disk x, where x is the number for the disk containing the partition you wish to make active. Press Enter.
Step five: Type List Partition and then press Enter. You will now be shown a list of the partitions on the selected disk. Determine which partition you wish to make active.
Step six: Type Select Partition x, where x is the number of the partition you wish to make active.
Step seven: Now, just type Active and then press Enter. That should be it — the selected partition is now active.
How to create a Windows 7 System Recovery Disc
Windows 7 makes it easy to create a System Recovery Disc if you already have Windows 7 installed and running.
Step one: Click Start > All Programs > Maintenance > Create a System Repair Disc
Step two: Insert a blank CD or DVD into your disc drive.
Step three: Click Create disc and let the program do its thing.
That’s it! It only needs to write about 140- to 160-megabytes to the disc, depending on whether your OS is 64-bit or 32-bit, and that should only take a minute. If you do not have a CD/DVD-R drive to create a recovery disc with, you can alternatively download the ISO image of the Windows 7 System Recovery Disc and use it to make a bootable USB flash drive.
How to create a Windows 7 System Recovery USB flash drive
Step one: If you do not have a DVD drive, download the appropriate Windows 7 Recovery Disc image from Here. You will need a torrent client for this step, such as µTorrent. Alternatively, if you have a DVD drive, you can use an existing Windows 7 Installation DVD or a Windows 7 Recovery Disc when at step seven.
Using a Windows 7 Installation DVD at step seven will also allow you to install Windows 7 via USB, not just recover a damaged system; very useful if you have a netbook!
Step two: Open a command prompt with administrative rights. To do this, click Start > All Programs > Accessories and then right click Command Prompt, followed by clicking Run as administrator.
Step three: After accepting any UAC verification questions, you should now be at the command prompt. Make sure your USB flash drive is plugged in and then type DiskPart, followed by pressing Enter.
Step four: Type List Disk and then press Enter. Determine which disk number corresponds to your USB flash drive. In the following scenario, Disk 1 corresponds to our USB drive since we know our USB drive has a capacity of 2-gigabytes.
Step five: Enter the following commands in order, changing the disk number to the disk number listed for your USB drive. Warning — the following commands will erase everything on your USB drive or the disk you select.
Step six: After DiskPart successfully formats the USB drive, which might take a few minutes, you will want to enter the following commands:
Step seven: You will now need to copy the contents of the ISO image you downloaded, or the contents of a DVD you wish use, to the USB flash drive. There should be two folders and a file in the ISO image that need to be copied. To extract the files contained within an ISO image, you will need to use a program such as WinRAR. You can download WinRAR from here.
Step eight: Now that the files are copied, we will want to make the USB drive bootable. To accomplish this however we will need to download a small file called bootsect.exe; it can be downloaded from here or here. The file can also be found in the boot directory of the Windows 7 Installation DVD. Once downloaded, place the bootsect.exe file in the root directory of your USB flash drive.
Step nine: Back at the command prompt, we will want to change the current directory to that of the USB drive and run the bootsect command. In our case this is drive E, so we will be using the following respective commands:
The bootsect command will update the target volume with a compatible bootcode. If all goes well, you should now have a bootable USB recovery drive; just remember to add the USB drive to the boot list in your system’s BIOS for it to work upon start up.
It can happen that your MBR will be corrupted/damaged after a cold-start of your PC and then you need to know how to fix the MBR in Windows 7. Usually, you will encounter the dreaded error message: «Operating System not found». There’s a really easy command that can be executed via the command line utility to fix it. But how to access the command line tool without operating system in the first place?
Fix MBR – Operating system not found
-
Start PC, Insert Windows 7 DVD and hit a key when asked to. You may have to change your boot order to boot from DVD!
-
Click on «Repair your computer»:
The installer will scan your PC for previous Windows installations:
-
Click on Command Prompt
-
Enter the following command on one line: bootrec.exe /fixmbr Fix MBR (Operating system found/logged on)
-
On boot up press F8 and select «Repair your computer».
-
Next, Windows 7 will automatically search for errors. Let it check for errors and when it’s done close the window. At the bottom you will see the «Command Prompt» tool. Click on it.
-
Enter the command
bootrec.exe /fixmbr
-
Insert the Installation DVD and let PC boot from the DVD Drive, If you are using an older PC you would have to change this from BIOS, Press F10 or DEL when system reboots, it will take you to BIOS settings from where you can change the Boot Device Options.
-
Now choose your default «Language», «Time» and «Keyboard Input» on the first Windows that appears on the Display Screen.
-
If you have done everything above correctly you will see three options >> Click on «Repair your Computer» to get into System Recovery Window.
System Recovery tool in Windows 7 allows you to recover the previous files that might have been altered by installation of a new software, game or similar stuff. Sometimes mischievous viruses are cause of Master Boot Record Malfunction.
-
Now once your System Recovery Windows is open, choose Command Prompt and run «bootsect.exe» which is located in boot folder so change your directory to boot.
-
Now if you have a copy of previous Windows 7 OS installed in C partition run command «bootsect /nt60 C:» you can change C with other partitions if Windows was installed in other partitions.
-
If you are unsure about which partition your OS is installed, use this alternative run command, type «»bootsect /nt60 SYS» or «bootsect /nt60 ALL» to repair OS installed in any partition in your hard disk drive.
-
Eject the DVD >> Restart your PC >> your problem should have been sorted and computer should now boot from Windows 7.