
Привет, Хабр! Сегодня делимся гайдом по началу работы с Windows Terminal. Да, поскольку он о начале работы с инструментом, в основном в материале описываются какие-то базовые моменты. Но я думаю, что и профессионалы смогут подчерпнуть для себя что-то полезное, как минимум из списка полезных ссылок в конце статьи. Заглядывайте под кат!
Установка
Windows Terminal доступен в двух разных сборках: Windows Terminal и Windows Terminal Preview. Обе сборки доступны для загрузки в Microsoft Store и на странице выпусков GitHub.
Требования
Для запуска любой сборки Windows Terminal на вашем компьютере должна быть установлена Windows 10 1903 или более поздняя версия.
Windows Terminal Preview
Windows Terminal Preview — это сборка, в которой в первую очередь появляются новые функции. Эта сборка предназначена для тех, кто хочет видеть новейшие функции сразу после их выпуска. Эта сборка имеет ежемесячный цикл выпуска с новейшими функциями каждый месяц.
Windows Terminal
Терминал Windows — это основная сборка продукта. Функции, которые поступают в Windows Terminal Preview, появляются в Windows Terminal через месяц эксплуатации. Это позволяет проводить обширное тестирование ошибок и стабилизацию новых функций. Эта сборка предназначена для тех, кто хочет получить функции после того, как они были изучены и протестированы сообществом Preview.
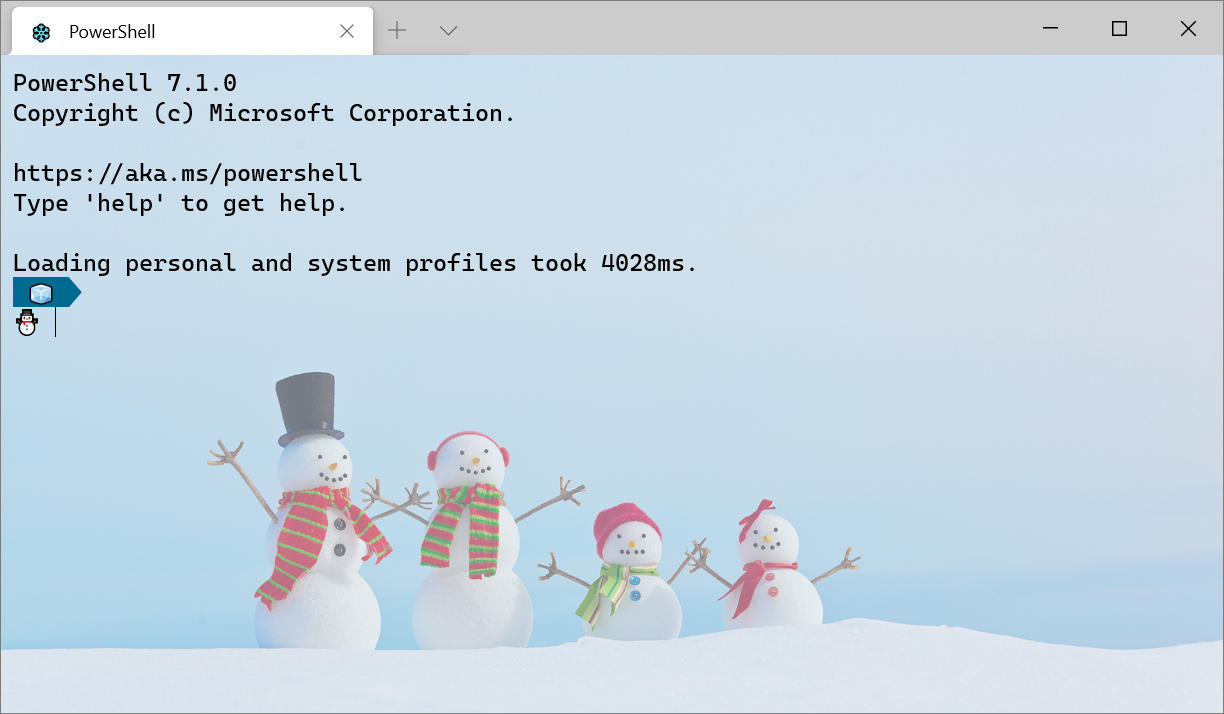
Первый запуск
После установки терминала вы можете запустить приложение и сразу приступить к работе с командной строкой. По умолчанию терминал включает профили Windows PowerShell, Command Prompt и Azure Cloud Shell в раскрывающемся списке. Если на вашем компьютере установлены дистрибутивы Подсистемы Windows для Linux (WSL), они также должны динамически заполняться как профили при первом запуске терминала.
Профили
Профили действуют как различные среды командной строки, которые вы можете настраивать внутри терминала. По умолчанию в каждом профиле используется отдельный исполняемый файл командной строки, однако вы можете создать столько профилей, сколько захотите, используя один и тот же исполняемый файл. Каждый профиль может иметь свои собственные настройки, которые помогут вам различать их и добавить в каждый свой собственный стиль.
Дефолтный профиль
При первом запуске Windows Terminal в качестве профиля по умолчанию устанавливается Windows PowerShell. Профиль по умолчанию — это профиль, который всегда открывается при запуске терминала, и это профиль, который открывается при нажатии кнопки новой вкладки. Вы можете изменить профиль по умолчанию, установив «defaultProfile» на имя вашего предпочтительного профиля в файле settings.json.
"defaultProfile": "PowerShell"Добавление нового профиля
Новые профили можно добавлять динамически с помощью терминала или вручную. Терминал Windows автоматически создаст профили для распределений PowerShell и WSL. Эти профили будут иметь свойство «source», которое сообщает терминалу, где он может найти соответствующий исполняемый файл.
Если вы хотите создать новый профиль вручную, вам просто нужно сгенерировать новый «guid», указать «name» и предоставить исполняемый файл для свойства «commandline».
Примечание. Вы не сможете скопировать свойство «source» из динамически созданного профиля. Терминал просто проигнорирует этот профиль. Вам нужно будет заменить «source» на «commandline» и предоставить исполняемый файл, чтобы дублировать динамически созданный профиль.
Структура Settings.json
В Терминал Windows включены два файла настроек. Один из них — defaults.json, который можно открыть, удерживая клавишу Alt и нажав кнопку «Настройки» в раскрывающемся списке. Это неизменяемый файл, который включает в себя все настройки по умолчанию, которые поставляются с терминалом. Второй файл — settings.json, в котором вы можете применить все свои пользовательские настройки. Доступ к нему можно получить, нажав кнопку «Настройки» в раскрывающемся меню.
Файл settings.json разделен на четыре основных раздела. Первый — это объект глобальных настроек, который находится в верхней части файла JSON внутри первого {. Примененные здесь настройки повлияют на все приложение.
Следующим основным разделом файла является объект «profiles». Объект «profiles» разделен на два раздела: «defaults» и «list». Вы можете применить настройки профиля к объекту «defaults», и они будут применяться ко всем профилям в вашем «list». «list» содержит каждый объект профиля, который представляет профили, описанные выше, и это элементы, которые появляются в раскрывающемся меню вашего терминала. Настройки, примененные к отдельным профилям в «списке», имеют приоритет над настройками, примененными в разделе «defaults».
Далее в файле расположен массив «schemes». Здесь можно разместить собственные цветовые схемы. Отличный инструмент, который поможет вам создать свои собственные цветовые схемы, — это terminal.sexy.
Наконец, в нижней части файла находится массив «actions». Перечисленные здесь объекты добавляют действия в ваш терминал, которые можно вызывать с клавиатуры и/или находить внутри палитры команд.
Базовая кастомизация
Вот несколько основных настроек, которые помогут вам начать настройку вашего терминала.
Фон
Одна из самых популярных настроек — настраиваемое фоновое изображение. Это настройка профиля, поэтому ее можно либо поместить внутри объекта «defaults» внутри объекта «profiles», чтобы применить ко всем профилям, либо внутри определенного объекта профиля.
"backgroundImage": "C:\Users\admin\background.png"Параметр «backgroundImage» принимает расположение файла изображения, которое вы хотите использовать в качестве фона вашего профиля. Допустимые типы файлов: .jpg, .png, .bmp, .tiff, .ico и .gif.
Цветовая схема
Список доступных цветовых схем можно найти на нашем сайте документации. Цветовые схемы применяются на уровне профиля, поэтому вы можете поместить настройку внутри «значений по умолчанию» или в конкретный объект профиля.
"colorScheme": "COLOR SCHEME NAME"Этот параметр принимает название цветовой схемы. Вы также можете создать свою собственную цветовую схему и поместить ее в список «schemes», а затем установить в настройках профиля имя этой новой схемы, чтобы применить ее.
Начертание шрифта
По умолчанию Windows Terminal использует Cascadia Mono в качестве шрифта. Начертание шрифта — это настройка уровня профиля. Вы можете изменить шрифт, установив «fontFace» на имя шрифта, который вы хотите использовать.
"fontFace": "FONT NAME"`Совет: Терминал Windows также поставляется с начертанием шрифта Cascadia Code, который включает программные лигатуры (см. Gif ниже). Если вы используете Powerline, Cascadia Code также поставляется в PL-версии, которую можно загрузить с GitHub.

Полезные ресурсы
Докуметация Windows Terminal
Скотт Хансельман: как сделать красивым Windows Terminal с помощью Powerline, шрифтов Nerd, кода Cascadia, WSL и oh-my-posh
Скотт Хансельман: Как настроить терминал с помощью Git Branch, Windows Terminal, PowerShell, + Cascadia Code!
Скотт Хансельман: Windows Terminal Feature PREVIEW – Кастомизируйте свои привязки клавиш, цветовые схемы, панели, и многое другое!
>_TerminalSplash – темы Windows Terminal
Впервые новая оболочка для команд Windows 11 и Windows 10 была представлена в мае 2020, а уже осенью была выпущена первая стабильная версия. С тех пор Windows Terminal продолжает обновляться, но уже сейчас более чем пригоден к работе как с командной строкой или PowerShell, так и другими оболочками, например, Ubuntu, установленной в рамках WSL (Подсистема Windows для Linux).
В этом обзоре — базовые сведения о том, где скачать и как настроить Windows Terminal, о некоторых его возможностях и дополнительная информация, которая может оказаться полезной.
Где скачать Windows Terminal
Прежде чем приступить, два важных примечания: в Windows 11 Терминал Windows уже встроен (нажмите правой кнопкой мыши по кнопке Пуск и вы сможете его запустить), а для работы нового терминала в Windows 10 требуется версия 1903 или новее.
Бесплатно скачать Windows Terminal можно из двух официальных источников:
- Microsoft Store — достаточно ввести Windows Terminal в поиске магазина или перейти на страницу приложения https://www.microsoft.com/ru-ru/p/windows-terminal/9n0dx20hk701

- Загрузить последний релиз из GitHub, скачиваем файл .msixbundle из раздела Assets и устанавливаем его как обычное приложение — https://github.com/microsoft/terminal/releases/

После установки Windows Terminal готов к работе — можно запускать. При первом старте по умолчанию будет открыта вкладка с PowerShell.

Использование Windows Terminal, возможности управления
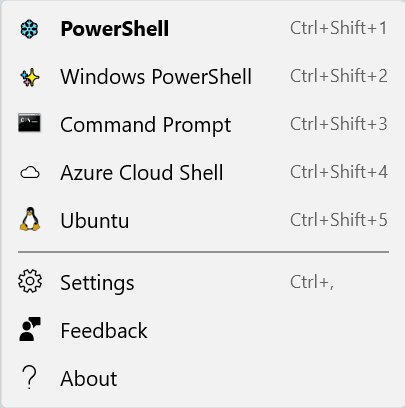
Скорее всего, с открытием новых вкладок с командной строкой, PowerShell и другими оболочками проблем не возникнет, достаточно нажать «+» если требуется открыть новую вкладку с консолью по умолчанию, либо по стрелке и выбрать нужную оболочку, там же можно увидеть и сочетания клавиш для быстрого открытия соответствующих новых вкладок.
Не будем торопиться с переходом к настройкам Windows Terminal, для начала некоторые вещи, которые вы можете сделать, не переходя к ним:
- Сочетания клавиш Ctrl + «+» и аналогичное сочетание с клавишей «минус» позволяет изменить размер текста в текущей вкладке.

- Нажмите клавиши Alt+Shift+D, чтобы разделить текущую вкладку на две панели. Действие можно повторять: выделенная панель будет разделяться при нажатии этих клавиш. Если вместо D использовать клавишу «минус» или «плюс», разделение будет происходить горизонтально и вертикально соответственно.

- Для панелей доступны и другие клавиши: Ctrl+Shift+W — закрыть текущую, Alt+Shift+стрелки — изменение размеров, Alt+стрелки — переключение между панелями.
- Если в Windows включены эффекты прозрачности, удержание клавиш Ctrl+Shift и вращение колеса мыши вниз позволяет сделать активное окно Windows Terminal более прозрачным.
- Windows Terminal добавляет пункт в контекстное меню Windows, позволяющий быстро запустить оболочку по умолчанию в текущей вкладке.

- «Стандартные» сочетания клавиш, такие как копирование и вставка, отмена (Ctrl+Z) и другие здесь также исправно работают.
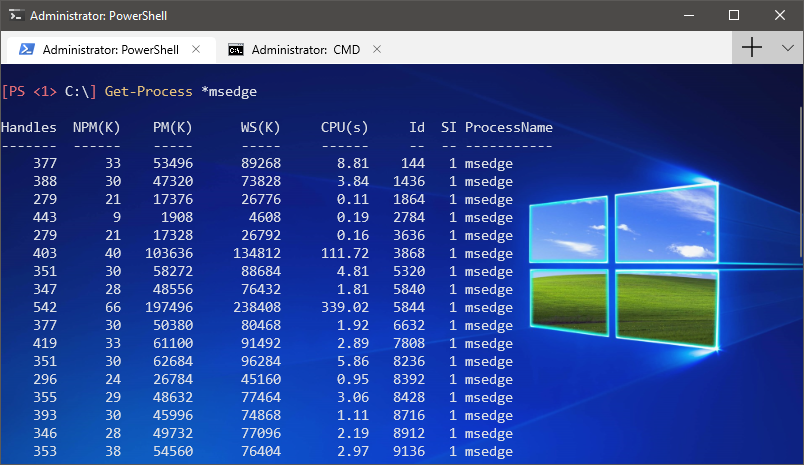
- Если вам нужно запустить Windows Terminal от имени администратора, можно использовать правый клик по нему в меню «Пуск» и выбор нужного пункта в разделе «Дополнительно» или, поиск в панели задач, как на изображении ниже.


Настройки
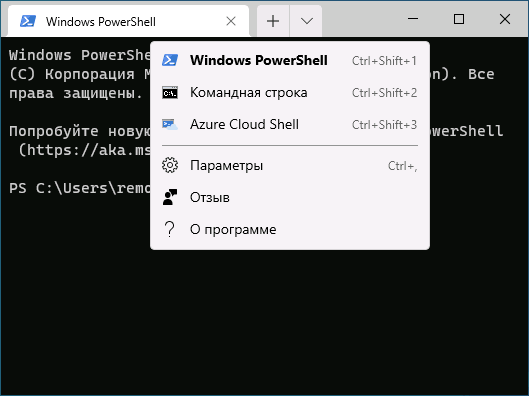
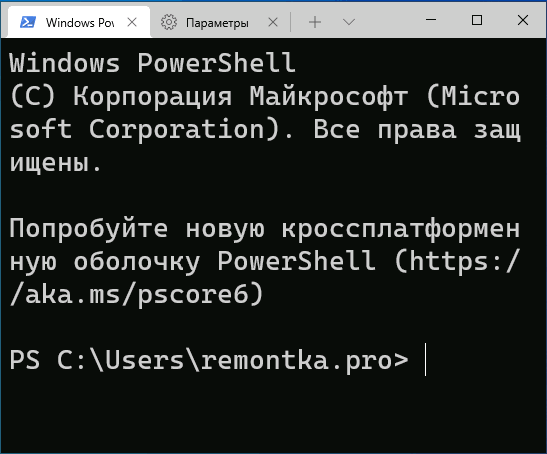
Зайти в настройки Windows Terminal можно, нажав по кнопке со стрелкой или же с помощью сочетания клавиш Ctrl + «запятая». Параметры меняются от версии к версии и на момент написания этого обзора выглядят следующим образом:

Большинство вкладок вполне понятны и на русском языке:
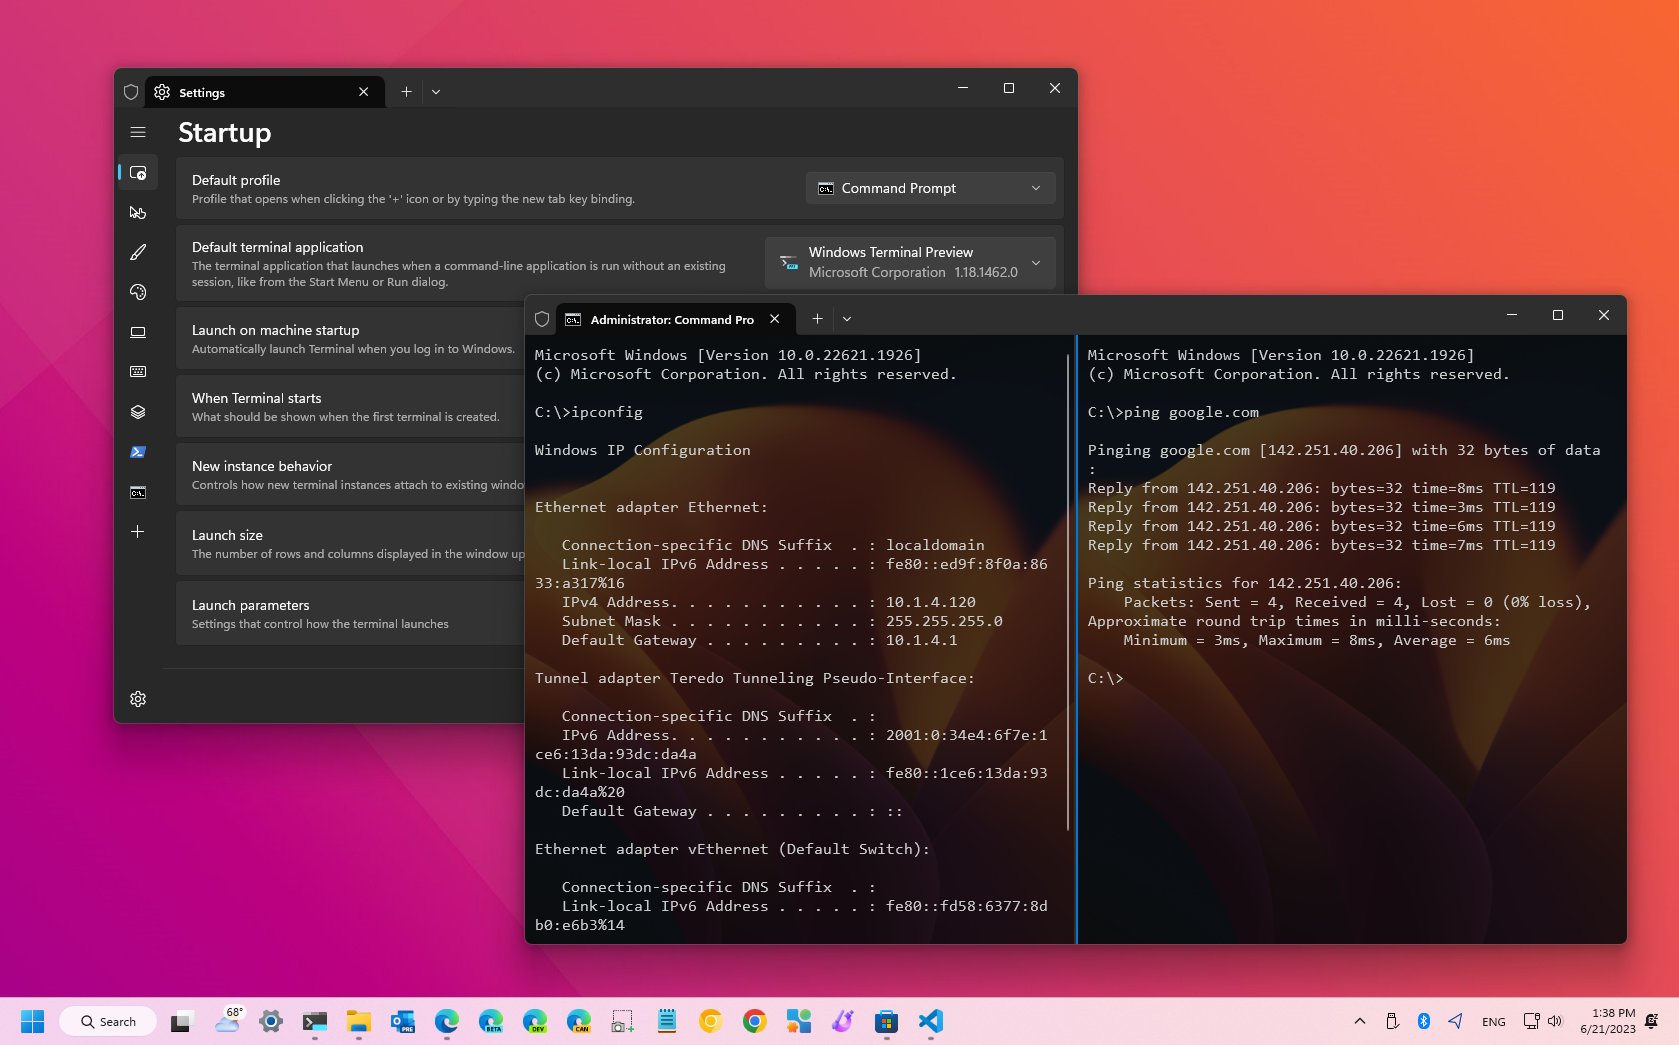
- На вкладке «Запуск» можно выбрать оболочку по умолчанию, например, выбрать «Командная строка» вместо «Windows PowerShell», включить автозапуск, изменить режим запуска.
- Вкладки «Оформление» и «Цветовые схемы» позволяют изменить общие параметры оформления приложения, а также отредактировать цветовые схемы (их мы можем указать отдельно для каждой консоли в разделе «Профили»), при необходимости — создать собственную цветовую схему.
- В разделе «Действия» — базовые сочетания клавиш для работы в Windows Terminal. Эти сочетания подлежат редактированию в файле конфигурации.
- Если перейти в подраздел «Профили», мы можем настроить отдельные параметры оформления, запуска, значка, папки запуска, прозрачности и другие для каждой «командной строки». В оформлении можно не только выбрать цветовую схему и настроить прозрачность (акриловый эффект), но и задать обои для соответствующих вкладок.

- Настройки в достаточной мере гибкие и скриншот ниже — далеко не всё, чего можно добиться.

- При нажатии кнопки «Добавить», вы можете добавить собственную консоль в Windows Terminal (или использовать системную — тот же PowerShell или Командную строку, но с другим профилем настроек).
- Кнопка «Открытие файла JSON» позволяет открыть файл конфигурации для редактирования.


Если после проделанных экспериментов с настройками вам потребуется сбросить все параметры Windows Terminal на настройки по умолчанию, достаточно проделать следующие шаги:
- Запустите Windows Terminal и перейдите в его параметры.
- Нажмите «Открытие файла JSON» и откройте его в текстовом редакторе.
- Удалите всё содержимое файла и сохраните файл.
- Закройте и снова запустите Windows Terminal — он будет запущен с настройками по умолчанию.
In early 2024, Microsoft replaced the long-standing Command Prompt application with a newer Terminal app. This is a host application for command-line interfaces like Command Prompt, Powershell, and bash, giving you access to a range of commands for Windows that were previously segmented into different apps. You can still use all the same Command Prompt commands you know and love, but can now also enjoy tabbed windows, GPU accelerated text tendering, and the ability to customize window themes.
If you know your way around Command Prompt already, you’ll know most of what you need to use Terminal. But there are some new tips and tricks you might want to look over. Whether you’re a beginner with these kinds of apps, or a well-versed professional, here’s how to use Terminal in Windows 11.
How to access Terminal in Windows 11

There are a lot of different ways to access the Terminal, but the most straightforward is to use the Windows search to look for “Terminal,” and then select the corresponding result.
Some commands won’t run in Terminal without the appropriate permissions, so if you run into difficulty, try right-clicking on the Terminal icon and selecting Run as Administrator instead.
How to use Terminal
As with the aged Command Prompt and Powershell applications, to input commands into Terminal, you’ll need to type them out in a specific order with correct spacing and special character usage. If you’ve ever done any programming, it’ll feel a little familiar. You input the command with correct spelling, syntax, and context, and you’ll get the result you want. If you don’t do all that right, it won’t do anything but let you know you did something wrong.
You can use Command Prompt or Powershell commands in Terminal. You can find a list of the most useful commands below, but let’s first cover opening the right kind of tab for the sort of commands you want to run, and adjusting some of Terminal’s settings.
Opening a new tab in Terminal

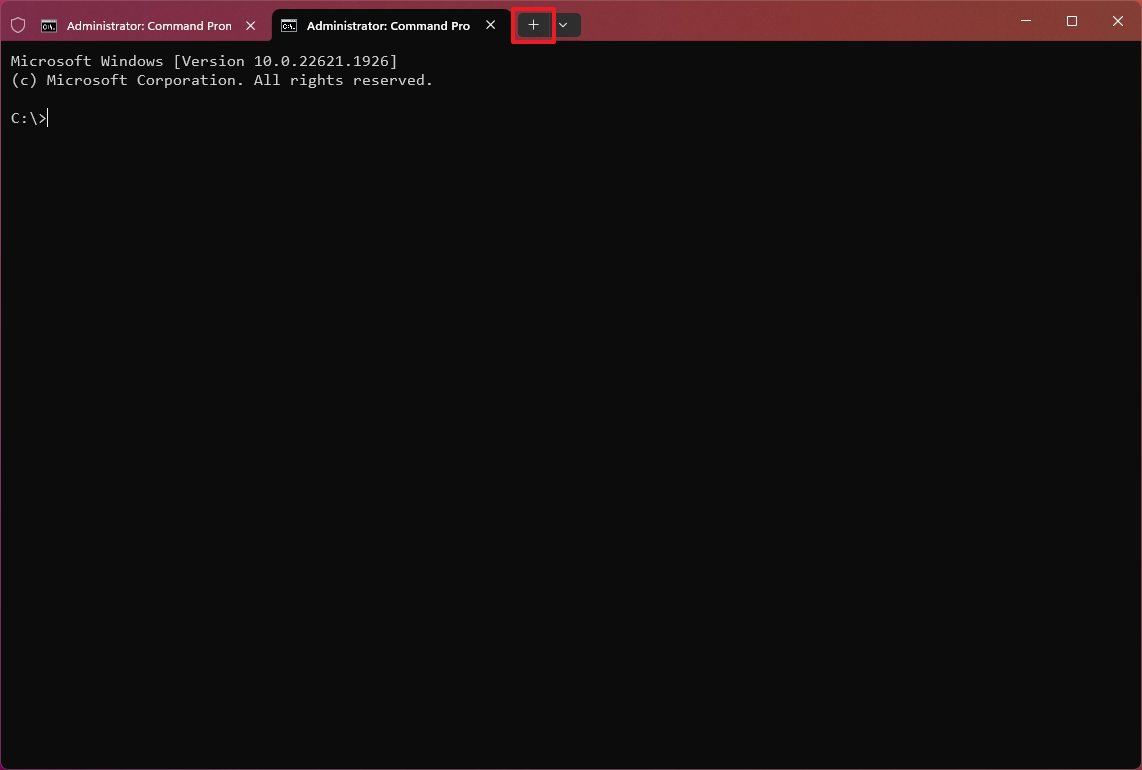
To open a new tab in Terminal, you can press Ctrl+Shift+T to open a new tab of the same type you have open already. Alternatively, select the + symbol.
If you want to open a specific type of Terminal tab, select the drop-down arrow next to the + icon, then choose the type of tab you want.
Important settings

You can access Terminal’s settings by selecting the drop-down arrow at the top of the window, followed by Settings. There you’ll find a range of options you might want to tweak to customize your Terminal experience. Here are some of the options to consider:
- Startup: Here you can adjust which profile that opens with the Terminal (Command Prompt, Powershell, etc.). You can also adjust whether it runs at Windows startup, and the launch size of the window.
- Appearance: This lets you tweak how the Terminal window looks, including whether it uses a dark or light theme, the size of the tabs, whether they’re animated, and more.
- Color schemes: Here you can choose the color palette used for your Terminal window. Customize one and you can have it trigger as soon as you select a certain profile.
- Actions: Here you’ll find an exhaustive list of Terminal commands and keyboard shortcuts you can use. This is a great way to find ones that can speed up your use of Terminal, but you can also select Add new at the top of the window to create your own new shortcut command.
- Profiles: These are the individual profiles for each of the Terminal window types. Select them to customize their name, icon, whether they should run as administrator, and to give them specific themes or color schemes.
The most useful commands
You don’t need to know all of the Command Prompt commands to find some use in it. These are our favorites and some of the ones we consider the most useful.
Note: Finding it hard to remember commands? Try using Terminal’s new Command Palette. Just press Ctrl+Shift+P and you’ll get a handy list of clickable shortcuts to all the most command commands. You can even narrow them down by typing in the first few letters.
Help — Arguably the most important of all Command Prompt commands, typing “help” will give you a list of available commands. If you don’t learn anything else from this guide, know that “help” is only four short letters away if you ever fall down a CMD rabbit hole.
“command” /? — While it requires you to input a command in the quoted section (without the quote marks), this one will tell you everything you need to know about any of the commands on this list. It’s great to use if you want more detailed information about what the commands do and to see examples of how they work.
TRACERT — Should you want to track your PC’s internet traffic, this command lets you track the number of intermediate servers your packets go through, the time each transfer requires, and the name or IP address of each server.
IPConfig — If you have networking issues, IPConfig will be very useful for all sorts of reasons. Running it tells you a lot about your PC and your local network, including the IP address of your router, the system you’re using at the time, and the state of your various network connections.
Ping — Need to confirm whether your internet is officially down or if a software problem is causing an issue? Ping something. It doesn’t matter whether it’s Google.com or your own personal remote server. Whatever you choose, if you get a response, you know a connection is there. This command is also useful for checking if local network systems are functioning properly.

Chkdsk — Check Disk, written as “Chkdsk,” looks at your chosen drive for errors. Although there are plenty of Windows and third-party tools for checking a drive for errors, Check Disk is a classic that works well and could save you from losing data if it finds a problem early enough.
SFC — Short for System File Checker, the command “SFC /scannow” will scan through all of the Windows system files to look for any errors and repair them if it can. Warning: This one can take some time.
Cls — Command Prompt command results might be useful, but they aren’t the most well-organized or easy to read. If the screen is getting too full, just type “Cls” and hit enter to clear it.
Dir — If you’re using the Command Prompt to browse your file system, the “Dir” command will display all files and folders within the current folder. You can also add an /S and use it as a search when you want to find something specific.

Netstat — This command displays all sorts of information about existing connections to your PC, including TCP connections, ports on which your system is listening, Ethernet statistics, and the IPRouting table.
Exit — This does exactly what you would expect it to do. Don’t want to reach for the mouse or can’t seem to click that “X” in the top-right corner? Just type “exit” and hit enter to leave the Command Prompt behind.
Tasklist — Tasklist gives you immediate data on all the tasks that Windows is currently operating. You can add switches (such as “-m”) to dig down into more detail about these tasks and how they work, which is very useful for diagnosing any potential problems. It’s no surprise that this is often followed up by the “Taskkill” command, which is used to force specific tasks to end.
Shutdown — Although you don’t necessarily need to shut down your Windows 10 or 11 PC at night, you can do it through the Command Prompt and Start Menu. Just type “shutdown” and hit enter, and your PC will put itself to bed.
Lesser-known but still worthwhile commands
Not all of the Command Prompt commands are ones you’ll need to use regularly, but that doesn’t mean there aren’t some handy functions among the less common ones. These are some of our favorites that often fly under the radar.
Ipconfig /flushdns — This is an extension of the IPConfig command, and it’s useful when you’re running into bizarre network or connection issues or change your DNS server. This one will often clear up any problems you have. This clears the Windows cache of DNS details, meaning that Windows will start using your preferred option instead.
Assoc — This command is used to view and change file associations, meaning the type of file, like .txt, .doc, etc. Typing “assoc [.ext]” — where ext is the file type in question — will tell you what it stands for, and “.txt” will tell you that it’s a text file. If you want to change that, you can type something like “assoc .log=txtfile” and all .log files will then be considered text files.
Note: This is a powerful command and should be used with caution. CommandWindows has a detailed guide on its more advanced functions.
Cipher — Cipher can be used to view and alter encryption information for your system’s files and folders. Depending on the additional parameters applied, you can have it encrypt files to protect them from prying eyes, create new encryption keys, and search for existing encrypted files. For the full list of parameters, Microsoft’s breakdown is comprehensive.
Finger — Finger is used to collect information about users on the computer or a connected remote computer. It’s often used to see what a specific user is doing or where they are, digitally speaking. It can be used with a specific computer or an IP address.
Deltree — Deltree is used to specify a particular file or directory path and delete it entirely, removing everything that used to be at that location. This can be a dangerous command for newcomers to use, so do so with caution, but it’s useful for users who want to get rid of data quickly.
Telnet — Telnet is not commonly used for accessing modern devices remotely, but some still require setup through the Terminal Network (Telnet) protocol. It’s not activated in Windows 10 or 11 by default, so to use it, you’ll need to turn it on. Start by going to the Windows search bar at the bottom of the screen and typing in “Telnet.” Windows is smart enough to suggest the right location. Select Turn Windows Features On or Off to open the window.
Scroll down until you find Telnet Client. Things are more or less in alphabetical order, which can help you find it. When you see it, make sure the box beside it is checked, then select OK. Windows will search for the necessary files and enable the software, then let you know you need to reboot to complete the changes. Do this and start back up!

Once enabled, Telnet can let you access remote devices or servers, though bear in mind it is completely unencrypted (a hacker’s dream). Commands will be very situation-specific but will look something like “telnet DigitalTrends.com 80,” which would have you attempt to connect to DigitalTrends.com on the 80 port. It won’t work, but that’s what a typical command might look like.
& — This command will let you run two commands at once. All you need do is put “&” between them, and both will execute at the same time.
| clip — Putting this command after your original command will copy the output directly to your clipboard. Say you want to copy down your IPConfig information — all you’d need to input is “ipconfig | clip” and the results will be added to your clipboard, so you can paste them anywhere you like.
You can also copy and paste in a similar manner to the main Windows interface.
nslookup — Want to find the IP address of any website? This command will do it for you. Simply type “nslookup” followed by the URL in question, and the Command Prompt will spit out an IP address.
A few additional tricks
Although the above commands are the most useful when using the Command Prompt, there’s more you can do. In learning how to use the Command Prompt, it’s also good to note these handy tricks.
Function keys — Although not so commonly used in modern software, the Function (F) keys can do quite a lot in a Command Prompt setting:
- F1 lets you paste in your last command, character by character.
- F2 pastes the last command only to a specified character.
- F3 pastes it entirely.
- F4 deletes a command up to a specified character.
- F5 pastes the last used command without cycling.
- F6 Pastes “^Z”.
- F7 gives you a list of previously-used commands.
- F8 pastes cyclable used commands.
- F9 lets you paste a command from the list of recently used ones.
Driverquery — If you ever wish to see a comprehensive list of all the drivers currently operating on your PC, typing “driverquery” into the Command Prompt is a great way to do it.
Compare files — You can conveniently compare a list of differences between similar versions of a file using a simple shortcut through CMD’s Compare File feature. To give it a try, type “FC,” the two filename locations, and the drive letter. It could look like this: “fc C:UsersTestDesktoptest.txt C:UsersTestDesktoptest2.txt”.
How to access Command Prompt in Windows 10
Windows 10 doesn’t have Terminal, but you can still access the Command Prompt easily enough to use many of the same commands listed above.
Search for “CMD” in Windows search, and select the Command Prompt application. Alternatively, if you need higher-level permissions, right-click it and select Run as Administrator.
(Image credit: Future)
On Windows 11, the Windows Terminal is a modern shell that replaces the legacy Windows Console Host to run Command Prompt, PowerShell, and Linux commands (through the Windows Subsystem for Linux (WSL)) from a unified experience, and in this guide, you will learn the steps to get started.
When Microsoft first released the Terminal, it was available as an optional download, but since the rollout of version 22H2, it’s now the default command line experience for Windows 11. Unlike the legacy experience, the Windows Terminal includes many improvements, from a modern code base to new features like tabs and panes, profile support, and the ability to customize virtually every aspect of the experience without modifying the configuration file manually.
This how-to guide will walk you through what you need to know to get started using and configuring the Windows Terminal on Windows 11.
Windows Terminal getting started guide
These instructions will teach you the basics of navigating the Windows Terminal, including essential commands. In addition, this guide will walk you through the settings and the options to customize the experience, including the steps to create and delete profiles and back up the settings.
Getting around
The Windows Terminal navigation is not much different than navigating a web browser. The app includes controls to manage tabs, and a menu to access the Settings, Command Palette, and the different profiles.
Tabs
To create a new tab with the default console, click the «+» button from the top right. To duplicate the tab, you can also use the «Ctrl + Shift + N» keyboard shortcut or the «Ctrl + Shift + D» shortcut. However, to open a new tab with another console, you can open the main menu and choose the profile from the list.
All the latest news, reviews, and guides for Windows and Xbox diehards.
In the same way, you can use the «Ctrl + Shift + W» keyboard shortcut to close a tab.
Finally, you can also use the «Ctrl + Shift + 1 through 9» keyboard shortcut to open a profile in a new tab, depending on the position of the profile in the main menu. For example, since Windows PowerShell is the first profile by default, you can open this profile using the «Ctrl + Shift + 1» shortcut.
Panes
On Windows Terminal, a pane is a way to have multiple windows inside a single tab, allowing you to work with different applications simultaneously.
To create a new pane, hold the «Alt» key and click the «+» button to open another instance of the default console. If you have to have Command Prompt and PowerShell in the same tab, hold the «Alt» key, open the main menu, and choose the profile.
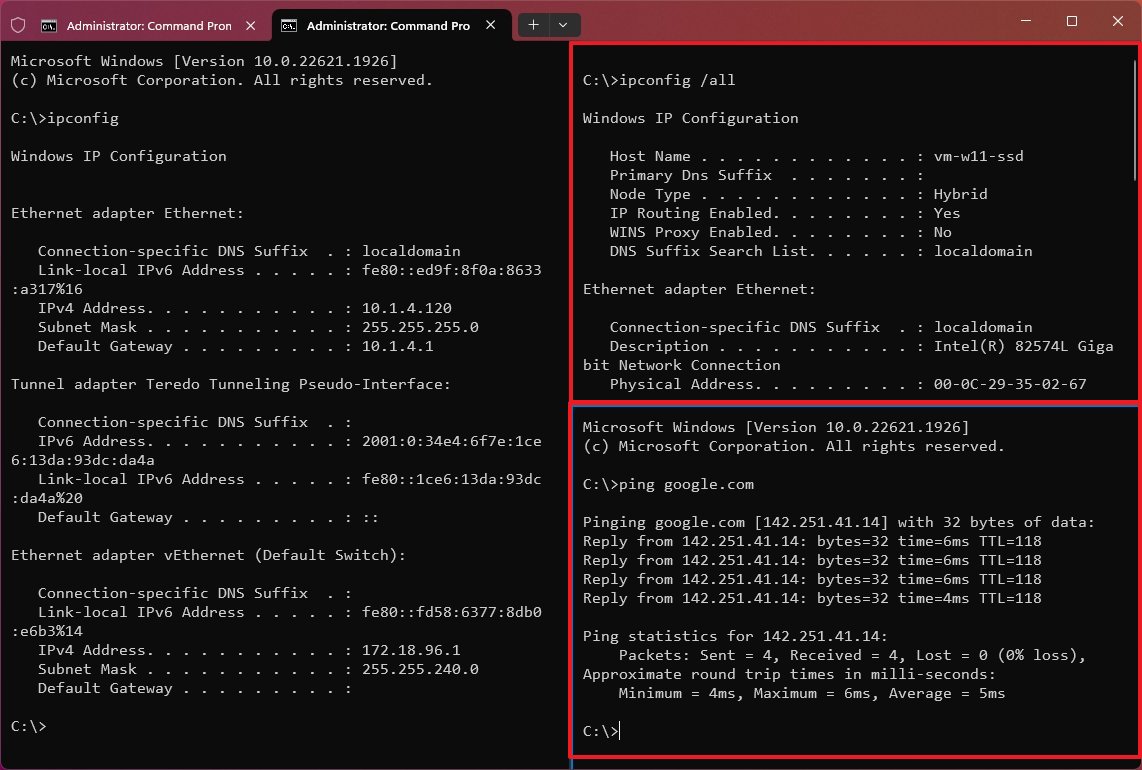
You can also use the «Alt + Shift + Plus key» keyboard shortcut to create a vertical pane or the «Alt + Shift + Minus key» shortcut to create a horizontal pane. Also, the «Alt + Shift + D» shortcut allows you to create a duplicate pane of the current tab. It’s even possible to use the «Split Tab» option from the tab right-click context menu to create a new vertical pane.
Similar to closing a tab, you can use the «Ctrl + Shift + W» keyboard shortcut to close a pane.
Command Palette
The Command Palette is available from the main menu or using the «Ctrl + Shift + P» keyboard shortcut, and it’s a feature that allows you to run commands, open settings, and perform other tasks without remembering the specific commands or keybindings.
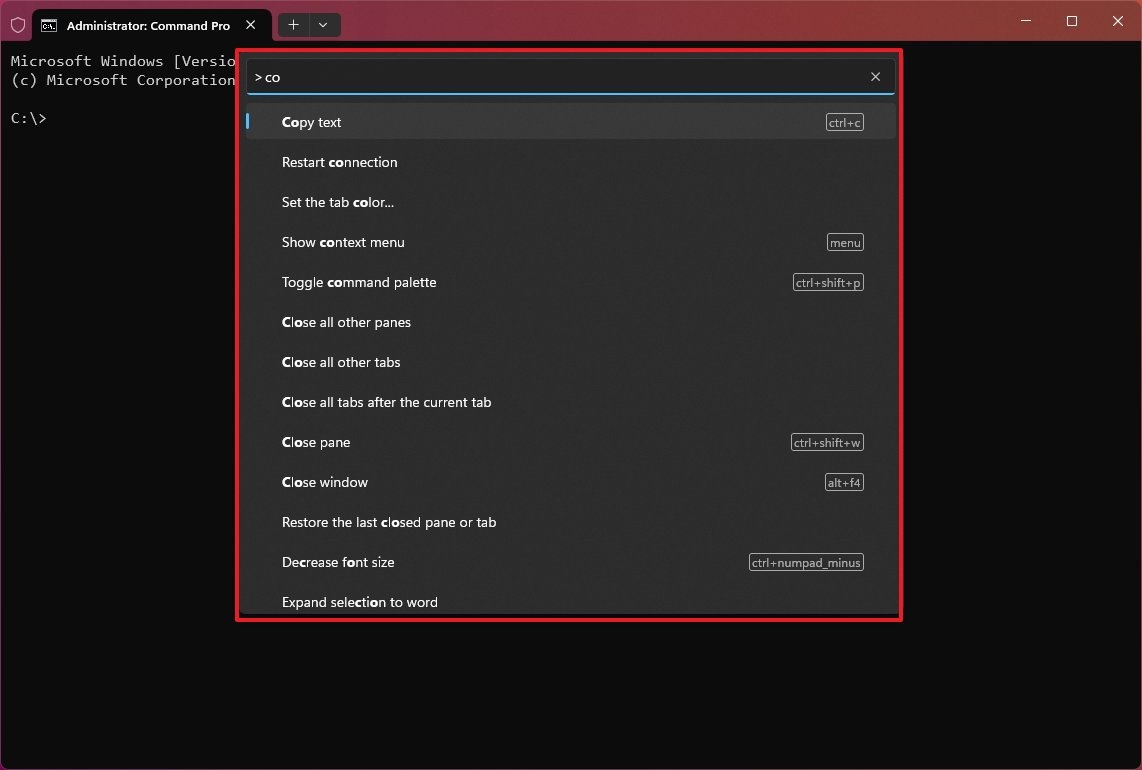
For instance, to run a palette command, use the «Ctrl + Shift + P» keyboard shortcut, scroll or use the search box, and choose the action to run it.
Settings
The Settings is the place that allows you to customize virtually anything about the Windows Terminal, including behaviors, features, and appearance.
To access the Settings, open the main menu next to the tabs and choose the Settings option. You can also use the «Ctrl + Shift + ,» keyboard shortcut.
You can always use the «Ctrl + Shift + Space» shortcut to open the Terminal menu or the «Ctrl + ,» keyboard shortcut to open the Settings page directly.
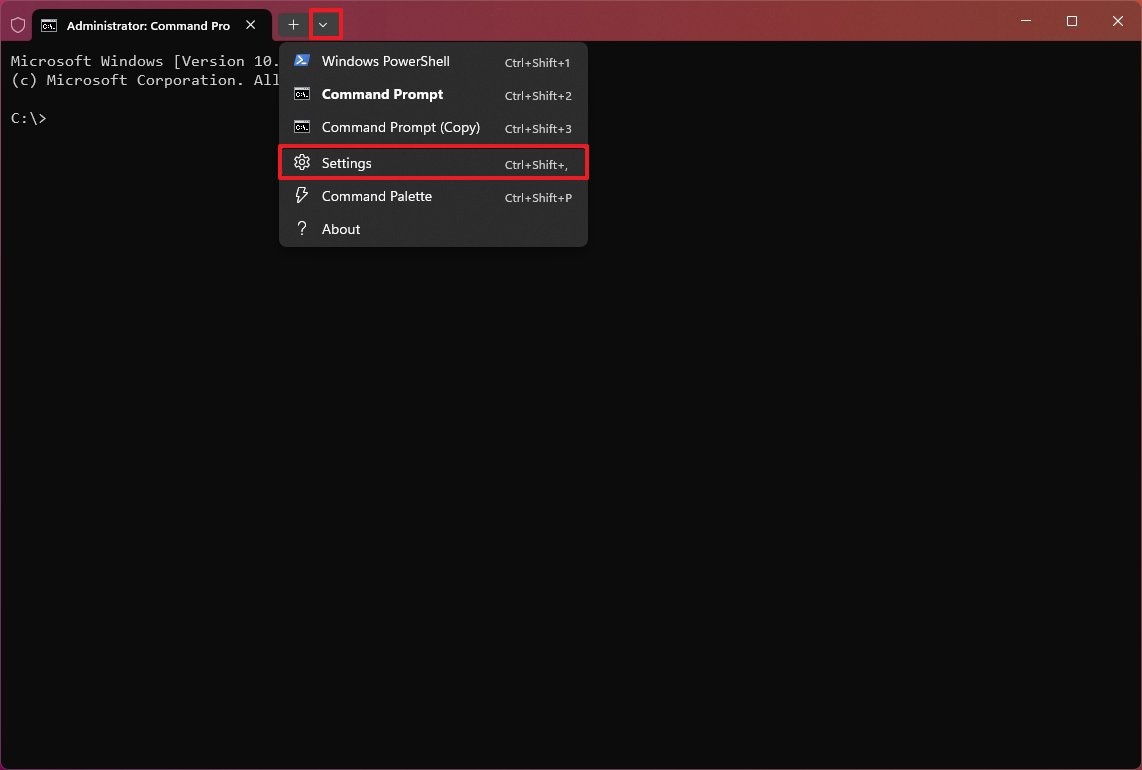
Inside Settings, you will find six sections, including Startup, Interaction, Appearance, Color Schemes, Rendering, and Actions.
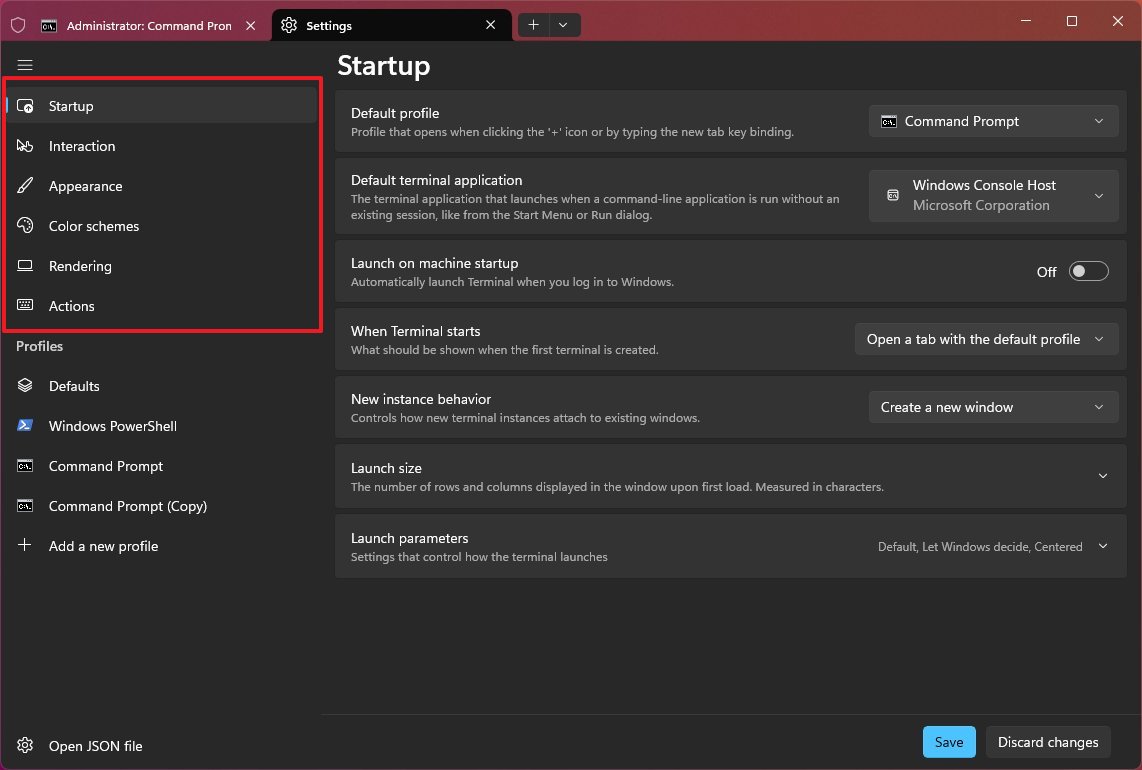
Then there’s the «Profiles» section that includes the «Defaults» page, which houses the global settings that will apply to every profile.
Also, the «Profiles» section lists the available profiles with their respective settings alongside the option to create and customize additional profiles.
Startup behavior settings
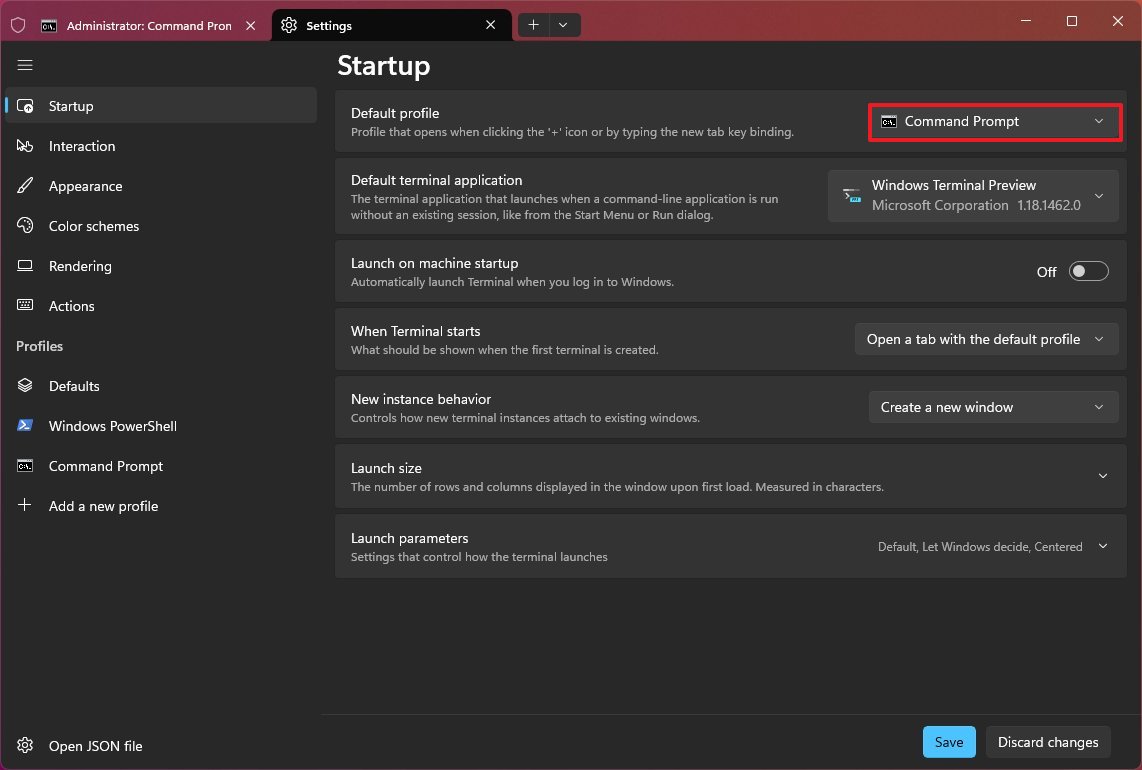
The Startup page includes the default startup settings.
To change the default command application that should open when launching the Windows Terminal, open Settings > Startup, choose one of the available profiles (Such as Command Prompt or Windows PowerShell) from the «Default profile» setting, and click the Save button.
To change the default terminal application, open Settings > Startup, choose the application from the «Default terminal application» setting and click the Save button.
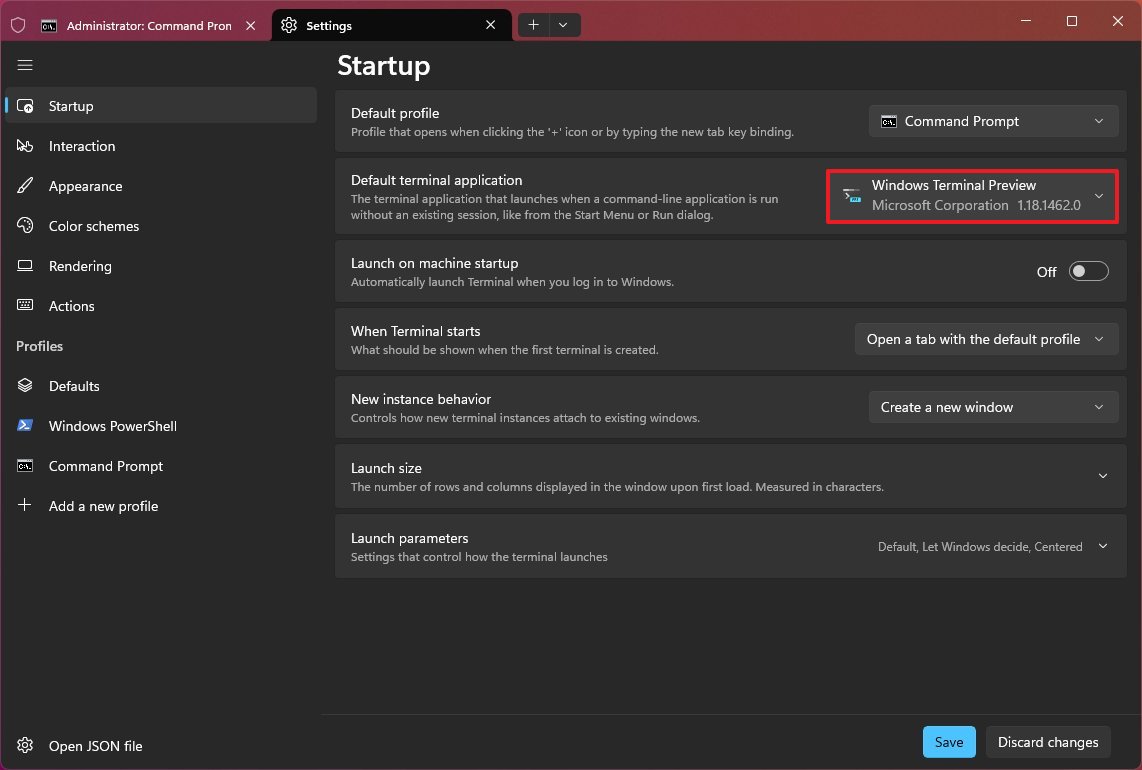
For example, if you selected the «Windows Console Host» option, then when opening Command Prompt, it will open in the legacy console. However, if you choose the «Windows Terminal» option, the terminal application will open Command Prompt.
In addition, the «Startup» page includes the settings that allow you to decide whether the terminal should launch automatically when the operating system starts, the default size, and other launch parameters.
Customize appearance
The Windows Terminal includes two ways to customize the look and feel of the experience, including the «Appearance» and «Color schemes» settings.
Change theme
The application theme defines the color the main color, which can be dark, light, or custom.
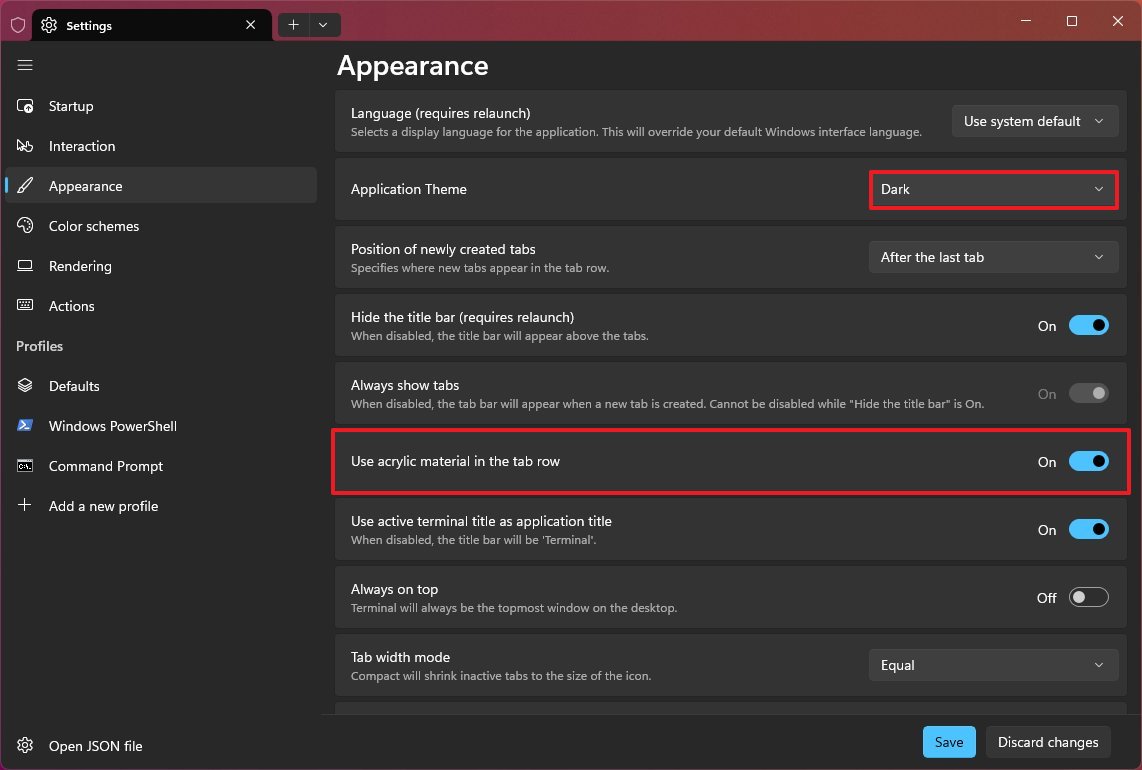
To change the Windows Terminal theme, open Settings > Appearance, and choose the color mode (light, dark, system mode) from the «Application theme» setting. On this page, you can also turn on the «Use acrylic material in the tab row» toggle switch to enable the mica material for the frame of the application. Once you complete selecting your settings, click the Save button.
Change color scheme
The color scheme defines the colors that apply to the elements, including test, cursor, background, foreground, selection, etc.
To change the Windows Terminal color scheme, open Settings > Color schemes, choose the available schemes, and click the Save button.
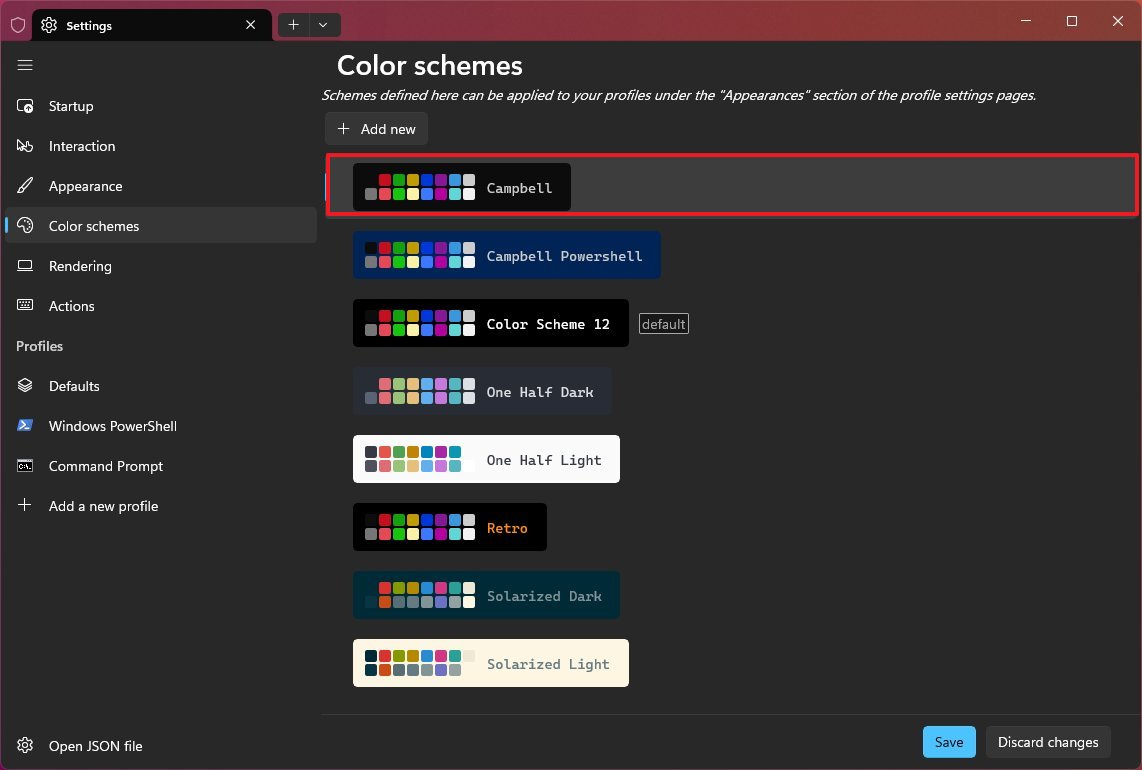
The page includes several color schemes, including Campell, Campell PowerShell, One Half Dark, One Half Light, Retro, Solarized Dark, Solarized Light, Tango Dark, Tango Light, and Vintage.
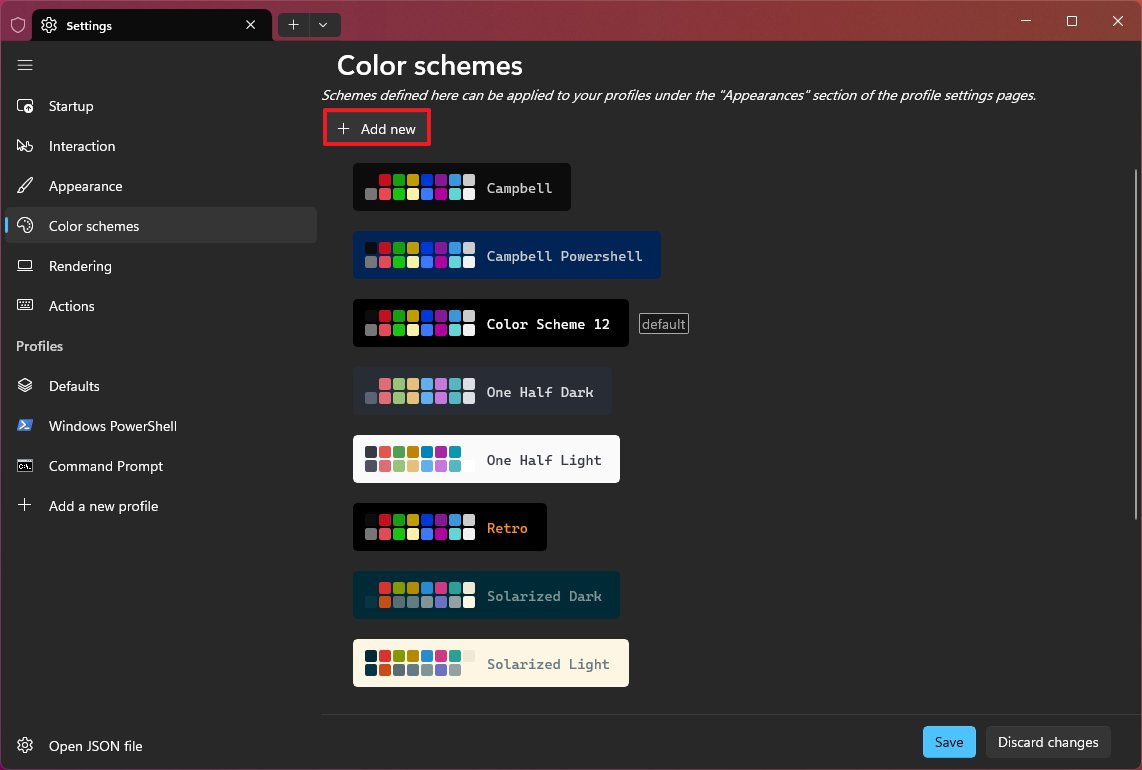
Create custom scheme
Alternatively, you can click the «Add new» button to create a custom scheme. While on the page, under the «Colors» section, click on each color and choose the replacement color.
Once you’re done, click the «Rename color scheme» settings, confirm a descriptive name, and click the Accept rename button.
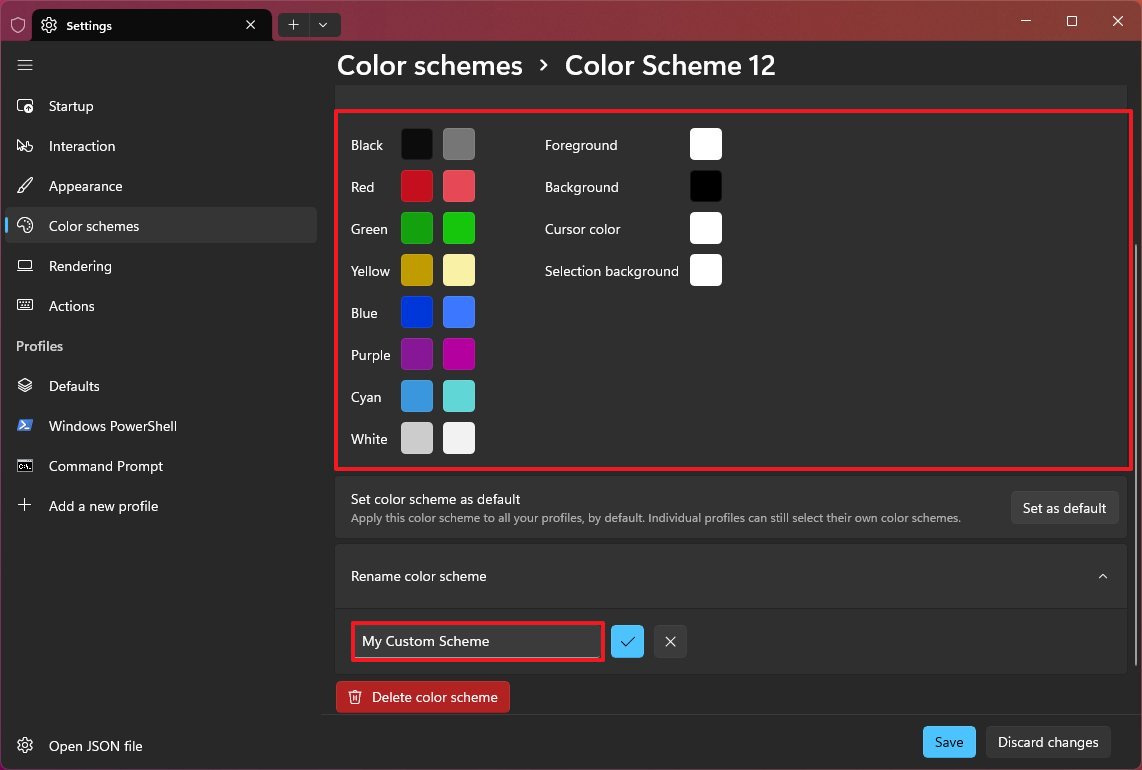
If you want to apply the new scheme, click the «Set as default» button and then the Save button.
In the case you don’t need a color scheme anymore, click on the scheme, then the «Delete color scheme» button, and confirm the deletion.
Change and create actions
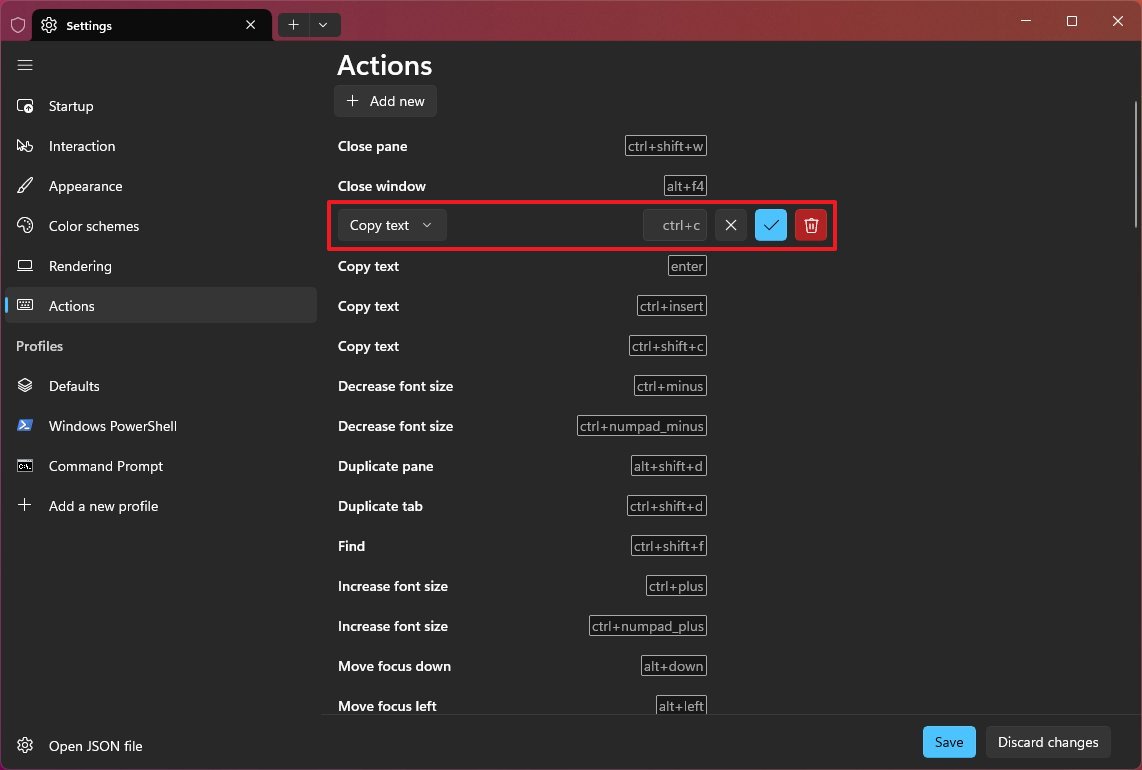
The «Actions» page includes the commands, actions, and tasks you can run from the Command Palette. By default, the Windows Terminal includes a long list of actions you can modify or create new ones.
To modify a terminal action, open Settings > Actions, hover over the action, and click the Edit button. Using the left menu, choose the action, and using the setting on the right, select the shortcut to run the action. Finally, click the Accept button to apply the changes.
To create a new action, click the «Add new» button from the «Actions» page. Using the left menu, choose the action, and using the setting on the right, select the shortcut to run the action, and click the Accept button to apply the changes.
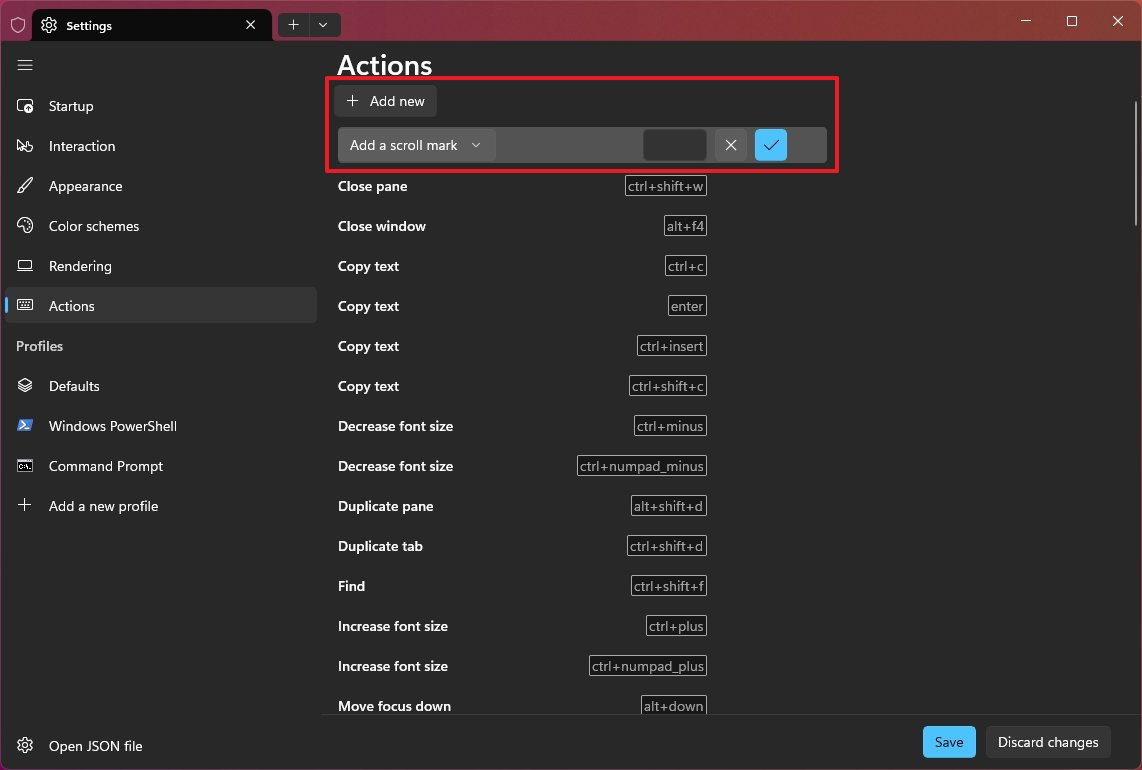
To run the action, refer to the steps to use the Command Palette instructions outlined earlier in this guide.
Profiles
The «Profiles» section includes all the profiles with their respective settings alongside the option to create and customize additional profiles.
You can manage these settings in two ways. You can change the settings on the «Defaults» page that will apply to every profile defined in the application. Or you can change the settings on each profile individually.
Change default settings
To change the profile settings globally, open Settings > Defaults. On the page, the most important settings are the «Starting directory» and «Run this profile as Administrator.»
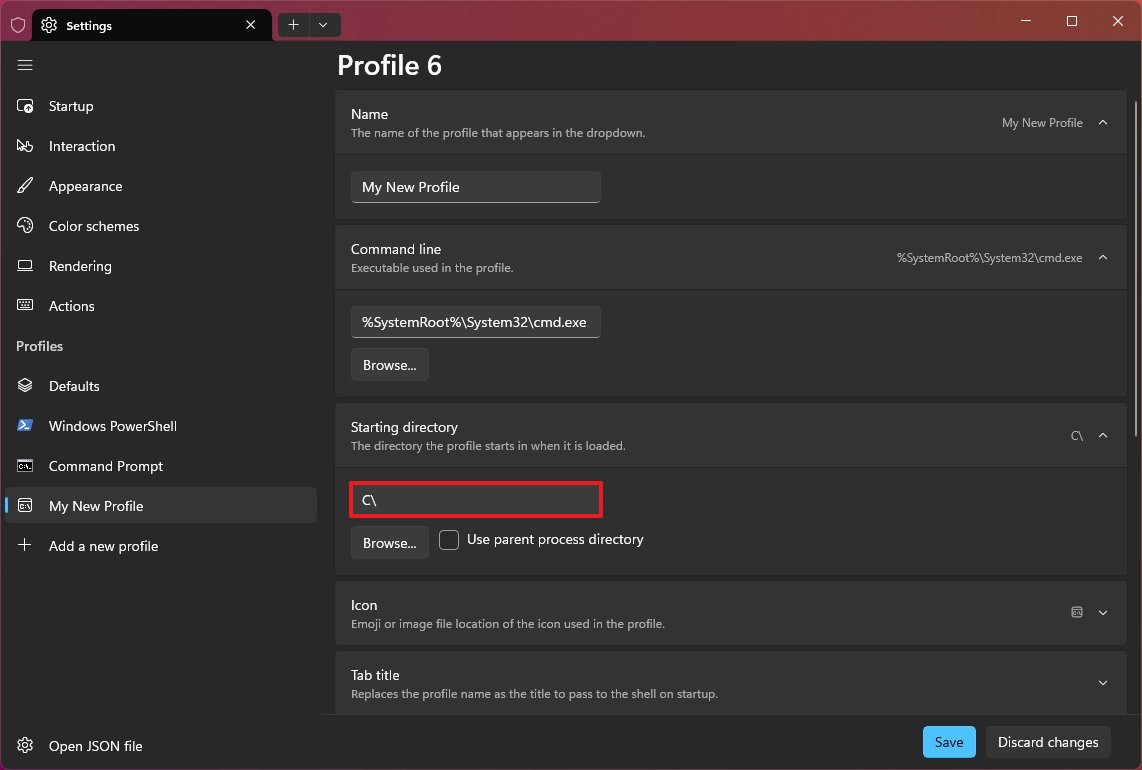
The «Starting directory» is the path the application will start by default. For instance, if you always move directories as soon as you open the app, consider adjusting this setting. Click the «Starting directory» setting, clear the «Use parent process directory» option, confirm the path, and click the Save button.
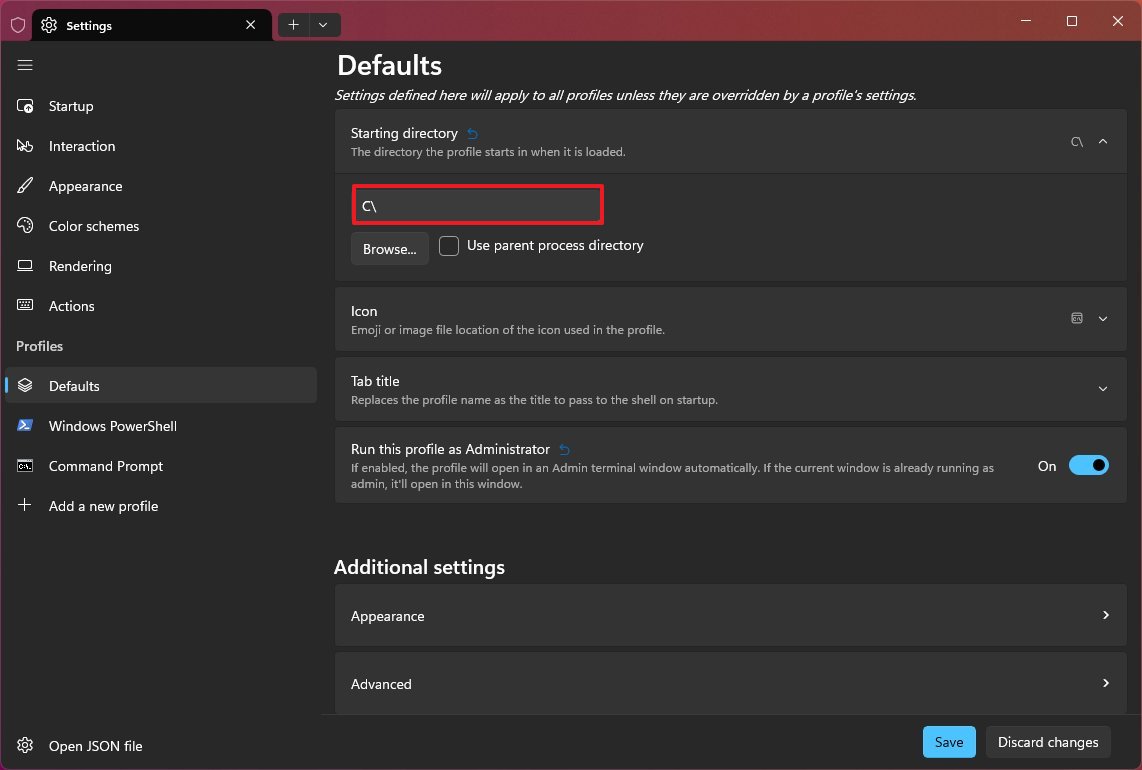
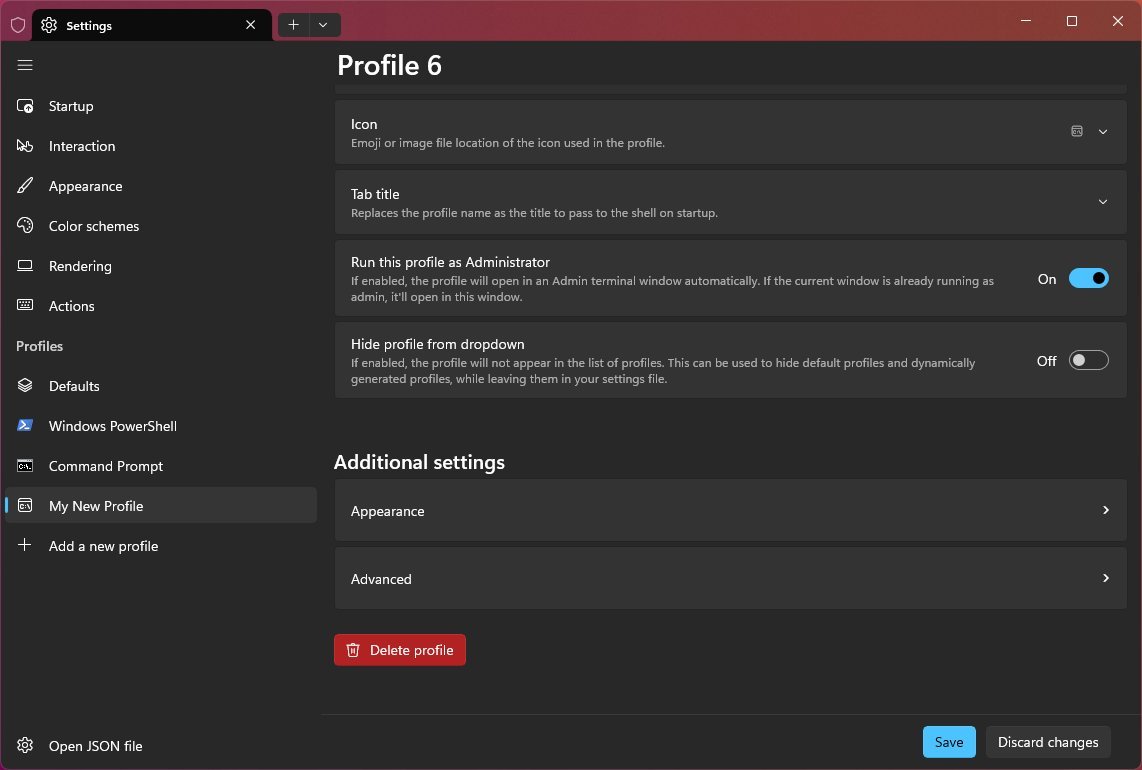
You can also configure the Windows Terminal to always run elevated, and to do this, you need to turn on the «Run this profile as Administrator» toggle switch and click the Save button.
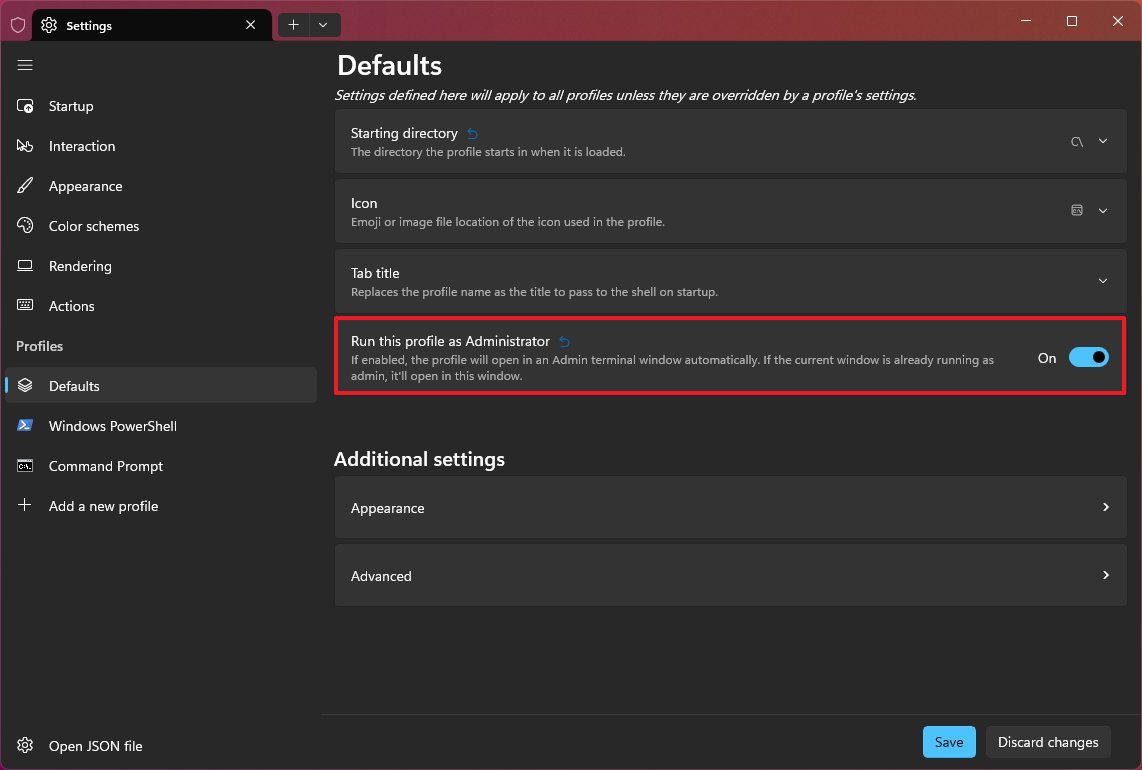
Under the «Additional settings» section, you will find two settings, including «Appearance» and «Advanced.»
On the «Appearance» page, you can customize various visual elements. For instance, you can choose the default color scheme, font properties, cursor shape, background image, control transparency, and more.

If you want to specify a default background image, click the «Background image» setting, click the Browse button, choose the image, click the Open button, select the background properties (stretch mode, alignment, and opacity) as necessary, and click the Save button. (You can also check the «Use desktop wallpaper» option for the current background as the wallpaper for the Windows Terminal.)
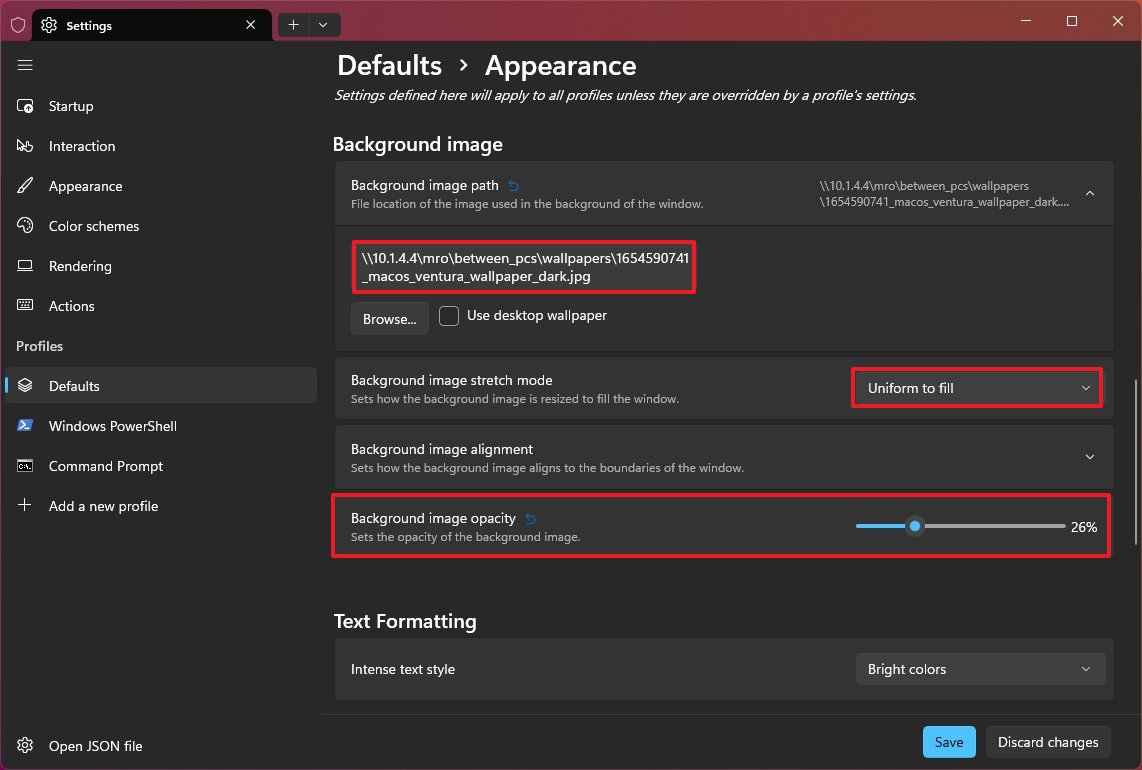
If you are not using a background image, you can add opacity and acrylic material to the background using the «Transparency» settings. The «Background opacity» setting makes the desktop background visible through the Windows Terminal, while the «Enable acrylic material» applies a semitransparent blur to the window.
In the case you want to undo a specific setting, you can click the «Reset inherited value» button next to the setting to apply the default values again and click the Save button.
On the «Advanced» page, if you’re getting with the Windows Terminal, you don’t need to change any of these settings.
Change profile settings
You can have each profile with its own settings alongside the default settings.
To change a profile setting, choose the profile from the left navigation pane. On the page, you will find similar settings to the ones available on the «Defaults» page, including the «Starting directory» and «Run this profile as Administrator.»
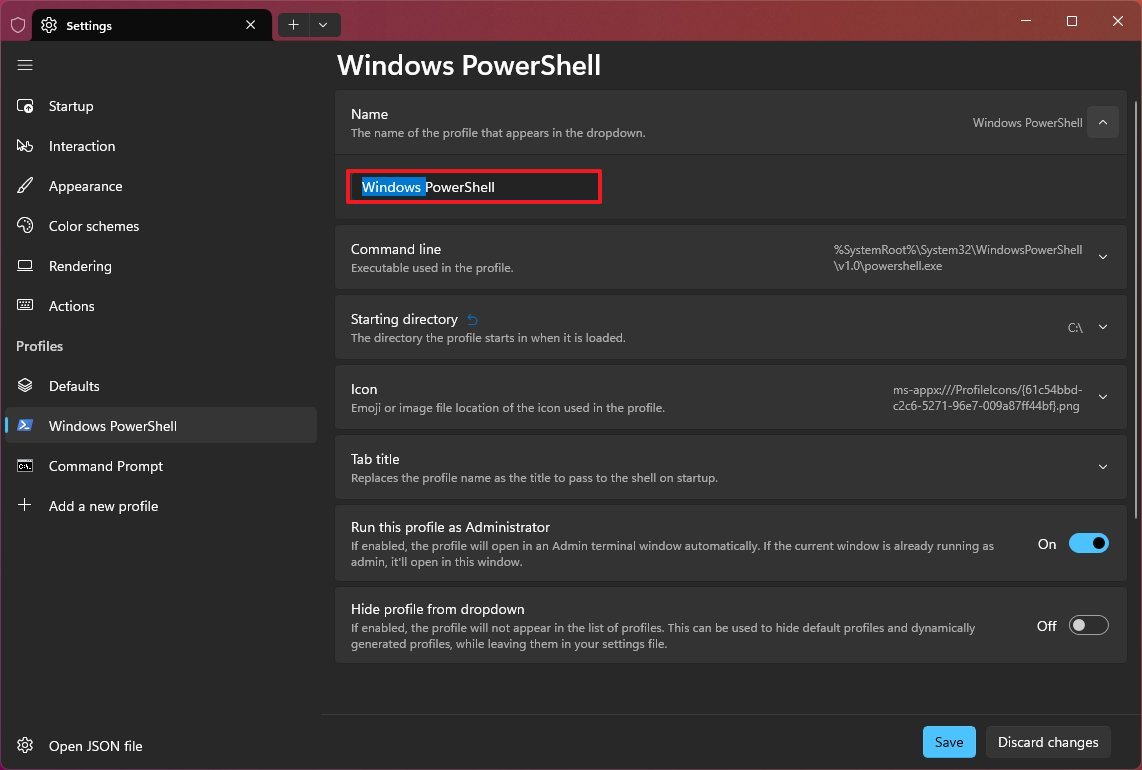
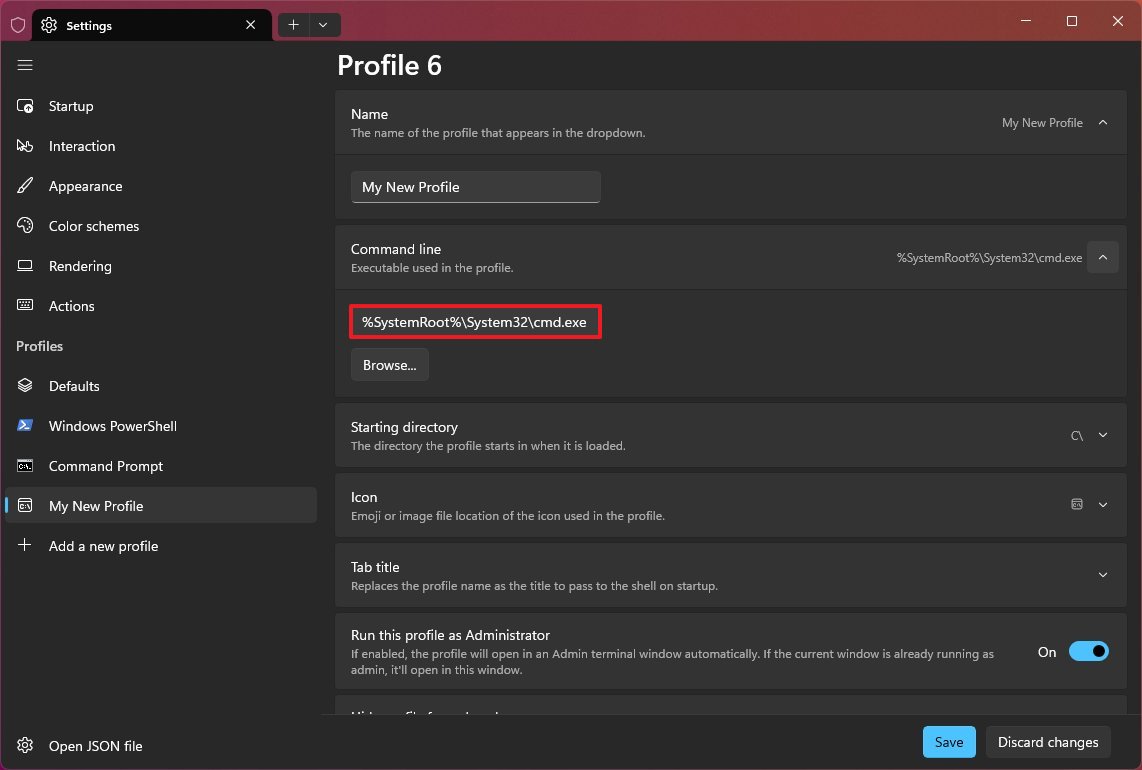
However, you’ll also find some settings specific to the profile. For example, you can use the «Name» setting to change the display of the profile. You can use the «Command line» setting to specify the location of the executable that launches the application. And you can hide the profile from the main menu, among other options.
To change the profile name, open Settings, click on the profile name from the left pane, click the «Name» setting, confirm the new name for the profile, and click the Save button.
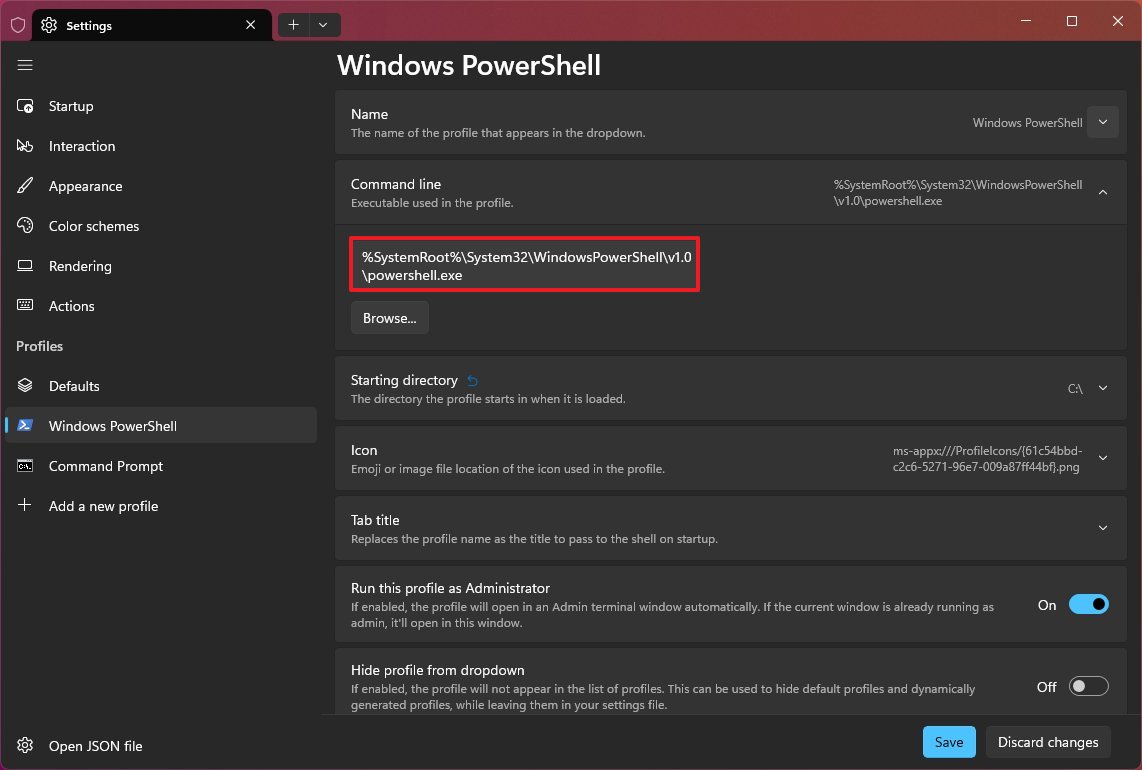
To specify the path for the command tool executable, open Settings, click on the profile name from the left pane, click the «Command line» setting, click the Browse button, then select the executable (such as diskpart.exe), click the Open button, and click the Save button.
Create new profile
On Windows Terminal, you can create profiles for the different applications with custom settings and personalization.
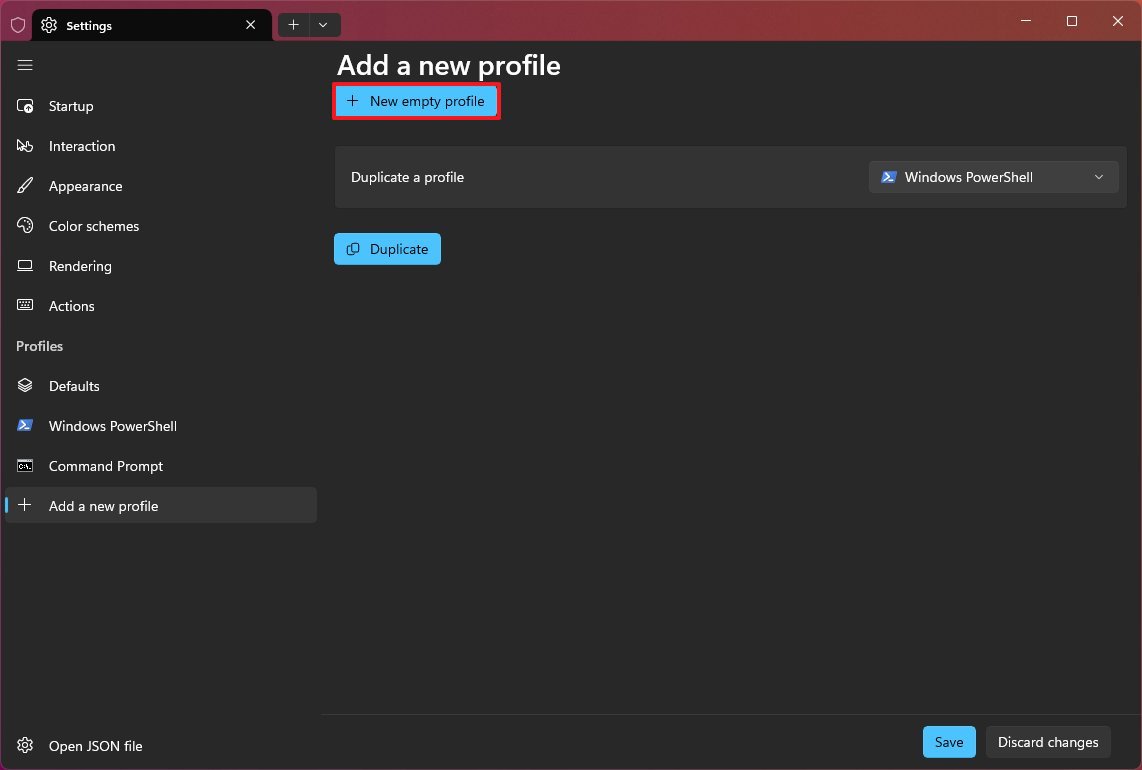
To create a new Windows Terminal profile, open Settings and click the «Add a new profile» option from the left navigation pane. On the page, you will find two ways to create a profile, including creating a new empty profile or duplicating an existing one and updating its settings.
If you want to create a profile from scratch, click the «New empty profile» button, click the «Name» setting, confirm the new name for the profile, and click the Save button.
To specify the application to run in the profile, click the «Command line» setting, click the Browse button, select the executable (such as cmd.exe), click the Open button, and click the Save button.
To specify the root directory to run the app, click the «Starting directory» setting, clear the «Use parent process directory» option, confirm the path, and click the Save button.
Optionally, you can also customize the appearance of the profile with a custom color scheme, font, cursor shape, background image, and more. (You can refer to the previous instructions outlined above to customize the experience.)
Delete profile
You can always delete those Windows Terminal profiles that are no longer needed on the system.
To delete a profile, open Settings, choose the profile from the left navigation pane, and click the Delete profile button (and the Yes, delete profile button to confirm).
Backup settings
Although the Windows Terminal doesn’t include a backup feature, every configuration (settings, profiles, appearance, etc.) is stored in the «settings.json» file, which means that backing up this file allows you to protect your settings and quickly transfer your settings to another computer.
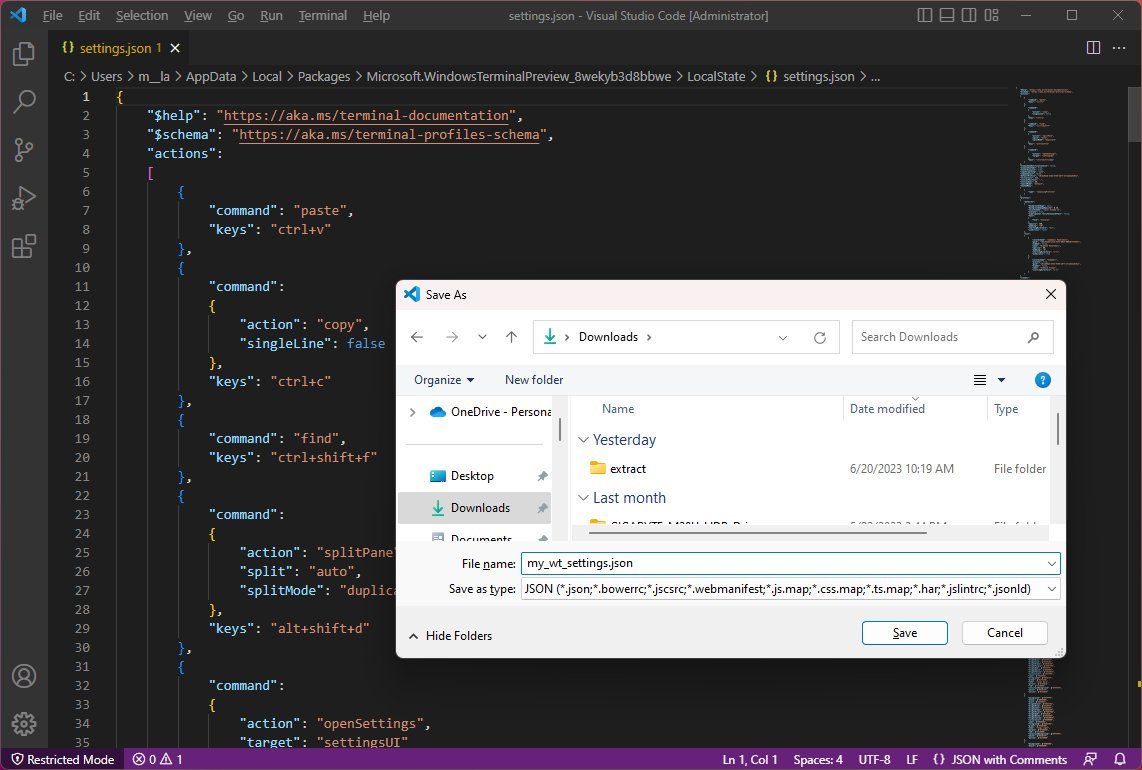
To back up the settings.json file, open Settings and click the «Open JSON file» button in the bottom-left corner of the navigation pane. Alternatively, you can use the «Shift + Control + ,» keyboard shortcut to open the settings.json directly with the default text editor. Once the settings file opens in the text editor, you can click on File, choose the Save As option, confirm a descriptive name for the file (for example, my_wt_settings.json), and click the Save button.
Alternatively, you can copy the «settings.json» file from the %USERPROFILE%\AppData\Local\Packages\Microsoft.WindowsTerminalPreview_8wekyb3d8bbwe\LocalState path.
To restore the configuration settings, open Windows Terminal > Settings and click the «Open JSAON file» button in the bottom-left corner of the navigation pane. Open the settings.json file with Notepad or any other text editor, use the «Ctrl + A» keyboard shortcut to select everything from the file, and use the «Ctrl + C» shortcut to copy the content to the clipboard.
In the settings.json file, use the «Ctrl + A» keyboard shortcut to select everything, hit the Delete key to clear the file, and use the «Ctrl + V» shortcut to paste the settings from the backup and use the «Ctrl + S» shortcut to save and restore the settings. Finally, restart the Windows Terminal to complete the restoration.
More resources
For more helpful articles, coverage, and answers to common questions about Windows 10 and Windows 11, visit the following resources:
- Windows 10 on Windows Central — All you need to know
- Windows 11 on Windows Central — All you need to know
Mauro Huculak has been a Windows How-To Expert contributor for WindowsCentral.com for nearly a decade and has over 15 years of experience writing comprehensive guides. He also has an IT background and has achieved different professional certifications from Microsoft, Cisco, VMware, and CompTIA. He has been recognized as a Microsoft MVP for many years.
Вы тут: Главная → Windows → Windows Terminal — основы настройки и первые впечатления
Для Windows 10 выпустили раннюю предварительную версию нового терминала, сопроводив событие постом в блоге команды WSL. Терминал не такой глянцевый как в промо-ролике, но внешний вид гибко настраивается.
Запуск
Несмотря на размещение в магазине, в пакете содержится приложение Win32 (при этом оно таскает с собой conhost). Как следствие, терминал можно запускать с правами администратора, например, Ctrl + Shift + click. Из командной строки или окна «Выполнить» терминал можно вызвать командой wt.
Однако из-за бага в оболочке из окна Win + R терминал не запускается от имени администратора сочетанием клавиш Ctrl + Shift + Enter в отличие от других программ (появилось в 1803).
Настройка внешнего вида
Кроме вкладок функционально там пока особо ничего нет, зато доставляет возможность изменения внешнего вида через JSON. Да, он просто открывается в текстовом редакторе, когда вы открываете настройки 
На мой вкус размещение вкладок в заголовке окна создает неудобства при перемещении окна по экрану — надо целиться в узкий промежуток между плюсом и кнопкой сворачивания. Поэтому я отключил это поведение, поместив вкладки под заголовком (см. картинку выше):
"showTabsInTitlebar" : false,
В комплекте идет три профиля (PowerShell, CMD и WSL) и пять настроенных цветовых схем (в конце конфигурационного файла). Просто подставьте в профиле имя схемы для параметра colorScheme (вместо Campbell). Кроме того, для каждого профиля можно в качестве фона установить свое изображение.
            "useAcrylic" : false,
            "backgroundImage" : "ms-appdata:///roaming/win1.jpg",
            "backgroundImageOpacity" : 0.94999998807907104,
            "backgroundImageStretchMode" : "fill"
Картинку кладите в папку с JSON и не забудьте отключить акрилик.
My life is complete now. pic.twitter.com/QN2cah2QzS
— Roman (@rlinev) June 23, 2019
Настройка окружения
Терминал запускается с профилем, GUID которого указан в параметре defaultProfile. Из коробки — конечно, PowerShell. Способа открыть несколько профилей при запуске я не нашел.
Текст в заголовках вкладок тоже настраивается. Для PowerShell автоматически подтягивается мой профиль, давно созданный по мотивам поста Василия Гусева. Для CMD я просто указал:
"commandline" : "cmd.exe /k title CMD",
Рабочая папка задается параметром startingDirectory. Пробуя разные переменные среды, я неожиданно наступил на грабли с %SYSTEMDRIVE% (стартовало в System32). На созданный в GitHub баг моментально отреагировал сотрудник Microsoft и оказалось, что это не дефект терминала, а странное поведение Windows, у которого ноги растут из MS-DOS 2.0.
Короче, надо добавлять обратный слэш после переменной и еще один для экранирования первого в JSON:
"startingDirectory" : "%SYSTEMDRIVE%\\",
В конфигурационном файле также можно задать свои сочетания клавиш на разные действия.
Дискуссия
Терминал работает, но пока функционально бедноват — тут он похвастаться может разве что вкладками и настраиваемыми сочетаниями клавиш. Первую стабильную версию обещают зимой, но планируемый набор функций не озвучивают. Поживем — увидим.
А как вам новый терминал? Есть ли вообще нужда в нескольких консолях в одном окне и гибкой настройке их внешнего вида? Если да, что нужно функционально?