
Протокол iSCSI (Internet Small Computer System) представляет собой протокол SCSI, работающий с системами хранения данных поверх протокола IP. С помощью iSCSI вы сможете подключать ваши сервера к сетевым хранилищам по обычной TCP/IP сеть без использования FC. В этой статье мы рассмотрим, как настроить iSCSI-хранилище на одном Windows Server 2019 и использовать его на других серверах(в Windows Server 2016 и 2012 R2 все настраивается аналогично). Первый пример использования iSCSI: файловому серверу необходимо дополнительное место, и мы по сети подключаем к нему виртуальный диск с другого сервера-хранилища по iSCSI. Другой пример – построение отказоустойчивого кластера, когда для нескольких серверов необходимо общее хранилище.
Для использования ISCSI-диска нужно на сервере-хранилище настроить виртуальный диск (это обычный vhd/vhdx файл) и опубликовать его в виде iSCSI таргета, к которому подключаются iSCSI инициаторы (другие сервера и устройства).
Содержание:
- Настройка iSCSI target в Windows Server
- Настройка iSCSI Initiator в Windows Server 2019
Настройка iSCSI target в Windows Server
Сначала нужно включить iSCSI target (активировать роль iSCSI Target Server), зайдя в File and Storage Services -> File and iSCSI Services.
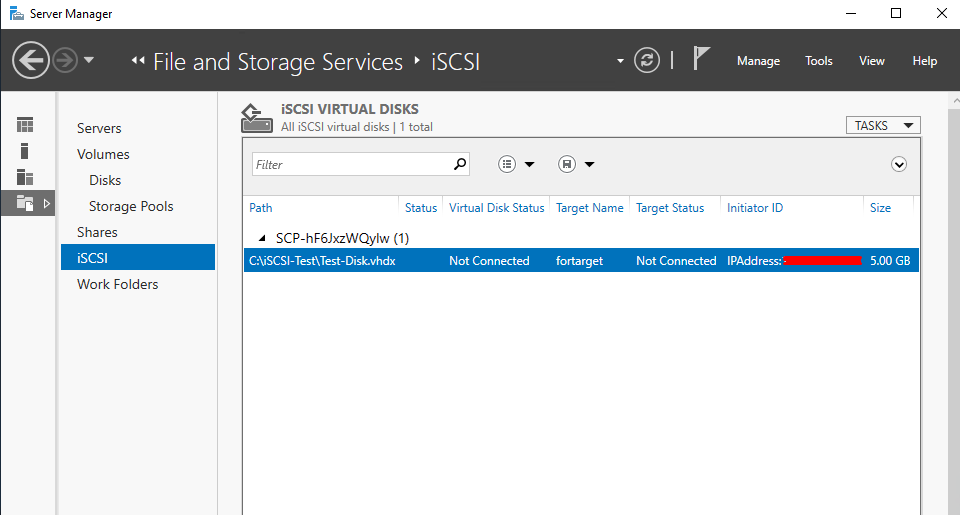
Теперь на iSCSI сервере нужно создать виртуальный диск. Для этого необходимо зайти в Server Manager -> File and Storage Services -> iSCSI, нажать To create an iSCSI virtual disk, start the New iSCSI Virtual Disk Wizard.

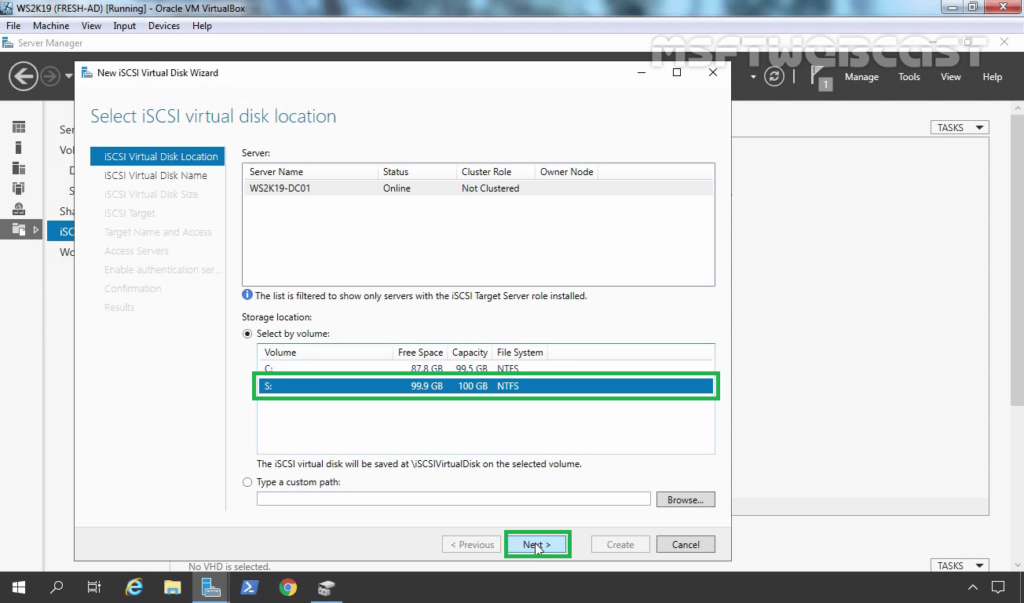
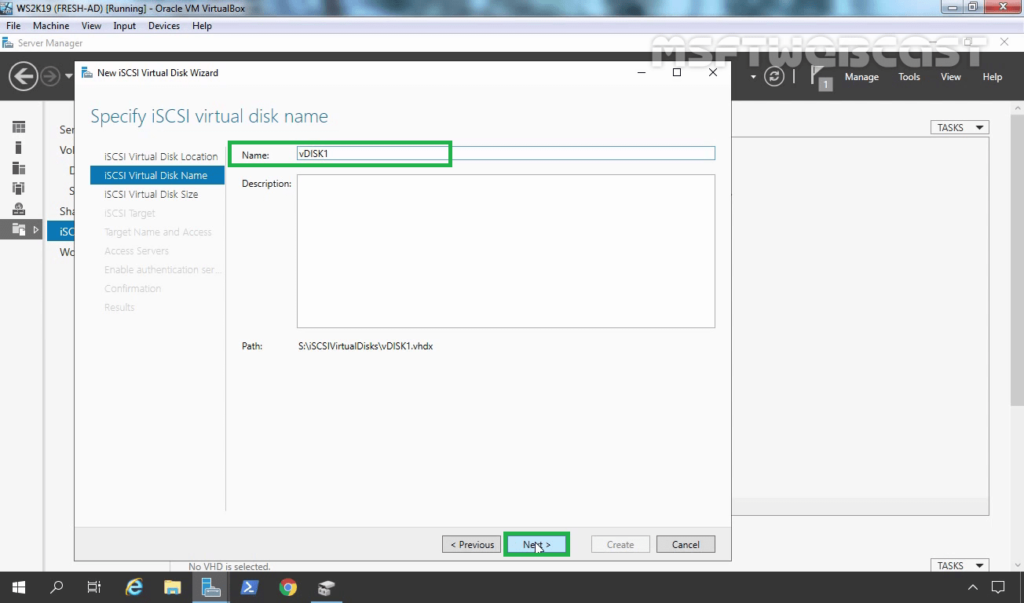
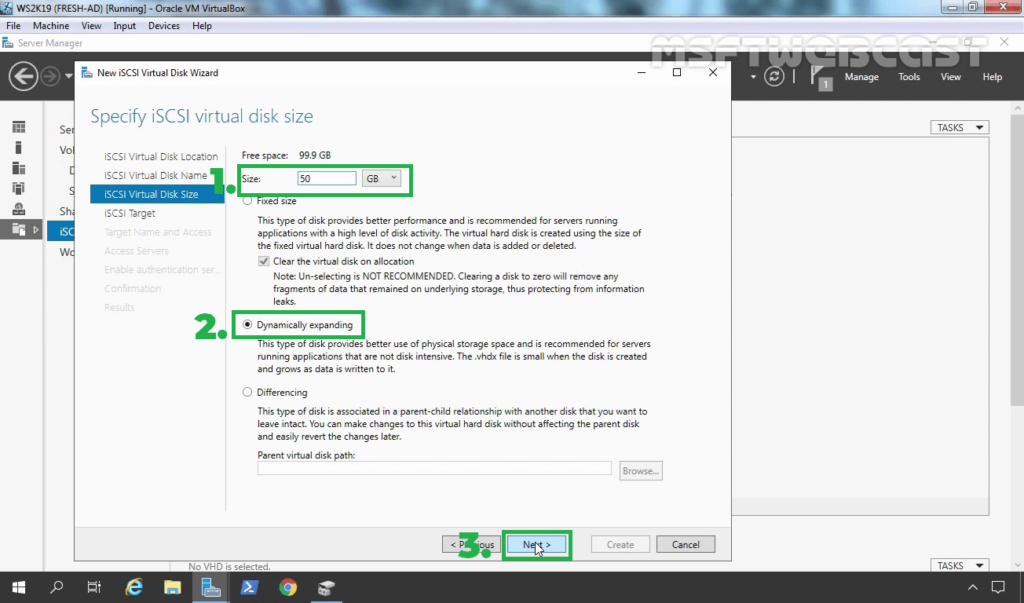
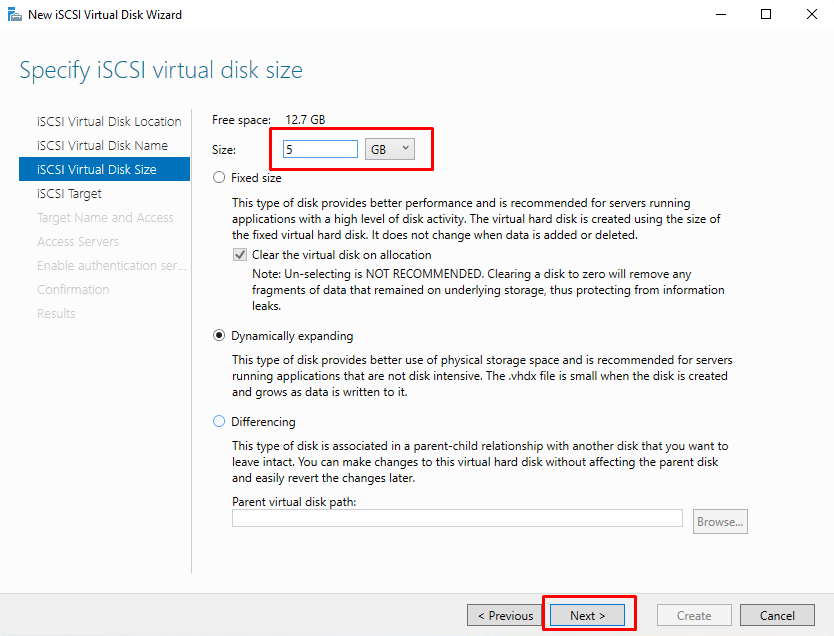
В мастере создания виртуального iSCSI диска нужно выбрать физический раздел, на котором его нужно разместить. Далее нужно присвоить имя iSCSI диска, указать размер диска и его тип (Fixed Size, Dynamically expanding или Differencing), имя iSCSI таргета.
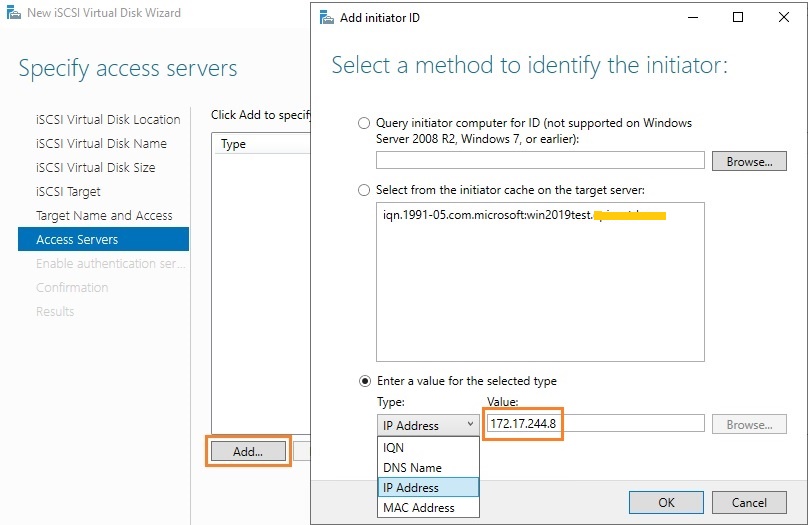
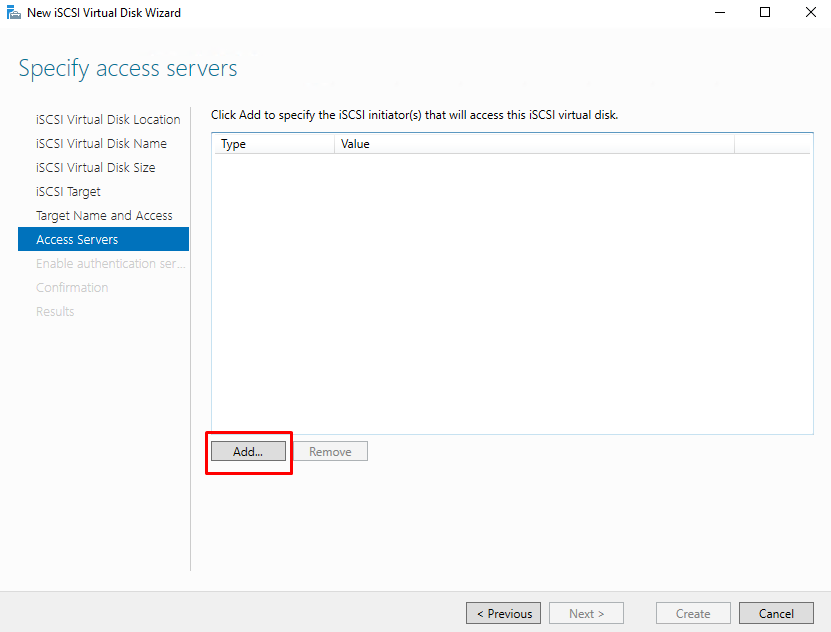
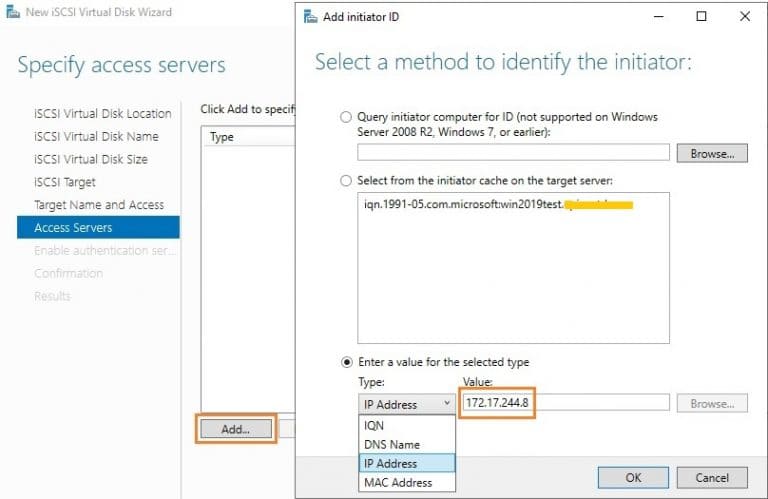
На шаге Access Servers нужно указать серверы (iSCSI инициаторы), которые смогут подключаться к данному iSCSI таргет, выбрав один из вариантов подключения:
- IQN (придется сначала включить iSCSI initiator на сервере и скопировать IQN);
- DNS Name
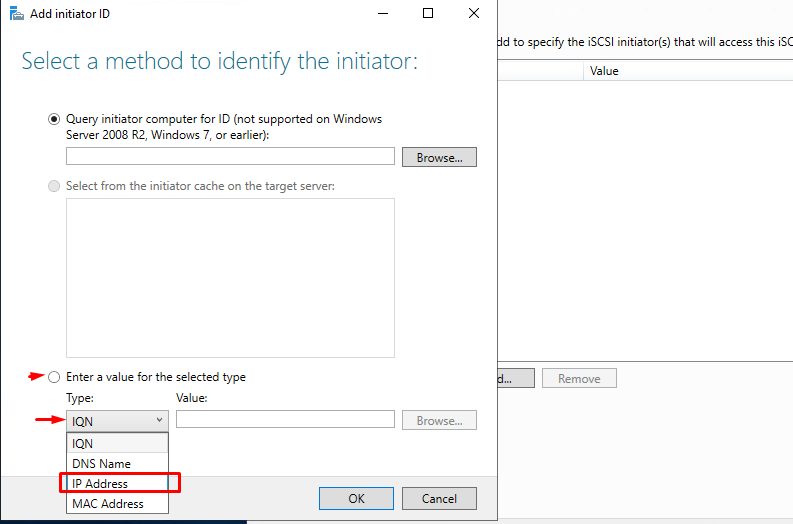
- IP Address;
- MAC Address.
Пусть используется вариант с IP-адресом.
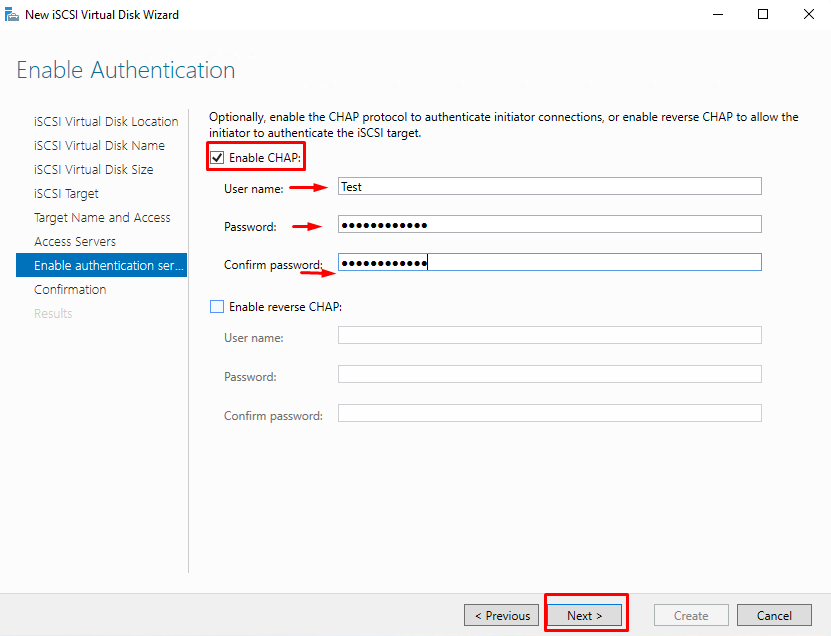
Следующий шаг в этом мастере – это настройка протокола аутентификации CHAP. Его следует использовать, если необходимо проверять подлинность подключения от инициатора. Далее он включается, вписывается имя пользователя и 12-значный пароль (или длиннее), затем Next -> Next -> Finish. Проверьте, что виртуальный диск iscsiDisk2.vhdx создался в каталоге D:\iSCSIVirtualDisks.
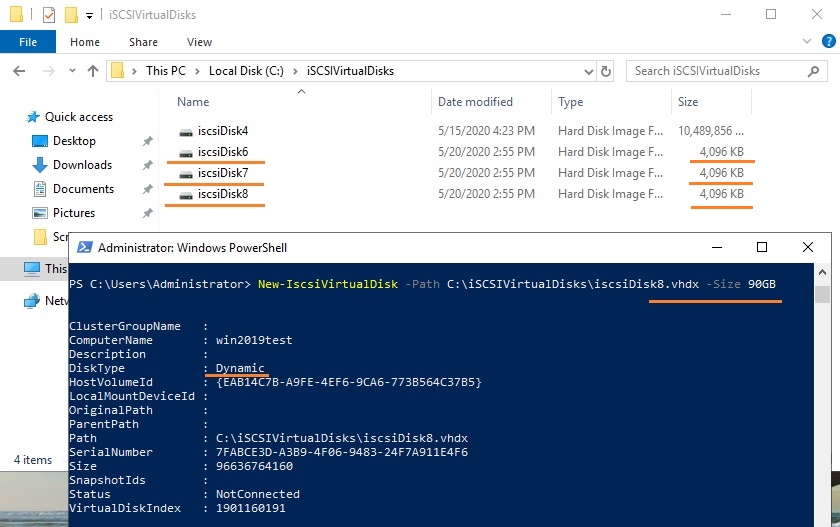
Можно создать iSCSI диск с помощью PowerShell. Создадим виртуальный диск размером 200 Гб:
New-IscsiVirtualDisk -Path С:\iSCSIVirtualDisks\iscsiDisk2.vhdx -Size 200GB.
По умолчанию создается динамический диск размером 4,096 Кб, независимо от того, сколько было указано параметром Size. Динамический диск будет расширяться по мере необходимости.
Если нужно использовать диск фиксированного размера (такие диске резервируют место на физическом носителе при создании), то его создать той же командой с дополнительным параметром UseFixed:
New-IscsiVirtualDisk -Path С:\iSCSIVirtualDisks\iscsiDisk2.vhdx -Size 200GB –UseFixed
Для дисков с высокой активностью и повышенными требованиями к IOPS нужно использовать диски фиксированного размера, т.к. для динамических дисков расходуются дополнительные ресурсы на операции приращения.
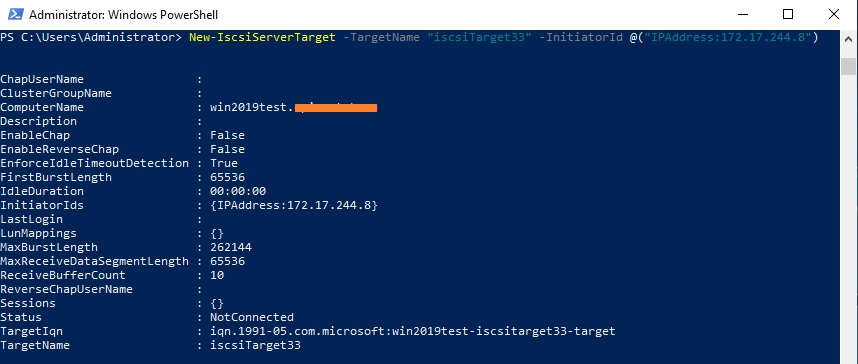
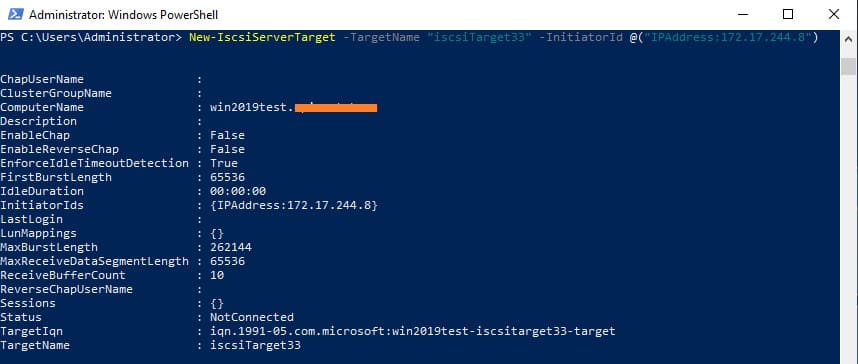
Далее таргету присваивается имя, здесь же можно разрешить к нему доступ с IP-адреса сервера-инициатора:
New-IscsiServerTarget -TargetName "iscsiTarget33" -InitiatorId @("IPAddress:172.17.244.8")
При желании вместо IP-адреса можно использовать IQN имя (iSCSI Qualified Name – уникальный идентификатор iSCSI устройства в сети):
New-IscsiServerTarget -TargetName iscsiTarget33 -InitiatorIds “IQN: 1991-05.com.microsoft:win2019test.ddd.com”
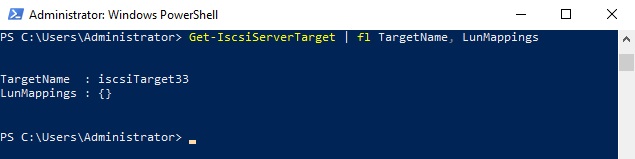
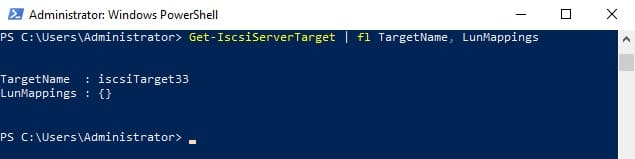
Затем желательно проверить результат:
Get-IscsiServerTarget | fl TargetName, LunMappings
Получить полное имя таргета можно с помощью командлета
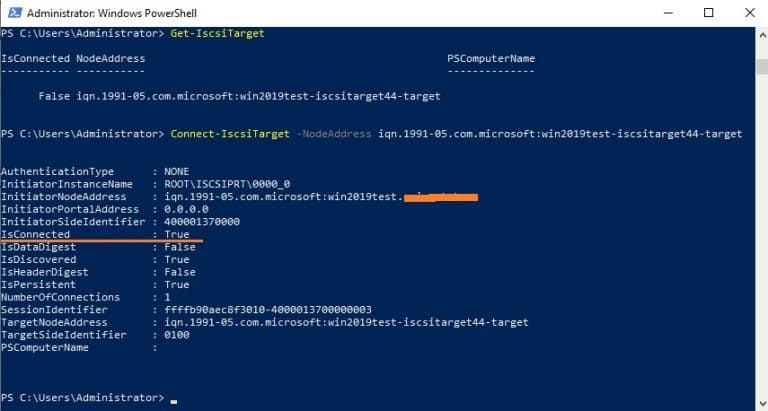
Get-IscsiTarget
, а затем подключить таргет:
Connect-IscsiTarget -NodeAddress iqn.1991-05.com.microsoft:win2019test-iscsitarget33-target

Настройка iSCSI Initiator в Windows Server 2019
Следующий шаг – подключение к созданному iSCSI диску со второго сервера-инициатора. Перейдите в панель управления Control Panel, запустите iSCSI initiator (или выполните команду
iscsicpl.exe
).
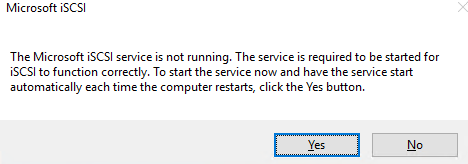
В консоли управления службами services.msc поставьте автоматический тип запуска для службы Microsoft iSCSI Initiator Service, Или используйте команду:
Set-Service -Name MSiSCSI -StartupType Automatic
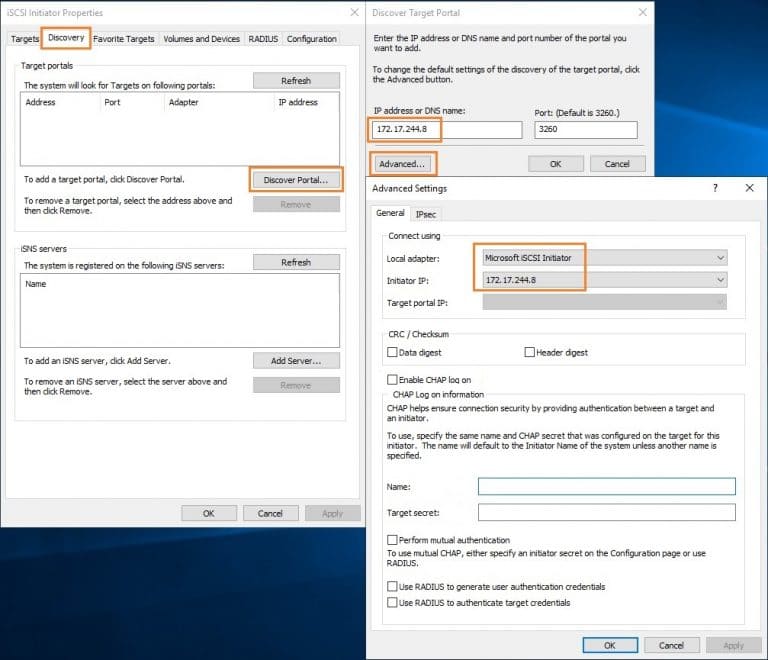
Перейдите на вкладку Discovery, нажмите на кнопку Discover Portal и введите ввести IP-адрес первого сервера (iSCSI-таргет). Чтобы трафик ходил только через определённый сетевой интерфейс, нужно нажать кнопку Advanced, и изменить значения по умолчанию в выпадающих списках: Local Adapter –> Microsoft iSCSI Initiator, Initiator IP –> 172.17.244.8.
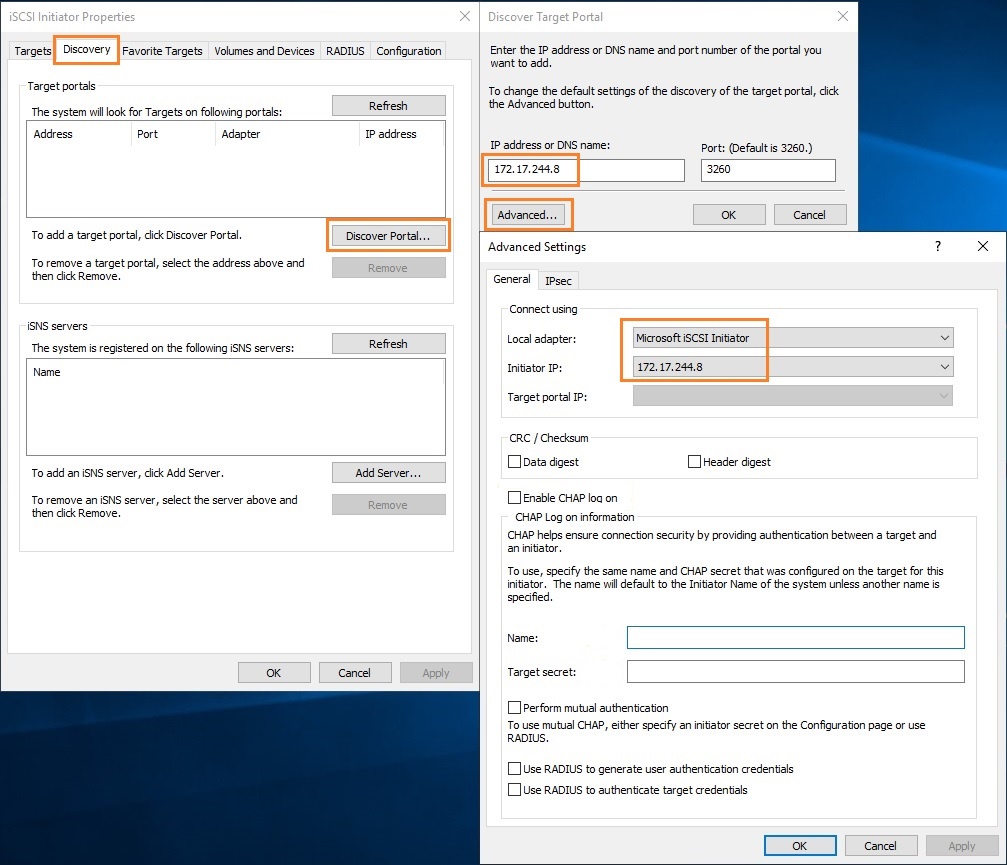
Для подключения к iSCSI хранилищу необходимо открыть порты 860 и 3260 в Windows Firewall.
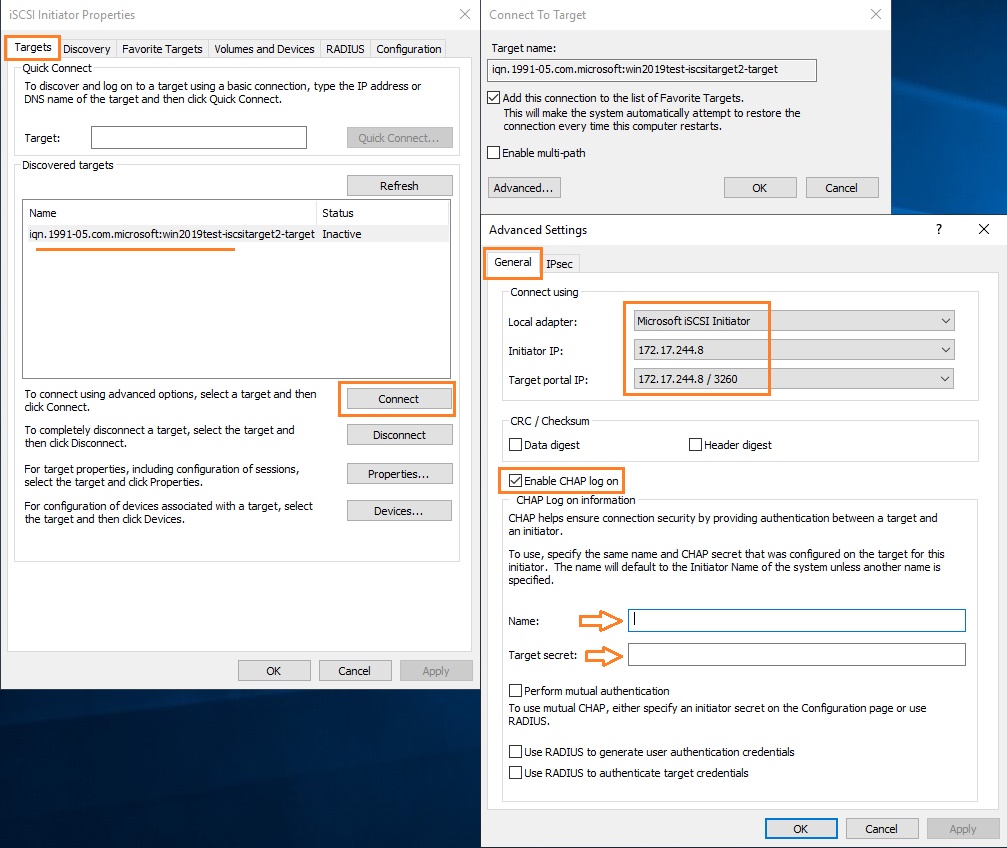
Теперь переключитесь на первую вкладку Targets, на ней появится новое подключение. Чтобы включить его, нажмите Connect -> Advanced, выберите значения из выпадающих полей, включите галочку Enable CHAP log on, укажите имя пользователя и 12-значный пароль.
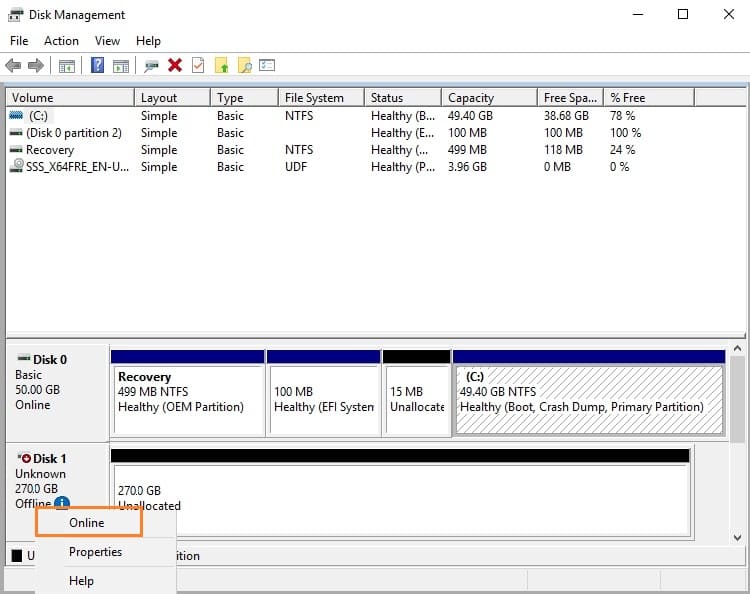
Осталось инициализировать сам iSCSI-диск, который сначала находится в состоянии Offline. Для этого на сервере-инициаторе необходимо в консоли Disk Management в контекстном меню нового диска выбрать пункт Online, а затем – Initialize Disk. Создайте на новом диске один или несколько разделов, присвойте метку и букву диска. Отформатируйте в файловой системе NTFS.
Для быстрой инициализации и форматирования нового диска можно использовать следующий однострочный PowerShell (см. пример в статье об управления дисками и разделами из PowerShell):
Get-Disk |Where-Object PartitionStyle -eq 'RAW' |Initialize-Disk -PartitionStyle MBR -PassThru |New-Partition -AssignDriveLetter -UseMaximumSize |Format-Volume -FileSystem NTFS -Confirm:$false
Примечание: iSCSI-диски не поддерживают файловую систему ReFS.
Теперь этот виртуальный диск, подключенный с другого сервера по протоколу iSCSI можно использовать как обычный локально подключенный диск.

Также вы можете подключить iSCSI диск на инициаторе из PowerShell. Чтобы получить IQN таргета, используйте командлет
Get-iSCSITarget
.
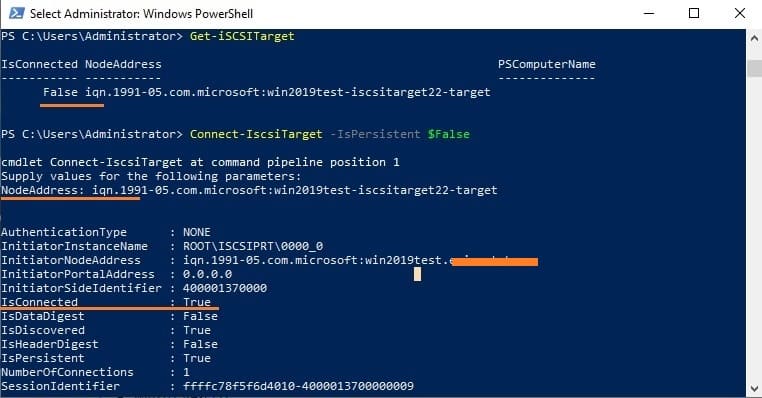
Чтобы подключится к iSCSI таргет выполните команду:
Connect-IscsiTarget –IsPersistent $False и введите IQN.

Если использовалась дополнительная проверка аутентификации CHAP, то необходимо будет это указать, используя следующую конструкцию:
Get-iScsiTarget | Connect-iScsitarget –AuthenticationType ONEWAYCHAP –ChapUserName <username> -ChapSecret <secret>
Если вы хотите обеспечить высокую доступность и балансировку нагрузки для iSCSI дисков, можно использовать несколько избыточные сетевые компоненты (сетевые карты, коммутаторы) и модуль MPIO.
Introduction:
In this blog post, we will cover the steps on how to install and configure the iSCSI Target server role on Windows Server 2019.
The iSCSI Target Server is a role service in Windows Server 2019 that enables you to make local storage available via the iSCSI protocol. Internet Small Computer System Interface (iSCSI) uses TCP port number 3260 for communication.
iSCSI create shared storage to share block storage over Ethernet. You can use the iSCSI Target Server to provide block storage leverages your existing Ethernet network.
Test Lab Setup:
Note: For this, we will use the virtual test lab created in VirtualBox.
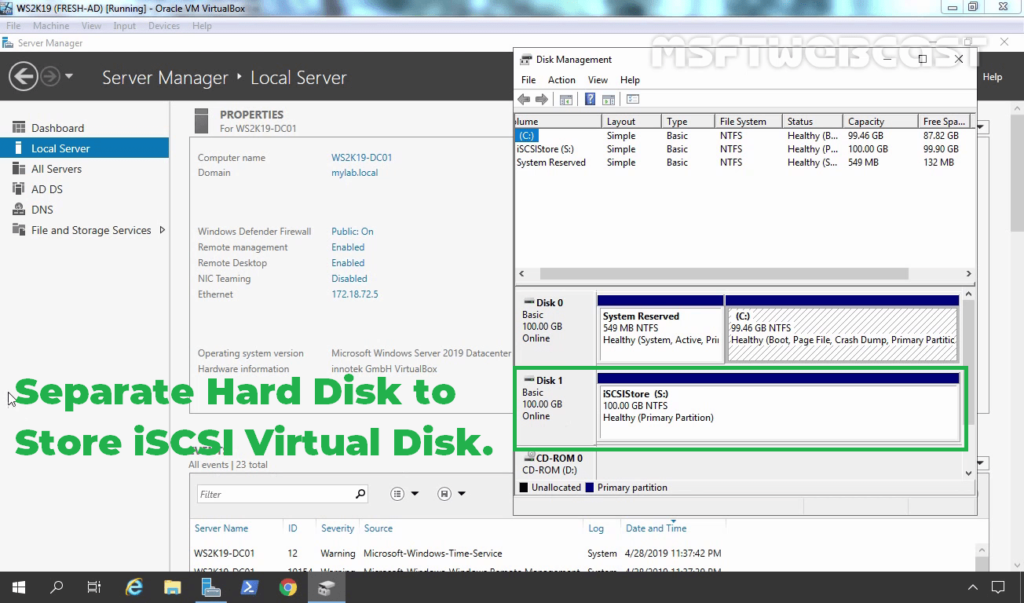
- WS2K19-DC01: Domain Controller and DNS with two Hard Disk.
- Disk 0: For Windows Server 2019 OS (Drive letter C:)
- Disk 1: For iSCSI Storage (Drive letter S:)
Install iSCSI Target Server on Windows Server 2019:
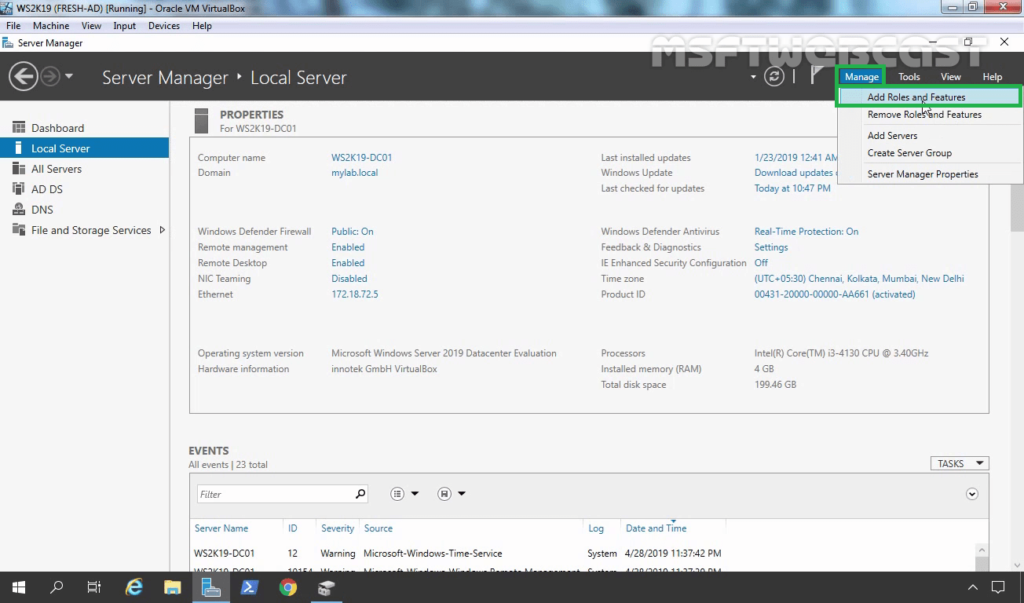
Sign in to Windows Server 2019 with an administrator account and open Server Manager Console to install the iSCSI target server role.
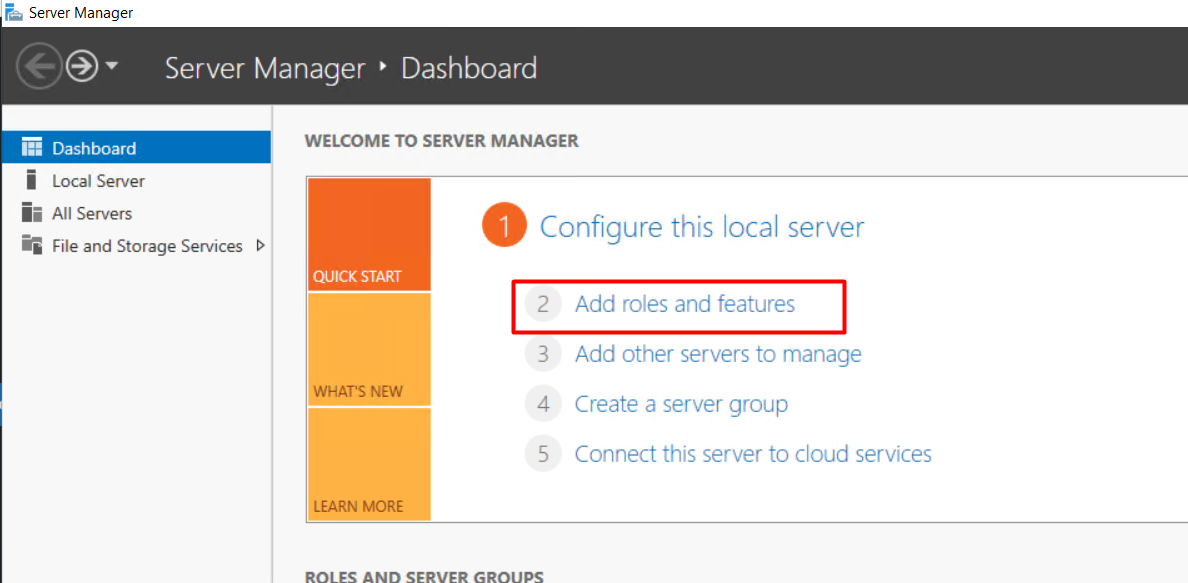
1. Click on Manage and select Add Role and Features.
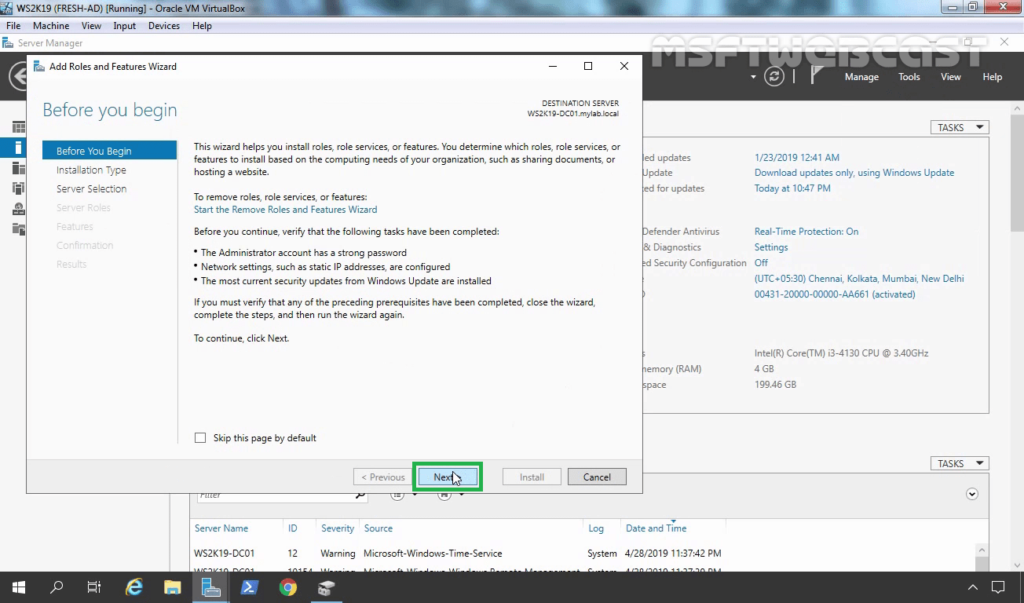
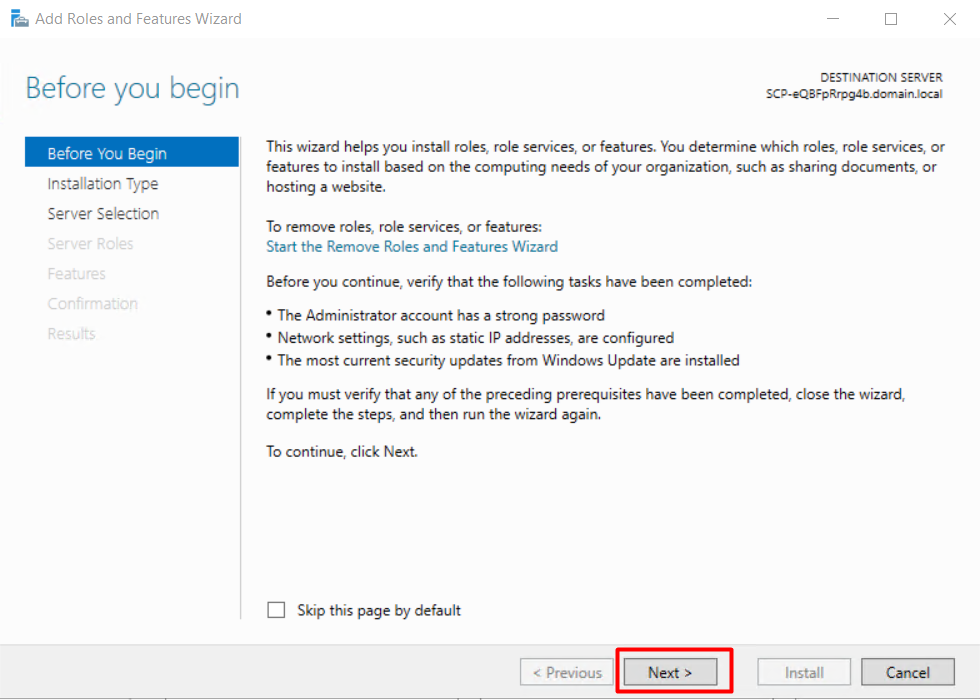
2. On the Before you begin page, click Next.
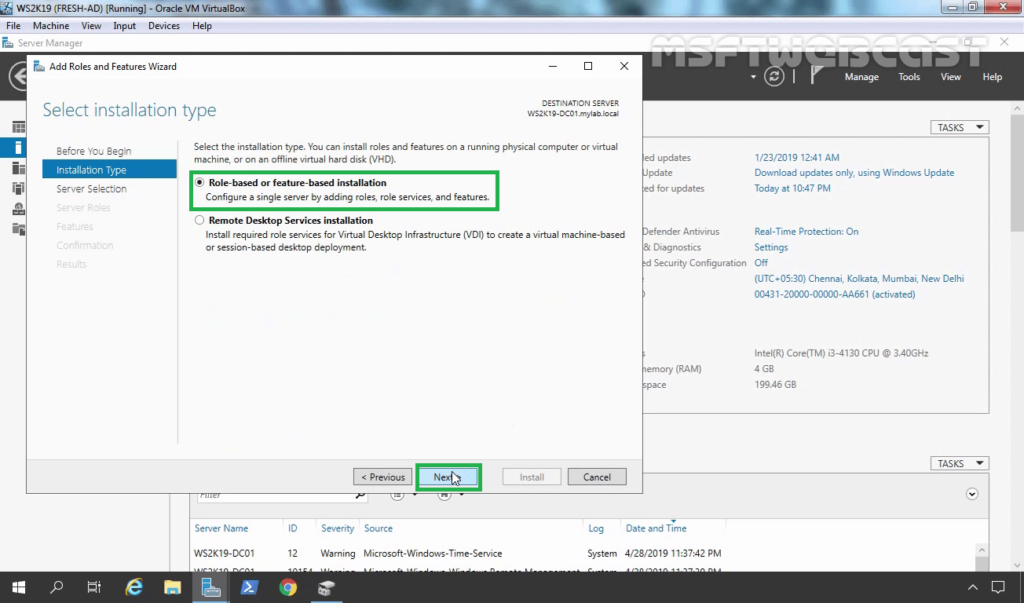
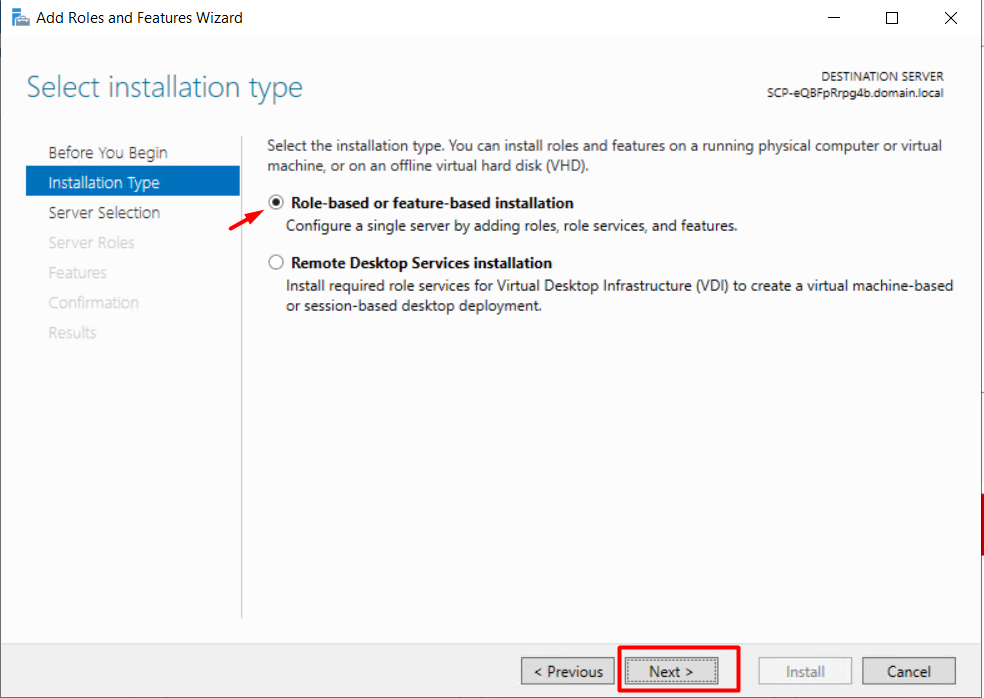
3. Select Role-based or feature-based installation and click Next.
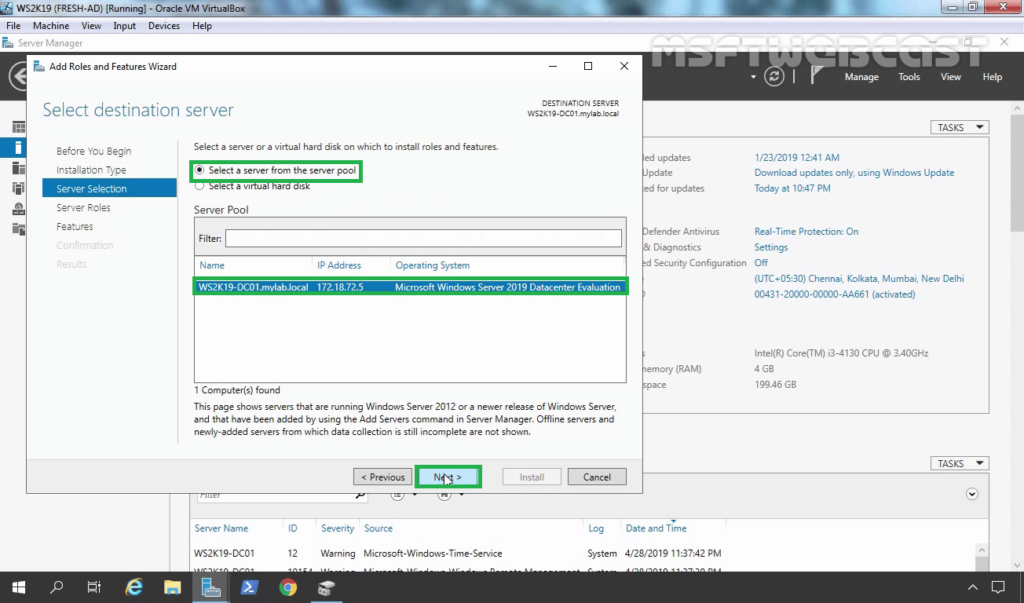
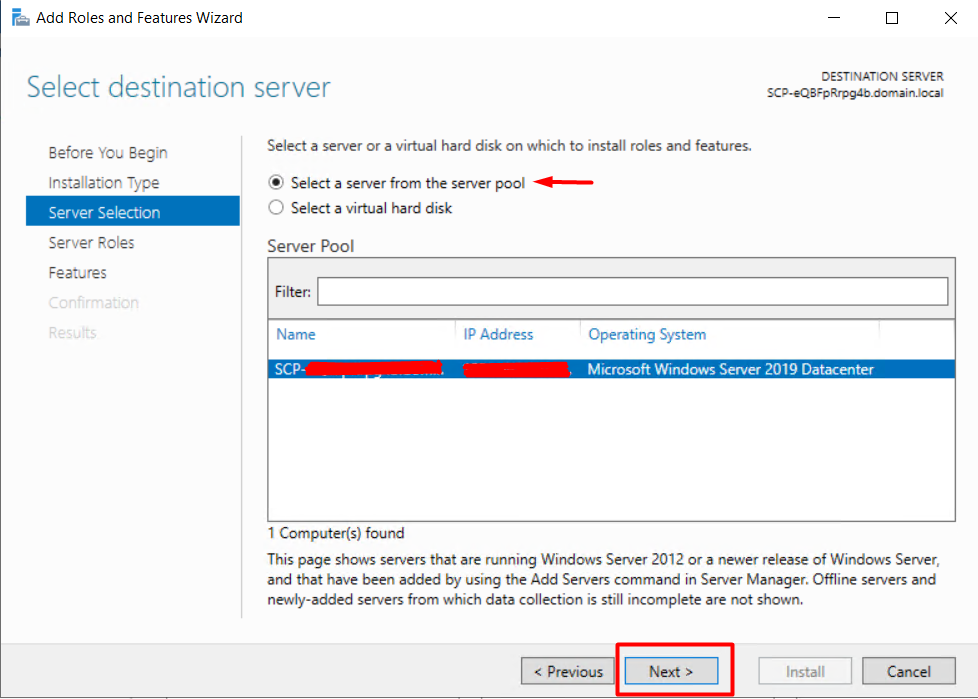
4. Select a server from the server pool on which you want to install the iSCSI Target role service, click Next.
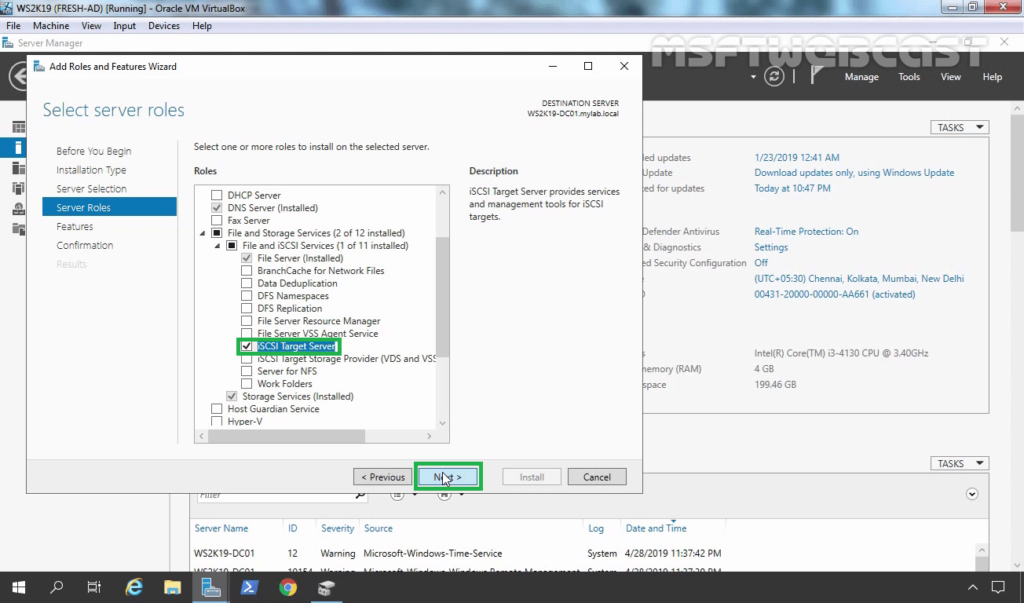
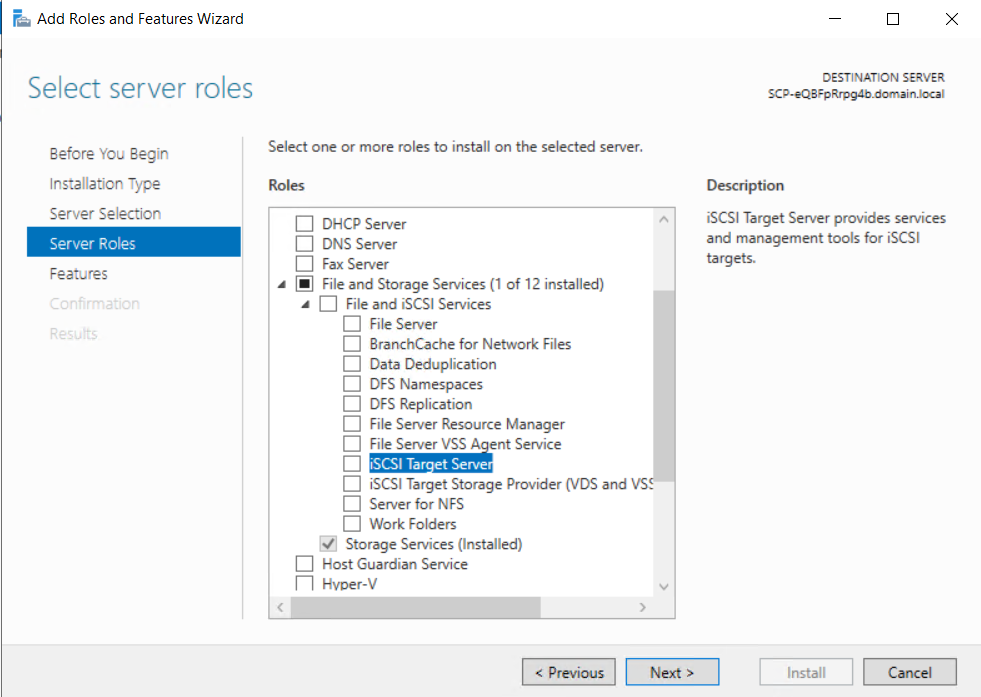
5. On select server roles page, expand File and Storage Services, expand File and iSCSI Services. Select the iSCSI Target Server checkbox. Click Next.
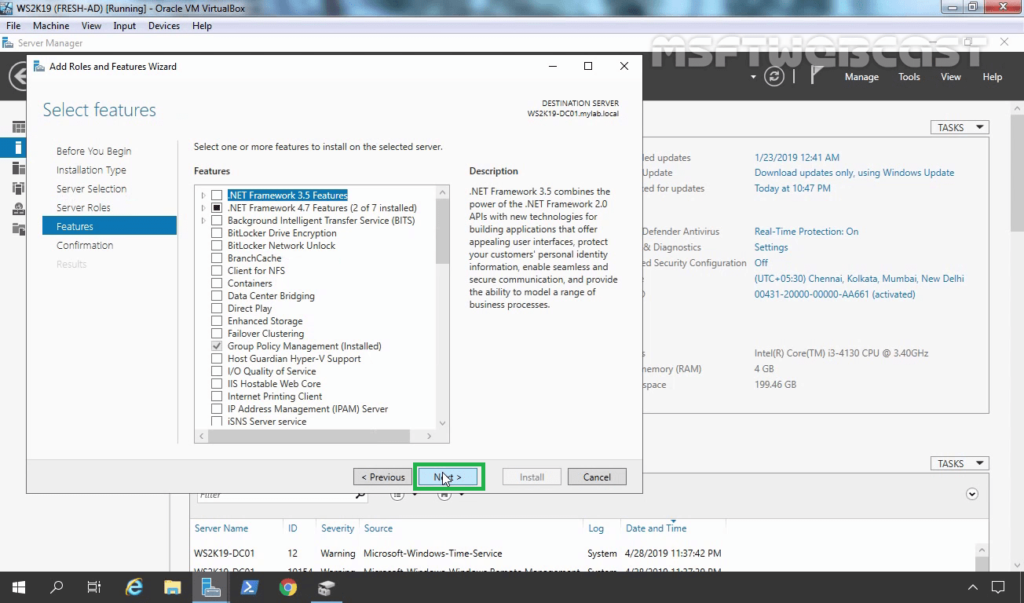
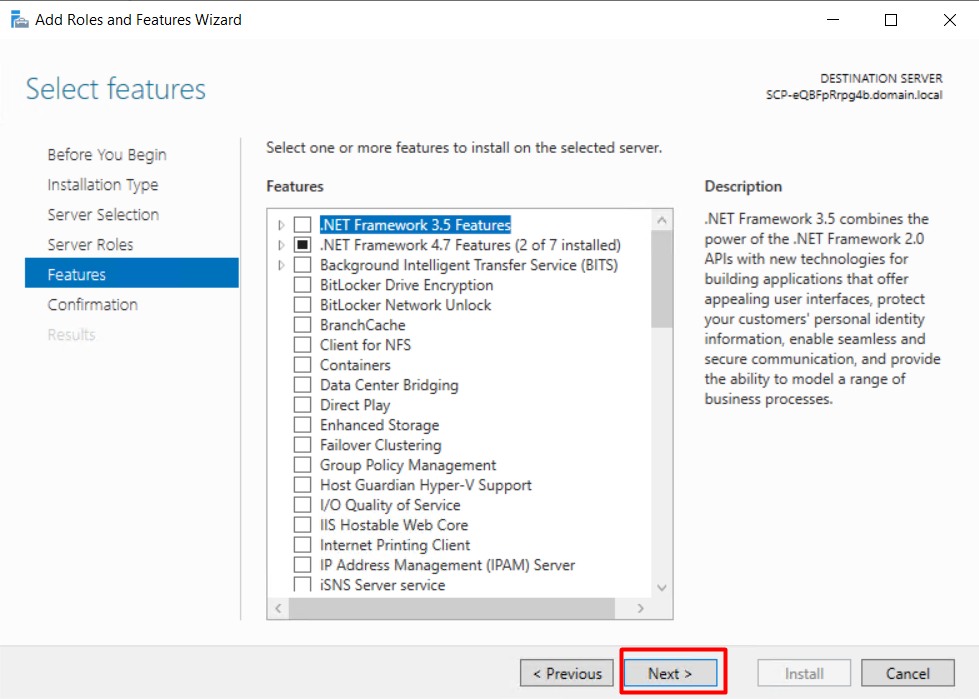
6. On select features, click Next.
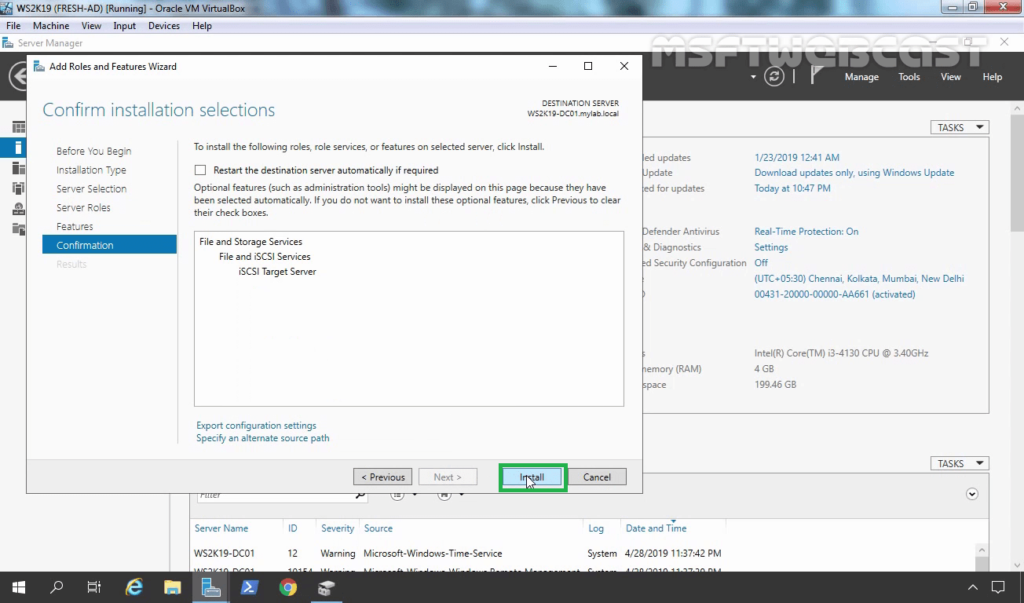
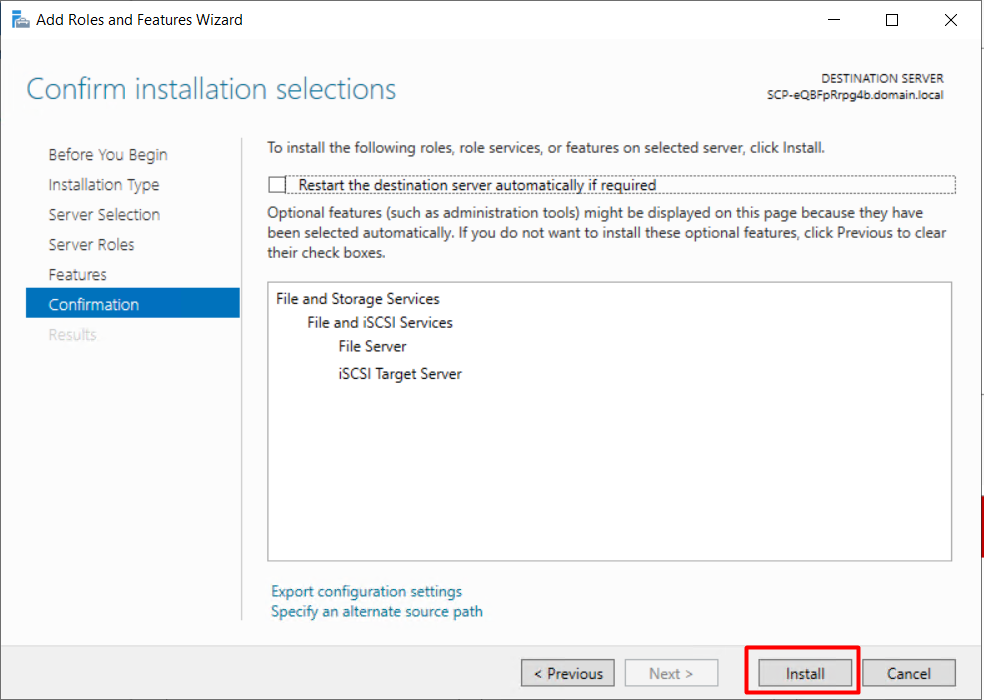
7. Click Install and complete the installation process.
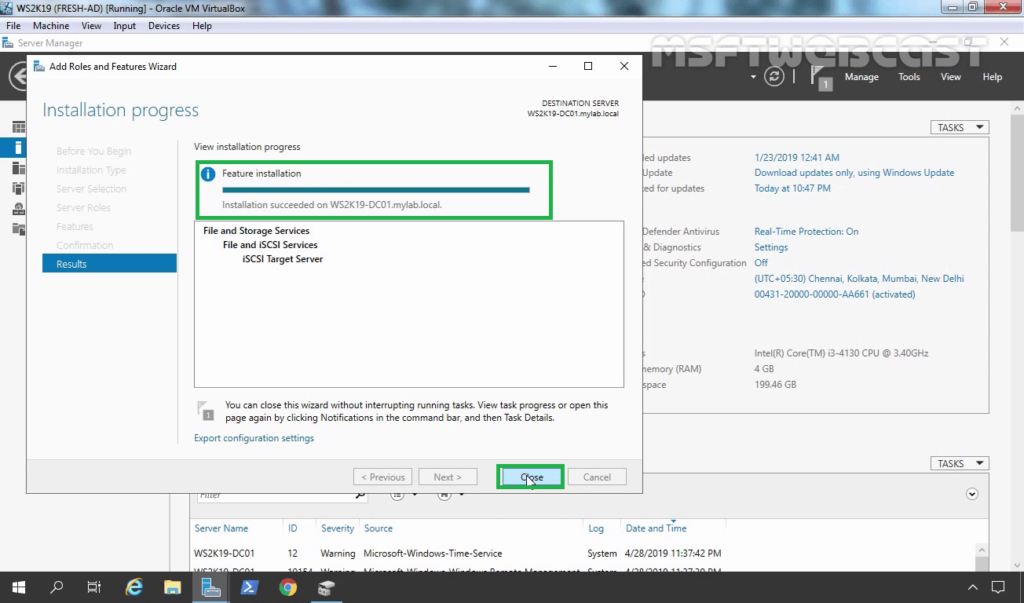
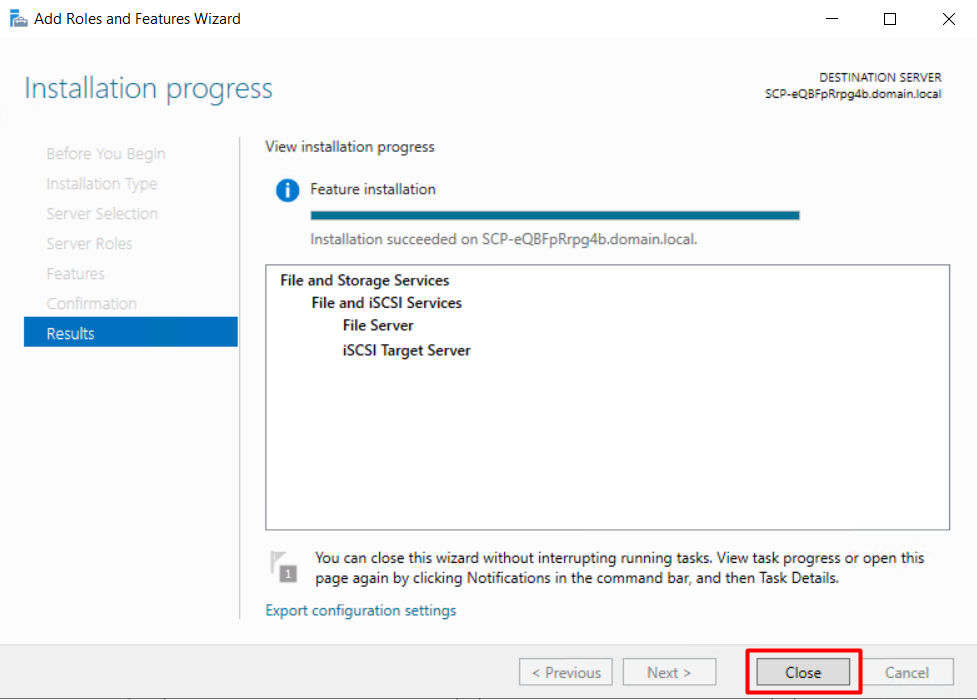
8. Click Close to finish the installation.
Configure iSCSI Target on Windows Server 2019:
After installing the iSCSI Target server role on Windows Server 2019, our next step is to configure it. We will use the File and Storage Services console to create iSCSI Target.
9. On the Server Manager Console, click on File and Storage Services.
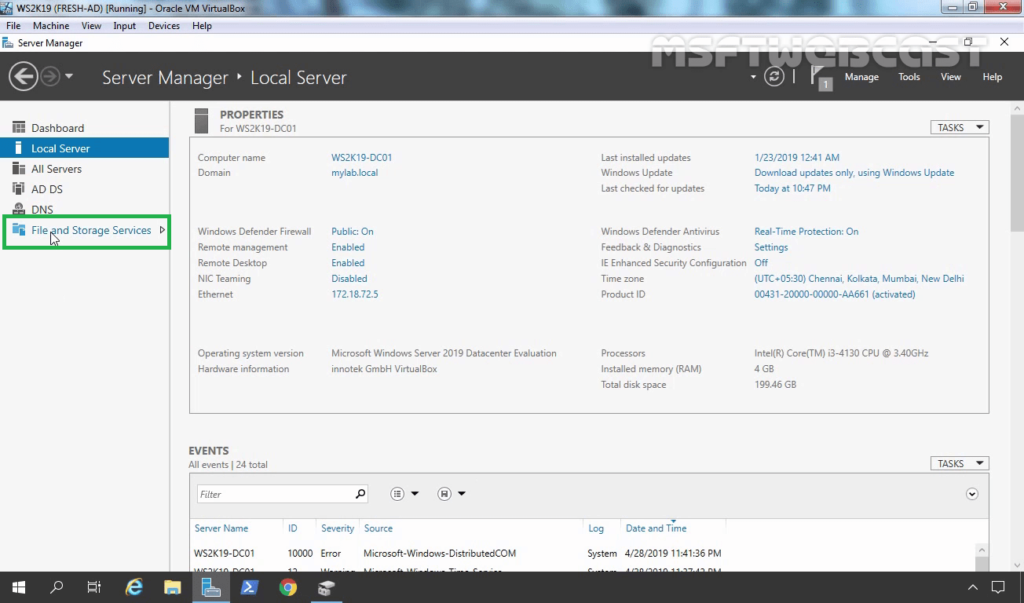
10. Click on iSCSI and then click on To create an iSCSI virtual disk link to start the new iSCSI virtual disk wizard.

11. Select the location to store the iSCSI virtual disk. In our case, we will select the second hard disk with drive letter “S:”.
12. Specify the iSCSI virtual disk name and description (optional). Click Next to continue. (Path will be S:\iSCSIVirtualDisks\<virtual-disk-name.vhdx)
13. Specify the size of the iSCSI virtual disk. Choose the disk type as per your requirement. You have three options to choose from:
- Fixed Size
- Dynamically Expanding
- Differencing
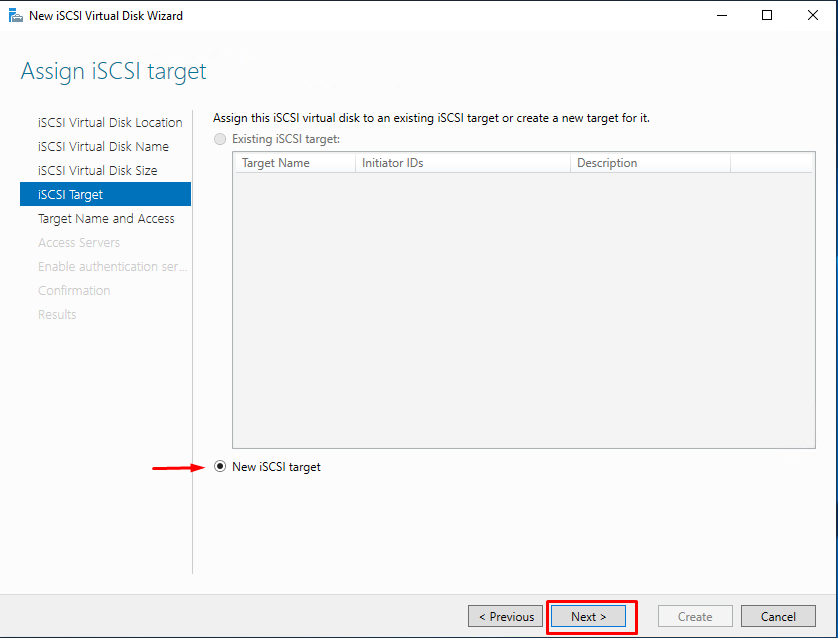
14. To create a new iSCSI target, click the New iSCSI target and click Next. If you have defined the iSCSI target earlier, you can select the target from the existing target list.
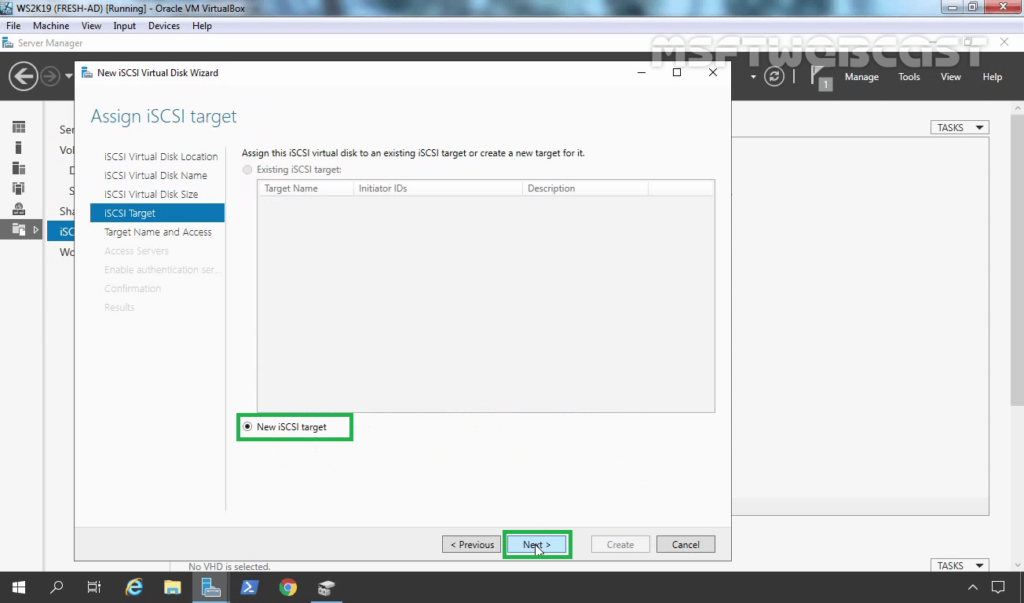
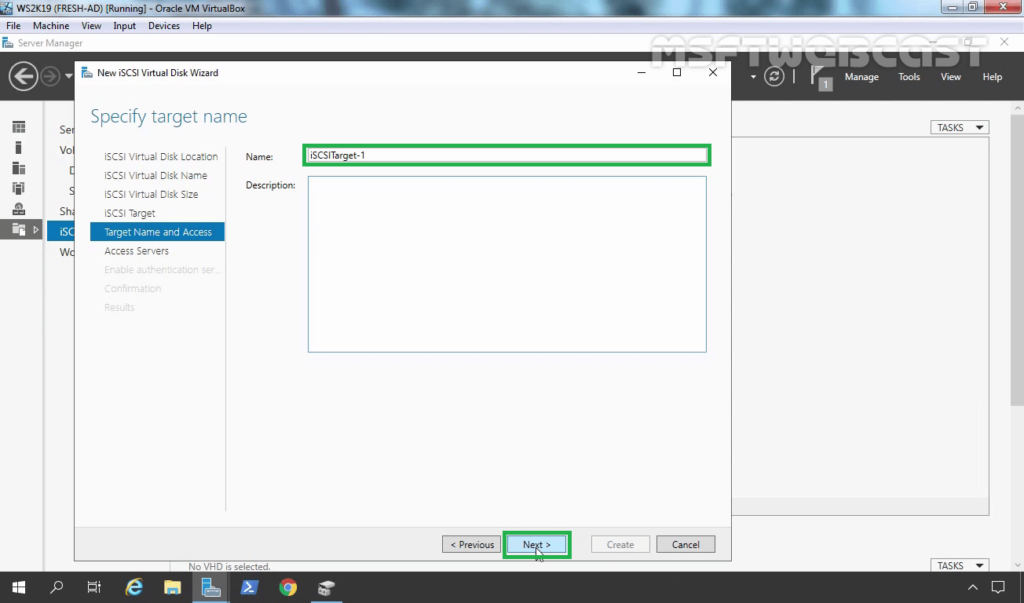
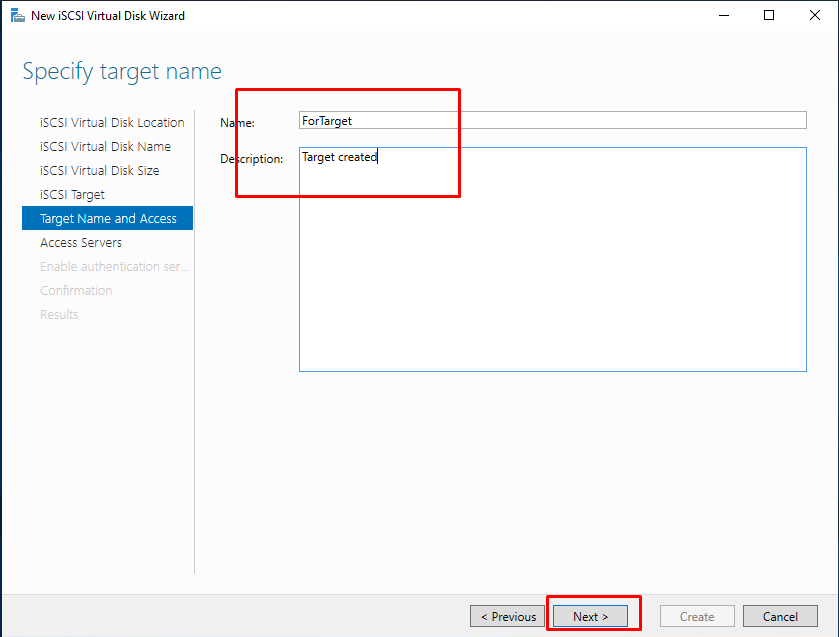
15. If you chose the New iSCSI target, on the Target Name and Access page, type the name of the target. Click Next.
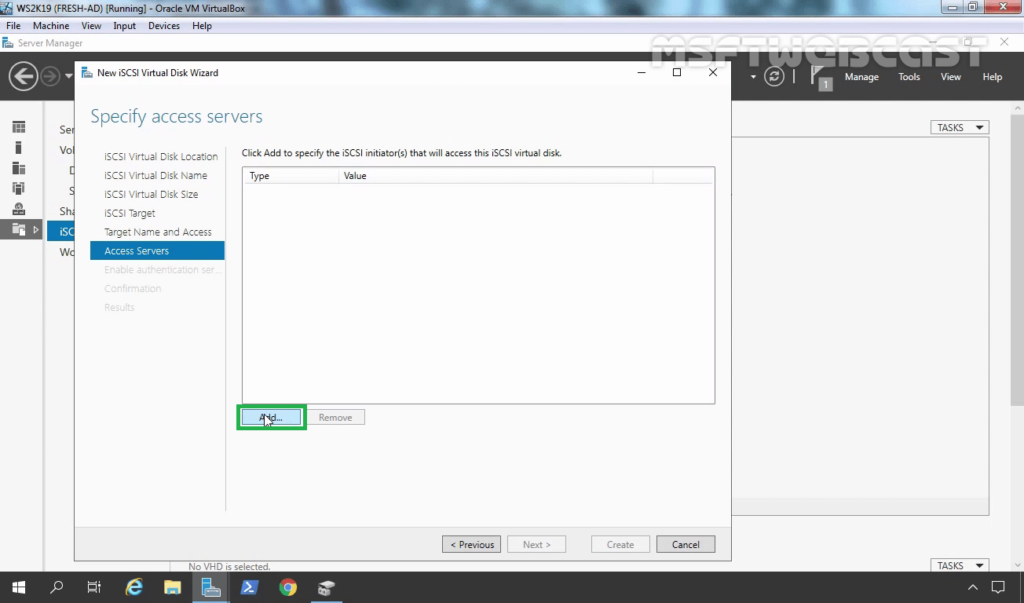
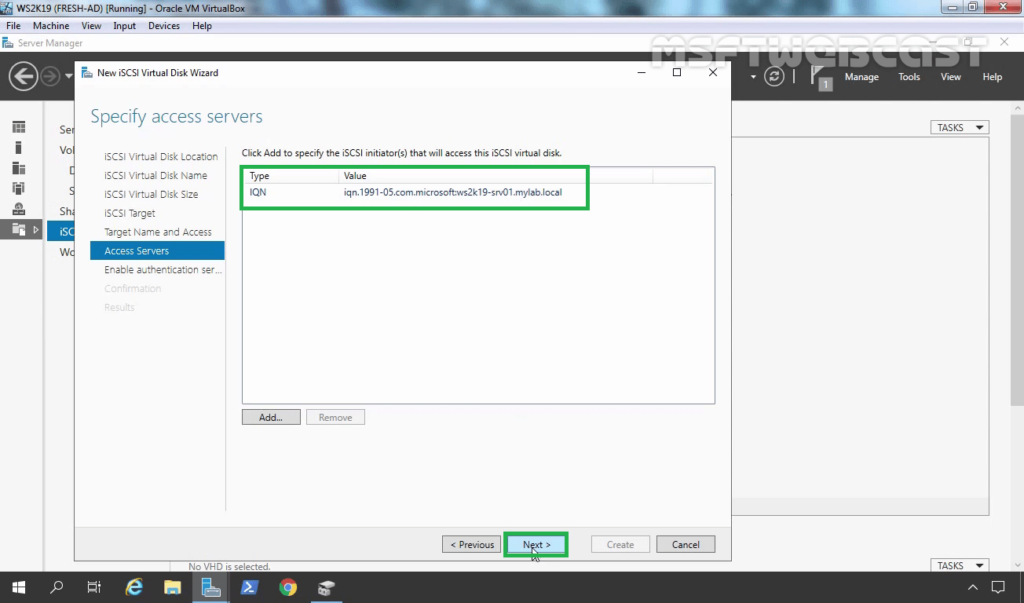
16. Choose the Access Server to specify the details about iSCSI Initiator, who will be accessing the iSCSI virtual disk. Click Add.
17. In the Select a method to identify the initiator dialog box, select Enter a value for the selected type radio button. From the type list, select IQN and type iSCSI qualified name (IQN) of iSCSI Initiator.
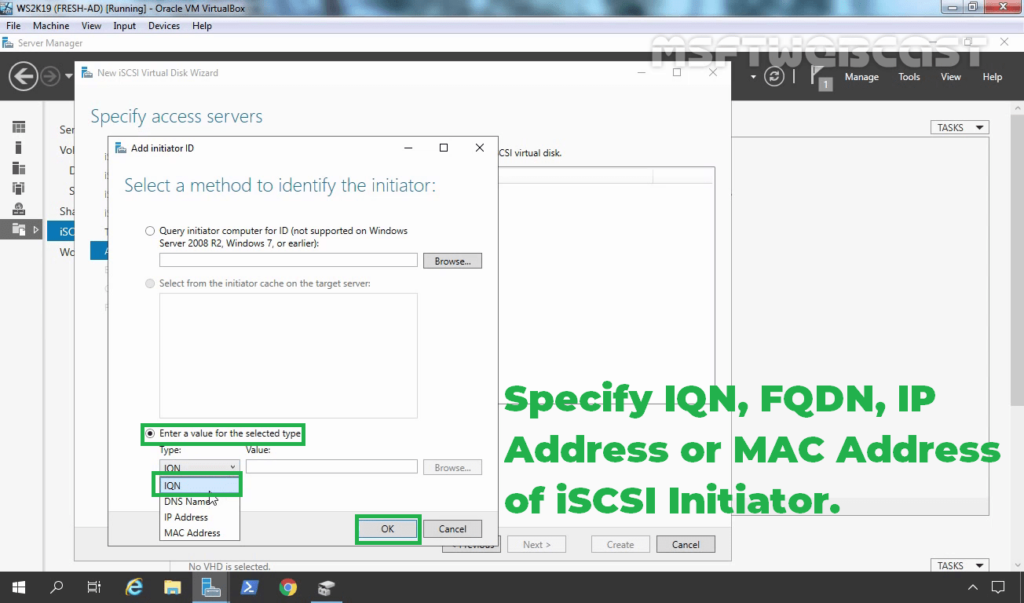
You can find the IQN in the iSCSI initiator properties window. You can also specify the IP address, FQDN or MAC Address of the iSCSI initiator.
18. On the Specify access server’s page, click Next.
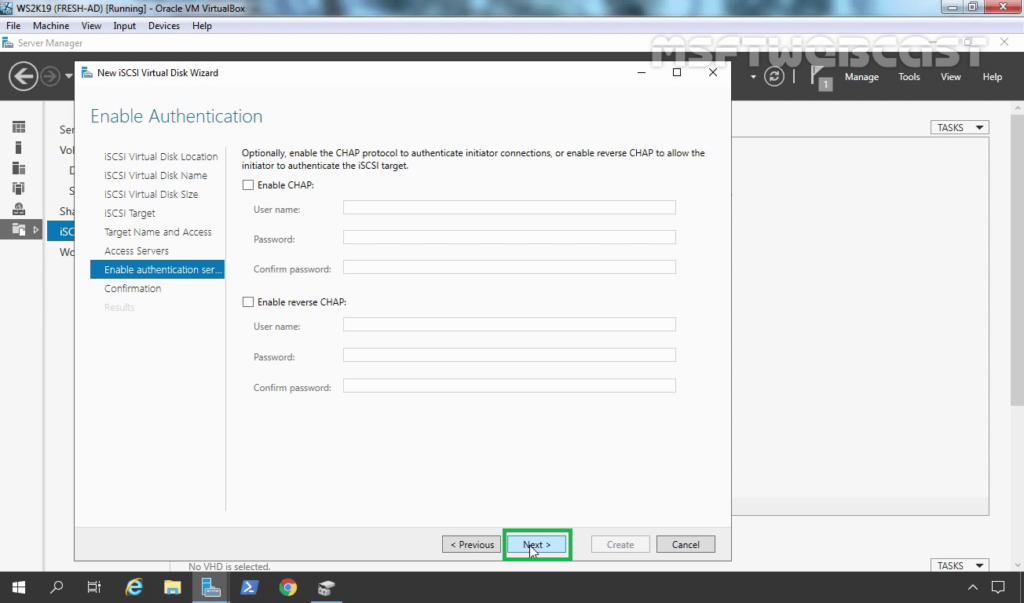
19. Click Next, as we don’t want to enable CHAP authentication for iSCSI Target.
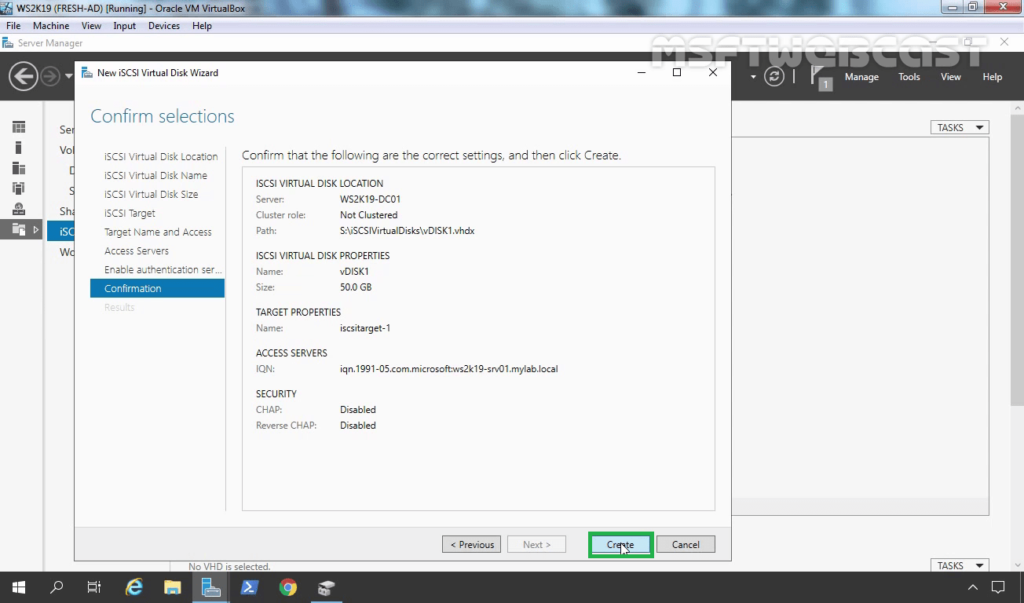
20. Review the selection. Click create and wait for it to finish.
21. When all progress bars indicate completed, click Close to exit the wizard and complete the configuration.

22. We can see the iSCSI virtual disk created in the server manager.
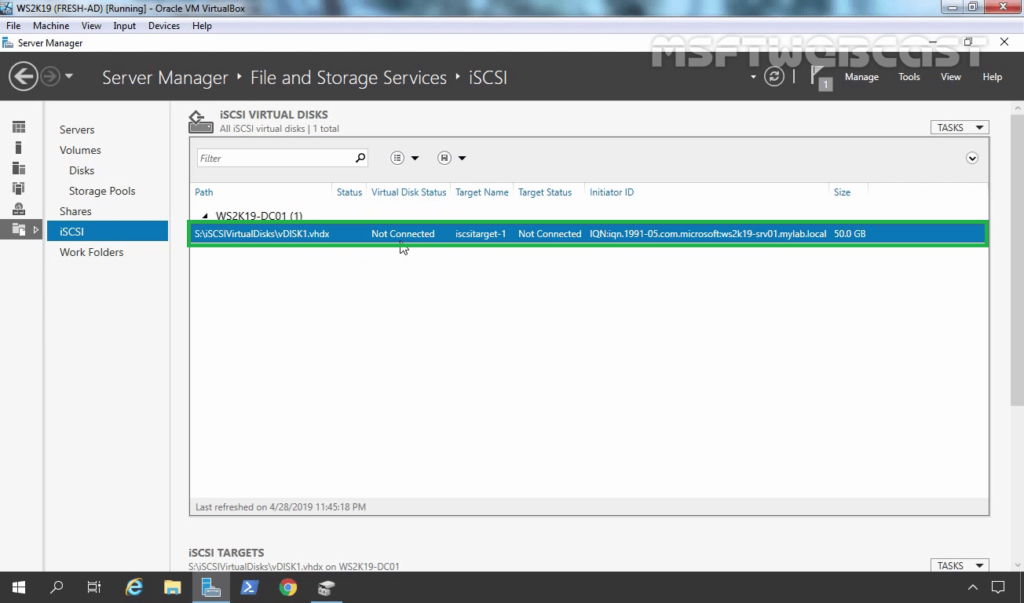
Now we have successfully installed and configured an iSCSI target Server role and created an iSCSI target virtual disk on Windows Server 2019.
In the next post, we will learn the steps to configure iSCSI initiator in Windows Server 2019 to connect iSCSI Target storage.
Thank you for reading.
Video on How to Install and Configure iSCSI Target Server 2019:
Post Views: 4,986
Estimated reading: 4 minutes
2184 views
Internet Small Computer Systems Interface (iSCSI) is a storage network resource that uses Internet Protocol connectivity to link data storage facilities.
It provides block-level (block) access to storage locations via SCSI commands. iSCSI Target is the network (memory) location and it appears as a local hard drive to the iSCSI Initiator. Basically, the iSCSI Initiator is a client that connects to the iSCSI Target.
When activated and configured, iSCSI Target Server turns Windows Server operating system computers into network storage devices.
Install iSCSI Target
Step 1 – To install iSCSI Target, go to “Server Manager” choose to Manage then click to Add Roles and Features.
Step 2 – Click Next in the window as shown below.
Step 3 – Select the Role-based or feature-based installation option and then click Next.
Step 4: Select a host for the iSCSI Target roles and services.
This can be a local server or a virtual hard drive on the server. In the example case, the local server will be used.
Click Next to continue.
Step 5: Select the iSCSI Server Roles
In this step, we will define a list of server roles to install for the iSCSI Target.
Click the Files and Storage Services tab to expand it.
Select iSCSI Target Server, then check the box iSCSI Target Server
Step 6: Add features to iSCSI Target.
When you selected the iSCSI Target Server in the previous step, a pop-up window titled Add features that are required for iSCSI Target Server? will open.
Here, click the Add Features tab and then click Next.

Step 7: Select features.
Check all the additional features required to install iSCSI Target Server and click Next
Step 8: Confirm installation selection.
Confirm that the iSCSI Target Server and other choices you made in the steps above are listed, then select Install.
Step 9: Complete the installation of iSCSI Target Server.
When the installation of the selected roles, features, and services is complete, click Close to complete the iSCSI Target Server installation.
Configure iSCSI Target
Step 1: Configure iSCSI Target Folder
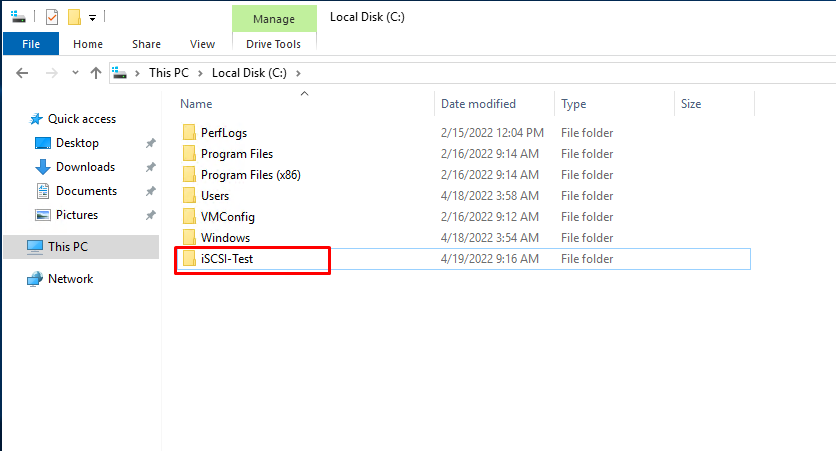
We are now going to configure a folder that we shall be connected to by initiators. Create a directory/folder in your desired disk partition. We will create iSCSI-Test in C partition.
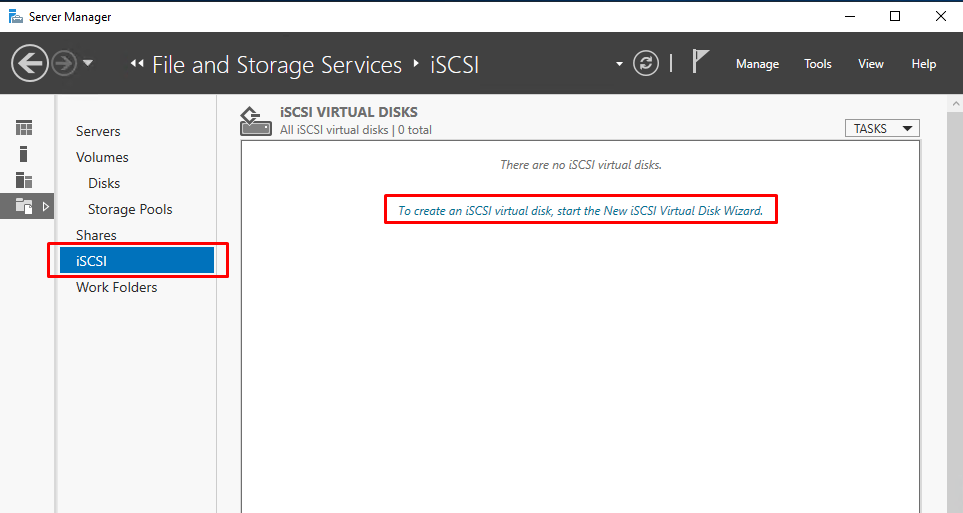
Head over to “Server Manager“. Click “File and Storage Services” and select iSCSI from the expanded menu. You will see “To create an iSCSI virtual disk, start the New iSCSI Virtual Disk Wizard” link on the right pane. Click on it. A wizard pops-up.
Step 2: Choose the folder we created
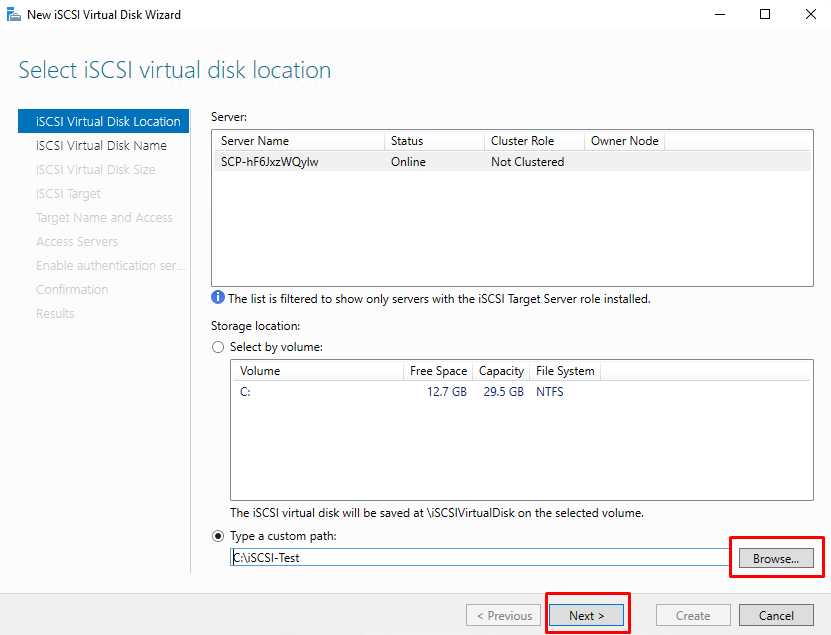
Select “Type a custom path” and browse for the folder we created earlier. Click “Next” after that.
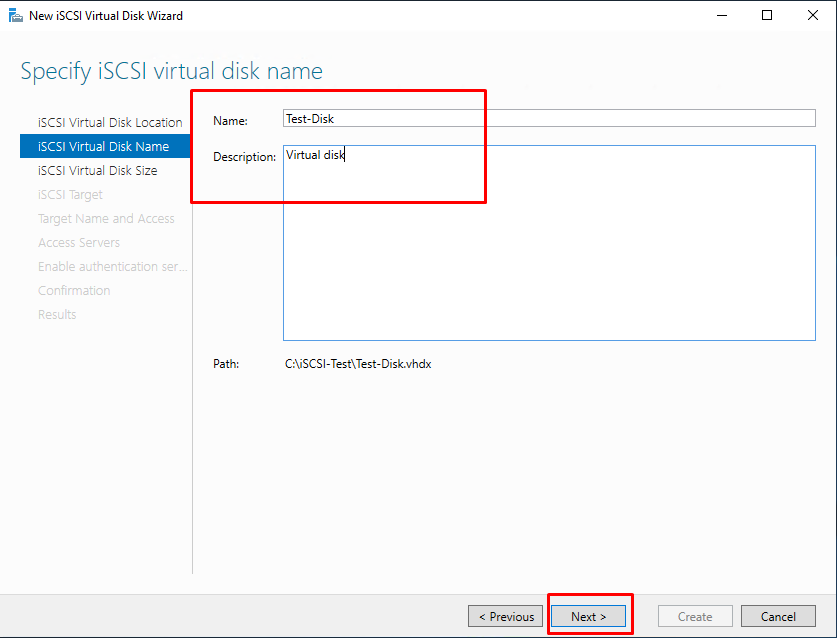
Step 3: Name and describe your virtual disk
This is an easy step of just naming and describing your virtual disk. Click on “Next” after you are done.
Step 4: Set the size of the virtual disk
In this step, apart from setting the size of the virtual disk, you have the option of choosing if the disk will be fixed, dynamically grow or in differencing modes. All of the three are described adequately in the window. Select the one that makes more sense in your set-up and click “Next“
Step 5: Assign iSCSI Target
Since this is a new target, select “New iSCSI target” and click “Next“
Step 6: Name and describe your target
This is yet another easy step of just naming and describing your target. Click on “Next” after you are done.
Step 7: Specify access servers
For security, we have to explicitly allow known initiators to our targets. This page gives us that opportunity. Click on “Add” which opens “Add Initiator ID” pop-up window. For simplicity, use “Enter a value for the selected type” and under “Type” choose IP Address from the drop-down menu. Key-in your initiator IP Address and click “OK“.
Step 8: Authentication between initiator and Target
You can use either of the two CHAP options provided which are well described in this step. Enter username and passwords. Click on “Next” after you are done.
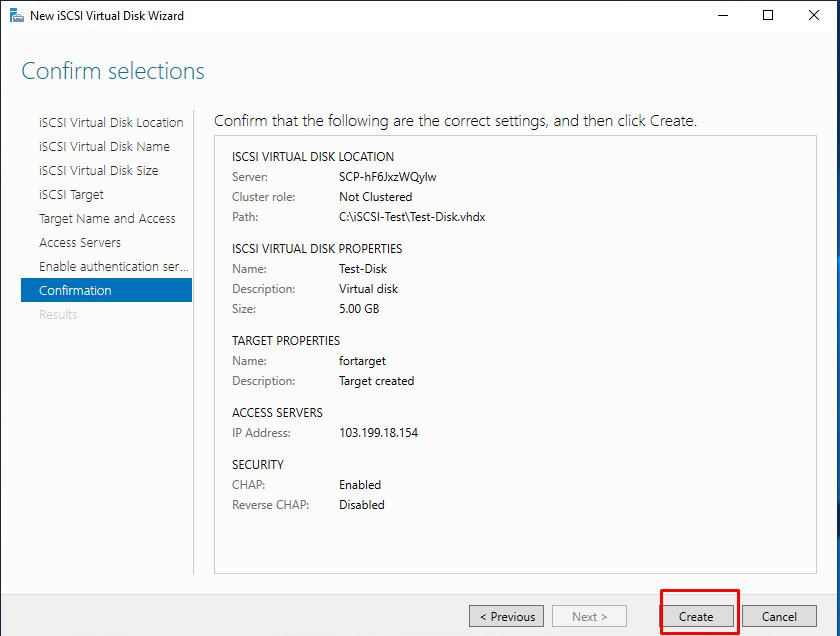
Step 9: Confirm selections and create
On this following page confirm your selections, click create and wait for it to finish.
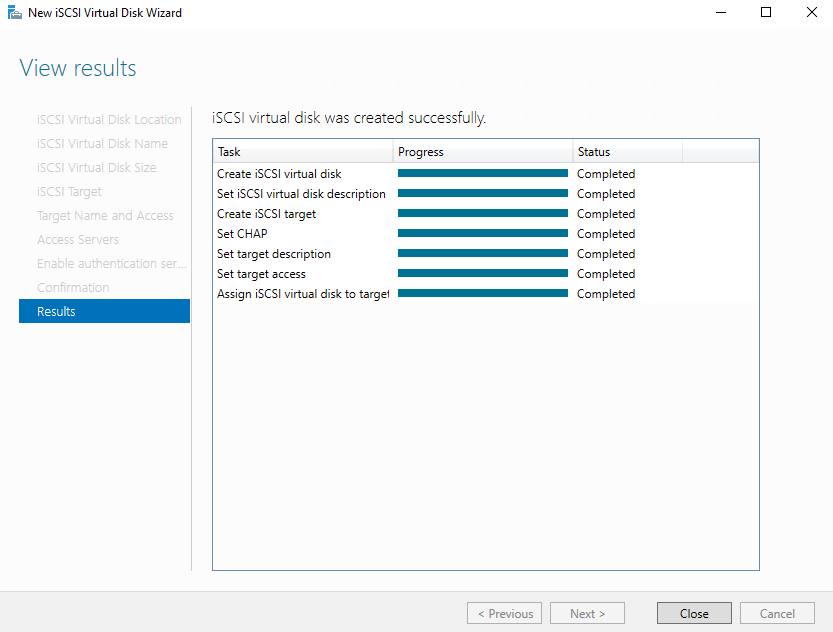
You should see your virtual disk created in the server manager.
That’s all we guide you in this article !

In this tutorial, we would learn how to configure iSCSI disks in Windows Server 2019 and setup a iSCSI target server. The following would be covered:
- What is iSCSI?
- Adding Virtual Disks to VM in VirtualBox
- iSCSI Target vs iSCSI Initiator
- Configure the iSCSI Initiators
- Installing and Configuring iSCSI Target
- Connect the iSCSI Initiators to the Target
- Access the Local Disks
Video Tutorial here
1. What is iSCSI?
iSCSI stands for Internet Small Computer Systems Interface. It is a standard network-based storage. iSCSI allows you to create storage devices on the network that are accessible via Internet Protocol. The storage disks are provisioned using the iSCSI protocol and are accessible to computers on the network as if they are local to that computer. In other works, network computer see iSCSI disks as local disks.
In this demo, we will setup virtual machines using VirtualBox. Then we add disks to one of the nodes (NODE3). These disk would then be configured to be used by the network as iSCSI disks.
2. Adding Virtual Disks to VM in VirtualBox
I have setup VirtualBox with some nodes shown below.
Let’s now add some disks to Node3.
Step 1 – With Node3 selected, click on settings and choose Storage.
Step 2 – Click on the Add Disk icon at the lower end and follow the procedure to add a new disk
Step 3 – Repeat the process to add 3 more disks
Step 4 – After adding the disks, power up the computer. Go to Computer Management > Disk Management and you will see the three disks as shown below:
Step 5 – Bring the three disks online and assign then drive letters.
We would now configure these disks to be used an an iSCSI disk. But before then, let’s first understand two terms: iSCSI target and iSCSI initiator.
3. iSCSI Target vs iSCSI Initiator
An iSCSI target is a source of the iSCSI storage services. This is normally where the iSCSI storage disks in hosted. In this demo, this would be a VM with Windows Server 2019 which has been configured as an iSCSI target.
A iSCSI initiator is a device that consumes the storage service provided by the iSCSI target. In this demo, we would use configure Node1 and Node2 as iSCSI initiator to access the iSCSI target disks. Both Node1 and Node2 are run Window Server 2019.
4. Configure the iSCSI Initiators
As mentioned before, Nod1 and Node2 would be used as the initiators. So we need to configure them as iSCSI initiators. To do that, follow the steps below:
Step 1 – Log in to Node1. Click on tools on the upper right and select iSCSI initiator as shown below:
Step 2 – Click ok in the dialog box that appears
Step 3 – In the iSCSI Properties windows, select the Configuration tab and take note of the Initiator name.
Step 4 – Repeat the same for Node2.
5. Installing and Configuring iSCSI Target
To setup Node3 as an iSCSI target, follow the steps below:
Step 1 – Log in to the Node2 and click on Add roles and features
Step 2 – Find the iSCSI Target Server under File and iSCSI Services. See figure below:
Step 3 – After the installation complete, goto the File and Storage Services > iSCSI. Click on the link “To create and iSCSI virtual disk, start..“. See figure below:
Step 4 – Select drive D. Follow the and go Next. Follow the wizard steps to complete the Virtual disk creation. You will need the following
iSCSI virtual disk name: I named it VDiskD
Disk size: enter the size same as the Free space
iSCSI target: select New iSCSI target. I named it Node3Target
Access Servers: Click on Add > Select ‘Enter a value for the selected type’. The type should be IQN. In the value enter the IQN value. You get this from the Node1 and Node2 as explained in the previous part.
Step 5 – Repeat the same steps for Drive E and Drive F.
At this point, you will have the output shown in the figure below:

You can see that the disks are not connected. You need to connect them from the initiators.
6. Connect the iSCSI Initiators to the Target
Follow the steps below to connect the iSCSI initiators to the target.
Step 1: Now you need to go to the iSCSI initiators (Node1 and Node2) and open the initiator properties window.

Step 2: Enter the name of the target, that is NODE3 and click on Quick Connect. If you get it right, then the connection succeeds
Step 3: Click on the Volume and Devices tab and click on Auto Configure. You will see that the three disks connects as shown below.

Step 4: Click OK and exit
Step 5: Repeat steps 1 to step 4 for Node2
7. Connect to the Local Disks
Finally we would have access this disk on Node1 and Node2 just like local disk. To get that done we need to take these final few steps:
Step 1: On Node1, go to Computer Management > Disk Management. You will see the three disks. However, they are not offline and not initialised.
Step 2: Right-click on the Disk an choose Online
Step 3: Right-click again and choose Initialise
Step 4: You can then create a simple volume using the disk
Step 5: Repeat steps 2 to 4 for the two other disk
Step 6: Repeat steps 1 to 5 for the Node2
At this point, you have successfully completed setup of iSCSI in Windows Server 2019. If you have challenges do let me know.
And finally, i recommend you watch the video explanation on my Channel here.
Протокол iSCSI (Internet Small Computer System Interface) представляет собой реализацию протокола SCSI поверх IP, что позволяет подключать серверы к системам хранения данных через стандартную TCP/IP сеть, не используя Fibre Channel. В данной статье мы рассмотрим настройку iSCSI-хранилища на Windows Server 2019 и использование его на других серверах (в Windows Server 2016 и 2012 R2 настройка аналогична). Пример использования: серверу файлов необходим дополнительный объем, и через сеть мы подключаем к нему виртуальный диск с другого сервера-хранилища по iSCSI.
Приобрести оригинальные ключи активации Windows Server можно у нас в каталоге от 1190 ₽
Создание и настройка iSCSI Target
Первым шагом является создание iSCSI таргета (сервера). Для этого необходимо включить роль iSCSI Target Server на сервере, где будет размещено хранилище. Процесс можно выполнить через GUI или командой PowerShell.
1. Активируйте роль iSCSI Target Server:
— Откройте Server Manager -> File and Storage Services -> File and iSCSI Services и установите роль iSCSI.
— Можно установить через PowerShell выполнив команду:
Install-WindowsFeature -Name FS-iSCSITarget-Server
2. Создание iSCSI виртуального диска:
— В Server Manager выберите File and Storage Services -> iSCSI и запустите New iSCSI Virtual Disk Wizard.

— Выберите физический диск, на котором будет создан виртуальный iSCSI диск, укажите его имя и тип (Fixed Size, Dynamically expanding или Differencing).
— На этапе выбора инициаторов (серверов, подключающихся к таргету), выберите один из методов идентификации: IP-адрес, IQN, DNS Name или MAC Address. Используем вариант с IP-адресом.
— При необходимости настройте аутентификацию через CHAP: введите имя пользователя и пароль (не менее 12 символов).
3. Пример создания iSCSI диска через PowerShell:
— Создание виртуального диска размером 200 ГБ:
New-IscsiVirtualDisk -Path С:\iSCSIVirtualDisks\iscsiDisk2.vhdx -Size 200GB
По умолчанию создается динамический диск размером 4,096 Кб, независимо от того, сколько было указано параметром Size. Динамический диск будет расширяться по мере необходимости.

— Для создания фиксированного диска:
New-IscsiVirtualDisk -Path С:\iSCSIVirtualDisks\iscsiDisk2.vhdx -Size 200GB -UseFixed
4. Настройка таргета и разрешение доступа:
— Присвоим таргету имя и разрешим доступ с определенного IP-адреса:
New-IscsiServerTarget -TargetName "iscsiTarget33" -InitiatorId @("IPAddress:172.17.244.8")
— Или используем IQN имя для подключения:
New-IscsiServerTarget -TargetName iscsiTarget33 -InitiatorIds “IQN: 1991-05.com.microsoft:win2019test.ddd.com”
5. Проверка результата:
— Получим список таргетов и LUN:
Get-IscsiServerTarget | fl TargetName, LunMappings
— Полное имя таргета можно получить командой:
Get-IscsiTarget
— Подключим таргет:
Connect-IscsiTarget -NodeAddress iqn.1991-05.com.microsoft:win2019test-iscsitarget33-target
Настройка iSCSI Initiator на Windows Server
Следующий шаг — это подключение к созданному iSCSI диску со второго сервера-инициатора.
1. Запуск iSCSI Initiator:
— Откройте Control Panel -> iSCSI Initiator или выполните команду iscsicpl.exe.

— Убедитесь, что служба Microsoft iSCSI Initiator Service настроена на автоматический запуск:
Set-Service -Name MSiSCSI -StartupType Automatic
2. Настройка подключения:
— Перейдите на вкладку Discovery, нажмите Discover Portal и введите IP-адрес iSCSI таргета.
— Нажмите Advanced и измените значения по умолчанию в выпадающих списках: Local Adapter –> Microsoft iSCSI Initiator, Initiator IP –> 172.17.244.8.
— Для подключения к iSCSI хранилищу необходимо открыть порты 860 и 3260 в Windows Firewall.
3. Подключение таргета:
— Перейдите на вкладку Targets, на ней появится новое подключение. Чтобы включить его, нажмите Connect -> Advanced, выберите значения из выпадающих полей, включите галочку Enable CHAP log on, укажите имя пользователя и 12-значный пароль.

4. Инициализация iSCSI-диска:
— После подключения, диск будет находиться в состоянии Offline. Откройте консоль Disk Management, выберите новый диск, сделайте его Online, а затем выполните Initialize Disk.
— Создайте разделы на диске и отформатируйте его в NTFS.
Для быстрой инициализации и форматирования нового диска можно использовать следующий однострочный PowerShell:
Get-Disk | Where-Object PartitionStyle -eq 'RAW' | Initialize-Disk -PartitionStyle MBR -PassThru | New-Partition -AssignDriveLetter -UseMaximumSize | Format-Volume -FileSystem NTFS -Confirm:$false
Важно: iSCSI-диски не поддерживают файловую систему ReFS.
Теперь этот виртуальный диск, подключенный с другого сервера по протоколу iSCSI можно использовать как обычный локально подключенный диск.
5. Подключение iSCSI-диска через PowerShell
Вы также можете подключить iSCSI-диск на инициаторе через PowerShell. Для получения IQN таргета выполните:
Get-iSCSITarget
Для подключения выполните команду:
Connect-IscsiTarget –IsPersistent $False
Если используется CHAP аутентификация, подключение будет таким:
Get-iScsiTarget | Connect-iScsitarget –AuthenticationType ONEWAYCHAP –ChapUserName -ChapSecret
Для обеспечения высокой доступности и балансировки нагрузки можно настроить несколько избыточных сетевых компонентов (сетевые карты, коммутаторы) и использовать модуль MPIO (Multipath I/O).
Заключение
Настройка и подключение iSCSI-дисков в Windows Server является простым и гибким решением для расширения хранилища или создания отказоустойчивых кластеров. Используя iSCSI, можно подключать диски по сети как к локальному хранилищу, так и к сетевым ресурсам, обеспечивая эффективное управление данными.