
Если вы убрали значок Bluetooth из области уведомлений Windows 11/10 или он не показывался изначально, а теперь потребовался, его отображение сравнительно легко включить.
В этой простой инструкции для начинающих о том, как добавить значок Bluetooth в панели задач и дополнительная информация, которая может быть полезной.
Включение значка Bluetooth в окне «Параметры Bluetooth»
Прежде чем приступить, важная деталь: для того, чтобы вы могли добавить соответствующих значок, должны выполняться следующие условия:
- На ноутбуке или ПК есть Bluetooth адаптер, драйверы на него установлены и исправно работают (если это не так, обратитесь к инструкции Что делать, если не работает Bluetooth в Windows).
- Bluetooth не отключен в Параметрах или панели быстрых действий, с помощью режима «В самолете» или каким-либо иным способом: при отключении исчезает и значок (и появляется снова при включении).
Если условия выполняются, то для включения значка Bluetooth в области уведомлений достаточно выполнить следующие действия:
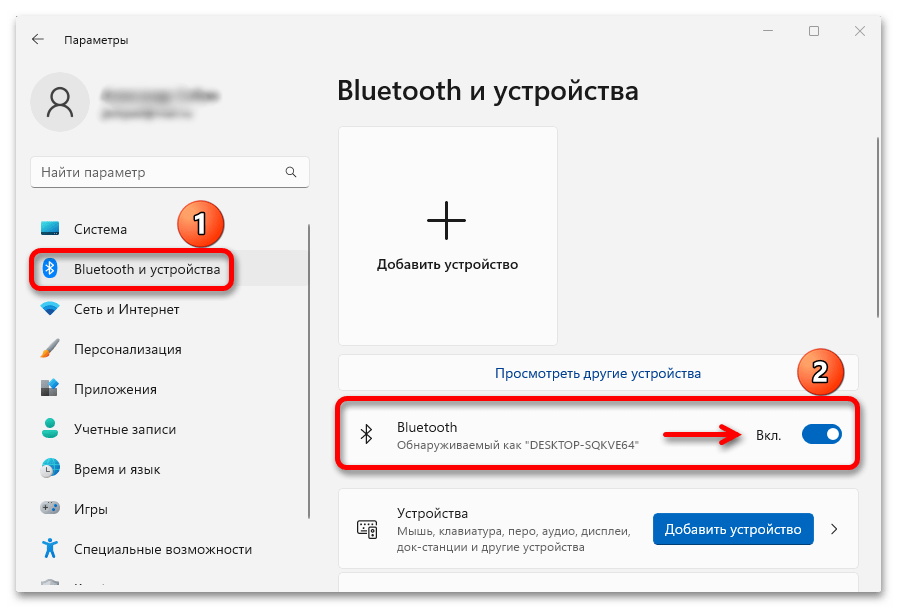
- В Windows 11 перейдите в Параметры — Bluetooth и устройства — Устройства — Дополнительные параметры Bluetooth.

- В Windows 10 откройте Параметры — Устройства — Bluetooth и другие устройства — Другие параметры Bluetooth, пункт может отображаться внизу или справа от списка основных параметров.

- Включите отметку «Отображать значок Bluetooth в области уведомлений».


На этом все действия выполнены и значок должен появиться.
Некоторые дополнительные нюансы, которые могут быть полезными в контексте рассмотренной темы:
Если у вас остаются вопросы по рассмотренной теме, вы можете задать их в комментариях к статье ниже, я постараюсь помочь.
Quick Links
-
1. Run the Appropriate Windows Troubleshooters
-
3. Check the Quick Settings Panel
-
5. Check Bluetooth Settings
-
6. Configure the Bluetooth Support Service
-
7. Update or Reinstall Your Bluetooth Drivers
-
8. Disable and Re-Enable the Problematic USB Driver
-
9. Run SFC and DISM Scans
Summary
- In most cases, running the Windows troubleshooters or performing a power cycle should restore Bluetooth functionality on your Windows 11 PC.
- Updating or reinstalling Bluetooth drivers on your PC can also help resolve this issue.
- If the problem persists, you may need to scan your PC for corrupted system files or boot it into Safe Mode for further troubleshooting.
Has the Bluetooth option disappeared on your Windows 11 computer? This can happen for several reasons, including temporary glitches, damaged Bluetooth drivers, and issues with the Windows OS. If you’re unsure about what caused the problem, here are some tips that will help.
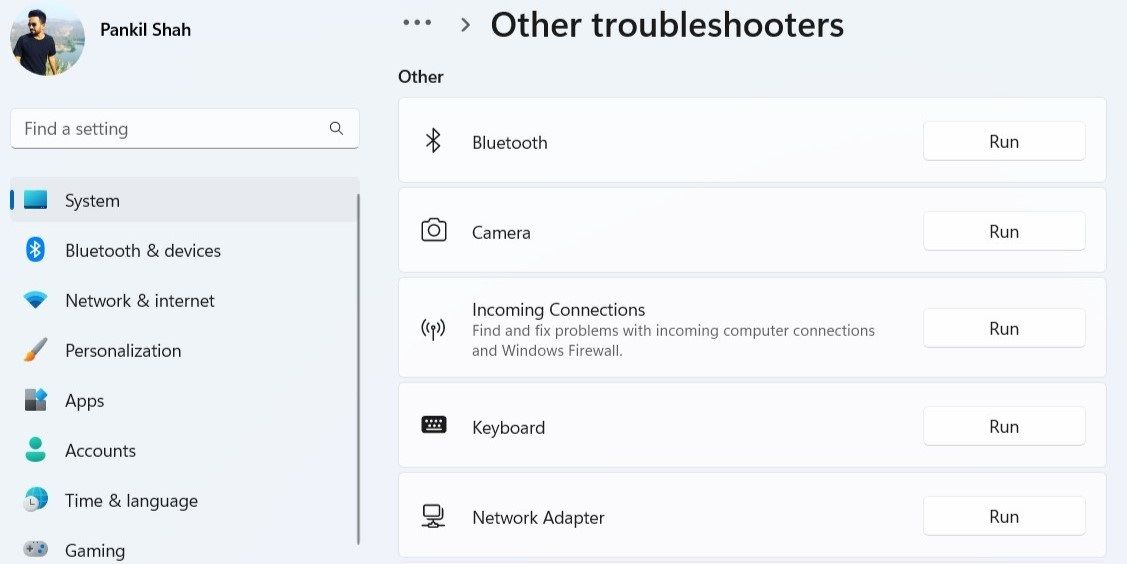
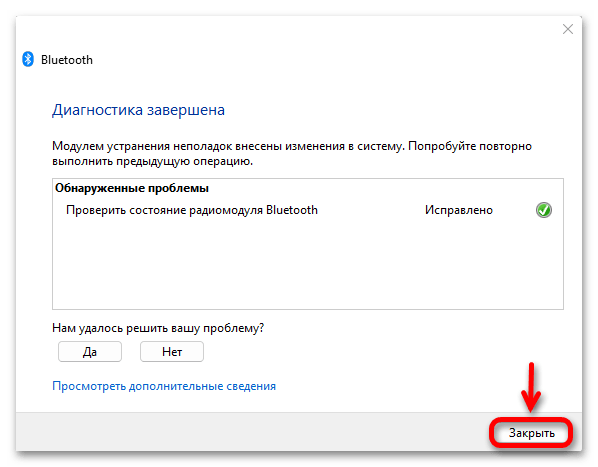
1. Run the Appropriate Windows Troubleshooters
Windows troubleshooters are built-in utilities that can help you diagnose and resolve various system-level issues. You can run the Bluetooth troubleshooter, which allows Windows to fix any common Bluetooth-related issues. Here’s how:
- Press Win + I to launch the Settings app.
- In the System tab, click Troubleshoot.
- Select Other troubleshooters.
- Click the Run button next to Bluetooth.
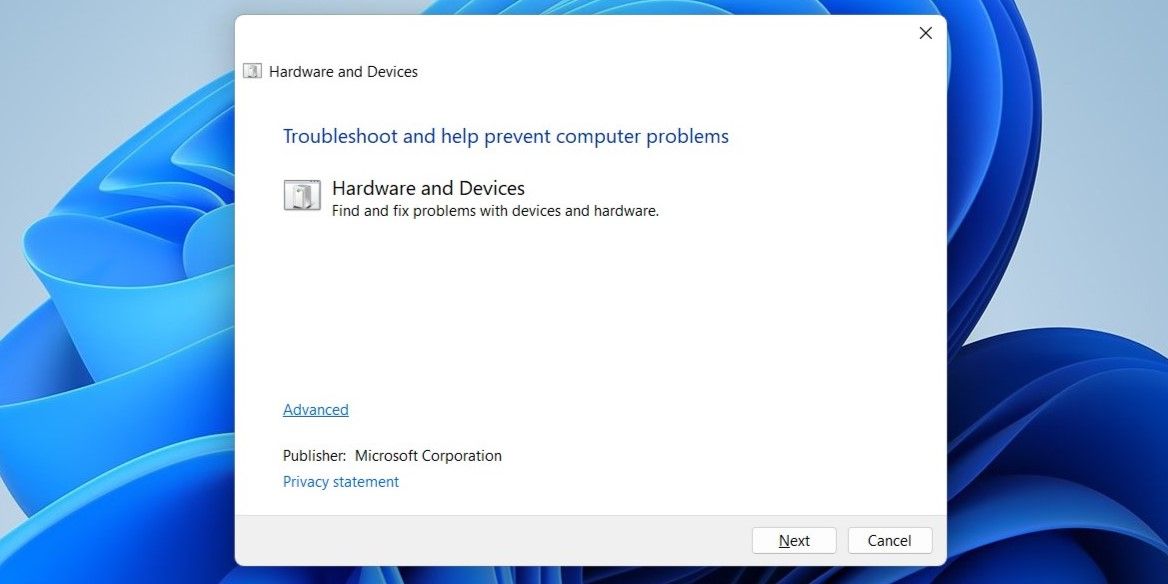
Windows will scan your computer for any issues and try to fix them. Additionally, you can run the Hardware and Devices troubleshooter to scan your computer for any hardware issues. To do so:
- Press Win + R to open the Run dialog.
- Type msdt.exe -id DeviceDiagnostic in the Open field and press Enter.
- In the Hardware and Devices window, click Next and follow the on-screen instructions to run the troubleshooter.
2. Perform a Power Cycle
Sometimes, the most effective solution is surprisingly simple. Performing a power cycle can resolve various issues with your Windows PC caused by temporary glitches. To perform a power cycle:
- Turn off your computer and unplug it from the power source.
- Press and hold the power button for 30 to 60 seconds to drain all the power that’s left on your device.
- Leave your computer idle for a few minutes.
- Connect your computer to the power supply, and then turn it back on.
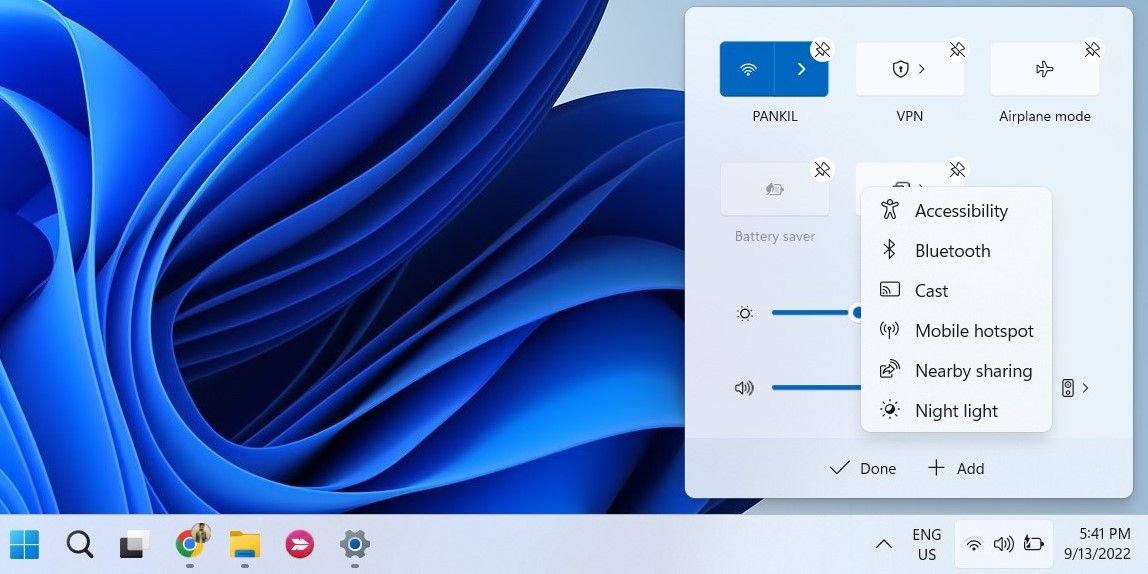
3. Check the Quick Settings Panel
The Quick Settings panel in Windows 11 provides access to various commonly used settings, including Bluetooth.
If you can’t find the Bluetooth toggle in the Quick Settings panel, you might have removed it by mistake. Here’s how to retrieve it.
- Press Win + A to open the Quick Settings panel.
- Click the pencil icon to edit the Quick Settings panel.
- Click on Add and select Bluetooth from the list to add it to the panel.
4. Turn Off Fast Startup
By default, the Fast Startup feature is enabled on most Windows computers. While it helps reduce boot times on Windows, it can sometimes cause issues, such as the Bluetooth option disappearing from your PC. You can try disabling this feature to see if that fixes the problem.
- Open the Control Panel using the Windows search menu.
- Select Power Options.
- Click on Choose what the power buttons do from the left sidebar.
- Select the Change settings that are currently unavailable link.
- Uncheck the Turn on fast startup (recommended) option.
- Click the Save changes button.
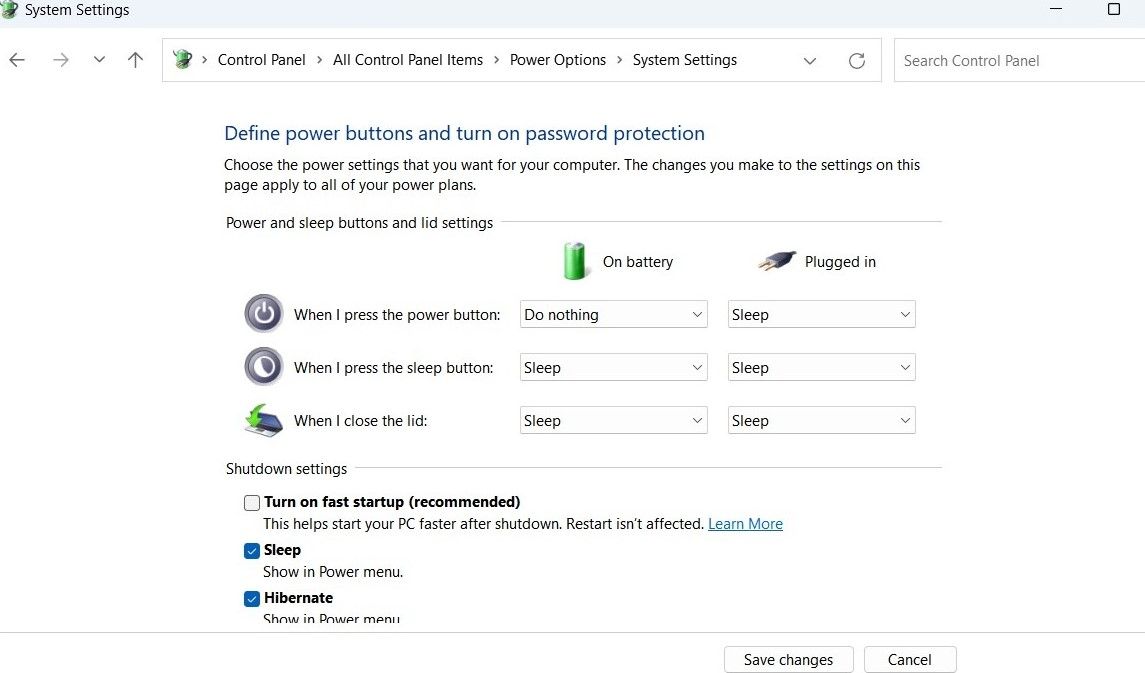
Restart your PC after this and check if Bluetooth appears and works as expected.
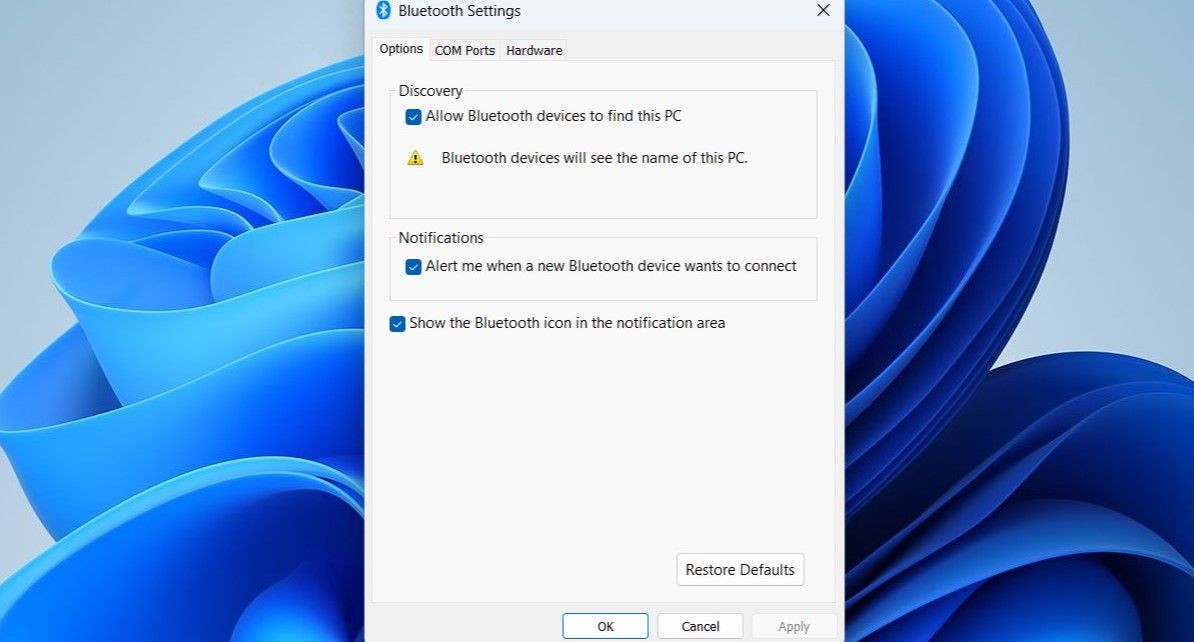
5. Check Bluetooth Settings
The Bluetooth icon may not appear on the taskbar or system tray if you have previously removed the icon. Here’s how you can pin the Bluetooth icon to the Windows taskbar again.
- Open the Start menu and go to Settings > Bluetooth & devices.
- Go to Devices and click on More Bluetooth Settings.
- Tick the box that reads Show the Bluetooth icon in the notification area.
- Hit Apply, followed by OK.
6. Configure the Bluetooth Support Service
Bluetooth Support Service is a small program that runs in the background to allow Bluetooth to function on Windows. Your Bluetooth issues could be caused by the service not running. Here’s how to fix it.
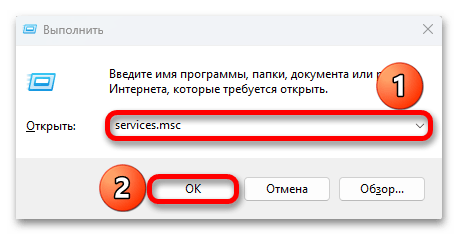
- Press Win + R to open the Run dialog.
- Type services.msc in the text field and press Enter.
- Double-click on Bluetooth Support Service to open its properties.
- Use the drop-down menu next to Startup type to select Automatic.
- Hit Apply to save changes.
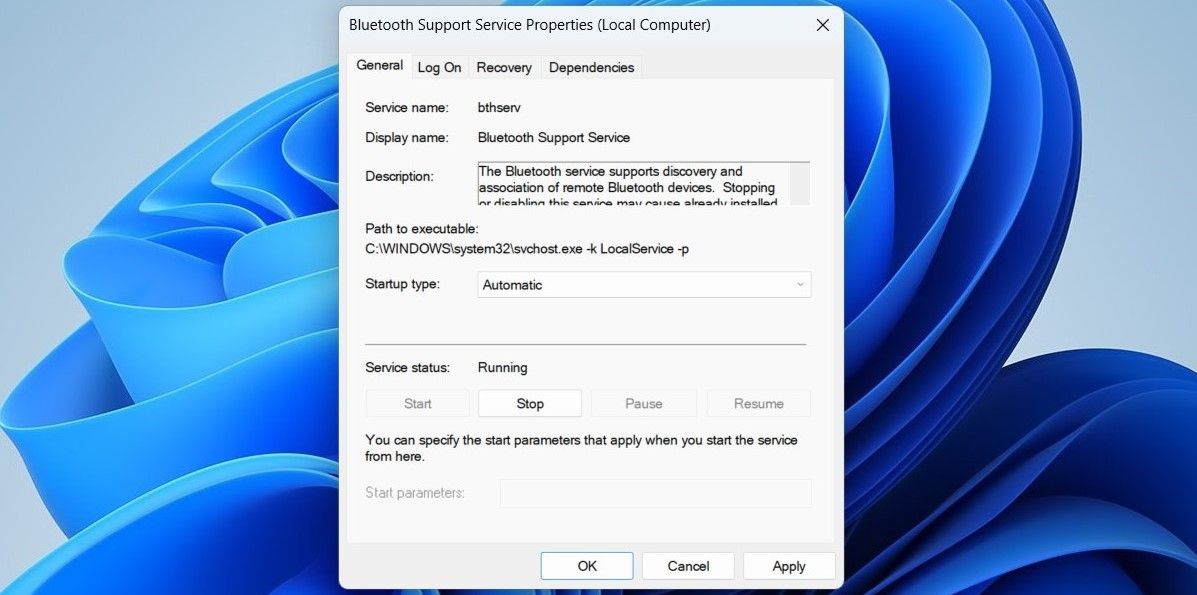
Restart your PC one more time and check if the Bluetooth option appears.
7. Update or Reinstall Your Bluetooth Drivers
Malfunctioning or corrupt Bluetooth drivers on your PC could also be the source of the problem. If that seems to be the case, updating the Bluetooth driver should help. To do that, use these steps:
- Right-click on the Start icon and select Device Manager from the list.
- Expand the Bluetooth section, right-click on the Bluetooth adapter, and select Update driver.
- Select Search automatically for drivers and allow Windows to install the best available drivers.
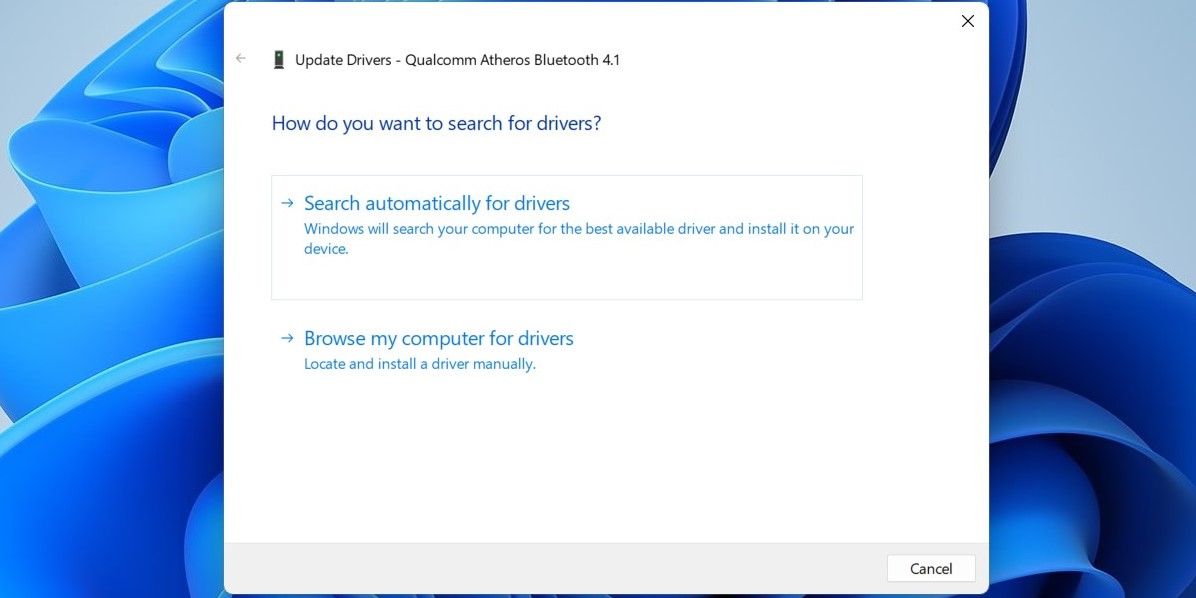
If the Bluetooth entry is missing from the Device Manager, visit your Bluetooth adapter manufacturer’s website to download the driver and install it manually.
If updating the driver does not help, you’ll have to reinstall the Bluetooth drivers. To do so, open the Device Manager again, right-click on the Bluetooth driver, and then select Uninstall device.
Once removed, restart your PC. Windows should install the missing Bluetooth driver during boot, and the Bluetooth option should appear on your PC.
8. Disable and Re-Enable the Problematic USB Driver
Several users on a Microsoft Community post reported restoring the missing Bluetooth functionality on their computers by disabling and re-enabling the USB drivers. You can also give it a go.
- Open Device Manager using the search menu.
- Expand Universal Serial Bus controllers.
- Look for any entries with a yellow warning triangle. Right-click it and select Disable device.
- Select Yes to confirm.
- Right-click on the USB driver again and select Enable device.

9. Run SFC and DISM Scans
Bluetooth issues can also arise if critical system files are missing from your computer. Windows includes a couple of tools that can help you replace any missing or damaged system files with their cached version. Here’s how to run them.
- Press Win + X and select Terminal (Admin) from the list.
- Select Yes when the User Account Control (UAC) prompt shows up.
- In the console, run the following command:
sfc /scannow
Wait for the scan to complete, and then run the DISM (or Deployment Image Servicing and Management) scan.
DISM.exe /Online /Cleanup-image /Restorehealth
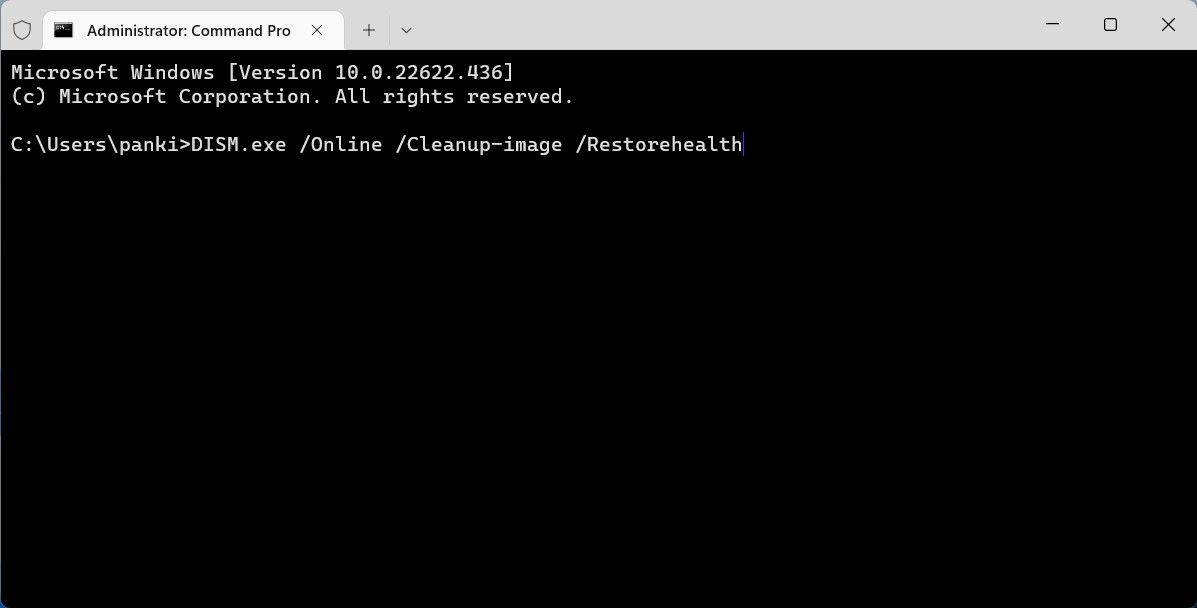
After the scan is complete, restart your PC and check if the issue is still there.
10. Boot into Safe Mode
When you boot Windows into Safe Mode, it runs without any non-essential drivers and programs. This can help you verify if the issue is caused by a third-party driver or program running in the background.
Windows 11 gives several options for booting into Safe Mode. You can use any of your preferred methods to enter Safe Mode and see if the Bluetooth option appears. If it does, then a third-party program or service is to blame. In that case, you’ll have to remove any recently installed apps or programs to fix the issue.
Bluetooth is an essential feature on any Windows computer, so it’s understandable to feel frustrated when it suddenly disappears. Fortunately, it’s nothing you can’t fix yourself with the tips mentioned above.
Все способы:
- Способ 1: Включение Bluetooth в ОС
- Способ 2: «Средство устранения неполадок»
- Способ 3: Проверка служб
- Способ 4: Сброс питания
- Способ 5: Работа с драйверами
- Способ 6: Настройка BIOS/UEFI
- Вопросы и ответы: 1
Способ 1: Включение Bluetooth в ОС
Если Блютуз пропал, значит, раньше он был, поэтому исходим из того, что ноутбук поддерживает эту технологию. При использовании внешнего адаптера попробуйте поменять USB-разъем или вставьте устройство в другой компьютер, если такая возможность есть. Далее проверим, включена ли интересующая нас функция на уровне системы.
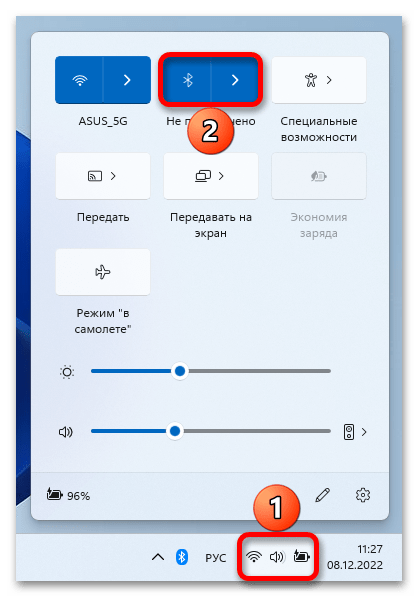
- Открываем быстрые настройки, кликнув по иконкам подключения к сети, настройки звука или отображения состояния батареи, расположенным справа на панели задач, и если опция отключена, включаем ее. Даже если модуль уже активен, останавливаем его на несколько секунд и снова запускаем.
- Учтите, что в быстрых настройках такой плитки может не быть. В этом случае сочетанием клавиш «Win+I» открываем «Параметры» Виндовс, переходим в раздел «Bluetooth и устройства» и включаем функцию.
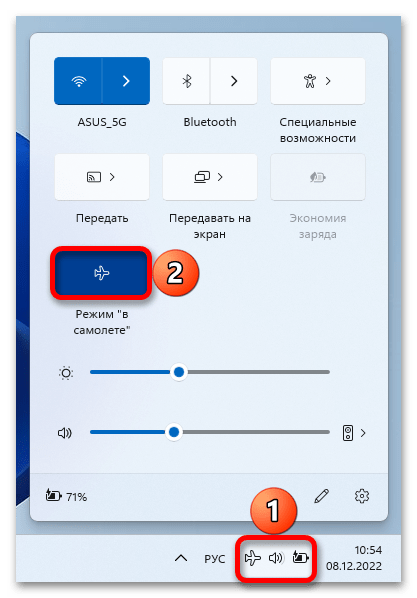
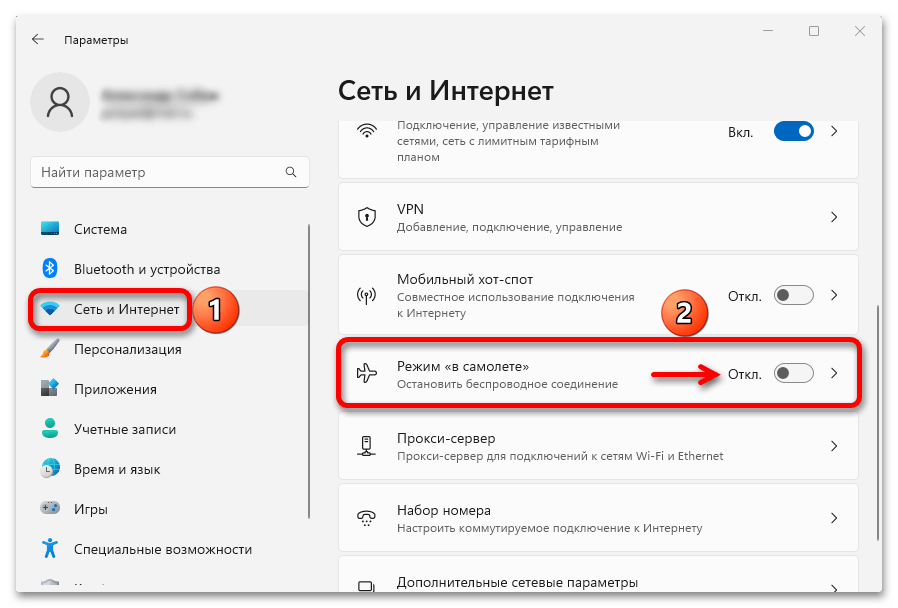
Кроме того, и на стационарных компьютерах, на ноутбуках предусмотрен режим «в самолете», который может блокировать беспроводные модули, поэтому на всякий случай убедимся, что он выключен.
- Когда режим активен, его значок в виде самолета будет на панели задач вместо иконки подключения к интернету. Снова открываем быстрые настройки и, если режим активен, т.е. плитка синяя, деактивируем его.
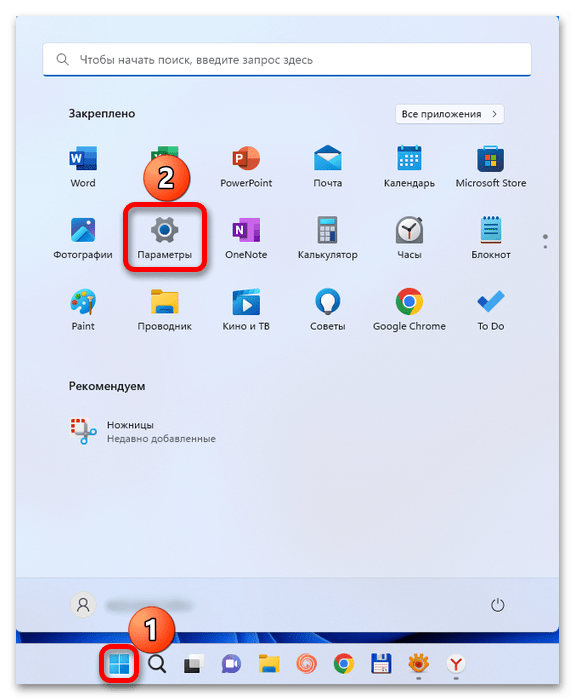
- Альтернативный вариант – сделать это через настройки системы. Кликаем «Пуск» и открываем «Параметры».

Переходим во вкладку «Сеть и Интернет», а затем устанавливаем ползунок справа от опции в положение «off», как это показано на скриншоте ниже.
Способ 2: «Средство устранения неполадок»
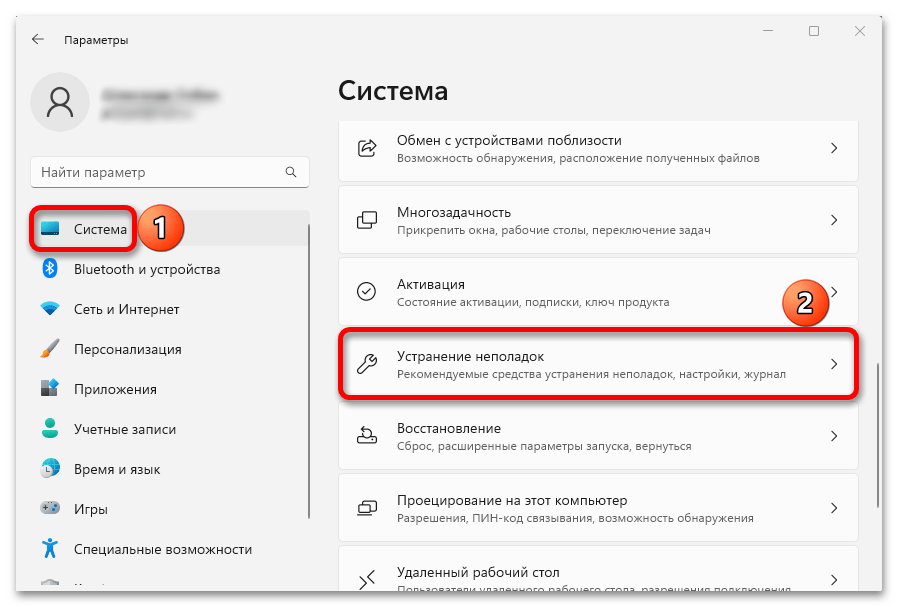
Если подключение по Блютуз до сих пор невозможно, воспользуемся штатным средством устранения неполадок.
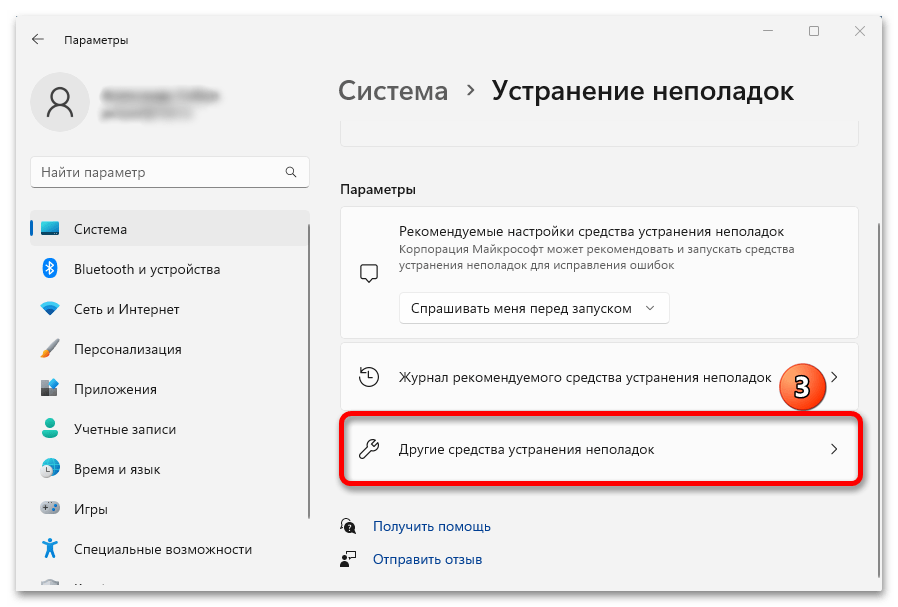
- Снова вызываем системные параметры («Windows+I»), открываем блок «Устранения неполадок»,

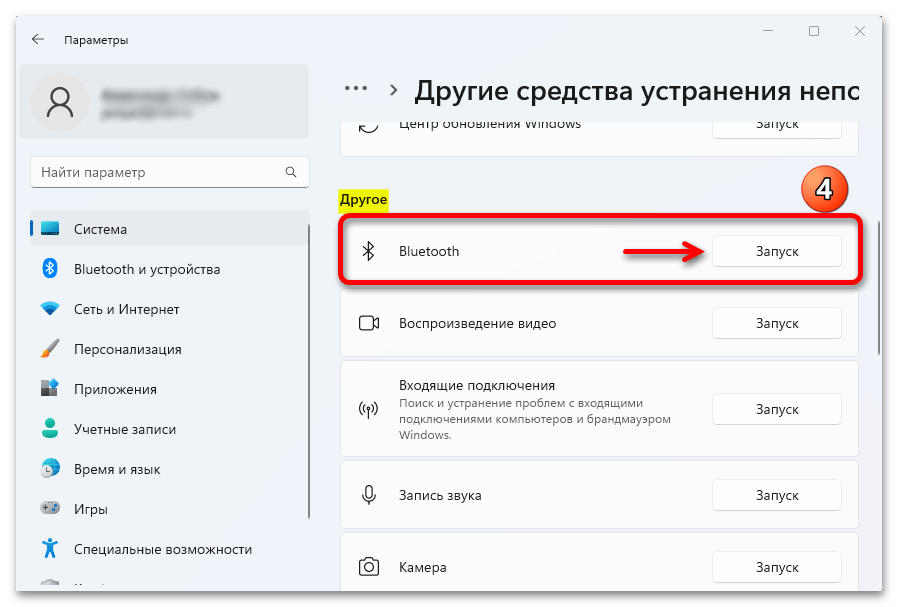
затем «Другие средства УН»
и запускаем модуль диагностики адаптера «Bluetooth».
- Инструмент отработает в автоматическом режиме, а все выявленные в процессе ошибки по возможности устранит.
Способ 3: Проверка служб
Чтобы Блютуз на ноутбуке работал стабильно, должны быть запущены все связанные с этой функцией службы.
- Сочетанием клавиш «Windows+R» открываем окно «Выполнить», вводим команду
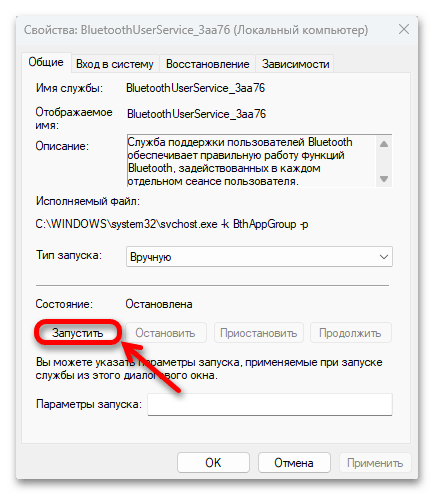
services.mscи подтверждаем ее. - Находим службу «BluetoothUserService» и открываем ее свойства двойным кликом.
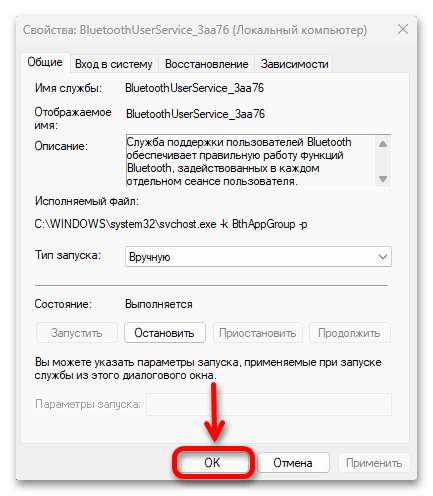
- Если она остановлена, жмем «Запустить»

и закрываем окно нажатием на кнопку «ОК».
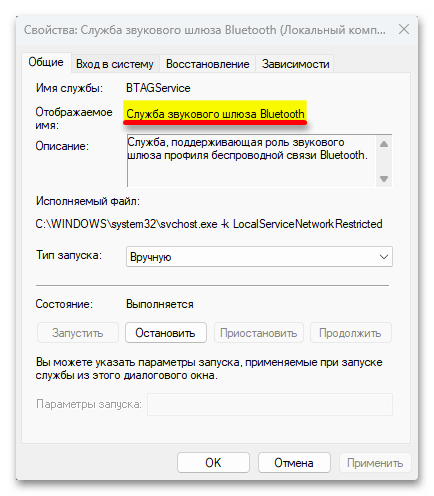
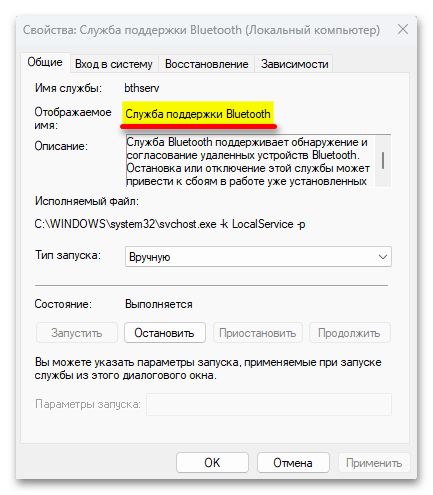
- Теперь таким же образом проверяем «Службу звукового шлюза Bluetooth»

и «Службу поддержки Bluetooth».

Способ 4: Сброс питания
Статическое электричество может оказывать негативное влияние на некоторые встроенные компоненты ПК – сенсорную панель, камеры, датчик Bluetooth и т.д. Действия, описанные ниже, рекомендуют на своих форумах и страницах технической поддержки многие производители компьютеров и, судя по комментариям пользователей, это работает.
- Выключаем ноутбук и отсоединяем кабель от электросети.
- Отключаем все периферийные устройства, карты памяти, достаем диски из привода и т.д.
- Вынимаем аккумуляторную батарею, если она съемная.
- Нажимаем и удерживаем кнопку питания 15-20 секунд.
- После этого вставляем аккумулятор обратно, подключаем устройство кабелем к электросети и включаем ноутбук.
Способ 5: Работа с драйверами
Почти все компоненты компьютера взаимодействуют с системой с помощью драйверов. Поэтому сейчас нам следует убедиться, что у модуля Bluetooth в этом плане проблем нет, а если есть, решить их.
- В окне «Выполнить» вводим команду
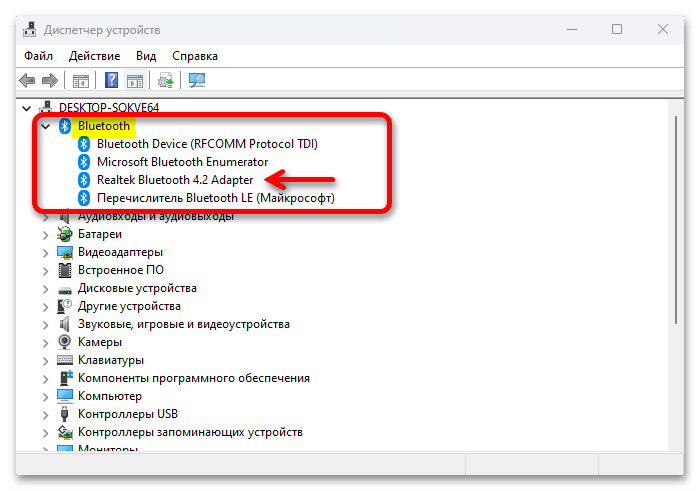
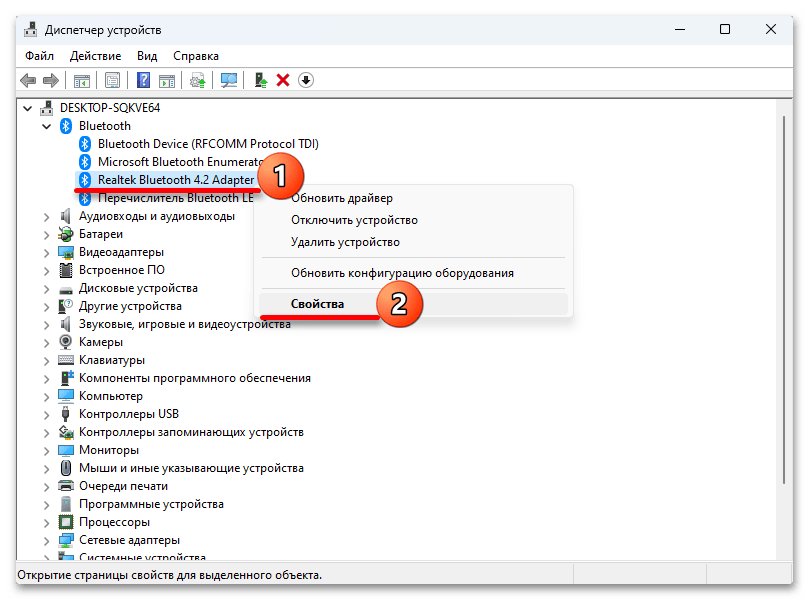
devmgmt.mscи подтверждаем ее. - Открываем вкладку «Bluetooth». Там должен отображаться сам адаптер, в нашем случае «Realtek Bluetooth 4.2 Adapter», а также дополнительные протоколы, драйверы и т.д.
- Если устройство отключено, мы увидим стрелочку вниз на его ярлыке. В этом случае кликаем по адаптеру правой кнопкой мышки и включаем его.
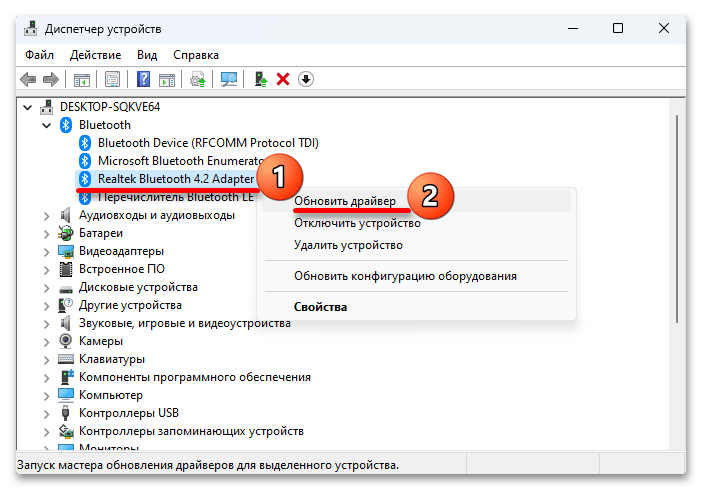
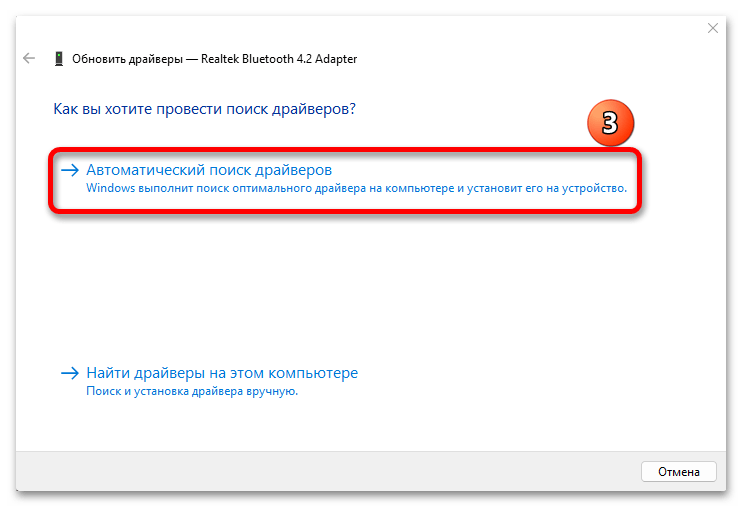
- Если устройство отображается как неизвестное, с восклицательным знаком или даже оно в нормальном состоянии, но все равно не работает, снова открываем контекстное меню, жмем «Обновить драйвер»

кликаем «Автоматический поиск» и ждем завершения операции.
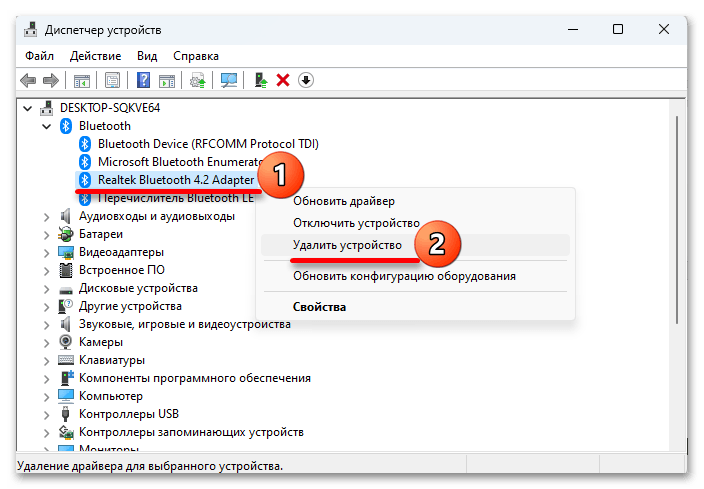
- Кроме того, можно удалить устройство, после чего оно будет переустановлено вместе с драйверами, что может исправить проблему, если изначально они работали некорректно. Для этого в контекстном меню адаптера выбираем «Удалить устройство»,

подтверждаем действие и перезагружаем систему.


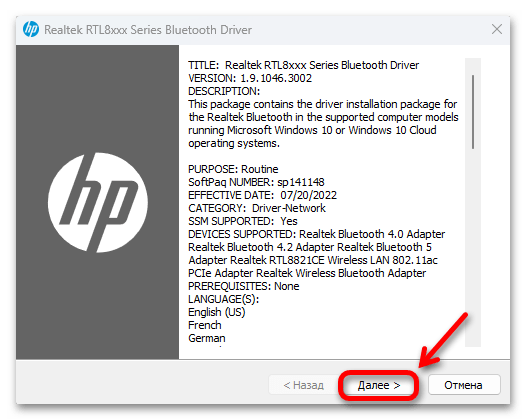
Дополнительно стоит поискать программное обеспечение для Bluetooth-адаптера за пределами серверов Microsoft. Оптимальный вариант – скачать их и установить самостоятельно. Мы покажем, как это выглядит, на примере лэптопа HP, но даже если у вас устройство другого бренда, действия примерно будут одинаковыми.
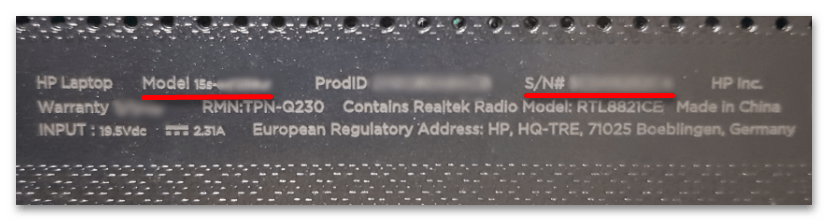
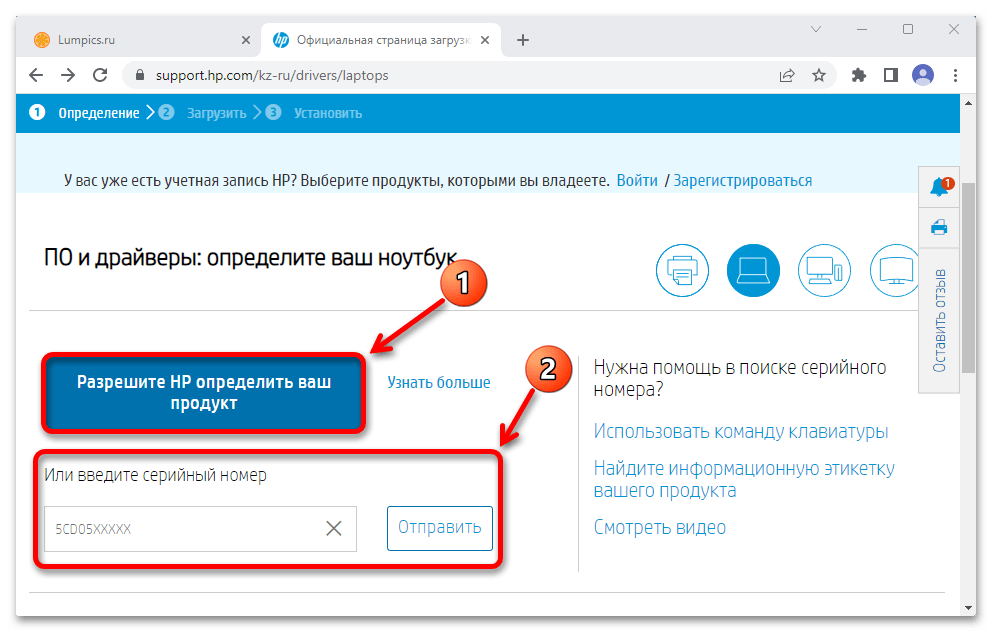
- Открываем в браузере официальный сайт производителя, в данном случае компании Hewlett-Packard. Вам может понадобиться модель ноутбука или серийный номер, которые обычно напечатаны на задней крышке устройства.

Название и S/N лэптопа можно узнать и с помощью системных инструментов, о чем подробно написано в отдельных статьях на эти темы.
Подробнее:
Как узнать название своего ноутбука
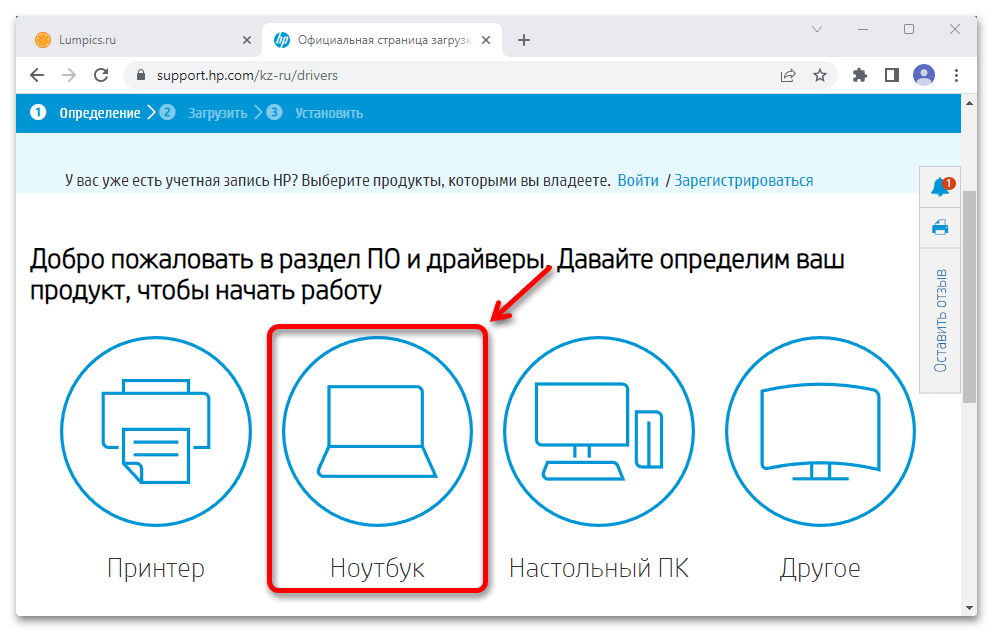
Как узнать серийный номер ноутбука - Ищем на сайте вкладку «Поддержка»,

в ней «Программы и драйверы»

и в блоке «Тип устройства» выбираем «Ноутбук».
- Далее можно либо воспользоваться средством обнаружения продукта, либо вручную ввести серийный номер нашего лэптопа.
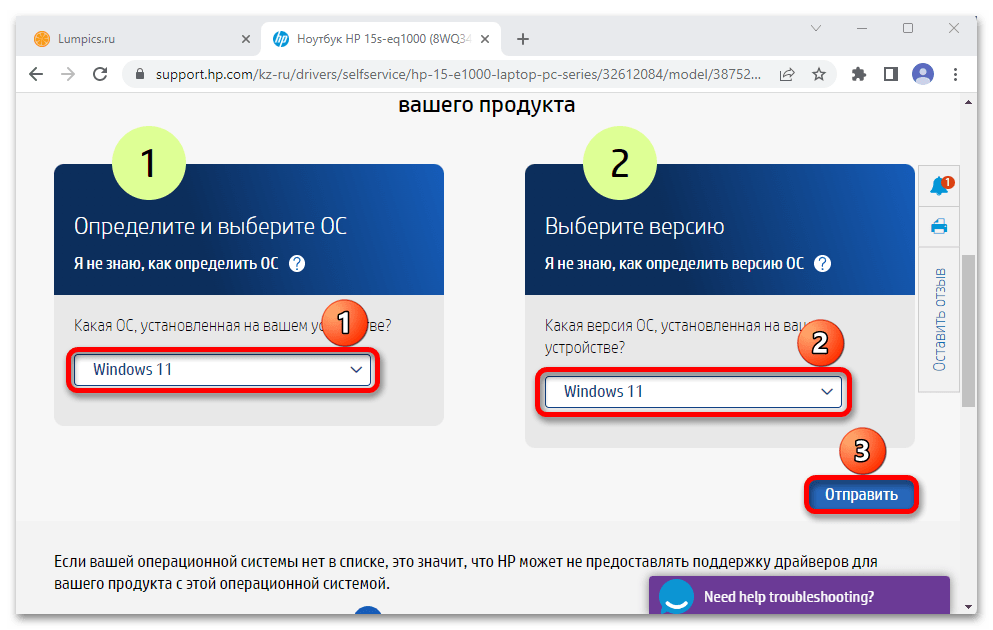
- Выбираем операционную систему, ее версию и нажимаем «Отправить».
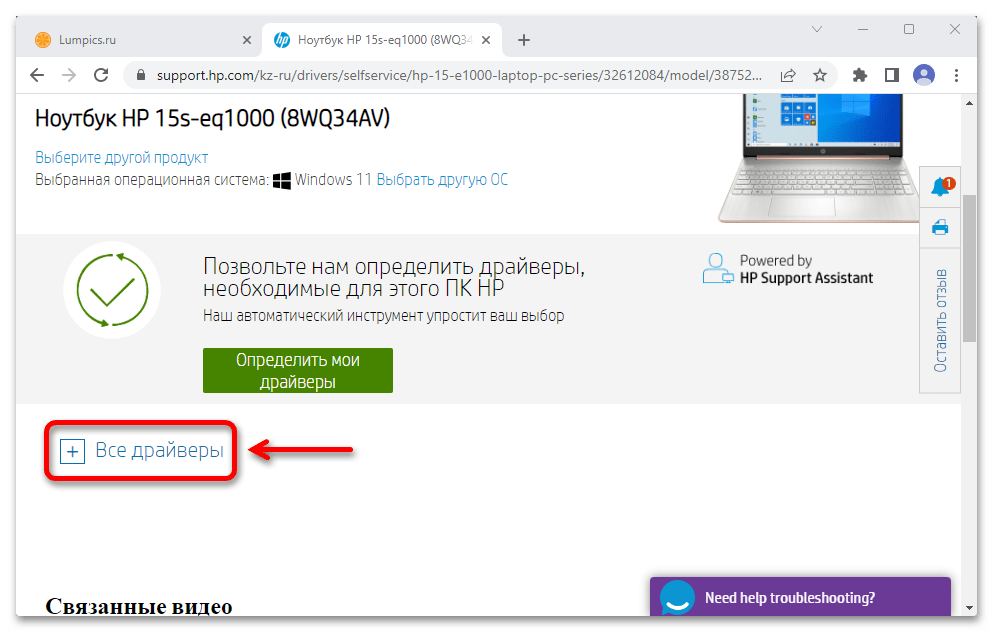
- На следующем экране разворачиваем список всех доступных для данного ноутбука драйверов.
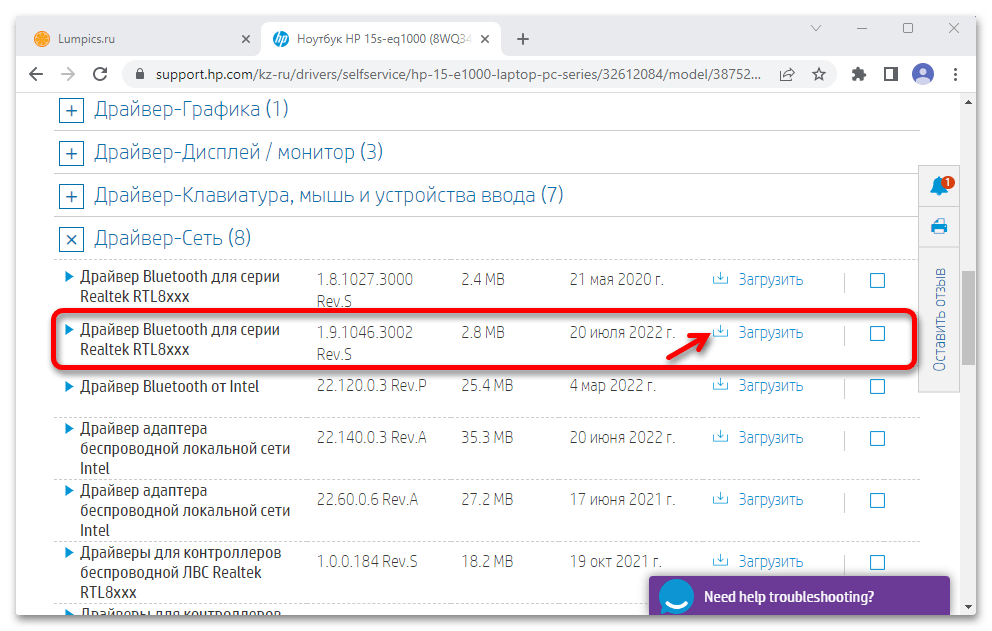
Открываем вкладку «Драйвер-Сеть». В «Диспетчере устройств» мы видели, что Bluetooth-адаптер в нашем лэптопе от Realtek. Основываясь на этих данных, загружаем самую свежую версию ПО.

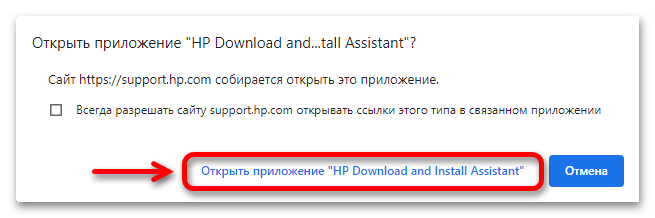
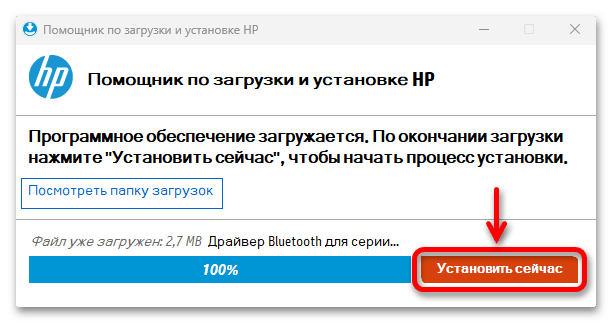
Для загрузки и установки программного обеспечения HP использует собственное приложение, поэтому подтверждаем его открытие,

а когда загрузка завершится, сразу запускаем установку

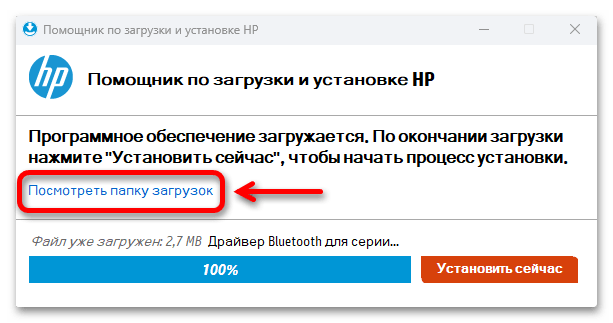
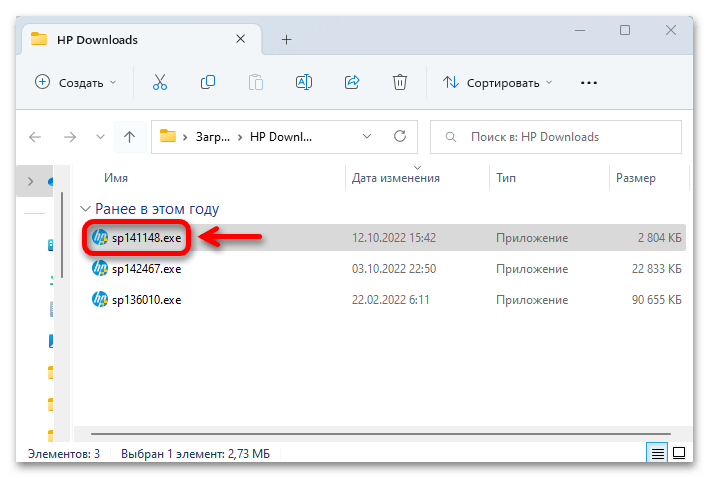
либо находим загруженный файл в «Проводнике»,

двойным кликом открываем его,

а дальше следуем инструкции.


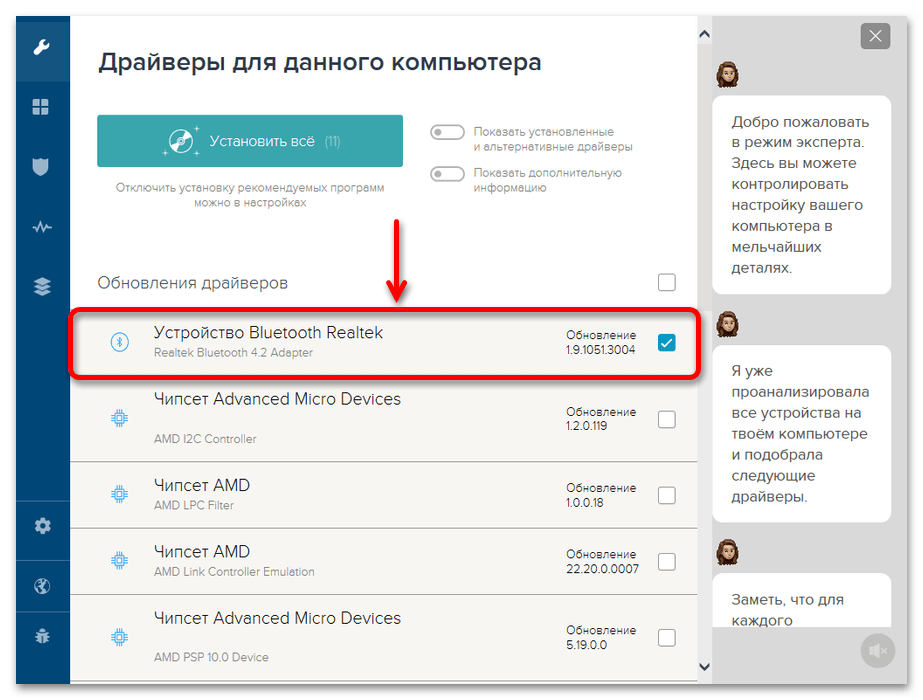
Также вы можете воспользоваться сторонними программами, которые за вас поищут драйверы, отсутствующие на компьютере, а затем помогут их установить сразу все или по отдельности. Подробнее об обновлении с помощью специального программного обеспечения написано в отдельной статье на нашем сайте.
Подробнее: Лучшие программы для установки драйверов
Еще один вариант – вернуться к предыдущей версии программного обеспечения. Это может сработать, например, если новые драйверы были выпущены с ошибкой, что привело Bluetooth в нерабочее состояние.
- В «Диспетчере устройств» кликаем правой кнопкой мышки по адаптеру и открываем его «Свойства».
- Переходим во вкладку «Драйвер» и нажимаем «Откатить». Через несколько секунд блютуз-модуль получит предыдущую версию ПО.

Способ 6: Настройка BIOS/UEFI
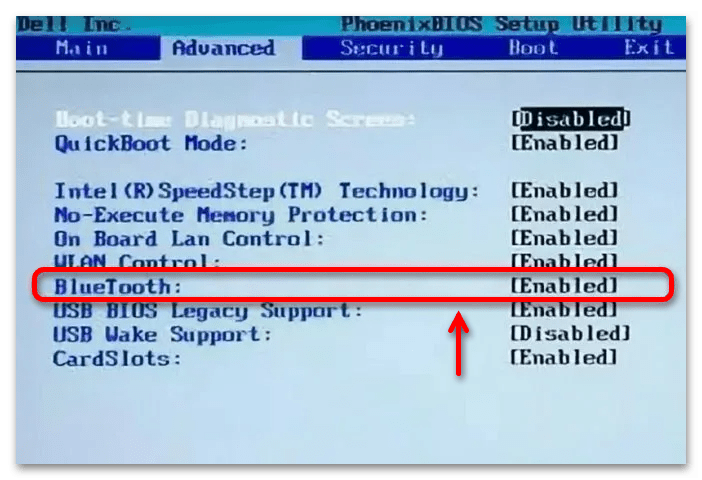
В некоторых ноутбуках функция управления Bluetooth встроена в прошивку, а значит, именно там она может быть выключена. Ищите такие вкладки, как «Advanced» и «Configuration», а также специальные разделы, например «Onboard Device Configuration». Сама функция может называться по-разному, так что в первую очередь ищите позиции со словами «Bluetooth», «Wireless» или что-то похожее. А когда найдете нужный пункт, убедитесь, что напротив него стоит значение «Enabled».
Подробнее: Как попасть в BIOS на ноутбуке
Наша группа в TelegramПолезные советы и помощь
You are here:
Home » Windows 11 » Fix: Bluetooth Icon Missing From Windows 11 Taskbar
Is the Bluetooth icon missing from Windows 11 taskbar? Do you want the Bluetooth icon always visible on the Windows 11 taskbar? This guide will show you how to add or restore the missing Bluetooth icon to Windows 11 taskbar.
The Bluetooth icon on the Windows 11 taskbar gives you quick access to various settings. Right-clicking on the Bluetooth icon on the taskbar shows Add a Bluetooth Device, Show Bluetooth Devices, Send a File, Receive a File, Join a Personal Area Network, and Open Settings.
If the Bluetooth icon is missing, it’s likely because the Bluetooth option has been turned off under Bluetooth settings.
Step 1: Open the Settings app using search or Windows + I hotkey.
Step 2: In the left pane of the Settings app, click on Bluetooth & devices. Now, on the right side, click Devices.
Step 3: Scroll down the resulting page (Bluetooth & devices > Devices) to see Related settings. In the Related settings section, click on the More Bluetooth settings link to open the classic Bluetooth Settings dialog.
Step 4: Here, under the Options tab, select the checkbox labeled Show the Bluetooth icon in the notification area. Click on the Apply button. That’s it!
The Bluetooth icon should now appear in the notification area of the taskbar. If it’s not visible, click on the up-arrow icon to see hidden icons. You can drag and drop it to the taskbar from the hidden icons box if you want to see the Bluetooth icon right on the taskbar.
Remove Bluetooth icon from Windows 11 taskbar
If at any point, you want to remove the Bluetooth icon from the taskbar, you can do so with ease. Here is how.
Step 1: Perform a right-click on the Bluetooth icon on the taskbar and then click the Remove icon option. The icon immediately disappears from the taskbar.
To see the Bluetooth icon again, you need to complete the directions mentioned at the beginning of this article.
Tip: You can quickly access Bluetooth settings by opening the Quick Settings flyout (Windows + A or click on the battery/volume/Wi-Fi icon to reveal Quick Settings flyout), right-clicking on the Bluetooth icon, and then clicking the Go to the Settings option.
Reinstall the Bluetooth driver to restore the missing icon
If the above solution does not work for you, you can try reinstalling the Bluetooth driver. Refer to our how to reinstall the Bluetooth driver in Windows 11/10 guide for step-by-step directions.
Our how-to check the Bluetooth version number in Windows 11/10 guide might also interest you.
Many users complain about Bluetooth icon missing from the taskbar in their Windows 11 PC. This icon gives access to various quick Bluetooth settings. If you also fail to find Bluetooth icon in the notification area of the taskbar, here is a guide to help you fix Bluetooth icon missing in Windows 11.
Page Contents
The icon appears in the notification area of the taskbar. If you don’t see it on the taskbar, you may find it by clicking on the arrow beside it showing the hidden icons. If you cannot find it there too, it is most likely because the Bluetooth option has been turned off. Once turned on, it would look like the picture below. Right clicking on it opens quick Bluetooth settings such as add a Bluetooth Device, Show Bluetooth Devices, Send and Receive a File, Open Settings, and others.
If you cannot see this icon even after turning the Bluetooth on, follow the steps below to add the icon.
Restore or add Bluetooth icon to Windows 11 taskbar
1: Open the Settings app from the Start Menu of by pressing Win + I and go to Bluetooth & devices.
2: Click on Devices.
- Scroll down to related settings and select More Bluetooth settings. This will open Bluetooth settings dialog box.
- Here, check the box against Show the Bluetooth icon in the notification area and click on Apply.
Now, you should be able to see the icon either directly on the taskbar or by clicking on the arrow showing hidden icons. Hence, with this simple process, you can add the Bluetooth icon on your taskbar.
If you want to remove this icon from here, that is also easy. You simply need to right click on the icon. It will show the quick settings as seen in the first picture. In this menu, select Remove Icon and that is it.
You can also checkout the registry method, as shown in below video to restore missing Bluetooth icon on taskbar.
Related: Bluetooth Icon Missing From Windows 10 Taskbar.