
Download Article
Tips for reinstalling the drivers & using disk management
Download Article
- Try This First
- Reinstalling the Drivers
- Using Disk Management
- Using the Command Prompt
|
|
|
If your USB drive is not being recognized by Windows, or is not formatting properly, there may be problems with either Windows or the USB drive itself. If the problem is on Windows’ end, you can usually solve it by reinstalling the USB drivers. If the problem is with the USB drive, you may be able to fix it with a deep format, or the drive may be irreparable.
What to Do if Windows Can’t Format USB Drive
- Open Disk Management to see if the USB is listed.
- Insert the USB into a different slot or computer to see if it appears.
- Uninstall and reinstall the USB drive.
- Reformat the USB drive using Disk Management.
-

This is a Windows utility that allows you to manage all of your connected disks. Your drive should appear in this utility, even if it isn’t formatted properly.
- Press the Windows key + R and type diskmgmt.msc. This will launch the Disk Management Utility.
- Look for your USB drive in the list of connected drives. If your USB drive is listed, it may not be formatted correctly. Click here for instructions on trying to format it. If your USB drive is not listed, read on for some troubleshooting tips.
-
Before continuing, the quickest troubleshooting method you can try is plugging the USB drive into another USB port on your computer. Be sure to try a port directly on the computer, not a USB hub.
- If the drive works in another USB port, the first one you tried is likely dead. There’s not much you can do about this short of replacing your motherboard. Just try to avoid using that port in the future.
Advertisement
-
If the drive still does not appear when plugged into another computer, there’s a good chance that the drive is dead. You may need to replace it.
- If the drive appears when plugged into another computer, there may be an issue with the drivers on your computer. See the next section for instructions on dealing with driver issues.


Advertisement
-
the Windows key + R and type devmgmt.msc. This will open the Device Manager.
-
This will list all of your connected disk drives, including hard drives and USB drives.
-
This will remove the drivers for the USB drive from your system.
-
Windows will attempt to automatically install the drivers.
-
If you see a yellow exclamation icon next to any of your devices, it means there is a problem with the drivers. If this yellow exclamation mark is on your Universal Serial Bus controllers, your computer’s USB drivers are acting up.
- Right-click on the non-working device and select «Update Driver Software». Follow the prompts to reinstall the drivers.[1]
- Right-click on the non-working device and select «Update Driver Software». Follow the prompts to reinstall the drivers.[1]


Advertisement
-
the Windows key + R and type diskmgmt.msc. This will launch the Disk Management Utility.
-
You will be able to see all of the partitions for each drive in the bottom frame of Disk Management.
-
This will open the Format tool.
-
This will allow the USB drive to be read by the most devices possible, including Windows, OS X, Linux, and most game consoles.
-
The formatting process will take longer, but Windows may be able to correct errors on the drive.
-
OK to start formatting the drive. This may take a while, but if the format is successful, the drive should appear in Windows. If the format process doesn’t work, try the next section.
- Formatting will delete all of the data on the USB drive.


Advertisement
-
You can start the Command Prompt from the Start menu, or by pressing the Windows key + R and typing cmd.
-
diskpart and press Enter. You may be prompted for administrator access. The prompt will change to DISKPART>.
-
list disk and press Enter. This will list all of your connected disks.
-
select disk # and press Enter. Replace # with the number associated with your USB drive.
-
clean and press Enter. This will check the disk for errors.
-
create partition primary and press Enter. This will create a new partition on the disk.
-
active and press Enter. this will make the newly-created partition the active partition on the USB drive.
-
format fs=fat32 and press Enter. This will format the new partition using the FAT32 file system, which is compatible with most devices and computers.
- The format process will likely take a while to finish.
-
exit and press Enter. This will close the DISKPART utility.
- If your USB drive will still not show up in Windows after using the DISKPART utility, or you receive errors when trying to format, your USB drive is most likely damaged and no longer functional.


Advertisement
How do I force a USB drive to format?
Try formatting in File Explorer by right-clicking the drive and selecting Format. Select a filesystem, choose Quick Format, and then click Start.
Why do I get the «Windows was unable to complete the format» error?
This error usually means the drive is write-protected. Right-click the drive in File Explorer and select Properties. On the Security tab, select a group that includes your account and look for a checkmark next to «Write» in the «Allow» column. If there is no checkmark, click Edit and check «Write» to remove write protection.
Why can’t I format my USB drive to FAT32?
FAT32 only appears as a formatting option for drives 32GB and smaller. If you want to make sure your USB drive can be used on multiple operating systems, use the exFAT filesystem instead. If you need FAT32, use a third-party formatting tool like Rufus.
How do I format a flash dive with corruption?
If you can’t format your flash drive, try checking it for errors. Right-click the drive in File Explorer, select Properties > Tools, and then click Check > Scan Drive. If errors are found, Windows will attempt to fix them.
Thanks for submitting a tip for review!
References
About This Article
Article SummaryX
1. Open Device Manager.
2. Expand the Disk Drives menu.
Did this summary help you?
Thanks to all authors for creating a page that has been read 775,395 times.
Is this article up to date?
Одна из частых проблем при форматировании карт памяти SD и MicroSD, а также USB флешки — сообщение об ошибке «Windows не удается завершить форматирование», при этом, как правило ошибка появляется вне зависимости от того, в какой файловой системе выполняется форматирование — FAT32, NTFS, exFAT или другой.
В большинстве случаев проблема возникает после того, как карта памяти или флешка была извлечена из какого-то устройства (фотоаппарат, телефон, планшет и подобного), при использовании программ для работы с разделами дисков, в случаях внезапного отключения накопителя от компьютера во время выполнения операций с ним, при сбоях в питании или же при использовании накопителя какими-либо программами.
В этой инструкции — подробно о различных способах исправить ошибку «не удается завершить форматирование» в Windows 10, 8 и Windows 7 и вернуть возможность очистки и использования флешки или карты памяти.
Полное форматирование флешки или карты памяти в управлении дисками Windows
Прежде всего при возникновении ошибок с форматированием рекомендую попробовать два самых простых и безопасных, но не всегда работающих способа с использованием встроенной утилиты Windows «Управление дисками».
- Запустите «Управление дисками», для этого нажмите Win+R на клавиатуре и введите diskmgmt.msc
- В списке накопителей выберите вашу флешку или карту памяти, нажмите по ней правой кнопкой мыши и выберите «Форматировать».

- Рекомендую выбрать формат FAT32 и обязательно снимите отметку «Быстрое форматирование» (хотя процесс форматирования в данном случае может занять продолжительное время).
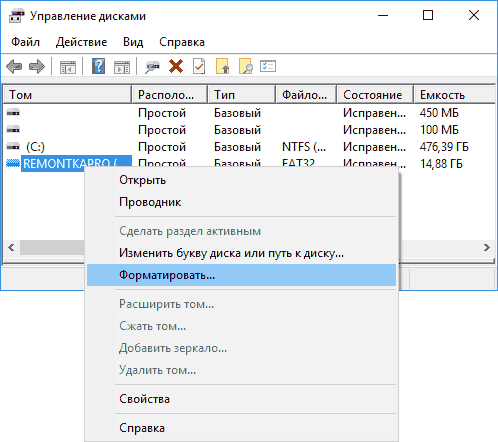
Возможно, в этот раз USB накопитель или карта SD будут отформатированы без ошибок (но не исключено, что снова появится сообщение о том, что системе не удается завершить форматирование). См. также: Чем отличается быстрое и полное форматирование.
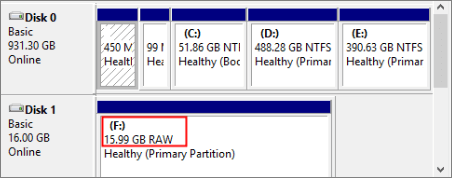
Примечание: используя Управление дисками обратите внимание на то, как ваша флешка или карта памяти отображается в нижней части окна
Форматирование накопителя в безопасном режиме
Иногда проблема с невозможностью завершить форматирование бывает вызвана тем, что в работающей системе накопитель «занят» антивирусом, службами Windows или какими-либо программами. В этой ситуации помогает форматирование в безопасном режиме.
- Загрузите компьютер в безопасном режиме (Как запустить безопасный режим Windows 10, Безопасный режим Windows 7)
- Отформатируйте флешку или карту памяти с помощью стандартных средств системы или в управлении дисками, как это было описано выше.
Также вы можете загрузить «безопасный режим с поддержкой командной строки» а затем использовать её для форматирования накопителя:
format E: /FS:FAT32 /Q (где E: — буква накопителя который нужно отформатировать).
Очистка и форматирование USB накопителя или карты памяти в DISKPART
Способ с использованием DISKPART для очистки диска может помочь в тех случаях, когда на флешке или карте памяти была испорчена структура разделов или же какое-то устройство, к которому был подключен накопитель создало разделы на нем (в Windows могут быть проблемы, если на съемном накопителе есть несколько разделов).
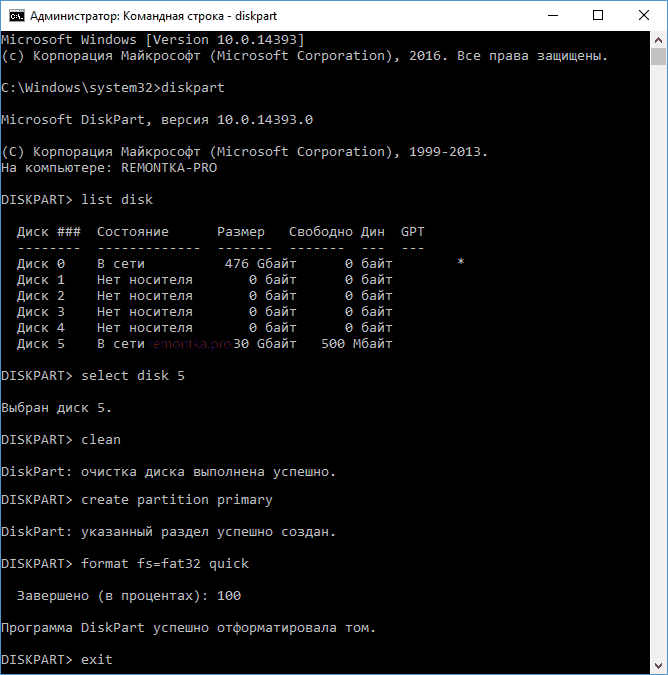
- Запустите командную строку от имени администратора (как это сделать), затем по порядку используйте следующие команды.
- diskpart
- list disk (в результате выполнения этой команды запомните номер накопителя, который нужно отформатировать, далее — N)
- select disk N
- clean
- create partition primary
- format fs=fat32 quick (или fs=ntfs quick)
- Если после выполнения команды под пунктом 7 по завершении форматирования накопитель не появится в проводнике Windows, используйте пункт 9, иначе пропустите его.
- assign letter=Z (где Z — желаемая буква флешки или карты памяти).
- exit
После этого можно закрыть командную строку. Подробнее на тему: Как удалить разделы с флешки.
Если флешка или карта памяти все так же не форматируются
Если ни один из предлагаемых способов не помог, это может говорить о том, что накопитель вышел из строя (но не обязательно). В этом случае можно попробовать следующие инструменты, есть вероятность, что они смогут помочь (но в теории могут и усугубить ситуацию):
- Специальные программы для «ремонта» флешек
- Также могут помочь статьи: Карта памяти или флешка защищена от записи, Как отформатировать флешку, защищенную от записи
- HDDGURU Low Level Format Tool (низкоуровневое форматирование флешки)
На этом завершаю и надеюсь, что проблема связанная с тем, что Windows не удается завершить форматирование была решена.
This page explains the causes of «Windows was unable to complete the format» error and covers 5 practical ways to help all Windows users to get rid of this error efficiently from USB flash drive, SD card, external hard drive, etc., devices. If you were unable to format the USB or SD card, relax and follow guidelines here to complete the format with ease now.
Formatting a Micro SD card, USB flash drive, pen drive, hard drive or SSD is a quick process for ordinary users to change the device file system and restore its full capacity, and it’s not strange to most of us. But sometimes, you might fail to complete the format on a Windows computer as the cases shown below:
Case 1 — Windows cannot complete format on USB
«Yesterday, Windows asked me to format my USB flash drive when I connected it to the computer. But I just got an error message ‘Windows was unable to complete the format’ when I tried to reformat it to FAT32. How can I fix this problem?»
Case 2 — Windows was unable to complete the format on the SD card
«I have a problem with my micro SD card. I can’t format it. I receive an error ‘Windows was unable to complete the format’, what can I do?»
So what is unable to complete the format? «Windows was unable to complete the format» is an error message that pops up in a window to warn users the Windows operating system cannot execute the formatting operation on your target devices so as to change the file system, setting the problematic device to usable again.
Stay calm when you are unable to complete formatting SD card, USB, external hard drive, or other devices on Windows PC. You should first check the causes of this error. Then you can follow the respective fix and refer to the guide steps remove the «Windows was unable to complete the format» issue from your device, completing the format.
For an instant solution for the ‘Windows was unable to complete the format’ issue, you can fully reply on the professional formatting tool — EaseUS Partition Master as shown below in Method 1 for help.
Causes of Windows Unable to Complete Format Error
There are many causes that may prevent Windows from completing the format process on your devices. Here is a list of the main reasons that explain why Windows is unable to format the USB, SD card, or external hard drive, etc., devices:
#1. The device contains the file system error
When a storage device displays as RAW or contains an unsupported file system such as Linux Ext2/3/4, Windows won’t be able to directly format the device by using File Explorer or Disk Management. To fix this error, you will need a third-party formatting tool for help.
#2. Presence of bad sectors on USB, SD
When a storage device contains a certain number of bad sectors, you won’t be able to format it using Windows built-in tools. To make your device accessible again and complete the format on a USB/SD card, you can run disk error checking and a bad sector repair tool to clear the errors on your device.
#3. Virus or malware infection
When your storage device is infected by a virus or malware, you can neither access the saved data nor format the device in a normal way. You need to clear the virus at first and then complete the formatting process.
#4.The device is locked or write-protected by third-party software
If your USB or SD card gets locked or write-protected by third-party software, you cannot format the device either. The only way out is to remove the write protection first, and then finish formatting your SD, or USB drive.
#5. Physical damage
When your storage device is physically damaged, you can do nothing to it. Either taking it to a local manual repair center or purchasing a new one to replace the damaged device is a good way out.
7 Fixes for «Windows Was Unable to Complete the Format» Error
In part, we will show you how to fix the ‘Windows was unable to complete the format’ error in 6+ practical ways. As the causes are different, the solutions may also be different. Check and follow the right solution to get rid of this error with ease now.
Method 1. Use EaseUS Partition Master
Applies to: Fix «Windows was unable to complete the format» caused by a file system error or unsupported file system on USB, SD card, hard drive, etc.
If your storage devices cannot be formatted due to file system error, such as USB shows RAW in Disk Management, EaseUS Partition Master can effectively format your device to a Windows supported file system such as NTFS, FAT32, or exFAT, etc., with ease.
Follow to see how to fix file system errors on your SD, or USB drive using this software and complete the formatting process in only a few simple clicks:
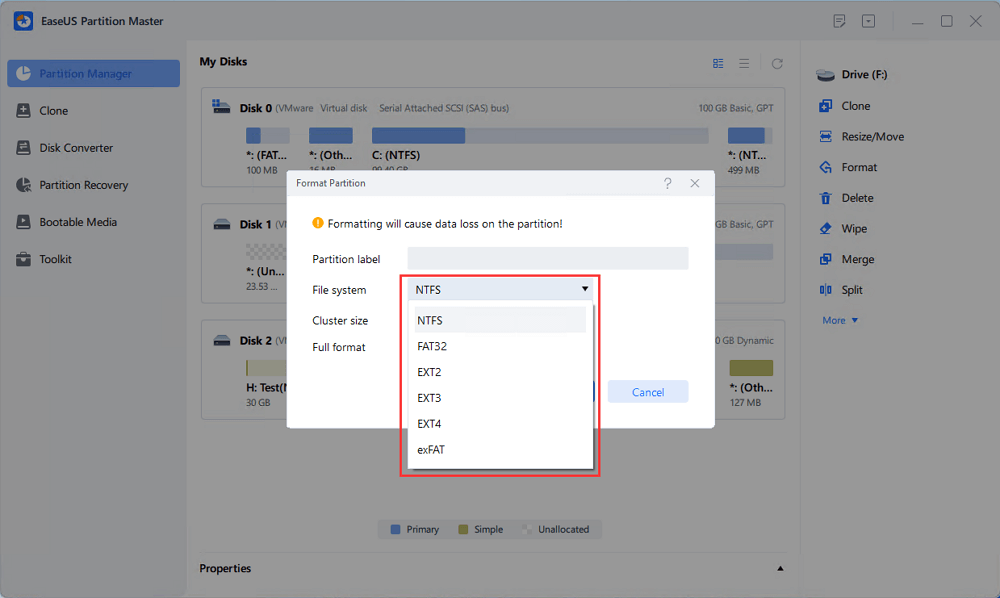
Step 1. Run EaseUS Partition Master, right-click the hard drive partition you intend to format and choose «Format».
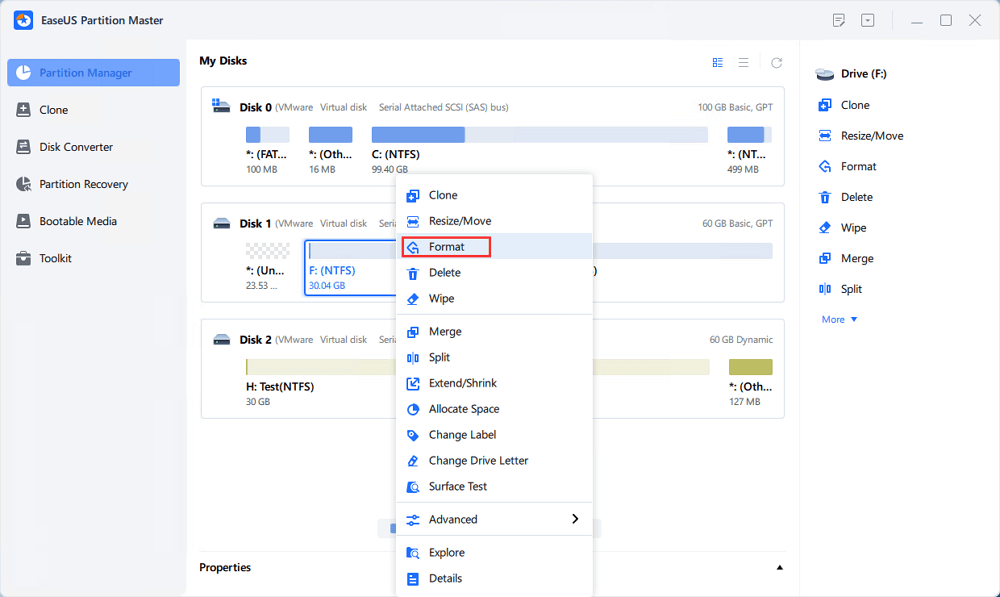
Step 2. In the new window, set the Partition label, File system (NTFS/FAT32/EXT2/EXT3/EXT4/exFAT), and Cluster size for the partition to be formatted, then click «OK».
Step 3. Then you will see a warning window, click «Yes» in it to continue.

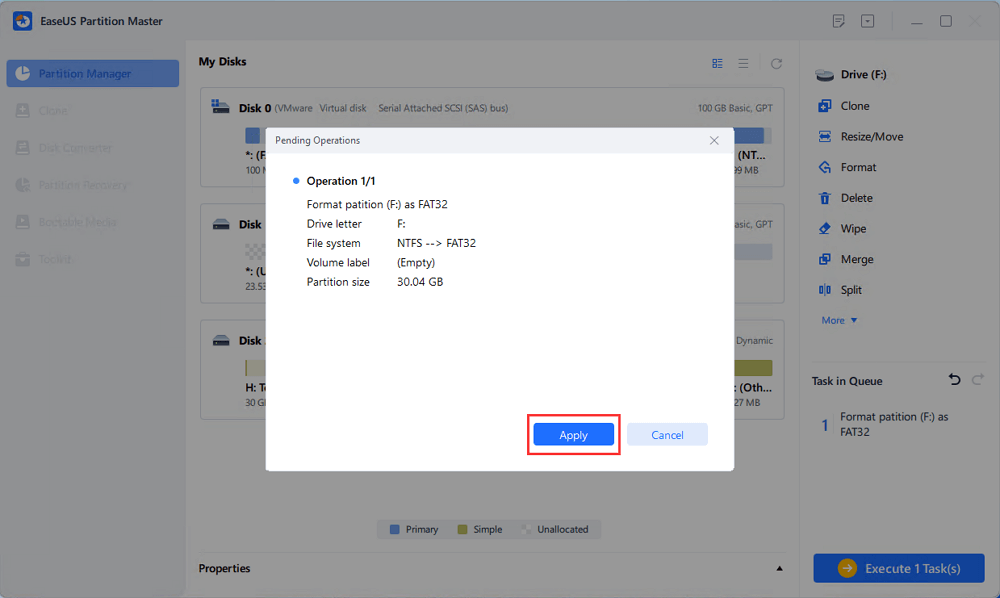
Step 4. Click the «Execute 1 Task(s)» button to review the changes, then click «Apply» to start formatting the partition on your hard drive.
Do you like using this powerful tool to fix Windows was unable to format error? If you think it’s helpful, click the buttons below to share it with other people in need!
Method 2. Use Diskpart Command
Applies to: Resolve Windows unable to format USB, SD, or other device error due to file system or bad sector issue.
When you failed to format USB, SD card, or other storage devices using Windows file explorer, the Diskpart formatting command can also help you complete the format.
Here are the steps:
Step 1. Right-clicking on Windows icon, type command prompt in Search, right-click on Command Prompt and select «Run as administrator».
Step 2. Type diskpart in Command Prompt and hit Enter.
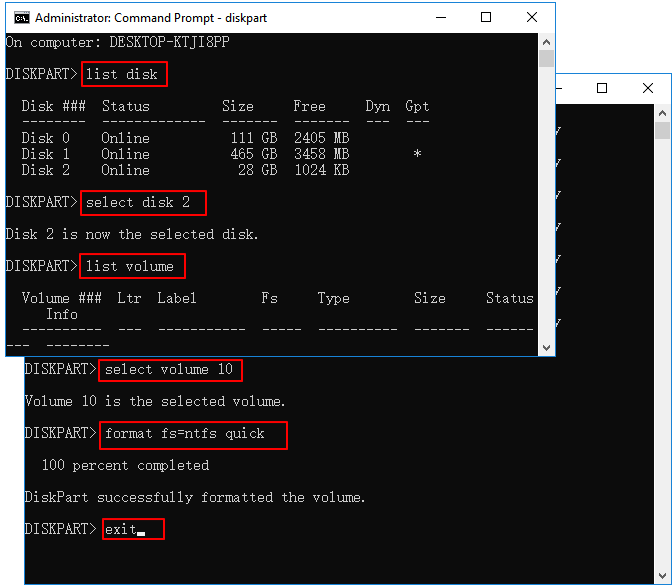
Step 3. Hit Enter each time when you type below command lines in DiskPart to quick format hard drive:
- list disk
- select disk 2 (Replace 2 with your disk number)
- list volume
- select volume 10 (Replace 10 with the volume number of the device that you want to format)
- format fs=ntfs quick (If you need to format a storage device to FAT32 or other file systems, replace NTFS with FAT32, exFAT, etc.)
Step 4. Type exit and hit Enter to close the program when DiskPart reports it has successfully formatted the volume.
To learn more details about how to use CMD, click the video below to try.
Method 3. Use Disk Management
Applies to: Get rid of «Windows was unable to complete the format» error caused by RAW file system error on USB, SD card, hard drive, etc.
When your storage device becomes RAW and Windows warns that it was unable to complete the format, you may try Windows Disk Management to complete the formatting:
Step 1. Connect your device to your PC if you want to format a removable device.
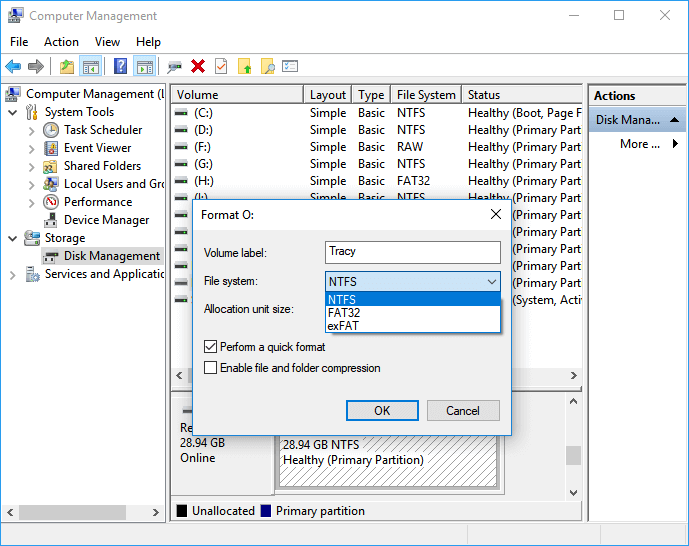
Step 2. Right-click on This PC and click «Manage», and select «Disk Management».
Step 3. Locate and right-click on your USB flash drive or external hard drive, and then select «Format».
Step 4. Set the file system of your USB, SD card, or hard drive to NTFS or FAT32, tick «Quick Format» and click «OK» to confirm.
Method 4. Clear Virus
Applies to: Resolve «Windows was unable to complete the format» issue on a locked device due to virus or malware infection.
If your device is locked or infected by viruses or unknown malware, your Windows computer won’t be able to format your USB, SD card, or other storage devices. The best way to get rid of this issue is to run virus-cleaning software and unlock the device.
If you are not familiar with antivirus software, TotalAV is one of the utilities that you can try. It enables you to protect your data and privacy against from virus, malware, and online threats in real-time:
TOTALAV
TotalAV is an Award Winning Antivirus and Security Software. It Provides Real-Time Protection from Viruses, Malware & Online Threats.
Step 1. Connect your external storage device like USB or SD card to your PC.
Step 2. Run a virus cleaner, malware removal tool, or antivirus software on your PC, select the target device to clear the existing virus, malware.
Step 3. After this, you can reformat the device again using Windows File Explorer or the former three formatting tools.
You can also remove virus without antivirus by using Windows Defender and enable the real-time virus protection feature. It also works to protect your device and data against viruses and malware infection.
Method 5. Remove Write Protection from Device
Applies to: Remove write protection and enable Windows to complete the format on USB, SD card, external hard drive, etc., devices.
If your target device is locked or write-protected by a password or third-party software, Windows cannot directly format your storage device. You will need to unlock the device first, and then complete the format:
First. Remove Device Write Protection — 3 Ways
#1. Unlock USB/SD card
Step 1. Connect your device to your PC.
Step 2. Remove the switch of your USB or SD card to the OFF side.
Then you can retry to format the device on Windows using File Explorer or other devices.
#2. Remove write protection from USB/SD
Here is a write protection removal tool named EaseUS CleanGenius for you to apply and directly remove the write protection from your device:
If you don’t consider yourself a pro-computer user and you’re not familiar with command-lines, don’t worry. There are graphical-based solutions to help you remove write-protection from your hard drives, USB drives, and even SD cards.
EaseUS CleanGenius is one of these tools that helps you fix aforementioned issues on your drives without knowing a thing about command-line.
Here’s an easy-to-follow guide on how to use this tool to get your issues sorted:
Step 1: DOWNLOAD and install EaseUS CleanGenius (free) on your computer.
Step 2: Run EaseUS CleanGenius on your PC, select Optimization and choose the Write Protection mode.
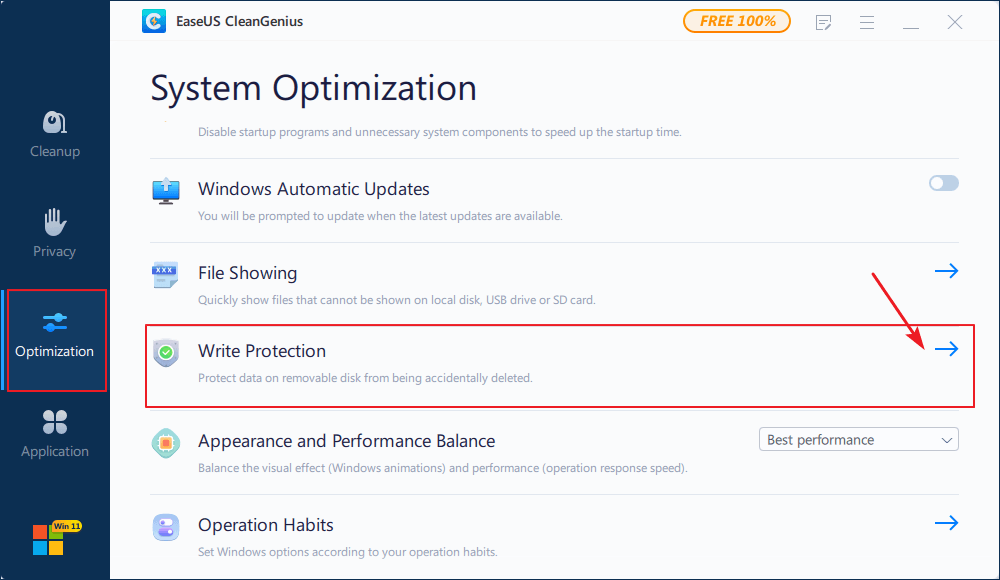
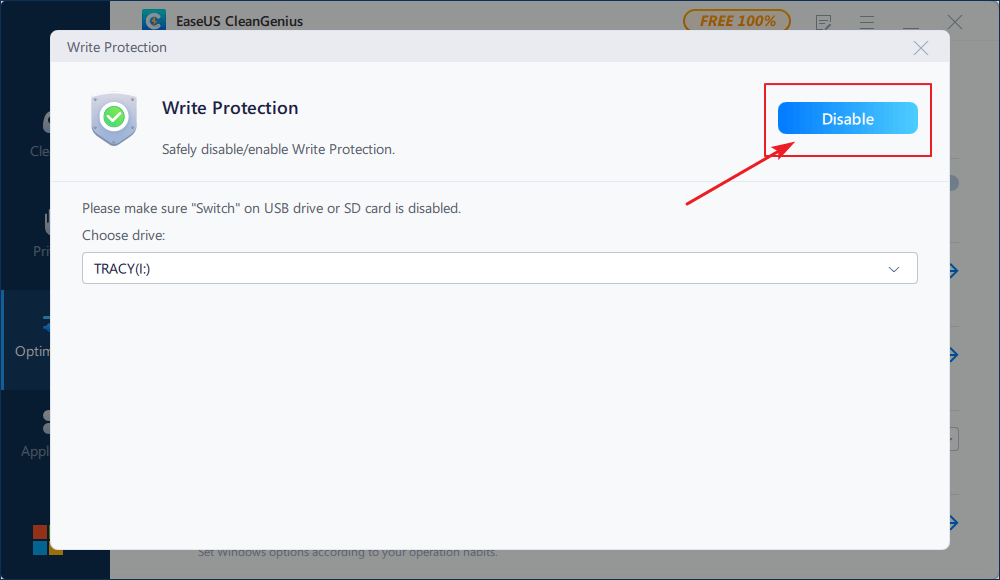
Step 3: Select the device that is write-protected and click Disable to remove the protection.
#3. Unlock device using a password or third-party software
If your storage device is write-protected by using a password or third-party software, you will need to reuse the password or the software to unlock your SD, USB, etc., devices.
Next. Format the Device — Complete Windows Formatting
Now, you can reformat the device with Windows File Explorer, Disk Management, Diskpart command, or EaseUS Partition Master.
Step 1. Connect USB, or SD card that you want to format to your PC and open up Windows Explorer.
Step 2. Right-click on the connected device and select «Format».
Step 3. On the format window, select the desired file system — NTFS for hard drive partition, FAT32 for 32GB SD/USB, and exFAT for 64GB or bigger SD/USB.
Step 4. Tick «Quick format» and click «Start».
Method 6. Check and Fix Disk Errors that Prevent Windows from Completing the Format
Applies to: Resolve «Windows unable to format» device error due to disk error.
Step 1. Open File Explorer, connect your device to PC and right-click on the problematic device, select «Properties».
Step 2. Under the Tools tab, click the Check button under «Error checking».
Step 3. Next, you can choose to Scan drive if wanted or Repair drive if errors were found.
Wait for the process to finish.
Step 4. Now, you can right-click on your device and complete the format using Windows File Explorer.
Method 7. Repair Bad Sector that Disallows Windows to Format Storage Device
Applies to: Fix and repair soft bad sectors that stops Windows from formatting device.
When a storage device contains a bit few soft bad sectors, you can’t format it using the Windows formatting tool. You can either apply EaseUS Partition Master with its File System Checker to repair bad sectors or run CMD command to repair soft bad sector first and then complete the format:
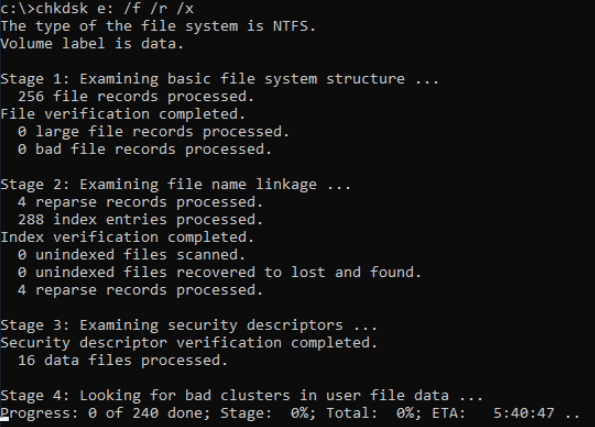
Step 1. Run CHKDSK command to fix soft bad sectors.
1. Type cmd in the Search box, right-click «Command Prompt» and choose «Run as administrator».
2. Type chkdsk E: /f /r /x and hit Enter. (Replace E with the drive letter of your storage device.)
Step 2. Format storage device to usable again
1. Open Windows File Explorer, locate and right-click on your hard drive.
2. Select «Format», reset the file system as NTFS, tick «Quick Format» and click «Start».
Bonus Tip: Recover Lost Data after Completing Windows Format
Applies to: Restore lost data from a faulty storage device after resolving the «Windows cannot complete the format» error and formatting the device.
When you finish formatting the faulty storage device which Windows was unable to format, you may lose the saved data. The only thing that you can do is to turn to reliable data recovery software and restore precious data immediately.
Here, we would like to recommend you try EaseUS Data Recovery Wizard. It supports to scan and restore all your data in only 3 steps as long as the device can be detected by a Windows computer:
Step 1. Run EaseUS Data Recovery Wizard. Choose the drive where you lost files and start scanning by clicking «Search for Lost Data». This software allows you to recover lost data from all devices, including HDD, SSD, USB drive, SD card, pen drive, camera, etc.

Step 2. Browse the full scan results. You can choose the file type you need by clicking on the file type filter. EaseUS data recovery software supports 1000+ file types like photos, videos, documents, emails, audio files, and many more.

Step 3. Select the files you want to preview. Click «Recover» and set a storage location or Cloud drive to save the recovered data.

After restoring the precious data, you can re-save your data back to the USB or SD card again.
Conclusion
This page answers the question of «How do I fix Windows was unable to complete the format?» with 7 to help you effectively resolve this issue on your USB, SD card, external or internal hard drive.
For a reliable and effective formatting software, EaseUS Partition Master is recommended for you to try. It makes everything easy for you to format the device in Windows PC. If you have other advanced partitioning requests, it also can help.
FAQs about Formatting Hard Drive
If you have other more questions in formatting devices, check and find answers in the following FAQs:
1. How do I fix a hard drive that won’t format?
First, you need to check the hard drive state: whether Windows can detect the hard drive.
If yes, apply EaseUS Partition Master to directly format your hard drive with provided steps in Method 1 on this page.
If not, or your hard drive displays as unknown or unallocated, create a new partition on your hard drive and reformat the hard drive.
2. Why can’t I format my hard drive?
As described on this page, when your hard drive gets locked, damaged, or contains file system error, bad sectors, or even virus-infected, you can’t directly format it.
To resolve this issue, you can try the three methods:
1). Unlock hard drive using password or third-party software;
2). Clean up virus and malware from the hard drive;
3). Format hard drive using EaseUS Partition Master, Diskpart, or Disk Management formatting tool.
For more details, follow the provided methods on this page for a guide.
3. How do I fix my flash drive unable to format?
When you are unable to format a flash drive, try the following steps:
Step 1. Connect the flash drive to the PC and unlock the USB if it’s locked.
Step 2. Run virus cleaner software to remove hidden viruses, malware.
Step 3. Run Windows Disk Management or EaseUS Partition Master
Step 4. Right-click the USB flash drive and select «Format». Set a new file system for the drive.
Step 5. Reset the file system for the flash drive and click «OK» to confirm.
After this, you can reuse the flash drive to transfer data and save files again.
Checklist
- I looked at https://github.com/pbatard/rufus/wiki/FAQ to see if my question has already been answered.
- I performed a search in the issue tracker for similar issues using keywords relevant to my problem, such as the error message I got from the log.
- I clicked the ‘Log’ button or pressed Ctrl—L in Rufus, and copy/pasted the log into the line that says
<FULL LOG>below. - The log I am copying is the FULL log, starting with the line
Rufus version: x.y.z— I have NOT removed any part of it.
Additionally (if applicable):
- I ran a bad blocks check, by clicking Show advanced format options then Check device for bad blocks, and confirmed that my USB is not defective.
- I also tried one or more of the following:
- Using a different USB drive.
- Plugging the USB into a different port.
- Running Rufus on a different computer.
- If using an image, I clicked on the
(✓)button to compute the MD5, SHA1 and SHA256 checksums, which are therefore present in the log I copied. I confirmed, by performing an internet search, that these values match the ones from the official image.
Issue description
hello
my English is not good, so I’m sorry for that.
yesterday i used my flash memory for created a bootable windows 10 pro and suddenly i saw an error in middle of flashing process.
now my memory recognize by windows and when i click in it or try to format it, i see this error: the request failed due to fatal device hard error
i already tried many solutions but none of them is working for me: minitool app, diskpart cmd cleaning, ubunto gparted app, test disk ,…
what should i do now?
Log
Requesting disk access...
Will use 'Z:' as volume mountpoint
Deleting partitions...
Deleting ALL partition(s) from disk '\\?\PhysicalDrive2':
● Partition 1 (offset: 1048576, size: 14.7 GB)
Opened \\.\PhysicalDrive2 for exclusive write access
Analyzing existing boot records...
Drive has a Windows 7 Master Boot Record
Clearing MBR/PBR/GPT structures...
Erasing 128 sectors
write_sectors: Write error [0x000001E3] The request failed due to a fatal device hardware error.
  StartSector: 0x01d73780, nSectors: 0x1, SectorSize: 0x200
Retrying in 5 seconds...
Deleting partitions...
Could not delete drive layout: [0x000001E3] The request failed due to a fatal device hardware error.
Could not reset partitions
Re-mounted volume as Z: after error

Found USB 2.0 device 'SanDisk Cruzer Blade USB Device' (0781:5567)
Found USB 2.0 device 'MXT-USB Storage Device USB Device' (AAAA:8815)
2 devices found
No volume information for drive 0x82
Disk type: Removable, Disk size: 16 GB, Sector size: 512 bytes
Cylinders: 1922, Tracks per cylinder: 255, Sectors per track: 63
Partition type: MBR, NB Partitions: 1
Disk ID: 0x007367D2
Drive has a Windows 7 Master Boot Record
Partition 1:
  Type: NTFS/exFAT/UDF (0x07)
  Size: 14.7 GB (15810428928 bytes)
  Start Sector: 2048, Boot: Yes
Getting “Windows Was Unable to Complete the Format” error when attempting to format a disk drive or external storage device on a Windows system. This error indicates that the operating system is unable to complete the requested formatting operation. Several reasons could contribute to this issue Write Protection, File System Issues, Bad Sectors or the device is corrupted or damaged, which means it cannot be recognized or accessed by Windows. If you see this error “Windows Was Unable to Complete the Format” with USB flash drive, SD card, or similar, here is what to do when Windows can’t format a drive.
Contents
- 1 Windows Was Unable to Complete the Format
- 1.1 How to Format a Drive in Windows
- 1.2 Check for Write Protection
- 1.3 Format The Drive Using Disk Management
- 1.4 Format The Drive Using the Command Prompt
-
- 1.4.0.1 Again Here is The Command List To Format a USB drive:
-
- 1.5 Repair the device using Windows Explorer
- 1.6 HP USB Disk Storage Format Tool
There are several reasons why you See a “Windows was unable to complete the format” error on your USB flash drive or SD card.
- The device is write-protected, which means it cannot be modified or erased.
- The device is corrupted or damaged, which means it cannot be recognized or accessed by Windows.
- The device has bad sectors, which means some parts of it are physically damaged and cannot store data.
- The device is incompatible with the file system or partition style that you are trying to format it with.
How to Format a Drive in Windows
Formatting a drive in Windows is a relatively straightforward process. But make a note, Formatting a drive erases all data on it Ensure you have a backup of important data before proceeding.
- Press Win + E on your keyboard or click on the File Explorer icon in the taskbar.
- locate the drive you want to format. Be careful to select the correct drive to avoid accidental data loss.
- Right-click on the drive you want to format, From the context menu, choose the “Format” option.
Here, you can choose the File System (NTFS is generally recommended for Windows) and the Allocation Unit Size. You can usually leave the Allocation Unit Size at the default setting.
If you’re in a hurry, you can check the “Quick Format” option. This will speed up the formatting process, but it won’t check for bad sectors on the disk.
Check for Write Protection
Some devices have a physical switch that can enable or disable write protection. If your device has one, make sure it is in the unlocked position. If your device does not have a switch, you can use a command prompt to remove the write protection.
Format The Drive Using Disk Management
Windows Disk Management Tool Allows managing partitions and disks for computers. With Disk Management Tool, you can create a new volume, extend or shrink partition, change drive letter, delete or format partition, etc. Also, Damaged flash drives / USB drives can be formatted within Disk Management.
Disk Management is another tool that can help you format your device.
- Press Windows key + X and select disk management,
- This will display all attached Storage Devices (including USB drives) to your computer.
- In the center, section find your problematic Device (you should be able to recognize it by its size) and the fact Windows recognizes it as Unallocated space.
- Right-click the flash drive and select the “Format” option, and select file system format to perform a quick format.
If Drive Shows Unallocated Space
On Computer Management, If the problematic drive Displays with unallocated space, Then Right-click on It and select New Simple Volume. The New Simple Volume Wizard will start Here, select format this volume with the following settings, set the file system type to NTFS, tick mark on Perform a quick format Click next, and finish the process. you will see that your drive has been formatted and is now correctly recognized by Windows.
Format The Drive Using the Command Prompt
If both of the methods not working for you, then don’t worry. With Windows command prompt utility, you can easily format any drive with type flew commands. This is the best and most effective way to format your USB drive without any Errors. For this, you need to Open the Elevated command prompt.
On the Start menu, search Type CMD Right-click on Command prompt from Search Results and select Run As Administrator.
Now on the Command prompt window, Type command diskpart and press the Enter key.
Next, Type the command list volume and press the enter key. Then you can see the partition and disk list of the current computer. All drives are listed with numbers check the USB Drive for me its Disk 4 is the flash drive.
Type Command: select volume 4 (your volume number may be different ) and press the enter key. This will show volume 4 is the selected volume.
Type below commands one by one and hit the enter key.
clean
The drive will be scanned and its damaged file structure will be erased during scanning. Once the process is done, it reports a confirmation message saying that it has successfully cleaned the drive, and a new partition needs to be created.
create partition primary
-active
-select partition 1
next type in Command prompt format /FS=NTFS (you can copy and paste it.) and press Enter. The Disk Drive will Start formatting with NTFS File System. Wait some moment to complete the format 100 %.
When the format completes (100%), close the command prompt window and go to the Computer to check the drive. Verify your drive by copying some data in it.
You can repair your corrupted SD cards, USB flash drives, and even your External hard drives by this method.
Again Here is The Command List To Format a USB drive:
-diskpart
-list disk
-select disk ‘your disk number’
-clean
-create partition primary
-active
-select partition 1
-format fs=NTFS
After trying the command prompt utility to format the Drive, you will no more face any errors to format the Disk Drive. If still getting try Third-party software to format, clean, and make usable the Disk Drive.
Repair the device using Windows Explorer
Sometimes, Windows Explorer can detect and fix errors on your device automatically.
- Connect your device to your PC and open Windows Explorer.
- Right-click on your device’s drive letter and choose “Properties”.
- Click on the “Tools” tab and then click on the “Check” button under “Error checking”.
- Click on “Scan and repair drive” and wait for the process to complete.
- Try to format your device again and see if the error is gone.
HP USB Disk Storage Format Tool
If none of the above methods work, you can try using a third-party tool that can format your device more effectively. HP USB Disk Storage Format Tool is an easy-to-use yet powerful application that can easily deal with any issue you might experience when formatting a USB drive. This is very similar in terms of looks to the standard Windows format screen.
Download HP USB Disk Storage Format Tool
Select the USB drive and choose the desired file system (NTFS for larger than 4 GB). Click start to format the Drive.
Note: again, do not use the “Quick Format” option! It might take a while in the full model, but it’s safer and more effective.
Also read:
- Fix Windows 10 memory management blue screen error 0x0000001a
- How to Fix You Need to Format the Disk before you can use it Windows
- Format write-protected USB Drive using CMD Prompt
- EaseUS Partition Master: Best Partition Manager for Windows PC
- Solved: Windows 10 Unmountable boot volume (STOP: 0x000000ED) BSOD