
Не многим известно, что операционная система Windows XP умеет работать с протоколом интернета IPv6. Но стоит оговорится, что поддержка данного протокола осуществляется в этой ОС на экспериментальном уровне.
Управление работой протоколом здесь осуществляется лишь через командную строку (cmd).
Ниже приводим небольшой перечень команд для осуществления управления данным протоколом:
• ipv6/? – получение помощи (help);
• ipv6 install – устанавливает поддержку IPv6, так как по умолчанию она не включена. При выполнении данной команды на всех интерфейсах автоматически появляются link-local IPv6-адреса. После выполнения рекомендуется перезагрузить систему во избежание проблем, хоть протокол и устанавливается, он не появляется в списке компонентов в свойствах локальных связей в папке «Сеть и удаленный доступ к сети»;
• ipv6 uninstall – обратная команда. При выполнении аннулируются все имеющиеся на узле IPv6 настройки (адреса, маршруты и т.п.), так что довольно часто именно с этой целью и используют данную команду. После выполнения, как и в случае с ipv6 install, желательна перезагрузка;
• ipconfig – просмотр сетевых настроек (настроек интерфейсов)
• ipv6 if – просмотр IPv6-сетевых настроек (IPv6-настроек интерфейсов)
• ipv6 adu / – добавление IPv6-адреса. Индекс или название интерфейса (название указывается в кавычках) для подключения по локальной сети можно узнать при помощи вышеупомянутых команд (ipv6 if или ipconfig);
• ipv6 rt – просмотр IPv6-таблицы маршрутизации;
• ipv6 rtu / – добавление маршрута. После выполнения данной команды пакеты, направленные в сеть с указанным префиксом, будут переправляться через указанный интерфейс на маршрутизатор с указанным адресом (ipv6-адресом). Если префикс равен «::/0», то это означает маршрут по умолчанию, то есть любые пакеты, отправленные в сеть, чей префикс не совпадает с префиксом сети отправителя, будут через указанный интерфейс перенаправлены на маршрутизатор по умолчанию.
К сожалению, все изменения, произведенные в системе при помощи вышеприведенных команд, отменяются при первой же перезагрузке системы, а сохранить их возможно лишь создав BAT-файл с соответствующими командами и прописать этот файл в автозагрузку Windows или же воспользовавшись специальной утилитой netsh, которая сохраняет настройки до применения команды ipv6 uninstall.
Если воспользоваться netsh, то добавить IPv6-адрес можно командами:
• netsh;
• interface ipv6;
• add address .
Просмотр IPv6-таблицы маршрутизации:
• netsh;
• interface ipv6;
• ipv6 show routes.
Добавление маршрута:
• netsh;
• interface ipv6;
• add route prefix= interface= nexthop= publish=yes
In this article we will show you the steps involved in configuring you Windows XP device with IPv6. All commands should be run via the command prompt.
Table of Contents
Enable IPv6
ipv6 install
Configure IP
If you are not using Stateful or Stateless IPv6 address Autoconfiguration you can manually configure your settings using the following commands :
netsh interface ipv6 add address "Local Area Connection 2" [ipv6 address]
netsh interface ipv6 add route ::/0 "Local Area Connection 2" [default gateway ipv6 address]
netsh interface ipv6 add dns "Local Area Connection 2"  [ipv6 address]
netsh interface ipv6 add dns "Local Area Connection 2" [ipv6 address] index=2
Additonal Commands
You can use the following commands to show all IPv6 routes and the Neighbor Discovery table. The Neighbor Discovery table is the equivialnt to the arp cache but with IPv6 addresses instead of IPv4. It is also worth noting that Neighbor Discovery is part of ICMP6.
netsh interface ipv6 show neighbors
netsh interface ipv6 show routes
DNS
Instead of using A records for DNS like IPv4, IPv6 uses AAAA records for domain to IP name resolution. Below shows a brief example,
C:\Documents and Settings\admin>nslookup
Default Server:  dns1.isp.net.uk
Address:  x.x.x.x
> set type=AAAA
> ipv6.google.com
Server:  dns1.isp.net.uk
Address:  x.x.x.xDNS request timed out.
    timeout was 2 seconds.
Non-authoritative answer:
ipv6.google.com canonical name = ipv6.l.google.com
ipv6.l.google.com       AAAA IPv6 address = 2a00:1450:8006::63
ipv6.l.google.com       AAAA IPv6 address = 2a00:1450:8006::93
ipv6.l.google.com       AAAA IPv6 address = 2a00:1450:8006::6
Ping
You can use the standard ping command to ping a IPv6 IP. But you will need to use the “-6” ping switch to ping a IPv6 name.
C:\Documents and Settings\admin>ping -6 ipv6.google.comPinging ipv6.l.google.com [2a00:1450:8006::93] with 32 bytes of data:
Reply from 2a00:1450:8006::93: time=35ms
Reply from 2a00:1450:8006::93: time=39ms
Reply from 2a00:1450:8006::93: time=34ms
Reply from 2a00:1450:8006::93: time=34msPing statistics for 2a00:1450:8006::93:
Packets: Sent = 4, Received = 4, Lost = 0 (0% loss),
Approximate round trip times in milli-seconds:
Minimum = 34ms, Maximum = 39ms, Average = 35ms
C:\Documents and Settings\admin>ping 2a00:1450:8006::93Pinging 2a00:1450:8006::93 with 32 bytes of data:
Reply from 2a00:1450:8006::93: time=34ms
Reply from 2a00:1450:8006::93: time=33ms
Reply from 2a00:1450:8006::93: time=35ms
Reply from 2a00:1450:8006::93: time=34msPing statistics for 2a00:1450:8006::93:
Packets: Sent = 4, Received = 4, Lost = 0 (0% loss),
Approximate round trip times in milli-seconds:
Minimum = 33ms, Maximum = 35ms, Average = 34ms
- Author
- Recent Posts
Rick Donato is a Network Automation Architect/Evangelist and the founder of Packet Coders.
Want to become a Windows expert?
Here is our hand-picked selection of the best courses you can find online:
Windows Server 2019 Administration course
Windows 10 Troubleshooting course
and our recommended certification practice exams:
AlphaPrep Practice Tests — Free Trial
Большинство провайдеров Интернета в последнее время начали использовать протокол IPv6, который идет в дополнение к используемому в настоящее время протоколу IPv4 (о плюсах использования IP6 я расскажу в другой раз).
В Windows Vista и Windows 7 пользователям не нужно настраивать свою операционную систему для использования IPv6 т.к. эта поддержка включена по умолчанию. Совсем иначе обстоит дело с Windows XP в которой пользователям, необходимо включить поддержку протокола IPv6 (отключенного по умолчанию) операционной системой
Для начала давайте проверим, включен ли IPv6 в вашей операционной системе. Самый простой способ, чтобы выяснить это, является команда IPCONFIG, которая отображает информацию о сети в окне командной строки. Чтобы запустить проверку необходимо нажать Пуск/выполнить, ввести команду CMD и нажать ввод. Данное действие откроет командную строку Windows. Теперь введите команду IPCONFIG, чтобы узнать, включена ли поддержка IPv6 в вашей операционной системе. Обращаю ваше внимание, что на следующем скриншоте показано выполнение команды IPCONFIG в Windows 7.
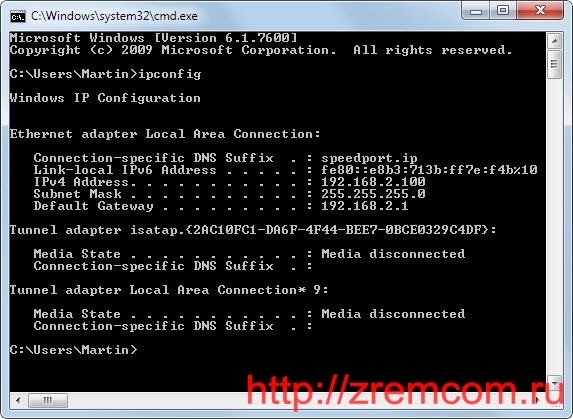
Если вы не видите вставки IPv6 адресов в списке, следовательно поддержка его не включена. Самый простой способ установить протокол IPv6 под управлением Windows XP выполняется из командной строки. Введите следующие команды отдельно и нажмите ввод после каждой из них (выполняется там же в командной строке):
c:> netsh
netsh> interface
netsh interface> ipv6
netsh interface ipv6> install
Данная последовательность команд установит поддержку IPv6 в Windows XP. Помимо вышеописанного способа, можно установить поддержку протокола IPv6 из Панель управления.<
Для этого
- Откройте Сетевые подключения
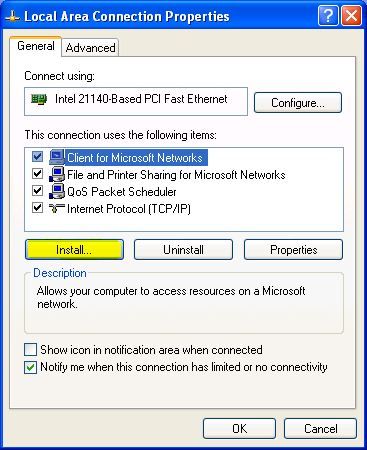
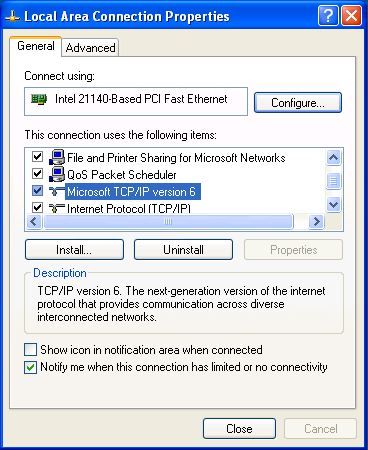
- Щелкните правой кнопкой мыши подключение по локальной сети, а затем выберите пункт Свойства.
- Нажмите кнопку Установить.
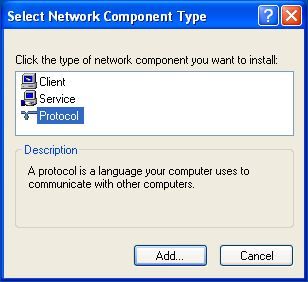
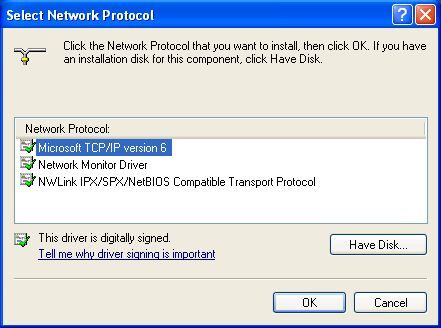
- В окне Выбора типа сетевого компонента , выберите Протокол и нажмите кнопку Добавить.
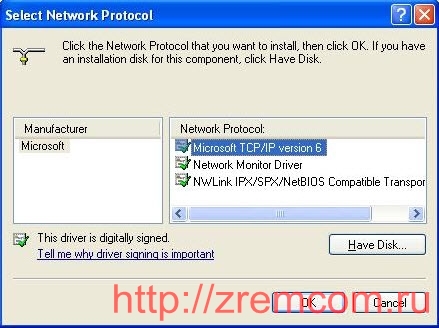
- В окне Выбора сетевого протокола, нажмите кнопку Microsoft TCP / IP версии 6, а затем нажмите кнопку ОК.
- Нажмите Закрыть, чтобы сохранить изменения в вашей сети.
Чтобы проверить подключение поддержки протокола IPv6 выполните команду
c:> ifconfigВсё.

IPv6 is here. Well, if you are like me and are running Windows 7 and/or Windows Server 2008 then you may have already realized some of the advantages of IPv6 protocol and appreciate the built-in support provided by Microsoft in the new operating systems.
If you would like to install IPv6 on Windows XP SP2 or later, follow the procedure described below.
1. Log on to the computer with an administrative account.
2. Click Start, Control Panel, and then double-click Network Connections.
3. Right-click on one of the local area connection icons and then click Properties.
NOTE: When you select one interface and install IPv6, it will be installed automatically on all the interfaces. For example, if you install IPv6 on your wireless interface on your laptop, it will also be installed on the wired interface. If you do not want IPv6 on a specific interface, simply uncheck the box on the interface properties.
4. Click Install.
5. In the Select Network Component Type dialog box click Protocol and then click Add.
6. In the Select Network Protocol dialog box click Microsoft TCP/IP version 6, and then click OK.
7. You will notice Microsoft TCP/IP version 6 added on the General tab of your network card Properties.
8. Click Close to close the Properties box.
Another way to install IPv6 is to use the netsh command at the command prompt by using the following command:
netsh interface ipv6 install
Even though you are not prompted to restart the computer, you should. This is particularly important when it comes to using RPC applications over IPv6.
For Windows XP SP1 the procedure is almost identical. The only difference is that in step 6 you will select Microsoft IPv6 Developer Edition. If you don’t have any Service Packs installed then you can use IPv6 install at the command prompt.
Copyright ©2009 Zubair Alexander. All rights reserved.
This div height required for enabling the sticky sidebar
We use cookies on our website to give you the most relevant experience by remembering your preferences and repeat visits. By clicking “Accept”, you consent to the use of ALL the cookies.
Support for Internet Protocol version 6 (IPv6), a new suite of standard protocols for the Network layer of the Internet, is built into the latest versions of Microsoft Windows, which includes Windows XP, although it is not installed by default. If you are running Windows XP prior to Service Pack 2, you will either need to update your system to the latest service pack or install the Advanced Networking Pack for Windows XP.
IPv6 is designed to solve many of the problems of the current version of IP (known as IPv4) such as address depletion, security, autoconfiguration, and extensibility. Its use will also expand the capabilities of the Internet and enable a variety of valuable and exciting scenarios, including peer-to-peer and mobile applications.
Since IPv6 is not installed by default on Windows XP computers, you will need to install it manually. There are two methods for installing this protocol. You can either install the protocol from the adapter’s properties windows or install it via the command prompt.
To install it via the properties windows follow these steps. The first step is to access the adapter’s properties and click on Install.
- Access the adapter’s properties and click on Install.

- Select the network component type. In this case, click on Protocol, then click Add.

- Finally, choose Microsoft TCP/IP version 6.

- If the protocol has been successfully installed, your adapter’s properties windows should now list the new protocol.

How to install and uninstall IPv6 using command line
To install IPv6
Start, point to All Programs, point to Accessories, and then click Command Prompt. At the command prompt, type:
ipv6 install [press the Enter Key]To uninstall IPv6:
Start, point to All Programs, point to Accessories, and then click Command Prompt. At the command prompt, type:
netsh int ipv6 uninstall [press the Enter Key]