
На летней презентации купертиновцы показали ключевые апдейты для всех операционных систем и в очередной раз прокачали яблочную экосистему. Самое заметное новшество позволяет использовать iPhone в качестве веб-камеры на Mac.
В тему: Как в iOS 16 и macOS Ventura использовать iPhone в качестве веб-камеры
Опция получилась достаточно полезная, но при этом работает исключительно внутри экосистемы Apple и требует последней версии ПО на смартфоне и компьютере. Сторонние утилиты давно предлагают гораздо больший набор опций и не требуют обновлять ОС для работы.
Одну из таких альтернатив мы и рассмотрим ниже.
-
🙋♂️ Ответ на любой вопрос про Apple вы найдете здесь: https://t.me/iphonesru_forum 👈
Как настроить iPhone в качестве веб-камеры для любого компьютера
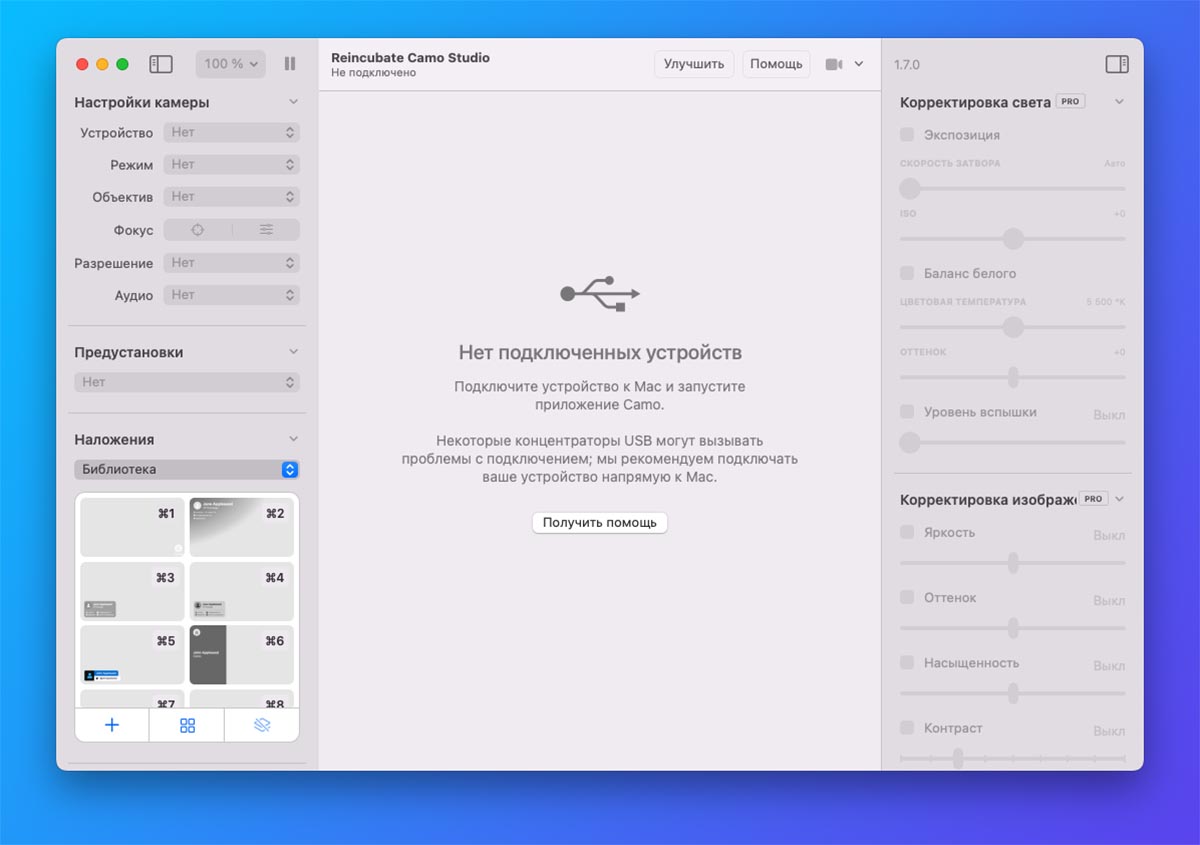
1. Загрузите приложение Camo с сайта разработчиков. Доступны версии для macOS и Windows.
2. Установите приложение Camo для iPhone или iPad (есть приложение для Android).
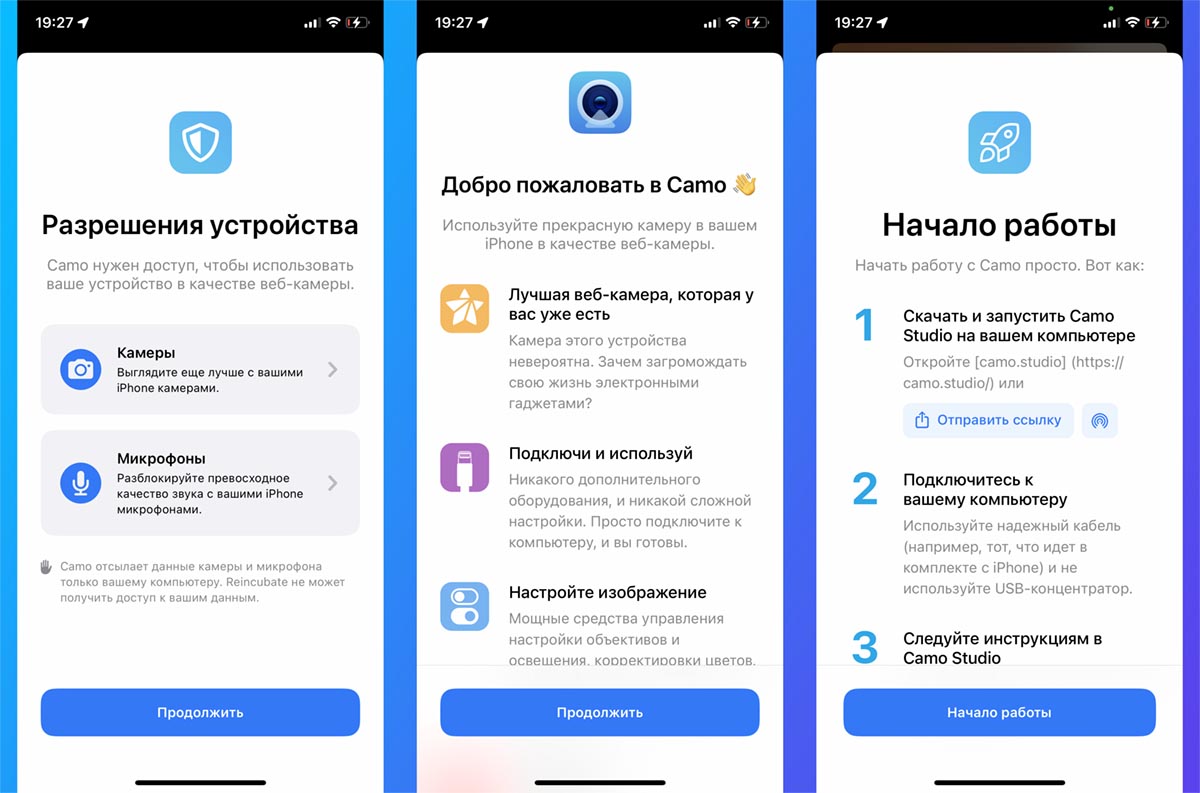
3. Запустите утилиту на смартфоне и выдайте все необходимые разрешения.
4. Подключите iPhone или iPad к компьютеру при помощи кабеля.
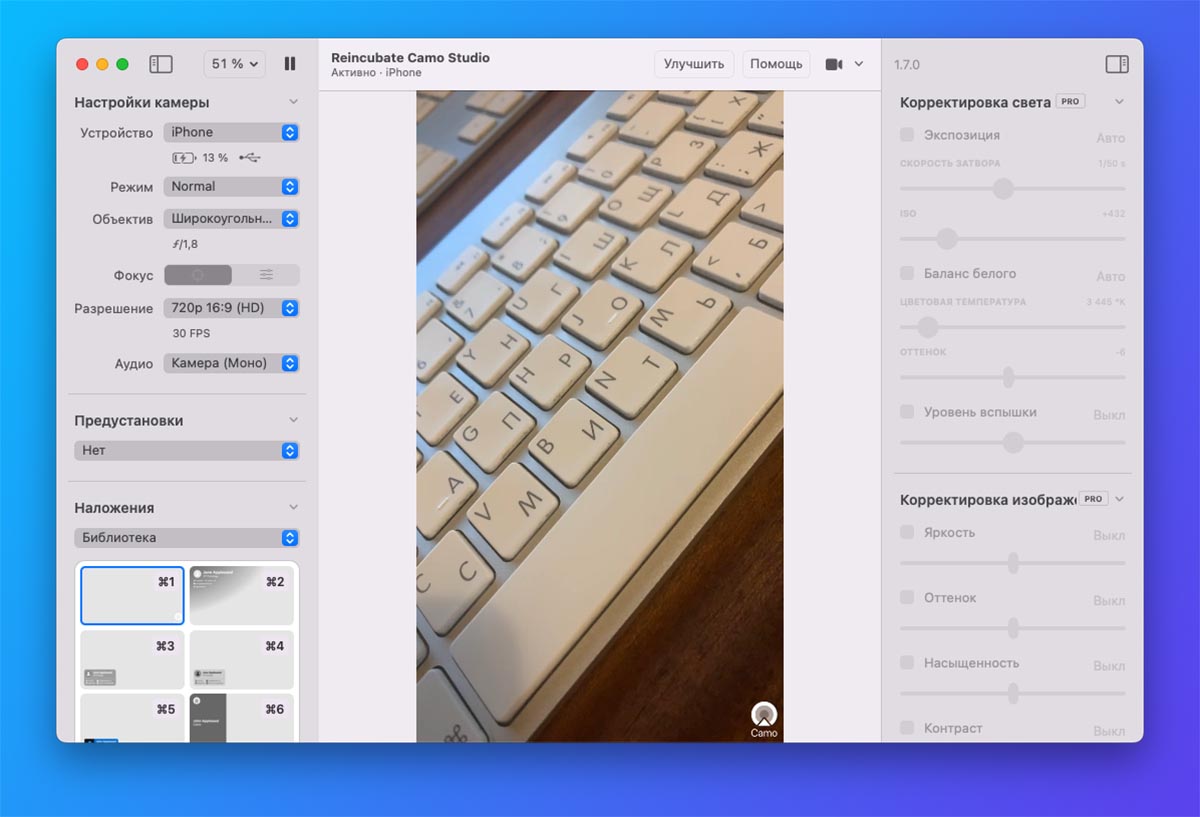
5. Запустите приложение на компьютере и произведите необходимые настройки.
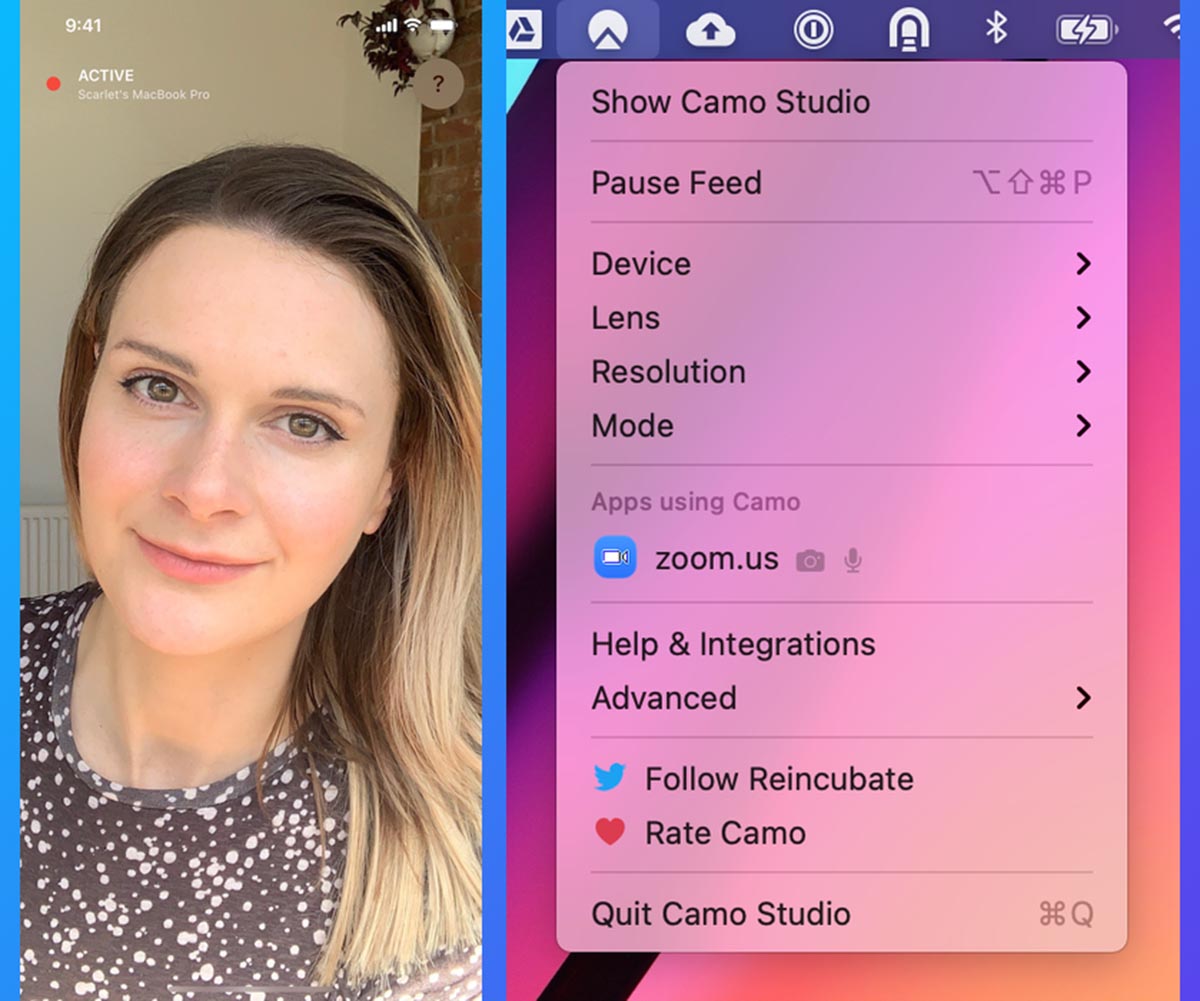
После внесения всех опций сможете использовать камеру в любой программе на компьютере. Поддерживаются FaceTime, Skype, Viber, Telegram, другие мессенджеры и приложения с возможностью захвата видео.
Чем стороннее приложение лучше решения Apple
Купертиновцы, как всегда, сделали опцию без настроек и параметров. Всё работает из коробки, но не позволяет изменить хоть что-то по своему усмотрению.
При этом на некоторых моделях iPhone будет доступен портретный режим, кадрирование картинки с фишкой “в центре внимания” или эффект студийного освещения.
В тему: Какие модели iPhone и iPad получат все нововведения iOS 16 и iPadOS 16
Вместо этого сторонняя утилита предлагает ряд настроек и опций:
▶ Можно подключить несколько гаджетов и переключаться между их камерами. Это позволит создать эффект крутой презентации, когда пользователь сможет менять ракурсы или быстро переключаться с портретной камеры на общий план.
При этом нет ограничения на использование устройств с одной учеткой Apple ID.
▶ Все работает через проводное подключение, а значит вам не потребуется Wi-Fi сеть для работы. Сам iPhone при этом будет заряжаться, а сигнал не будет зависеть от загрузки сети.
▶ Можно переключаться между основной и фронтальной камерами. Это удобно, ведь при использовании фронталки экран iPhone или iPad станет отличным видоискателем. Один взгляд на гаджет и вы точно увидите построение кадра.
▶ Есть возможность гибко менять разрешение до 720p, что позволит минимизировать задержки при общении по медленному соединению.
▶ В параметрах можно указать один из микрофонов смартфона для записи звука.
▶ Есть предустановленные пресеты по изменению цветовой палитры, баланса белого или наложения эффектов.
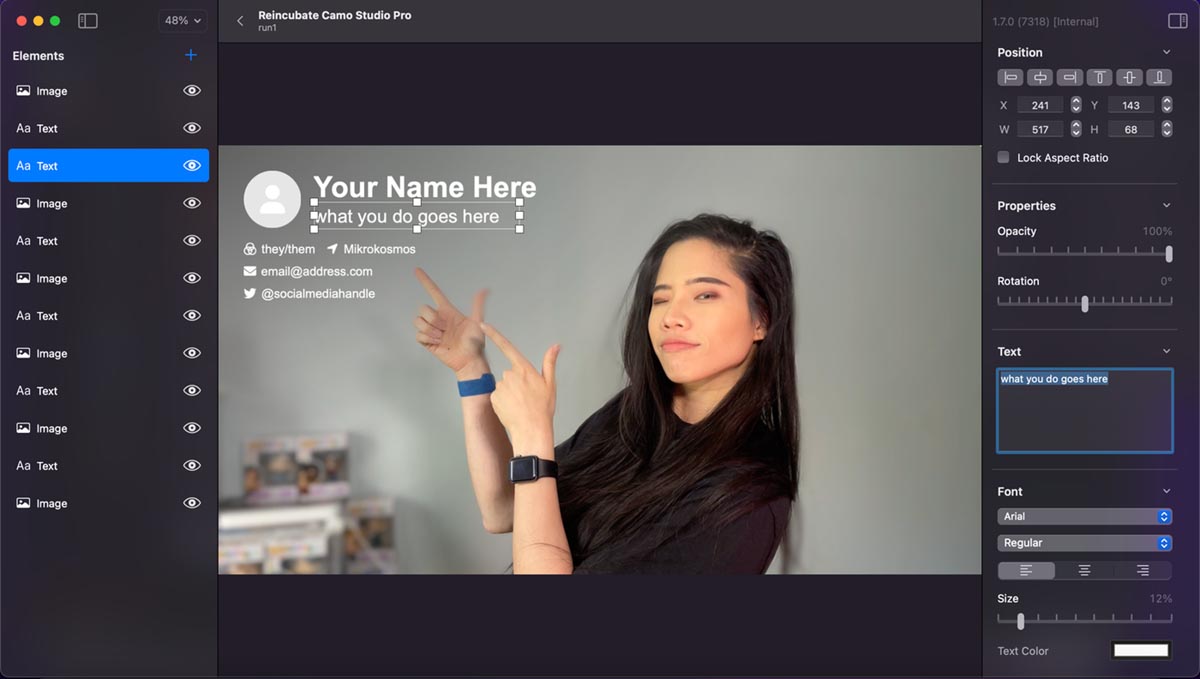
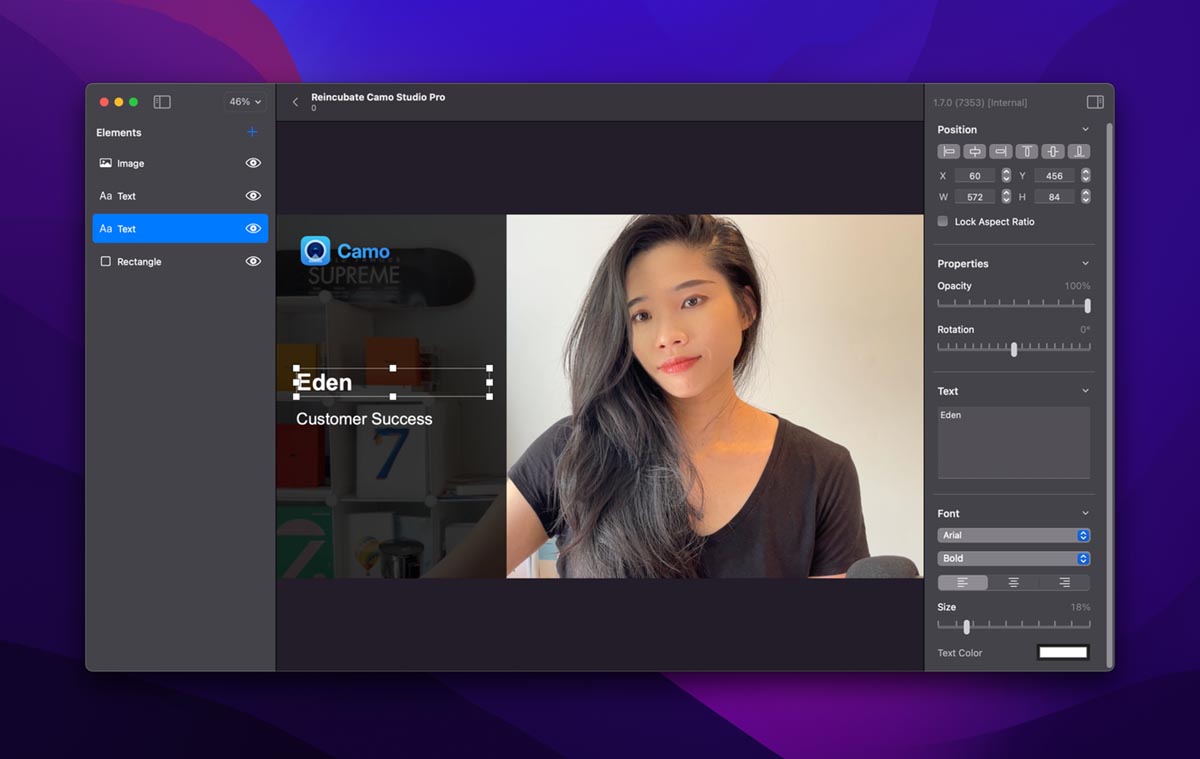
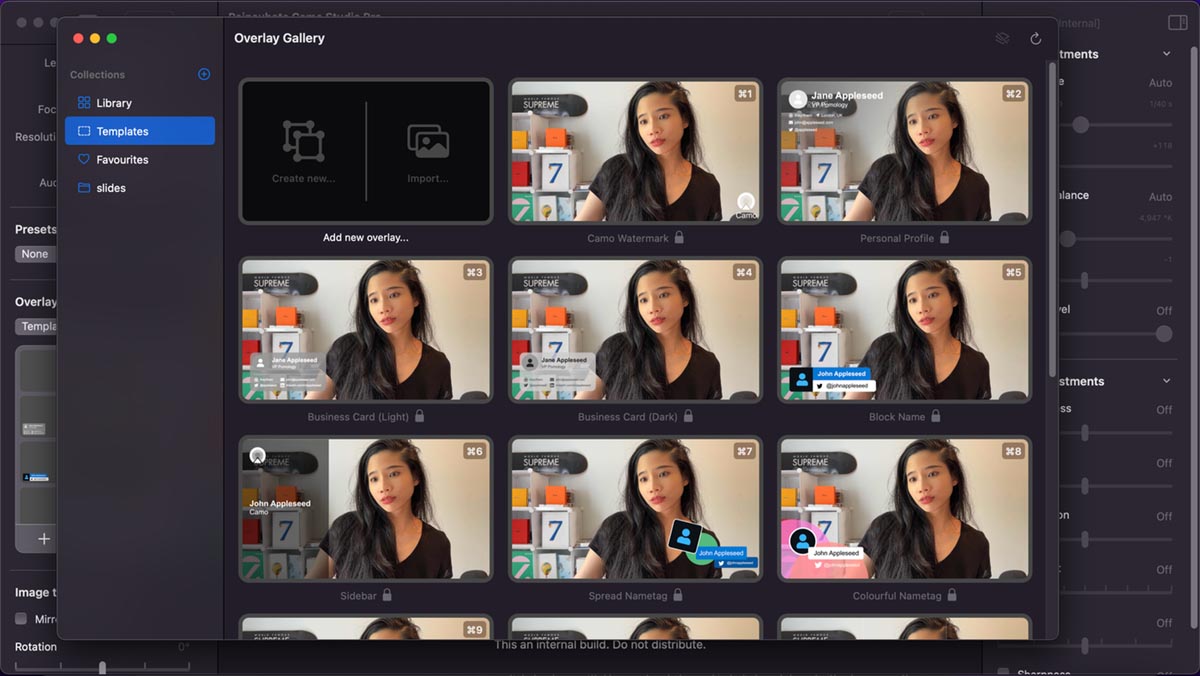
▶ Шаблоны позволяют настроить данные для наложения поверх видео. Вы можете ввести титры, визитку, контактную информацию или любые другие данные, которые понадобятся во время общения. При этом для включения или выключения шаблонов предусмотрено 9 шорткатов. Так можно быстро менять информацию для наложения во время эфира.
▶ Можно записывать трансляцию прямо через приложение. При этом вы можете выбрать любой подходящий источник звука: микрофон компьютера, системные звуки, смартфон или планшет или даже подключенную гарнитуру.
Такой солидный набор возможностей доступен бесплатно в стандартной версии приложения.
За какие опции Camo придется заплатить
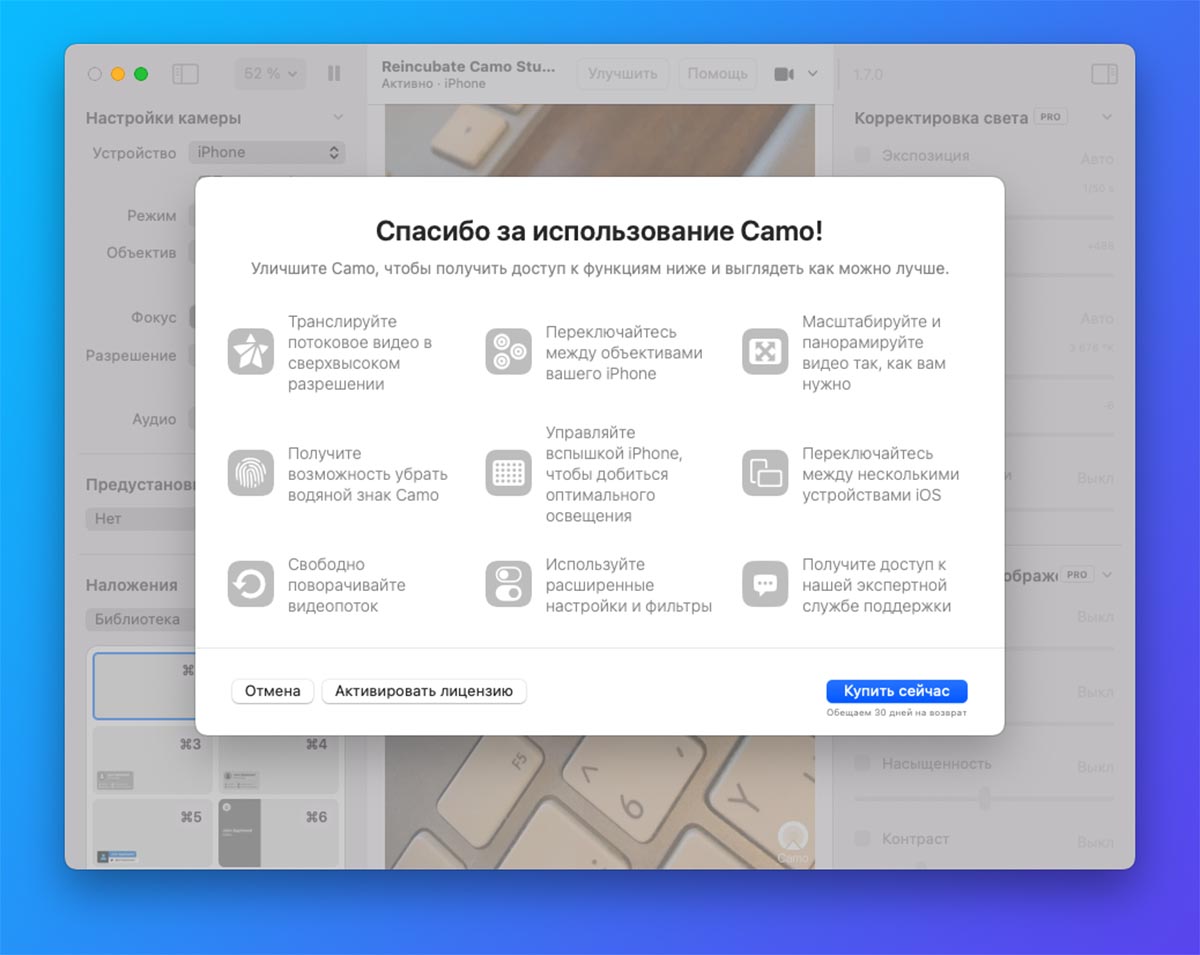
Разумеется, что такой достойный продукт имеет платную версию. Она доступна по подписке (единоразовая покупка была бы лучше) за $5 в месяц или $40 в год. Для оплаты придется поискать заграничную карточку.
За такую сумму вы получите дополнительные опции и параметры:
Во-первых, сможете переключаться на телеобъектив или сверхширик смартфона.
Во-вторых, сможете вручную фиксировать фокус в любом месте кадра.
В-третьих, получите доступ к разрешению 1080p.
В-четвертых, откроете боковое меню с большим количеством ползунков и настроек изображения.
Если вы достаточно часто пользуетесь смартфоном в качестве вебки и хотите получить дополнительные опции, выбирайте вариант Pro, остальным пользователям с головой хватит и основных возможностей программы.
В сравнении с решением от Apple вы не получите фишку “в центре внимания”, не сможете применять эффект студийного освещения и пользоваться камерой по Wi-Fi. Зато набор преимуществ оказывается намного весомей. При этом вы не ограничены в используемых гаджетах и операционных системах.
Установить приложение получится на любой iPhone, iPad и iPod Touch с iOS 12 или новее.
(27 голосов, общий рейтинг: 4.41 из 5)
iPhones.ru
Есть много преимуществ в сравнении со стандартной опцией Apple.
Артём Суровцев
@artyomsurovtsev
Люблю технологии и все, что с ними связано. Верю, что величайшие открытия человечества еще впереди!
If you’re searching for a Webcam for attaining video calls, or the webcam is no longer working, why not use your latest iPhone as a webcam on your computer? This way, you can take advantage of your iPhone camera and save hefty money on buying a new webcam. But being new users, many users aren’t familiar with a procedure on how to do so. If that’s the same with you, fuss not; here is how to use an iPhone as a webcam on a Mac. So, without any ado, let’s get started!
iPhone as webcam:- Mac & Windows
Here are different ways to use an iPhone as a webcam on a Mac.
1. How to use iPhone as a webcam for Mac with continuity camera
If you’re reading this guide, it means you have an iPhone. And for those with both iPhone and Mac, Apple has introduced the native solution to use iPhone as a webcam for Mac. Thanks to a new feature known as Continuity Camera, however, to use this feature, there are some requirements you need to fulfill.
Requirements to use Continuity Camera
- Both iPhone and Mac must be nearer to each other.
- Mac, iPhone, or iPad must be connected to Wi-Fi, and Bluetooth should be turned on.
- Similarly, both devices should be signed in with the same Apple ID along with two-factor authentication enabled.
- Your macOS should be updated to at least Mojave or above.
- Your iPhone & iPad are running iOS 12 and iPadOS 12 or above, respectively.
Here Below are list of application that supports continuity camera to take sketch, photos, or scan documents
- Finder
- Keynote
- Messages
- Notes
- Number 5.2 & later
- Pages 7.2 & later
- TextEdit
How to enable Continuity Camera webcam on iPhone
While the continuity camera is turned on by default on your iPhone, it’s best to verify the settings for a seamless experience. Here’s how you can do so.
Step 1: Head to the Settings App on your iPhone.
Step 2: Scroll down and tap General.
Step 3: Select AirPlay & Handoff and enable the toggle next to Continuity Camera.
Now that you can use your iPhone as a webcam with your Mac. It can record audio and capture video. So that you can upgrade your video quality and improve audio quality as well. Remember, you only use the rear camera as a webcam and also keep your iPhone closer to your Mac. Below are steps to use Continuity Camera within the downloaded apps on your Mac running the latest macOS.
Use a continuity camera in any video calling app on a Mac
You can use the Continuity Camera feature with any apps that support video calling, for instance, Zoom, Skype, FaceTime, etc. In the steps below, we have FaceTime as an example.
2. Use a Continuity Camera with FaceTime
Step 1: Press Command + Space to access Spotlight search. Enter FaceTime and click on it to open. Make sure both the Mac and iPhone is connected to Bluetooth and Wi-Fi.
Step 2: Select the Video located in the Mac menu bar. The title may differ based on the application you’re using.
Step 3: From the prompted menu, select your iPhone name. That’s it! Your iPhone will work as a webcam.
Step 4: Connected to your laptop Your iPhone will work as a webcam.
3. Use Continuity Camera with Google Meet
Step 1: Access Google Meet on your Mac. Make sure your iPhone and Mac is connected to Bluetooth & Wi-Fi
Step 2: Go to Settings.
Step 3: Select Video.
Step 4: Below in the camera section, choose your iPhone name from the list of devices.
That’s It!
Note: You won’t be able to use your iPhone when it’s being used as a webcam with your Mac. If you no longer want to use your iPhone as a webcam, then tap Disconnect on your iPhone.
How to use Center Stage, Portrait Mode, Desk View, and Studio Light on Mac
Apple has done a great job in utilizing the iPhone’s hardware to its best advantage. One advantage of using an iPhone as a webcam is that you can access various features, like Portrait Mode, Desk View, Center Stage, and Studio light.
Center Stage: If you often use machine learning and adjust the ultrawide lens on your iPhone to track your movements. But if you move from one side to another, this aspect lets you keep in the center of frame. For instance, if more users enter the frame while on a call, the lens will automatically zoom out and reconfigure to extra people.
Studio lights: It darken the background and brighten up the subject.
Portrait Mode: The camera focuses on the main object and applies blurriness in the background of the video. It works like a Cinematic Mode found while recording video on the iPhone.
Well, that’s all said; here are the steps to use those effects on your Mac.
3. How to manage video effects in Continuity Camera
Step 1: Access the Top Menu Baar on your Mac.
Step 2: Select the Video Effects Tab.This feature is only available when using Contuinity Camera feature.
Step 3: Select from Portrait, Center Stage, or Studio Light.
Step 4: Choose Desk View to use the aspect.
4. Using EpocCam Mac App
The EpocCam software is compatible with both audio & video, and it supports video players such as YouTube and Skype. The best part is that the software is available in a free and paid version. However, in the free version, the software provides 640 x 480 video resolution and a watermark on the video. It is compatible with both Windows PC and Mac.
Step 1: First of all, download EpocCam app on your iPhone.
Step 2: After this, download and install the driver on your Mac and Windows from the Kinoni Site.
Step 3: Now, link your iPhone and computer with same Wi-Fi network.
Step 4: Next, access EpocCam on your iPhone and access a video app on your Mac computer.
It will automatically connect instantly and feature the image. It’s handy as that.
5. How to use iPhone as a webcam for Mac using Camo
iPhone as a webcam for Mac
Step 1: First thing first, download and install the Camo app on your iPhone. For that, go to the App Store. In the search bar, search for the Camo app and then tap the Get > Install Button to finish the downloading procedure.
Step 2: Simultaneously, install the Camo Studio on your Mac. Once the installation procedure is finished, give all the necessary permission to Camo.
Step 3: After this, connect your iPhone and Mac to the same Wi-Fi network.
Step 4: Open the Camo App on your iPhone and Mac. And then, click on the drop-down below the Device in Camo app on your Mac. From the menu, select your iPhone. As soon as your iPhone camera will work as a webcam for Mac.
iPhone as a webcam for Windows
Step 1: First thing first, download and install Camo app on your iPhone. For that, go to the App Store. In the search bar, search for Camo app and then tap Get > Install Button to finish downloading procedure.
Step 2: Simultaneously, install the Camo Studio on your Windows PC. Once the installation procedure is finished, give all the necessary permission to Camo.
Step 3: After this, connect your iPhone and Windows with the same Wi-Fi network.
Step 4: Open the Camo App on your iPhone and Windows. And then, click on the drop-down below the Device in Camo app on your Windows. From the menu, select your iPhone. As soon as your iPhone camera will work as a webcam for Mac.
Final Verdict!
Which method did you use to convert your iPhone to a webcam for your Mac? Do let us know in the comment box below!
обновленный
-
Откройте приложение на своем телефоне и пройдите онбординг.

Адаптация Camo на iOS -
Загрузите Camo Studio на свой компьютер macOS или Windows. Вы можете сделать это, перейдя по адресу https://camo.studio в браузере, переместив загрузку Camo Studio на свой Mac с помощью AirDrop или нажав
Share Linkна последнем экране загрузки на вашем телефоне. -
Далее следуйте инструкциям, чтобы загрузить Camo Studio на свой компьютер. Вам потребуется предоставить Camo некоторые разрешения, и во время установки вас могут попросить ввести пароль.

Следуйте инструкциям установщика, чтобы выполнить настройку на macOS. -
Установите и запустите Camo Studio. Как в Windows, так и в Mac Camo Studio спросит, хотите ли вы автоматически проверять наличие обновлений. Мы рекомендуем вам разрешить это, поскольку мы регулярно выпускаем обновления с новыми функциями и улучшениями.

Экран приветствия Camo Studio в macOS и Windows -
Подключите iPhone к компьютеру через USB-кабель или Wi-Fi. Если вы выберете USB, мы рекомендуем вам подключить iPhone напрямую к компьютеру, а не через USB-концентратор, чтобы избежать проблем с подключением.


После подключения кабеля нажмите Get Started в приложении iPhone, если вы еще этого не сделали. Затем вы можете выбрать свой iPhone в раскрывающемся списке Device на левой боковой панели Camo Studio, и теперь видео должно появиться в предварительном просмотре.
Подключение вашего iPhone к компьютеру Mac или Windows через Wi-Fi
-
На вашем Mac или Windows PC откройте Camo Studio и нажмите кнопку
+рядом с раскрывающимся спискомDeviceв левой боковой панели. Это откроет окно с QR-кодом для сопряжения ваших устройств. -
В приложении Camo Camera на iPhone нажмите кнопку беспроводного соединения в правом верхнем углу и отсканируйте QR-код из шага 1.
-
Через несколько секунд ваши устройства должны подключиться автоматически, и видео с вашего устройства должно появиться в окне предварительного просмотра в Camo Studio.
Использование Camo в качестве веб-камеры
Теперь, когда Camo настроен, вы можете использовать все инструменты, доступные в приложении, для настройки изображения, улучшения кадрирования и многого другого. А когда вы будете готовы, почему бы не записать короткий видеоролик, чтобы убедиться, что все ваши настройки и устройства именно такие, как вы хотите? Вы можете сделать это, нажав кнопку записи в правом верхнем углу Camo Studio.
Если вы хотите использовать Camo для своих рабочих встреч и презентаций, просто откройте выбранное вами приложение для видеоконференций и выберите Camo Camera в настройках видео. Вы также можете выбрать Camo в качестве источника звука, чтобы использовать микрофон вашего iPhone в качестве входа или позволить приложению синхронизировать аудио и видео.
Camo совместим со всеми приложениями для видеоконференций . После того как Camo Studio будет установлена и запущена на вашем компьютере, вам не нужно будет больше ничего делать, чтобы использовать ее с другими приложениями.
Аналогичным образом, если вы хотите начать потоковую передачу, используя свой телефон Android в качестве камеры — скажем, в качестве источника для вашего селфи-видео — просто выберите Camo Camera в качестве устройства для источника захвата видео в программном обеспечении для вещания, таком как OBS или Streamlabs.
Если вы хотите углубиться, у нас есть дополнительные руководства и статьи, которые охватывают:
- Получите идеальное крепление для вашей установки
- Поможем вам выглядеть великолепно во время звонков
- Как максимально эффективно использовать освещение
После того, как вы выбрали лучшую настройку для своих нужд с помощью Camo и хотите начать создавать контент профессионального качества, возможно, пришло время попробовать Camo Pro . Это позволит вам в полной мере использовать возможности вашего устройства, открывая более высокие разрешения для записи, встреч и потоковой передачи.
Scarlet Salkeld
Как мы можем помочь?
Наша служба поддержки здесь, чтобы помочь!
Наш офис работает с понедельника по пятницу с 9:00 до 17:00 по Гринвичу. Время в настоящее время 2:34 ДП с GMT.
Мы стремимся отвечать на все сообщения в течение одного рабочего дня.
Связанный контент
Комментарии (1)
Are you looking for a way to enhance your video conferencing experience on Windows 10? Look no further than your iPhone! With just a few simple steps, you can transform your iPhone into a high-quality webcam to use with your Windows 10 computer. Say goodbye to grainy video and hello to crystal-clear images. Let’s explore how to use your iPhone as a webcam on Windows 10.
Using your iPhone as a webcam on Windows 10 is a game-changer in the world of video conferencing. Not only does it allow you to take advantage of the superior camera quality of your iPhone, but it also provides a convenient and portable solution for remote meetings. Plus, with the right apps and software, you can easily integrate your iPhone into popular video conferencing platforms like Zoom or Microsoft Teams. Say goodbye to awkward angles and hello to a professional setup.
Using your iPhone as a webcam on Windows 10 is a convenient way to enhance your video calling and live streaming experience. Here’s a simple guide to get started:
- Download and install a third-party webcam app on your iPhone from the App Store.
- Connect your iPhone to your Windows 10 computer using a lightning cable.
- Launch the webcam app on your iPhone and open the corresponding software on your computer.
- Select your iPhone as the webcam source in the computer software.
- You can now enjoy using your iPhone as a high-quality webcam on Windows 10.

Utilizing Your iPhone as a Webcam on Windows 10
The advancement of technology has made it possible to repurpose your iPhone as a webcam for your Windows 10 computer. This innovative solution allows you to enhance your video conferencing experiences, create high-quality content, and participate in online meetings seamlessly. In this guide, we will explore the different methods that enable you to use your iPhone as a webcam on Windows 10. Whether you need a webcam for professional use or simply want to improve your video communication, these methods will help you utilize the capabilities of your iPhone to the fullest.
Method 1: Using a Third-Party App
One of the simplest ways to use your iPhone as a webcam on Windows 10 is by utilizing a third-party app. There are several apps available that enable you to connect your iPhone to your Windows computer and use it as a webcam. These apps function by establishing a connection between your iPhone and computer over Wi-Fi or USB, allowing you to stream the video feed from your iPhone’s camera directly to your computer.
To get started, you need to install a compatible app on both your iPhone and Windows 10 computer. Some popular third-party apps that you can consider are EpocCam, iVCam, and iCam. Once you have installed the app on your iPhone, follow the app-specific instructions to connect your iPhone to your Windows computer. Usually, this involves downloading and installing the corresponding desktop client for your Windows computer and making sure both devices are connected to the same Wi-Fi network.
After the connection is established, you can launch the app on your iPhone and the corresponding desktop client on your Windows computer. The app will provide you with options to adjust the video quality, choose between the front and rear camera, and enable other features such as autofocus and video stabilization. Once you have configured the settings to your preference, you can start using your iPhone as a webcam on Windows 10 with your preferred video conferencing or recording software.
Pros of Using a Third-Party App:
- Easy setup and installation
- Flexibility to choose from a variety of apps
- Options to adjust video quality and enable additional features
Cons of Using a Third-Party App:
- Compatibility issues with certain apps and devices
- Potential limitations in terms of video quality and performance
- Reliance on Wi-Fi or USB connections, which may introduce latency or stability issues
Method 2: Using the Webcam Feature in EpocCam
If you have chosen EpocCam as the app to use your iPhone as a webcam on Windows 10, there is a built-in webcam feature available in the app that provides a seamless experience. To utilize this method, follow the steps below:
- Install the EpocCam app on your iPhone from the App Store.
- Download and install the EpocCam drivers for Windows from the Kinoni website.
- Connect your iPhone to your Windows computer using a USB cable.
- Open the EpocCam app on your iPhone and launch the EpocCam Viewer on your Windows computer.
- Select «EpocCam» as the webcam source in your desired video conferencing or recording software on your Windows computer.
Pros of Using the EpocCam Webcam Feature:
- Easier setup process compared to some third-party apps
- Direct compatibility with the EpocCam desktop client
- Potential for improved video quality and performance
Cons of Using the EpocCam Webcam Feature:
- Requires a USB connection between your iPhone and Windows computer
- Possibility of limited functionality compared to other third-party apps
Method 3: Using the DroidCam App
The DroidCam app is another popular option for using your iPhone as a webcam on Windows 10. This app allows you to connect your iPhone to your Windows computer over Wi-Fi or USB and utilize the iPhone’s camera as a webcam. To use the DroidCam app, follow the steps below:
- Download and install the DroidCam app from the App Store on your iPhone.
- Download and install the DroidCam client for Windows from the Dev47Apps website.
- Launch the DroidCam app on your iPhone and the DroidCam client on your Windows computer.
- Ensure that both your iPhone and Windows computer are connected to the same Wi-Fi network or use a USB cable to connect them directly.
- Enter the IP address displayed on the DroidCam app into the DroidCam client on your Windows computer.
- Select «Start» on the DroidCam app on your iPhone.
Pros of Using the DroidCam App:
- Versatile options for connection via Wi-Fi or USB
- Compatible with both Windows and macOS
- Ability to use the iPhone’s camera as a webcam
Cons of Using the DroidCam App:
- Possible stability issues with Wi-Fi connection
- Potential limitations in terms of video quality and performance
Using your iPhone as a webcam on Windows 10 can greatly enhance your video conferencing and content creation experiences. With the methods highlighted in this guide, you can choose the approach that best fits your needs and preferences. Whether you opt for a third-party app, utilize the webcam feature in EpocCam, or employ the DroidCam app, you can transform your iPhone into a reliable and high-quality webcam for your Windows 10 computer.

Using iPhone as Webcam on Windows 10
If you want to use your iPhone as a webcam on your Windows 10 computer, there are several ways to do it. One option is to download a third-party app that allows you to connect your iPhone to your computer and use it as a webcam. Many of these apps offer additional features like filters and effects to enhance your video quality. Another option is to use the built-in features of certain video conferencing apps like Zoom or Skype. These apps often have the option to select your iPhone as the video source. Make sure to check the settings of the app you are using to see if this feature is available.
To use your iPhone as a webcam, you will need to connect it to your computer using a USB cable or through Wi-Fi. Some apps may require additional software to be installed on your computer to establish the connection. Once connected, you can adjust the video settings and position your iPhone to get the desired angle. It is important to note that using your iPhone as a webcam may consume a significant amount of battery, so make sure your device is fully charged or connected to a power source during use.
Key Takeaways: How to Use iPhone as Webcam Windows 10
- Using your iPhone as a webcam on Windows 10 is possible with the right software and apps.
- Third-party apps like EpocCam and iVCam allow you to connect your iPhone to your Windows 10 PC as a webcam.
- Make sure your iPhone and Windows 10 PC are connected to the same Wi-Fi network for the webcam connection to work.
- Download and install the necessary software on both your iPhone and Windows 10 PC to use your iPhone as a webcam.
- Once the software is installed on both devices, follow the instructions to connect your iPhone to your Windows 10 PC as a webcam.
Frequently Asked Questions
If you want to use your iPhone as a webcam on your Windows 10 computer, you may have some questions. Below, we have answered the most common queries to assist you in setting up and using your iPhone as a webcam seamlessly.
1. How can I use my iPhone as a webcam on Windows 10?
To use your iPhone as a webcam on Windows 10, you can follow these steps:
Step 1: Download a webcam app on your iPhone from the App Store, like EpocCam or iCam. Make sure to install the corresponding desktop client on your Windows 10 computer as well.
Step 2: Connect your iPhone and Windows 10 computer to the same Wi-Fi network.
Step 3: Launch the app on your iPhone and the desktop client on your computer.
Step 4: Open your preferred video conferencing app on your computer and select your iPhone as the webcam device.
2. Can I use my iPhone as a webcam for multiple applications simultaneously?
Yes, you can use your iPhone as a webcam for multiple applications on your Windows 10 computer at the same time. However, it depends on the webcam app you are using. Some webcam apps support multiple applications, allowing you to use your iPhone as a webcam in various programs simultaneously. Make sure to check the app’s features and compatibility before using it for multiple applications.
3. Can I use my iPhone as a webcam via USB on Windows 10?
Yes, you can use your iPhone as a webcam via USB on your Windows 10 computer. However, it requires additional software and setup. Some webcam apps, like EpocCam, offer the option to connect your iPhone to your computer with a USB cable and use it as a webcam. You may need to install drivers or a desktop client to enable this functionality. Refer to the app’s instructions or documentation for detailed steps on setting up a USB connection.
4. Can I use my iPhone as a webcam with third-party video conferencing apps?
Yes, you can use your iPhone as a webcam with third-party video conferencing apps on your Windows 10 computer. Once you have set up your iPhone as a webcam using a compatible webcam app, you can select it as the camera device in your preferred video conferencing app. Popular video conferencing apps like Zoom, Microsoft Teams, and Skype support external cameras, including iPhones used as webcams. Just make sure to select your iPhone as the camera source in the video settings of your chosen app.
5. Are there any limitations in using an iPhone as a webcam on Windows 10?
While using an iPhone as a webcam on Windows 10 offers convenience, there are some limitations to be aware of:
— Video quality may be affected by factors such as network bandwidth and the capabilities of the webcam app.
— Audio may not be captured by the iPhone when used as a webcam. You may need to use a separate microphone for audio during video conferencing.
— Battery life on your iPhone may drain quickly, especially during extended video conferencing sessions.
— Some webcam apps may have limitations on features or compatibility with certain video conferencing apps.
It’s essential to choose a reliable webcam app and ensure your iPhone and Windows 10 computer are properly connected and configured for the best webcam experience.
In conclusion, using your iPhone as a webcam on Windows 10 can be a convenient and cost-effective solution for video calls, live streaming, and online meetings. By following the steps outlined in this guide, you can easily set up your iPhone as a webcam and take advantage of its superior camera quality and features.
Remember to download and install a reliable webcam app on both your iPhone and Windows 10 PC to ensure seamless compatibility and functionality. With this setup, you can enhance your video communication and enjoy a professional webcam experience without having to invest in a separate webcam device.
Хорошая веб-камера может стоить довольно дорого, да и под рукой в нужный момент ее может попросту не оказаться. Да и качество камеры у такого устройства скорее всего будет хуже, чем у вашего iPhone. Почему бы не использовать именно смартфон в качестве веб-камеры для видео-общения? И сделать это на самом деле несложно.
♥ ПО ТЕМЕ: Самые сложные пароли: как правильно придумывать и не забывать их – 2 совета от хакера.
iOS-приложения для видеоконференций
Использование iPhone в качестве веб-камеры для компьютера требует установки соответствующего приложения на смартфоне. Стоит запустить эту программу и проверить ее работоспособность, как и соответствующую программу (ссылки ниже) на компьютере с Windows или Mac. Иногда можно обойтись и вовсе без компьютера. В этом случае необходимо использовать привычные приложения-мессенджеры.
Если вы хотите с помощью веб-камеры звонить по Skype, общаться с коллегами в Zoom или Slack, или просто болтать с друзьями через WhatsApp или Viber, попробуйте загрузить соответствующее приложение для iPhone. Эти приложения специально созданы для мобильных устройств, поэтому они отлично работают на маленьком экране.
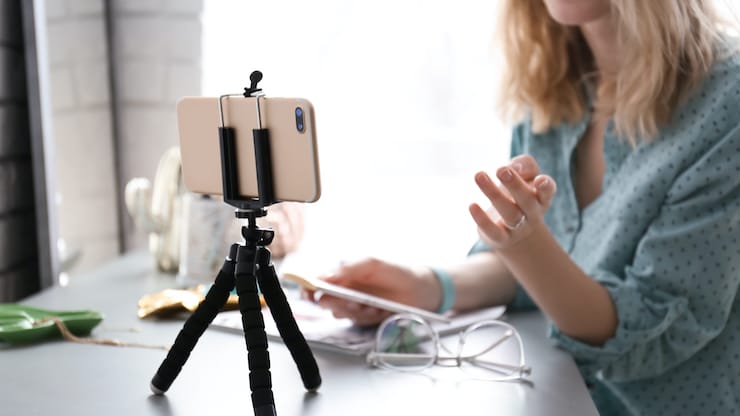
Если же вы хотите использовать громкую связь при использовании iPhone, то вам понадобится приобрести недорогой штатив. На рынке есть немало штативных креплений для смартфонов, позволяющих удобно разместить любое имеющееся у вас видео-оборудование. Практически все необходимое позволит осуществить качественный штатив-паук, который вы сможете установить практически на любой поверхности.
Главным недостатком такой схемы является то, что вы будете зависеть от микрофона и динамика iPhone. Беспроводные наушники являются лучшим способом решения этой проблемы. Качество звука будет весьма неплохим, да и вам будет намного легче разобраться с микрофоном, расположенным так близко около лица.
Конечно, иногда приходится работать за компьютером. В таком случае мало что способно заменить отдельную веб-камеру. К счастью, с ролью альтернативы неплохо справляется и iPhone.
♥ ПО ТЕМЕ: iPhone отслеживает все ваши перемещения (посещаемые места): где это смотреть и как отключить.
Использование iPhone в качестве веб-камеры потребует установки специального приложения на телефон и на компьютер. К сожалению, iPhone не поддерживает эту функцию «из коробки», поэтому для ее реализации и понадобится стороннее программное обеспечение.
Мы протестировали несколько приложений и ознакомились с обзорами на них. В результате можно выделить два варианта: EpocCam (для iPhone, iPad, Windows и Mac) и iVCam (для iPhone, iPad и Windows). Оба продукта можно отнести к премиум-классу с многочисленными бесплатными опциями, дается возможность опробовать функционал программы перед ее приобретением. Поддерживаются версии Windows 7, 8 и 10.
EpocCam помимо версий для Mac и ПК предлагает еще и три варианта приложения для iPhone. Бесплатная версия имеет ограничения, версия для работы с высоким разрешением стоит 749 рублей. Бесплатная версия ограничена разрешением камеры 640 × 480 пикселей и наносит водяной знак поверх изображения с камеры.
iVCam работает практически идентично, но доступна только версия для Windows. Приложение для iPhone и сопутствующее программное обеспечение можно загрузить бесплатно. Бесплатная версия iVCam поддерживает разрешение HD, но также содержит водяной знак поверх видеопотока. За удаление этой картинки надо будет заплатить 749 рублей с помощью покупки внутри приложения.
Оба этих приложения позволяют использовать как беспроводное, так и USB-соединение. Вы можете выбрать фронтальные или задние камеры, использовать разные объективы и даже включить вспышку на вашем устройстве, чтобы лучше осветить сцену. Если вы решили, что вам нравится какое-либо приложение и хотите разблокировать полную версию, то оба варианта стоят относительно недорого (599 рублей и 749 рублей) относительно среднего качества веб-камер.
Кроме того есть приложение под названием iCam (379 рублей). К сожалению, вы не сможете протестировать его перед приобретением. Программа также базируется на UPnP для беспроводного соединения, которое может работать не со всеми маршрутизаторами.
Какое бы приложение вы ни выбрали, вам понадобится оставить его запущенным и открытым на экране iPhone, который и будет выступать качестве веб-камеры. После установки приложения и настройки iPhone вам понадобится перейти к настройкам приложения для видеоконференций на компьютере, где необходимо выбрать виртуальную веб-камеру в качестве устройства источника видеосигнала.
♥ ПО ТЕМЕ: Как скачивать файлы, документы, видео и музыку на iPhone и iPad из Интернета.
Советы по использованию iPhone в качестве веб-камеры на компьютере
Проводное соединение всегда будет лучше, чем беспроводное. Если вы хотите получить самое надежное решение для веб-камеры, отключите беспроводную связь и выберите USB-соединение. Оба выбранных нами приложения поддерживают USB-соединение. Если вы не гуляете по дому во время чата, использование Wi-Fi в таком случае не имеет большого смысла.
Если вы хотите использовать свой iPhone в качестве веб-камеры, вам также понадобится способ размещения в неподвижном положении. Лучшее решение – это штатив для смартфона или уже имеющийся стандартный штатив.
Упомянутый выше универсальный штатив-паук идеально подходят для этого, потому что вы можете установить их практически где угодно.

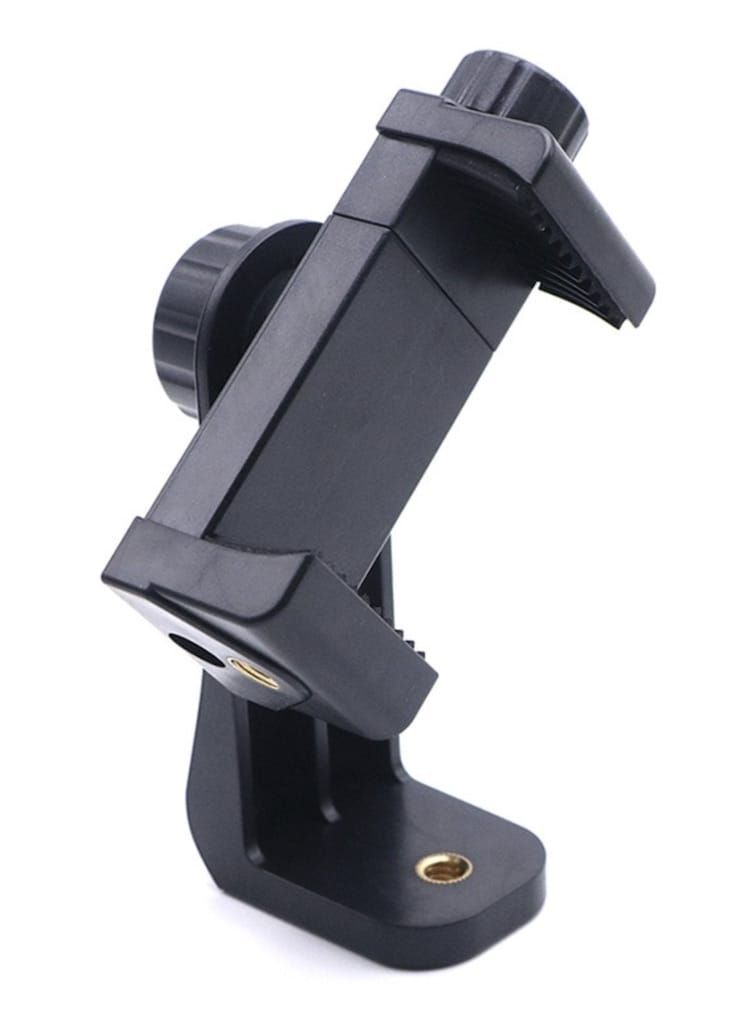
В случае, если у вас уже имеется штатив, но отсутствует лишь крепление для смартфона к нему, обратите внимание на этот вариант:
Оба приложения позволяют вам использовать камеру заднего вида, чем определенно надо воспользоваться. Мало того, что вы можете при необходимости использовать вспышку, так и камеры iPhone на задней панели значительно превосходят камеру для селфи.
Вы можете использовать EpocCam и iVCam и для захвата звука, но это будет не лучшая идея. Наушники – хороший аксессуар, но качественный настольный микрофон будет звучать в 10 раз лучше. Советуем настроить освещение (пусть даже настольной лампой) перед звонком, чтобы убедиться, что ваше лицо не окажетесь чрезмерно затемненным (подробно).
Использование iPhone в качестве веб-камеры будет разряжать аккумулятор. Если вы не используете USB-соединение (которое еще и заряжает ваш телефон во время чата), то убедитесь в подключении смартфона к розетке.
Смотрите также:
- Какой iPhone лучше держит батарею? Сравнение времени автономной работы всех актуальных iPhone в 2020 году.
- Все функции кнопок оригинальных наушников из комплекта iPhone.
- Фото контакта при звонке на весь экран iPhone – как сделать?