
При ручной установке MSU обновлений на компьютерах и серверах Windows вы можете столкнуться с ошибкой автономного установщика обновлений Windows: Обновление неприменимо к вашему компьютеру. С такой проблемой проблема чаще всего встречается при ручной установке обновлений на компьютерах в сетях, изолированных от Интернета. Если ваш компьютер обновляется автоматически через Windows Update или сервера обновлений WSUS, такой проблемы быть не может, т.к. агент wuauserv проверяет зависимости перед установкой.
В этой статье мы рассмотрим почему Windows считает, что это обновление неприменимо к компьютеру, и как установить такое обновление.
Итак, ошибка Обновление неприменимо к этому компьютеру (The update is not applicable to your computer – в английской версии Windows) появляется при попытке ручной установки MSU файла обновления с помощью встроенной утилиты
wusa.exe
(Автономный установщик обновлений Windows).
Содержание:
- Почему Windows считает, что обновление неприменимо?
- Ручная установка обновления с помощью CAB файла
- Поиск кодов ошибок применения обновления Windows
Почему Windows считает, что обновление неприменимо?
- Если компьютер давно не перезагружался или не перезагружался после установки последних обновлений, попробуйте принудительно перезагрузить Windows;
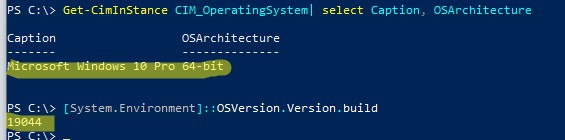
- Данное обновление не соответствует вашей версии ОС, редакции, билду, разрядности (архитектуре процессора: x86, x64; ARM) или языку. Например, вы пытаетесь установить обновление x86 на 64-битную версию Windows x64. Вы можете проверить версию, архитектуры и билд Windows с помощью следующих PowerShell команд:
Get-CimInStance CIM_OperatingSystem| select Caption, OSArchitecture
[System.Environment]::OSVersion.Version.build

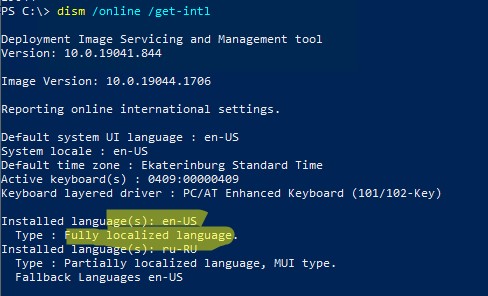
Попытайтесь скачать обновление, подходящее для вашей версии Windows. Касательно языка системы: иногда язык установленной Windows отличается от используемого языка интерфейса, здесь нужно быть внимательным. Проверьте оригинальный язык Windows с помощью команды:
dism /online /get-intl
В этом примере видно, что на компьютере установлена английская версия Windows:Installed language(s): en-US Type : Fully localized language, и дополнительно установлен русский language interface pack/LIP: Partially localized language, MUI type: ru-RU;

- Обновление уже установлено. Список установленных обновлений на компьютере можно получить с помощью команды
wmic qfe list
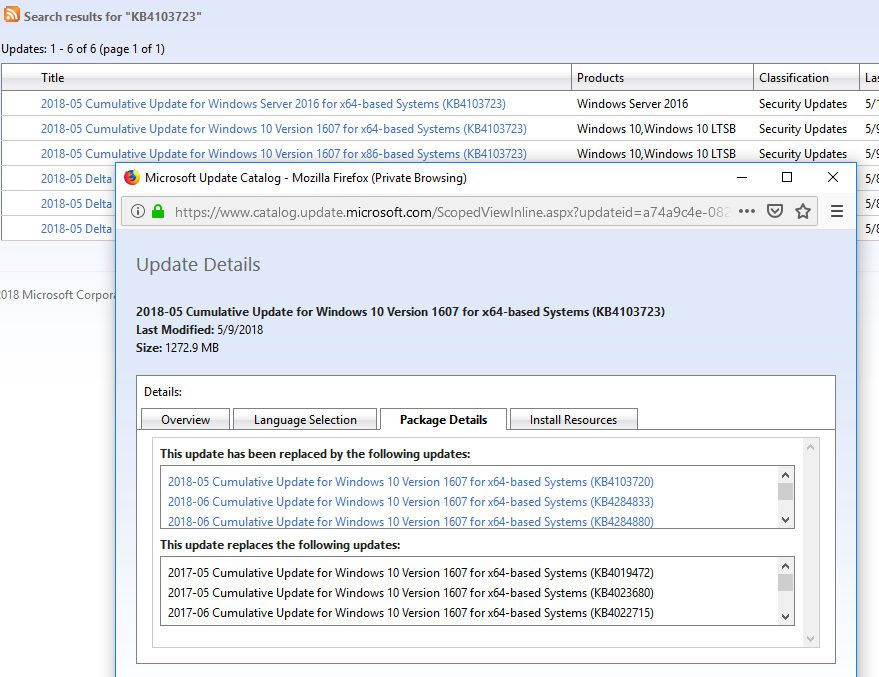
или при помощи PowerShell модуля PSWindowsUpdate; - Данное обновление заменено или установлено более новое обновление, заменяющее данное обновление (информацию о заменяющих обновлениях можно найти на странице KB на сайте Microsoft, обычно эта информация указана в формате Сведения о замене обновлений. Это обновление заменяет ранее выпущенное обновление…);

- Не выполнены предварительные требования для установки данного обновления. Например, большинство обновления для Windows 7 требуют наличия установленного SP1, обновления для Windows 8.1 / Windows Server 2012 R2 требует наличия Update 1 и т.д. Вся эта информация также присутствует на странице с информацией о KB в каталоге обновлений Microsoft (https://www.catalog.update.microsoft.com/Home.aspx ). Внимательно прочтите все требования к вашему патчу, возможно перед его установкой нужно предварительно установить еще какой-то апдейт;
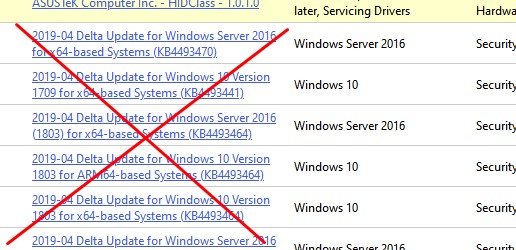
- Проверьте, что вы скачали полноценное MSU обновление для Windows, а не Delta пакет;

- Проверьте, что дата и время на вашем компьютере корректны (включая часовой пояс);
- Некорректно работает служба Windows Update (можно попробовать выполнить скрипт сброса настроек службы обновлений, или запустить Windows Update Troubleshooter (Параметры > Обновления и безопасность > Устранение неполадок > Центр обновления Windows и нажмите Запустить средство устранение неполадок);
- Если вы получили *.msu файл обновления из третьих источников, возможно он был поврежден. Попробуйте заново скачать файл обновления Windows из Microsoft Update Catalog;
- Проверьте целостность системных файлов Windows с помощью команды
Dism.exe /Online /Cleanup-Image /Restorehealth
или
sfc /scannow
.
Также обратите внимание, что обновления безопасности для Windows сейчас выпускаются в виде кумулятивных обновлений. Это значит, что вы можете установить любое более новое месячное кумулятивное обновления для вашего билда Windows (оно уже включает все предыдущие обновления).
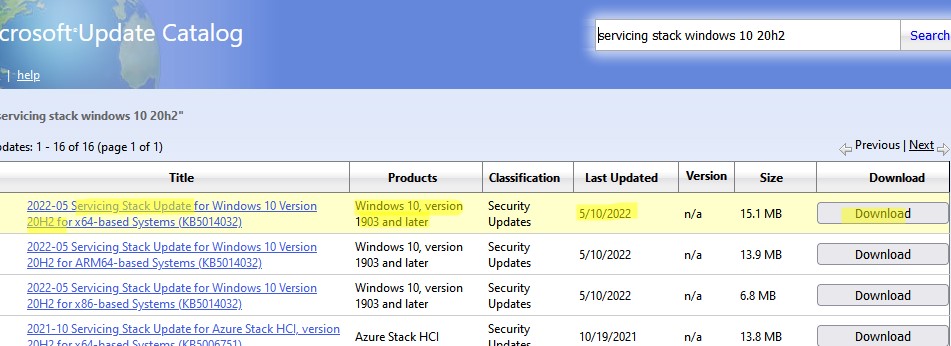
Перед установкой некоторых обновлений нужно сначала установить последнее доступное обновление служебного стека (SSU — Servicing Stack Update). Это обновление можно найти в Windows Update Catalog с помощью следующего поискового запроса:
servicing stack windows 10 20h2
В этом примере, я нашел что последний Servicing Stack Update для Windows 20h2 выпущен в мае 2022. Скачайте и установите SSU перед установкой вашего обновления.
C марта 2021 года Microsoft интегрирует SSU обновления для версий Windows 10 2004 и старше в последнее кумулятивное обновление LCU (Latest Cumulative Update). Администраторам систем Windows 10 до версии 2004 придется следить за зависимостями при развертывании обновлении самостоятельно.
Ручная установка обновления с помощью CAB файла
Вы можете попробовать установить MSU файл обновления не через утилиту WUSA.exe (ее использует автономный установщик обновлений Windows), а распаковав CAB файл и установив его через DISM или командлет Add-WindowsPackage напрямую в образ Windows. Для вашего обновления процедура ручной установки обновления может выглядеть так:
- Распакуйте MSU файл обновления:
expand _f:* “C:\Temp\windows10.0-KB4103723-x64.msu” C:\Temp\KB4103723 - В каталоге C:\Temp\KB4103723 появится CAB с именем вида Windows10.0-KB4103723-x64.cab;
- Установите данный CAB файл обновления с помощью DISM.exe (
DISM.exe /Online /Add-Package /PackagePath:c:\Temp\Windows10.0-KB4103723-x64.cab
) или с помощью PowerShell (
Add-WindowsPackage -Online -PackagePath “c:\Temp\Windows10.0-KB4103723-x64.cab”
)
Поиск кодов ошибок применения обновления Windows
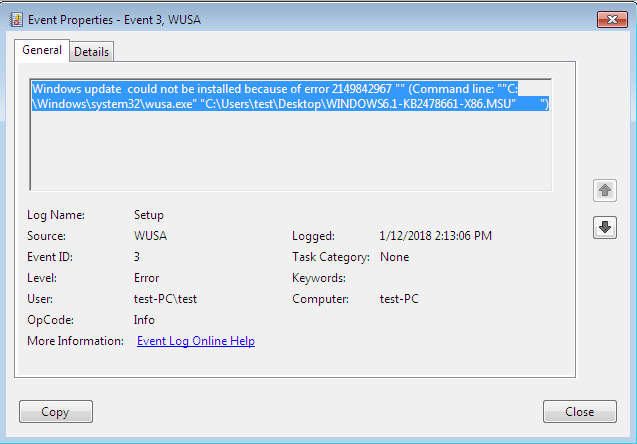
Проверьте конкретный код ошибки установки обновлений в консоли событий Windows Event Viewer. Перейдите в раздел Установка (Event Viewer -> Windows Logs -> Setup) и найдите событие с источником WUSA, скорее всего там будет содержаться примерно такой текст:
Источник: WUSA
Код: 3
Уровень: Ошибка
Не удается установить обновление Windows из-за ошибки: 2149842967 «» (Командная строка: C:\Windows\system32\wusa.exe C:\Downloads\Updates\windows10-kb4103723.msu)
Поищите в Google информацию по коду ошибки (вам может помочь полный список кодов ошибок Windows Update).
Также проверьте ошибки установки обновлений в файле
%systemroot%\Logs\CBS\CBS.log
(ищите ошибки по номеру вашего KB).
7 June, 2022
1 category
When installing an offline windows hotfix on a Windows Server 2012 R2 machine, I encountered the errors:
Windows update could not be installed because of error 2149842967
Installer encountered an error: 0x80240004
Windows update could not be installed because of error 2149842948 “” (Command line: “”C:\Windows\system32\wusa.exe” “E:\Win8.1AndW2K12R2-KB3191564-x64.msu” “)
Windows update could not be installed because of error 2147500037 “Unspecified error” (Command line: “”C:\Windows\system32\wusa.exe” “C:\Users\admin\Desktop\Win8.1AndW2K12R2-KB3191564-x64.msu” “)
To fix this, I stopped the Windows update service, removed all files in C:\Windows\SoftwareDistribution and then started the Windows Update service again:
net stop wuauserv
rd /s /q %systemroot%\SoftwareDistribution
net start wuauserv
Ошибка 2149842967 возникает в Просмотре событий после неудачной установки обновления для ОС Windows посредством автономного установщика. Впрочем, некоторые пользователи утверждают, что данный код можно увидеть и при автоматической установке, но это происходит в крайне редких случаях.
Что вызывает ошибку 2149842967?
Появление этой ошибки означает, что вы пытаетесь установить обновление, которое уже присутствует в системе либо оно ей совершенно не подходит.
Если вы уверены в том, что делаете, то можете принудительно установить нужный апдейт, скачав его из каталога Центра обновлений Майкрософт. Также вы можете устранить ошибку при помощи средства устранения неполадок или проведя процедуру сброса компонентов Центра обновления.
Устранение ошибки 2149842967
Решение №1 Запуск средства устранения неполадок
У Майкрософт на официальном сайте можно найти особое средство, которое устраняет возникшие неполадки с Центром обновления Windows. Существует две версии этого средства, так что выбирайте с умом! Перейдите по этой ссылке для загрузки средства.
Допустим, что вам понадобилось средство для Windows 10 — скачайте файл wu10.diagcab и запустите его. В появившемся окошке нажмите на строчку «Дополнительно» и поставьте галочку возле опции «Автоматически применять исправления». Теперь нажмите «Далее» и следуйте инструкциям на экране.
Решение ошибки 2149842967 не гарантировано, но попытаться определенно стоило!
Решение №2 Установка обновления вручную
Надоело «париться» с автоматическими средствами Windows? Тогда мы предлагаем установить нужное обновление для систему вручную. Верно, вам не обязательно полагаться на Центр обновлений, чтобы устанавливать для своей ОС новые апдейты.
Итак, прежде всего вам необходимо понять, какое именно обновление вызывает появление ошибки 2149842967. Для этого вам нужно перейти в каталог Центра обновления (Параметры→Обновление и безопасность→Центр обновления) и найти обновление, подписанное этим кодом. Также можете воспользоваться этим ресурсом.
Найдя нужный апдейт, перейдите по этой ссылке в каталог Центра обновления Майкрософт. Ну а дальше все просто: вписываем в поисковую строку номер обновления, скачиваем его на компьютере и запускаем установщик. Вот настолько все элементарно. После установки, разумеется, перезагрузите ПК.
Решение №3 Сброс компонентов Центра обновления
Сброс компонентов Центра обновления — это, как правило, достаточно продолжительный и непростой процесс, но именно благодаря ему решаются многие проблемы с обновлением ОС Windows. Выполняется этот сброс через ввод в Командную строку кучи разнообразных команд.
Но вы ведь не хотите эти всем заниматься, правда? Сейчас мы покажем вам, как создать у себя на компьютере удобный «батник», который сделает все за вас. Откройте самый обыкновенный Блокнот и вставьте в него все следующие команды:
@ECHO OFF
echo .
echo .
PAUSE
echo .
set b=0:bits
set /a b=%b%+1
if %b% equ 3 (
goto end1
)
net stop bits
echo Checking the bits service status.
sc query bits | findstr /I /C:»STOPPED»
if not %errorlevel%==0 (
goto bits
)
goto loop2:end1
cls
echo.
echo Failed to reset Windows Update due to bits service failing to stop
echo Please run the script as administartor by right clicking the WuReset file or your BITS service isn’t responding.
echo.
pause
goto Start:loop2
set w=0:wuauserv
set /a w=%w%+1
if %w% equ 3 (
goto end2
)
net stop wuauserv
echo Checking the wuauserv service status.
sc query wuauserv | findstr /I /C:»STOPPED»
if not %errorlevel%==0 (
goto wuauserv
)
goto loop3:end2
cls
echo.
echo Failed to reset Windows Update due to wuauserv service failing to stop.
echo.
pause
goto Start:loop3
set app=0:appidsvc
set /a app=%app%+1
if %app% equ 3 (
goto end3
)
net stop appidsvc
echo Checking the appidsvc service status.
sc query appidsvc | findstr /I /C:»STOPPED»
if not %errorlevel%==0 (
goto appidsvc
)
goto loop4:end3
cls
echo.
echo Failed to reset Windows Update due to appidsvc service failing to stop.
echo.
pause
goto Start:loop4
set c=0:cryptsvc
set /a c=%c%+1
if %c% equ 3 (
goto end4
)
net stop cryptsvc
echo Checking the cryptsvc service status.
sc query cryptsvc | findstr /I /C:»STOPPED»
if not %errorlevel%==0 (
goto cryptsvc
)
goto Reset:end4
cls
echo.
echo Failed to reset Windows Update due to cryptsvc service failing to stop.
echo.
pause
goto Start:Reset
Ipconfig /flushdns
del /s /q /f «%ALLUSERSPROFILE%\Application Data\Microsoft\Network\Downloader\qmgr*.dat»cd /d %windir%\system32
if exist «%SYSTEMROOT%\winsxs\pending.xml.bak» del /s /q /f «%SYSTEMROOT%\winsxs\pending.xml.bak»
if exist «%SYSTEMROOT%\winsxs\pending.xml» (
takeown /f «%SYSTEMROOT%\winsxs\pending.xml»
attrib -r -s -h /s /d «%SYSTEMROOT%\winsxs\pending.xml»
ren «%SYSTEMROOT%\winsxs\pending.xml» pending.xml.bak
)if exist «%SYSTEMROOT%\SoftwareDistribution.bak» rmdir /s /q «%SYSTEMROOT%\SoftwareDistribution.bak»
if exist «%SYSTEMROOT%\SoftwareDistribution» (
attrib -r -s -h /s /d «%SYSTEMROOT%\SoftwareDistribution»
ren «%SYSTEMROOT%\SoftwareDistribution» SoftwareDistribution.bak
)if exist «%SYSTEMROOT%\system32\Catroot2.bak» rmdir /s /q «%SYSTEMROOT%\system32\Catroot2.bak»
if exist «%SYSTEMROOT%\system32\Catroot2» (
attrib -r -s -h /s /d «%SYSTEMROOT%\system32\Catroot2»
ren «%SYSTEMROOT%\system32\Catroot2» Catroot2.bak
)if exist «%SYSTEMROOT%\WindowsUpdate.log.bak» del /s /q /f «%SYSTEMROOT%\WindowsUpdate.log.bak»
if exist «%SYSTEMROOT%\WindowsUpdate.log» (
attrib -r -s -h /s /d «%SYSTEMROOT%\WindowsUpdate.log»
ren «%SYSTEMROOT%\WindowsUpdate.log» WindowsUpdate.log.bak
)sc.exe sdset bits D:(A;;CCLCSWRPWPDTLOCRRC;;;SY)(A;;CCDCLCSWRPWPDTLOCRSDRCWDWO;;;BA)(A;;CCLCSWLOCRRC;;;AU)(A;;CCLCSWRPWPDTLOCRRC;;;PU)
sc.exe sdset wuauserv D:(A;;CCLCSWRPWPDTLOCRRC;;;SY)(A;;CCDCLCSWRPWPDTLOCRSDRCWDWO;;;BA)(A;;CCLCSWLOCRRC;;;AU)(A;;CCLCSWRPWPDTLOCRRC;;;PU)regsvr32.exe /s atl.dll
regsvr32.exe /s urlmon.dll
regsvr32.exe /s mshtml.dll
regsvr32.exe /s shdocvw.dll
regsvr32.exe /s browseui.dll
regsvr32.exe /s jscript.dll
regsvr32.exe /s vbscript.dll
regsvr32.exe /s scrrun.dll
regsvr32.exe /s msxml.dll
regsvr32.exe /s msxml3.dll
regsvr32.exe /s msxml6.dll
regsvr32.exe /s actxprxy.dll
regsvr32.exe /s softpub.dll
regsvr32.exe /s wintrust.dll
regsvr32.exe /s dssenh.dll
regsvr32.exe /s rsaenh.dll
regsvr32.exe /s gpkcsp.dll
regsvr32.exe /s sccbase.dll
regsvr32.exe /s slbcsp.dll
regsvr32.exe /s cryptdlg.dll
regsvr32.exe /s oleaut32.dll
regsvr32.exe /s ole32.dll
regsvr32.exe /s shell32.dll
regsvr32.exe /s initpki.dll
regsvr32.exe /s wuapi.dll
regsvr32.exe /s wuaueng.dll
regsvr32.exe /s wuaueng1.dll
regsvr32.exe /s wucltui.dll
regsvr32.exe /s wups.dll
regsvr32.exe /s wups2.dll
regsvr32.exe /s wuweb.dll
regsvr32.exe /s qmgr.dll
regsvr32.exe /s qmgrprxy.dll
regsvr32.exe /s wucltux.dll
regsvr32.exe /s muweb.dll
regsvr32.exe /s wuwebv.dll
regsvr32 /s wudriver.dll
netsh winsock reset
netsh winsock reset proxy:Start
net start bits
net start wuauserv
net start appidsvc
net start cryptsvc
echo Task completed sucessfully!Please restart your computer and check for the updates again.
PAUSE
Теперь нажмите на «Файл» в строке меню и выберите «Сохранить как…». Выберите удобную вам директорию, задайте подходящее название для файла и, внимание, измените его расширение с TXT на BAT. Обязательно сделайте последнее, иначе ничего не выйдет. Теперь нажмите кнопку «Сохранить» — и нужный нам батник будет создан!
Что делать дальше? Просто дважды кликаем на файл и смотрим за процессом сброса компонентов Центра обновления Windows. На все про все должно уйти несколько секунд. Как только сброс завершится, перезагрузите компьютер и проверьте, была ли устранена ошибка с кодом 2149842967.
Error 2149842967 is basically an update-related issue and it normally occurs when you are trying to update your Build OS. In this post, we will look into the reasons causing this error code, and the six solutions that should resolve this error once and for all. So, without any further ado, let’s learn what causes this error code in the first place.
What triggers an update error 2149842967?
An update error may occur because of different things going wrong on your computer. However, we are not going to explore the basic things like network issues, third-party antivirus running on your device, etc. Instead, we will look into the common problems that may lead to this error.
First thing first, you may overcome an update error quite easily by manually downloading and installing the relevant update. This works most of the time. However, if it doesn’t, attempt purging Windows cache folders, troubleshooting Windows Update, and restarting update-related services, especially BITS.
How to Fix Update Error 2149842967 on Windows PC
If a cumulative update is failing to install on an error code 2149842967, attempt the below fixes, and check if any resolve this issue. The most probable solutions to this problem are as follows –
- Manually update Windows OS
- Restart Update Services
- Reset Windows Update Components
- Run SFC/DISM Scans
- Boot into Safe Mode and retry updating your Windows
1] Manually update Windows OS
The update error 2149842967 primarily occurs during an ongoing installation of cumulative updates. This could have been because you download a faulty update and are now trying to install it on your PC. Well, in such cases, you may manually download the relevant standalone package and install that. Here’s how to perform the manual update on Windows PC –
First of all, you need to know the exact KB number that is failing on your computer. You may find it by visiting the below path –
Windows 11: Settings > Windows Update > Update history
Windows 10: Settings > Update & Security > Windows Update > View update history
Now that you know the KB number, visit Microsoft’s Update Catalog, and type the copied KB number in the search bar. Press Enter to view the updates bearing this number. Pick the update that best matches your system configuration and hit Download.
Click on the top link and wait for this download to finish. The setup file is downloaded in the “.msu” file format. Double-click on it to begin its installation on your Windows PC. I hope the error 2149842967 resolves after your device updates to this patch update.
2] Restart Update Services
Windows Update Errors may also occur if any update-related service is somehow disabled or not running. If that’s the case, you must re-enable all services which are essential to update Windows. Here’s how to check and restart update services –
- Press Win + R to launch the Run dialog.
- Type
services.mscin the text field and hit OK. - On the Services window, scroll down and locate Background Intelligent Transfer Service.
- Right-click on this service and select Start/Restart.

- Follow the above steps to restart the below services as well –
Windows Udpate
Cryptographic Services
Now that you have restarted all these services, restart your PC and check if you can update Windows normally.
3] Reset Windows Update Components
With each update coming to Windows, some info about them gets stored inside the cache folders. When these folders accumulate too much data, it might also trigger an error 2149842967. As a workaround, you need to purge these folders. However, make sure to stop the update-related services first as otherwise, your system may crash unexpectedly. Worry not, as all you require is to open CMD as administrator and run these codes one by one.
Stop Update Services
net stop bitsnet stop wuauservnet stop appidsvcnet stop cryptsvc

Delete non-essentials files
Del “%ALLUSERSPROFILE%\Application Data\Microsoft\Network\Downloader\qmgr*.dat”
Purge Windows Cache folders
Ren %systemroot%\SoftwareDistribution SoftwareDistribution.bakRen %systemroot%\system32\catroot2 catroot2.bak
Restart Update Services
net start bitsnet start wuauservnet start appidsvcnet start cryptsvc

Close Command Prompt and restart your PC. Check if you can update Windows normally.
4] Run SFC/DISM Scans
Third-party apps running on Windows OS often interact with the system files and make them corrupt. As a result, the update process fails on different error codes. Disable external antivirus (if running on your PC), and repair the corrupt files using SFC/DISM.
- Right-click on the Windows icon and select Run.
- Type CMD and press Ctrl + Shift + Enter keys altogether.
- When the UAC window prompts, hit Yes to authorize opening Command Prompt as admin.
- On the elevated console, run the SFC code first –
sfc /scannow

- Wait for the next 15-20 minutes while this command finds and repairs corrupt system files.
- Once this is over, repair any corruption inside the System Image via DISM.
DISM /Online /Cleanup-Image /RestoreHealth

- This command will also take 15-20 minutes in order to resolve any issues within your operating system.
- Type exit and press Enter to come out of Command Prompt and restart your PC.
Sign back into your device and check if you can update Windows without getting into any update error.
5] Boot into Safe Mode and retry updating your Windows
In case none of the above solutions help to fix error 2149842967 on Windows 11/10, you should boot into Safe Mode and try updating Windows once again. Since the third-party apps and services are not running inside the Clean boot, your device may upgrade without getting into any trouble.
If you are not concerned about the data stored inside the root drive, you may go for a clean installation of Windows 11 as well. I hope the solutions outlined above indeed help to fix this error 2149842967 on your PC. If you face difficulty following either section, let’s know in the below comment section.
Automatic Windows update is no doubt a convenience but some users find problems when installing a patch or build through this process. 2149842967 is one such error which is haunting people and we are going to discuss here and provide solutions. When you attempt to conduct the installation via “Check for updates” this issue will most frequently appear. The error message is “Windows update could not be installed because of error 2149842967”.
Most probably the update you are attempting to install is already in place or it’s incompatible with system and this is quite confusing because circumstances don’t necessarily have to be that way. Fortunately, you have the ability to manually “force” the update installation by downloading and installing it from the Microsoft Update Catalog. Also, running the updated troubleshooter or reverting the Windows update components back to default settings are additional methods you can try to fix the issue. Let’s see the workarounds for this Windows 11/10 update error.
Windows update could not be installed because of error 2149842967
Here is how to Fix Windows update could not be installed because of error 2149842967 –
Way-1: Bring Windows Update Troubleshooter into use
Windows update troubleshooter is a native tool to rescue error messages generated when any glitch occurs due to failed installation. The utility will detect problems, check pending restart and registry keys, initialize diagnostic, stop and start auxiliary services and repair the issue. So, follow the steps and bring the tool into use –
- Press Win+Q.
- Type – Troubleshooter
- Hit – Enter.
- From the Settings app, click on Additional troubleshooters link from the right pane. If you’re on Windows 11, select – Other troubleshooters.
- Go to Windows Update and click on it.
- Select – Run the troubleshooter. In case of Windows 11, click – ‘Run’.
- The troubleshooting wizard will open checking for the problems, automatically find out the error and solve this.
After completing the procedure, Check for updates once more to verify if “Windows update could not be installed because of error 2149842967” error reappears.
Way-2: Manually Install the Update
Failing process makes a way to attempt to manually install the rollout after downloading the same from “Windows Update Catalog”. This website hosts every single file of all the updates in variants of architectures. This is a recommended fix if the error happens to show up when the Window tries to search and install a build or patch. Examine the effectiveness of this method and give it a try to clear the error message. Find out which Windows update is the most recent for installation by visiting the Settings app by advancing with the steps –
- At first, know the KB number of the problematic update by going to “Settings > Update & Security > View update history.
- Now, navigate to Microsoft update catalog.
- Paste – KB number on the search box and Enter.
- You will see the update available in a list. Download the file based on your Processor (32bit/64bit)
- Double click the standalone file of the update.
- Click on Yes.
See – How to Download and Install Update from Microsoft update catalog on Windows 11/10.
Way-3: Reset the Components of Windows Update
Starting Windows Update components from scratch is generally recognized as the best option to resolve the majority of errors. We have made every effort to keep it as well defined as we can, given that it has a lot of varied and rather intricate components.
- Click on – Start.
- Type – “cmd.exe“.
- Select – “Run as administrator“
- Now copy the below commands successively, paste into command prompt, and press Enter for each one separately.
net stop bits
net stop wuauserv
net stop appidsvc
net stop cryptsvc- Now, press Win+R.
- Type – C:\Windows\SoftwareDistribution\Download.
- Press – Enter.
- Now, again go the command prompt and click run the following command as you have done before –
net start bits
net start wuauserv
net start appidsvc
net start cryptsvc- Restart the system and check if the error is fixed.
You can also take help from – How to Reset Windows Update to Default in Windows 10.
Way-4: Activate the BITS Service If It Isn’t Already
BITS stands for Background Intelligence Transfer Service and sometimes this is found disabled when this problem arrives. And without enabled BITS service, you may even not imagine to install all a build or patch. Use these steps to activate it –
- Press – Windows + R
- Type – services.msc
- Press – Enter.
- Find Background Intelligence Transfer Service by scrolling down the list.
- Double-click on it.
- Ensure that it’s an Automatic selection for the Startup Type.
- Check to make sure the service status is Running as well.
- Clicking the Start button will enable the service if its status was set to Stop.
Way-5: Run a full scan of Windows Defender and remove third party programs
External programs such as antivirus often cause conflicts with the core system files and trigger error when trying to install an update. They don’t let any task run easily and slow down the system as well therefore when you encounter Windows update could not be installed because of error 2149842967 error the files need removal. Most common thing that is worth attention when a problem occurs in Windows 11 or 10 is malware, virus, or adware. Because of these nasty threats, you might be getting this weird Windows update error. But you can use up Windows Defender, the built-in threat and virus protection tool to detect and quarantine harmful files.
- Click on – Search.
- Type – Windows security.
- Hit – Enter.
- Choose Virus & threat protection from the app.
- Click on Scan options.
- Select Full scan” and let this complete.
- Restart the system and press Windows and R.
- Type – ‘appwiz.cpl’.
- Find the third party app and highlight it.
- Click on – Uninstall.
- Follow the onscreen instruction until the removal is over.
Way-6: SFC and DISM tools might do wonder
When the annoying error Windows update could not be installed because of error 2149842967 appeared there could be likeliness of corruption in System Files or .WIM. To remediate the issue occurring due to these reasons SFC and DISM tools are pain relievers. Only move ahead with steps –
- Click on Search from the taskbar.
- Type – cmd.
- Select – Run as administrator.
- Type
SFC /Scannow- and hit – Enter.
- Once the Scanning and repairing are completed reboot the system
- Again Open Command Prompt as administrator.
- This time type –
DISM /Online /Cleanup-Image /RestoreHealth - Hit Enter and allow the command to complete the task.
- In the end reboot the device.
Way-7: Use In-place upgrade to fix Windows update could not be installed because of error 2149842967
In-place upgrade is system to take you directly to the latest version of Windows 11 or 10 including the most recent security patch or LCU and this means you don’t need to take an action separately to install that. This method will keep your personal programs and files as it is, moreover, get through the current edition. Media creation tool will help you in this work when you follow the below guidelines –
- Go to Official site and navigate to ‘Create Windows 10 installation media’ section.
- Click – Download the tool now.
- In case of Windows 11, visit this page. Reach ‘Create Windows 11 Installation Media’ field.
- Select- Download now.
- Double click on “MediaCreationTool.exe”.
- Select Accept for Terms & conditions.
- Click on – Upgrade this PC now.
- Select – Next.
- Again click on ‘Accept’.
- Next window will check for update; allow it to complete.
- In Choose what to keep window, select – Keep personal files and apps.
- Select – “Next”.
- Finally, click on Install.
Way-8: Perform clean install
If nothing works then you should be ready to perform clean install because this will set up absolutely new copy of Windows 11 or 10 where there is no room for errors and glitches. But be cautious, you will need to save all your personal files and programs into a different drive before starting this task.
- Follow 1-6 steps same as in the previous method.
- Check the option saying – “Create installation media (USB flash drive, DVD or ISO file) for another PC“.
- Select correct Language, Architecture, and Edition.
- Click – Next.
- Click on Save to store the file in a pen drive.
- Later, run install the version using the pen drive.
- Alternatively, you can also Use Rufus to create the bootable media.
Methods
Way-1: Bring Windows Update Troubleshooter into use
Way-2: Manually Install the Update
Way-3: Reset the Components of Windows Update
Way-4: Activate the BITS Service If It Isn’t Already
Way-5: Run a full scan of Windows Defender and remove third party programs
Way-6: Way-6: SFC and DISM tools might do wonder
Way-7: Use In-place upgrade
Way-8: Perform clean install
That’s all!!