
В тестовом стенде на отдельно-стоящем Hyper-V сервере потребовалось создать несколько внутренних IP подсетей и настроить маршрутизацию между ними. По умолчанию Hyper-V не маршрутизирует трафик между подсетями на виртуальных коммутаторах. Поэтому при решении задачи в-лоб обычно создают отдельную ВМ с двумя сетевыми интерфейсами на разных коммутаторах Hyper-V (в разных подсетях) и настраивают маршрутизацию на между интерфесами средствами гостевой ОС (это может быть как ВМ с Windows Server с маршрутизацией ролью RRAS или Linux хост с нужной таблицей маршрутов). Этот способ неудобен тем, что необходимо держать отдельную ВМ только для маршрутизаций, и при добавлении новой IP подсети приходится добавлять новый серевой интерфейс и перенастраивать маршрутизацию на шлюзе. Но мне удалось разобраться, как настроить Hyper-V хост, чтобы он сам выполнял роль маршрутизатора между разными виртуальными коммутаторами/IP подсетями.
Итак, у меня на хосте Hyper-V созданы 2 виртуальные машины в разных подсетях со следующими IP адресами:
- Msk-dc01:
192.168.13.11/24
(шлюз 192.168.13.1) - Spb-dc02:
192.168.113.11/24
(шлюз 192.168.113.1)
Чтобы разрешить маршрутизацию в Windows Server нужно включить специальный параметр реестра IPEnableRouter (он разбирался в статье про настройку форвардинга портов в Windows).
На хосте Hyper-V откройте консоль PowerShell с правами администратора и внесите изменение в реестр и перезагрузите хост:
Set-ItemProperty -Path HKLM:\system\CurrentControlSet\services\Tcpip\Parameters -Name IpEnableRouter -Value 1
Restart-computer

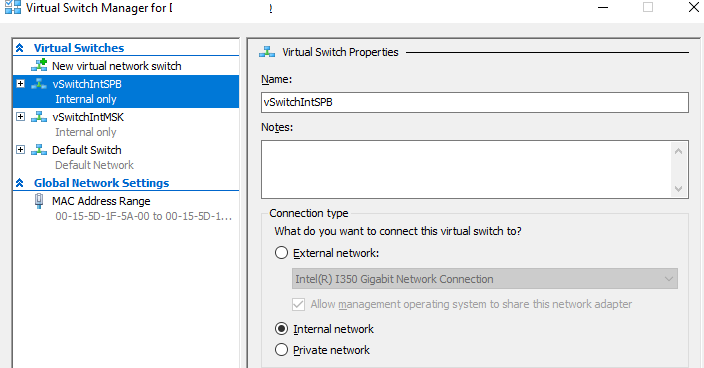
Следующим этап – создать два новых виртуальных коммутатора Hyper-V типа Internal. Можно создать коммутаторы из консоли Hyper-V Manager, а можно из PowerShell:
New-VMSwitch -Name vSwitchIntMSK -SwitchType Internal
New-VMSwitch -Name vSwitchIntSPB -SwitchType Internal
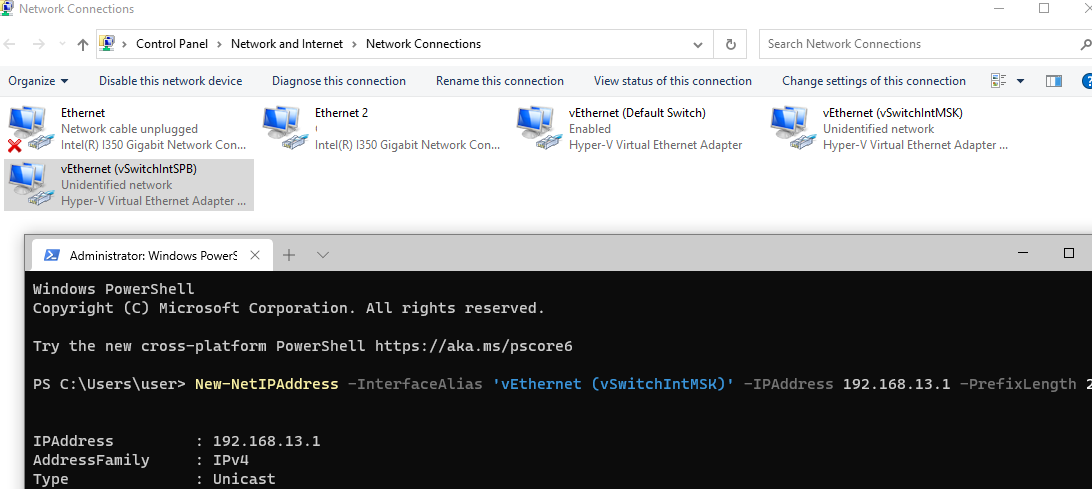
Теперь на хосте Hyper-V перейдите в Control Panel\Network and Internet\Network Connections. Перед вами появится список сетевых адаптеров хоста. Среди них должны появится есть два новых виртуальных адаптера (Hyper-V Virtual Ethernet Adapter) для созданных вами виртуальных коммутаторов. Назначьте им IP адреса с помощью PowerShell или через свойства сетевых адаптеров:
New-NetIPAddress -InterfaceAlias ‘vEthernet (vSwitchIntMSK)’ -IPAddress 192.168.13.1 -PrefixLength 24
New-NetIPAddress -InterfaceAlias ‘vEthernet (vSwitchIntSPB)’ -IPAddress 192.168.113.1 -PrefixLength
24
Как вы видите, мы назначили этим интерфейсам IP адреса шлюзов по-умолчанию в каждой подсети.
Подключите каждую ВМ к своему виртуальному коммутатору (если вы еще не сделали это):
Connect-VMNetworkAdapter -VMName Msk-dc01 -SwitchName vSwitchIntMSK
Connect-VMNetworkAdapter -VMName spb-dc03 -SwitchName vSwitchIntspb

Теперь ваши ВМ будут пересылать трафик через эти интерфейсы виртуальных коммутаторов.
Проверьте, что теперь виртуальные машин Hyper-V из разных сегментов видят друг друга. Проверьте маршрутизацию с помощью tracert и доступность TCP портов с помощью PowerShell командлета Test-NetConnection:
Test-NetConnection 192.168.13.11 -port 445
tracert 192.168.13.11
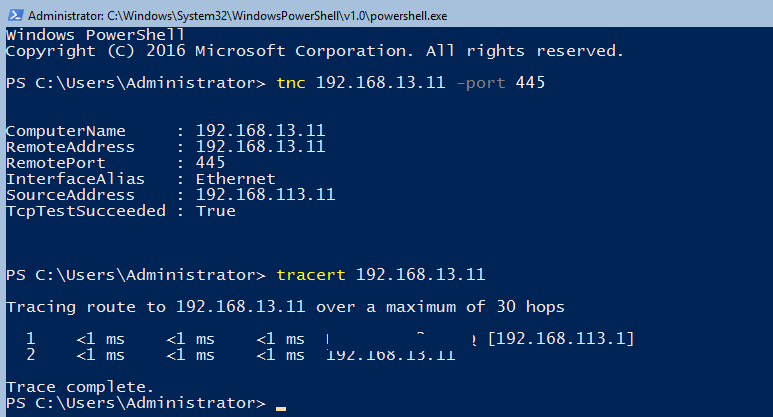
Как вы видите, теперь хосты отвечают на ICMP ping и TCP. Имейте в виду, что настройки Windows Defender Firewall в ваших ВМ могут блокировать трафик. Убедитесь, что вы разрешили ICMP трафик в Windows Firewall и добавили другие разрешающие правила файервола.
Итак, мы настроили маршрутизацию между несколькими виртуальными подсетями на хосте Hyper-V. Эта методика работает как для Hyper-V на Windows 10, так и на Windows Server 2016/2019.
Enabling IP Routing on Windows 10 allows your computer to forward network packets, essentially making it act as a router. This is handy for network sharing and advanced configurations. Let’s break it down step-by-step to make it crystal clear.
Enabling IP Routing on Windows 10 involves tweaking a setting in the Windows Registry Editor. This will allow your computer to forward packets from one network to another, effectively making it a mini-router.
Step 1: Open the Registry Editor
Press Win + R, type regedit, and press Enter.
The Registry Editor is a built-in tool in Windows that allows you to view and make changes to the registry, which is a database used by Windows to store configuration settings.
Step 2: Navigate to the IPEnableRouter Key
Go to HKEY_LOCAL_MACHINESYSTEMCurrentControlSetServicesTcpipParameters.
This path leads you to the Tcpip Parameters, where you can find the key responsible for IP routing.
Step 3: Modify the IPEnableRouter Key
Right-click on IPEnableRouter, select Modify, change the value from 0 to 1, and click OK.
Changing the value of this key from 0 to 1 enables IP forwarding on your machine. Setting it back to 0 will disable it.
Step 4: Close the Registry Editor and Restart Your Computer
Close the Registry Editor and restart your computer to apply the changes.
Rebooting your computer is essential as it ensures the changes take effect properly, allowing your computer to start forwarding network packets.
After following these steps, your computer will be able to forward network packets, effectively functioning as a router.
Tips for Enabling IP Routing on Windows 10
- Backup Before Changes: Always back up your registry before making any modifications. This can save you from potential system issues.
- Correct Permissions: Ensure you have administrative privileges to make changes to the registry.
- Testing: After enabling IP routing, test your setup by checking if network packets are being forwarded correctly.
- Firewall Settings: Adjust firewall settings if necessary to allow packet forwarding.
- Advanced Configurations: Consider additional configurations like setting up static routes if needed for complex network setups.
Frequently Asked Questions
What is IP Routing?
IP Routing allows a computer to forward network packets from one network to another, similar to how a router operates.
Do I need administrative rights to enable IP routing?
Yes, you need administrative privileges to modify the registry settings.
Is it safe to modify the registry?
Modifying the registry can be safe if you’re careful and know what you’re doing. Always back up the registry before making changes.
How can I verify IP routing is working?
You can use the ping command or other network utilities to test if packets are being forwarded correctly.
Can I disable IP routing after enabling it?
Yes, you can always go back to the Registry Editor and change the IPEnableRouter value back to 0, then restart your computer.
Summary
- Open the Registry Editor using
regedit. - Navigate to
HKEY_LOCAL_MACHINESYSTEMCurrentControlSetServicesTcpipParameters. - Modify the
IPEnableRouterkey value to 1. - Restart your computer.
Conclusion
Enabling IP routing on Windows 10 is a straightforward process that can turn your computer into a mini-router. This can be incredibly useful for advanced network configurations and sharing network connections. Remember to always back up your registry before making any changes to avoid potential system issues. After following the steps and rebooting your machine, your computer will start forwarding network packets, making it an integral part of your network setup. If you encounter any issues, don’t hesitate to revisit the steps or consult additional resources. Enabling IP routing opens a door to many possibilities in network management and optimization.
Kermit Matthews is a freelance writer based in Philadelphia, Pennsylvania with more than a decade of experience writing technology guides. He has a Bachelor’s and Master’s degree in Computer Science and has spent much of his professional career in IT management.
He specializes in writing content about iPhones, Android devices, Microsoft Office, and many other popular applications and devices.
Read his full bio here.
Windows 10: IPEnableRouter
Discus and support IPEnableRouter in Windows 10 Software and Apps to solve the problem; Hi. Trying to add IPEnableRouter as a 1 in the registry editor in windows 11, but when we do a reeboot on the pc, it disappears from the registry. When…
Discussion in ‘Windows 10 Software and Apps’ started by LDABL, Dec 12, 2024.
-
IPEnableRouter
Hi. Trying to add IPEnableRouter as a 1 in the registry editor in windows 11, but when we do a reeboot on the pc, it disappears from the registry. When asking for ipconfig /all, it is still disabled. Do you have any tips on how to solve this in windows11 pro? Has worked fine on windows 10 before

-
How to enable WINS Proxy and IP Routing in Windows 10
Neither WINS Proxy or IP Routing are enabled in Windows 10 on my laptop, which I found out by opening a black screen using «cmd» prompt in the «run» box and typing in «ipconfig /all». Here I could see that both the WINS Proxy and IP Routing are not
enabled on my laptop. Looking for a solution with the help of a google search I was led to the Registry Editor. To enable the IP Routing I found the following thread: HKEY_LOCAL_MACHINE\SYSTEM\CurrentControlSet\Services\ Netbt\Parameters, where I found IPEnableRouter
and proceeded to modify it by giving it a value of «1».To enable the WINS Proxy I went to the same Registry thread, hoping to follow this instruction: «Right-click the \»EnableProxy\» key and select \»Modify.\» In the popup box, enter \»1\» and click the \»Ok\» button.»
However, there is no «EnableProxy» key listed under Parameters on the right side of the Editor so now I’m confused.If any of this makes any sense to anyone, I would greatly appreciate help on how to enable the WINS Proxy. Without it I am having some trouble getting some things to work. Thank you!
<Moved from: Windows / Windows 10 / Performance & system failures>
-
Windows 10 IP Forwarding
I am trying to provide Windows 10 with router capabilities(IP Forward). Yes I know I could buy a router or switch. This setup is for TESTING only.
Found a good resource: GG9BET สล็อตเว็บตรงอันดับ 1 แหล่งรวมเกมสล็อต แจกเครดิตฟรี
However after setting everything up, I still cannot get to the internet from LAN2(USB). LAN1 can get to internet. My setup:
- Computer 1
- Lan1 (main connection, can access Internet)
- Lan2 (USB NIC)
- Computer 2
- Lan1 (Connected to Lan2 of Computer1)
In regedit I have enabled IPEnableRouter. I rebooted my computer.
- I can ping Lan1-Computer2 192.168.140.48 from Lan2-Computer 1 192.168.140.47
- I can ping Lan2-Computer1 192.168.140.47 from Lan2-Computer2 192.168.140.46
- I can ping LAN1-Computer1 192.168.130.47
So LAN1 can contact LAN2 vice versa but not the internet (which gateway is 192.168.130.1)
Any help please?
- Computer 1
-
IPEnableRouter
Providing Network Access to a Windows 10 Pro Guest Under Hyper-V Using an Internal Virtual Switch
I am running Windows 10 Pro 1903 on a physical machine. On that machine, I am running Hyper-V. I have a Windows 10 Pro 1903 guest running under Hyper-V.
I would like the guest to have network access beyond the host (i.e. access to my LAN and to the Internet). This should be possible in three ways:
- The Hyper-V NAT-based default virtual switch
- A Hyper-V external switch
- A Hyper-V internal switch
Hyper-V NAT-Based Default Virtual Switch
The usual way to provide network access to a guest is to bind the guest’s NIC to the Hyper-V default switch. This gives network access via NAT.
I prefer to not do this for two reasons:
- When I perform network captures at various places in my network, traffic from the host and traffic from the guest are indistinguishable since all guest traffic gets NATed to have a source IP equal to that of the host.
- Connections to the guest cannot be made without getting into port forwarding configuration via PowerShell.
Hyper-V External Virtual Switch
Network access can be provided by binding the guest’s NIC to a Hyper-V external switch. This will put the guest directly on the physical LAN.
This solution works only if the host has a wired Ethernet connection. It does not work if the host’s network connectivity is via Wi-Fi. Hence, this is not an option for me.
Hyper-V Internal Virtual Switch
It seems that one should be able to provide network access to a guest using these steps:
- Binding the guest’s NIC to a Hyper-V internal virtual switch that is shared with the host
- Designating the host as the guest’s default gateway
- Enabling IP forwarding on the host
I have set up this configuration but have been unable to get it to work.
Unsure if IP Forwarding is Properly Enabled
To enable IP forwarding on the host, I made this registry setting:
- HKEY_LOCAL_MACHINE\SYSTEM\CurrentControlSet\Services\Tcpip\Parameters\IPEnableRouter
- REG_DWORD
- 1
I also enabled the Routing and Remote Access service.
My experience on Windows 7 and earlier was that only the registry modification was necessary. For Windows 10, I’ve seen many references that one must also enable Routing and Remote Access. I am unsure what the proper way to enable IP forwarding in Windows 10 is since I haven’t seen it work with either the registry modification or the enabling of Routing and Remote Access, alone or in combination.
Firewall on Host
I have added / enabled both inbound and outbound firewall rules on the host that explicitly allow all traffic from the guest.
I had already tried disabling the firewall on the host and found no difference in behavior. So, I did not expect this to make a difference, and indeed it did not.
Request for Help
Is anybody able to see where I may be going wrong in attempting to provide network access to the guest via a Hyper-V internal switch?
If additional information is needed, I will be glad to provide it.
Thank you in advance for any assistance provided.

-
IPEnableRouter — Similar Threads — IPEnableRouter
-
IPEnableRouter
in Windows 10 Gaming
IPEnableRouter: Hi. Trying to add IPEnableRouter as a 1 in the registry editor in windows 11, but when we do a reeboot on the pc, it disappears from the registry. When asking for ipconfig /all, it is still disabled. Do you have any tips on how to solve this in windows11 pro? Has worked fine…
Enabling IP routing on Windows 10 can be a handy skill if you want your PC to act as a router, sharing its internet connection with other devices. The process involves accessing the Windows Registry and modifying a specific value. You’ll need administrative privileges to make these changes. Once enabled, your PC can forward packets between network interfaces, effectively routing traffic. It’s not as complicated as it sounds, so let’s dive into the step-by-step guide.
To successfully enable IP routing on Windows 10, you need to adjust some settings in the Windows Registry. This will allow your computer to direct internet traffic between its network interfaces. Let’s break it down into simple steps.
Step 1: Open the Run Dialog
Press the Windows key + R on your keyboard to open the Run dialog box.
This is your starting point for accessing many hidden settings in Windows. It’s like a secret portal that lets you jump straight into parts of the system you rarely visit.
Step 2: Launch the Registry Editor
Type “regedit” in the Run dialog box and press Enter.
The Registry Editor is the area where Windows keeps all its configuration settings. You’ll need to be careful here because changes can affect your system’s stability.
Step 3: Navigate to the Correct Key
In Registry Editor, follow this path: HKEY_LOCAL_MACHINESYSTEMCurrentControlSetServicesTcpipParameters.
Think of this as taking a stroll through a massive library. The path you’re following is like a series of directions to the exact book you need.
Step 4: Modify the IPEnableRouter Value
Find “IPEnableRouter,” double-click it, and change the value from 0 to 1. Then click OK.
This is the magic switch. It’s like turning on the light in a dark room. By changing this value, you’re enabling the IP routing feature.
Step 5: Reboot Your Computer
Close Registry Editor and restart your computer to apply the changes.
Restarting is like hitting refresh. It ensures all changes are properly loaded and your computer recognizes the new settings.
After completing these steps, your PC will have the ability to route traffic between different networks. It essentially turns your computer into a mini-router, forwarding packets from one network segment to another.
Tips for Enabling IP Routing on Windows 10
- Always back up your registry before making changes. This ensures you can restore your system if something goes wrong.
- Ensure you have administrative privileges to access and modify the registry.
- Be cautious when making registry changes. Incorrect modifications can affect system stability.
- Consider using a professional router for larger networks. While your PC can handle small setups, it’s not ideal for heavy loads.
- Keep your network drivers updated to prevent any connectivity issues.
Frequently Asked Questions
What is IP routing?
IP routing is the process of forwarding data packets between computer networks. When enabled, your PC can direct internet traffic between multiple network interfaces.
Why would I need to enable IP routing on my PC?
You might enable IP routing to share an internet connection with other devices on a small network, turning your PC into a makeshift router.
Is it safe to change registry settings?
Modifying the registry can be risky if you don’t know what you’re doing. Always back up the registry before making any changes.
Can I disable IP routing later?
Yes, you can disable it by following the same steps and changing the IPEnableRouter value back to 0.
Will enabling IP routing affect my internet speed?
For small networks, the impact on speed is usually minimal. However, it’s not recommended for high-traffic networks since PCs are not optimized for heavy routing tasks.
Summary
- Open the Run dialog.
- Launch the Registry Editor.
- Navigate to the correct key.
- Modify the IPEnableRouter value.
- Reboot your computer.
Conclusion
Enabling IP routing on Windows 10 is like unlocking a secret capability of your computer. With just a few tweaks in the registry, your PC can transform into a network traffic director, sharing its internet connection with other devices. While this can be useful for small setups, remember that a dedicated router is much more efficient for handling larger networks.
Before diving into registry edits, be sure to arm yourself with knowledge and caution. Backup your registry—it’s akin to wearing a helmet before riding a bike. And, always ensure you have administrative access to avoid unnecessary headaches.
If you find yourself using this feature frequently, it may be worth looking into more permanent solutions, like getting a reliable router that suits your needs.
With IP routing enabled, you’ll not only gain more control over your network but also expand your understanding of how networks function, adding a valuable skill to your tech toolkit. Whether you’re a budding IT enthusiast or just someone who loves tinkering with tech, knowing how to enable IP routing on Windows 10 is a nifty trick to have up your sleeve.
Matt Jacobs has been working as an IT consultant for small businesses since receiving his Master’s degree in 2003. While he still does some consulting work, his primary focus now is on creating technology support content for SupportYourTech.com.
His work can be found on many websites and focuses on topics such as Microsoft Office, Apple devices, Android devices, Photoshop, and more.
Содержание
- Вопрос или проблема
- Ответ или решение
- Причины проблемы
- Временное решение
- Долгосрочные решения
Вопрос или проблема
В Windows 11 23H2 (Сборка 22631.4037) значение реестра IPEnableRouter больше не работает.
Если вы установите следующее значение реестра для включения маршрутизации в Windows, значение исчезает после перезагрузки, и маршрутизация не включается.
HKLM\SYSTEM\CurrentControlSet\Services\Tcpip\Parameters!IPEnableRouter = 1
На машинах с Windows 11 22H2 это все еще работает, не уверен, после какого обновления это перестало работать.
Почему значение реестра IPEnableRouter больше не работает в последней версии Windows?
Та же проблема и у нас. Мы немного поизучали этот вопрос и выяснили, что Служба хост-сети удаляет его из реестра. В качестве теста я отключил службу и вручную ввел ключ, и, о чудо, ключ остался после перезагрузки.
Мне не очень нравится это решение, но пока оно работает.
Я не видел упоминания о IPEnableRouter в последних заметках о выпуске Windows, но и не углублялся в это слишком сильно.
У нас также есть эта проблема для одного из наших клиентов. Изначально мы удалили проблемное обновление KB5041585, но теперь отключили Службу хост-сети и восстановили ключ реестра как временное решение.
Представьте, что не так много конфигураций требует маршрутизации в Windows 11.
У меня есть аналогичная проблема с машиной на Windows 11 24H2, работающей под сервером openvpn.
Ранее (23H2) все работало нормально. С 24H2 пересылка больше не работает, как с командой “Set-NetIPInterface -Forwarding Enabled”, так и с ключом реестра IPEnableRouter при отключенной Службе хост-сети.
При откате на 23H2 пересылка работает, как и ожидалось, даже без ключа IPEnableRouter, но с включенной пересылкой через команду powershell.
IPEnableRouter = 2 не является допустимым значением: оно должно быть либо 0 (отключено), либо 1 (включено).
Ответ или решение
Ситуация с регистрационной настройкой Windows, отвечающей за маршрутизацию IP, в версии Windows 11 23H2, действительно вызывает серьезные вопросы среди IT-специалистов, использующих системы для сетевого администрирования и виртуализации. В частности, значение реестра IPEnableRouter = 1, которое должно обеспечивать включение маршрутизации, перестало функционировать, а настройка теряется после перезагрузки. Рассмотрим причины, которые могут объяснить эту проблему, а также возможные решения.
Причины проблемы
-
Изменения в Windows 11 23H2 и более поздних версиях: С выходом обновлений сборки 23H2 и выше, Microsoft, по всей видимости, внесла изменения в работу системных служб, касающихся сетевых конфигураций. В частности, служба сети хоста (Host Network Service) начала влиять на ключи реестра, которые управляют маршрутизацией. Это означает, что при запуске службы, она может удалять настройки, затрагивающие маршрутизацию, в том числе ключ
IPEnableRouter. -
Совместимость с предыдущими версиями: В версиях, таких как 22H2, данная настройка работала корректно. Из-за изменений в коде и архитектуре процессов обработки сетевых параметров в новых сборках, поддержка старых функций может быть нарушена.
-
Неправильная документированность: В последних обновлениях Windows отсутствуют описания изменений, касающихся
IPEnableRouter, что затрудняет пользователям понимание происходящих изменений в функциональности и идентификации возможных багов.
Временное решение
Как уже упоминалось в обсуждениях, временным решением проблемы является отключение службы Host Network Service. Это приводит к тому, что ключ IPEnableRouter сохраняется даже после перезагрузки. Однако стоит отметить, что данное решение может негативно сказаться на других функциях сети, поэтому применять его следует с осторожностью.
-
Отключение службы Host Network Service:
- Откройте
Services(Службы). - Найдите
Host Network Service. - Остановите службу и настройте автоматический запуск на отключенный или вручную.
- Откройте
-
Ручная установка ключа реестра: После отключения службы вручную установите значение реестра:
- Откройте
regedit. - Перейдите к
HKLM\SYSTEM\CurrentControlSet\Services\Tcpip\Parameters. - Установите
IPEnableRouterв1.
- Откройте
Долгосрочные решения
Поскольку проблема может стать системной, рекомендуется:
-
Сообщить о проблеме Microsoft: Учитывая, что это может быть баг, стоит отправить обратную связь через специальный канал, чтобы команда разработки была осведомлена о вопросах, связанных с маршрутизацией.
-
Проверка альтернатив: Рассмотрите возможность использования сторонних решений для маршрутизации, таких как программное обеспечение для маршрутизаторов или настройки VPN, которые могут обойти необходимость в использовании встроенной маршрутизации Windows.
-
Мониторинг обновлений: Следите за обновлениями Windows и примечаниями к ним на предмет каких-либо исправлений, затрагивающих данную функцию, так как это может решить проблему в будущем.
Таким образом, произошедшие изменения в конфигурации служб Windows 11 стали первопричиной проблем с настройкой маршрутизации через IPEnableRouter. Временные решения, такие как отключение службы Host Network Service, могут помочь, однако необходимо учитывать их возможные последствия на другие сетевые функции системы. Рекомендуется внимательно следить за обновлениями и проявлять активность в сообщениях о проблемах, чтобы добиться необходимого уровня поддержки от Microsoft.