
Неотъемлемой частью администрирования сетью является управление IP адресами. До выхода Windows Server 2012 системным администраторам для комплексного управления всем пространством IP адресов, а также службами DNS и DHCP, приходилось использовать таблицы, различные сторонние инструменты, писать пользовательские скрипты. С выходом Windows Server 2012 ситуация изменилась – появился IPAM (IP Address Management). Тому, что из себя представляет IPAM, а также о том, как настроить эту службу в вашей сети и будет эта статья.
Как уже отмечалось выше, до появления IPAM для управления IP –адресами в сети приходилось использовать подручные средства: от сторонних инструментов до списка адресов в таблице Excel. Как результат, продуктивность администрирования сетью падала, а затраты только возрастали. Более того, имеющиеся инструменты подходили для решения задачи управления адресами сети в краткосрочной перспективе. Но чем больше становилась сеть и чем дольше с ней работали, тем более трудоемкой становилась эта задача.
С выходом Windows Server 2012 появился внутренний инструмент для управления IP-адресами сети – IPAM. IPAM (IP Address Management) – служба управления IP адресами, впервые представленная в Windows Server 2012 и Windows Server 2012 R2. Кроме того, изменения-улучшения IPAM стоит ожидать и в Windows Server vNext. IPAM представляет собой платформу для обнаружения, мониторинга, управления и аудита для пространства IP адресов в сети организации.
Среди основных возможностей IPAM можно выделить следующие:
- Автоматическое обнаружение инфраструктуры IP-адресов
- Удобные и гибкие средства для отображения пространства IP-адресов, а также управления ими и составления отчетов
- Аудит изменений в конфигурациях служб DHCP и IPAM
- Наблюдение за службами DHCP и DNS, а также управление ими
- Отслеживание аренды IP-адресов
Основное преимущество IPAM заключается в том, что он предоставляет единую консоль, в которой представлена информация о конфигурациях всех служб DNS и DHCP в лесу. С помощью этой консоли можно изменять настройки, например, как одной, так и нескольких зон DHCP, что не требует от системного администратора написания дополнительных скриптов или ручной настройки каждого DHCP-сервера. Далее мы увидим такую настройку в примере.
Но сначала мы развернем службу IPAM, а также посмотрим, как ее можно использовать для наблюдения за службами DNS и DHCP.
Разворачиваем IPAM Server
Для того, что начать работать с IPAM Server его необходимо установить – IPAM не входит в набор служб, устанавливаемых по умолчанию. Выполнить установку можно двумя способами. Можно использовать следующую команду PowerShell:
Install-WindowsFeature IPAM –IncludeManagementTools
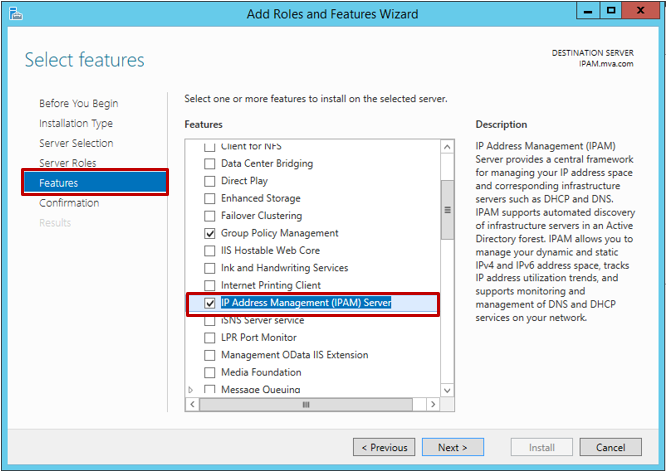
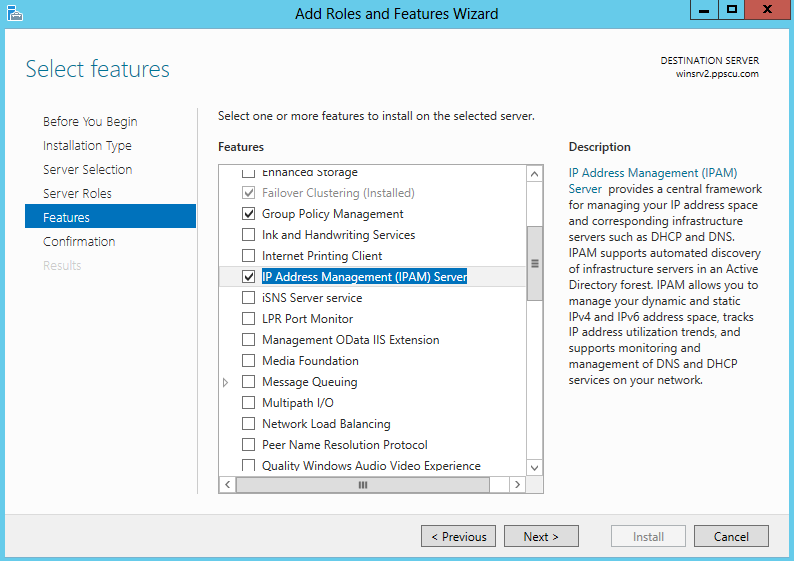
Также можно использовать мастер установки ролей и компонентов сервера:
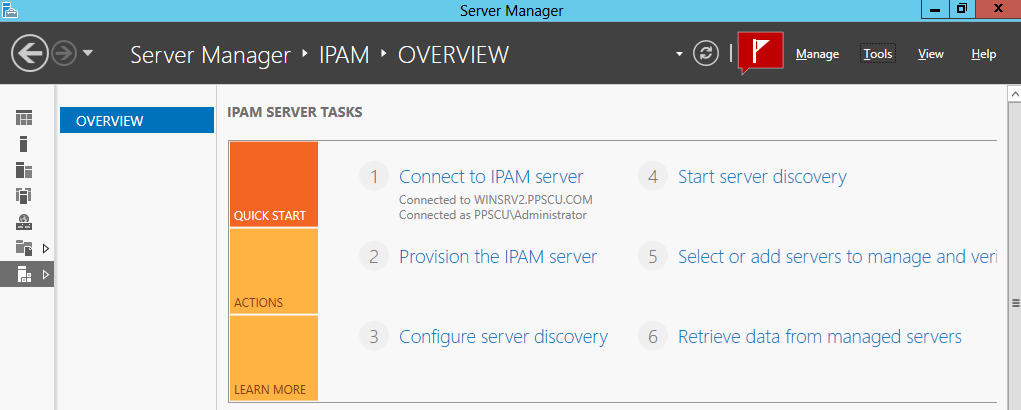
После того, как процесс установки IPAM завершен, необходимо подготовить его к работе. Для этого в Server Manager необходимо выбрать IPAM и далее Provision the IPAM server:

Вы можете выбирать между двумя методами подготовки: вручную (manual) или на основе групповых политики (group policy based). В чем же разница между двумя этими методами?
Ручной метод подготовки IPAM сервера рекомендуется использовать в тех случаях, если количество управляемых серверов мало. Если вы выбираете этот метод подготовки, то должны быть готовы к тому, что придется вручную настроить условия доступа для каждого из управляемых серверов. Кроме того, удалять настройки также придется вручную, в том случае, если вам не нужно будет больше управлять тем или иным сервером. Можно использовать групповые политики для того, чтобы применять необходимые настройки к управляемым серверам, даже если вы выбрали ручной метод подготовки, но все объекты групповой политики должны применяться или удаляться вручную. В связи с тем, что ручной метод подготовки IPAM сервера более трудоемкий и сложный, предпочтительный использовать метод подготовки с помощью групповых политик.
Подготовка IPAM сервера с помощью групповых политик проще и имеет меньшую вероятность ошибок. При использовании этот метода объекты групповой политики применяются и удаляются автоматически на управляемых серверах. Именно этот метод предлагается использовать по умолчанию в Мастере подготовки IPAM. Вам необходимо ввести префикс для имени объектов групповых политик:

Стоит здесь отметить, если вы выбираете подготовку IPAM сервера с помощью групповых политик, вы не сможете изменить его на ручной метод подготовки. А вот в обратном случае вы можете изменить ручной метод подготовки на подготовку с помощью групповых политик, используя командлет Windows PowerShell:
Set-IpamConfiguration
Вернемся теперь к Мастеру подготовки. Выбрав метод подготовки с помощью групповых политик, мы получаем сообщение о том, что настройки будут применяться на управляемые сервера с использованием следующих объектов групповых политик:
- <GPO-prefix>_DHCP: этот объект групповой политики используется для применения настроек, с помощью которых IPAM сможет наблюдать, управлять и собирать информацию с управляемых DHCP серверов в сети
- <GPO-prefix>_DNS: этот объект групповой политики используется для применения настроек, с помощью которых IPAM сможет наблюдать и собирать информацию с управляемых DNS серверов в сети
- <GPO-prefix>_DC_NPS: этот объект групповой политики используется для применения настроек, с помощью которых IPAM сможет собирать информацию с управляемых контроллеров домена и с серверов политик сети (Network Policy Servers, NPS) в сети для DHCP сервера в сети для отслеживания IP адресов
В нашем случае, объекты групповой политики будут носить имена IPAM_DHCP, IPAM_DNS и IPAM_DC_NPS соответственно. Для завершения подготовки IPAM проверьте, верно ли указана информация на вкладке Summary и нажмите Apply. Процесс подготовки займет некоторое время. В итоге вы увидите сообщение о том, что подготовка IPAM успешно выполнена:

Здесь важно сообщение о дальнейших шагах. Объекты групповой политики не были созданы, их нужно будет создать далее с помощью командлеты PowerShell:
Invoke-IpamGpoProvisioning
Это будет чуть позже. А пока перейдем к Server Manager и настроим обнаружение серверов:

В появившемся окне нужно выбрать домен для обнаружения. В нашем случае это корневой домен mva.com. После добавления этого домена, необходимо убедиться, что среди ролей сервера есть контроллер домена, DHCP и DNS сервера. Нажимаем ОК.

Теперь начнем обнаружение серверов:

После завершения задачи. Перейдите в Server Manager на вкладку IPAM – SERVER INVERNTORY. Вы увидите, что для серверов dsc01 и DC в столбце «Состояние управления» будут отображаться состояние «Не определено», а в столбце «Состояние доступа» — «Заблокирован». Необходимо предоставить IPAM разрешение на управление этими серверам с помощью объектов групповой политики.

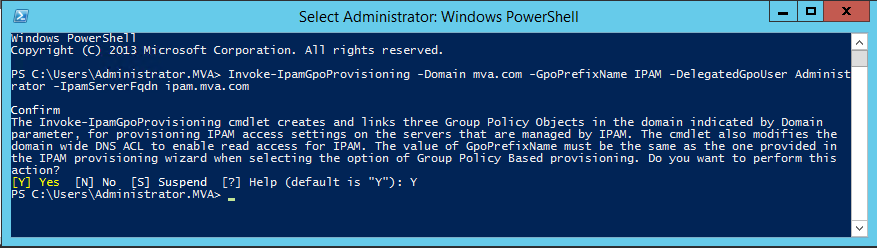
Теперь вспоминаем следующий шаг, который нам рекомендовали сделать после завершения подготовки IPAM. Нам необходимо запустить на сервере IPAM Windows PowerShell с правами администратора и использовать следующий командлет
Invoke-IpamGpoProvisioning –Domain mva.com –GpoPrefixName IPAM –DelegatedGpoUser Administrator –IpamServerFqdn ipam.mva.com
Теперь объекты групповой политики созданы, что можно увидеть в оснастке Group Policy Management:
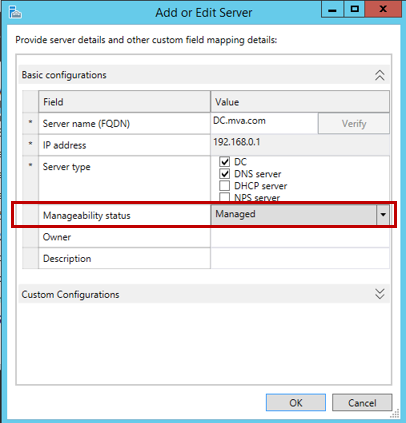
Вернемся к Server Manager. Во вкладке IPAM – SERVER INVENTORY щёлкните правой кнопкой мышки по одному из серверов и выберите Edit Server. В появившемся окне измените пункт «Состояние управления» на «Управляемый» и нажмите ОК. Повторите тоже самое для второго сервера.
Теперь нужно, чтобы на серверах DC и dsc01 вступили в силу изменения групповых политик. Самым быстрым способом будет на каждом из нужных нам серверов использовать следующий командлет PowerShell:
gpupdate /force
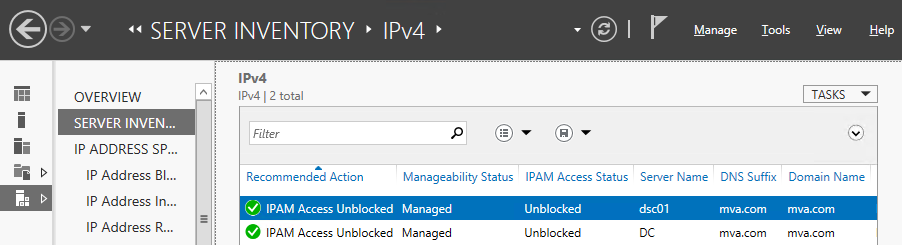
Дождемся завершения выполнения этой команды на каждом из серверов. Вернемся на сервер IPAM в Server Manager – IPAM – SERVER INVENTORY и обновим «IPv4», а также обновим статус доступа к серверу, щёлкнув правой кнопкой мыши по каждому и выбрав пункт «Refresh Server Access Status». В итоге мы должны получить для наших серверов статус «Разблокирован» в столбце «Состояние доступа IPAM».
Теперь вернемся в вкладке IPAM – OVERVIEW и выберем «Retrieve data from managed servers» и дождемся завершения выполнения этой задачи:

Автоматически будут запущены следующие задачи по сбору данных: AddressExpiry, AddressUtilication, Audit, ServerAvailability, ServiceMonitoring, ServerConfiguration.
На этом этапе мы завершили настройку IPAM сервера и далее посмотрим, как его можно использовать в работе. В качестве примера рассмотрим наблюдение за инфраструктурой и управление ею с помощью IPAM.
Наблюдение за инфраструктурой и управление ею
IPAM позволяет автоматизировать и настроить периодичность мониторинга DHCP- и DNS-серверов по всему лесу. Также есть возможность управления несколькими серверами на применение настроек автоматически и периодически мониторить сервера DHCP и DNS в лесу AD. Кроме того, есть возможность управления несколькими серверами DHCP и настройками областей для распределенных серверов буквально одним щелчком мыши.
В качестве примера рассмотрим, как можно осуществлять наблюдение за DHCP- и DNS-серверами, а также управление ими, используя IPAM.
Откроем Server Manager на вкладке IPAM – MONITOR AND MANAGE – DNS and DHCP Servers. Обратите внимание, что в поле «Тип сервера» (1) вы можете выбрать не только DNS и DHCP, но и отсортировать только DNS или только DHCP. Выбрав один из серверов, можно просмотреть свойства этого сервера, параметры и каталог событий (2):
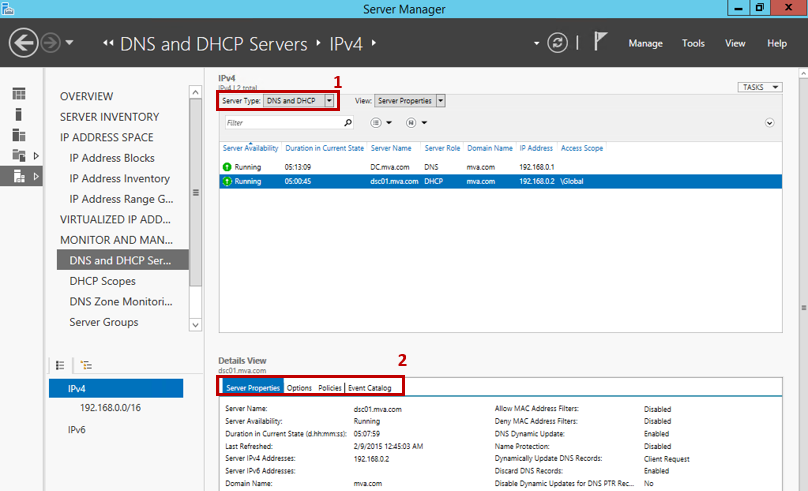
Теперь давайте выберем в поле «Тип сервера» DHCP, а в поле «Вид» — «Свойства области»:

Щелкните правой кнопкой мыши область DHCP MVA—scope1 и выберите «Дублировать область DHCP». В появившемся диалоговом окне «Дублирование области DHCP» измените значение поля «Имя области», а в разделе «Общие свойства» введите следующие значения:
- Начальный IP-адрес: 192.168.1.1
- Конечный IP-адрес: 192.168.1.254
- Маска подсети: 255.255.255.0
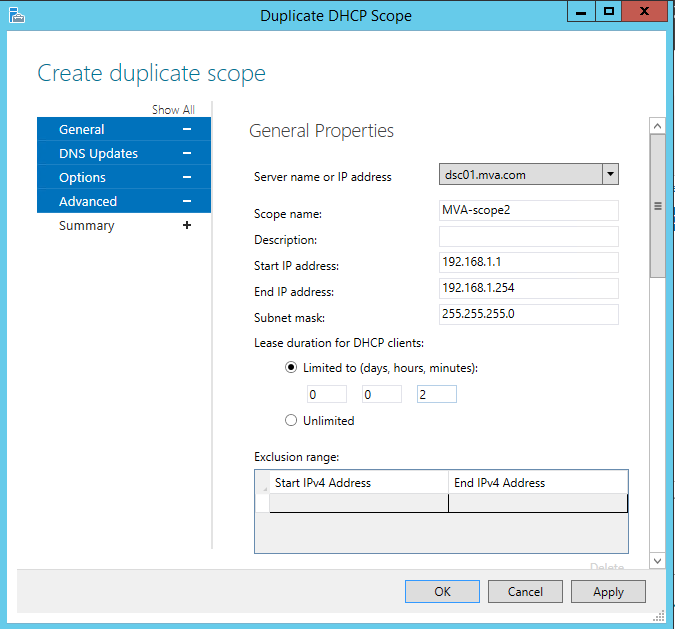
По мере необходимости, можно изменить и другие свойства области. После того, как все нужные изменения были внесены, нажмите ОК и убедитесь, что в списке теперь отображается еще одна область – MVA-scope2.

Та же область появится в консоли DHCP на нашем DHCP-сервере DSC01.
Если вы вернетесь на IPAM сервер и выберите обе области DHCP, щёлкните по ним правой кнопкой мыши, то сможете изменять параметры обеих областей.
Конечно же, с помощью IPAM можно отслеживать различные типы событий на DNS- и DHCP-серверах, включая данные как о самих серверах, так и о клиентах. Чтобы просмотреть журналы аудита и событие, в меню навигации IPAM нужно выбрать «Каталог событий» (EVENT CATALOG). По умолчанию в нижней области навигации выбрано «События настройки IPAM». Вы можете выбрать и другие события для просмотра, а также экспортировать их в файл для дальнейшего просмотра и анализа.
Надеюсь, информация в этой статье была вам полезна!
Полезные ссылки
- Попробовать Azure бесплатно на 30 дней!
- Изучить курсы виртуальной академии Microsoft
- Корпоративные устройства. Как обеспечить защиту данных и приложений
- Корпоративные устройства. Как управлять гибридными учетными данными
- Основы компьютерной безопасности
- Основы построения доменной сети
- Модернизация инфраструктуры организации с помощью Windows Server 2012 R2
- Лицензирование Windows Server 2012 R2
- Скачать пробную версию Windows Server 2012 R2
- Загрузить бесплатную или пробную Visual Studio

IP address management (IPAM) is a new feature introduced in Windows Server 2012 that allows you to configure, manage and have a general overview of the network’s IP addresses and ranges. With IPAM, you can search for desired IP addresses and ranges, manage and configure DHCP scopes and DNS entries, view the status of your IP addresses blocks and search for free IP addresses. Large enterprises usually deploy one or multiple IPAM servers because, as the network evolves, the complexity of its IPs and subnets increases significantly.
An IPAM server allows you to track all IP address changes that occur within the network. I’ve previously used IPAM software from other vendors, but never from Microsoft. With the release of Windows Server 2012, System Administrators were able to track and manage all network devices from an Active Directory domain. Note that this is a requirement of IPAM, you cannot manage any servers that do not belong from the same Active Directory forest. Because this is a Microsoft technology, you cannot use this feature with non-Windows Operating Systems or network devices. IPAM allows you to manage both DNS and DHCP servers and you can now easily change DHCP options from one or multiple scopes using the centralized IPAM console. You can also track dynamically assigned addresses but also static ones. Both public and private IP addresses can be tracked with IPAM.
In this article I will show you how to install and configure IPAM and we’ll also cover some of its basic features. Note that I will be using a Virtual Machine hosted in my VMware testing environment running Windows Server 2012. My VM is also a member of an Active Directory forest so make sure to cover this aspect as well.
Step 1 – Installation
IPAM can be installed in two ways: using Windows Powershell or by accessing the Roles and Features section from Server Manager Console:
With Windows PowerShell this operation can be performed much faster by executing the following command:
Install-WindowsFeature IPAM –IncludeManagementTools
Step 2 – Provisioning
Once the installation has been successfully completed, open the Server Manger Console and navigate to the IPAM section. Here you will discover all available IPAM server tasks:
Select the second option, Provision the IPAM, to start the IPAM configuration wizard. In this section is where the IPAM database, security groups, tasks and folders are created.
Step 3 – Provisioning Method
You must configure how the IPAM server interacts with network servers, there are two options available: manually or by using GPOs. Simply put, by selecting the first option, an administrator would have to configure security groups, firewall rules and network shares manually on each machine. This method is really not recommend since it adds a lot of extra configurations and increases the overall complexity of the IPAM deployment.
The second option is much easier to implement since it uses Group Policy Objects to configure all IPAM managed servers. Unless you simply cannot you use the second option, you should always use GPOs to configure servers managed by IPAM. Note that you have to specify a prefix that will be set to the IPAM GPOs:

Once the wizard has been successfully completed, three Group Policy Objects will be created: one for DNS servers, one for DHCP servers and one for Domain Controllers.
Step 4 – Configure Server Discovery
Select the third task from the IPAM console to configure server discovery. This is where we specify what servers should be discovered by our IPAM machine. You will need to select and add domains to discover. By default, all three types of servers are selected: DNS, DHCP and Domain Controllers. You can change the discovery options by selecting only desired types of servers:

Step 5 – Start Discovery
Once this section has been covered, select the 4th task to start the server discovery procedure:
If you receive an error stating that discovered machines were blocked, you need to execute the following Powershell command to create the GPOs that later will be assigned to your machines:
Invoke-IpamGpoProvisioning -Domain ppscu.com -GpoPrefixName IPAMPPSCU

Step 6 – Verify GPOs
You can now verify the GPOs in the Group Policy Management Console. Connect to the blocked machine and execute gpupdate /force to propagate the newly created GPOs.
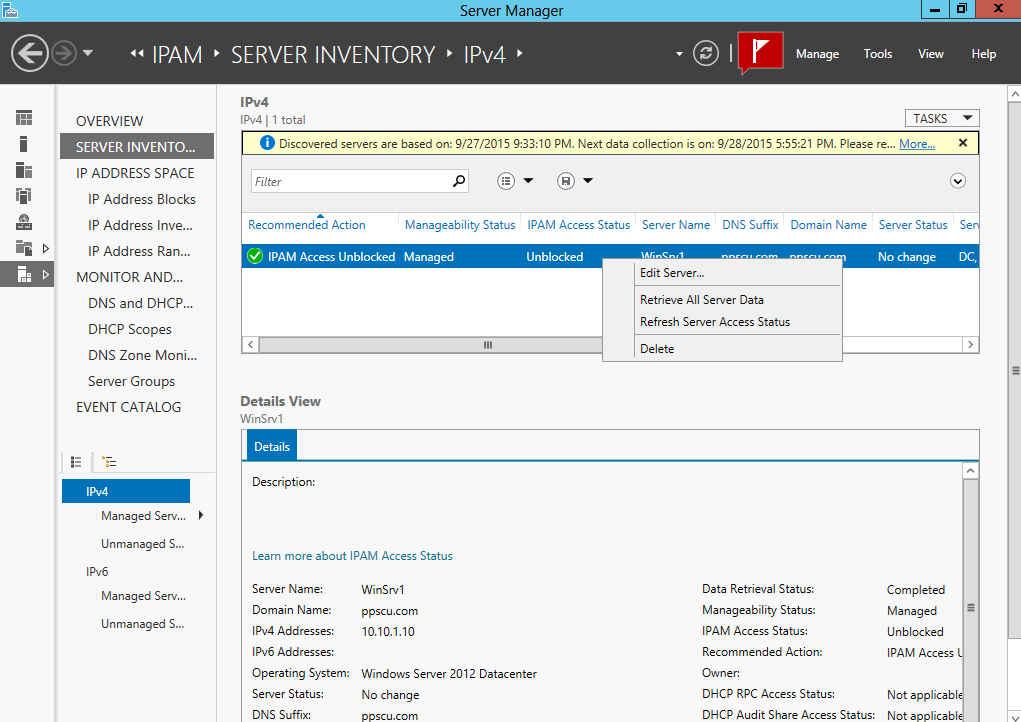
For each machine you will have to change its manageability status to managed, you can do so if you right click on the blocked machine and select edit server:
The machine should change its IPAM Access status to Unblocked.
Step 7 – Import Data
Now that the server has been added to IPAM, you can retrieve and import its data to the IPAM server if you right click on the machine and select Retrieve All Server Data. You can also execute the 6th available task from the IPAM console to retrieve data from managed servers:
That’s about it for the configuration part of an IPAM server. We’ve covered the most important steps that you need to take in order to successfully deploy IPAM within your enterprise. If you have followed these steps precisely, you should have installed and configured an IPAM machine with at least one discovered host. Note that same principles are applied when used in a large organization with multiple hosts. I want to further discuss about other aspects of this technology so stay tuned for the following article in which we’ll mostly talk about IPAM IP address spaces. Wish you all the best!
Let me ask you a question. You’re an IT pro, how do you keep track of all the IP addresses on your network?
We don’t mean how you distribute them, but how do you keep track of the static addresses? How do you report on them? Maybe you have them all itemized on an Excel spreadsheet. Does everyone in your shop keep track as diligently as you? Is it up to date?
Now you don’t have to. IPAM to the rescue. It’s part of the new functionalities included in Windows Server 2012 and Windows Server 2012 R2.
IPAM in Windows Server 2012 is a new built-in framework for discovering, monitoring, auditing, and managing the IP address space used on your network. IT includes components for:
- Automatic IP address infrastructure discovery: IPAM discovers domain controllers, DHCP servers, and DNS servers in the domains you choose.
- You can enable or disable management of these servers by IPAM.
- Custom IP address space display, reporting, and management: The display of IP addresses is highly customizable and detailed tracking and utilization data is available. IPv4 and IPv6 address space is organized into IP address blocks, IP address ranges, and individual IP addresses.
- IP addresses are assigned built-in or user-defined fields that can be used to further organize IP address space into hierarchical, logical groups.
- Audit of server configuration changes and tracking of IP address usage: Operational events are displayed for the IPAM server and managed DHCP servers.
- IPAM also enables IP address tracking using DHCP lease events and user logon events collected from Network Policy Server (NPS), domain controllers, and DHCP servers. Tracking is available by IP address, client ID, host name, or user name.
- Monitoring and management of DHCP and DNS services: IPAM enables automated service availability monitoring for Microsoft DHCP and DNS servers across the forest. DNS zone health is displayed, and detailed DHCP server and scope management is available using the IPAM console.
It can be a huge help for you to be able to automatically manage your DNS, DHCP and all the monitoring and auditing. Here’s how we do it.
Install IPAM
IPAM is a feature of and it need to be installed using Server Manager or PowerShell.
Install-WindowsFeature IPAM –IncludeManagementTools
Whichever you’re most familiar with.
Choose an IPAM Provisioning Method
Once installed you need to choose your provisioning method. The provisioning method is the process of enabling required permissions, files shares, and access settings on managed servers so that the IPAM server can communicate with them. You can choose either the Manual or Group Policy Based method. Pick the one that’s best for you and remember, you can’t change it later.
- Manual: Typically used when the number of managed servers is small. If you choose the manual provisioning method, access settings must be configured individually on each managed server. Settings must also be removed manually if the server becomes unmanaged. You can use Group Policy to apply settings to managed servers even if the manual provisioning method is chosen, but you must apply and remove GPOs manually.
The Manual provisioning method is not preferred because it is more complex and less consistent than the Group Policy Based method. - Group Policy Based: The Group Policy based method is preferred because it is simpler and less prone to errors. If you choose the Group Policy based provisioning method, GPOs are applied automatically to servers when they are assigned a status of managed in the IPAM console. GPOs are also removed automatically if the status of a server changes from managed to unmanaged.
If you chose the Group Policy based method, you must also provide a GPO name prefix in the provisioning wizard. After providing a GPO name prefix, the wizard will display the GPO names that must be created in domains that will be managed by IPAM. The following role-based GPOs are required in each domain that contains managed servers. The wizard does not create these GPOs.
- <gpo -prefix>_DHCP: This GPO is used to apply settings that allow IPAM to monitor, manage, and collect information from managed DHCP servers on the network.
- <gpo -prefix>_DNS: This GPO is used to apply settings that allow IPAM to monitor and collect information from managed DNS servers on the network.
- <gpo -prefix>_DC_NPS: This GPO is used to apply settings that allow IPAM to collect information from managed domain controllers and network policy servers (NPS) on the network for IP address tracking purposes.
In our case we will use the Group Policy method:
In Server Manager, in the IPAM section. Select Provision the IPAM server, and go through the provisioning wizard.
We’ll create the GPOs later. Next we need to configure the Server discovery.
Configure Server Discovery
When you configure server discovery, you are defining the domains that the IPAM server can monitor and manage (also called the scope of discovery). An IPAM server can monitor and manage multiple domains as long as they are part of the same Active Directory forest as the IPAM server.
On the IPAM Overview page, click Configure server discovery. Choose each domain that you will manage with the current IPAM server by selecting it from the drop-down list and then clicking Add.
To remove a domain from the scope of discovery, click the domain and then click Remove.
By default all server roles are enabled in the domains you select. To remove a server role from the scope of discovery for a specific domain, de-select the checkbox under the appropriate server role.
Click OK when you have finished.
Discover Servers on the Network
Domain controllers, DHCP servers, and DNS servers can be discovered on the network, provided they are running Windows Server® 2008 or a later operating system. Computers running NPS must be added manually to the server inventory.
Since this is the first time we are discovering servers, we will discover servers by running the server discovery task. This task also runs regularly on the IPAM server with a default frequency of once per day, and will discover new servers automatically provided that they meet the conditions for discovery.
Conditions for discovery depend on the type of role services that are installed and running on managed servers. For example, a DHCP server will not be discovered if it is not authorized in Active Directory or does not have any DHCP scopes configured. DHCP scopes do not need to be active to be discovered. A DNS server will not be discovered unless it is authoritative for an Active Directory domain configured in the scope of discovery
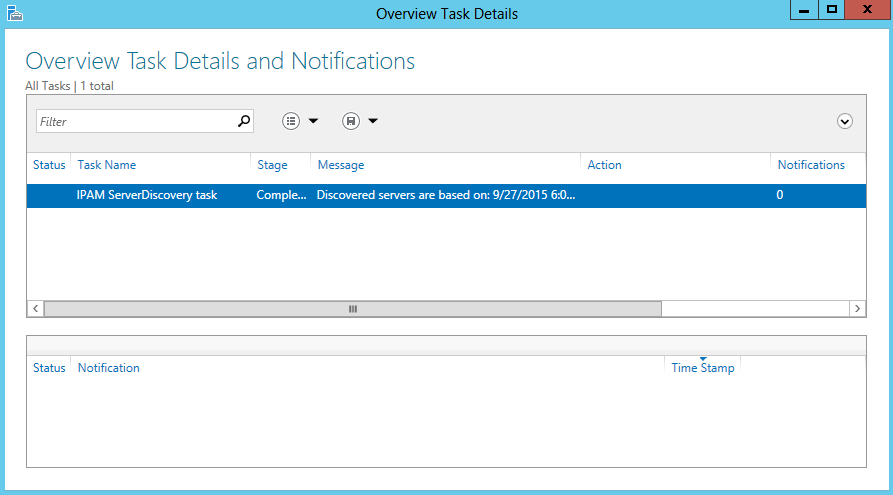
- On the IPAM Overview page, click Start server discovery. This will start the IPAM ServerDiscovery task. Alternatively, you can click Manage on the IPAM console menu, and then click Start Server Discovery.
- Wait for the task to complete. You can click the notification flag to view status of the ServerDiscovery task if desired.
- When the task has completed running, view the Server inventory page to display the list of discovered servers.
If the list of discovered servers is incomplete, verify that the correct node is selected in the lower navigation pane. By default, IPv4 is selected. You can click Refresh to ensure the view is current.
Create IPAM Provisioning GPOs
When we picked the Provisioning method. We picked the GPO method, however the wizard did not actually create the group policies. All it did is configure and assign the names for them.
There are 3 policies that need to be created. The GPO Prefix we selected in step 2 is IPAM. So our 3 policies will be:
- IPAM_DHCP: For managed DHCP servers.
- IPAM_DNS: For managed DNS servers.
- IPAM_DC_NPS: For managed domain controllers and NPS servers.
They will created by running the following PowerShell script.
Invoke-IpamGpoProvisioning –Domain contoso.com –GpoPrefixName IPAM –IpamServerFqdn dc1.contoso.com
Choose Managed Servers
So far we:
- Installed IPAM Server
- Chose an IPAM Provisioning Method
- Configured Server Discovery
- Discovered Servers on the Network
- Created IPAM Provisioning GPOs
Now we need to choose our managed servers.
Choosing a managed server is done by assigning manageability status. In our case since we chose the GPO method, a manageability status of Managed means that the server will automatically be added to security filtering in the appropriate IPAM GPO.
Membership in the Administrators group, or equivalent, is the minimum required to complete this procedure.
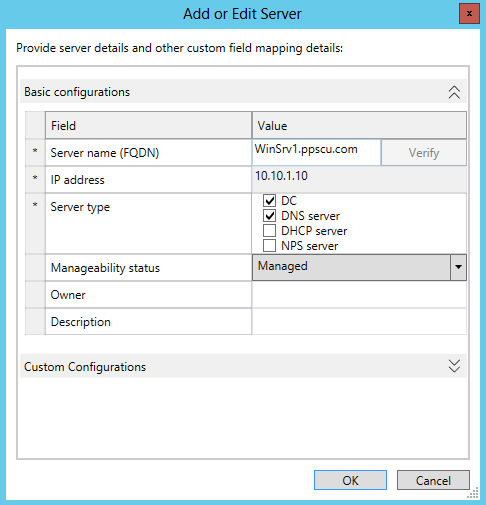
In the upper IPAM navigation tree, click SERVER INVENTORY. The list of servers that have been discovered or manually added is displayed. Right-click the server or servers that you are selecting and then click Edit Server.
In the Add or Edit Server dialog box next to Manageability status, select Managed from the drop-down list if the server will be managed by the current IPAM server.
Retrieve Data from Managed Servers
After you have verified the IPAM server has access to managed servers, you can retrieve data from managed servers to begin populating the IPAM database. You might also want to retrieve server data after a configuration change or just to obtain updated information. You do not have to manually retrieve data from managed servers because scheduled tasks on the IPAM server will perform this task automatically
- In the upper IPAM navigation tree, click SERVER INVENTORY.
- Select the managed servers from which you want to collect data. Press and hold CTRL or SHIFT to select multiple servers.
- Right-click the servers that are selected, and then click Retrieve All Server Data.
- The following data collection tasks will run immediately on the selected servers: AddressExpiry, AddressUtilization, Audit, ServerAvailability, ServiceMonitoring, ServerConfiguration.
- Wait for the data collection tasks to complete.
You’re environment is now set to discover, monitor, auditi, and manage the IP address space used your network.
IPAM stands for IP Address Management. It’s a feature in Windows Server 2012 R2 that enables you manage your DHCP and DNS servers as a whole rather than at the individual service or server level.
Installation of IPAM follows the standard approach for any Windows feature. Note that you can install IPAM on a Domain Controller but it won’t configure. IPAM is designed to be installed on a member server.
Full details on deploying IPAM server are available from here https://technet.microsoft.com/en-us/library/hh831353.aspx
I’m not going to run through the full deployment and configuration – just point out some issues and where you can use PowerShell to make things easier.
Once the IPAM feature is installed you have to provision the IPAM server. There isn’t a separate MMC for IPAM admin – you use Server Manager. Provisioning an IPAM server can be done manually or by GPO. Manual seemed best for lab/experiment/initial set up as can’t swap from GPO to manual. You can use Windows Internal Database (WID) or SQL Server – I used WID.
You then need to configure your DHCP servers, DNS servers and domain controllers. This involves a number of group membership changes, firewall rule changes and a registry setting.
Create a group called IPAMUG and add the IPAN server into it.
New-ADGroup -Name IPAMUG -DisplayName IPAMUG -SamAccountName IPAMUG -Description ‘IPAM management group’ -GroupCategory Security -GroupScope Universal
Add-ADGroupMember -Identity IPAMUG -Members (Get-ADComputer -Identity W12R2SUS)
Add IPAMUG to a number of groups
Add-ADGroupMember -Identity ‘Event Log Readers’ -Members (Get-ADGroup -Identity IPAMUG)
Add-ADGroupMember -Identity ‘DHCP Users’ -Members (Get-ADGroup -Identity IPAMUG)
Add-ADGroupMember -Identity ‘DNSAdmins’ -Members (Get-ADGroup -Identity IPAMUG)
I also found I had to add the IPAM server to the domain Administrators group to get the DNS data to come through.
Modify some firewall rules
$cs = New-CimSession -ComputerName W12R2SCDC01
Enable-NetFirewallRule -DisplayName ‘Remote Service Management (RPC)’ -CimSession $cs -PassThru
Enable-NetFirewallRule -DisplayName ‘Remote Service Management (NP-In)’ -CimSession $cs -PassThru
Enable-NetFirewallRule -DisplayName ‘Remote Service Management (RPC-EPMAP)’ -CimSession $cs -PassThru
Get-NetFirewallRule -DisplayGroup ‘Remote Service Management’ -CimSession $cs |
ft DisplayName, Enabled, Direction,Profile –a
There are a bunch of firewall rules that need setting. You can find the full list in the TechNet documentation.
For DHCP servers create an audit share
New-SmbShare -Name dhcpaudit -Path ‘C:\Windows\System32\dhcp’ -ReadAccess ‘manticore\IPAMUG’
Set-SmbShare -Name dhcpaudit -Description ‘DHCP audit share for IPAM’ -Force
## restart DHCP service
Get-Service -Name DHCPServer | Restart-Service -PassThru
Enable event log monitoring on the DNS servers
$csd = Get-ItemProperty -Path ‘HKLM:\SYSTEM\CurrentControlSet\Services\EventLog\DNS Server’ -Name CustomSD |
select -ExpandProperty CustomSD
$ipamsid = (Get-ADComputer -Identity W12R2SUS | select -ExpandProperty SID).value
$csd = $csd + “(A;;0x1;;;$ipamsid)”
Set-ItemProperty -Path ‘HKLM:\SYSTEM\CurrentControlSet\Services\EventLog\DNS Server’ -Name CustomSD -Value $csd –PassThru
I also had to manually add the IPAMUG group into the security permissions for the DNS servers. Didin’t seem to be a way to automate that bit.
IPAM has a PowerShell module – IpamServer – which contains lots of cmdlets:
Add-IpamAddress
Add-IpamAddressSpace
Add-IpamBlock
Add-IpamCustomField
Add-IpamCustomFieldAssociation
Add-IpamCustomValue
Add-IpamDiscoveryDomain
Add-IpamRange
Add-IpamServerInventory
Add-IpamSubnet
Disable-IpamCapability
Enable-IpamCapability
Export-IpamAddress
Export-IpamRange
Export-IpamSubnet
Find-IpamFreeAddress
Get-IpamAddress
Get-IpamAddressSpace
Get-IpamAddressUtilizationThreshold
Get-IpamBlock
Get-IpamCapability
Get-IpamConfiguration
Get-IpamConfigurationEvent
Get-IpamCustomField
Get-IpamCustomFieldAssociation
Get-IpamDatabase
Get-IpamDhcpConfigurationEvent
Get-IpamDiscoveryDomain
Get-IpamIpAddressAuditEvent
Get-IpamRange
Get-IpamServerInventory
Get-IpamSubnet
Import-IpamAddress
Import-IpamRange
Import-IpamSubnet
Invoke-IpamGpoProvisioning
Invoke-IpamServerProvisioning
Move-IpamDatabase
Remove-IpamAddress
Remove-IpamAddressSpace
Remove-IpamBlock
Remove-IpamConfigurationEvent
Remove-IpamCustomField
Remove-IpamCustomFieldAssociation
Remove-IpamCustomValue
Remove-IpamDhcpConfigurationEvent
Remove-IpamDiscoveryDomain
Remove-IpamIpAddressAuditEvent
Remove-IpamRange
Remove-IpamServerInventory
Remove-IpamSubnet
Rename-IpamCustomField
Rename-IpamCustomValue
Set-IpamAddress
Set-IpamAddressSpace
Set-IpamAddressUtilizationThreshold
Set-IpamBlock
Set-IpamConfiguration
Set-IpamCustomFieldAssociation
Set-IpamDatabase
Set-IpamDiscoveryDomain
Set-IpamRange
Set-IpamServerInventory
Set-IpamSubnet
Update-IpamServer
Now I’ve got my IPAM server up and running its time to see what I can do with it
Microsoft IPAM (IP Address Management) is a feature that was released in Windows Server 2012 to help administrators manage decentralized DHCP and DNS Servers. Previously administrators may have needed to use spreadsheets to keep track of DHCP Scopes, IP Addresses DNS Names etc but with IPAM installed, a single server can refresh all of this data and put it in a single, always up to date place.
Deployment Guidelines
There are a few things you should know before installing IPAM.
DO: Install on a Server that is joined to the domain.
DO: Install on a Server that has network connectivity to your DNS, DHCP and Domain Controllers. The IPAM Server needs to be able to directly communicate with the services that they provide.
DON’T: Install on a Domain Controller. This is not supported.
DON’T: Install on a DHCP Server. This will prevent IPAM from discovering other DHCP Servers and is not supported.
Install IPAM Role
The IPAM Server role is added like all the server roles in Server 2012. From the Server Manager go through the Add Roles and Features wizard. Make sure to select the IPAM Server under features.

Setup IPAM
Once IPAM has been installed, use Server manager and go through the steps which are neatly ordered 1-6. Connect Server Manager to the IPAM server you just installed.

Step 2 is to provision IPAM. A wizard will pop up and give you some instructions. On the second page of the wizard, you need to make a decision about whether you will manually configure all of your security groups, firewall rules, etc. on each of your DHCP Servers, DNS Servers and Domain Controllers. I chose to forgo this method and choose the default option of using Group Policy. Notice that you’ll be required to put in a GPO Prefix.

Review the Summary and take notice to the fact that three new GPOs will be configured, each starting with your GPO Prefix (in my case hollow_)

Now we move on to Step 3. Which is doing the server discovery. What Servers do you plan on managing with this IPAM Server? I’ve chosen all of the server types.

Step 4 will attempt to discover the server types that you’ve selected. In the Server Inventory will show your servers listed, but will have an alarm about the server manageability status. Before you can set the manageability status the GPOs have to be deployed. The GPOs that you created in the wizard earlier haven’t been deployed yet and need to be invoked from PowerShell.
Note: I’m not sure exactly why this is a separate step, and furthermore not sure why this couldn’t have been done from the same Server Manager window you’ve been running through all along. RANT OVER.

In order to deploy the GPOs, the “Invoke-IpamGpoProvisioning” cmdlet needs to be run from PowerShell.
Run from a PowerShell prompt.
Invoke-IpamGpoProvisioning -Domain DOMAINNAME -GpoPrefixName GPOPREFIX -IpamServerFQDN IPAMSERVERNAME.DOMAINNAME

When finished you should see your GPOs listed in Group Policy Management.
Go back to Server Manager and look at your inventory again. Click Edit Server.

Chose the server types you plan to manage and choose “Managed” as the manageability status.

Once this is complete you may see a Red X indicating an error. This is likely due to the GPO not being applied yet. If this happens you can login to the server in question and run the “GPupdate /Force” command to get the server to re-read the GPOs assigned to it.


When finished your Server inventory should look something like this.

IPAM USAGE
When you’ve finished your setup, you can use IPAM to do things like manage your IP Addresses, manage DNS Zones and review auditing and logs.

