
iphlpsvc aka IP Helper Service is a pre-installed program of Microsoft that comes automatically in your Windows 11 or 10. Mainly, this allows for tunnel connectivity through 6to4, ISATAP, Port Proxy, and Teredo, as well as IP-HTTPS. It also helps to recover and modify the network configuration settings of a local computer. To do so, it creates tunnel connectivity through IPv6 transition technologies. iphlpsvc works as a notifier too that keeps notifying the changes of the network configuration of local computer. When you disable the service, enhanced connectivity depending will also be stopped.
Multiple services that are present on your computer you hardly use. IP Helper or iphlpsvc is among these types. This service put in the system for people who may need them but disabling the same will not affect your system unless you run a remote database or you need tunnel connectivity. On the contrary, it is often found to be effective as iphlpsvc consumes a lot of memory in between all other resources.
Ways to Disable or Enable IP Helper Service in Windows 11 and 10 [iphlpsvc]
Here is How to Disable or Enable IP Helper Service in Windows 11 or 10 [iphlpsvc] –
You can use either Services console or Command prompt or Registry editor or System Configuration for the same purpose. We will discuss all of them one by one.
Using Services Console
Most convenient way to Disable or Enable IP Helper Service is using Services console. Here is how to proceed –
Step-1: Click on Windows search bar and type services.msc in the text field. Press Enter.
Step-3: On the running page, locate IP Helper located under Name column eventually make double-click on the same.
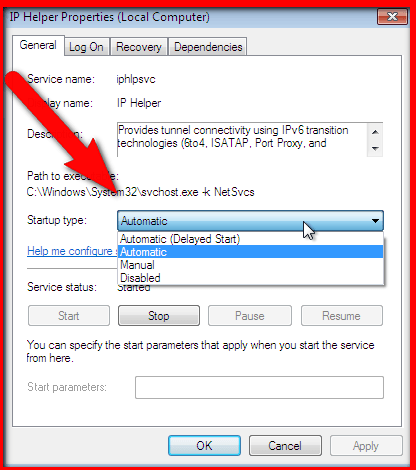
Step-4: Properties of the same service will make an appearance with General tab by default. Click on the dropdown adjacent to Startup type and select Automatic.
Step-5: Now, choose Start button to Enable IP Helper Service in Windows 11 or 10.
Step-6: In order to disable iphlpsvc, simply hit the Stop button.
Step-7: Lastly, click Apply followed by pressing OK button to save the changes.
Through Command Prompt
Follow the below steps to Disable or Enable IP Helper Service in Windows 11 or 10 using the Command Prompt –
- Right-click on Start icon and select Run from the Win+X menu.
- Type cmd.exe in the empty text field and hit Ctrl+shift+Enter keyboard shortcuts altogether to Launch Elevated Command Prompt.
- If a UAC prompts up, click Yes to give approval from your side.
- Type the following and hit Enter to execute –
net start iphlpsvc
This will Enable IP Helper Service instantly but if it doesn’t start that means the Startup type of this service is still Disabled.
- To change the Startup type, you need to execute the preferred command in elevated Command Prompt –
Automatic –
REG add “HKLM\SYSTEM\CurrentControlSet\services\iphlpsvc” /v Start /t REG_DWORD /d 2 /f
Manual –
REG add “HKLM\SYSTEM\CurrentControlSet\services\iphlpsvc” /v Start /t REG_DWORD /d 3 /f
Disabled –
REG add “HKLM\SYSTEM\CurrentControlSet\services\iphlpsvc” /v Start /t REG_DWORD /d 4 /f
Automatic (Delayed Start) –
REG add “HKLM\SYSTEM\CurrentControlSet\services\iphlpsvc” /v Start /t REG_DWORD /d 2 /f
- If you wish to disable IP Helper Service, run the below command –
net stop iphlpsvc
Enable IP Helper Service using Registry Editor
Modifying registry key is not much tough but incorrect operation might cause severe problems. Therefore, we suggest you do it at your own risk. Here is the procedure –
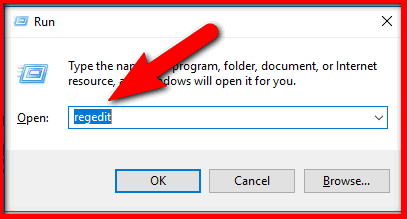
- Click on Taskbar search and type regedit in the text area.
- When the result comes into the view, hit Registry Editor option.
- A UAC will pop-up, click on Yes to continue.
- Once Registry Editor page shows up on the screen, navigate the following path –
HKEY_LOCAL_MACHINE\SYSTEM\CurrentControlSet\Services\iphlpsvc
Later on, shift to the right pane. Hit right-click on Start option and select Modify from the context menu.
In the Value data box, put preferred value followed by clicking OK button.
Automatic – 2
Manual – 3
Disabled – 4
Automatic (Delayed Start) – 2
Use System Configuration
Last way to Disable or Enable IP Helper Service is via System Configuration console. Let’s see the steps –
Step#1: Press “Windows+R” hotkey and let the Run dialog box come into appearance.
Step#2: Type “msconfig” in the available text box and hit Enter.
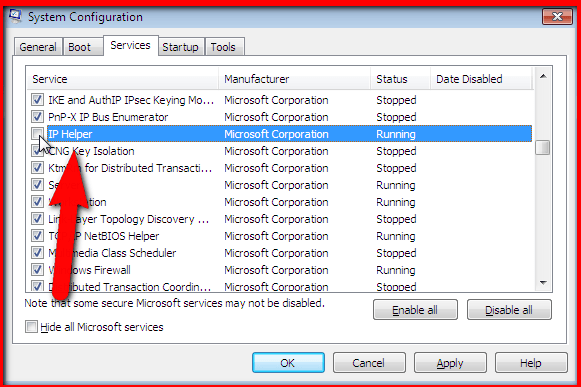
Step#3: When System Configuration wizard turns up in the display, move to Services tab.
Step#4: Locate IP Helper from the available services and uncheck the box located beside it to disable the same.
Step#5: If you want to keep the service Enabled, simply click on check the box located beside IP Helper.
Step#6: Once done, Click Apply and then OK button.
Step#7: To make the changes effective, Reboot the device.
That’s all!!
The Internet Protocol Helper Service (IP Helper) is a crucial component of Windows operating systems, including Windows 10 and Windows 11. This service facilitates various network-related functionalities, such as IPv6 support and communication across different network types. Though it’s typically beneficial for most users, there may be instances where you need to tweak its settings for troubleshooting network issues or optimizing system performance. In this detailed guide, we will explore how to enable or disable the IP Helper Service, as well as the implications of these actions.
Understanding the IP Helper Service
Before diving into how to enable or disable the IP Helper Service, it’s essential to understand its function. The service assists applications in managing Internet Protocol (IP) operations, including:
- IPv6 Support: It allows older applications to communicate over IPv6 without full-fledged support from the operating system.
- Dynamic DNS: Provides name resolution services and updates DNS records dynamically.
- Tunneling Protocols: Facilitates certain tunneling protocols that help connect disparate networks over the internet.
The service runs in the background and is generally set to start automatically when the operating system launches. While it generally enhances connectivity, in some scenarios—such as resource optimization or troubleshooting—disabling it may be beneficial.
Checking the Status of IP Helper Service
Before you can enable or disable the service, you need to check its current status. Here’s how you can do it using the Services application:
-
Open the Services application:
- Press
Windows + Rto open the Run dialog. - Type
services.mscand hitEnter.
- Press
-
Find the IP Helper Service:
- Scroll through the list of services to locate «IP Helper.»
- Look at the «Status» column; if it says «Running,» it is currently enabled.
-
View the Startup Type:
- Right-click on «IP Helper» and select «Properties.»
- In this window, you will see the «Startup type» drop-down menu, showing whether it’s set to Automatic, Manual, or Disabled.
How to Enable the IP Helper Service
To enable the IP Helper Service if it is currently disabled or set to Manual, you can follow these steps:
Method 1: Using Services Application
-
Open Services:
- Press
Windows + R, typeservices.msc, and hitEnter.
- Press
-
Access IP Helper Properties:
- Locate «IP Helper» from the list, right-click on it, and select «Properties.»
-
Change the Startup Type:
- In the properties window, find the «Startup type» drop-down menu.
- Set it to «Automatic» to ensure it starts with the system.
-
Start the Service:
- Click on the «Start» button within the properties window to launch the service immediately.
-
Apply Changes:
- Click «OK» to apply the changes and close the window.
Method 2: Using Command Prompt
Alternatively, you can enable the IP Helper Service via the Command Prompt:
-
Open Command Prompt as Administrator:
- Press
Windows + Xand choose «Terminal (Admin)» or search for “cmd” in the Start Menu, right-click on it, and select «Run as administrator.»
- Press
-
Enter the Command:
- Type the following command to enable the service:
sc config iphlpsvc start= auto
- Type the following command to enable the service:
-
Start the Service:
- Type this command to start the service:
net start iphlpsvc
- Type this command to start the service:
-
Verify:
- To check if the service has started correctly, you can use the command:
sc query iphlpsvc
- To check if the service has started correctly, you can use the command:
Method 3: Using PowerShell
If you prefer using PowerShell, you can enable the service with these commands:
-
Open PowerShell as Administrator:
- Search for «PowerShell» in the Start Menu, right-click, and select «Run as administrator.»
-
Enable the Service:
- Run the following commands:
Set-Service -Name iphlpsvc -StartupType Automatic
Start-Service -Name iphlpsvc
- Run the following commands:
How to Disable the IP Helper Service
Disabling the IP Helper Service can be useful for troubleshooting or if you are experiencing issues related to networking. Here’s how to do it:
Method 1: Using Services Application
-
Open Services:
- Press
Windows + R, typeservices.msc, and hitEnter.
- Press
-
Access IP Helper Properties:
- Locate «IP Helper» from the list and right-click on it, then select «Properties.»
-
Change the Startup Type:
- In the properties window, change the «Startup type» to «Disabled.»
-
Stop the Service:
- Click on the «Stop» button to disable the service immediately.
-
Apply Changes:
- Click «OK» to save your changes and close the window.
Method 2: Using Command Prompt
You can also disable the service via the Command Prompt:
-
Open Command Prompt as Administrator:
- Press
Windows + Xand select «Terminal (Admin).»
- Press
-
Enter the Command:
- Type the following command to disable the service:
sc config iphlpsvc start= disabled
- Type the following command to disable the service:
-
Stop the Service:
- Type this command to stop the service if it is running:
net stop iphlpsvc
- Type this command to stop the service if it is running:
-
Verify:
- You can use this command to check the status of the service:
sc query iphlpsvc
- You can use this command to check the status of the service:
Method 3: Using PowerShell
To disable the service with PowerShell:
-
Open PowerShell as Administrator:
- Search for «PowerShell» in the Start Menu, right-click, and select «Run as administrator.»
-
Disable the Service:
- Run the following commands:
Set-Service -Name iphlpsvc -StartupType Disabled
Stop-Service -Name iphlpsvc
- Run the following commands:
Implications of Enabling or Disabling IP Helper
While enabling or disabling the IP Helper Service is relatively straightforward, understanding the implications of these actions is essential for optimal system performance.
Enabling IP Helper
Enabling the IP Helper Service has several benefits, including:
- Improved Connectivity: It enhances network connectivity and allows older applications to work smoothly with newer IP protocols.
- IPv6 Support: If you are using applications that rely on IPv6, enabling this service is crucial for proper functionality.
- Tunneling Applicability: Applications that require tunneling can function correctly with this service active.
However, enabling it may consume additional system resources and could potentially cause conflicts with specific network configurations or software, particularly if you’re trying to optimize performance.
Disabling IP Helper
On the other hand, disabling the service may have its own set of pros and cons:
- Resource Optimization: Disabling the service can free up system resources, which can lead to improved performance, especially on older hardware or systems with limited capabilities.
- Troubleshooting Network Issues: If you experience network problems, disabling this service could help pinpoint conflicts with other network services or software.
However, disabling it comes with some risks, including:
- Loss of IPv6 Functionality: Applications requiring IPv6 may run into issues or fail to connect properly.
- Compatibility Issues: Some older applications may not operate correctly if they expect the service to be running.
- Dynamic DNS Problems: If you’re relying on dynamic DNS updates, you may find that they cease working properly.
Conclusion
The IP Helper Service plays a vital role in managing Internet Protocol operations in Windows 10 and Windows 11. Whether you choose to enable or disable this service should depend on your specific requirements, such as whether you need IPv6 connectivity or tunneling protocols.
Being adept at these adjustments can not only help optimize your system but also assist in troubleshooting network-related issues you may encounter. Always consider the implications of enabling or disabling the service and evaluate how it may affect your applications and network environment.
By following the steps outlined in this article, you can successfully manage the IP Helper Service on your Windows 10 or Windows 11 system, ensuring that your network experience is as seamless and efficient as possible. Remember to periodically check your network settings and service status to maintain an optimized system.
Provides tunnel connectivity using IPv6 transition technologies (6to4, ISATAP, Port Proxy, and Teredo), and IP-HTTPS. If this service is stopped, the computer will not have the enhanced connectivity benefits that these technologies offer.
This service also exists in Windows 11, 8 and Vista.
Startup Type
| Windows 10 version | Home | Pro | Education | Enterprise |
|---|---|---|---|---|
| 1507 | Automatic | Automatic | Automatic | Automatic |
| 1511 | Automatic | Automatic | Automatic | Automatic |
| 1607 | Automatic | Automatic | Automatic | Automatic |
| 1703 | Automatic | Automatic | Automatic | Automatic |
| 1709 | Automatic | Automatic | Automatic | Automatic |
| 1803 | Automatic | Automatic | Automatic | Automatic |
| 1809 | Automatic | Automatic | Automatic | Automatic |
| 1903 | Automatic | Automatic | Automatic | Automatic |
| 1909 | Automatic | Automatic | Automatic | Automatic |
| 2004 | Automatic | Automatic | Automatic | Automatic |
| 20H2 | Automatic | Automatic | Automatic | Automatic |
| 21H1 | Automatic | Automatic | Automatic | Automatic |
| 21H2 | Automatic | Automatic | Automatic | Automatic |
| 22H2 | Automatic | Automatic | Automatic | Automatic |
Default Properties
| Display name: | IP Helper |
| Service name: | iphlpsvc |
| Type: | share |
| Path: | %WinDir%\System32\svchost.exe -k NetSvcs -p |
| File: | %WinDir%\System32\iphlpsvc.dll |
| Error control: | normal |
| Object: | LocalSystem |
| Privileges: |
|
Default Behavior
The IP Helper service is running as LocalSystem in a shared process of svchost.exe. Other services might run in the same process. If IP Helper fails to start, the error is logged. Windows 10 startup proceeds, but a message box is displayed informing you that the iphlpsvc service has failed to start.
Dependencies
IP Helper is unable to start, if at least one of the following services is stopped or disabled:
- NetIO Legacy TDI Support Driver
- Network Store Interface Service
- Remote Procedure Call (RPC)
- TCP/IP Protocol Driver
- Windows Management Instrumentation
- WinHTTP Web Proxy Auto-Discovery Service
If IP Helper is stopped, the Network Connectivity Assistant service fails to start and initialize.
Restore Default Startup Type of IP Helper
Automated Restore
1. Select your Windows 10 edition and release, and then click on the Download button below.
2. Save the RestoreIPHelperWindows10.bat file to any folder on your hard drive.
3. Right-click the downloaded batch file and select Run as administrator.
4. Restart the computer to save changes.
Note. Make sure that the iphlpsvc.dll file exists in the %WinDir%\System32 folder. If this file is missing you can try to restore it from your Windows 10 installation media.
Yea, though I walk through the valley of the shadow of death, I will fear no evil: for thou art with me; thy rod and thy staff they comfort me.
Provides tunnel connectivity using IPv6 transition technologies (6to4, ISATAP, Port Proxy, and Teredo), and IP-HTTPS. If this service is stopped, the computer will not have the enhanced connectivity benefits that these technologies offer.
Default Settings
| Startup type: | Automatic |
| Display name: | IP Helper |
| Service name: | iphlpsvc |
| Service type: | share |
| Error control: | normal |
| Object: | LocalSystem |
| Path: | %SystemRoot%\System32\svchost.exe -k NetSvcs -p |
| File: | %SystemRoot%\System32\iphlpsvc.dll |
| Registry key: | HKEY_LOCAL_MACHINE\SYSTEM\CurrentControlSet\Services\iphlpsvc |
| Privileges: |
|
Default Behavior
IP Helper is a Win32 service. In Windows 10 it is starting automatically when the operating system starts. Then the IP Helper service is running as LocalSystem in a shared process of svchost.exe along with other services. If IP Helper fails to start, the failure details are being recorded into Event Log. Then Windows 10 will start up and notify the user that the iphlpsvc service has failed to start due to the error.
Dependencies
IP Helper cannot be started under any conditions, if the following services are disabled, deleted or working improperly:
- NetIO Legacy TDI Support Driver
- Network Store Interface Service
- Remote Procedure Call (RPC)
- TCP/IP Protocol Driver
- Windows Management Instrumentation
- WinHTTP Web Proxy Auto-Discovery Service
While IP Helper is stopped, the Network Connectivity Assistant service cannot be launched.
Restore Default Startup Configuration of IP Helper
Before you begin doing this, make sure that all the services on which IP Helper depends are configured by default and function properly. See the list of dependencies above.
1. Run the Command Prompt as an administrator.
2. Copy the commands below, paste them into the command window and press ENTER:
sc config iphlpsvc start= auto
sc start iphlpsvc
3. Close the command window and restart the computer.
The iphlpsvc service is using the iphlpsvc.dll file that is located in the C:\Windows\System32 directory. If the file is removed or corrupted, read this article to restore its original version from Windows 10 installation media.

The Windows service which provides tunnel connectivity using IPv6 transitions technology like 6to4, ISATAP, Port Proxy, and Teredo using IP-HTTPS. Whenever the service is stopped your computer will not have the tunnel connectivity benefits that this technology offers.
These are the main service for the computer in terms of having the connectivity. We know that these days we simply cannot do anything without internet connectivity and when it comes to establishing a connection there are certain things that we should be wary of. IPHLPSVC refers to the Internet Protocol Helper (IP Helper) API which allows the modification of network configuration settings for your computer.

Also, Read – How to apply update from ADB Sideload
Our computer doesn’t need the IP helper (IPHLPSVC) service to run but the Homegroups network functionality requires it to work. The IP Helper service provides many advanced connectivities functionality to the PC. Like the HomeGroup and IPv6 transitions depends mostly on the IPHLPSVC services. This service starts automatically and can be executed from C:\windows\System32\svchost.exe -k NetSvcs.
When it comes about IPHLPSVC there should be a valid program needed to run for its startup. The iphlpsvc.dll is an executable file on our computer. This file mainly contains the machine code. When we run the computer with Windows on it the iphlpsvc executes on our PC and then its loaded into the memory (RAM) and then it runs its processes which is called tasks. This is the main program which works especially to start the service to work smoothly. Some of the main technology are ISATAP, Teredo and Port Proxy. These are the main things we should keep in mind for different stages of the working process which will help us to bring out all the benefits of the Technologies. This is an application created by Microsoft and you can remove it if you no longer use the Windows operating system.
Running too many services might affect the performance of your computer and to reduce this load we can manually disable these services. These processes aren’t CPU intensive but sometimes it may reduce the PC performance. We can use tools provided by Microsoft like the MSConfig (Microsoft System Configuration Utility or the Windows Task Manager to find these running services manually and disable the process that launches automatically on Windows Startup.
In this article, we will cover IP Helper IPHLPSVC services tuning in Windows 7 and Windows 10 by 3 methods mainly Services.msc, registry editing and Microsoft Configuration.
Method 1: How to start and Stop IPHLPSVC using Services.msc
The Service console Services.msc helps up in enabling and disabling windows services. These programs are system level and start when the Windows boots up. It doesn’t require any user to be logged in to the Windows operating system and can be run from the command prompt. This service console can be used to start the process or stop the process. We need to handle step by step process in order to establish the connectivity it also needs to follow certain instructions at the right time to show the performance by either starting the process or stopping it. Now let’s process further on the instructions.
- So the very first thing we have to do is to click on the start button. In Windows 7 it’s the pearl icon with Windows logo on it located at the button left corner of the screen. On Windows 10 it’s the button with a Windows logo in white located at the bottom left corner of the screen.

- Once you have opened the Start menu we have to search the program services.msc. For Windows 7 look for “Search Program and files” and on Windows 10 look for the search bar and enter “services.msc” and press Enter key. This step involves opening the service console program now let’s proceed further.
- This will open up a new window for the Service console. Now locate the IP Helper which mainly carries the processes. We have to do certain modifications in the file. Now open the IP Helper properties by clicking “IP Helper” on the services console.

- Again a new small window will popup you can see 4 tabs on the top. General, Log on, Recovery and Dependencies. Now open the general tab and search for “Startup type” option. The Dropdown menu has 4 options Automatic, Automatic Delayed, Manual, and Disabled. From the drop-down menu select Disabled. By Default, the Automatic Delayed option is selected we need to change that to start or stop the process manually. Now choose the option “Automatic” Now click on the OK button and close the properties windows then the Service console window.
- That’s it, this was the procedure we had to follow to step by step to disable the IP helper service manually using services.msc console in Windows 7 and Windows 10. Now let’s check out another process we can follow to tune the IP Helper.
Method 2: Using the Registry Editor
Registry Editor contains a vast variety of Windows Configuration settings. Third Party installed software can also use the Registry to store their settings. These settings aren’t revealed to the Normal user from there you can change a wide variety of Settings. These are referred to the term Registry Hack or Registry Tweaks. You should also be careful while playing with the registry editor if you don’t know what you are doing then make sure not to delete anything or change any settings. By using Registry editor we can help to show about startup change in the type of IP.
- So the very first thing we have to do is to click on the start button. In Windows 7 it’s the pearl icon with Windows logo on it located at the button left corner of the screen. On Windows 10 it’s the button with a Windows logo in white located at the bottom left corner of the screen.

- Once you have opened the Start menu we have to search the program services.msc. For Windows 7 look for “Search Program and files” and on Windows 10 look for the search bar and enter “regedit” and press Enter key. This step involves opening the Registry editor program now let’s proceed further.
- A small dialogue box will appear asking you to confirm user Account control. Now allow it by pressing the Yes button and proceed to further steps.
- Now look for iphlpsvc on the left panel and click on it. Now click on Start file on the panel located at the right side.
- The change of settings here is in Binary so you have to enter either 1 or 0. You need to change the startup type from one of the following Automatic, Manual, Disabled, and Automatic (Delayed Start). You have to replace 1 with 0 and 0 with 1 to make the change in settings.
- Now let’s see how you can stop IP Helper by using the Registry editor: Go to HKEY_LOCAL_MACHINE\SYSTEM\CurrentControlSet\services\iphlpsvc and check the Start Registry key
- Now double click on Start file and then edit the value in the new dialogue box which opened.
- Change Startup Type to – Automatic – 2, Manual – 3, Disabled – 4, Automatic (Delayed Start) – 2.
- Now enter the digit 2 in the Value data box and click on OK to close the Window.
- That’s it!! This was the important step to Stop IP Helper using Registry editor.
Method 3: Using CMD (Command Prompt)
CMD or Command Prompt is a command line interface (CLI). The Command Prompt is an executable CLI Program and can be executed from cmd.exe. It is a powerful tool that isn’t even available through GUI tools. CMD is referred to Command Shell and its officially called Windows Command Processor. To use the command prompt we must enter a valid command prompt command with its optional parameters. There is a large number of command exists for Windows 7 and 10 and with the help of those commands, we will guide you on how to stop IP Helper using CMD. It is the main method to start or stop functions with the change IP Helper using Command Prompt.
- So the very first thing we have to do is to click on the start button. In Windows 7 it’s the pearl icon with Windows logo on it located at the button left corner of the screen. On Windows 10 it’s the button with a Windows logo in white located at the bottom left corner of the screen.
- Once you have opened the Start menu we have to search the program services.msc. For Windows 7 look for “Search Program and files” and on Windows 10 look for the search bar and enter “cmd” and press Enter key. This step involves opening the Command prompt window program now let’s proceed further.
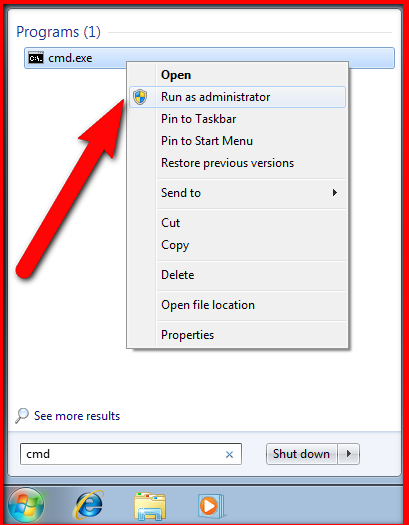
- Now open a command prompt as “Run as administrator” and also allow user Account control by pressing the Yes button. This will open up the CMD window.
- Copy the registry key by pressing right click on the Command Prompt Window before pressing the enter button.
- Now let’s proceed further on how to start or stop IP Helper using the Command Prompt, You should enter keywords like “net stop iphlpsvc” by using this command you can change settings between Automatic, Manual, Disabled and Automatic Delayed Start.
- That’s it, You have successfully stopped the IP Helper services using the “net stop iphlpsvc” command in the Command Prompt WIndow.
Method 4: Using Ms. Configuration
Microsft System Configuration Utility also knew as Msconfig is a Microsoft Utility tool that was introduced back with Windows 98 and was carried forward to all later Windows version. This Configuration utility tool configures how a computer starts and what program or services loads when the Windows Operating System Starts up. By using Msconfig we can also start or stop IP Helper services with ease. Now let us guide you on how to stop IP Helper Service using Ms Configuration,
- So the very first thing we have to do is to click on the start button. In Windows 7 it’s the pearl icon with Windows logo on it located at the button left corner of the screen. On Windows 10 it’s the button with a Windows logo in white located at the bottom left corner of the screen.
- Once you have opened the Start menu we have to search the program services.msc. For Windows 7 look for “Search Program and files” and on Windows 10 look for the search bar and enter “MSConfig” and press Enter key. This step involves opening the Microsft Service Configuration Utility program now let’s proceed further.
- Now a new Window will popup having 5 main tabs General, Boot, Services, Startup, and tools.
- Now click on the services tab and locate IP Helper, Now uncheck the small box on the left side of IP Helper, this will stop the IP Helper service to open on Startup.
- Now click on Ok button to close the dialogue box.
- That’s it, you have now disabled the IP Helper Services using MSconfig or Microsoft Service Configuration Utility tool.
These were some of the available methods on stopping the IP Helper services from starting automatically. Make sure to follow the Step by Step guide and not change any extra settings. You can disable the IP Helper by using any of the 3 methods listed above, if one method doesn’t work for you then you can try another method. This will disable the IP Helper from working.
Final Words
So this was a step by step guide on how to disable the IP Helper service by using some of the common methods available. You can get a chance to go over with all the functions which provide the tunnel connectivity by using IPv6. Hope we made it clear to you with better understandings for anyone wondering about iphlpsvc. If you want to know further details you can search over the web. If you face any problem in any steps don’t hesitate to let us know in the comments below we will be happy to help you out with whatever problem you are facing.
Important Note: Before changing or deleting any services make sure you know what you are doing. We will not be responsible if something went wrong. Always make sure to create a backup System restore point. In case anything went wrong, so you can just restore it and everything will be back to normal. To create a System restore point Open the Start Menu and Search for “Create Restore Point” and click the result System Properties. Under the System Protection Settings select the main system drive and click create button. Now Enter a description which will help you to identify the correct restore point, Now click on Create and Press Ok. This will create you a backup point for you to restore original settings in case something went wrong.