
-
Home
-
News
- How To Invert Colors On Windows 10 Easily
By Sarah |
Last Updated
You can see clearly the content on a webpage most of the time. But in some rare cases, you’ll access a page that’s hard to look at. In addition, in order to help those people with impaired vision see things more clearly, Microsoft allows them to invert colors. This post shows you how to invert colors on Windows.
Whether you can work properly on a computer is based on what you can see on the screen. Considering this, Microsoft adds a series of features to Windows to help people with color blindness or vision problems see what they’re looking at clearly.
If you have deleted files mistakenly or encountered other problems, please turn to MiniTool Solution to get help.
What’s built into Windows to help users with impaired vision?
- High contrast mode: it replaces colors with defaults or user-set values.
- An on-screen magnifier: it is used to see small icons easier.
- A dark mode: it turns your screen into dark instantly to make the light from your screen less intense.
- Inverted colors: it will flip the bits that make up the pixels on the screen so that all the colors will turn to the opposite.
But the question is how you can invert colors.
How To Enable Windows 10 Dark Mode – Here’s A Detailed Tutorial!
Invert Colors Windows 10
Do you want to get a color inverter to see your screen more clearly? Different ways will be demonstrated in this part to show you how to invert colors easily on your computer. I will focus on how to invert colors on Windows.
Use Magnifier as Color Inverter
- Press Windows + S buttons on the keyboard to open search box.
- Type magnifier into the textbox.
- Choose Magnifier (Desktop app) from the search result. (You can also open Magnifier directly by pressing Windows and + buttons.)
- Click on the Options button in the far right corner.
- Scroll down in the right panel to find and check Invert colors. (You can also access Windows 10 invert colors by pressing Ctrl + Alt + I.)
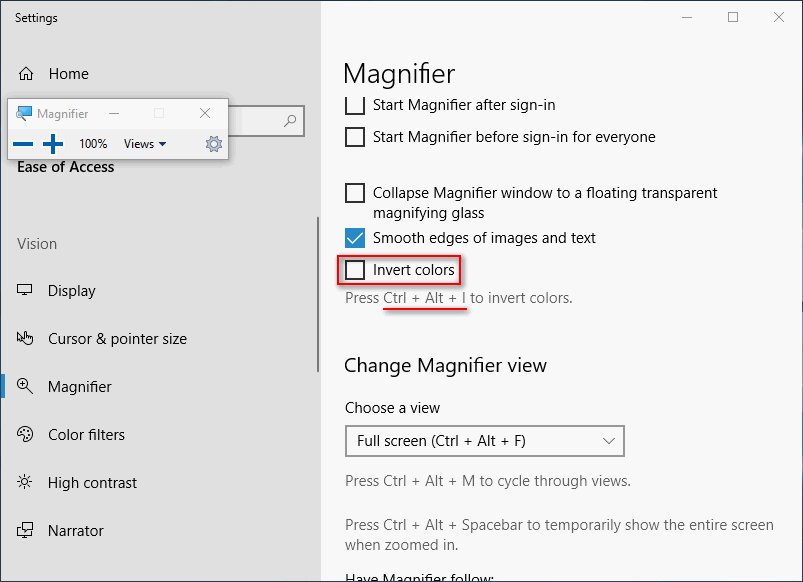
How to invert colors Windows 10 by using Settings app?
- Press Windows + I to open Settings app.
- Choose Ease of Access from the menu.
- Select Magnifier from the left sidebar.
- Look for Invert colors option in the right panel and check it.
Attention please:
- You can uncheck Invert colors or press Ctrl + Alt + I to disable inverted colors.
- The inverted color effect will disappear as soon as you close the Magnifier.
- The last used settings of Magnifier will be remembered, so the Magnifier will show inverted colors if you open it again without disabling the effect in advance.
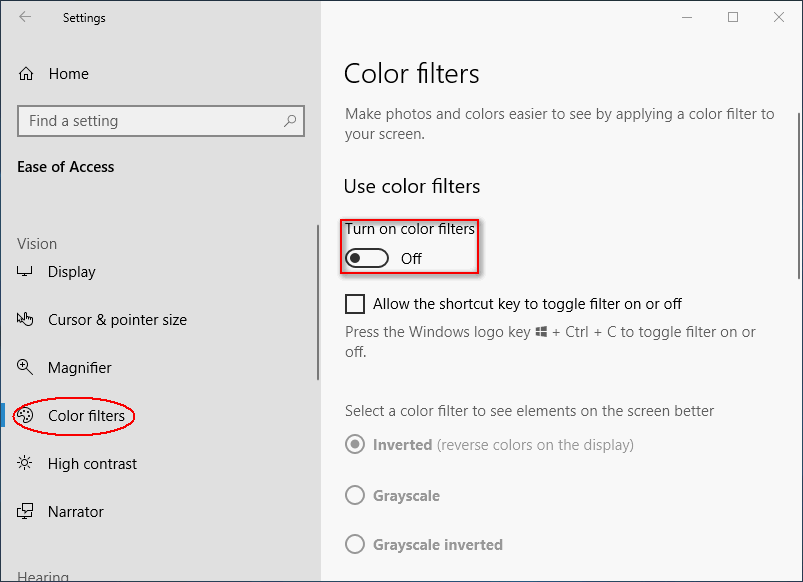
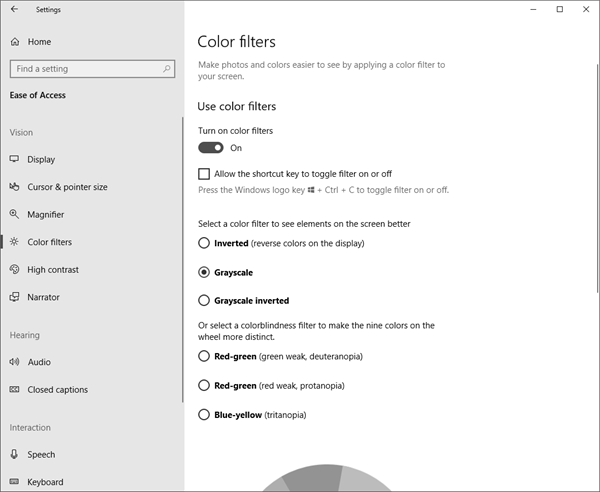
Invert Colors through Color Filters
- Open Settings app by pressing Windows + I or through other ways.
- Also, select Ease of Access from the Settings window.
- Choose Color filters (it’s Color & high contrast in some editions) option from the left sidebar.
- Look for Use color filters section in the right panel.
- Switch the toggle under the Turn on color filter option to On.
- Choose Inverted (reverse colors on the display) for Select a color filter to see elements on the screen better.
You can also check Allow the shortcut key to toggle filter on or off.
Make Use of High Contrast Mode
- Click on Start button in the lower left corner of your PC screen.
- Choose Settings option from the left sidebar of Start menu.
- Also, you need to click Ease of Access.
- Select High contrast from the left panel.
- Switch the toggle under the Turn on high contrast option to On.
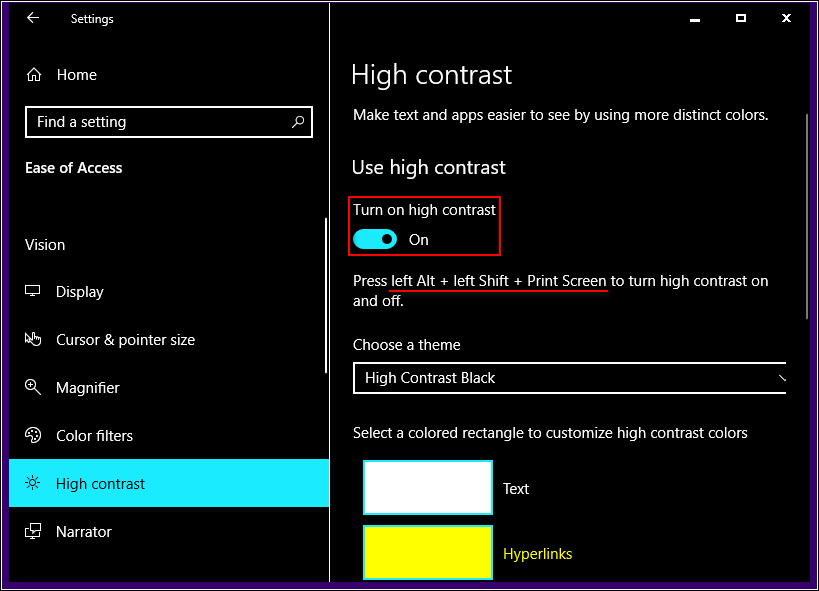
What’s more to know about high contrast?
- You can choose a theme for the high contrast effect.
- You can also press left Alt + left Shift + Print Screen and click Yes to turn high contrast on directly. Then, press left Alt + left Shift + Print Screen to turn high contrast off.)
Besides, Microsoft adds a dark theme to some of the apps running on Windows.
Windows 10 Mail App Dark Theme Appeared In The Latest Update.
About The Author
Position: Columnist
Sarah has been working as an editor at MiniTool since she graduated from university. Sarah aims at helping users with their computer problems such as disk errors and data loss. She feels a sense of accomplishment to see that users get their issues fixed relying on her articles. Besides, she likes to make friends and listen to music after work.

Today, in this article I am going to describe an unusual problem – inverted colors on Windows 10.
Many Windows 10 users are found reporting about the inverted colors on Windows 10 problem and searching for the solutions to fix it.
Well, the Screen Colors Inverted Windows 10 is not a very common problem but can be big trouble on your PC.
And while talking about the invert colors on Windows 10, display or color issues, here check out some of the common problems.
1: Windows 10 Desktop Colors stuck on Inverted – This is the common problem faced by Windows 10 users if unintentionally applied a “Color Filter”, which is hidden within ease-of-access settings. And to fix it you need to go to Color & High contrast settings and from there choose off under the “Apply color filter” option.
2: Inverted colors and unable revert to normal display – It seems this issue due to unexpectedly starting an option and to fix it simply perform a system restore.
3: Invert colors Windows 10 hotkey, keyboard shortcut – You can fix the issue with inverted colors by using a single keyboard shortcut. And the shortcut key is left Alt + left Shift + Print Screen, try it.
4: Inverted colors on Dell & HP laptop – Many laptops users reported this issue so, make sure to follow the solutions.
So, below follow the fixes given one by one to fix invert colors on Windows 10. But before heading toward the fixes learn the reasons for inverting colors on Windows.
Why Are My Colors Inverted on PC?
Well, the process of altering color and contrast settings of Windows is called a Color inversion. And altering Windows display settings makes the visibility of screen more manageable to the people having poor vision.
Despite this, there are other reasons as well for inverting colors on PC. Such as:
- Provide relief from eyestrains,
- Helps in getting better night’s sleep after using the computer for a long day
- Or just to give different look to your screen
So, these are some of the reasons why computer screen inverted colors. But still, some users reported they are facing problem with the inverted colors on Windows 10.
So below follow the steps to fix inverted colors or high contrast issue on Windows 10.
In order to fix computer screen that has invert colors Windows 10 try the fixes like use the magnifier tool to turn off invert colors on Windows 10, change ease of access settings, use Windows dark mode, and change your registry entries.
Fix 1 – Turn Off Invert Colors
Well, the inverted colors on Windows 10 can be a problem caused by the Magnifier. This is an inbuilt tool that is responsible for inverting image color and allows zooming certain parts of the screen to make it appear better.
Moreover, this tool can also invert colors so here learn how to invert colors on Windows 10?
Follow the steps to do so:
- Press Windows Key and (+) key > open the Magnifier tool.
- Now press Ctrl + Alt + I > and click the toggle to turn on and off invert colors on the screen.
And in this way you can turn off invert colors on Windows 10 PC and everything starts working properly.
Fix 2 – Modify Ease of Access Settings
It is also found that sometimes the inverted color issues appear due to the Ease of Access settings. So check if you have accidentally enabled any of these features then this might cause an issue with the colors.
So, to fix the problem you need to change the Ease of Access settings.
Follow the steps to do so:
- Press Windows key + I shortcut to open the Settings app
- And as the Settings app opens > go to Ease of Access section.
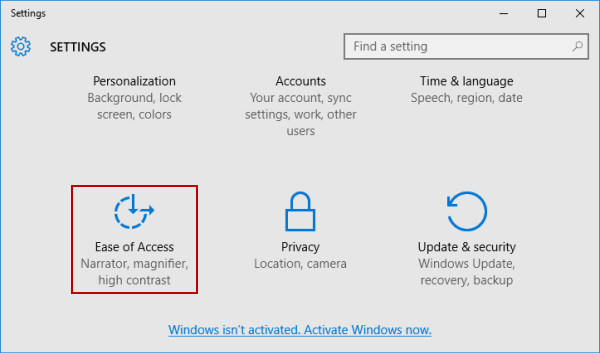
- Now from the menu > choose High Contrast
- Then in the right side disable the Turn on high contrast
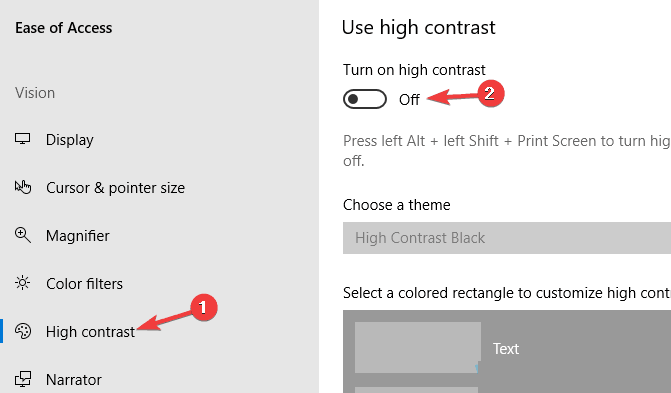
Well, if the option is already disabled, press Alt + left Shift + Print Screen to turn off the high contrast quickly.
Or else you can set the high contrast theme to None hope this works for you to fix inverted colors Windows 10 problem.
But if not then head to the next solution to fix inverted colors/high contrast issue on Windows 10.
Fix 3 – Disable Visual Notifications for Sounds Feature
Another possible reason for your screen invert color is the Visual notifications for sound. If this option is enabled, then your screen will invert colors whenever sound is played.
So, try disabling this feature and this worked for many users to fix invert colors Windows 10.
Follow the steps to do so:
- Press Windows + S key > type control panel.
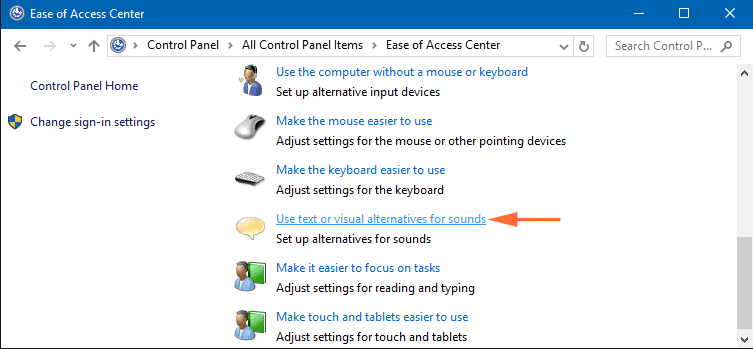
- Now choose Control Panel for the list > and navigate to Ease of Access Center
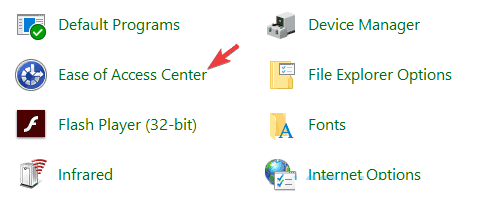
- Choose Use text or visual alternatives for sounds
- And disable Turn on visual notifications for sounds (Sound Sentry) > click Apply > OK to save the changes.
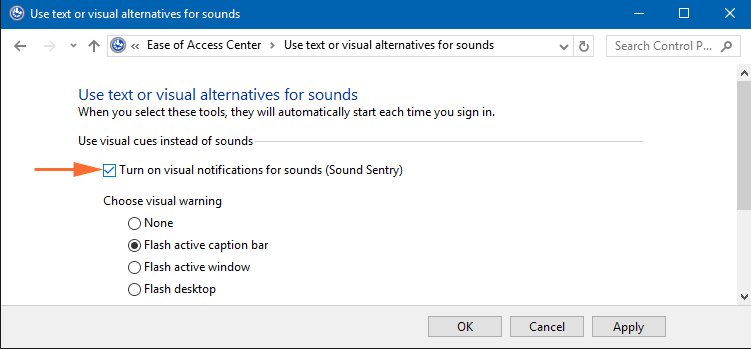
It is estimated after making these changes, the inverted colors on Windows 10 issues is resolved.
Fix 4 – Check the Graphics Card Settings
As per the users, sometimes the inverted colors issue appears on the PC due to the graphics card settings. Well, the entire graphics cards have their software that allows the users to configure all types of graphics-related settings.
So if your colors are inverter than check if you have enabled the Stereoscopic 3D feature. Here you need to disable it and to do so open Nvidia Control Panel or the Catalyst Control Panel and look for this feature.
As you find this feature > disable it. And check if the invert colors Windows 10 problem is fixed or not.
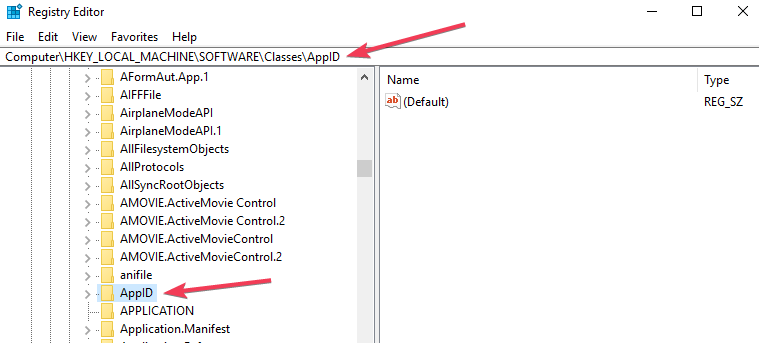
Fix 5 – Check your Registry
Well if still, you are looking how to fix inverted colors on Windows 10 then here it is suggested to verify your registry entries.
As we know the registry holds all sorts of computer settings and if any one of these settings is not configured properly, then the colors might become inverted.
So, here it is suggested to edit your registry entries.
But if you are not tech-savvy then avoid following the manual steps as a single mistake can damage your complete system.
So, in this situation, it is best to go for the automatic Registry Repair Tool. This is advanced that just by scanning once detects and fixes the registry related issues and errors.
Follow the steps to do so:
- Press Windows Key + R > type regedit > hit Enter
- As the Registry Editor opens > navigate to the below-given commands
- HKEY_CURRENT_USER\Software\Microsoft\ScreenMagnifier
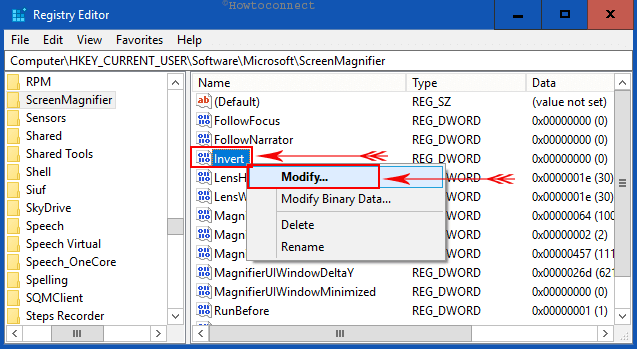
- Then in the right pane > double-click the Invert DWORD to open
- And as the properties window opens > assure the Value data is set to 0 > click OK to save changes.
It is estimated now the inverted colors Windows 10 problem is resolved.
Fix 6 – Reinstall Graphics Card Drivers
It is also seen the invert colors Windows 10 issue appears due to the graphics card driver issues. And to fix it try reinstalling your graphics card drivers completely.
Follow the steps to reinstall your drivers:
- Press Win + X menu > from the list choose Device Manager
- Next, locate your graphics card driver > right-click on it > select Uninstall device from the menu.
- Make sure to checkmark the Remove driver software for this device option > click on Uninstall to confirm
- And after removing the driver Scan for hardware changes icon > to install default driver.
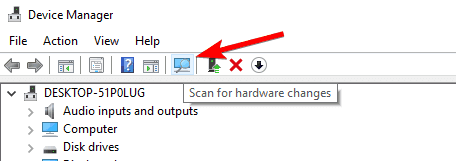
Well doing this step will allow you to install the current driver and switch to the default one.
However, you can also run the driver booster to update the drivers automatically and also fix driver-related issues.
Get Driver Updater to update the drivers automatically
Fix 7 – Try Running Windows in Safe Mode
If the above-given fixes won’t work for you then here it is suggested to start the PC in Safe Mode.
So to fix inverted colors on Windows PC it is suggested to try to boot Windows in Safe Mode.
Follow the steps to start the PC in Safe Mode:
- Open the Settings app > move to Update & Security section.
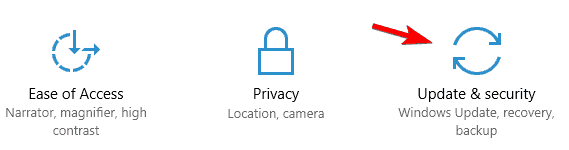
- Now from the menu choose Recovery > click the Restart now button.
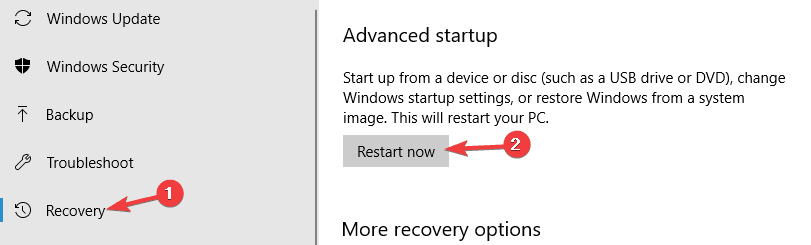
- And choose Troubleshoot > Advanced options > Startup Settings. And click the Restart button.
- As the system restart a list of options appears > choose the Safe Mode with Networking option
As you start the Windows in Safe Mode > check if the issue is resolved or not.
Fix 8 – Perform System Restore
If the invert colors Windows 10 problem still persists then, there are chances that one of the settings is causing the problem. Perform a system restore to fix inverted colors in Windows.
Follow the steps to do so:
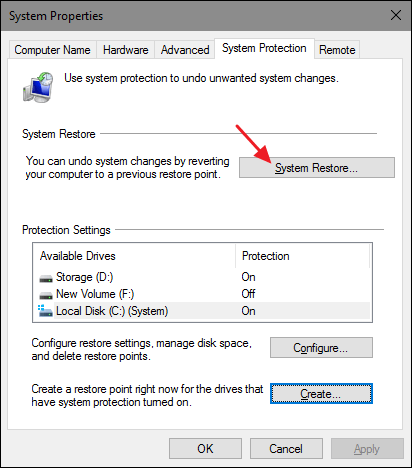
- Press Windows + S key > type system restore and click on create a restore point
- Select System protection from the system properties Window
- Click on system restore
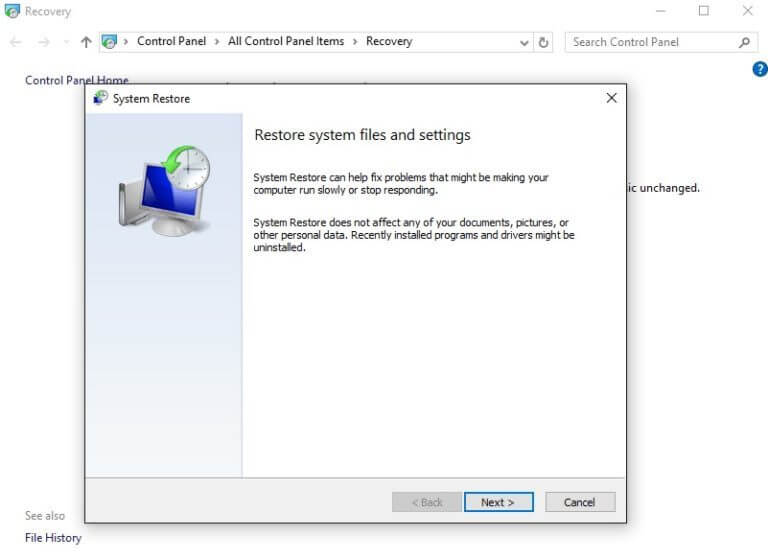
- A system restore window will open, click on Next button
- Now, click on show more restore points option > select the restore point that you want to return and click on Next button
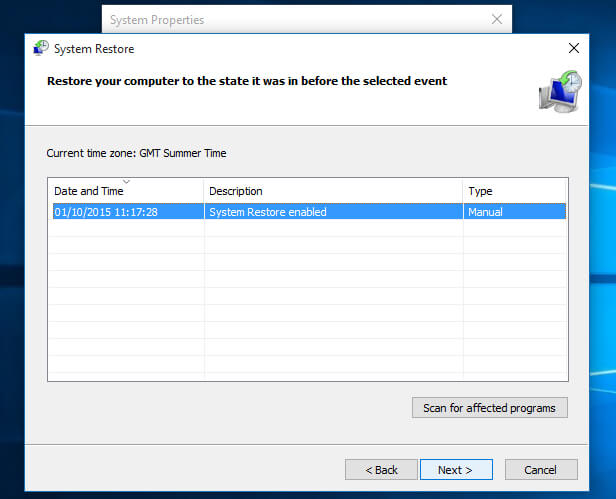
- Follow the instructions appearing on the screen to complete the restore process.
After the restoration process is completed, check whether the inverted colors Windows 10 problem is solved or not.
Fix 9 – Enable Windows Dark Mode
Here is another feature of Windows that uses dark screen colors in the dark mode. This is a color scheme or the graphical theme that is used for text, screen background, Windows and additional elements on-screen.
To check whether the dark mode is suitable for you, perform the steps given below:
- Click on Start >go to Settings.
- Select Personalization > click on Colors.
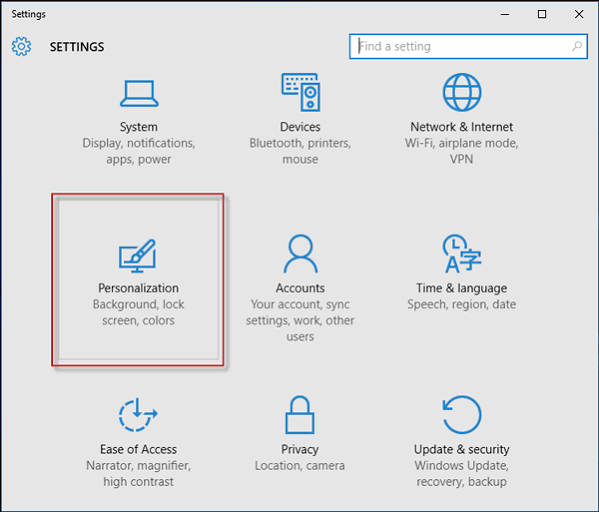
- Select Dark as default app mode from the bottom.
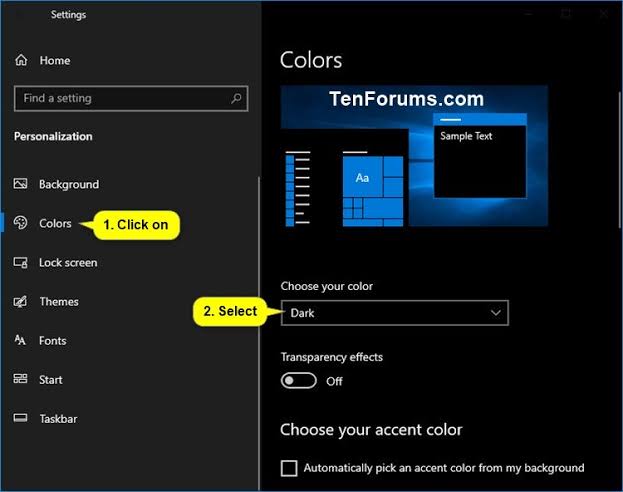
This won’t affect Microsoft Office apps or the Edge browser as they have their individual dark mode settings.
Follow the steps to check dark mode in MS Office:
- Click on File and select the Account
- Change the Office Theme to Black or Dark Grey
Steps to check Edge Browser dark mode:
- Open Edge
- Click on the 3-dot button
- Select settings and Find choose the theme option and select dark.
I hope the Windows Dark mode option will help you to fix the problem with inverted colors on Windows 10.
Fix 10 – Inspect your Hardware
If none of the above-given fixes works for you then here it is suggested to check the hardware. Due to the hardware issues, the Windows 10 colors messed up or cause invert or change the colors on the Windows computer.
And to check if the hardware are causing the problem, check if the colors are inverted during the boot sequence or in the BIOS or if it appears outside of Windows then there are chances the problem occurs with the hardware.
Also, make sure the cable is properly connected to your monitor and PC. If the monitor is not the culprit then there is the possibility your graphics card is faulty. Check if the graphics card is properly placed on the PC.
Or of having an extra slot than move it to a different slot on the PC, I hope this works for you to fix inverted colors on Windows 10 issue.
Bonus Tip – How Do Invert Colors on Windows 10?
1 – Use the Magnifier Tool
Well, if you are looking how to invert colors on computer then here it is suggested to use the Magnifies tool. This is an inbuilt tool that is responsible for inverting image color and allows zooming certain parts of the screen to make it appear better.
So, to invert colors on Windows 10. follow the steps given below:
- Hit Windows Key and Plus (+) key > to open the Magnifier tool.
- Next hit Ctrl + Alt + I > now invert all colors on the screen.
And in this way you can invert or change the colors on a Windows 10 computer.
Check Your Windows PC & Laptop Health
Try the PC Repair Tool, this is an advanced repair tool, that just by scanning once detect and fix various Windows PC related issues and errors.
With this, you can fix various PC problems like DLL errors, BSOD Errors, hardware issues, registry errors and other stubborn PC issues. This not only fixes errors but also optimizes Windows PC performance.
It is easy to use, just download and install the tool. Rest work is done automatically.
Get PC Repair Tool, to Optimize your Windows PC Performance
The Way Forward:
Well, the screen colors inverted Windows 10 problem is very irritating, so here I tried to list down the entire possible fixes to resolve inverted colors issue.
Make sure to follow the given solutions one by one and check which one works for you.
You can also scan your system with the automatic repair utility to fix Windows 10 problems easily.
Good Luck…!!
Hardeep has always been a Windows lover ever since she got her hands on her first Windows XP PC. She has always been enthusiastic about technological stuff, especially Artificial Intelligence (AI) computing. Before joining PC Error Fix, she worked as a freelancer and worked on numerous technical projects.
В этой статье:
-
Настройка яркости дисплея
-
Ночной свет
-
Управление цветным профилем
-
Использование HDR
Настройка яркости дисплея
Управление яркостью дисплея может значительно улучшить просмотр и сэкономить время работы батареи. Вы можете настроить яркость вручную или позволить компьютеру обрабатывать ее автоматически в зависимости от условий освещения или содержимого.
Важно: Ползунок Яркость может не отображаться на устройствах с внешним монитором. Чтобы изменить яркость внешнего монитора, используйте кнопки на нем.
Чтобы настроить яркость экрана, щелкните значок Сеть в правой части панели задач, а затем переместите ползунок Яркость , чтобы настроить яркость.
Кроме того, можно настроить яркость дисплея в разделе Параметры > системный > дисплей.
Важно: Ползунок Яркость может не отображаться на настольных компьютерах с внешним монитором. Чтобы изменить яркость внешнего монитора, используйте кнопки на нем.
На некоторых компьютерах Windows может автоматически регулировать яркость экрана в зависимости от текущих условий освещения. Чтобы узнать, поддерживает ли это ваш компьютер, выберите Параметры > системный > дисплей. Выберите Яркость, найдите поле Изменение яркости автоматически при изменении освещения проверка а затем выберите его, чтобы использовать эту функцию. Благодаря этой автоматической настройке текст на экране будет хорошо виден независимо от окружающих условий. Даже если вы используете его, вы все равно можете переместить ползунок Яркость, чтобы точно настроить уровень яркости для встроенного дисплея.
Примечание: На дисплеях HDR Windows оптимизирует автоматическую корректировку яркости в соответствии с тем, как воспринимает изменение яркости человеческий глаз. В результате регулировка яркости может занять больше времени на дисплеях HDR при изменении условий освещения.
Некоторые Windows 11 пк могут автоматически настраивать яркость и контрастность экрана в зависимости от содержимого, отображаемого на встроенном экране. Например, если вы смотрите видео с темной сценой, за которой следует более яркая сцена (например, с ярким солнечным днем), яркость и контрастность могут измениться. Это нормально.
Адаптивное управление яркостью содержимого обеспечивает идеальный уровень яркости и контрастности, одновременно экономя питание и обеспечивая более длительное время работы батареи. Если эти внезапные изменения яркости отвлекают вас или если вы работаете в приложениях для фото и видео, где точность цвета важна для вас, эти параметры можно настроить в соответствии с вашими потребностями между обеспечением соответствующей яркости и контрастности и экономией заряда батареи.
-
Нажмите кнопку Пуск и введите параметры. Выберите Параметры > Системный > Дисплей .
-
В разделе Параметры отображения выберите Яркость , а затем при необходимости задайте раскрывающийся список Изменить яркость на основе содержимого:
-
От: Адаптивное управление яркостью будет отключено, а яркость и контрастность экрана не будут регулироваться. Это может привести к более короткому сроку работы батареи.
-
Всегда:Адаптивное управление яркостью всегда будет работать независимо от того, подключено ли устройство к сети или от батареи.
-
Только от батареи: Адаптивное управление яркостью будет активировано только в том случае, если устройство работает от аккумулятора.
-
Ночной свет
Дисплей излучает синий свет, похожий на дневной. Однако ночью этот свет может мешать вам спать. Чтобы лучше засыпать, включите ночной свет для дисплея. В результате свет дисплея смягчится и не будет утомлять глаза.
Примечание: Ночной индикатор недоступен, если на устройстве используются определенные драйверы, например DisplayLink или Basic Display.
Щелкните значок Сеть в правой части панели задач. затем найдите Ночной свет в разделе Быстрые параметры и выберите его, чтобы включить или отключить его.
Кроме того, можно переключить параметр Ночной свет в разделе Параметры > системный > дисплей.
-
Нажмите кнопку Пуск , а затем введите параметры в поле поиска. Выберите Параметры > Система > Отображение > ночного света.
-
Переместите ползунок прочности, чтобы отрегулировать интенсивность уменьшения синего света.
-
Нажмите кнопку Пуск , а затем введите параметры в поле поиска. Выберите Параметры > Система > Отображение > ночного света.
-
Включите параметр Расписание ночного света. Затем выберите От заката до рассвета или Установить время и задайте время включения и отключения ночного света.
Управление цветным профилем
Параметры управления цветом Windows позволяют пользователям добавлять или удалять цветовые профили, задавать цветовые профили по умолчанию для подключенных дисплеев, а также получать доступ к калибровке дисплея и включать автоматическое управление цветом.
Творческие профессионалы и энтузиасты заботятся о полностью откалиброванных, точных цветах, потому что это помогает обеспечить согласованность цветов от начала до конца своих проектов. Автоматическое управление цветами в Windows обеспечивает управление цветом на уровне системы, чтобы цвета в приложениях Windows отображались точно и согласованно на поддерживаемых дисплеях независимо от того, управляются ли они цветом.
Автоматическое управление цветом также помогает новым и обновленным приложениям отображать больше цветов с большей точностью. Это обеспечивает дополнительную детализацию и меньшее число цветовых артефактов (например, в градиентах, тени и более темных сценах или рисунках). Благодаря автоматическому управлению цветом приложения могут использовать миллиарды цветов с точностью от 10 до 16 бит. Даже на дисплеях, поддерживающих только 8-разрядный цвет, автоматическое управление цветом помогает улучшить качество цвета с помощью различных методов, таких как дизеринг.
Включение автоматического управления цветом
-
Нажмите кнопку Пуск , а затем выберите Параметры > Системный > Дисплей > Профиль цвета.
-
Выберите дисплей в верхней части экрана, а затем проверка для следующего параметра: Автоматическое управление цветом для приложений.
-
Выберите Автоматически управлять цветом для приложений, чтобы включить его.
-
Перейдите в раздел Параметры > Системный > Дисплей > Профиль цвета.
-
На странице Параметры управления цветом выберите дисплей, для которого вы хотите управлять цветными профилями.
-
Добавьте новый цветной профиль, щелкнув Добавить профиль и найдите цветной профиль.
-
Перейдите в раздел Параметры > Системный > Дисплей > Профиль цвета.
-
На странице Параметры управления цветом выберите дисплей, для которого вы хотите управлять цветными профилями.
-
Разверните цветной профиль, который нужно удалить, и нажмите кнопку Удалить в нижней части экрана.
-
Перейдите в раздел Параметры > Системный > Дисплей > Профиль цвета.
-
На странице Параметры управления цветом выберите дисплей, для которого вы хотите управлять цветными профилями.
-
Задайте один из цветовых профилей по умолчанию, нажав кнопку Задать профиль.
-
Перейдите в раздел Параметры > Системный > Дисплей > Профиль цвета.
-
Выберите Calibrate display (Калибровка дисплея ) и следуйте инструкциям по калибровке дисплея. При этом будет создан новый цветовой профиль для дисплея, на котором расположен инструмент калибровки.
Использование HDR
Содержимое HDR в Windows обеспечивает лучшую яркость и цветовые возможности по сравнению с традиционным содержимым (иногда называемое стандартным динамическим диапазоном [SDR]). Традиционное содержимое обычно показывает детали в яркой части сцены или более темной части сцены, но не в обеих частях одновременно.
Дополнительные сведения о параметрах HDR в Windows см. в статье Что такое HDR в Windows?
Download Windows Speedup Tool to fix errors and make PC run faster
Not all the Windows users are physically identical, and that is the reason Microsoft added a new feature called Color Filters. This feature allows users to set different filters to the computer screen based on individual requirements and it can help color-blind or visually impaired persons better view the display. If a color-blind person wants to work on the Windows 11/10 machine, he/she will face problems because of the impairment. However, now Windows 11/10 users can choose different settings to make the screen easily readable even with their impairment. In this post, we will see how to enable ColorBlind Mode and apply Color Filters on Windows 10 screen.

There are three different methods to enable & apply Color Filters to the computer screen, and you can try any of them on your Windows 10 PC.
1] Using the Keyboard shortcut
This is probably the fastest way to enable the color filter on your Windows 10 screen. Just press Win+Ctrl+C keys together. You will get the Grayscale effect immediately. However, the problem with this keyboard shortcut is it cannot enable other color filters except Grayscale. To check out different filters, you need to follow the following guide.
2] Windows Settings Panel
Windows 11
Right-click on the Windows button on the Taskbar and select Settings from the list of options displayed therein. Alternatively, you can use the Win+I keyboard shortcut to go to the Settings panel directly.
Once there, select Accessibility from the side panel on the left.
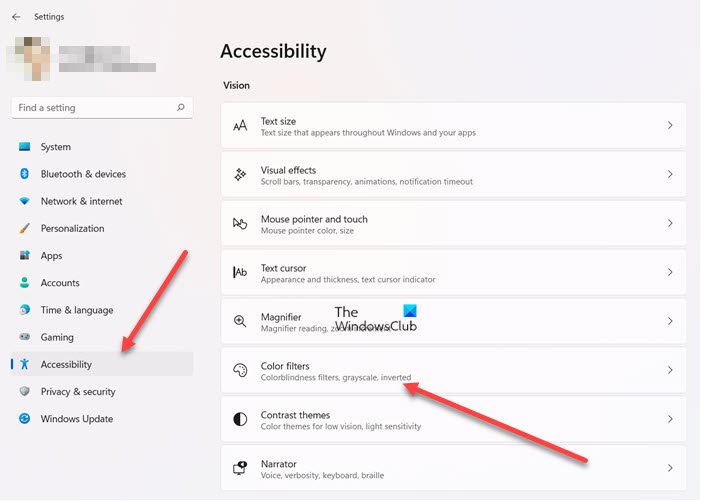
Switch to the right. Under the Vision section, scroll down to the Color Filters heading and click the heading to expand its menu.
When directed to a new screen, scroll down to Color Filters entry and slide the toggle next to it to the on position.
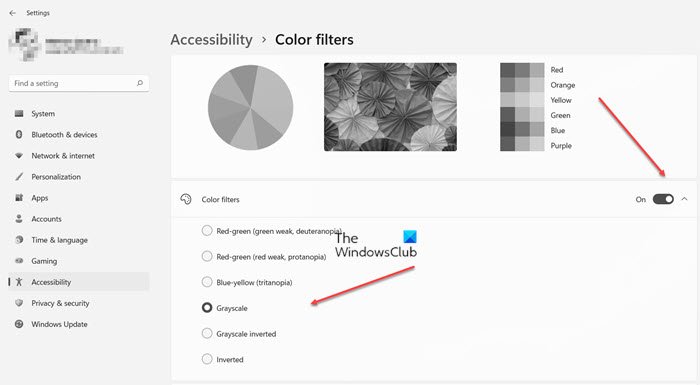
you can choose various filters such as:
- Inverted
- Grayscale
- Grayscale inverted.
Also, you can select color blindness filters like:
- Deuteranopia
- Protanopia
- Tritanopia.
Windows 10
This is where you can find the Color Filters option. Open Windows Settings panel by pressing Win+I and go to Ease of Access > Color filters.
On your right-hand side, you can find an option called Turn on color filter. Toggle the button to enable it immediately.
After enabling, you can choose various filters such as:
- Inverted
- Grayscale
- Grayscale inverted.
Or you can select color blindness filters like:
- Deuteranopia
- Protanopia
- Tritanopia
These are different conditions. For example, Deuteranopia, Protanopia, and Tritanopia are different types of color blindness.
3] Registry Editor
Open Registry Editor. For that, press Win+R, type regedit and hit the Enter button. Before using Registry Editor, make sure you have created a system restore point and backed up Registry files.
Now, navigate to the following path-
Computer\HKEY_CURRENT_USER\Software\Microsoft\ColorFiltering
On your right-hand side, you can find two different keys, i.e., Active and FilterType. Double-click on “Active” key and set the value to 1. After that, double-click on the “FilterType” key and set the value anything between 0-5 as required.
- 0 = Grayscale
- 1 = Invert
- 2 = Greyscale Inverted
- 3 = Deuteranopia
- 4 = Protanopia
- 5 = Tritanopia

That’s it!
What does a Colorblind mode do?
The Colorblind mode in Window allows you to adjust the on-screen colors for several different types of color blindness. Most common forms of red-green color blindness, which are genetic conditions caused by a recessive gene, but there are other types as well.
What is color filters in laptop?
Color filters are a setting in Windows that allows you to change the color palette on the screen. This helps you distinguish between things that differ only by color. It’s especially useful when you find it hard to see what’s on the screen.
Related read: How to enable and use Color Filters for Colorblind users in Windows.
Anand Khanse is the Admin of TheWindowsClub.com, a 10-year Microsoft MVP (2006-16) & a Windows Insider MVP (2016-2022). Please read the entire post & the comments first, create a System Restore Point before making any changes to your system & be careful about any 3rd-party offers while installing freeware.
С каждым релизом Windows 10 Microsoft делает свою операционную систему все более дружелюбной для пользователей с определенными расстройствами или болезнями. Windows 10 Fall Creators Update получила набор изменений, которые улучшат взаимодействие с компьютером для тех, кому приходится мириться с проблемами со зрением. Функция называется «Цветовые фильтры» и активируется из настроек Специальных возможностей.
Что такое цветовые фильтры в Windows 10
Цветовые фильтры упрощают жизнь пользователям с определенными расстройствами зрения или чрезмерной светочувствительностью. Фильтры применяются ко всей системе целиком, поэтому изменяется не только внешний вид определенных системных элементов, но и всех остальных приложений, включая игры, фото и видео. Работа цветовых фильтров также не зависит от того, какой экран или видеокарту вы используете. Эта функция реализована таким образом, чтобы ею мог воспользоваться каждый, вне зависимости от мощности устройства, его форм-фактора или возраста.
Для справки: цветовые фильтры доступны только на компьютерах, которые обновлены до Windows 10 Fall Creators Update или Windows 10 1709 сборки 16299. Если ваш ПК еще не обновлен, почитайте статью, которая рассказывает о том, как установить Windows 10 Fall Creators Update.
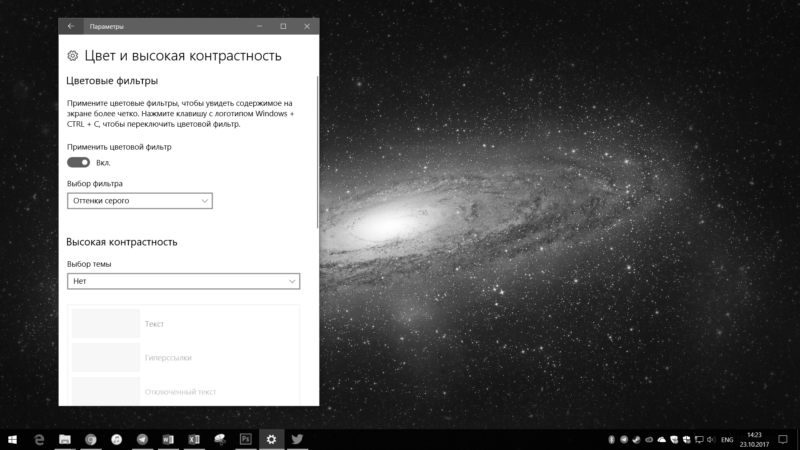
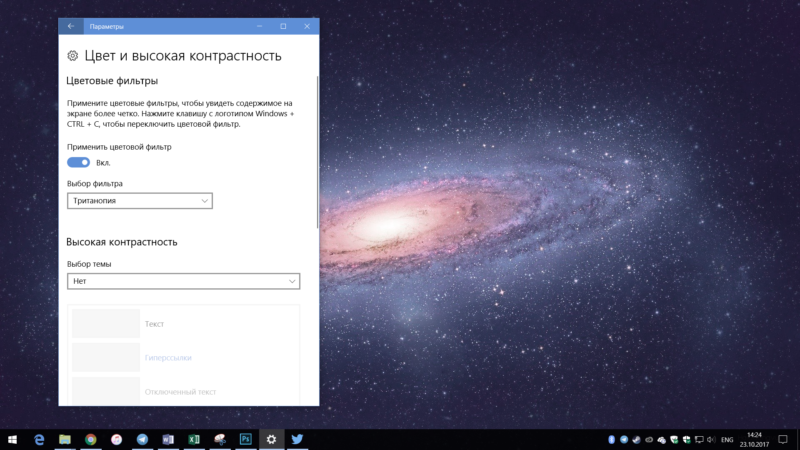
Как включить цветовой фильтр в Windows 10
- Нажмите Win + I и перейдите в раздел Специальные возможности.

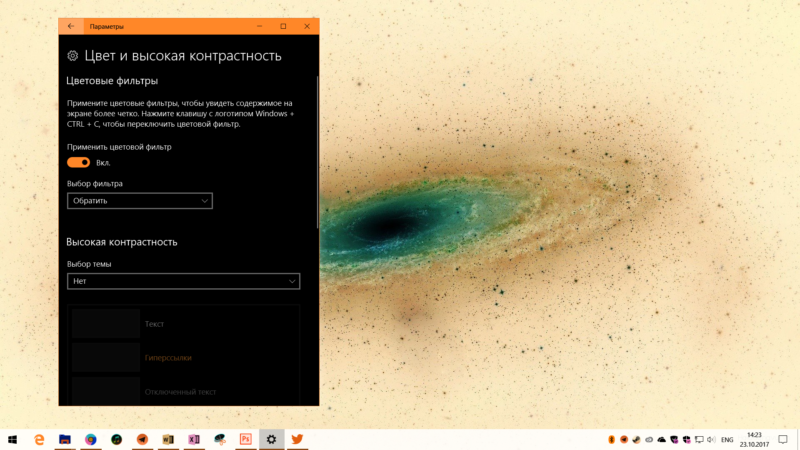
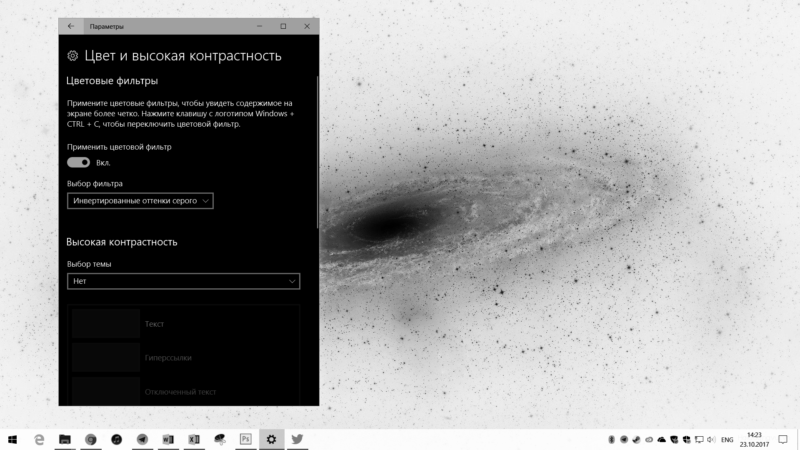
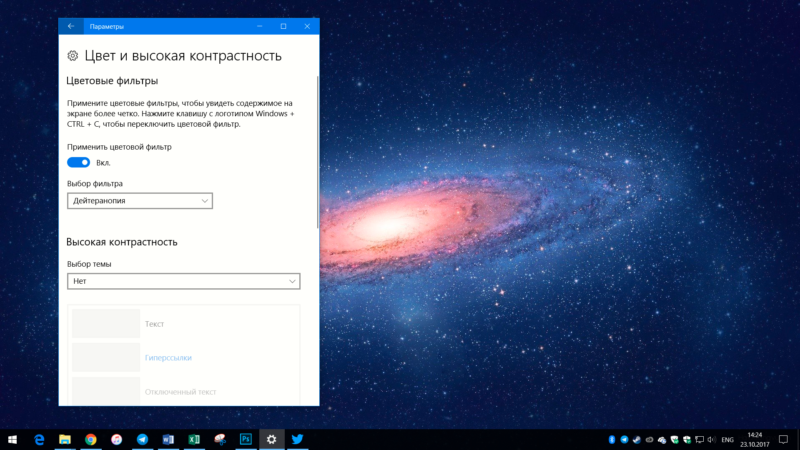
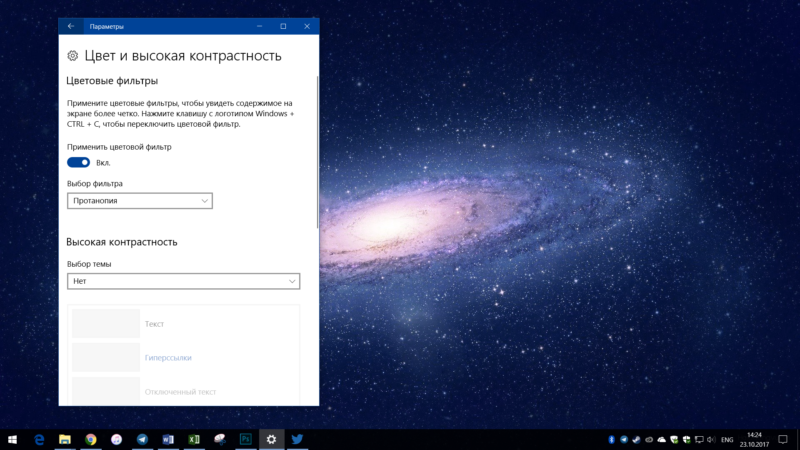
- В боковом меню выберите пункт Цвет и высокая контрастность.
- Активируйте переключатель Применить цветовой фильтр.
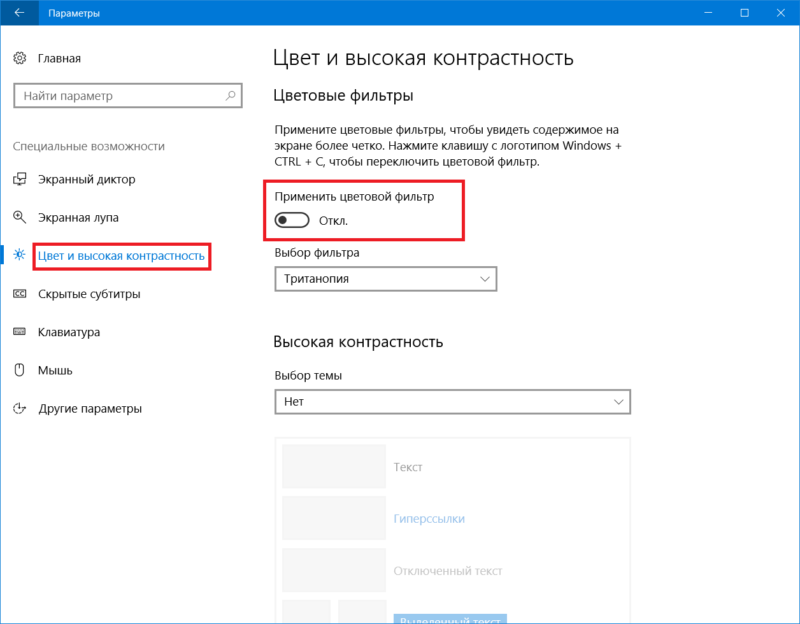
После этого система наложит «поверх» экрана определенный фильтр, чем существенно изменит картинку на экране. Вы можете выбрать один из нескольких фильтров, чтобы подстроить картинку под ваши личные предпочтения или физические особенности. Всего доступно шесть филтров.
- Оттенки серого – система выключает любое отображение цвета, поэтому экран станет черно-белым.

- Обратить – он же «негатив» или «инверсия». Цвета инвертируются, так что в результате получается весьма странная для обычного пользователя картинка. Тем не менее, определенно найдутся случаи, когда инвертированное изображение окажется полезным.
- Инвертированные оттенки серого – сочетание первого и второго фильтра. Экран становится черно-белым, но при этом инвертированным. Иными словами, черное стает белым, а белое черным (и в пределах диапазона серого цвета). Другие цвета не отображаются.
- Дейтеранопия – этот фильтр для тех, кто страдает от пониженной чувствительности в основном к зеленым цветам. При включенном фильтре «Дейтеранопия» Windows увеличит насыщенность отдельных цветов, при этом картинка в общем останется прежней.
- Протанопия – облегчит работу за компьютером, если у пользователя расстройство восприятия красных цветов.
- Тританопия – в этом случае нарушается восприятие сине-фиолетовой области спектра. Весьма редкое расстройство, но и для него предусмотрен фильтр в Windows 10, что определенно порадует пользователей.
Активировать цветовой фильтр можно не только из Параметров Windows. Для этого в системе предусмотрена отдельная комбинация клавиш. Надо нажать Win + Ctrl + C, после чего Windows сразу же применит выбранный вами фильтр.
Как и в случае с любыми другими настройками Windows 10, вы можете включить цветовые фильтры с помощью Редактора реестра (смотрите «Что такое системный реестр Windows»). Не совсем понятно, кому такое надо, но все же, если вы захотите включить фильтры столь нестандартным способом, вот как это сделать:
- Нажмите Win + R и введите regedit (подробнее о всех доступных методах запустить редактор реестра читайте в статье «Как открыть Редактор реестра»).

- Перейдите по адресу Компьютер\HKEY_CURRENT_USER\Software\Microsoft\ColorFiltering. Можно просто скопировать путь и вставить в адресную строку редактора.

- В правой части экрана должно отображаться два ключа – Active и FilterType. Если их нет, создайте их. Тип ключа – DWORD 32-бита.
- Для включения цветового фильтра измените значения ключа Active с 0 на 1. Для отключения установите обратно 0.

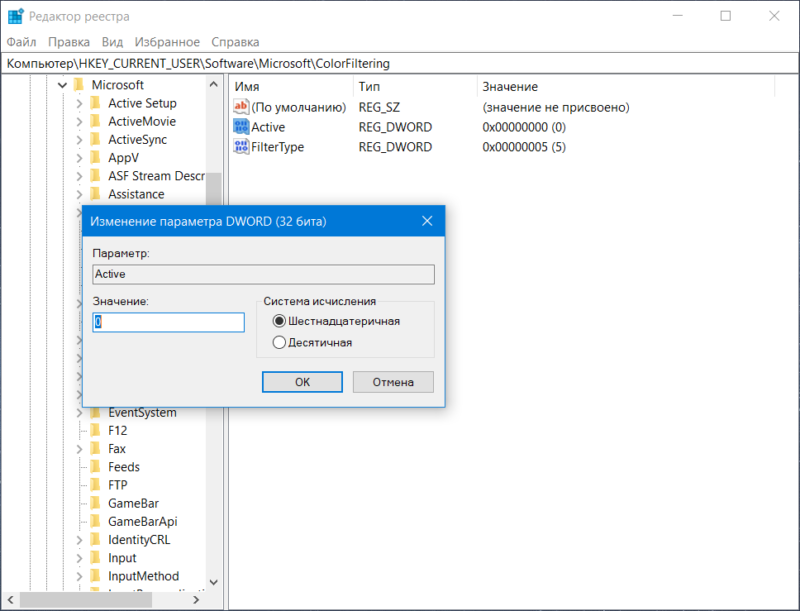
Чтобы задать какой-то конкретный фильтр, измените ключ FilterType и укажите одно из следующих значений:
- 0 – оттенки серого.
- 1 – обратить.
- 2 – инвертированные оттенки серого.
- 3 – дейтеранопия.
- 4 – протанопия.
- 5 – тританопия.
После редактирования выйдите из системы, либо перезагрузите компьютер для применения изменений.
Как отключить цветовой фильтр в Windows 10
Цветовые фильтры отключаются точно так же, как и включаются.
- Откройте Параметры – Специальные возможности – Цвет и высокая контрастность.
- Отключите параметр Применить цветовой фильтр.
Опционально воспользуйтесь той же комбинацией клавиш Win + Ctrl + C для более быстрого отключения фильтров.
Как вы видите, все довольно просто. Лишь несколько кликов мышью и вы сможете подстроить отображение цветов под свои нужды. Разумеется, для более точной калибровки или настройки вам может понадобится более сложное стороннее программное обеспечение. Также рекомендуем почитать статью о том, как откалибровать монитор в Windows 10.