Introduction to Windows PowerShell. Windows PowerShell is an advanced command environment that Microsoft has installed in Windows to provide the user with the ability to control, manage, and configure Windows services as a shell. In this article, we will fully explain Windows PowerShell and tell you the difference between PowerShell and CMD. Stay with us.
Table of Contents
In today’s world, people dealing with Windows must be familiar with the CMD or Command Prompt environment.
Command Prompt or CMD is a simple text environment that supports very few commands alone and has been on Windows since the birth of Windows NT.
Command Prompt uses two sets of commands that include:
Internal Commands: Internal commands are located inside the Command.com file. Like the dir command
External commands: commands that have a separate file and can be executed and controlled in the Command Prompt environment. Like the netsh command
Now, with the short description that we have provided to you about CMD and the fact that this grammatical environment is more than 20 years old, it can be realized that it no longer has the necessary capabilities and efficiency for users, especially professionals in the field of executing commands.
So in 2006, Microsoft launched a new command environment called Windows PowerShell to improve the quality of its Windows command environment.
Microsoft outlined the reasons for the development and release of Windows PowerShell, two of which were the most prominent.
Introduction to Windows PowerShell.
The main reasons for the production and development of Windows PowerShell
1. Creating a complete text environment for running, controlling and managing all services and launching them.
2. Do not lag behind Linux due to the very high power of the Linux terminal.
The Linux terminal environment is very powerful and it can be said that all the various tasks including controlling and running all services can be done with Linux commands. For this reason, in order not to lag behind Linux, Microsoft started producing and developing an environment called Windows PowerShell, so that it can provide its users with the ability to work with a text environment more than before.
The difference between Windows PowerShell and CMD
One of the main differences between these two Windows command text environments is the undisputed power of Windows PowerShell.
Network administrators, programmers, and professional Windows users will be able to run and manage any services and commands they have in the Windows graphical environment in PowerShell.
The CMD grammatical text environment has the limited ability to execute commands.
In Windows PowerShell you will be able to write and execute professional scripts such as nested scripts and multi-step scripts.
The Command prompt environment supports limited commands and there is no ability to add commands as a module.
In Windows PowerShell you will be able to add modules to new and external services and control and manage them.
The structure of Windows PowerShell
Windows PowerShell with the help of .net framework Designed and developed. For this reason, writing and executing commands in it is similar to the .net programming language. Users can also use the C# and .net commands as scripts in PowerShell.
For example, a simple command in PowerShell is as follows:
New-NetIPAddress –InterfaceAlias “Ethernet” –IPv4Address “192.168.0.1” –PrefixLength 24 -DefaultGateway 192.168.0.254In the example above, a static IP will be set on the system.
Tip for working with PowerShell
At first, when you come across PowerShell commands, you might think that you have to memorize a lot of commands for that long. But we have to tell you that this is not true.
Windows PowerShell follows certain rules and regulations that make it very easy. Also, working with Command Prompt commands may seem difficult at first, but with a little effort and perseverance, you can be sure that you will easily learn PowerShell.
How to open Windows PowerShell
There are three different ways to open Windows PowerShell.
1. Press Winkey + R to open Run, then enter powershell and click OK.
2. From the Start menu, search for windows powershell and open it.
3. In CMD environment, by entering powershell and pressing Enter, you will go to PowerShell environment.
Finally, we will mention some of the benefits and features of PowerShell.
Benefits and Features of Windows PowerShell
– Ability to execute all CMD commands in PowerShell
– Being object oriented
– Ability to write scripts with net language and PowerShell script language
– Structured commands
– Ability to increase different modules
– Manage and control all Windows server and client services
– Existence of PowerShell ISE tool for easier scripting
– Ability to execute multi-step and selective commands
– Ability to enter commands automatically after entering part of the command
– Has system control commands to improve and expedite the needs of the user
– Ability to execute commands remotely
– Ability to direct PowerShell to control servers (in Windows 10 family)
Dear user, we hope you would enjoy this tutorial, you can ask questions about this training in the comments section, or to solve other problems in the field of Eldernode training, refer to the Ask page section and raise your problem in it as soon as possible. Make time for other users and experts to answer your questions.
Introduction to Windows PowerShell.
Goodluck.
Contents
- Introduction
- What is PowerShell and Why is it Useful?
- Getting Started
- Open PowerShell
- Navigation
- Viewing Directory Contents with
Get-ChildItem(gci,ls) - Moving Between Directories with
Set-Location(sl,cd) - Creating New Directories with
mkdir - Using
Explorerto View Directories in the GUI - Deletion with
Remove-Item(rm) - Understanding the Tree Structure of Your Computer’s File System
- Moving fast with
Push-Location(pushd) andPop-Location(popd)
- Viewing Directory Contents with
- Working With Files
- Creating Files with
New-Item(ni) - Copying and Moving Files with
Copy-Item(cp) andMove-Item(mv)
- Creating Files with
- Doing More
- Writing to Files with
Write-Output(write,echo) and Redirection - Reading Files with
Get-Content(gc,cat) - Working with Lots of Files at Once Using Wildcards (
*) - Searching with
Select-String(sls) - Infinite Loops and Aborting with
control-c - Specifying cmdlets with Parameters
- Finding out more with
Get-Help - Solving the Infinite Loop Problem with the
-excludeParameter - Getting Even More out of cmdlets with Piping
- Using Command-Line Tools and Running Python Scripts
- Writing to Files with
- Conclusion
- Quick Reference
This tutorial will introduce you to the basics of Windows PowerShell, the standard command-line interface for Windows computers. If you are a Mac or Linux user, you should check out the Bash introduction instead. If you are already familiar with using Bash, you may be able to get started with PowerShell just by looking at the table at the end of this lesson.
The tutorial is divided into two main sections. In the first section, “Getting Started,” you will learn to do basic desktop tasks like creating and opening files and folders using PowerShell. In the second section, “Doing More,” you will get a glimpse of some of the features that make work on the command line particularly efficient, and learn enough of the basics to be able to explore further on your own. You will also get set up to run Python scripts from the command line.
This tutorial was written for PowerShell 5.0. If you are using an earlier version, you may encounter a few small syntax differences which you should be able to overcome with a little help from a search engine.
What is PowerShell and Why is it Useful?
Windows PowerShell is a command-line interface for Windows computers. A command-line interface (CLI) is a program for telling your computer to do tasks using typed commands, rather than by clicking pictures on the desktop as in a graphical user interface (GUI). (Technically, PowerShell is more than just the CLI, and you can get a quick overview of its features on Wikipedia.) Using the command line has many advantages. It makes it possible to automate tasks and to do many things with one command. Most importantly, a number of tools of value to humanists can only be run from the command line, including many you can learn about on The Programming Historian, like Mallet, Pandoc, or Wget. The command line is also the best place to work with programs you have custom built for your own research using programming languages like Python.
Getting Started
You will first learn to navigate through your files and do some of the basic tasks you do every day on the computer.
Open PowerShell
Run a search for PowerShell on your computer. You probably have several different options, like “PowerShell,” “PowerShell ISE,” and “PowerShell (x86).” The ISE (integrated scripting environment) is a handy tool which allows you to write scripts on the fly, and also has a convenient look-up for all the PowerShell commands. Right now, this is more than we need. “x86” exists for backwards compatibility. (If you’ve been around a while, you’ll remember old Intel processors from the 80s and early 90s called “286,” “386,” “486,” and so forth. That’s what “x86” is getting at. It is a 32-bit version.) We want 64-bit and simple, so we’ll use the one just called “Windows PowerShell.” You may want to pin it to your task-bar (right click it to get this option). When you open it, it will look like this:
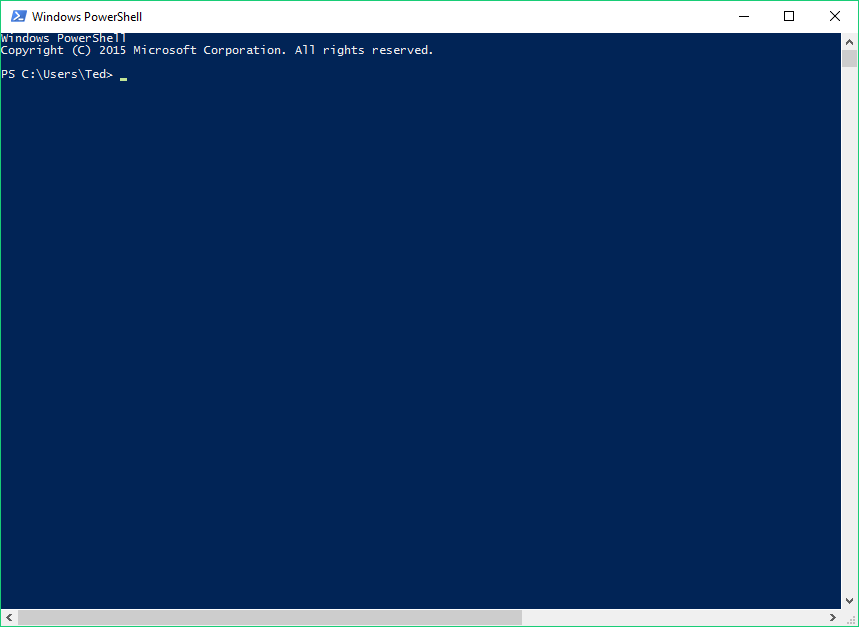
PowerShell on start up
If you don’t like the white on blue, right click the top bar, select “properties,” and go to “colors” to change things. You may have to close and re-open PowerShell to get it to display correctly.
Navigation
A nice thing about PowerShell is you always know where you are because it tells you in the prompt. In my case, I see:
C:\Users\Ted>
You should see something similar, but with your user name. In case you don’t, type
sl ~
Make sure to include the space. This will bring you to your home directory: C:\Users\YOURUSERNAME where “YOURUSERNAME” is replaced with the name of your account on the machine. “Directory” is just another word for “folder,” and PowerShell considers your user folder — not the desktop — to be your home. (The desktop is actually just another folder within your user folder, that is, a subdirectory of the user directory). Entering sl ~ is just like opening the folder called “Users” and from there “YOURUSERNAME” using your GUI. Let’s start by learning how to move around between directories and view their contents.
Viewing Directory Contents with Get-ChildItem (gci, ls)
Our first command is Get-ChildItem. Go ahead and type it in, and hit enter. You’ll see a list of everything in your current directory. In my case, that looks like this:
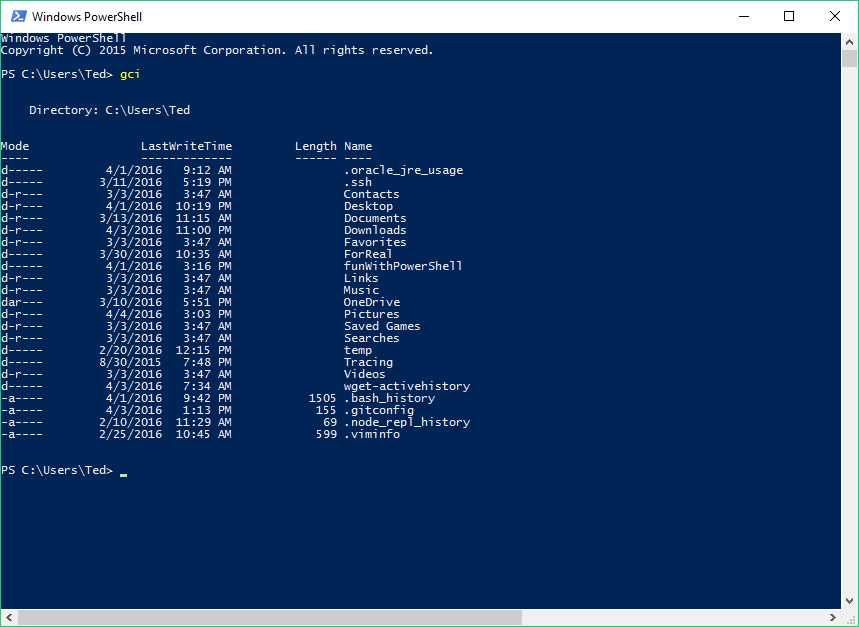
Listing directory contents with Get-ChildItem
Notice that I didn’t actually enter Get-ChildItem. I just entered gci. The commands we will be learning are all of the form Verb-Noun. These are called “cmdlets” (pronounced “commandlets”), and their form is supposed to make it easy to remember what they do and predict similar cmdlets. Because cmdlets are rather long, most of them come with sleeker aliases that you can use instead. I will first present cmdlets with their names, but always subsequently use the standard aliases, because they are much faster to work with. It is important to note that many cmdlets have multiple aliases. For instance, Get-ChildItem, gci, dir, and ls all do exactly the same thing. While it is unsurprising that gci is short for Get-ChildItem, you may be wondering where dir and ls come from.
PowerShell is relatively new (first released in 2006), and its designers anticipated that many people who would use it would already have experience with some existing CLIs (command-line interfaces), specifically either with Microsoft’s older CLI called command prompt, or with Linux CLIs like Bash, which is now also standard on OS X. Thus, many cmdlets have an alias that is the standard command in one of these two systems (and often for both). In the present example, dir comes from command prompt, and ls comes from Bash. I will use the “PowerShell-style” aliases in this tutorial, since it makes it easier to remember the actual cmdlet names. However, I will try to also mention other common aliases, particulary those familiar to Bash users. If you work with a lot of people who use OS X or Linux, it can be good to know these names. The table at bottom gives the cmdlets along with their standard PowerShell aliases and the nearest Bash equivalent.
Go ahead and try using gci, dir, and ls. You’ll get the exact same list of things. Most of these things will be directories. One of them should be your desktop. Let’s move into that directory.
Moving Between Directories with Set-Location (sl, cd)
To move to your desktop, we’ll use the Set-Location cmdlet. Enter
sl desktop
into PowerShell. This tells PowerShell to move to the desktop. Notice that you can write “desktop” using all lowercase letters, even though when you looked at the contents of the YOURUSERNAME directory, “Desktop” was spelled with a capital “D”. PowerShell is not case sensitive! Now that you’ve changed your location, you can use gci to see a list of everything on your desktop — that is, everything in the directory named Desktop. If you’re as disorganized as I am, this will be a long list. We can move back to the YOURUSERNAME directory by typing
sl ..
Don’t leave out the space! Now type
sl ..
again. You should be in the Users directory.
Now try navigating back to the desktop, and then back again to Users. That should take four commands: sl YOURUSERNAME, sl desktop, sl .., sl ... But you can actually do it with only two. You should be at C:\Users> right now. Instead of typing sl YOURUSERNAME and then sl desktop, you can just type
sl YOURUSERNAME\desktop
and get to the desktop with one command! Similarly, from the desktop, by typing
sl ..\..
you can get back to where you started with one command. If you don’t have the pinkie stamina for typing \ all the time, you can also type sl ../... Not only is PowerShell not case sensitive, it also doesn’t care what direction the slash goes. sl ../.., SL ..\.., Set-Location ..\.., and set-location ../.. all do exactly the same thing.
Creating New Directories with mkdir
We’re moving toward working with files. Before we start, let’s make a directory where we can store everything we’re using for this lesson. Navigate back home by typing
sl ~
We’ll make a new directory inside of your YOURUSERNAME directory. To do this, we use the command mkdir. Call your directory whatever you want, but try not to use spaces, as these make working on the command line more complicated than necessary. I will call my directory “funWithPowerShell”. So I type
mkdir funWithPowerShell
See how I used CamelCase to avoid spaces? Another common way to do this is with hyphens or underscores, as in fun_with_power_shell. Whatever you name your directory, try to avoid using spaces. Once you’ve been working with PowerShell a little, you’ll probably find that you start titling new files without spaces by default. This is a good habit to be in, as it simplifies work on the command line as well as work with programming languages like Python.
However, you probably have plenty of existing files with spaces in their names. To open these in PowerShell, you just need to use quotes. Let’s try this. Move into your new directory using
sl funWithPowerShell
(Or whatever you titled your directory.) Enter
gci
and you’ll see that there’s nothing here. That’s because you haven’t put anything in it! Let’s put a new directory inside with mkdir. We’ll call this directory “Directory with a long name and lots of spaces”. Because the name has spaces in it, we’ll have to use quotes to create it. Type
mkdir "Directory with a long name and lots of spaces"
and hit enter. Now enter
gci
and you’ll see your new directory. Suppose we want to move into this directory. We would have to type sl "Directory with a long name and lots of spaces". Not only will this take a while to type, but if we get one letter wrong, PowerShell won’t be able to find our directory. Instead, try just typing
sl d and then hitting the tab key.
Voila! PowerShell completes the name of the directory for us, including the quotes! Using tab for auto-completion will save you a lot of time. You’ll notice that when PowerShell completed the name for us, it also threw in a .\ at the beginning of the directory name. The dot is just shorthand for the current directory. When you type commands, PowerShell always assumes there’s a .\ at the beginning — in other words, that you are referring to something in the current directory. So you don’t have to type this part (unless you want PowerShell to look somewhere else for whatever you’re telling it to do, in which case you can type the path for that directory — i.e. C:\directory\bla\etc.)
Let’s practice a little more with directories before getting to files.
Using Explorer to View Directories in the GUI
At this point, we’ve made two directories. I mentioned above that “directory” is just another word for “folder.” You can see this for yourself by finding your new directories in the GUI. Windows actually calls your GUI “File Explorer” or just “Explorer.” We can call Explorer from within PowerShell by using the command Explorer. Navigate back into your funWithPowerShell folder with
sl ..
Now try typing
explorer .
Remember, the dot just means “this directory,” and you don’t have to capitalize “explorer” because case doesn’t matter in PowerShell. Explorer should have just opened a window showing the contents of the “funWithPowerShell” directory. Arrange your windows so you can see both the image in Explorer and PowerShell. Now you’ll be able to watch how what you do in PowerShell shows up in Explorer.
The Explorer command is extremely useful. It is essentially like double-clicking something in the GUI. Thus, you can also use it to open files and programs.
Deletion with Remove-Item (rm)
Now that you can see the results of what you’re doing in PowerShell, let’s learn to delete things — for instance that directory with the long name. First, create a few more directories. Name them “dir,” “dir1,” and “dir2.” You can make all three with a single command by typing
mkdir dir, dir1, dir2
Pretty neat, huh? You should see your three new directories pop up in your open Explorer window.
Now, let’s get rid of that long-named directory. To do this, we use the cmdlet Remove-Item or just rm. You have to be very careful with this cmdlet, because it does not put things in your recycle bin. It deletes them permanently. Gone. Type in rm followed by a space and the long-named directory’s name. You’ll probably want to use tab for auto-completion. Note, however, that now that we have a bunch of directories with names beginning with “d”, so we have to type through the first unique letter to get it to auto-complete correctly. So I type
rm dire and then hit tab.
Alternatively, you can just type rm and then hit tab multiple times to scroll through all your directories. If you go too far, use shift with tab to scroll back.
Before pressing enter, I stare long and hard to make sure I’m deleting the thing I want to delete. Then I hit enter.
Go ahead and delete the other three directories, and watch them disappear from Explorer. Just like with mkdir, you can delete all three directories with one command. Give it a try.
We just deleted the dir, dir1, and dir2 directories. But we’ll need them for the next example. So let’s create them again. Rather than typing out the instruction, though, try just tapping the up arrow on your keyboard a couple of times. You should soon see the command you used to make the three directories the first time. Once you do, hit enter, and they’ll be made again! Like using tab to auto-complete, using the up and down arrows to scroll through recent commands will save you a lot of time! Note that we are not undoing our earlier deletion. We are just using a shortcut to enter again a command we’ve recently used.
Understanding the Tree Structure of Your Computer’s File System
Okay, now you should have three directories inside your funWithPowerShell directory. Move into the dir directory. (Use sl dir).
It’s important to understand how your computer organizes things. Look at the path to your current directory. The path is all the stuff written before the >. In my case, that’s
C:\Users\Ted\funWithPowerShell\dir
Yours should look pretty similar. What this path actually represents is a tree-like structure the computer follows to get to where you are. The trunk of the tree is C: which is your hard drive. (Actually, on most modern computers, it will be a partition of your hard drive. Why is it called C? Your computer assigns a letter to every drive. A and B are reserved for the two floppy disk drives which long ago users would have interacted with more frequently than their hard drives. Even though most computers no longer have them, their names are still reserved.)
If C: is the trunk, each section of the path after it is a branch, each one coming off the one above it. Thus, Users is a branch from C:, Ted is a smaller branch coming off of Users and so forth. You could also use a metaphor of heredity rather than botany and call each branch a child of the directory above it. This is actually the more common language for describing the relationships between directories (hence the cmdlet Get-ChildItem), but we’ll stick with the tree metaphor, since in real life, relationships of heredity can be much more complex than the extremely hierarchical structure according to which your computer is organized.
Understanding that the path works like a tree is important for navigating around to directories not immediately above or below the current one. Thus, we know there is a directory called “dir1”, and that this directory is also in the “funWithPowerShell” directory. See what happens if you attempt to use sl to move directly over into it by typing
sl dir1
This threw an error!
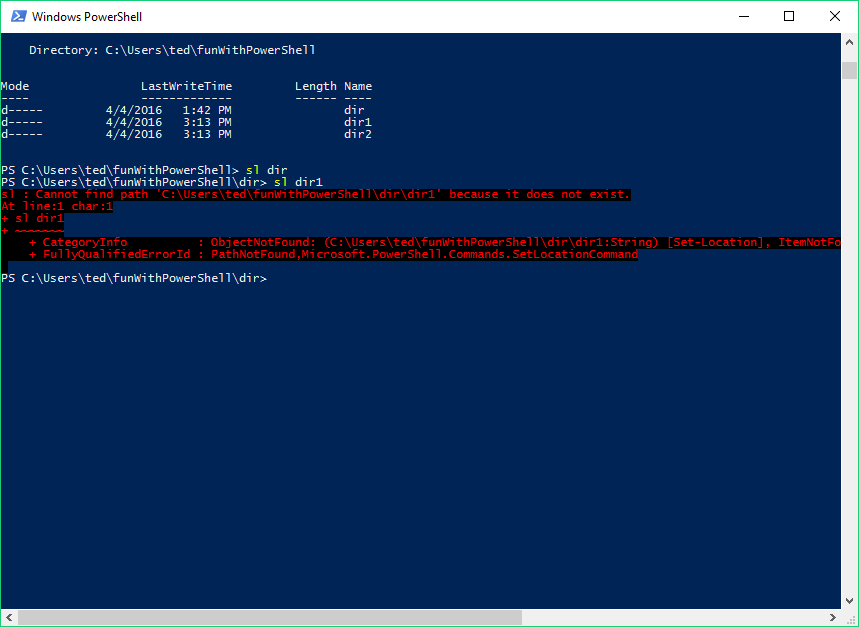
An error caused by jumping between branches
We’ve tried to jump from one branch to another, and PowerShell can only understand our movement if we move along the tree. That means we first have to move up to where the branches for “dir1” and “dir” meet, and then back down to “dir1.” You can do this with one command. See if you can figure it out before you read the next line.
The command is:
sl ..\dir1
This tells PowerShell to move up one directory to funWithPowerShell and then move back down into the directory dir1.
Moving fast with Push-Location (pushd) and Pop-Location (popd)
Before moving on to working with files, let’s try out the commands pushd and popd. Do this: Go all the way up to the trunk of your tree, C:. That should be four directories above where you are, so you could type
sl ..\..\..\..
Then, change back to dir1. But rather than typing sl before the path, type pushd. Like this:
pushd users\YOURUSERNAME\funWithPowerShell\dir1
You’ll now be in the directory, just as if you’d typed sl at the beginning of that path. But here’s the fun part. Now type
popd
and hit enter. Neat, right? The command pushd tells powershell to move into the given directory after marking the current directory so it can be returned to with popd. In other words, popd will always “pop” you back to the last directory you were in before using pushd. (If you want to understand more about what is going on, read about the call stack on Wikipedia.) Using pushd and popd is very useful when you’re frequently moving between two directories.
Working With Files
Now that you know how to move around your computer’s file system from the command line, let’s work on actually doing things to files. We’ll start by learning to create new files, copy them, and move them around.
Creating Files with New-Item (ni)
First, we need some files to work with. Let’s make a new plain text document called “example.txt”. Navigate to the funWithPowerShell directory — use tab for each directory name as you type out the path to speed this up — and type
ni example.txt
then hit enter. Now do
gci
to see that, indeed, you now have, in addition to your directories, the file example.txt. We’ll need several files, so go ahead and make example1.txt and example2.txt. You’ll be unsurprised to hear that with a comma, you can do this in one command:
ni example1.txt, example2.txt
Copying and Moving Files with Copy-Item (cp) and Move-Item (mv)
We probably should have put these files into one of our directories. Let’s move them.
We’ll put example.txt in dir by typing
mv example.txt dir
Now type gci and you’ll see example.txt has disappeared. Move into dir (sl dir) and type gci and you’ll see it’s now in there! (You can also do this without moving by just typing gci dir from funWithPowerShell.) Move back to funWithPowerShell and put example1.txt in dir1 and example2.txt in dir2.
We can also use mv to rename things. Use sl to move into dir. Do a quick gci and you should see your example.txt file. This is a boring name. Let’s call it “benjamin.txt” instead. Type
mv example.txt benjamin.txt
Use gci again to confirm that your document is now called benjamin.txt.
You may be surprised that the same cmdlet is used both to move and to rename files. In fact, though, the operation is the same. In both cases, you’re telling the computer to change the “name” of the file’s location, that is, to change the path it follows to find the file. In the first example above, the path began as
C:\Users\Ted\funWithPowerShell\example.txt
and changed to
C:\Users\Ted\funWithPowerShell\dir\example.txt
In the second example, the path changed from
C:\Users\Ted\funWithPowerShell\dir\example.txt
to
C:\Users\Ted\funWithPowerShell\dir\benjamin.txt
In other words, in both examples, mv just changed the path. Don’t worry if this doesn’t make sense just yet. Just be careful when you use mv, because if you don’t type exactly the right thing, you may rename something when you mean to move it, or vice versa.
Beyond moving files, we also want to be able to copy and delete them. To copy files, we use the cmdlet Copy-Item, or cp. Let’s make a two copies of benjamin.txt, and name them “steven.txt” and “susie.txt”.
cp benjamin.txt steven.txt
cp benjamin.txt susie.txt
We can also delete these two new files with rm, just like with directories. Try to do it with one command. As always, be careful when you use rm.
Here’s the command:
rm steven.txt, susie.txt
Goodbye, Steven and Susie!
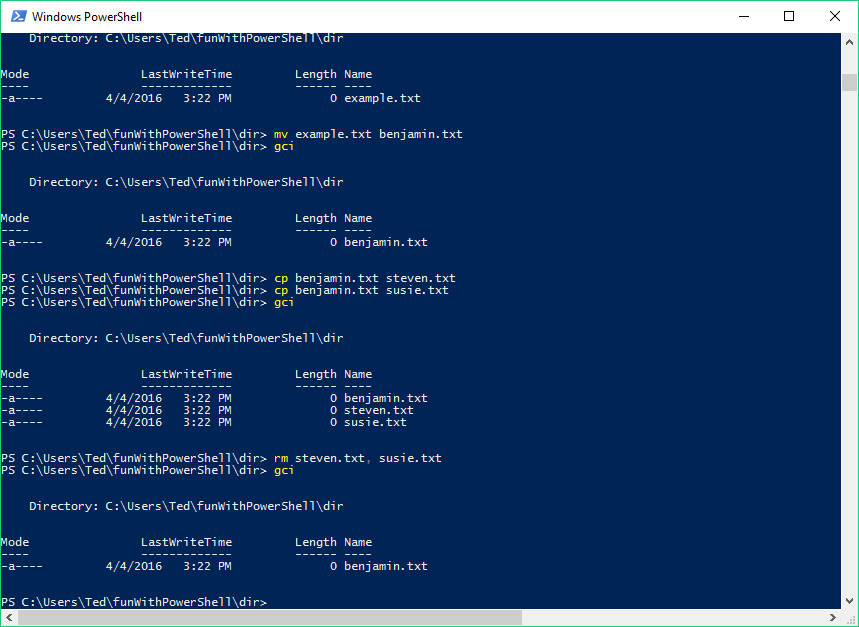
Moving, copying, and deleting
Doing More
Okay, so now we can navigate around, make files, and move and delete them in PowerShell. We feel pretty cool and/or geeky, because we can do these things from the command line, but it’s not actually useful, since we could already do these things pretty easily in the GUI. Now that we know these basics, though, we can start learning slightly more complex commands that can be useful in our work as digital humanists.
Writing to Files with Write-Output (write, echo) and Redirection
We have an empty file in our dir directory. That’s not very interesting. Let’s add some content. We could open the file in Notepad and modify it that way. But we can also add to it with commands right from the command line. The cmdlet we use for this is Write-Output, or just write.
Try entering this:
write "The technique of reproduction detaches the reproduced object from the domain of tradition."
PowerShell should print that statement directly into the command-line window. That’s all that write does. It tells PowerShell “Print out whatever I write.” That’s not very useful, though, because we want it to put this text into our document. To do this, we’ll use something called redirection.
Redirection is just a way to tell PowerShell to take the results of a command and put them somewhere other than in the PowerShell window. To redirect a command, we put a right angle bracket (>) between the command and the place we want its output to go. In this case, we want the output of our write command to wind up in benjamin.txt. So we use the up arrow to get the statement back, and add > benjamin.txt at the end. The whole thing should look like this:
write "The technique of reproduction detaches the reproduced object from the domain of tradition." > benjamin.txt
When you hit enter, nothing will seem to have happened. That’s because your write statement was redirected. To see that something did indeed happen, use gci to view the contents of your directory. Notice that the length of benjamin.txt is no longer 0. That’s because we just put some text in there!
Reading Files with Get-Content (gc, cat)
While gci can show us that something is in the file, it would be nice to see that it’s the sentence we tried to put in there. We could do this by typing notepad benjamin.txt, which would open the document in Notepad. But there is also a cmdlet for just printing the contents to PowerShell. This cmdlet is called Get-Content. Enter:
gc benjamin.txt
There’s your sentence!
Using gc by itself is helpful, but not that interesting. By combining it with redirection, we can do a lot more. For starters, we can put the contents of one file into another. This is a lot like copying a file. You already know how to do this with cp. Make a copy of benjamin.txt named benjamin1.txt using cp. That command will look like this:
cp benjamin.txt benjamin1.txt
Now, try to make benjamin2.txt, with the exact same contents as benjamin.txt but by using gc and redirection. See if you can figure out how to do this.
In case you’re stumped, here’s the answer:
gc benjamin.txt > benjamin2.txt
Of course, that’s just a more cumbersome way to do what we can already do with cp. The difference in these methods is substantial, though, because using gc we can append information to a text without replacing what is already there, and we can also get the contents of multiple texts and put them into another text.
First, let’s look at appending. We need something to append, so let’s make a new text called next.txt and write to it the sentence “By making many reproductions it substitutes a plurality of copies for a unique existence.” We could make our file first with ni, but we don’t need to. If we tell PowerShell to write to a file that isn’t there, it will make the file for us. Thus we can just enter
write "By making many reproductions it substitutes a plurality of copies for a unique existence." > next.txt
Use gc to check that next.txt really is what we want it to be.
Now, let’s add the content of next.txt to benjamin.txt using gc and redirection. Seems simple enough, right? Try entering
gc next.txt > benjamin.txt
Then, check what happened with gc benjamin.txt. You will see that you have indeed put the content of next.txt into benjamin.txt, but that you’ve replaced the content that was already there. This isn’t what we wanted to do!
Using >, we just told PowerShell to put the content of one text into another, and it overwrote what was already there. We can fix this by using >> for our redirection instead of just a single >. This tells PowerShell to append the new information. Try this:
gc next.txt >> benjamin1.txt
Use gc to see that benjamin1.txt now has both sentences.

The difference between > and >>
Now, let’s see about getting the contents of multiple files at the same time.
Working with Lots of Files at Once Using Wildcards (*)
You should now have four files in your directory, each with one or two sentences from Walter Benjamin’s artwork essay in it. You might be losing track of what exactly is in them. Let’s use gc to check the contents.
We could look at each one individually. As you may have guessed, though, you can display all four with one command. Enter
gc benjamin.txt, benjamin1.txt, benjamin2.txt, next.txt
and you’ll get your sentence printed out three times. We can do this even more quickly. Try entering
gc *.txt
The result will be exactly the same thing. What the *.txt does is tell PowerShell to find anything ending with .txt. The * is called a wildcard, and can be used to replace any part of a file name. Try typing gc ben*, and you’ll get only the texts that begin with “ben”. Since the only files in this directory are the four we want, you can even type gc * and get the content we’re interested in by having PowerShell get the content of everything in the directory.
Searching with Select-String (sls)
Of course, we don’t always want to see everything. Often, we want to find specific content. Using *, we can search multiple files at the same time. One of our sentences had something about “unique existence,” didn’t it? Where was that? We can use the Select-String cmdlet to search for specific bits of text. Enter
sls "unique existence" *.txt
and PowerShell will spit out all the lines containing that string from any file in our directory ending in .txt.
Using sls on files as small as ours won’t save us all that much time over reading the files ourselves. But using this cmdlet with larger numbers of longer files can be extraordinarily helpful.
Infinite Loops and Aborting with control-c
Let’s look at one more useful task we can accomplish by combining gc, wildcards, and redirection. Suppose we have numerous different files we want to combine together into another file, for instance because we’ve downloaded hundreds of song lyrics we want to analyze, and want to group all the ones by a certain artist into a single file. Although we could do this by listing them all out, i.e. gc text1, text2, text3 > newtext, if we have a hundred texts, this will be pretty cumbersome. This is what wildcards are for.
Let’s try concatenating all four of our texts and putting the result into a fifth text. Using *.txt might seem a handy helper. We are about to do something foolish, so please read the next paragraph before typing this command!
Let’s try
gc *.txt > bigben.txt
Your computer will appear to do nothing. But unlike other times when your computer has apparently done nothing, this time, the command prompt doesn’t come back up. If you try to type another command, nothing will happen. This is because PowerShell is still working on your last command. As you do more and more complicated things with PowerShell, this will sometimes happen — you’re making your computer sweat! In this case, however, PowerShell will never stop working on this command, because it is in an infinite loop! Fortunately, you can abort this task with
control-c
Using control-c like this is very handy, as you may sometimes accidentally get caught in a loop, or you may just get sick of waiting for your computer to do certain extremely long tasks.
How did we just get stuck in that loop? We told PowerShell to put all files ending in .txt into a new file ending in .txt. Since that new file fell under the rubric of files the computer should be concatenating and adding to bigben.txt, it added that one in there, too. And then, since it had a .txt file with new content, it added that as well. This is a great example of something we often forget about our computers: they are not smart. Extremely powerful, yes. But totally lacking common sense. Humans look at instructions and try to interpret them. “She can’t possibly mean for me to add the contents of the final text back into itself over and over again forever.” Computers, on the other hand, do exactly what we tell them to, no matter how illogical our commands may be. As you gain experience working on the command line, you will often be flummoxed by your computer’s overly literal interpretations of your commands, but you will also learn how to give it instructions it can follow. Infinite loops should be avoided at all costs, but they will occur, and when they do, just remember control-c.
Specifying cmdlets with Parameters
We have seen that your computer needs to have things told to it in very exact ways. Fortunately, PowerShell provides methods for refining cmdlets by adding parameters.
Let’s look at an example. Use gci and you should see that you have five files in your directory. One of them, bigben.txt, is very large. Enter
gc bigben.txt
PowerShell will start dumping an inordinate amount of text onto the screen. You may want to abort the process with control-c (this is not an infinite loop, just a really large file, so you can wait for the whole thing to print, it’ll just take a while.) You can use the cmdlet clear if the large block of text bothers you.
What we really want to see is just that bigben.txt really is comprised of the lines of the other texts, repeated over and over again. We can do this by looking only at the beginning and ending, and for this, we add a parameter to our cmdlet.
Enter this:
gc bigben.txt -totalcount 10
You will see the first 10 lines of your text. Make sure to include the hyphen, as otherwise PowerShell will not know that -TotalCount is a parameter. Now enter
gc bigben.txt -tail 10
and you will see the last 10 lines. What we have done is specified our gc cmdlet with the parameters -totalcount and -tail. Almost all cmdlets can be refined by adding parameters like this. But how do we know what parameters are available?
Finding out more with Get-Help
PowerShell does not expect you to memorize all the possible parameters for all the cmdlets. Instead, it provides an easy way to list them off using the cmdlet Get-Help. Enter
Get-Help gc
and you’ll get a screen that looks like this:
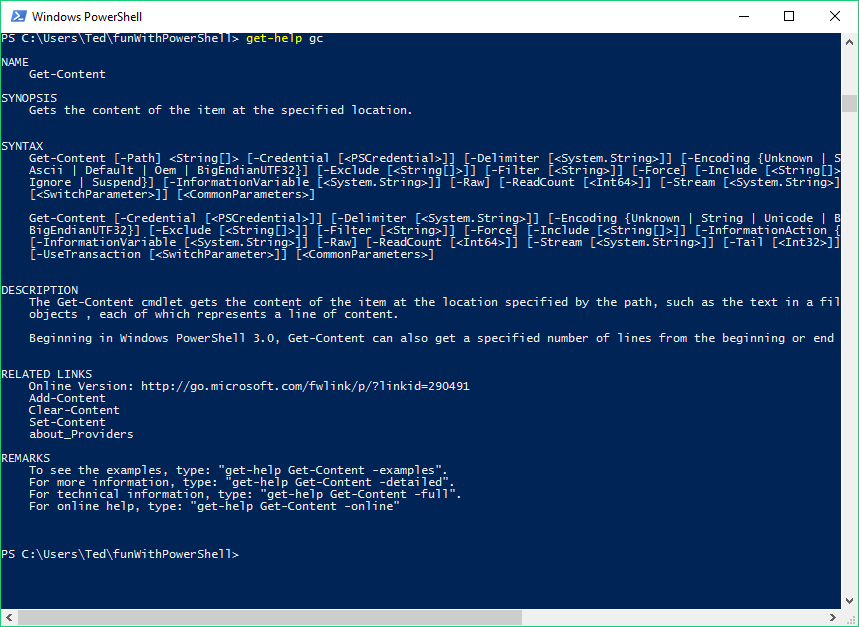
Help page for Get-Content
Your page may be slightly different, but the important part to look at right now is the section labeled “SYNTAX.” This shows us all of the parameters we can add to Get-Content. If you’re just trying to remember the exact name of a parameter you’ve used before, this will be enough to jog your memory. But it doesn’t tell us what the parameters actually do.
Fortunately, Get-Help itself has parameters, and by adding -online to your Get-Help cmdlet, you tell PowerShell to ask your browser to open a page on Microsoft’s TechNet portal that explains all the parameters in plain English. Enter
Get-Help gc -online

The online help page for Get-Content
Here we can see the actual description of the parameters -TotalCount and -Tail.
Solving the Infinite Loop Problem with the -exclude Parameter
Look again at the help for Get-Content, and you’ll see that one of the possible parameters is -exclude. This sounds promising for dealing with our infinite loop problem! The description online reads: “Omits the specified items. The value of this parameter qualifies the Path parameter. Enter a path element or pattern, such as ‘*.txt’. Wildcards are permitted.” This sounds very promising. The “Path parameter” is (usually) the thing you write immediately after your cmdlet. It tells PowerShell where to apply the cmdlet. When we type gc benjamin.txt, benjamin.txt is the path. It is actually shorthand for .\benjamin.txt, which in turn is shorthand for C:\Users\YOURUSERNAME\funWithPowerShell\dir\benjamin.txt. That line tells your computer the path to follow through the tree-like structure of your file system in order to find the file you want. What help is telling us, then, is that we can omit specified items from our gc cmdlet by adding the parameter -exclude and then entering the path we want it to exclude. We can use this to take the contents of all of our .txt files and put them into a new file without creating an infinite loop. See if you can figure out what to type, using what we did with -totalcount and -tail as a reference.
Here’s what I did. I first deleted my current bigben.txt with rm. (This isn’t really necessary, since using a single > on my redirect will replace the current contents anyway, but it’s nice to have a clean start!) Then I entered
gc *.txt -exclude bigben.txt > bigben.txt
Voila!
Throughout this process, we’ve been adding texts together, or concatenating them. You can learn more about concatenation from Wikipedia, and if you want to see a few more examples of concatenation using PowerShell, check out this blog entry, which will take you into the wonderful world of variables, something beyond the scope of this tutorial, but well worth learning about.
Getting Even More out of cmdlets with Piping
So now we have five documents in our directory. In order to be able to do really useful things with them, we need one more tool: Piping. Piping is sort of like redirection, but instead of telling PowerShell to put the results of a cmdlet somewhere else, it tells it to take the output of one cmdlet and use it as the input for another. Where we use > for redirection, for piping we use |.
We are going to get even more mileage out of gc, this time by piping its results to the cmdlet measure-object (or just measure). This latter cmdlet measures various properties. For our purposes, we will use it to get the number of lines, words, and characters in our files by adding the parameters -line, -word, and -character, or just -l, -w, -c. (With parameters, you only need to type as much of the name as necessary to identify the parameter in question. Use Get-Help to figure out what that will be for a given cmdlet.)
Enter this:
gc benjamin.txt | measure -l -w -c
You should get a count of the lines, words, and characters in the text. Of course, you could do this easily enough with your word processor. The power of working on the command-line comes from being able to manipulate lots of things at once and being able to specify what we want done with extra precision. In this example, this means we can count words in multiple of our files at once, and that we can add additional parameters to specify exactly how we want to count them.
See if you can get a count for the lines, words, and characters in all the files. It should be no surprise to you that the wildcard (*) can help you here. For instance, you could enter
gc *.txt | measure -l -w -c
With our five small files, this still doesn’t result in much, but it would have taken longer using the word processor, and we could also do it with a directory containing thousands of lengthy files. We can also control our actions more precisely with additional parameters. Use Get-Help measure to see the parameters at your disposal. We could go to the online help to learn more about them, but for now let’s just use one that’s self-explanatory as an example: -IgnoreWhiteSpace.
Use the up-arrow to get your last command back, and add -ignorewhitespace to the end. (You can also just type -ig, but -i alone is not sufficient, because it doesn’t differentiate the -IgnoreWhiteSpace parameter from the -InputObject parameter, as a helpful error message will tell you if you try it.) You’ll see the same count, but with fewer characters, because this time PowerShell didn’t count the spaces. The advantage of precision is clear over using a word processor, where it is difficult to determine whether or not white space is being ignored in the first place, let alone to toggle the feature.
The most important reason to become familiar with using the command line is not because of the increased precision or the ability to work with multiple files, useful as these features are, but rather because of the many additional tools you gain access to, as mentioned in the introduction. When getting set up to work with some of these tools, you may run into problems because Windows sometimes configures the paths incorrectly. Fixing this problem requires setting environment variables, a topic beyond the scope of this tutorial. Fortunately, there is a lot of support out there, and a little searching will usually turn up the solution you need. Because many lessons on The Programming Historian require you to use Python, let’s look briefly at getting Python set up. Having done this, you will be less daunted by instructions for setting environment variables for other programs.
If you don’t already have Python, or if you wonder why you would want to use it, check out the Python tutorial right here on The Programming Historian. In that tutorial, you will learn to set up Python to run scripts directly in an editor. It will often be more useful to be able to run scripts from the command line. In order to do that, we need to set an environment variable. First, you need to know the name of the directory where Python is installed on your computer. Enter sl C:\ and then use gci. You should see a directory named “Python” with the version number at the end. On my computer, the directory is “Python27.” Now we tell Windows to create a Path variable pointing to that directory by entering this into PowerShell, replacing “Python27” with the name of the directory on your computer:
[Environment]::SetEnvironmentVariable("Path", "$env:Path;C:\Python27", "User")
This tells Windows: “Hey, the path for Python is C:\Python27.” If you want to understand exactly how this works, look at this page on Microsoft’s TechNet portal (the same portal you get to using the -online parameter with Get-Help).
Once you’ve entered the command above, exit PowerShell and start it again. You should now be able to start the Python interpreter by typing python into PowerShell. To run scripts, you simply type python followed by the path for the script you want. It’s easiest to first navigate to the directory with the script in it, and then just enter python script-name.py.
Now you’re all set up to run Python scripts from the command line!
Conclusion
In this tutorial, you’ve learned some of the basics of working with PowerShell, the command-line interface on Windows. You now know enough to use PowerShell for many of the day-to-day tasks you do on your computer, and I would recommend using it for just that. At first, you may find it more difficult to copy a file and move it to a new directory from the command line, but the more you practice, the more natural it will become. Eventually, you will be very comfortable working in PowerShell, and will be able to do many tasks more easily this way.
Although we have only had a glimpse of what PowerShell can do, you now have enough basic knowledge to learn to do more. There are lots of helpful resources online, and they are yours for the googling! It is also helpful to know that a lot of discussions about using the command line will be based on Unix and other *nix systems. In most cases, if you just type the names of the commands they are using together with “PowerShell” into a search engine, you will find the corresponding PowerShell cmdlet.
The more you use PowerShell, the easier it will be, and the more you will learn to unlock capabilities you did not even know your computer had! Eventually, you will see how constraining your GUI has been. You won’t stop using it, but you will find yourself starting up PowerShell more and more often to break free from these constraints, and utilize your computer more fully. Your computer is like a pocket knife. The GUI only allows you to open a few blades. With the command line, you can open them all!
Quick Reference
This table serves as a quick reference to all the cmdlets discussed in this lesson. The first column shows the actual name; the second shows what you will normally type instead. The Bash equivalent shows the most similar command in Bash. Unless this command is in parentheses, it can also be used in PowerShell as an alias for the corresponding cmdlet. (Linux and OS X users, please see the note below.) For a more complete explanation of any of the cmdlets, use Get-Help with the -online parameter (e.g. Get-Help Get-ChildItem -online.)
| Cmdlet | Alias | Bash Equivalent | Description |
|---|---|---|---|
Get-ChildItem |
gci |
ls |
List the directories and files in the current location. |
Set-Location |
sl |
cd |
Change to the directory at the given path. Typing .. rather than a path will move up one directory. |
Push-Location |
pushd |
pushd |
Changes to the directory. |
Pop-Location |
popd |
popd |
Changes back to the previous directory after using pushd |
New-Item |
ni |
(touch) |
Creates a new item. Used with no parameter, the item is by default a file. Using mkdir is a shortcut for including the parameter -ItemType dir. |
mkdir |
none | mkdir |
Creates a new directory. (See New-Item.) |
Explorer |
none | (open) |
Open something using File Explorer (the GUI) |
Remove-Item |
rm |
rm |
Deletes something. Permanently! |
Move-Item |
mv |
mv |
Moves something. Takes two arguments — first a filename (i.e. its present path), then a path for its new location (including the name it should have there). By not changing the path, it can be used to rename files. |
Copy-Item |
cp |
cp |
Copies a file to a new location. Takes same arguments as move, but keeps the original file in its location. |
Write-Output |
write |
echo |
Outputs whatever you type. Use redirection to output to a file. Redirection with >> will add to the file, rather than overwriting contents. |
Get-Content |
gc |
cat |
Gets the contents of a file and prints it to the screen. Adding the parameter -TotalCount followed by a number x prints only the first x lines. Adding the parameter -Tail followed by a number x prints only the final x lines. |
Select-String |
sls |
(grep) |
Searches for specific content. |
Measure-Object |
measure |
(wc) |
Gets statistical information about an object. Use Get-Content and pipe the output to Measure-Object with the parameters -line, -word, and -character to get word count information. |
> |
none | > |
Redirection. Puts the output of the command to the left of > into a file to the right of >. |
| |
none | | |
Piping. Takes the output of the command to the left and uses it as the input for the command to the right. |
Get-Help |
none | man |
Gets the help file for a cmdlet. Adding the parameter -online opens the help page on TechNet. |
exit |
none | exit |
Exits PowerShell |
Remember the keyboard shortcuts of tab for auto-completion and the up and down arrows to scroll through recent commands. These shortcuts can save a lot of typing!
A note to Linux and OS X users: Although many Bash commands work in PowerShell, they often don’t do exactly the same thing. They may take different parameters, and the syntax may be slightly different. (Technically, they never do the same thing, as PowerShell commands produce objects, whereas Bash commands produce text.) However, the similarity of their actions offers a handy crutch for quickly getting up and running with PowerShell, and a little help from the Get-Help cmdlet (you can just type man like in Bash) will usually resolve any confusion.