
INTERRUPT_EXCEPTION_NOT_HANDLED is a Blue Screen of Death (BSOD) error commonly occurring on Windows 11 and 10 PCs. This Windows error is typically caused by a hardware or software conflict that triggers an interrupt request.
When the operating system cannot handle the interrupt request, it results in a system crash, and the INTERRUPT_EXCEPTION_NOT_HANDLED BSOD error message is displayed.

Seeing a BSOD error can be frustrating and worrying, but fortunately, there are several solutions that you can try to fix the INTERRUPT_EXCEPTION_NOT_HANDLED error on your Windows 11 or 10 computer.
What Causes This BSOD Error to Happen on your Windows PC?
Here are some common causes of this error on Windows computers:
- Outdated or corrupt device drivers – If the drivers for your hardware devices are outdated or corrupted, they can trigger this error.
- Faulty hardware – Issues with your hardware components, such as hard drive, RAM, or processor, can also cause this error.
- Software conflicts – If two or more software programs conflict, it can lead to an INTERRUPT_EXCEPTION_NOT_HANDLED BSOD error.
- Malware or virus infections – Malware or viruses can corrupt system files, including drivers, resulting in this error.
- Overclocking – Overclocking your system components beyond their recommended settings can cause this error.
How to Fix INTERRUPT_EXCEPTION_NOT_HANDLED BSOD Error on Windows 11/10 PC
You can use several methods to fix the INTERRUPT_EXCEPTION_NOT_HANDLED BSOD error on your Windows 10/11 PC. When encountering this blue screen problem, you might see this error message:
“Your PC ran into a problem and need to restart. We’re just collecting some error info, and then we’ll restart for you. (0% Complete). If you’d like to know more, you can search online later for this error INTERRUPT_EXCEPTION_NOT_HANDLED”
Here are some of the most effective solutions you can try right now:
Update Device Drivers
Outdated or corrupted drivers are a common cause of this error. You can update your device drivers to the latest versions to fix it. You can do this manually by visiting the manufacturer’s website and downloading the latest drivers or using third-party software to update drivers automatically.
Check for Hardware Issues
If the error persists after updating your drivers, it may be due to hardware issues. You can run hardware diagnostic tests to identify any issues with your hardware components, such as RAM, hard drive, or processor. If any hardware is faulty, you may need to replace it.
Uninstall Conflicting Software

If two or more software programs conflict, it can cause this error. To fix it, you can uninstall the conflicting software programs, then reinstall them one at a time to identify the problematic software.
Scan for Malware or Virus Infections
Malware or virus infections can cause this error by corrupting system files. To fix it, you should scan your PC for malware or viruses using antivirus software and remove any infections.
Restore your System to Factory Settings
If the above methods don’t work, you can restore your system to a previous state before the error occurred using Windows System Restore. This will revert your PC to when the error wasn’t present.
Disable Overclocking on your PC
Overclocking your system components can cause this error. You should disable overclocking and restore the components to their default settings to fix it.
Remember that the INTERRUPT_EXCEPTION_NOT_HANDLED BSOD error is a common issue that can occur on Windows 11/10 PCs for various reasons. Fortunately, there are several effective solutions to fix this error. Apply these solutions today to troubleshoot the error and get your PC back to normal functioning.
Windows Dispatch is a website supported by its readers & community. Some pages may contain affiliate links which may allow us to earn a little money when you buy through them.
Eddie Mendoza Jr
Eddie has a degree in Information Technology with a natural inclination towards troubleshooting devices. With more than 10 years of blogging experience in different niches, he has found it most satisfying when writing easy-to-follow guides and simplified articles related to computers, smart TVs, mobile devices and Internet-based services.
Do you find INTERRUPT_EXCEPTION_NOT_HANDLED error on your Windows 10 desktop while starting any program or closing? Being a BSOD issue, system experiences continuous restart without prior notice along with weird texts. Furthermore, it holds a bug check value of 0x0000003D which also leads to freeze and hang.
The main causes behind this Blue Screen of Death are outdated device drivers. Other reasons involve malware infection, a conflict between similar programs, troublesome memory, missing DLL files, and faulty Windows image files. Addition to these, low disk space in the HDD, problematic areas present in it and often using an extra drive might also create the issue. You need to take necessary actions to limit its effects so here is the description of some workarounds which can solve INTERRUPT EXCEPTION NOT HANDLED error easily. Solutions list is as follows –
INTERRUPT_EXCEPTION_NOT_HANDLEDBSOD in Windows 10 Solutions
Here is how to fix INTERRUPT_EXCEPTION_NOT_HANDLED BSOD in Windows 10 –
1] Restrict Automatic Restarting of Windows 10
The most annoying conception about BSOD error in Windows is, it will try to reboot by itself anytime without even noticing the user. At the same time, due to lack of opportunity, applying resolutions will be impossible as well. The same is applicable to INTERRUPT_EXCEPTION_NOT_HANDLED blue screen of death error. Therefore, first thing first, you must disable this action following through below guidelines –
Step-1: Press Win+D and head to the Desktop screen after saving all the ongoing programs.
Step-2: Make a right click on the This PC icon and choose Properties from the menu.
Step-3: When the System Properties comes into view, select “Advanced system settings” located at the left-hand side.
Step-4: In a while, a wizard will unroll on the screen named System Properties. Switch to Advanced tab.
Step-5: Navigate to the Startup and Recovery block and perform a click on Settings button located here.
Step-6: Windows will show up now a Startup and Recovery window on display. Proceed ahead to its System failure area.
Step-7: In due course, uncheck the box beside option Automatically restart to continue.
Step-8: Finally, hit the Apply and then OK to save the modifications.
That’s it, Windows will now restrict the device from rebooting automatically. Thereafter, you will have sufficient time to sort out the issue.
2] Update Drivers via Windows Device Manager
We have mentioned earlier in the above section that, outdated and defective device drivers play a bigger role in causing “INTERRUPT_EXCEPTION_NOT_HANDLED” BSOD in Windows 10. Therefore, updating these would resolve the error at the same time can resist many other vulnerabilities. Device Manager shows these drivers in yellow indication and thus, the task becomes a lot easier to accomplish. Here are the steps to follow –
- Do a combined press of Win & S keys and invoke Taskbar search on display.
- When it shows up, type Device Manager in the null search box and also select it when available in the result.
- Moving ahead to the console, have a closer look at the devices having an exclamation mark at its side.
- If you notice any, do a click on that very device to expand the driver’s list.
- Right click on the drivers and choose the option namely “Update driver” from the menu. Keep on moving with the instructions to complete the update procedure.
- Do the same for all the devices showing exclamation mark and lastly ensure to reboot the device. Hopefully, there will be no more INTERRUPT_EXCEPTION_NOT_HANDLED BSOD in Windows 10 afterward.
3] Use the Windows Blue Screen Troubleshooter to deal with BSOD issues
BSOD errors like INTERRUPT_EXCEPTION_NOT_HANDLED found to cause serious damage to Windows. Seeing the devastation, Microsoft technicians came out with a new default utility that can effectively fix this issue. A utility named Windows Blue Screen Troubleshooter was introduced in Windows 10 Fall Creators Update. Here is how to use the default tool –
- Press Windows and I keys together and call up the Settings app.
- Select Update & Security.
- When the succeeding page loads completely, choose Troubleshoot from the left layout.
- Now, jump on to the alternative pane and reach out to Blue Screen option.
- Make a click on it and hit Run the Troubleshooter button and apply the utility.
This tool will, therefore, resolve the INTERRUPT_EXCEPTION_NOT_HANDLED BSOD in Windows 10. In the end, you can stay out of any trouble and work smoothly.
4] Load only Basic Processes using Safe Mode
Starting after the development, Windows has been indulged in many known and unknown issues. Every time in critical error, Booting in the Safe Mode was a rescuer. In this special Startup method, the device starts with loading only basic processes that heal the most. To apply this process, the guidelines are as following –
- Click on the Start.
- When it launches, select Power icon and also choose Restart holding Shift key at the same time.
- In cooperating with the action, Windows will reboot normally and when it boots up to Start you will come across a Blue screen showing few options.
- Make a click on the Troubleshoot option and load the next screen.
- On this page, select Advanced options and in the process, hit Startup Settings.
- In the consequent move, click on the Power icon located at the bottom right most end of this screen. Allow the device to reboot for the second time.
- After the Startup screen will come in, you will see a collection of options including one to Enable Safe Mode.
- At this moment, Press F4 button at a stretch to enter into the Safe Mode.
Once moved to the Safe Mode, there shouldn’t be any more INTERRUPT_EXCEPTION_NOT_HANDLED BSOD in Windows 10.
5] Don’t keep the Update patches pending, Install immediately
Every single cumulative patch comes with the latest features and fixes of existing bugs. Installing them strengthen the Operating System. Since an outdated OS always at a higher risk of getting affected with INTERRUPT_EXCEPTION_NOT_HANDLED BSOD error. Thus, let’s step out for installing them by going through the below instructions –
Important – You need to get connected with a speedy internet connection to download these files quickly. Try to get connected with Wi-Fi or broadband providers. If you have to use the “Mobile Hotspot”, disable Metered connection in the Network Settings.
- Click the Start button.
- Once the menu appears, select the Settings icon. And let the app to launch in a separate window.
- Proceeding forward, select Update & Security tile and load its additional setting page.
- After transferring to the succeeding page, select Windows Update from the left wing and jump to the corresponding pane.
- On the right, ignore the dialog showing “You’re up to date” and at the same time, perform a click on Check for updates button under it.
- Once the searching process ends and patches are available, select the Download button located under all.
- Upon finishing the downloading process, the installation begins automatically. Keep your eyes on the screen for further instructions coming here.
- Do Restart once asked and update the Windows completely.
6] Remove Applications conflicting to fix INTERRUPT_EXCEPTION_NOT_HANDLED
If two similar kinds of applications in the Windows stay in parallel, they often come in contact with each other. In the end, many important files go missing. This action results in occurring INTERRUPT_EXCEPTION_NOT_HANDLED BSOD in particular. The resolution is very simple, we need to uninstall one from them. To remove one program from the system, follow below instructions –
- Open the Windows Settings app by pressing “Win+I” keys together.
- When in the layout, select Apps in this layout and proceed to more settings page.
- Choose Apps & features from left wing side when the succeeding page loads.
- Pass over to adjacent pane in due course.
- Moving ahead on the right, reach out to the Apps causing INTERRUPT_EXCEPTION_NOT_HANDLED BSOD error in the list.
- Select it and also hit Uninstall option from the expanded pane.
- When UAC prompts for permission, choose Yes to provide the consent.
- Perform the next moves according to the instructions available on display.
- When these are uninstalled, restart the device using a convenient way.
- Upon startup, check for the BSOD error in the system. If nothing comes up, install those programs if required.
7] Unplug external Hardware devices and reconnect once INTERRUPT_EXCEPTION_NOT_HANDLED BSOD resolves
Sometimes, people might experience the INTERRUPT_EXCEPTION_NOT_HANDLED BSOD in their respective systems after using hardware items. An External hard drive in particular. So many people around the world have resolved the issue only by offering these devices a temporary break. Accomplish the task using the below guidelines –
- As for the initial move, disconnect the hardware accessories in order and place them in an accessible location.
- Restart Windows 10 PC.
- After the cycle of rebooting completes, perform an inspection for the existence of BSOD error.
- If no issue shows up next, plug in all the separated accessory one by one.
- Now, launch the web browser from the computer and visit the manufacturer website for respective items.
- Download and install again the latest drivers from there.
8] Launch Windows Security and abolish all the Malware
Nowadays, it’s really hard to stay from viruses since they are present in every corner of the web. When you visit a malicious website or do a click on the suspicious link coming in Spam mail, they get entrance to the system. Once there, deteriorates the system components and INTERRUPT_EXCEPTION_NOT_HANDLED BSOD evolves. Therefore, we need to clean them immediately as soon as diagnosed and in this concern, Windows Security app can offer the best deal. See the method in below segment –
- Open the Taskbar Search, type “Windows Security” in the empty text area provided and select the same when it shows up in the result.
- Moving on to the app interface, choose Virus & threat protection from the left side and also move to the corresponding overlay.
- On the right, select Scan options link to spread up the detection methods.
- In the continuation of the task, choose the radio button before Full scan.
- In due course, hit Scan now button and let the process begin.
- Upon finishing up the scan, you will see the result. If any malware present, select Clean threats and dismiss them.
- On the next page, among three options available, select Remove and later on Start actions button to start the removal.
9] Put an end to the Memory issues
You might get the INTERRUPT_EXCEPTION_NOT_HANDLED BSOD error when Windows suffer in memory issues like incorrect allocation and defective areas in RAM. To abolish these problems, Microsoft has developed Windows Memory Diagnostic and this default tool detects and fixes those issues in the most effective way. To use the tool, instructions are as follows –
- Get access to the Settings app and once you come across the search box in the UI, type memory.
- Select “Diagnose your computer’s memory problems” from the visible list.
- When the utility shows up in the popup, choose “Restart now and check for problems (recommended)” option.
- In a short interval, Windows 10 will restart. When it signs back in afterward, a Blue screen will come in display and start detecting memory issues.
- Once the progress hits 100%, the system will reboot again automatically. Upon coming back to operation later, results will be available in the System Tray of the Notification area.
10] Clear up the Junk files to make more space in Disk
Windows 10 produces lots of junk files every day and stores them in disk space. These files are unnecessary and will come to no use eventually later on. Furthermore, when they pile up in a big amount, occupy huge disk space. As a result, the normal functionality deteriorates and INTERRUPT_EXCEPTION_NOT_HANDLED BSOD evolves. We have the Disk Cleanup tool to delete these files in a single shot. To access the tool, follow the below steps –
Step#1: Hover the cursor to Start menu and do a right click on it.
Step#2: Select Run option listed there and invoke the dialog on the screen.
Step#3: Type cleanmgr in the void box available here and hit Enter key eventually.
Step#4: A small popup will appear shortly as for the action and ask you to select the drive where you opt to carry out freeing up the task.
Step#5: Choose C: by clicking on the available dropdown menu and also select OK option seen here.
Step#6: The Disk Cleanup utility will first calculate the space in volume it can recover.
Step#7: When it is available in the wizard, move down a little and hit Clean up system files button.
Step#8: The small popup dialog will appear again. Select the same drive like before and hit Ok.
Step#9: Disk Cleanup for C: will again calculate retrievable space in the drive and throw new wizard on the screen.
Step#10: Now, head to Files to delete section and check all the boxes leaving Downloads.
Step#11: Now, Select Ok to initiate cleaning.
Step#12: The process will take some time to finish up, so do wait patiently until it ends. Restart the device and when comes back to desktop later, see if the error is resolved.
Note- Before starting the deleting process, perform a check in Recycle Bin for necessary items. If anything present, restore them in respective locations.
11] Remove Faulty Windows Update Files
Usually, this is rare to have any issues in the autonomous Windows Updating procedure while doing through the Settings app. Unfortunately, if the process terminates abnormally anytime, INTERRUPT_EXCEPTION_NOT_HANDLED BSOD error will be imminent. To safeguard the system, these dreadful files need to be removed soonest possible. You can use the below guidelines to delete those files –
- Open the Windows Settings app using any of the conventional methods.
- When it unrolls, proceed to the Update & Security tile and eventually do a click on it.
- Upon loading the consequent page, select Windows Update from the left side.
- Jumping ahead to the corresponding right, perform a click on the link saying “View update history”.
- After shifting to the succeeding window, choose the option namely Uninstall updates.
- In a moment, the Installed Updates window will come up.
- Reach out to the last cumulative patch in the list and do a right click on it.
- Hit Uninstall option once visible in the upper ribbon.
- Follow on-screen instructions appearing to delete those files completely.
12] Detect the Poor areas in Hard Disk and resolve using the Disk Checking tool
Hard Disk Areas might have poor areas present as for using it day after day. When such segments evolve, INTERRUPT_EXCEPTION_NOT_HANDLED BSOD is eminent as well. To settle down these, Disk Checking Utility comes handy. The detailed process is stated below –
- Make a together press of Win+ S hotkeys and invoke the Taskbar Search.
- When it appears on display, type cmd.exe in the empty space provided and do a right click on Command Prompt when visible in the result.
- Select Run as Administrator and also choose Yes once User Account Control prompts.
- On the elevated Command Prompt, type the command in the following arrangement –
chkdsk [Drive:] [parameters]
- Press Enter key and the utility will show only the status of the disk. To recover these poor areas present, you have to add more suffix like below –
/f /r /x
Here,
- f- Fixes the defective areas found in the volume.
- r- Finds out poor sectors in the volume.
- x- Splits up the volume for detection before the process starts.
Finally, the complete command with all notations look like-
chkdsk C: /f /r /x
- C: drive is added here as we have installed the Windows 10 in this drive. You can replace it by D:, E: based on where you have stored the OS.
- Now, Hit Enter key and let the Disk Checking Utility take over charge. Detection and fixing will be done automatically and you just need to wait patiently.
- When the process ends finally, perform a Reboot to the device and afterward check if the error is there or not.
13] Revert all the recent Changes using System Restore
Any changes made on Windows like installing a program or uninstalling another leaves mark in the Windows Registry. When something goes either way in this system, INTERRUPT_EXCEPTION_NOT_HANDLED BSOD comes up. Using System Restore makes these changes undo if the presence of a previously created restore point. If you don’t have such points, we recommend to leave this resolution here and proceed for next. If you have, follow the below guidelines-
- Open Run dialog box by pressing “Win+R” keys together.
- Type rstrui in the search field and also press Enter key.
- When System Restore opens up, hit Next to move ahead.
- From the succeeding page, select Show more restore points.
- Hut the last one and hit Next option.
- Moving ahead to the consequent page, perform a click on Finish and initiate the restoring process.
14] Fix up the Corrupted System Resources and Recover DLL files
When Windows system components indulge in corruption, INTERRUPT_EXCEPTION_NOT_HANDLED BSOD evolves immediately. Missing DLL files causes the same as well and in this regard, System File Checker will effectively make an attempt to resolve these issues in the most fruitful way. To call in the tool, move with below guidelines –
- Press Ctrl+Alt+Del keys altogether and select Task Manager when a page show up.
- Moving ahead, click File located at the upper left corner. Choose Run a new task option to launch a dialog.
- Type cmd in the null search area to proceed ahead.
- Do put a checkmark on the box ahead of “Create this task with administrative privileges”.
- Now, Hit Enter key and head to the Elevated Command Prompt directly.
- Once the black window is upfront, type
sfc/ scannowcommand and hit Enter. - System File Checker will start searching for corrupted system elements and fix automatically.
- Be patient and wait till the process ends normally. Restart the device when it finishes and upon returning to the desktop, check if the INTERRUPT_EXCEPTION_NOT_HANDLED BSOD in Windows 10 has resolved.
15] Uninstall Third Party Anti-virus programs now
Malware is the worst enemies these days and we are no longer safe from them. You can use a third party anti-virus tool to dismiss them. But, Windows Security is the best program in this case. You don’t really need them actually. Besides, using a third party app might cause INTERRUPT_EXCEPTION_NOT_HANDLED BSOD error as well. You can immediately step up to uninstall them using below instructions –
- Invoke the Run dialog in the display by pressing Windows and R keys together.
- In the empty search field, type appwiz.cpl and hit the Enter key.
- Programs and features will flash up from Control Panel and list of install apps will be available.
- Move out for the third party Anti-virus tool the list.
- Make a right click on the same and also hit Uninstall option once available.
- Perform the further move according to the instructions available on display until the app uninstalls completely.
16] Execute DISM tool to rectify Windows image files
Dreadful Windows Image Files plays a greater role in causing INTERRUPT_EXCEPTION_NOT_HANDLED BSOD and to deal with this, DISM tool is well renowned. Here is how to move on to the utility –
- Manage the entrance to the Elevated Command Prompt using the above guidelines shown.
- When in the black window appearing next, type the following command at the root of winking cursor –
DISM.exe /Online /Cleanup-image /Restorehealth
- Hit Enter button from keyboard and let the DISM tool to take action.
- This process might take about 10 minutes and more. Be a little patient until the process ends completely.
- Once it gets over, perform a restart and once sign back again, check for BSOD issues in the system.
These are the collection of most effective resolutions owing to INTERRUPT_EXCEPTION_NOT_HANDLED BSOD in Windows 10. We expect that you have resolved the error already and using the device smoothly. Unfortunately, if someone fails to fix the issue, it’s frustrating though. In that case, you can perform Clean installation of Windows 10 again. This will be the last resort and there will be no more issues if done accurately.
After coming to a decision to perform the task, make sure you have managed the following things –
- First of all, get the device connected with speedy internet network via Ethernet cable or connect to Wi-Fi.
- Create a backup folder and save all the necessary items in it. Take it out in USB or external Hard Drive to avoid losing them when required.
- Being a professional workaround, it might be a little complex to you as a regular user. Therefore, seek help from professionals or skilled personnel to do the task.
Methods:
1] Restrict Automatic Restarting of Windows 10
2] Update Drivers via Windows Device Manager
3] Use the Windows Blue Screen Troubleshooter to deal with BSOD issues
4] Load only Basic Processes using Safe Mode
5] Don’t keep the Update patches pending, Install immediately
6] Remove Applications conflicting with each other
7] Unplug external Hardware devices and reconnect
8] Launch Windows Security and abolish all the Malware
9] Put an end to the Memory issues
10] Clear up the Junk files to make more space in Disk
11] Remove Faulty Windows Update Files
12] Detect the Poor areas in Hard Disk
13] Revert all the recent Changes using System Restore
14] Fix up the Corrupted System Resources and Recover DLL files
15] Uninstall Third Party Anti-virus programs now
16] Execute DISM tool to rectify Windows image files
That’s all!!
The INTERRUPT_EXCEPTION_NOT_HANDLED BSOD occurs when a hardware device or a software program launches a request to the processor, but the processor fails to execute it. This can make the Windows operating system crash, leading to a Blue Screen of Death.
In the following sections, we examine the most common causes of this issue and the troubleshooting methods you can try to resolve it permanently.
Understanding the Causes
This error typically occurs when you install a new program or update your PC. The program or update you have installed might cause conflicts with the drivers or other software in the system, leading to a crash. Alternatively, it might itself be corrupt.
Apart from this, here are a few other potential causes that can cause this problem:
- Faulty Registry keys: if a critical Registry key is missing or contains incorrect information, it can cause the system to malfunction and trigger the error at hand.
- Outdated drivers: the essential drivers may contain bugs or be outdated, leading to system instability.
- Corrupted system files: the critical system files needed to operate the system might be dealing with some sort of inconsistency, preventing you from using the system properly.
Now that we know the potential causes, let’s look at the solutions that helped several affected users fix the issue. Proceed with the one that fits your situation the best.
1. Boot Into WinRe if Your PC Won’t Launch
If the BSOD error is preventing you from booting into the system at all, you will need to access the recovery environment of Windows to perform the troubleshooting methods.
This diagnostic tool comes with several different troubleshooting utilities to help you fix problems like startup issues, hardware problems, and crashes like a Blue Screen of Death. To launch this environment, simply turn on your computer. But as soon as it turns on, repeatedly press the F11 key to launch WinRE.
However, remember that this key may be different for you, depending on your device. In some devices, it is F9 or F12 key. It is best to check your manufacturer’s official website for this information.
If using a key does not work, you can also try hard rebooting your computer a couple of times. Usually, upon the third attempt, Windows automatically launches WinRE.
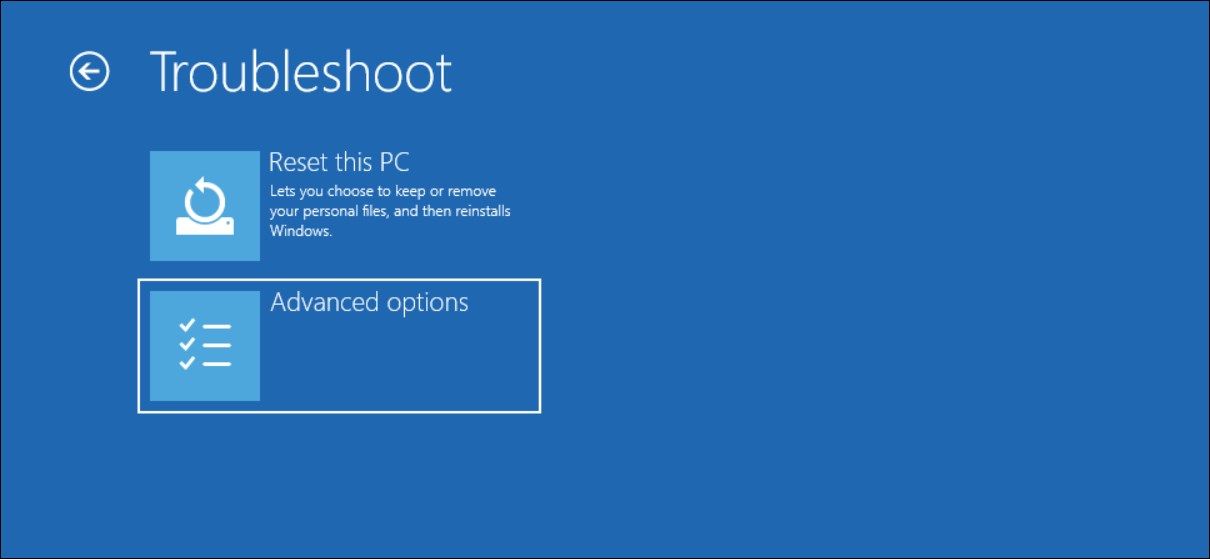
Once in the Recovery Environment, navigate to Troubleshoot > Advanced Options > Startup Settings.
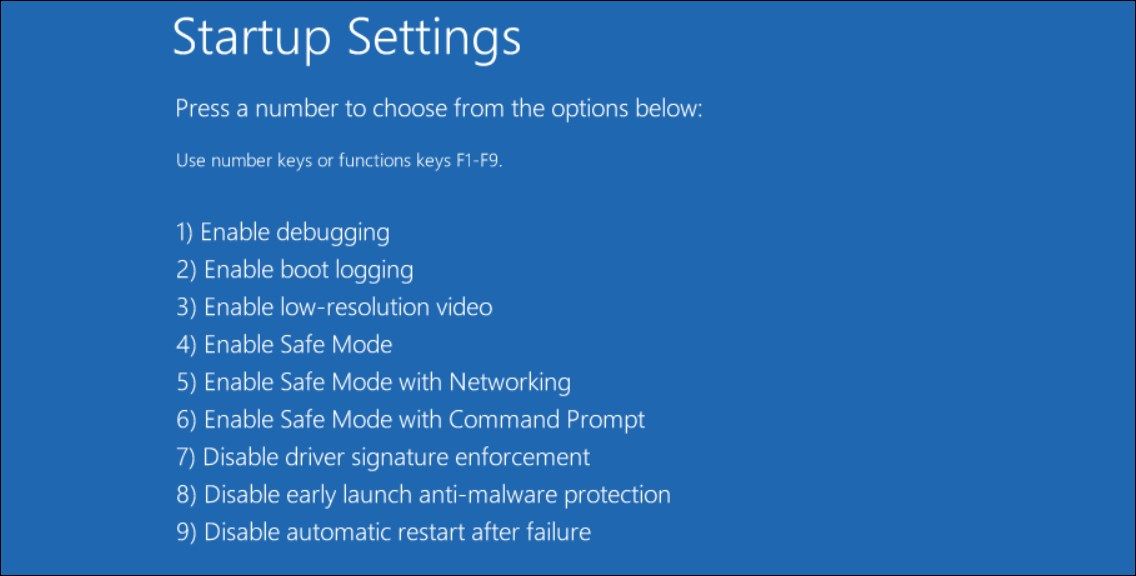
Here, click on the Restart button. Once the system reboots, you should see a list of options. Choose 5 or press the F5 key to boot into Safe Mode with Networking. After booting into Safe Mode, you can perform the solutions below.
2. Delete the Problematic Registry Keys
As mentioned above, several Registry entries might be corrupted or have incorrect information, causing the problem. In the case of this specific error, several users noticed that the Registry keys related to a tech program were leading to the issue.
This is why the first thing we recommend doing is deleting the problematic keys. However, before proceeding, we highly suggest creating a Registry backup to be safe. You will also need to perform these steps in Safe Mode, so if you haven’t yet booted into it using WinRE, follow these steps to boot your computer into Safe Mode.
Once that is done, you can proceed:
-
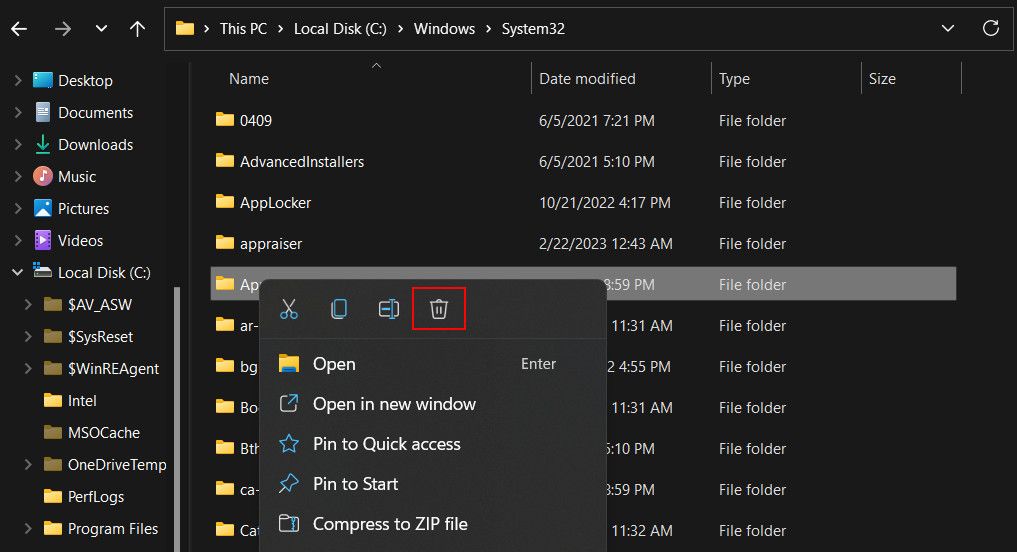
Launch File Explorer and navigate to the following location:
C:\Windows\System32\
-
Here, delete the APOIM32.EXE. APOMNGR.DLL, and CMDRTR.DLL files.

- Now, press the Win + R keys together to open Run.
- Type regedit in Run and click Enter.
- Click Yes in the User Account Control prompt.
-
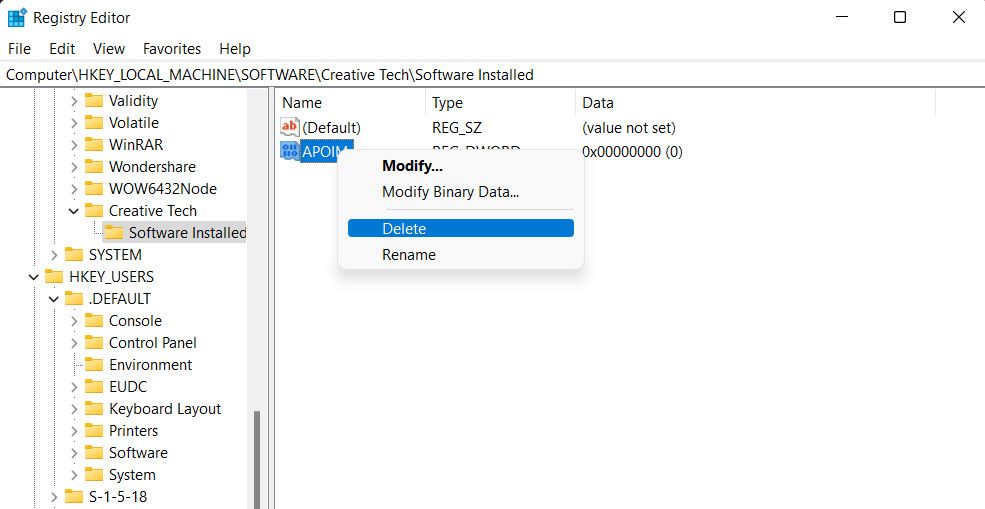
Once you are inside the Registry Editor, navigate to the location mentioned below if you are using a 32-bit system:
HKEY_LOCAL_MACHINE\SOFTWARE\Creative Tech\Software Installed\APOIMHKEY_LOCAL_MACHINE\SOFTWARE\Creative Tech\Installation\CTRedist\APOIM
-
Delete the APOIM values from here by right-clicking on the value and choosing Delete.

-
If you are using a 64-bit operating system, navigate to the following locate and delete the APOIM value using the same method from here:
HKEY_LOCAL_MACHINE\SOFTWARE\Wow6432Node\Creative Tech\Software Installed\APOIMHKEY_LOCAL_MACHINE\SOFTWARE\Wow6432Node\Creative Tech\Installation\CTRedist\APOIM
Finally, you can close the Registry Editor and restart your computer. Hopefully, you should no longer face the Blue Screen of Death error upon reboot.
3. Remove the Problematic Software
If you recently installed new software and the issue started appearing after that, it’s possible that the new software is conflicting with existing software, leading to the problem. In this case, removing the software from the system is the best solution.
Here is what you need to do:
- Press the Win + R keys together to open Run.
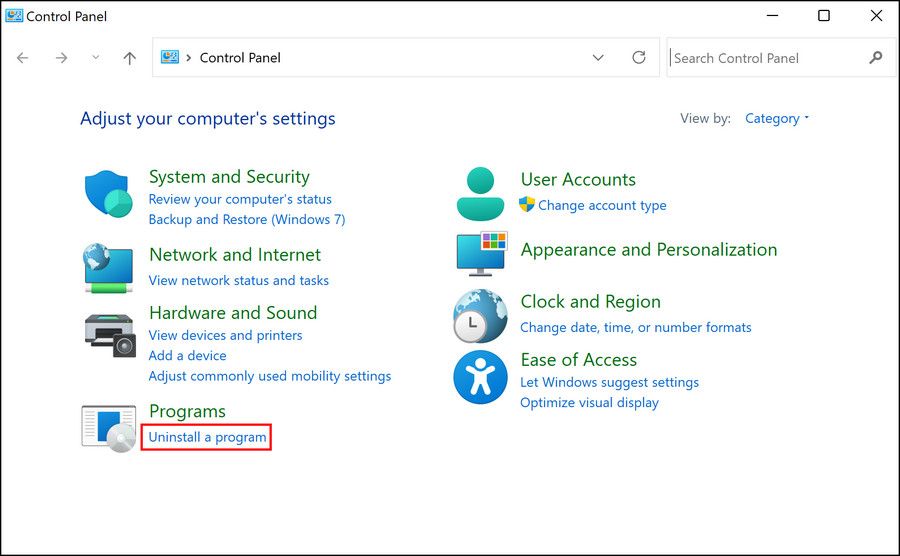
- Type control in Run and click Enter.
-
In the Control Panel, navigate to Programs > Uninstall a program.

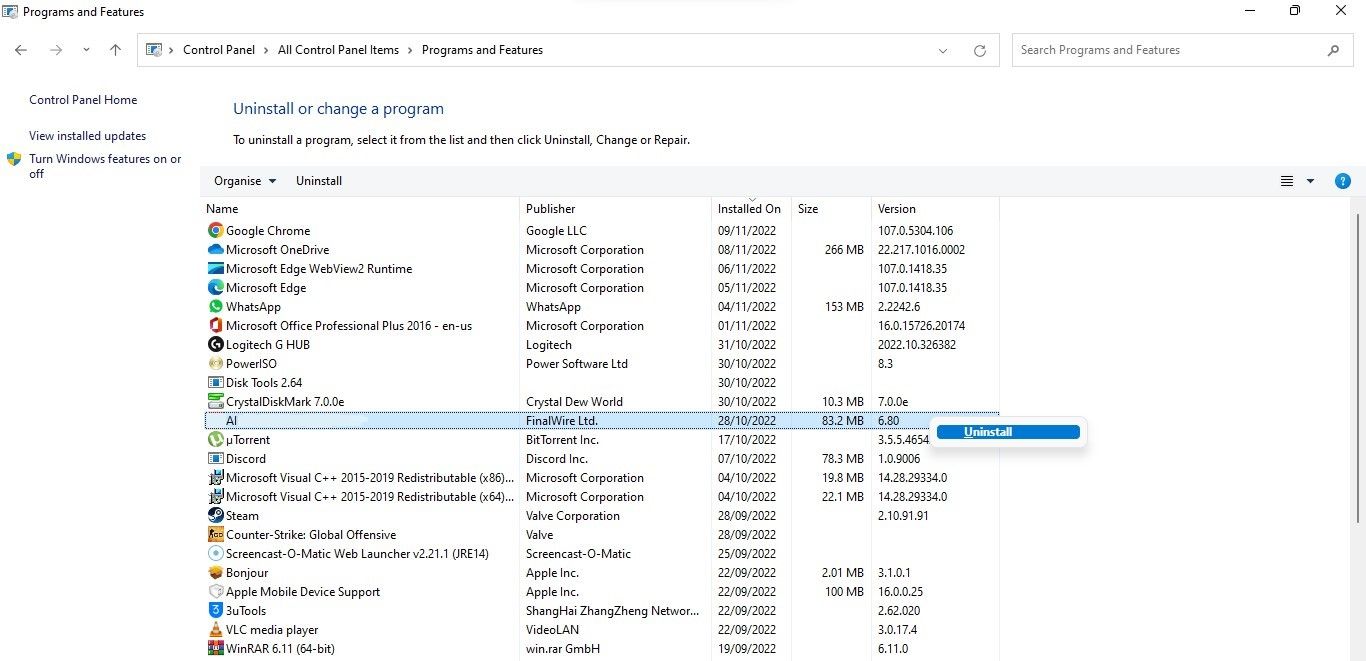
-
You should now see a list of installed apps in the system. Right-click on the targeted app and choose Uninstall from the context menu.

- Follow the on-screen instructions to complete the process.
Once the app is uninstalled, restart your computer and check if the issue is resolved.
4. Run Driver Verifier
If you encounter a blue screen error, it may be due to an issue with the critical drivers on your computer. Identifying the problematic driver manually can be time-consuming, which is where the Driver Verifier utility comes in handy.
It helps you identify the problematic driver quickly and efficiently by subjecting your system to multiple stress checks. Keep in mind that this utility only helps narrow down the issue and won’t fix it for you. We have a detailed guide on how to use the Driver Verifier utility to fix blue screen errors in Windows which you can head over to for step-by-step instructions on how to use the tool.
Once you’ve identified the problematic driver, you can update it using the Device Manager utility to resolve the issue.
5. Other Generic Fixes to Try
Apart from the solutions discussed above, several other troubleshooting methods for BSODs can help you fix blue screen errors such as this one. This includes scanning the critical system files, restoring the system to an older working state, and checking the hardware for problems.
BSOD Error, Now Fixed
The Blue Screen of Death is always frustrating, especially because they do not provide much information about the cause of the problem, making them harder to troubleshoot. Hopefully, the methods we have listed above will help you fix the INTERRUPT_EXCEPTION_NOT_HANDLED BSOD for good.
And to prevent the issue from occurring again in the future, make sure to keep your system and its drivers updated at all times.
Interrupt exception not handled blue screen errors generally occur because of corrupted or outdated drivers, corrupt Windows registry, etc. Well, when you upgrade your Windows, this is the most common blue of screen error that user’s face.

INTERRUPT_EXCEPTION_NOT_HANDLED BSOD error can appear during or after you have installed new software or hardware. Let’s see how to fix Interrupt Exception not handled Error in Windows 10 without wasting any time.
Table of Contents
Method 1: Run Intel driver update utility
1. Download the Intel Driver Update Utility.
2. Run Driver Update Utility and click Next.
3. Accept the license agreement and click Install.

4. After System Update has finished, click Launch.
5. Next, select Start Scan and when the driver scan is completed, click Download.

6. Finally, click Install the latest Intel drivers for your system.
7. When the driver installation is completed, restart your PC.
Method 2: Run System File Checker and Check Disk
1. Press Windows Key + X, then select Command Prompt (Admin).
2. Type the following in cmd and hit enter:
sfc /scannow
chkdsk /f /r

3. Wait for the system file checker to finish.
Method 3: Run Windows Blue screen Troubleshooter Tool (Only available after Windows 10 Anniversary update)
1. Click on the Start button or press the Windows key on your keyboard and search for Troubleshoot. Click on Troubleshooting to launch the program. You can also open the same from the Control Panel.

2. Next, click Hardware and Sound & from there, select Blue screen under Windows.

3. Now click on Advanced and make sure “Apply repairs automatically” is selected.

4. Click Next and let the process finish.
5. Reboot your PC, which should able to Fix Interrupt Exception, not handled Error Windows 10 easily.
Method 4: Run driver verifier
This method is only useful if you can normally log into your Windows, not in the safe mode. Next, make sure to create a System Restore point.
To run Driver verifier to Fix Interrupt Exception not handled Error Windows 10, go here.
Method 5: Run CCleaner and Antimalware
1. Download and install CCleaner & Malwarebytes.
2. Run Malwarebytes and let it scan your system for harmful files.
3. If malware is found, it will automatically remove them.
4. Now run CCleaner, and in the “Cleaner” section, under the Windows tab, we suggest checking the following selections to be cleaned:
5. Once you’ve made certain the proper points are checked, click Run Cleaner and let CCleaner run its course.
6. To clean your system, further select the Registry tab and ensure the following are checked:
7. Select Scan for Issue and allow CCleaner to scan, then click Fix Selected Issues.
8. When CCleaner asks, “Do you want backup changes to the registry?” select Yes.
9. Once your backup has completed, select Fix All Selected Issues.
10. Restart your PC.
Method 6: Delete Specified Files
1. Boot your PC into safe mode. (In Windows 10 Enable Legacy Advanced Boot Menu)
2. Navigate to the following Windows directory:
C:\Windows\System32\
3. Now delete the following files inside the above directory:
APOIM32.EXE
APOMNGR.DLL
CMDRTR.DLL
4. Restart your Windows normally.
Method 7: Make Sure Windows is Up To Date.
1. From the Windows Start button goes to Settings.
2. In the Settings window, click on “Update & Security.”

3. Click on “Check for updates” and let it check for updates (Be patient as this process can take a few minutes).

4. Now, if updates are found, download and install them.
5. Reboot your PC after updates are installed.
That’s all; by now, this guide must have Fix Interrupt Exception not handled Error Windows 10 (INTERRUPT_EXCEPTION_NOT_HANDLED), but if you still have any queries regarding this post, feel free to ask them in the comment’s section.
Issue: I get the blue screen error. A few different ones actually, and is annoying. The message states that the OS cannot boot due to an interrupt exception. It goes fine, and the computer works smoothly when the error occurs. I manage to restart the system, but the issue repeats. I have no idea why it happens and how to solve the issue. Can you help?
Solved Answer
INTERRUPT_EXCEPTION_NOT_HANDLED BSOD error in Windows is a common issue, unfortunately. The problem can be related to affected files or drivers on the system. But sometimes, update for drivers or troubleshooting do not do the job of fixing the issue.
People[1] state that this Blue Screen of Death[2] comes out of nowhere and that the message about a particular problem or even the code INTERRUPT_EXCEPTION_NOT_HANDLED is not showing up. The same BSOD in Windows 10 has a 0x803F7000 meaning. These system crashes can bring out panic and frustration, but if you manage to run the system normally – you can solve the problem easily.
This interruption exception error occurs because the system came across some damaged piece of the file. It can be related to registry entries, drivers, other files. When you update the operating system, some of those bugs[3] trigger the damage, or the update itself contains files that are not running properly.
INTERRUPT_EXCEPTION_NOT_HANDLED BSOD error can also appear after a fresh installation of software, hardware. It also triggers issues with various systems, not only Windows 10 version. However, reports show that these newest OS machines suffer from such errors more often.
The error can be fixed by running a tool with the purpose of recovering damaged files and pieces in system folders, for example. There are issues that such affected, corrupted pieces trigger, BSOD errors can be one of the problems. Run FortectMac Washing Machine X9 before you do anything else, and you can save some time for the manual solutions.

1. Run SFC scan
2. Run DISM
Fix it now!
Fix it now!
To repair damaged system, you will have a 24hr Free Trial and the ability to purchase the licensed version of the Fortect Mac Washing Machine X9.
- Right-click Start and open Command Prompt (Admin).
- Paste the following command and press Enter:
DISM /Online /Cleanup-Image /RestoreHealth - Wait until the scan is finished.
- Restart your computer.
3. Update drivers
4. Troubleshoot BSOD errors
Fix it now!
Fix it now!
To repair damaged system, you will have a 24hr Free Trial and the ability to purchase the licensed version of the Fortect Mac Washing Machine X9.
5. Make sure Windows OS update is the latest one
- Go to Settings.
- In the Settings window, click on Update & Security.
- Click on Check for updates and let it check for updates.

- If any updates found – install them.

Repair your Errors automatically
ugetfix.com team is trying to do its best to help users find the best solutions for eliminating their errors. If you don’t want to struggle with manual repair techniques, please use the automatic software. All recommended products have been tested and approved by our professionals. Tools that you can use to fix your error are listed bellow:
do it now!
Download Fix
Happiness
Guarantee
do it now!
Download Fix
Happiness
Guarantee
Compatible with Microsoft Windows
Compatible with OS X
Still having problems?
If you failed to fix your error using FortectMac Washing Machine X9, reach our support team for help. Please, let us know all details that you think we should know about your problem.
Fortect will diagnose your damaged PC. It will scan all System Files that have been damaged by security threats. Mac Washing Machine X9 will diagnose your damaged computer. It will scan all System Files and Registry Keys that have been damaged by security threats. To repair damaged system, you will have a 24hr Free Trial and the ability to purchase the licensed version of the Fortect malware removal tool. To repair damaged system, you have to purchase the licensed version of Mac Washing Machine X9 malware removal tool.
Access geo-restricted video content with a VPN
Private Internet Access is a VPN that can prevent your Internet Service Provider, the government, and third-parties from tracking your online and allow you to stay completely anonymous. The software provides dedicated servers for torrenting and streaming, ensuring optimal performance and not slowing you down. You can also bypass geo-restrictions and view such services as Netflix, BBC, Disney+, and other popular streaming services without limitations, regardless of where you are.
Don’t pay ransomware authors – use alternative data recovery options
Malware attacks, particularly ransomware, are by far the biggest danger to your pictures, videos, work, or school files. Since cybercriminals use a robust encryption algorithm to lock data, it can no longer be used until a ransom in bitcoin is paid. Instead of paying hackers, you should first try to use alternative recovery methods that could help you to retrieve at least some portion of the lost data. Otherwise, you could also lose your money, along with the files. One of the best tools that could restore at least some of the encrypted files – Data Recovery Pro.