
Уровень сложностиПростой
Время на прочтение2 мин
Количество просмотров39K
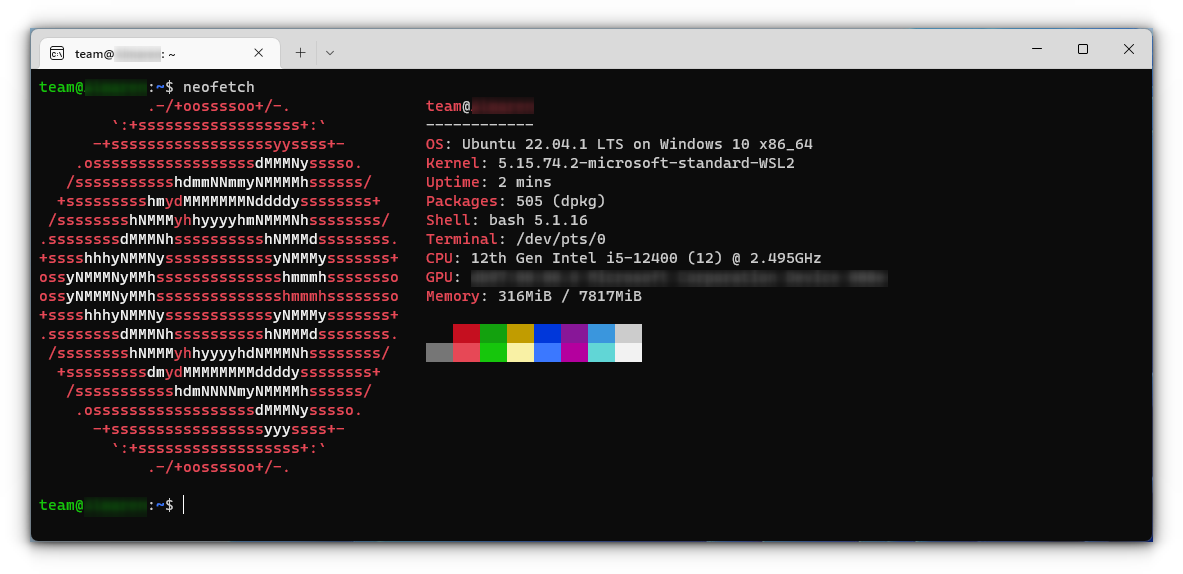
Для пользователя Linux командная строка Windows кажется чем-то непривычным и неудобным. С появлением WSL казалось, что проблема использования Bash решена, но запуск виртуальной машины требует времени, да и пути в WSL отличаются от Windows. Плюс скорость файловых операций на виртуальной машине хуже.
Ещё есть возможность использовать Bash через MSYS2, но мне хотелось найти что-то более компактное и легковесное, а также простое в настройке и установке.
Так как я часто использовал Linux на роутерах, то познакомился с BusyBox, набор UNIX-утилит командной строки, используемой в качестве основного интерфейса во встраиваемых операционных системах. Оказалось, есть версия BusyBox для Windows. В 2020 году появился Windows Terminal, а в нем есть возможность создавать вкладку с запуском конкретной программы.

Сложив эти два факта, пришла очевидная мысль, использовать BusyBox, содержащий в себе Bash, в Windows Terminal как отдельную консоль.

Для этого необходимо скачать BusyBox 64, и я, например положил файл в C:/Program Files/Busybox. А дальше создать новый профиль Windows Terminal и поменять его имя на Bash и указать команду для запуска как C:/Program Files/Busybox/busybox64.exe bash

У этого подхода был один минус, при запуске терминала не из конкретной папки, а из ярлыка на рабочем столе или из панели задач.
То адрес рабочей папки был C:/Windows/System32, и если случайно ввести команду удаления или создания файла, то мы портим важную системную папку. Обойти возможно используя аналог .bashrc или /etc/profile или .profile.

Но просто создать файл .profile мало, BusyBox для Windows их не считывает, для этого необходимо добавить путь к этому файлу в ENV в “Переменные среды”.

Теперь мы можем написать скрипт, который будет настраивать рабочую директорию при запуске консоли.
#!/bin/bash

domain=$(echo $PWD | tr '[:upper:]' '[:lower:]')

if [ $domain = "c:/windows/system32" ]; then
    cd $HOME
fi
Теперь если мы запустили терминал из ярлыка или панели задач, то рабочей директорией по умолчанию становится домашняя папка пользователя, а если мы запускаем из конкретной папки то, она и становится рабочей директорией.
Мы получили Bash в Windows Terminal с удобной начальной директорией.
Last Updated :
12 Apr, 2025
Did you know you can use Linux right inside your Windows 10 computer—without needing a separate Linux setup? Thanks to a feature called Windows Subsystem for Linux (WSL), you can now open a Bash shell, run Linux commands, and manage your projects easily.
This guide will help you set up and use the Bash shell on Windows 10, making it simple to explore Linux tools and commands while still using your Windows system. It’s the best of both worlds.
Steps to Install & use Bash Shell Natively on Windows 10
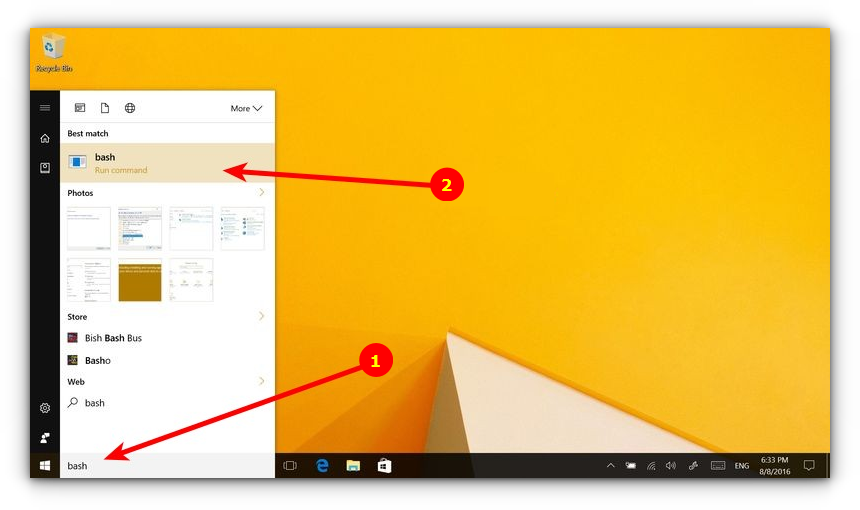
Microsoft, therefore, in their Anniversary Update, added several features to the Windows 10 OS, with bash being one of them. To install and use it on Windows 10, one needs to perform the following steps :
- Start -> Settings -> Update&Security. Under the ‘Use Developer Features’, select ‘Developer mode’.

- Selecting the developer mode will pop the following alert. Click yes, and let the computer restart.


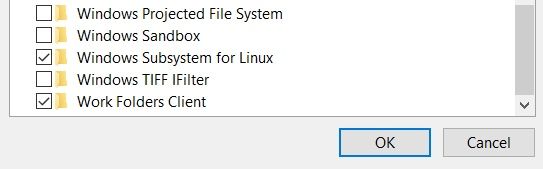
- Go to Control Panel -> Programs and Features -> Turn Windows Features On and Off. In the window that appears, check the ‘Windows Subsystem for Linux’ option, and click OK.

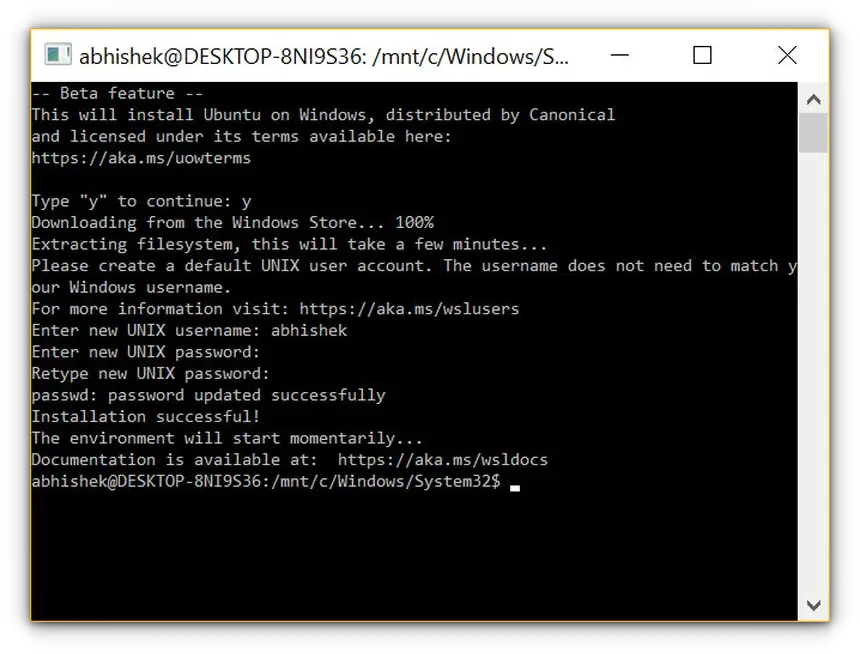
- This will trigger an alert asking for the system to be restarted to complete the installation of the required components. After the restart is complete, go to the command prompt, and type ‘bash’. Follow the instructions that appear to install bash from Windows store. After it is installed, it will be required to create a UNIX username. After completing the installation, exit the prompt.
- To access the shell, simply type ‘bash’ in the Windows command prompt, and everything is good to go.


Note that bash runs natively on Windows 10, which is different from using emulators like ‘cygwin’ for Windows which enabled GNU tools to run on unsupported Windows environment. Also, Linux subsystem for Windows 10 is only available on the 64-bit version of the OS.
Conclusion
By following these steps, you can easily set up and use the Bash shell natively on Windows 10 through the Windows Subsystem for Linux (WSL). This integration allows you to run Linux commands, scripts, and tools directly on your Windows machine, making it a versatile and convenient solution for developers and power users alike. Whether you’re looking to leverage Linux utilities or streamline your development workflow, using Bash on Windows 10 opens up a world of possibilities without leaving the Windows environment.

When Microsoft’s CEO announced that the Bash shell was coming to Windows, several people couldn’t believe it. #BashOnWindows trended on Twitter for days; such was the impact of this news.
Initially referred as Bash on Windows, it is actually called Windows Subsystem for Linux, popularly known as WSL.
With WSL, you can install one of the supported Linux distribution inside Windows and use the Windows terminal to access the Linux systems and run Linux commands.
In this tutorial, you’ll learn how to enable WSL on Windows and then install a Linux distribution of your choice.
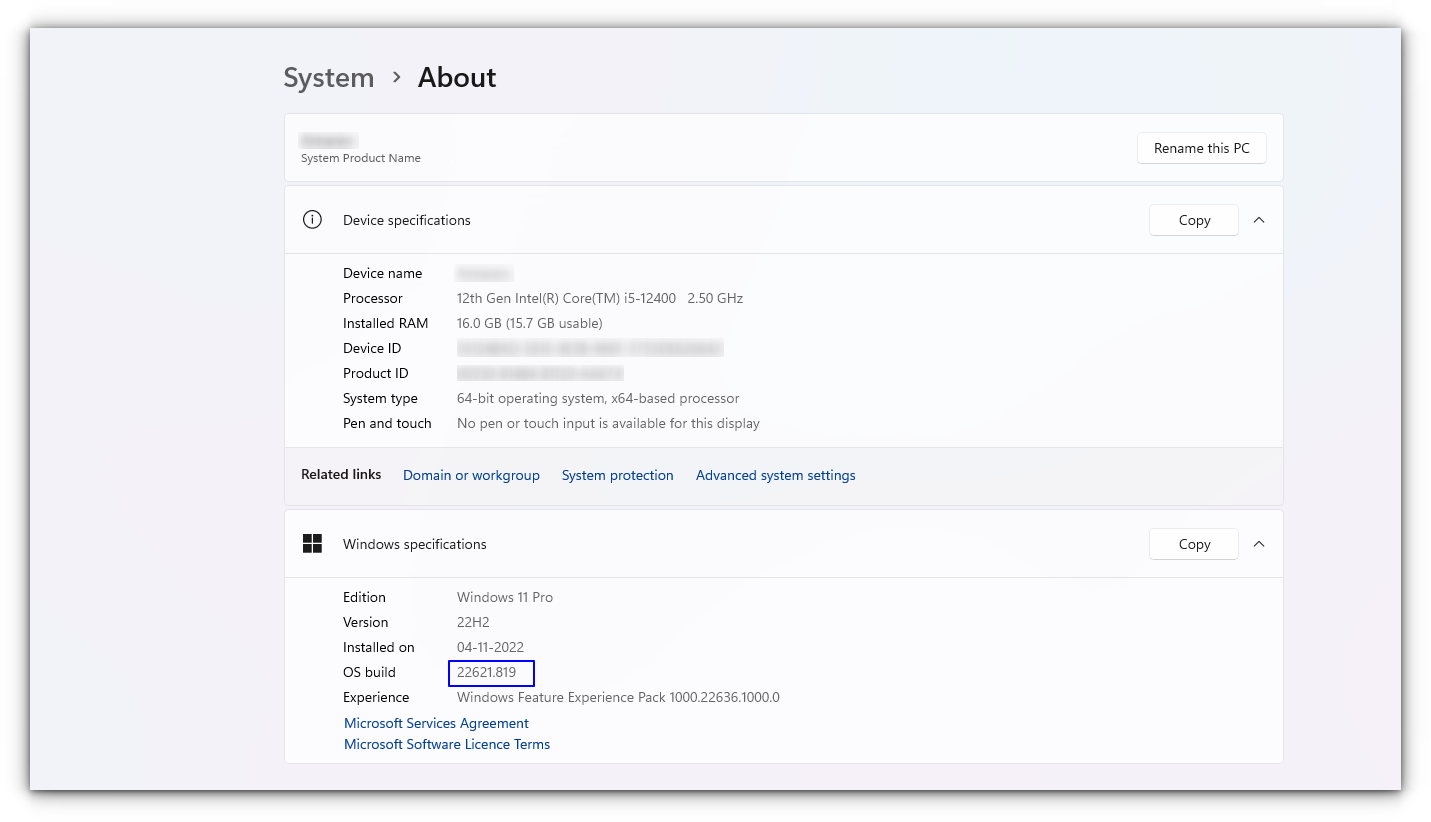
📋
This tutorial was tested with the latest Windows 11 version 22H2, and build 22621.819. You might need to update your Windows installation if you have an older build to follow everything in this tutorial.
What is WSL?
WSL (formerly Bash on Windows) provides a Windows subsystem, and Linux runs atop it. It is not a virtual machine or an application like Cygwin. It is a complete Linux system inside Windows 10/11. It allows you to run the same Bash shell you find on Linux. You can run Linux commands inside Windows without installing a virtual machine or dual-boot Linux and Windows.
You install Linux inside Windows like a regular application. This is a good option if your main aim is to learn Linux/UNIX commands.
Check for System Compatibility
You must be running specific versions of Windows for the different features described in this article. Requirements necessary for a particular feature to work are described under its titles. To check your Windows version, search for about in the start menu.
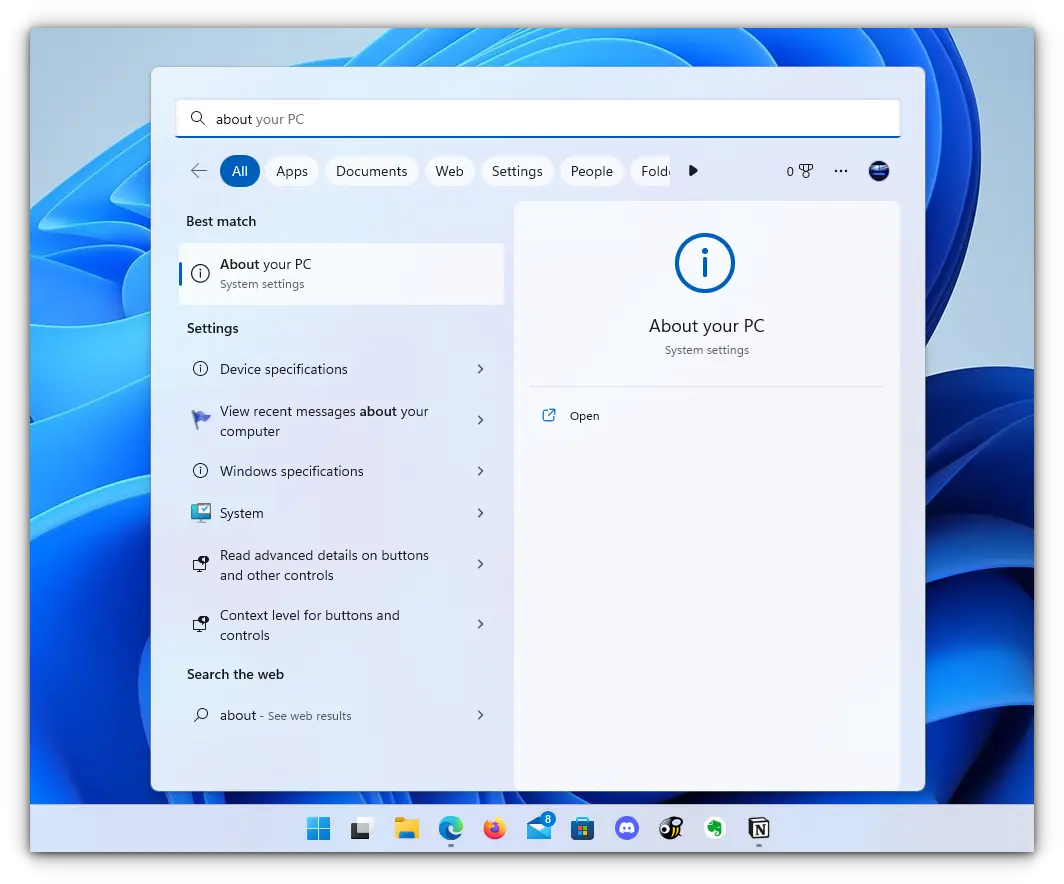
Here, you can see the build of your PC, as shown in the screenshot below. Make sure it is matching with the respective requirements described under various sub-headings here in this article.
- You must be running Windows 10 version 1607 (the Anniversary update) or above.
- WSL only runs on 64-bit versions 32-bit versions are not supported.
Install Bash in Newer Windows 10 and 11
The good thing is that the latest set of upgrades, including the stable release of WSL v1.0 released from Windows, makes it easier to install Bash on Windows.
There are two ways you can go about it:
- You can get it in one click from Windows Store.
- Choose to use the command-line.
1. Install WSL Using the Microsoft Store
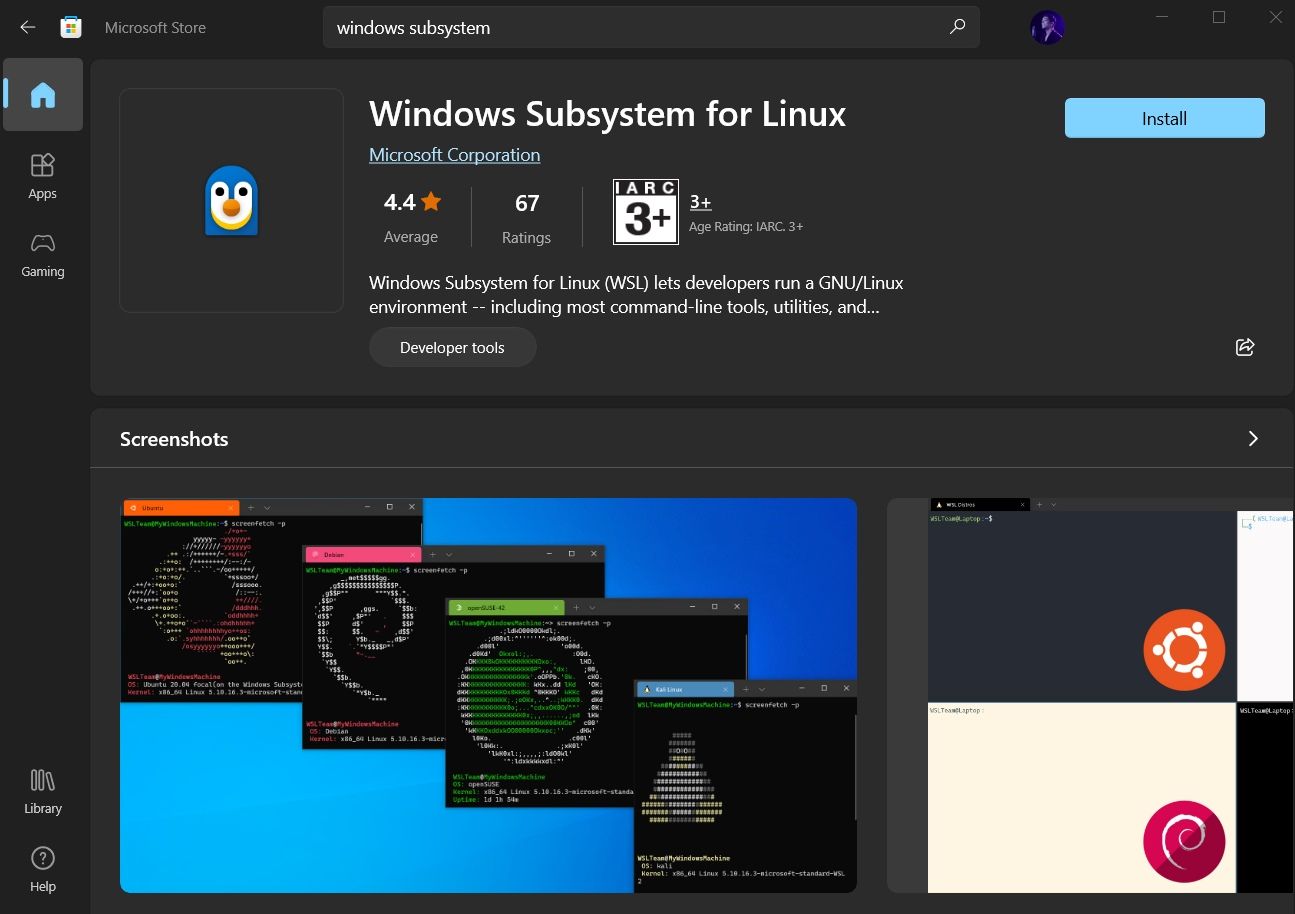
Launch the Microsoft Store and search for «Windows subsystem«.
Install it, and you’re done with the first step. Next, you have to install a Linux distribution.
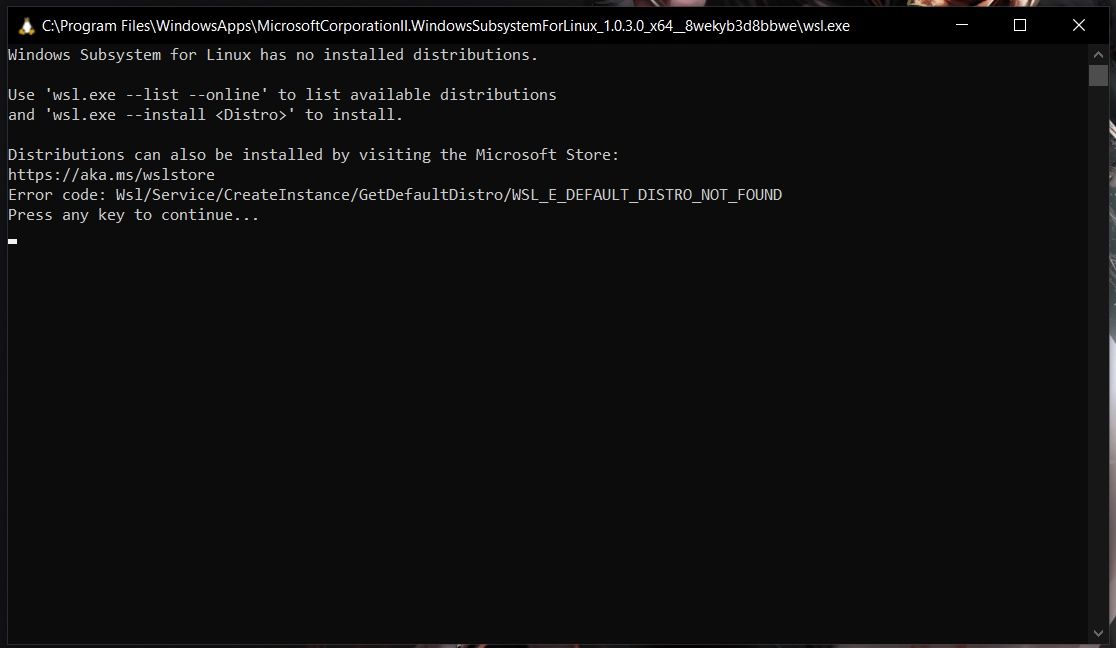
So, if you try to open WSL, you will get to see a window informing you that no distribution is installed.
Similar to WSL, search for the distribution on Microsoft Store, and then install it.
For instance, I installed Ubuntu from the store as shown in the image below:
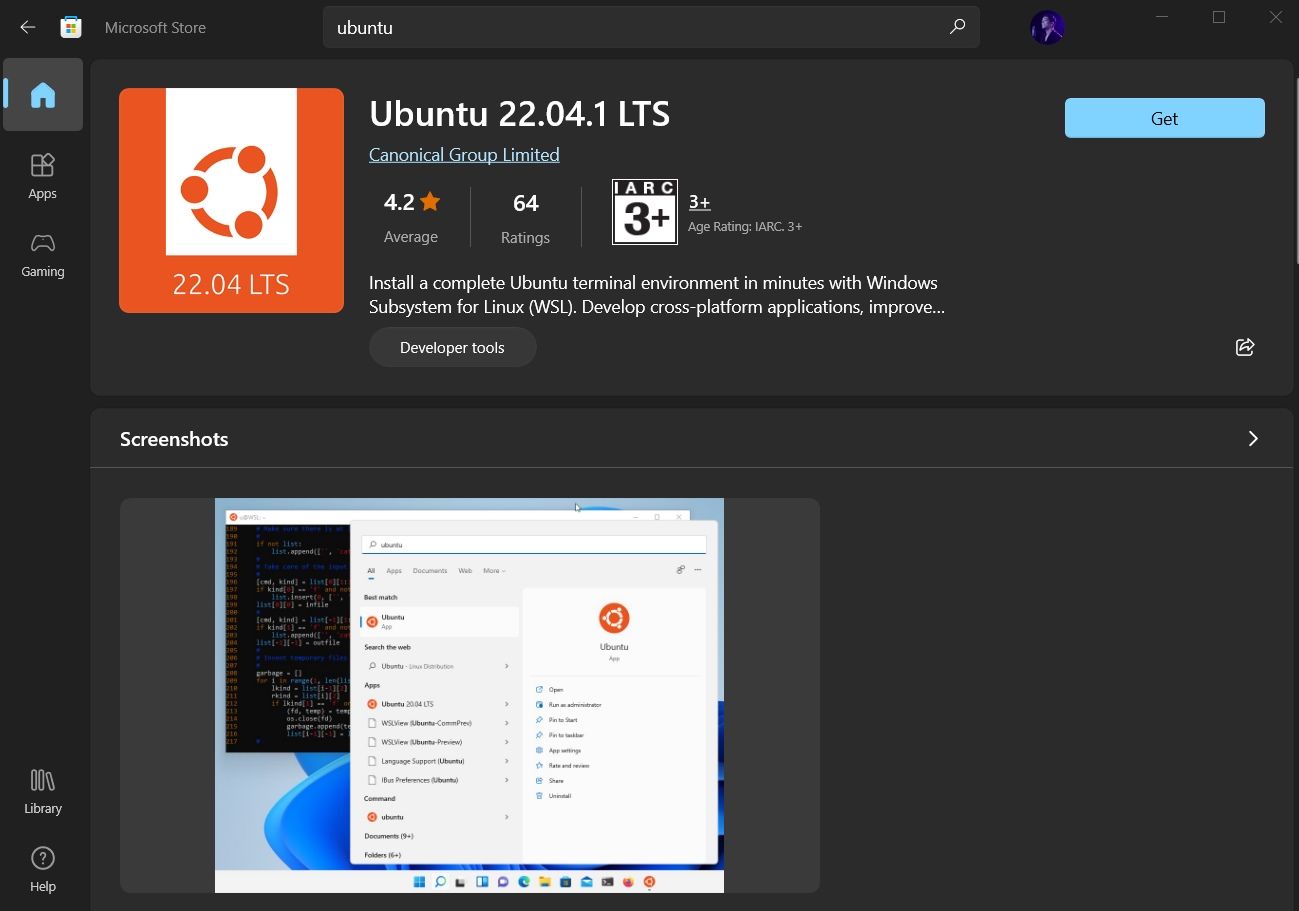
And, then proceed to «Open» it and it will automatically start installing. The procedure is same for any distribution you choose.
We then have to configure it, which is discussed right after installing it through the command line.
2. Install WSL and the default distribution using the command-line
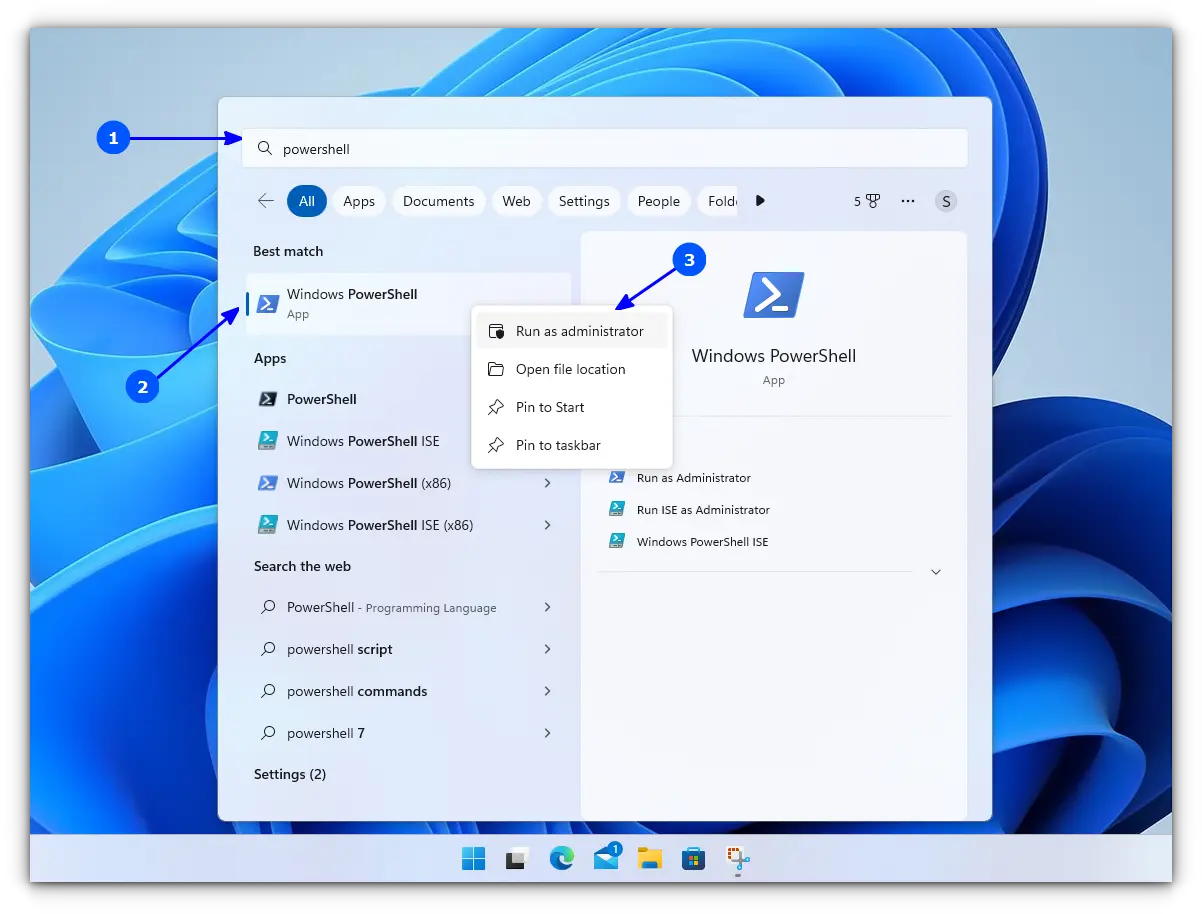
In WSL, the default distribution is Ubuntu (which can be changed). To install, open Powershell as an administrator.
For this, search for Powershell in the start menu, right-click on Powershell and select Run as Administrator.
Inside Powershell, enter the following command to install WSL, along with all necessary features and the default distribution, that is, Ubuntu.
wsl --installOnce finished downloading and installing, you need to reboot to apply the changes.
Whether you installed WSL and Ubuntu using the Microsoft Store or the command line, you need to configure it.
Here’s how it is done:
🛠️ Configure the newly installed Ubuntu
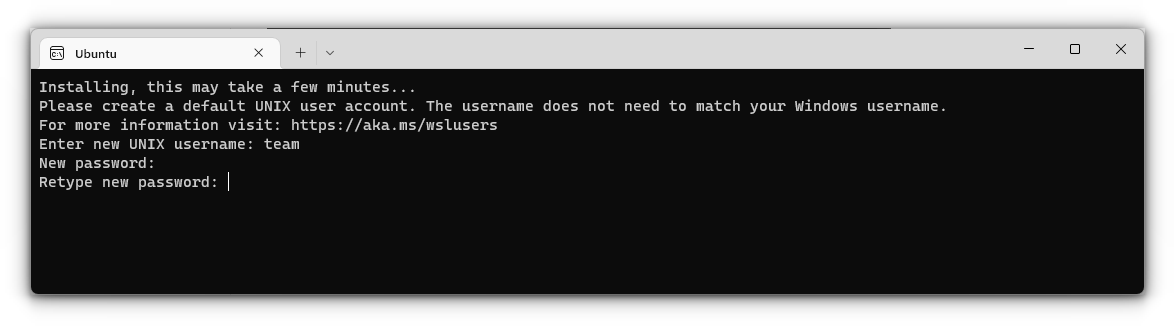
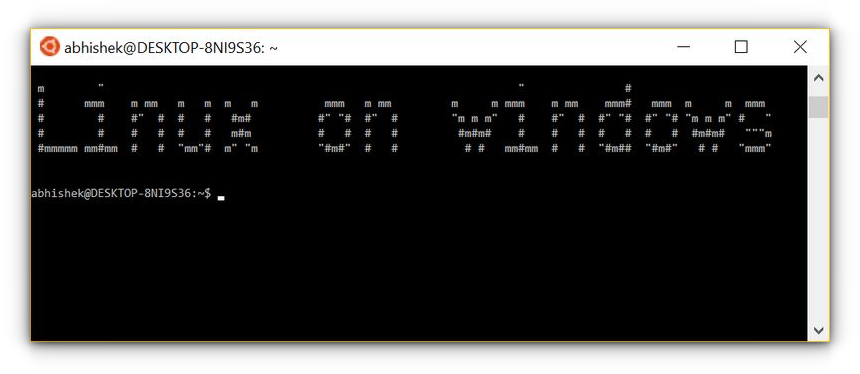
After rebooting, search for Ubuntu in Start Menu and open it.

It will ask you to enter a UNIX Username and Password. Enter these details and press enter key.
You will now be inside the terminal window of Ubuntu.
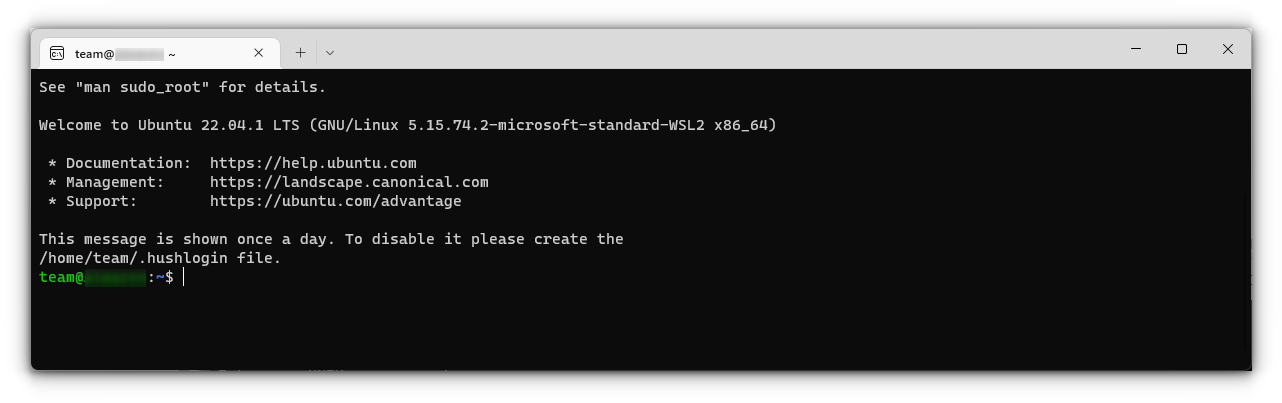
Once logged in, you need to update the installed Ubuntu. For this, enter the following commands one by one:
sudo apt update
sudo apt full-upgrade
After completing the update, you are good to go with Ubuntu in WSL.
Install Bash on Older Windows
If you have the minimum requirements mentioned in the beginning but are running an older Windows build, the previous method may not be supported. So there is a manual installation method.
Also, there are both WSL1 and WSL2 available. WSL2 offers some upgraded functionalities but has some minimum requirements to run:
- For x64 systems: Version 1903 or later, with Build 18362 or later.
- For ARM64 systems: Version 2004 or later, with Build 19041 or later.
So this brings us to two possibilities to install:
- Install Ubuntu with WSL1
- Install Ubuntu with WSL2
1. Install Ubuntu with WSL 1
This is a relatively simple procedure for those with a system incompatible with WSL2. First, you need to enable the Windows Subsystem for the Linux feature. This can be done through the command line. Open Powershell as an administrator and enter the following command:
dism.exe /online /enable-feature /featurename:Microsoft-Windows-Subsystem-Linux /all /norestartOr, to do this via GUI, follow the steps below:
- Search for Windows Features in Start Menu.
- Turn on Windows Subsystem for the Linux feature.
- Reboot your system.
- Open the Windows store and search for the distribution of your choice to install.
Once installation is completed, open the Ubuntu app from the start menu. It will take a couple of seconds to install. You will be prompted to enter a username and password. Provide those credentials, and you are good to go with Ubuntu in WSL1.
2. Install Ubuntu with WSL 2
It is recommended to use WSL2 instead of WSL1 if you have support. To install Ubuntu with WSL2, you need to make sure that the Windows Subsystem for Linux feature is turned on. For this, as in the above case, execute the following command in an elevated Powershell:
dism.exe /online /enable-feature /featurename:Microsoft-Windows-Subsystem-Linux /all /norestartReboot the device once the command is completed.
After this, you need to enable the Virtual Machine Platform feature. Open the Powershell with admin privileges and enter the following command:
dism.exe /online /enable-feature /featurename:VirtualMachinePlatform /all /norestartOnce again, restart the device to complete the WSL install and update to WSL 2.
Now, download the Linux Kernel Update Package for x64 machines from the official website. If you are using ARM64 devices, use this link to download the latest kernel update package.
If you are not sure about the device architecture, enter the command below in Powershell to get the type:
systeminfo | find "System Type"When the file is downloaded, double-click on it and finish the installation of the Kernel update package.
Now, open PowerShell and run this command to set WSL 2 as the default version when installing a new Linux distribution:
wsl --set-default-version 2Once WSL2 is set as the default version, you can now install the Linux distribution of your choice.
Go to Windows Store and install Ubuntu, as described in the earlier steps. and the rest of the procedure is already described above.
Enjoy Linux inside Windows.
🔧 Troubleshooting Tip 1
«The WSL optional component is not enabled. Please enable it and try again.»
You may see an error like this when you try to run Linux inside Windows 10:
The WSL optional component is not enabled. Please enable it and try again.
See https://aka.ms/wslinstall for details.
Error: 0x8007007e
Press any key to continue...
And when you press any key, the application closes immediately.
The reason here is that the Windows Subsystem for Linux is not enabled in your case. You should enable it as explained in this guide. You can do that even after you have installed Linux.
🔧 Troubleshooting Tip 2
Installation failed with error 0x80070003
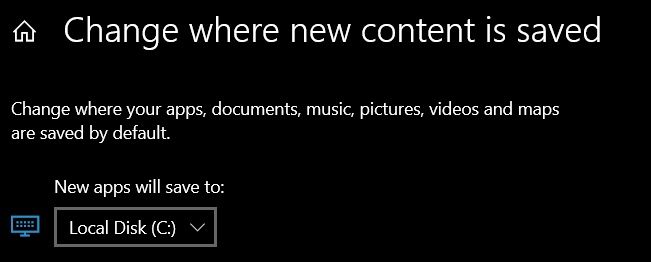
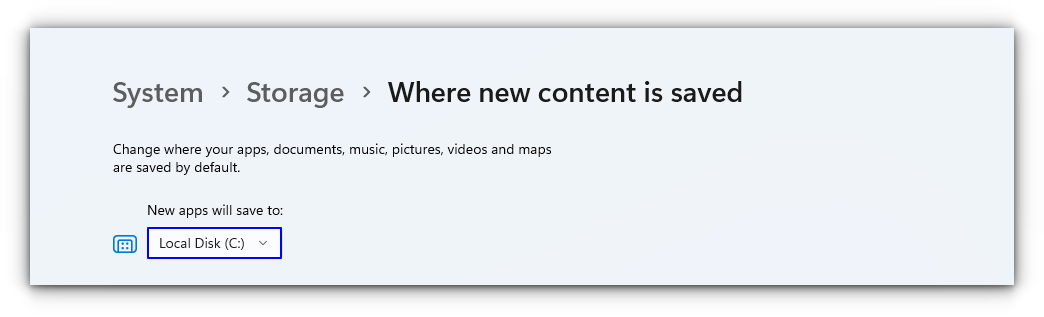
This is because Windows Subsystem for Linux only runs on the system drive i.e. the C drive. You should ensure that when you download Linux from the Windows Store, it is stored and installed in the C Drive.
On Windows 10, go to Settings -> Storage -> More Storage Settings -> Where new content is saved: Change where new content is saved and select C Drive here.
On Windows 11, go to Settings -> System -> Storage -> Advanced storage settings -> Where new content is saved and select C Drive here.
🔧 Troubleshooting Tip 3
«Failed to attach disk Error»
Sometimes, this error will appear when we reinstall the Ubuntu in WSL.
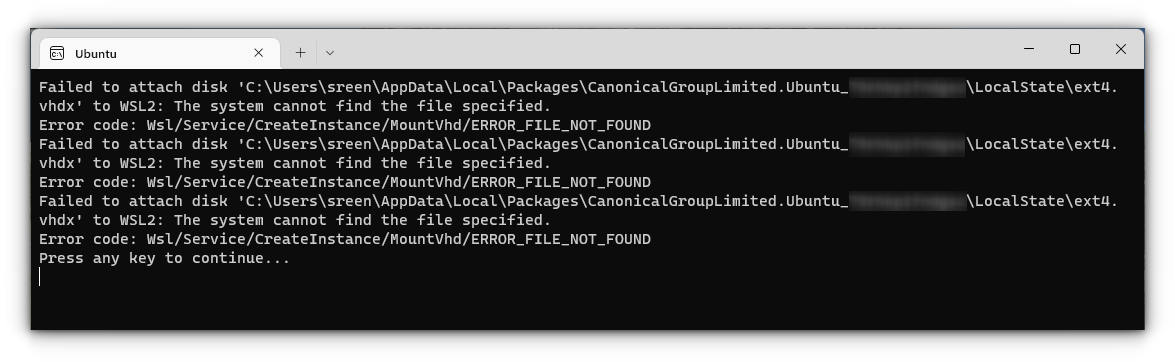
In this case, open Powershell and run the following command:
wsl -l -vThis will list the installed Linux systems. Find the name of the system, that is throwing the error, in my case Ubuntu. Now run the following command:
wsl --unregister UbuntuYou can restart the ubuntu app and it will run without any issues.
You can refer to more common troubleshooting methods from the official website.
Run GUI Apps On Windows Subsystem for Linux
The ability to run GUI apps on Windows Subsystem for Linux was introduced with the WSL 2 release in May 2020.
Windows Subsystem for Linux (WSL) with WSL2 now supports running Linux GUI applications (X11 and Wayland) on Windows in a fully integrated desktop experience. This allows you to install Linux applications and seamlessly integrate them into Windows desktop, including features like “pin to taskbar”.
📋
One crucial point is that you must be on Windows 10 Build 19044+ or Windows 11 to access this feature.
Step 1: Enable/Update WSL 2
This procedure has been explained in the above section and you can refer to it.
Step 2: Download and Install Graphics drivers
To run GUI apps, you need to install appropriate graphics drivers. You can use the following link to download the drivers according to your provider.
- Intel GPU Driver for WSL
- AMD GPU Driver for WSL
- NVIDIA GPU Driver for WSL
Once installed, you are all done.
Step 3: Install some GUI Apps
Now, go to your Ubuntu app and install any GUI app using the APT package manager. You should note that running apps from other sources like flatpak are problematic within WSL.
For this article, I installed the Gedit text editor using the following command:
sudo apt install gedit -yThis will install several MB of packages including required libraries. Once completed, you can run the following command to start the GUI Gedit app in Windows.:
gedit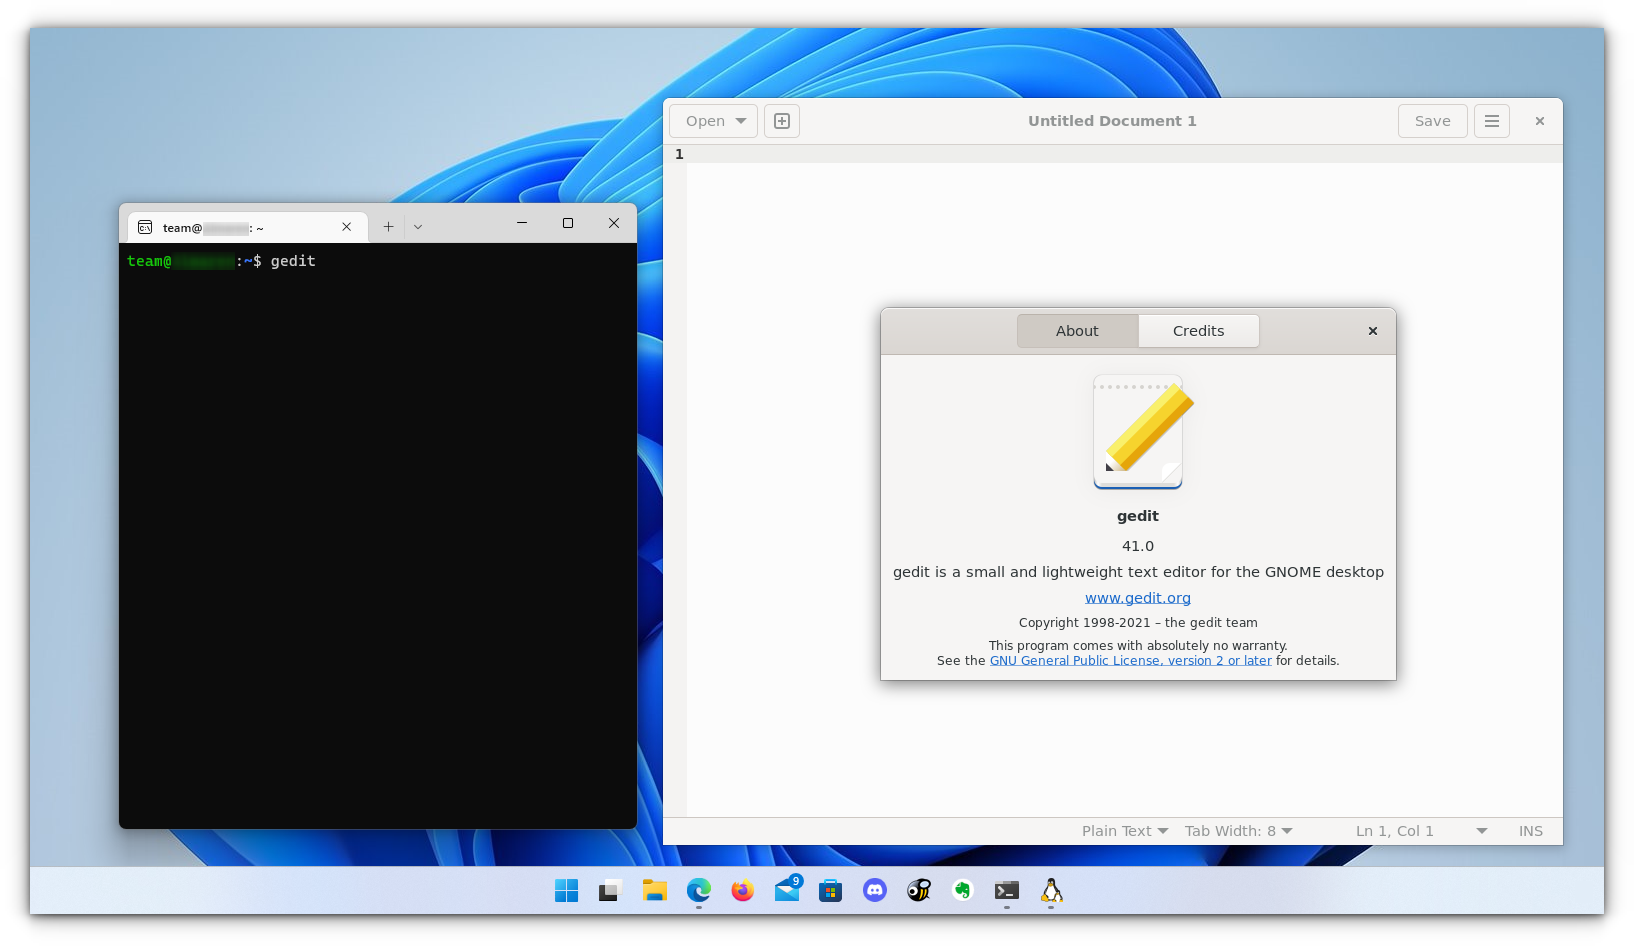
Similarly, you can install all the popular applications available to Linux, including Nautilus file manager, GIMP, etc. For more about running GUI applications in WSL, you can refer to the official documentation.
Install Linux Bash Shell on other older Windows 10
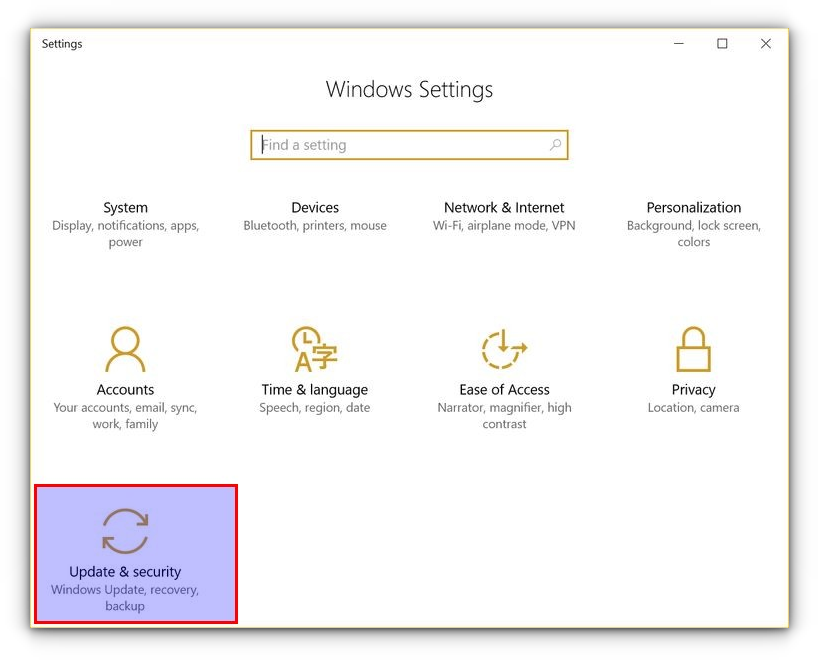
If you cannot get the Fall Creator’s update on Windows 10 for some reason, you can still install it if you have the Anniversary update of Windows 10. But here, you’ll have to enable developer mode. I still recommend upgrading to the Fall Creator’s update or the latest Windows 10 2004 version update though.
Press Windows Key + I to access Windows system settings. Here, go to Update & Security:
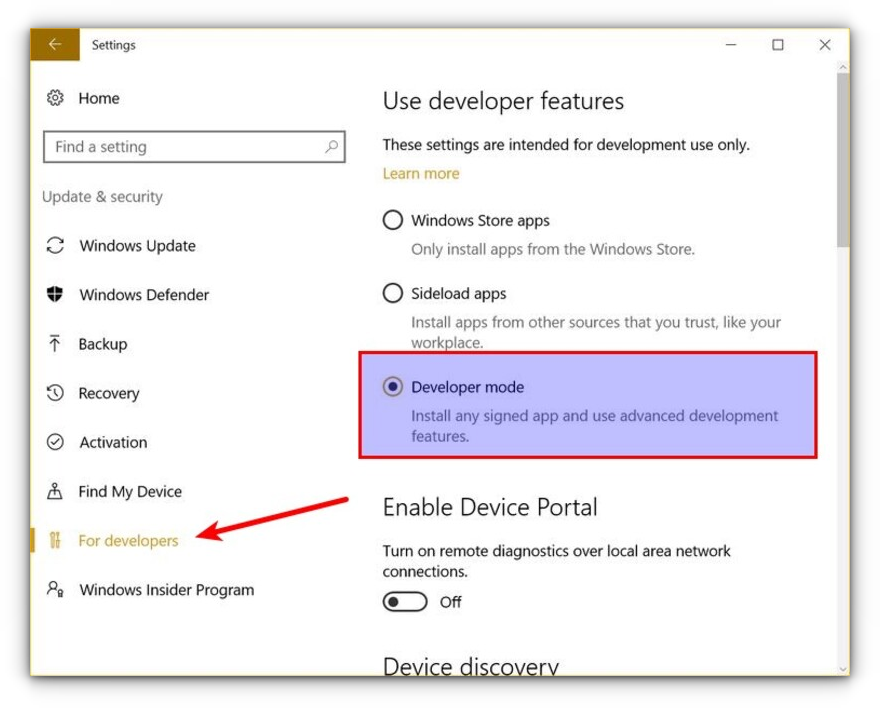
From the left side pane, choose “For developers.” You’ll see an option for “Developer mode.” Enable it.
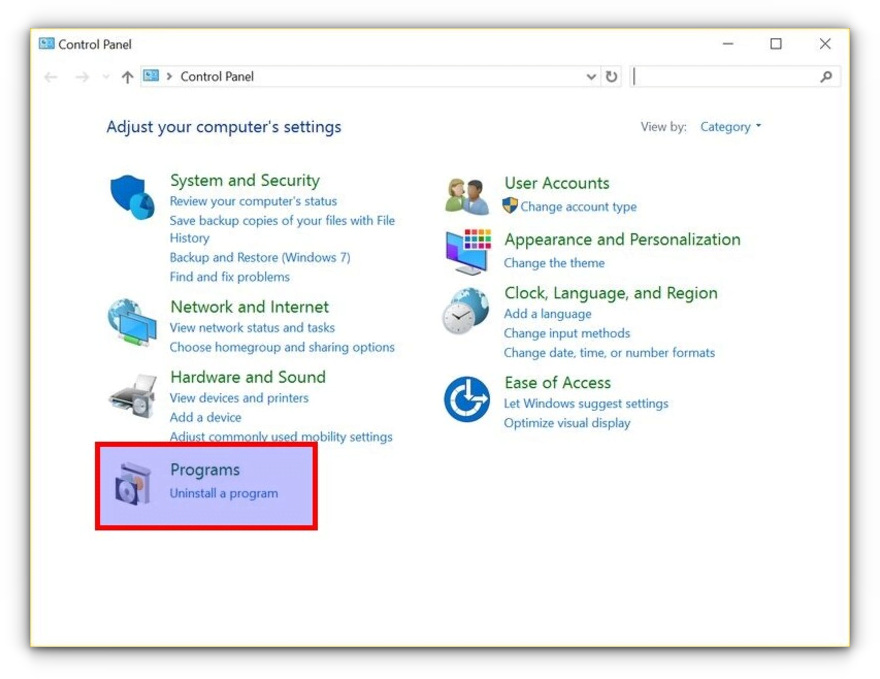
Now search for Control Panel and in Control Panel, click on “Programs”:
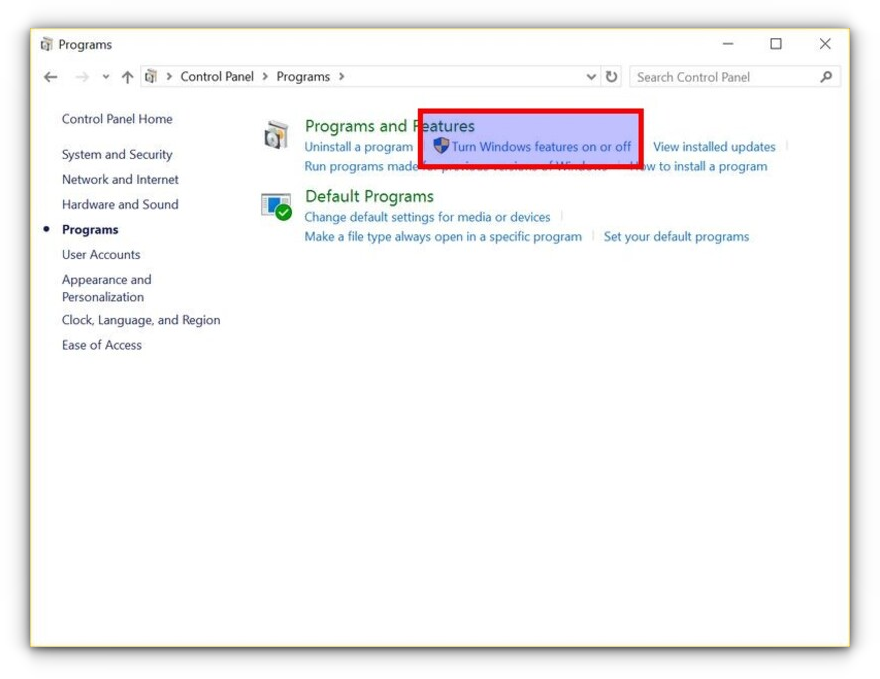
In Programs, click “Turn Windows features on or off”:
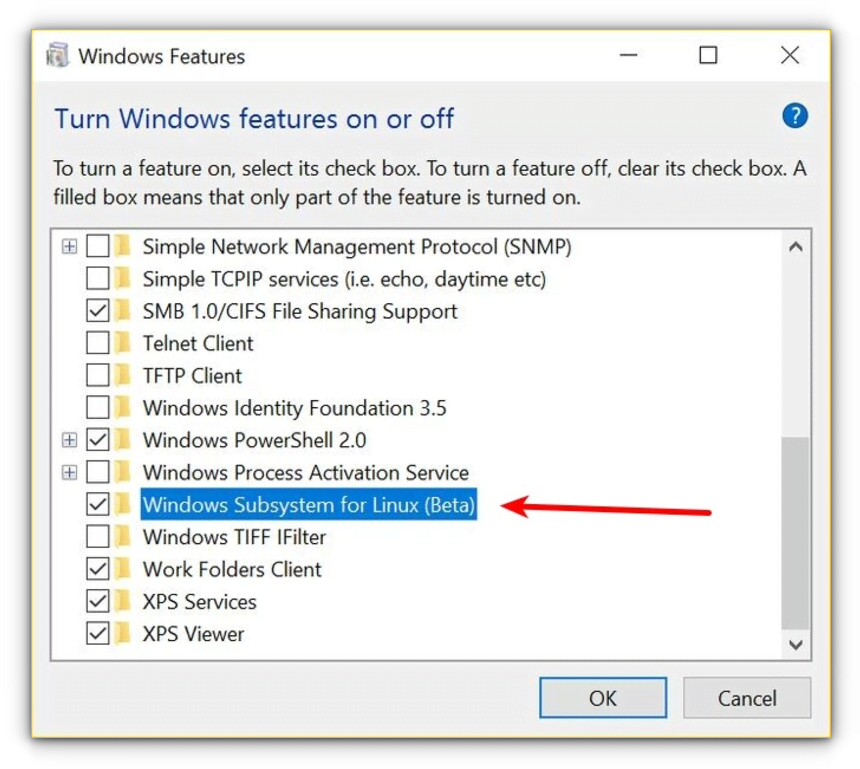
When you do this, you’ll see several Windows features. Look for “Windows Subsystem for Linux” and enable it.
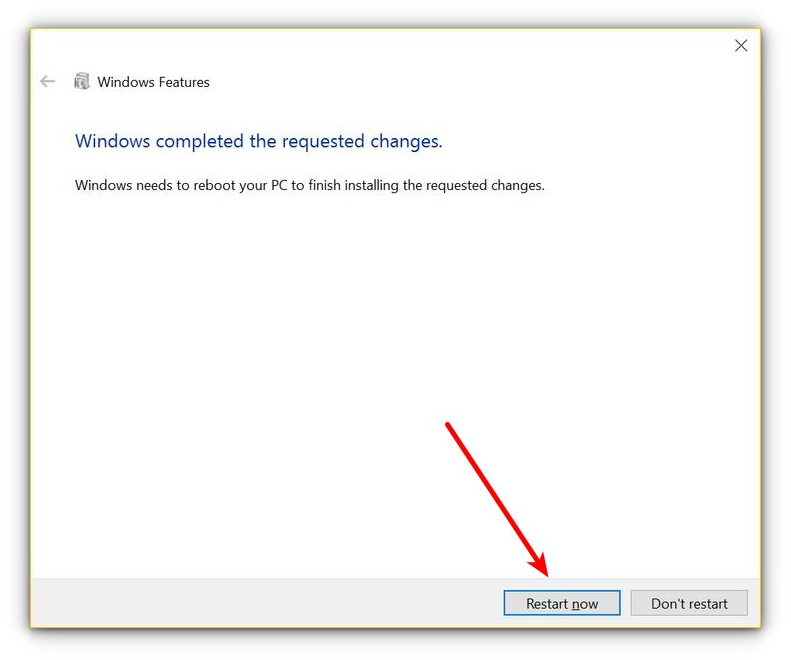
You’ll need to restart the system after doing this.
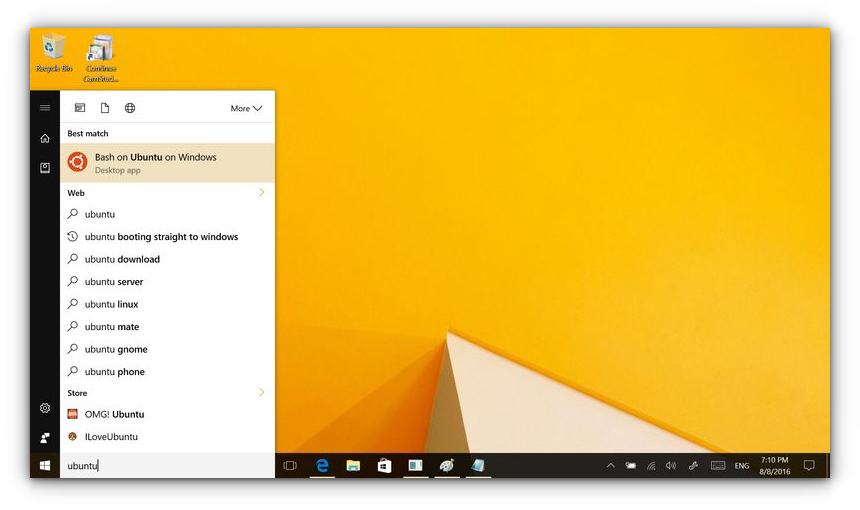
After restarting the computer, click the start button and search for “bash”.
When you run it for the first time, you’ll be given the option to download and install Ubuntu. You’ll be asked to create a username and password during this process. It will install an entire Ubuntu Linux system, so have patience as it will take some time in downloading and installing Linux on Windows.
Once this is done, go back to the Start menu and search for Ubuntu or Bash.
Now you have a command line version of Ubuntu Linux. You can use apt to install various command line tools in it.
💬 I hope you find this tutorial helpful for installing bash on Windows and experimenting with Linux GUI apps on Windows. No wonder WSL lets you play with Linux inside of Windows. If you have questions or suggestions, feel free to ask.
To download and set up the Windows Bash terminal, you can enable the Windows Subsystem for Linux (WSL) and install a Linux distribution via PowerShell using the following command:
wsl --install
Understanding Bash
What is Bash?
Bash, or Bourne Again SHell, is a command line interpreter that is widely used in Unix and Linux environments. It allows users to execute commands, run shell scripts, and perform complex automation tasks with ease. This command line tool serves as a bridge for users to interact with their operating system, enabling them to control files, manage processes, and execute scripts.
Why Use Bash on Windows?
Using Bash on Windows can significantly streamline your workflow, especially if you are accustomed to Linux. The ability to use Unix commands in a familiar Windows environment allows developers and system administrators to perform tasks swiftly and efficiently. For instance, Bash commands for file manipulation, such as `cp` for copying files or `rm` for removing files, make it easier to manage data without navigating through GUI-based file explorers.
Mastering Windows Bash Terminal Lambda Commands
Installing Bash on Windows
Different Methods to Install Bash on Windows
There are several methods to install Bash on Windows, particularly through the Windows Subsystem for Linux (WSL), Git Bash, and Cygwin. Each method has its own advantages depending on your needs.
Installing Bash via Windows Subsystem for Linux (WSL)
What is WSL?
The Windows Subsystem for Linux (WSL) enables users to run a full-fledged Linux distribution alongside their Windows installation. This allows you to use native Linux command-line tools without the need for a virtual machine or dual-boot setup. With WSL, you can utilize Bash and access a broad array of Linux applications seamlessly.
Steps to Install WSL
-
Step 1: Enable WSL feature
First, you need to enable the WSL feature on your Windows system. Open a Command Prompt or PowerShell as an administrator, and run the following command:dism.exe /Online /Enable-Feature /FeatureName:Microsoft-Windows-Subsystem-Linux /All /LimitAccess /Source:wimgapi -
Step 2: Install a Linux Distribution
After enabling WSL, you can install a Linux distribution. Popular choices include Ubuntu, Debian, and Fedora. To install Ubuntu specifically, you can run this command:wsl --install -d Ubuntu -
Step 3: Verify Installation
Once the installation completes, it’s crucial to verify that Bash is functioning correctly. Simply run the following command:bash --version
This command should return the version of Bash installed, confirming that the installation was successful.
Installing Git Bash
What is Git Bash?
Git Bash provides a BASH emulation environment for Windows, allowing you to use Unix commands and Git features. It’s a lightweight alternative for users who want to execute Bash commands without needing the full power of WSL.
Steps to Install Git Bash
-
Step 1: Download Git Bash
Begin by visiting the official Git website to download the Git Bash installer for Windows. -
Step 2: Run the Installer
Launch the installer and follow the guided prompts. During installation, you will encounter a series of options; it is usually recommended to use the default settings unless you have specific needs. -
Step 3: Launching Git Bash
After the installation is complete, you can access Git Bash through your Start Menu. When you open it, you will see a terminal that resembles a Linux shell, and you can start entering Bash commands right away.
Installing Bash with Cygwin
What is Cygwin?
Cygwin is a software package that provides a Linux-like environment for Windows. It offers a large collection of GNU and Open Source tools that provide functionality similar to a Linux distribution.
Steps to Install Cygwin
-
Step 1: Download Cygwin Setup
Go to the official Cygwin website and download the setup executable that corresponds to your Windows architecture (32-bit or 64-bit). -
Step 2: Run the Installer and Select Packages
Run the downloaded setup file. During the installation process, you will have the option to select packages. For a complete Bash experience, ensure you include core packages such as `bash`, `coreutils`, and `gcc`. -
Step 3: Finalizing the Installation
After completing the installation, open the Cygwin terminal, where you will be greeted with a Bash prompt similar to other Bash environments. This prompts you to start executing your commands in a Unix-like fashion.
Mastering the Bash Terminal: Your Quickstart Guide
Verifying the Installation
Checking Bash Availability
After installation, you should verify whether Bash is available by running the following command in your terminal of choice:
echo $SHELL
This command should return the path to the Bash shell, affirming its installation.
Running Your First Bash Command
Once you have confirmed that Bash is installed and functioning, try running a simple command to familiarize yourself with the environment. For instance:
echo "Hello, World!"
This command will print «Hello, World!» to the terminal, demonstrating that Bash is operational. Another useful command to check your current directory contents is:
ls -la
This will list all files in the current directory, including hidden files, with detailed information.
Bash Download: Mastering File Retrieval in Bash
Troubleshooting Common Issues
Common Installation Problems
During installation, you may encounter problems such as feature-related errors or issues downloading your selected Linux distribution. To resolve these problems, ensure that your Windows version is up to date and that virtualization support is enabled in your BIOS settings for WSL.
Reinstalling Bash
If you experience issues with Bash after installation, a cleanup and reinstall might be necessary. Uninstall the Linux distribution from Windows settings or use `wsl —unregister <distro_name>`. Then, re-follow the installation steps to ensure everything is set up correctly.
Quick Guide to Git Bash Download for Beginners
Conclusion
Installing Bash on Windows enhances your ability to perform tasks efficiently and expands your command-line skills. With options like WSL, Git Bash, and Cygwin, you can choose the method that best fits your workflow. The command line is a powerful tool, and getting accustomed to Bash commands will undoubtedly improve your productivity. As you explore further, remember to dive into more complex scripts and versatile Bash functionalities to maximize your use of the Windows Bash terminal download capabilities.
Mastering Windows Bash Script: A Quick Guide
Additional Resources
To continue your learning journey in Bash, consider exploring official documentation for WSL, Git Bash, and Cygwin, along with online tutorials, forums, and community support. These resources will provide deeper insights and assistance as you build your skills and tackle various command-line tasks efficiently.
Bash (Bourne Again Shell) is the command line, and graphical user interface distributed with all Linux distributions. Using Bash on Windows 10 wasn’t a simple process. However, Windows 11 includes an upgraded Windows Subsystem for Linux (WSL 2.0) that allows you to install and use Bash easier than ever.
The new version of WSL runs a true Linux kernel inside of a virtual machine. This means that any Linux distribution you run under WSL includes Bash.

To install and run Linux operating systems that include Bash on your Windows 11 system, you’ll need to install WSL first. On Windows 11, this is a straightforward process using Windows Terminal. Do not launch CMD (Command Prompt) – Windows Terminal is a different application.
1. Select the Start button, and type “terminal” in the search field. In the Windows Terminal pane select Run as Administrator.

Note: If Windows Terminal doesn’t launch, you may need to update it. Visit the Microsoft Store and install the latest version of the Windows Terminal.
2. Type the following command: wsl –install, at the command prompt and press Enter. This single command will download and install the latest version of the Windows Subsystem for Linux. The download is a few hundred megabytes so the installation process may take some time to finish.

3. When it’s finished, you should see the message: “The requested operation is successful.” Once you see this message, restart your system to complete the WSL installation. You can type shutdown /r /t 0 in Windows Terminal to initiate the reboot.
4. After your system reboots, the process will continue by installing Ubuntu as the default Linux distro. You will be prompted to enter a username and password for the Linux system.

5. Once you’ve finished, Ubuntu will launch into the Bash shell automatically. You can use the same commands you would normally use in Linux, including installing Linux apps into this virtual environment.

6. You can install other Linux distros if you prefer. To see which ones are available to install, reopen Windows Terminal (Powershell), type wsl –list –online, and press Enter. You will see options like Opensuse, Debian, and others.

7. You can install any of these distros by typing wsl –install -d <<distro name>> into the Windows Terminal. The same process as the previous Ubuntu installation will repeat, and you’ll need to enter a username and password to complete the installation.
Note: You can also install any Linux Distro on Windows from the Microsoft Store.
How to Launch Your Linux Distro and Use Bash
There are two methods you can use to launch your Linux distro. If you installed Ubuntu, you can select the Start menu, type Ubuntu, and select the Ubuntu app to launch it.

Alternatively, you can launch the Windows Terminal and just type the command Ubuntu to launch the Linux Bash shell in the Ubuntu environment.

To see a list of all available Linux commands you can use in Bash, type help -d.

You can get more details about individual commands by typing help followed by the command name. For example, help printf returns command details and information about each command parameter.

Some of the more common Bash commands most people use when they first get started include:
- Interactive Mode: Type commands into the command-line interface (Windows Terminal).
- Batch Mode: Run a text file that contains all of the commands you’d like Linux to execute in order. Many people create these scripts using programming syntax.
How to Run a Bash Script in Windows
To run a script in Bash, just create a text file using your favorite file editor like Notepad and save it in a location you’ll remember.
One thing that’s unique about a Bash script is that the first line must be “#!” followed by the path of your Linux bash path. To see what that is, launch Ubuntu and type which bash into the command line window. This will provide the Bash path.

Create a new text file and include that first line at the top. In the case of this example, that would be:
#! /user/bin/bash

Follow this line with each sequential command you want Linux to run. In this example:
- Line 1: Uses the echo command to display text to the user on the screen.
- Line 2: Combines echo with the date command to return today’s date.
- Line 3: Combines echo with the whoami command to return your user name.
Save this text file with a .sh extension. Remember the path to this file.
Next, open the Windows Terminal and use the cd command to navigate to the path where you’ve saved the Bash script.
To run the script, type bash <<name of script>>.

This is a very simple example, but this demonstrates how you can use such a file to craft entire Bash script programs. Even programming statements like IF statements are available to include decision-making capabilities in your script.
The site SS64 provides an extensive resource with all available Bash commands that you can use in the Bash terminal or your Bash scripts.
You can also see a tutorial on using a Linux shell script to back up a directory.
Related Posts
- How to Fix a “This file does not have an app associated with it” Error on Windows
- How to Add OneDrive to Windows File Explorer
- How to Fix an Update Error 0x800705b4 on Windows
- How to Resolve “A JavaScript error occured in the main process” Error on Windows
- How to Fix the Network Discovery Is Turned Off Error on Windows