
Microsoft Windows XP is an old operating system that has reached the end of its support from Microsoft. But if you’re still required to run it, then the best way to do so is to execute it on a virtual machine.
I completely switched to ‘Linux‘ about a year ago and personally, and starting very recently, I wanted to run Windows XP because I have to use a couple of applications that’re only designed to run in Windows, and for a couple of months I’ve been using my licensed Windows 8.1 in a virtual machine on Ubuntu 15.10 just for the sake of running those applications. But my laptop only has 4 GB of RAM and when using Windows 8.1 virtual machine (I use VirtualBox and have allocated 1.4 GB of RAM for Windows 8.1) alongside my web browser with 8-12 tabs opened in Ubuntu 15.10, it really slows things down due to the heavy memory usage.
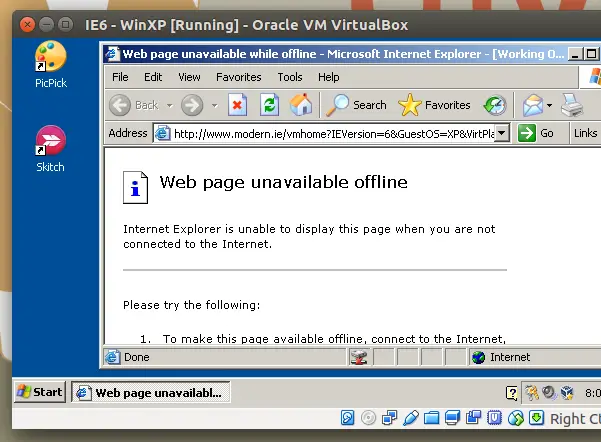
So recently I switched to a Windows XP virtual machine to see if I can counteract this somehow. I’ve been using it for a few weeks now, and with just a 700 MB RAM, XP runs great!. Sure it’s an outdated and a bit ugly looking operating system, but I just use it for the sake of running my applications. I can’t really complain. However, being old, Windows XP also has an outdated hardware driver support. Therefore, unlike with Windows 8.1, you won’t be able to connect to the Internet without first making a couple of changes in VirtualBox. So in this article I’ll share with you what I did to enable internet access to Window XP virtual machine under VirtualBox, hoping that someone may find it useful. And even though I used Ubuntu 15.10 as the host, these instructions should work despite what operating system you’ll be utilizing to act as the host.
What we’ll be doing is simple. First we have to change the network setting of VirtualBox for the Window XP VM. And then we have to download the network adapter driver through the Host operating system, share it with the VM, and install it on the Windows XP VM. Afterwards, Windows XP will be able connect to the internet. It’s pretty simple. So let’s do it.
Step 1: First of all, if you’re already running the Window XP virtual machine, then turn it OFF. Then from the VirtualBox VM manager window, select the Windows XP VM and click on the Settings icon.
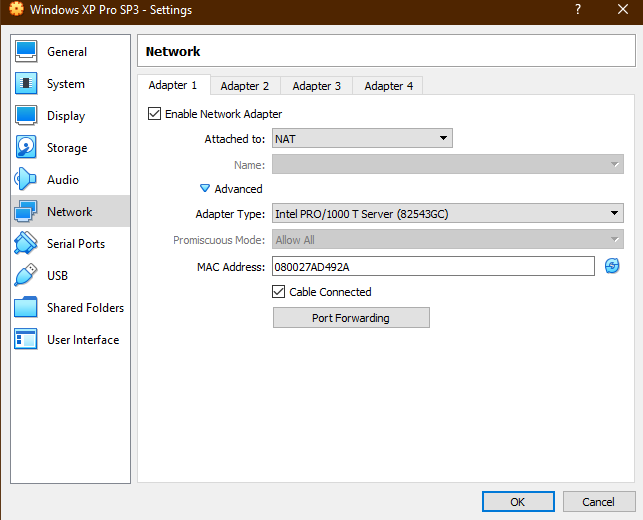
Step 2: Then click on the Network tab, and make sure you’ve selected ‘NAT‘ under Attached to: option. Then click on Advanced, and under ‘Adapter Type‘, make sure you’ve selected Intel Pro/1000 MT Desktop(...). Below that, the ‘Cable Connected‘ option should also be checked.

Step 3: If you’ve already setup a shared folder for the Windows XP VM you can simply click on the ‘OK’ button and move on to Step 4. Otherwise, don’t click on the ‘OK’ button just yet, and click on the Shared Folders icon instead.
From the window to your right, click on the small folder icon with the green cross to add a shared folder.

You can share any folder with the virtual machine. I’ve shared my ‘Home’ folder (which is the equivalent of ‘My Documents’ in Windows) with the VM and since I should be able to write to the shared folder from the VM, I make sure to uncheck ‘Read-only‘ option and check the ‘Auto-mount‘ option so that the folder gets mounted every time the virtual machine boots up. You can also changed the name of the mounted folder as well (by default VirtualBox uses the shared folder’s name).
Step 4: Now download the Intel Pro/1000 MT Ethernet adapter driver from this page (there are two drivers. One for the 32-bit version of Windows XP, & the other is for the 64-bit version) using the Host operating system. Once the download finishes, copy it over to the shared folder.
Step 5: Now turn ON the Windows XP virtual machine. Once it finishes booting, open My Computer and you should see the shared folder mounted there. Now locate the downloaded Intel Ethernet adapter installer and install it (when unsure, just go with the default selection of the installer).
Now open up the web browser and you should be able to access internet. If not, reboot the virtual machine. That’s it. Good luck.
Update (2019-04-11): It’s been a while since I wrote this tutorial but these steps should still work. However, even after following all these steps you still can’t connect to the internet, then try downloading Firefox for Windows XP from the host computer and then place it in the shared folder and install it from there. After that you should be able to connect to the internet as long as you are using that web browser. A especial thank you should go to Tim in the comment section for pointing this out!
P.S: (if you’ll be browsing internet often through the Windows XP VM, then replace the old IE with Firefox or Google Chrome).
In today’s digital age, having access to the internet is crucial, even when working within a virtual machine. For enthusiasts who love old operating systems, getting Windows XP to connect via VirtualBox can be an exciting challenge. Whether you’re looking to use legacy software, play classic games, or simply explore XP’s unique interface, figuring out how to connect to the internet will enhance your experience. In this comprehensive guide, we will walk you through the steps needed to set up an internet connection on Windows XP running in Oracle’s VirtualBox.
Understanding VirtualBox and Windows XP
Before we dive into the connection process, let’s briefly discuss what VirtualBox is and why you might want to run Windows XP.
Oracle VM VirtualBox is a powerful x86 and AMD64/Intel64 virtualization product for enterprise as well as home use. It allows you to run multiple operating systems on a single machine. This flexibility is particularly beneficial for testing, development, or educational purposes.
Windows XP, released in 2001, is one of the most popular operating systems of its time, known for its user-friendly interface and robustness. Many applications and games require this OS, making it essential for those who want to relive or access software from that era.
Preparing Your Virtual Machine
Before establishing an internet connection, it is crucial to ensure that your Windows XP virtual machine is properly set up.
1. Installing Oracle VM VirtualBox
Make sure you have the latest version of Oracle VM VirtualBox installed on your host machine (Windows, macOS, or Linux). You can download it from the official VirtualBox website. After downloading, follow the installation instructions specific to your operating system.
2. Creating a Windows XP Virtual Machine
Once VirtualBox is installed, you can create a new virtual machine:
- Open VirtualBox and click on the “New” icon.
- Follow the prompts: name your virtual machine, select “Windows XP” as the operating system and version, allocate memory (at least 512MB recommended), and create a virtual hard disk.
Now that you have a virtual machine set up, it’s time to install Windows XP.
3. Installing Windows XP
You will need a Windows XP installation ISO or CD. Insert your CD or point to the ISO file in VirtualBox settings. Start the virtual machine, and follow the installation prompts for Windows XP. This process typically involves partitioning a virtual hard drive and formatting it.
Configuring Network Settings
Once Windows XP is installed, you need to configure your network settings in VirtualBox to enable internet access.
1. Accessing VirtualBox Network Settings
To configure network settings:
- Ensure your Windows XP VM is powered off.
- Select your VM in VirtualBox and click on “Settings.”
- Navigate to the “Network” tab.
2. Selecting the Right Network Adapter
You typically have several options under “Adapter 1”. Let’s focus on the recommended choices for internet connectivity:
Using NAT (Network Address Translation)
This is the simplest mode for beginners and allows your VM to access the internet without additional configuration:
– Enable the Adapter: Check the “Enable Network Adapter” box.
– Adapter Type: Ensure “Intel PRO/1000 MT Desktop (82540EM)” is selected.
– Attached to: Set this to “NAT”.
Using Bridged Adapter
A bridged connection gives your VM its own IP address on the same network as your host machine:
– Enable the Adapter: Check the “Enable Network Adapter” box.
– Adapter Type: Keep “Intel PRO/1000 MT Desktop (82540EM)”.
– Attached to: Choose “Bridged Adapter”.
– Name: Select your host’s active network connection (Wi-Fi or Ethernet).
After configuring the network settings to your preference, click “OK.”
3. Additional Configuration within Windows XP
Now, let’s configure networking in Windows XP itself:
- Start your Windows XP virtual machine.
- Once logged in, right-click on “My Computer” on the desktop and select “Properties.”
- Navigate to the “Hardware” tab and select “Device Manager.”
Here, check if you see a network adapter listed under “Network Adapters.” If there’s a yellow exclamation mark, you may need to install the necessary network drivers. Make sure you have a copy of the drivers available before proceeding.
Establishing an Internet Connection
Now that your network configuration is complete, follow these steps to connect to the internet from within Windows XP.
1. Configuring Internet Connections
- Click on the “Start” menu, then “Control Panel.”
- Open “Network Connections.”
- Right-click on “Local Area Connection” and select “Properties.”
- In the “Networking” tab, make sure Internet Protocol (TCP/IP) is checked.
2. Setting Up TCP/IP Properties
- Highlight “Internet Protocol (TCP/IP)” and click on “Properties.”
- You can choose the following options:
- Obtain an IP address automatically: This option works best if you are using NAT or Bridged mode.
- Obtain DNS server address automatically: This is also preferred for easier configuration.
After making your selections, click “OK” to proceed.
3. Testing the Internet Connection
Open the web browser within Windows XP, such as Internet Explorer, and try to visit any website. If you see the webpage load successfully, your internet connection is functioning correctly.
Troubleshooting Connection Issues
In some cases, you may face challenges connecting to the internet. Here are some troubleshooting tips to resolve common issues.
1. Checking Network Configuration in VirtualBox
Verify that the network settings in VirtualBox are correctly configured, especially if using Bridged Adapter. Ensure you have selected the right physical network adapter that your host system is using.
2. Verifying Windows XP Network Settings
Double-check that the “Internet Protocol (TCP/IP)” settings are configured as discussed earlier. Make sure you are set to obtain an IP and DNS automatically for the simplest configuration.
3. Reinstalling Network Drivers
If there is an issue with the network adapter in Device Manager (such as a yellow exclamation mark), reinstall or update the network drivers by downloading them from the manufacturer’s website.
Enhancing Your Experience
Now that you have successfully connected Windows XP to the internet in your VirtualBox setup, consider taking further steps to enhance your experience.
1. Install Guest Additions
Installing VirtualBox Guest Additions can significantly improve the performance of your virtual machine. It provides better graphics, mouse pointer integration, seamless windows, and shared folders between host and guest. To install:
- Click on “Devices” in the VM menu, then select “Insert Guest Additions CD Image.”
- Follow the prompts to complete the installation within Windows XP.
2. Keeping Your System Secure
While running Windows XP in a virtual environment, it is advisable to take precautions to keep your system secure, especially since Windows XP is no longer officially supported by Microsoft. Consider installing a lightweight antivirus solution and making sure to use browsers that support modern security protocols.
Conclusion
Connecting Windows XP to the internet within VirtualBox is a rewarding process that allows you to experience old software and games in a modern setting. By following the steps outlined in this guide, you can easily set up your virtual machine for internet access, troubleshoot any potential issues, and enhance your overall experience with additional features.
Now that you’re connected, you can explore the charming world of Windows XP all over again—play vintage games, run legacy applications, or even perform tasks unique to this classic operating system. Embrace the nostalgia and enjoy your virtual journey!
What is VirtualBox and how does it work with Windows XP?
VirtualBox is a powerful open-source virtualization software that allows users to run multiple operating systems on a single physical machine. It creates virtual machines, or “VMs,” where you can install different operating systems, such as Windows XP, Linux, or macOS. When you run Windows XP in VirtualBox, the software simulates a computer environment capable of running the OS as if it were on dedicated hardware, making it convenient for testing, development, and running legacy applications.
Using VirtualBox with Windows XP can be particularly useful for accessing older software that may not run on modern operating systems. It also allows users to achieve isolation and potentially safeguard their main operating system from vulnerabilities inherent to older systems. However, to unlock the full potential of Windows XP in VirtualBox, you’ll need to configure networking settings properly so the virtual machine can connect to the Internet.
How do I set up Windows XP in VirtualBox?
To set up Windows XP in VirtualBox, you first need to download and install the VirtualBox software on your host operating system. After installing, create a new virtual machine by selecting the appropriate settings for Windows XP, including memory allocation and storage options. You will also need a Windows XP installation disc or ISO file to proceed with the installation process.
Once you’ve configured your virtual machine, boot it up to begin the installation of Windows XP. Follow the on-screen instructions for installing the operating system, which will typically involve partitioning the virtual disk and configuring basic preferences like the time zone and language. After the installation is complete, you may need to install the VirtualBox Guest Additions for optimal performance and enhanced features.
What networking options are available for Windows XP in VirtualBox?
VirtualBox offers several networking options for connecting your Windows XP virtual machine to the Internet. The most common configurations include NAT (Network Address Translation), Bridged Adapter, Host-Only Adapter, and Internal Network. NAT allows the VM to access the Internet through the host’s network connection without exposing the VM directly. This is often the simplest option for users who just need Internet access.
If you need the Windows XP VM to be accessible from other devices on the same network, then the Bridged Adapter setting is the best choice. With this configuration, your VM will act as a separate device on the network, receiving its own IP address and connecting directly to your local area network. Exploring these options will help you determine the best way to configure your network settings based on your specific needs.
Can I share files between my host and Windows XP in VirtualBox?
Yes, you can share files between your host operating system and the Windows XP virtual machine by utilizing VirtualBox’s shared folders feature. To set this up, you need to go into the settings of your Windows XP virtual machine, navigate to the “Shared Folders” section, and add a new folder from your host that you wish to share. You can choose options such as making the folder read-only or specifying whether it should be auto-mounted on startup.
Once you have configured the shared folder, you will need to install the VirtualBox Guest Additions within the Windows XP virtual machine. This will enable the necessary drivers for sharing and networking features. After installation, you can access the shared folder through Windows Explorer in your VM, making it easy to transfer files between your host and the Windows XP instance.
How can I troubleshoot network issues in Windows XP on VirtualBox?
When encountering network issues in Windows XP within VirtualBox, the first step is to check your network settings in VirtualBox. Verify that the correct network adapter is selected, whether it’s NAT or Bridged, and ensure that the adapter is enabled. Additionally, ensure that any relevant firewalls or security settings are not blocking the network connection for the virtual machine.
If networking configurations seem correct but issues persist, you can troubleshoot within Windows XP itself. This includes checking the IP settings, verifying that drivers are installed properly, and determining whether the network connection is recognized by accessing the “Network Connections” in the Control Panel. Resetting the network adapter and checking for any additional software that may interfere with connectivity can also help resolve issues.
Is Windows XP still secure to use in a virtual environment?
Using Windows XP, even in a virtual environment, poses some security risks. Since Microsoft ended support for Windows XP in April 2014, the operating system no longer receives security updates, making it vulnerable to new threats and vulnerabilities. Running XP on VirtualBox may isolate it from your primary system, but it’s crucial to implement strict security measures to minimize risks, such as restricting Internet access unless necessary.
To enhance security when using Windows XP in a virtual environment, consider using a VPN and avoid accessing sensitive data or websites. Additionally, you should never share the VM’s network with your primary system if it requires handling secure information. Regularly back up any important data stored within the virtual machine, and if possible, utilize the VM exclusively for tasks requiring the older operating system.
Can I run Windows XP applications on newer Windows systems without VirtualBox?
Yes, it is possible to run Windows XP applications on newer Windows systems without using VirtualBox, although results may vary. One way to achieve this is through the compatibility mode feature available in Windows. By right-clicking on the application executable, you can select “Properties” and navigate to the “Compatibility” tab to set the application to run in a Windows XP environment.
Another alternative is to use third-party software solutions like Wine or DOSBox, which can emulate older Windows environments for specific applications. However, compatibility might not be guaranteed, and certain applications may not function properly outside of their native Windows XP environment. Therefore, for the best experience, using VirtualBox remains a recommended option for users with extensive reliance on legacy applications.
What are the benefits of using VirtualBox for Windows XP?
Using VirtualBox for running Windows XP offers several advantages, especially for users who need access to older software that is no longer supported on modern operating systems. One of the primary benefits is encapsulation; your XP installation can operate independently of your host machine. This allows for testing and running legacy applications without risking compatibility issues with the host OS.
Additionally, VirtualBox provides an easy way to create snapshots, allowing you to save the state of the Windows XP virtual machine. This feature can be incredibly useful when experimenting with potentially harmful software, as you can quickly revert to a previous state. Furthermore, virtualization also offers flexibility in terms of resource allocation, enabling users to optimize performance or modify settings to suit specific needs without affecting the overall system performance.
It’s now all go thanks to the knowledgeable responses above. Pity it’s so difficult to do. I found that all drives, Firewire and USB, can be shared.
For my future reference, and for any other novice interested in running Windows XP or 7 on a Mac under OSX 10.6.8, here’s how to do it with VirtualBox:
Windows XP
1. Open VirtualBox and click New inside the Oracle VM VirtualBox Manager window.
2. Give the new OS a name and location. It can be installed anywhere.
3. Select the install disk or .iso file and click Start to begin the installation.
4. Windows XP will not automatically connect to the internet, though Windows 7 will. To set up internet connection via Airport:
a. Shut down VirtualBox and reopen
b. Navigate to Settings > Network and set these options:
• Attached to: Bridged Adapter
• Name: en1: Airport
• Advanced > Adapter Type: PCnet-Fast 111 (Am79C973). All other settings at default.
5. When Windows XP is installed there is no capability for storage or reading from disks. Shared folders (where files can be stored or retrieved) have to be set up by the Guest Additions package called VBoxGuestAdditions.iso file contained with the VirtualBox application. Luckily, Windows XP can set up shared folders semi-automatically. Not so for Windows 7 (see below).
6. Run Windows XP from within VirtualBox.
7. Go to Devices > Insert Guest Additions CD Image … A Setup Wizard will appear. Do as the instructions say. Messages from Windows will appear saying that this software has not passed certain tests. Install anyway.
8. Select Reboot when asked.
9. To allow Windows to see drives or folders, shut down Windows and within the VirtualBox Manager window click on Settings > Shared Folders > Add folders (“+” sign to the right) > Folder Path > Other, navigate to the disk or folder and select Auto-Mount. To add additional folders, hit the “+” sign on the right side of the window.
10. Within VirtualBox, and with Windows XP selected, choose Start to boot into Windows and the folders should appear under My Computer > Network Drives.
11. To uninstall VirtualBox run the uninstaller contained in the install package. It is a Terminal document which opens and runs to do the de-installation.
Windows 7
The auto install for the Guest Additions does not seem to work for Windows 7, it has to be installed manually. You will need the VBoxGuestAdditions.iso file contained with the VirtualBox application. Right click on the VirtualBox icon in Finder and choose Show Package Contents. The iso file is located in the Contents > MacOS folder. Extract it and save as part of the VirtualBox install files.
1. Go to Devices > CD/DVD Devices > Choose a virtual CD/DVD disk file. This will bring up Windows 7 and a dialog box. Navigate to VBoxGuestAdditions.iso and open it. This will present the file to Windows 7.
2. Within Windows 7 navigate to the newly installed file via My Computer. It will appear as a CD called VirtualBox Guest Additions. Double click to open it and follow the prompts. If the prompts don’t appear, close Windows (which will say it can’t close because the VirtualBox app is running), then choose Close and the app will appear. The relevant software will be installed in a minute or so. Tick the box that says “Accept files from Virtual Box” to speed the installation.
3. Reboot Windows to activate the Additions, then shut down Windows again, and reboot to add drives and folders.
VirtualBox 6.1.26
Host OS: Windows 10
Guest OS: Windows XP SP3
Настройки сети системы:
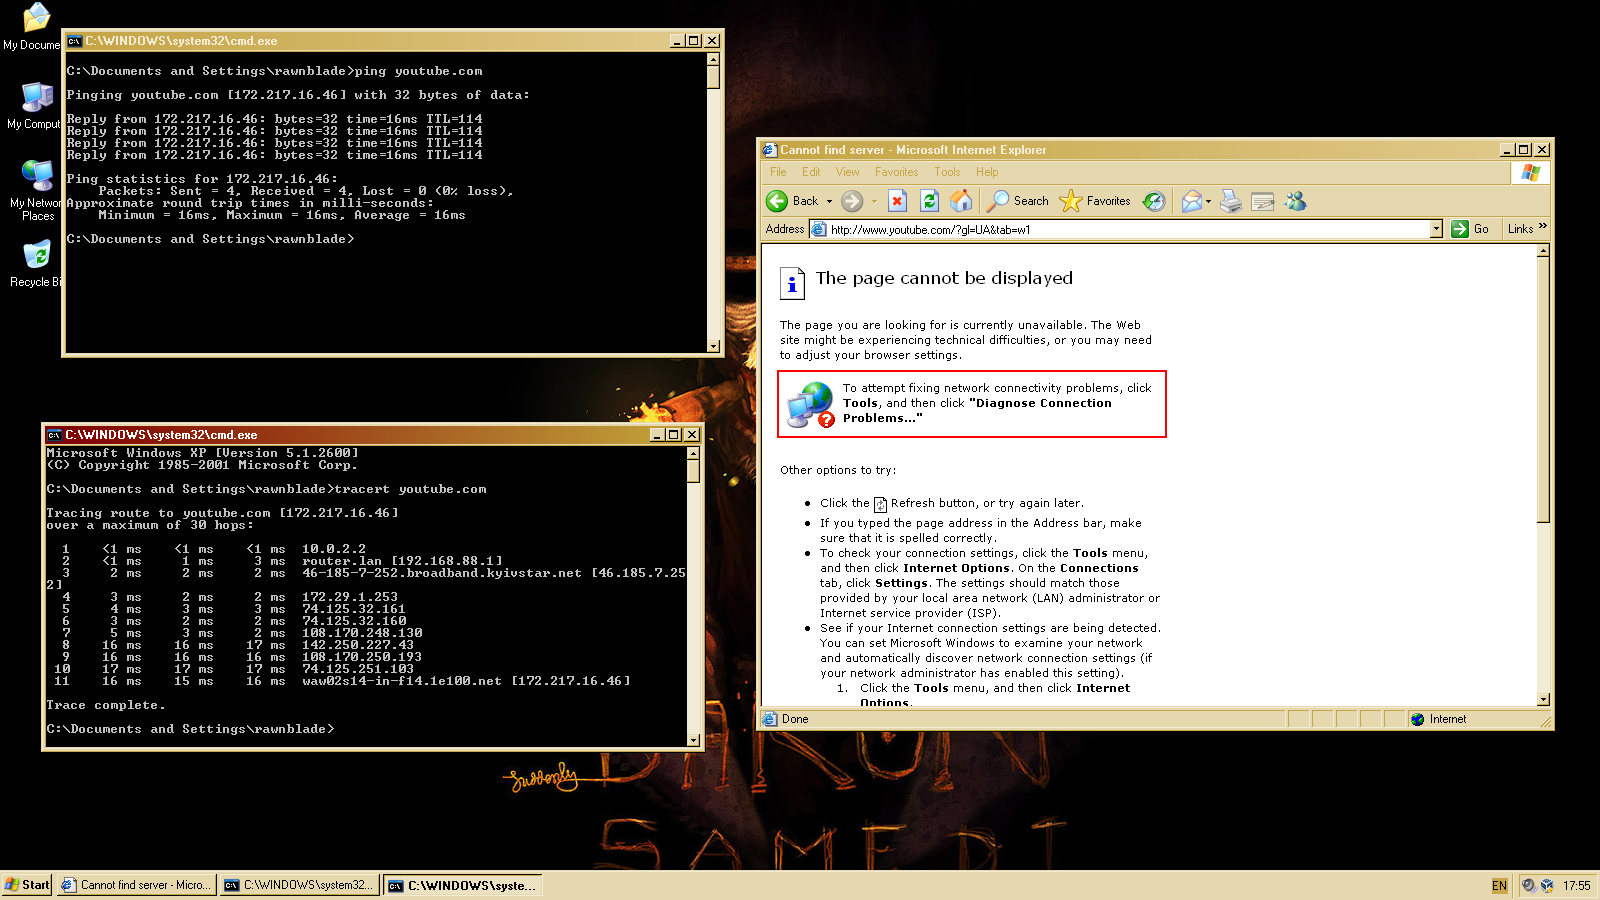
Внутри гостевой ОС все сайты пингуются. Однако открывается только google.com
И пинг и трейс до сайта работает, однако сайт недоступен:
Что пробовал для решения:
- изменение типа сети на Мост/Виртуальная
- изменение типа адаптера
- перенастройку роутера на фиксированные адреса и ручное назначение адреса в режиме моста
- включение/отключение файрвола как на хосте, так и в гостевой системе
- ручную установку альтернативного браузера через Shared Folders
Пока никаких изменений. Решения не нашел.
-
Вопрос задан
-
2979 просмотров
ну через эксплорер то точно не заработает… пробуйте через портабл моззилу к примеру.
и наверняка надо будет корн сертификаты обновить
Пригласить эксперта
Если открывается google.com, то дело тут не в виртуалке, а в ОС. Обновите winXp хотя бы до WinVista (шутка)
Исправляйте проблему со старой ОС, а не с виртуалкой
-
Показать ещё
Загружается…
Минуточку внимания
0. Итак, мы настроили локальную сеть между
Хост-системой Windows XP Service Pack 2 и локальными машинами Windows 98 и Windows XP
— смотри VirtualBox
и сеть.Режим Виртуальный адаптер хоста . Настроим теперь связь с интернетом.
1. Настройка Windows XP для связи с интернетом
На виртуальной машине Windows XP в
свойствах TCP/IP ставим Основной Шлюз = 192.168.0.1 и Предполагаемый
DNS
сервер = 192.168.0.1 . 192.168.0.1 — это адрес хоста в локальной сети. На хосте находится выход в интернет.
| Настройка свойств TCP/IP |
Перезагружаем Виртуальную
машину Windows
XP и
должны получить связь с интернетом.:

|
| Интернет в Windows XP |
2. Настройка Windows 98 для связи с интернетом
| IP адрес и маска свойств TCP/IP |
Поставим шлюз =
192.168.0.1 — это адрес хоста в локальной сети, на котором находится выход в интернет
| Адрес шлюза свойств TCP/IP |
Затем ставим DNS = 192.168.0.1 и имя компьютера, на котором
выход в интернет – имя хоста.
| Адрес и имя DNS свойств TCP/IP |
Перезагружаем Виртуальную
машину Windows
98 и должны получить связь с интернетом:

|
| Интернет в Windows 98 |
3.Возможные проблемы.
3.1. Отсутствует интернет
в виртуальных машинах, а на хосте интернет есть, и сеть работает – т.е. связь
между машинами локальной сети существует.
В частности, на виртуальной машине Windows XP:

|
| Не работает интернет на виртуальной машине Windows XP |
Можно попробовать следующий метод устранения неисправности.
Надо на Хосте запустить
команду ipconfig /all. И посмотреть на начало его сообщений:

|
| Лог ipconfig/all — нет маршрутизации |
Мы видим, что ipconfig сообщает:
IP-маршрутизация включена . . . . : нет
В этом случае можно
попробовать следующее. Перейти ПУСК — Панель Управления — Администрирование
– Службы. Затем найти службу Брандмауэр Windows/Общий доступ к интернету
(ICS):

|
| Службы Windows XP |
После чего — Перезапустить
службу.
Затем проверить включение маршрутизации — запустить команду
ipconfig /all. И посмотреть на начало его сообщений:

|
| Лог команды ipconfig/all — есть маршрутизация |
Мы видим, что ipconfig стал сообщать:
IP-маршрутизация включена . . . . : да
Идем в виртуальную машину
и видим, что интернет заработал:

|
| Интернет в ВМ Windows XP заработал |
4. Скачать инструкцию по работе с Oracle
VM VirtualBox здесь: User-Manual-VirtualBox.pdf . В том числе рассказано про работу с сетью и
режим Виртуальный адаптер хоста
5. Полезные ссылки.