
Как сделать Windows похожей на MacOS

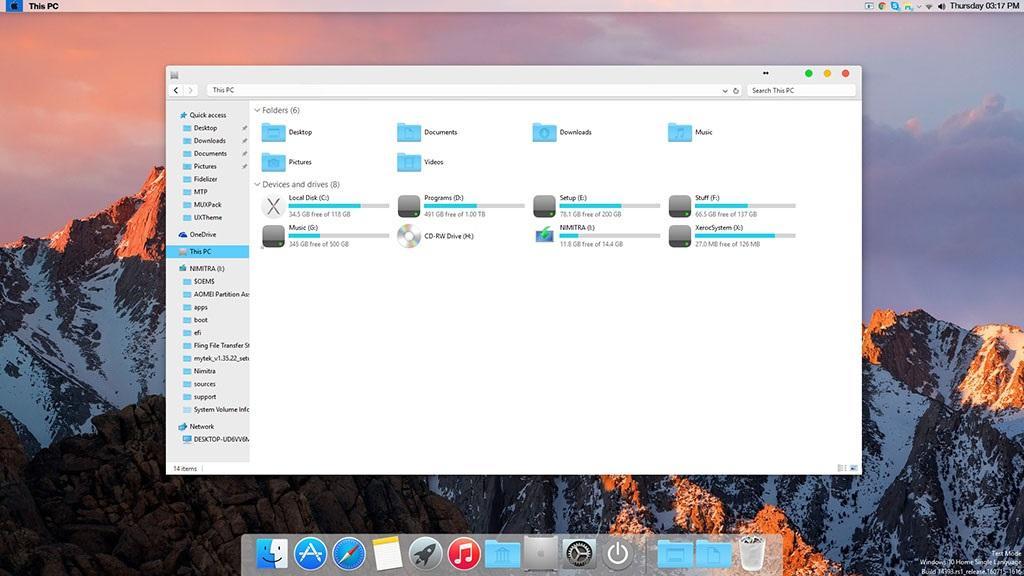
На фото: рабочий стол компьютера с операционной системой Windows 11, стилизованный под операционную систему MacOS от Apple.
Точка восстановления
Перед любыми серьезными изменениями в вашем устройстве мы всегда рекомендуем создавать резервную копию ваших данных
На Windows это называется «Точка восстановления»
После создания резервной точки можем переходить к установке темы
Как установить?

Скачиваем тему MacOS
2. Нажимаем кнопку «Скачать» (Стрелка вниз под фотографией)
3. Сайт попросит вас авторизоваться, вводим свою почту или выбираем удобный способ авторизации (Apple, Google и т.д.)
4. Проходим процесс регистрации и выбираем режим использования и ваши интересы (занимает 15 секунд)
5. Нажимаем кнопку «Скачать» (Стрелка вниз под фотографией)
6. Файл скачивается
Скачиваем Blur-эффект для окон
2. Не пугаемся сложного интерфейса
3. Кликаем на зеленую кнопку Code
4. Нажимаем Download Zip
Скачиваем панель Doc
2. Листаем ниже и выбираем скачать New Version
Теперь вам осталось все это установить и настроить, в этом вам поможет пошаговый видеогайд:
а если оно оказалось для вас непонятным, мы нашли рускоязычного блогера, который довольно понятно рассказал про процесс установки

If you want to style your desktop in the style of MacOS, then this solution is without exaggeration the best at the moment. You have 6 options for the visual style and dark and light modes. The archive contains system icons, start buttons, styles, and skins for various programs. Use this to get the dock look on the mac shown in the picture above.
Make your customization awesome by installing this theme’s appropriate Windows 7TSP icons.
What is included in this?
- Themes 6 types(dark,light)
- 7tsp Icon (4 types)
- Dock
- Stardock Curtains
- Start Orb
- Tools
Instalation steps:
- I recommend creating a restore point before starting the customization to ensure easy restoration if needed.
- This third party theme will only work if you install Theme Patcher, so definitely install Theme Patcher.
- If you’re new to this, check out this page to learn how to install a Windows custom theme.
- Watch the video tutorial on my YouTube channel for a visual guide on windows customization.
- Windows 10 users use Stardock Curtainsfor round corners
- Theme support: Windows 10 version (1903 to latest) & Windows 11
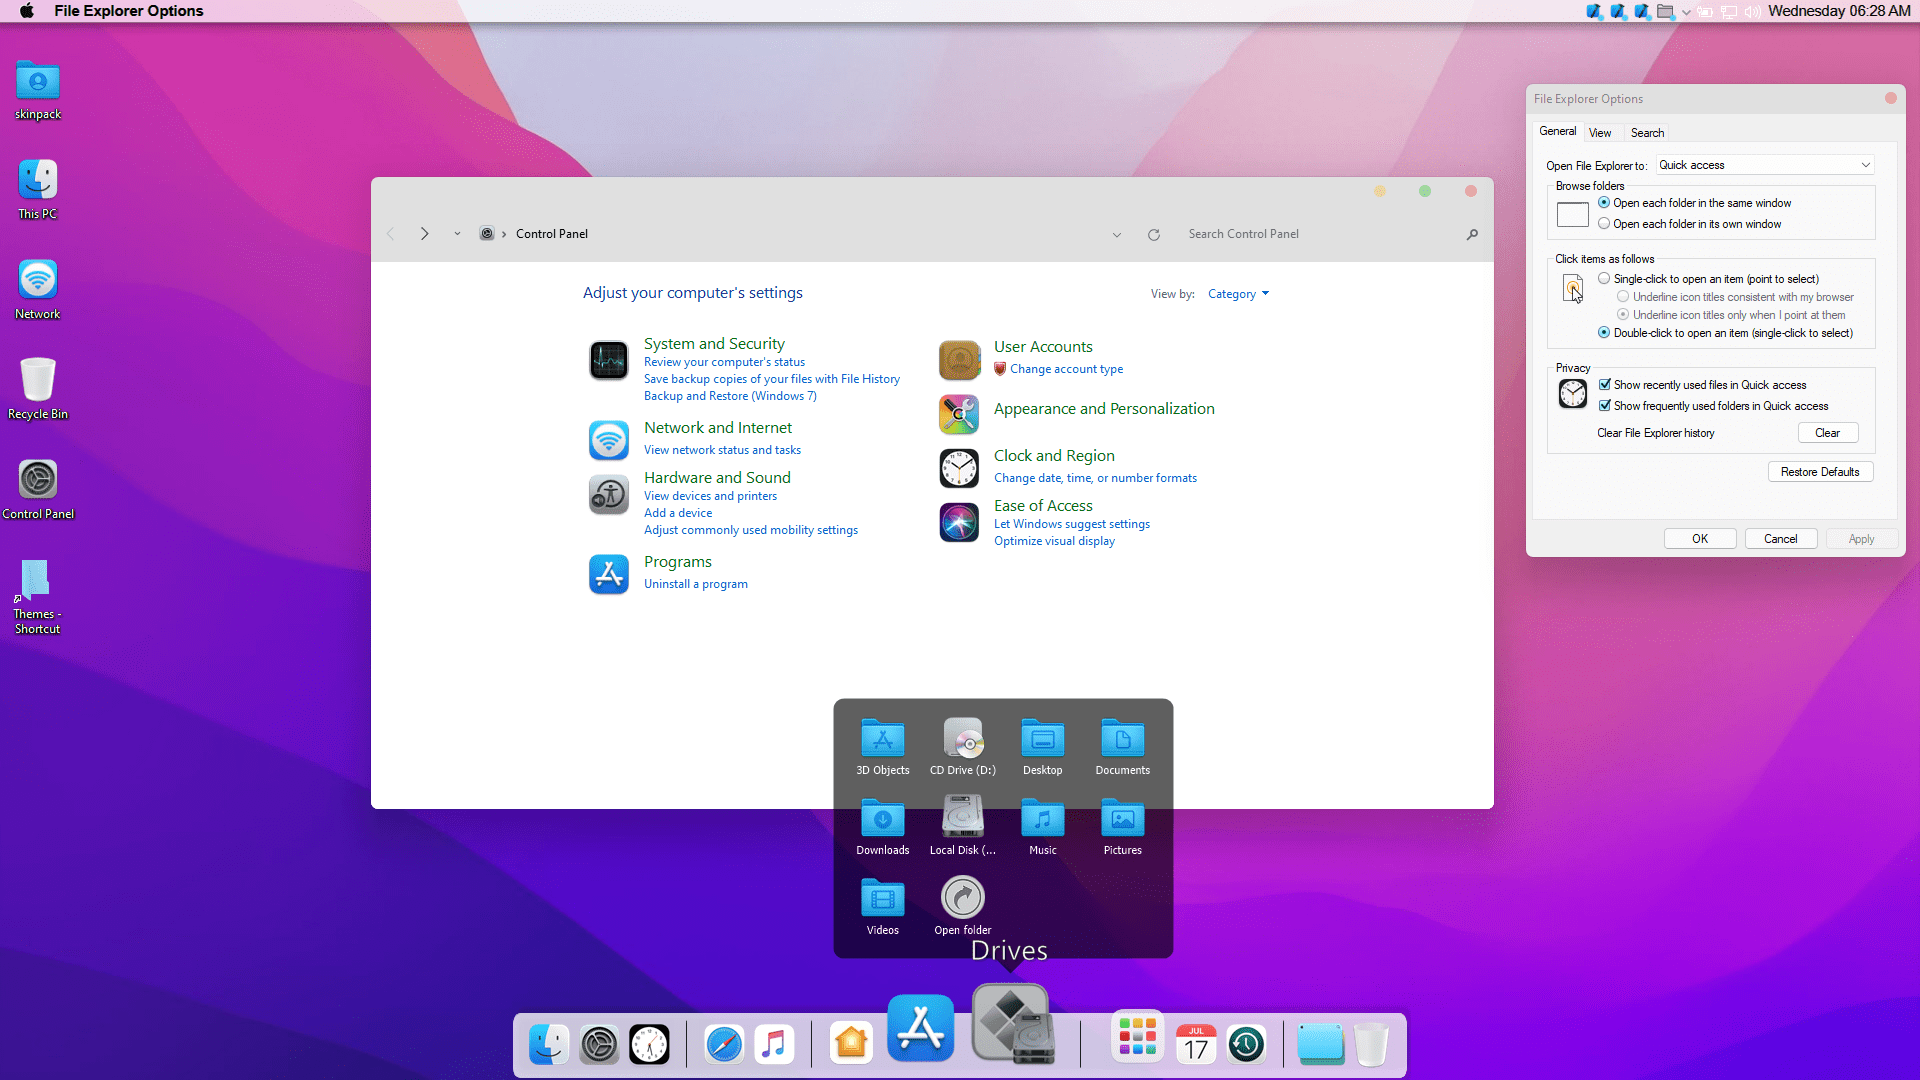
MacOS Theme Windows 10 & 11
Download
×
Download Page
Are you new to Windows customization?
Follow the steps given on this post page and I always recommend Creating a Restore Point before starting the customization. If you have any other doubts comment below.
- niivu themes
- niivu windows 11 themes
We all know how sleek and polished macOS looks. It’s not surprising that many Windows users are jealous and wish to emulate the aesthetic of Apple’s macOS. And the good news is that you don’t have to purchase a brand-new Mac to get a similar look.
Fortunately, it’s possible to recreate a similar visual experience on Windows using some third-party programs and some easy tweaks.
1. Use a macOS-Themed Desktop Background
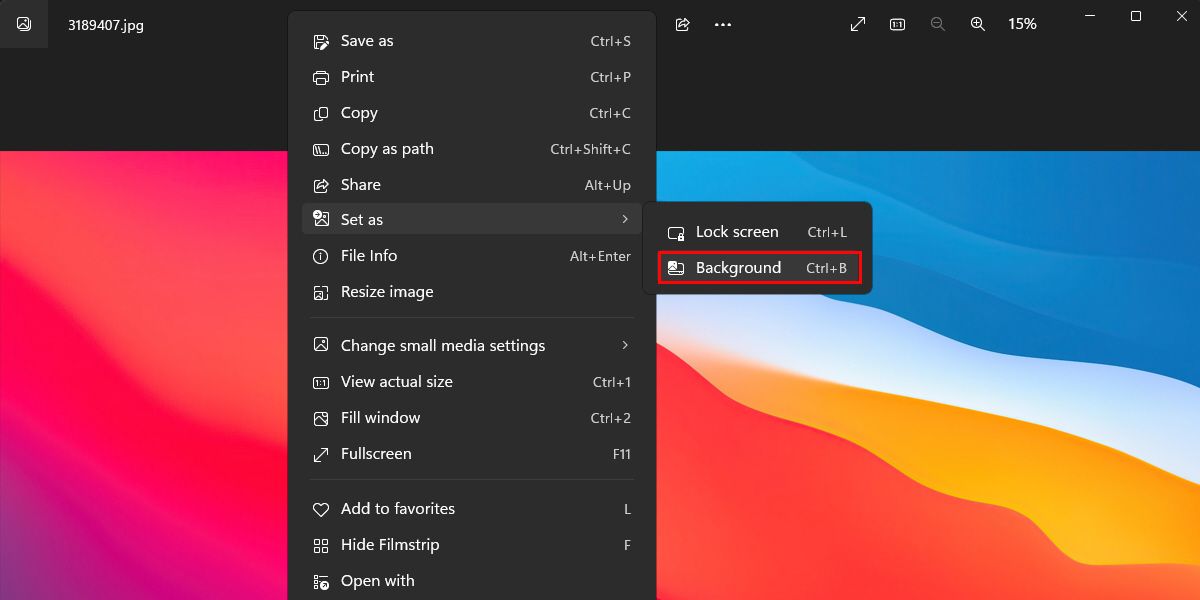
Before moving on to the actual steps for customizing your Windows looks, first, you have to change the current wallpaper of your Windows PC.
Many websites offer a variety of macOS wallpapers, such as WallpapersHome, WallpaperAccess, and WallpaperCave. Simply search for «macOS wallpaper», and you will find a wide selection of images to choose from.
Once you have found an image you like, download and open the image. Right-click anywhere on the image and click Set as > Background to apply it to your desktop.
Installing WinDynamicDesktop
If you’re finding it hard to download a macOS wallpaper on the web, you can install WinDynamicDesktop to get access to a wide range of macOS wallpapers.
Follow the below-given steps to get started with WinDynamicDesktop:
- Download it from the WinDynamicDesktop Microsoft Store page.
-
Open it, enter your location in the initial setup, and click OK.

-
WinDynamicDesktop will provide you with a variety of wallpapers to choose from. Select the wallpaper that best suits your taste and click the Apply button.

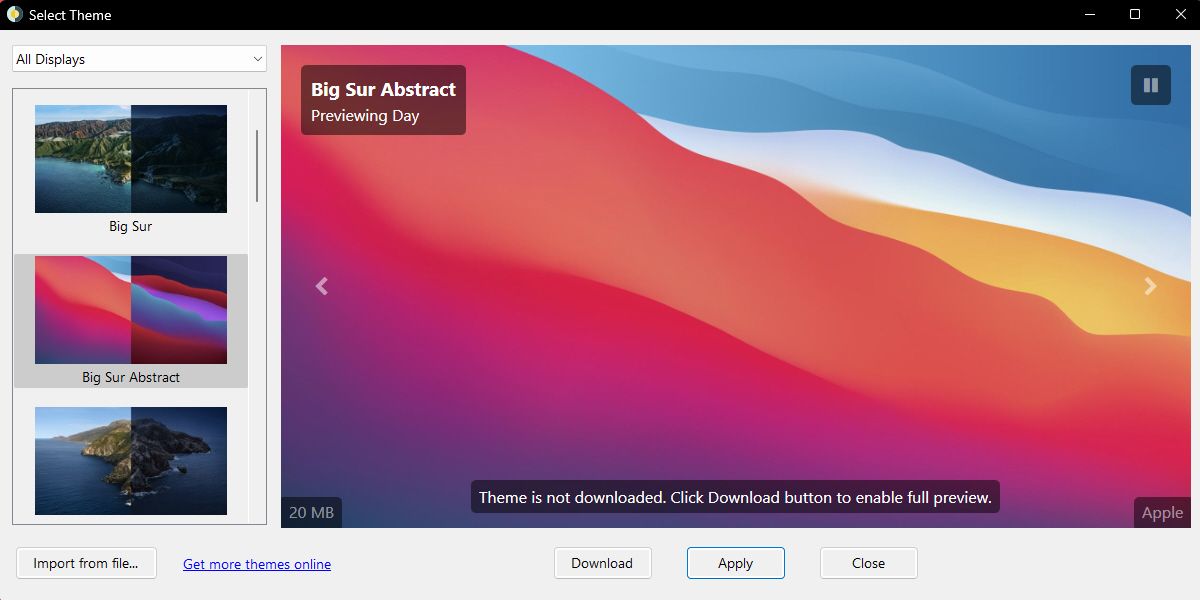
It’ll automatically download the selected wallpaper and apply it to your desktop.
Want to know the best part about using WinDynamicDesktop? WinDynamicDesktop downloads two different versions of a wallpaper. One version of the wallpaper is optimized for light mode, and the other version is optimized for dark mode. The good thing is that it will automatically switch the wallpaper depending on the time of day.
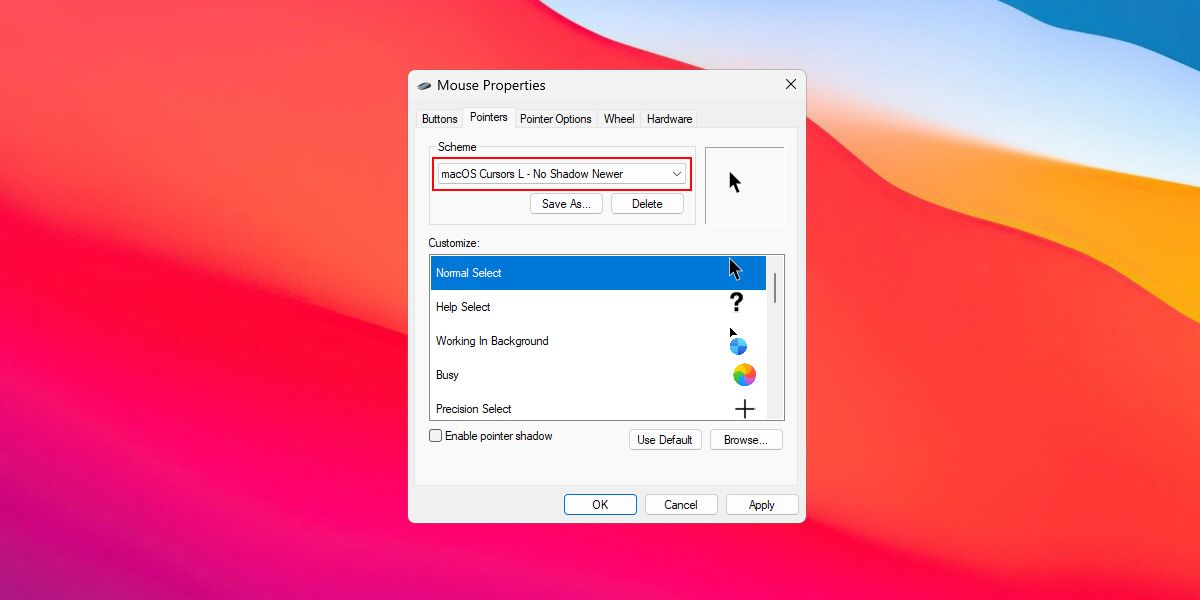
2. Install a macOS-Style Cursor
The default Windows cursor is quite basic and does not provide the same level of aesthetic as macOS. Thankfully, there is a way to customize the Windows cursor to make it look more like its macOS counterpart.
To make your cursor look more like a macOS cursor, you can use a macOS cursor theme, which is available for free on DeviantArt.
Here’s how to install the macOS-style cursor theme on Windows:
- Download the macOS Cursor theme from DeviantArt and unzip the downloaded file.
-
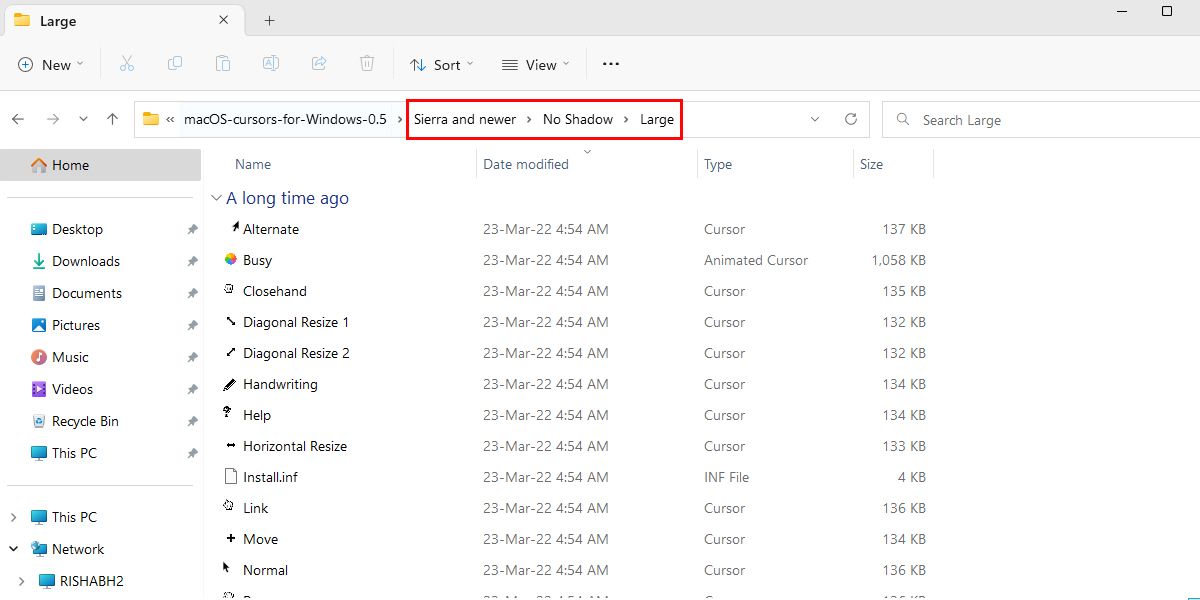
Navigate to the extracted folder and enter the folder named Sierra and newer > No Shadow > Large. For this guide, we will install the large and no-shadow cursor theme. You can choose which variant you want to install by navigating to the desired folder.
-
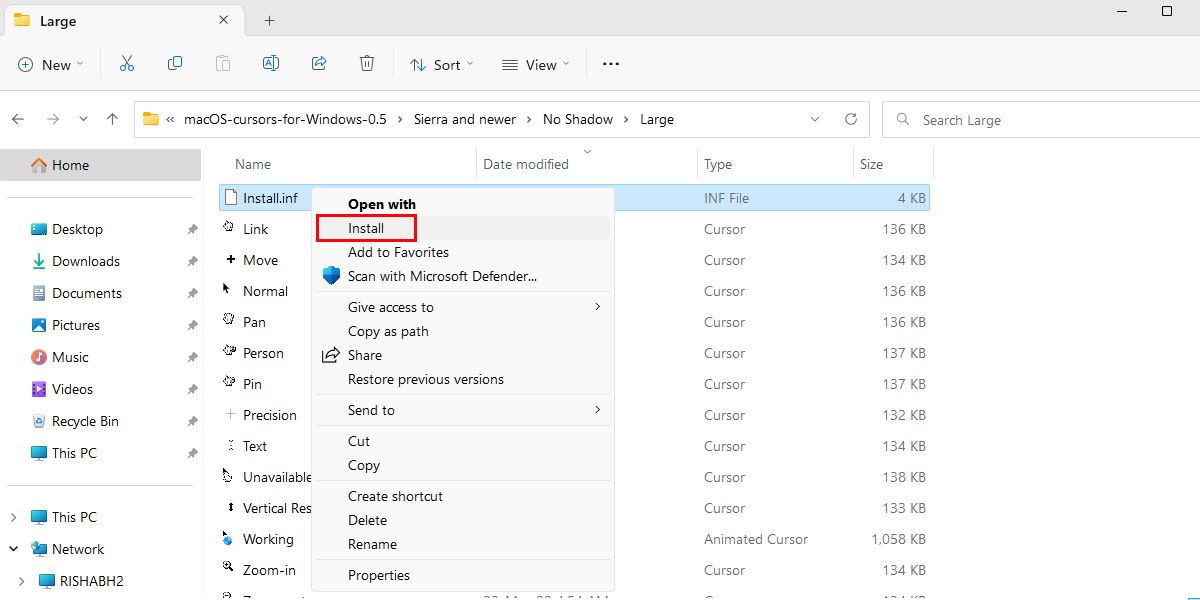
Right-click on the Install.inf file and click Install from the context menu.
-
Select the macOS cursor scheme and click the Apply button in the Mouse Properties window.
- Click Yes to replace the default Windows cursor theme with the macOS cursor theme.
That’s it. With that, you are done, and you should now be able to enjoy the macOS cursor theme on your Windows desktop.
If you’ve never used macOS before, you may not like the normal scheme of the macOS cursor. So, if you want to change it, go inside the No Shadow > XtraLarge folder and perform the same steps mentioned above.
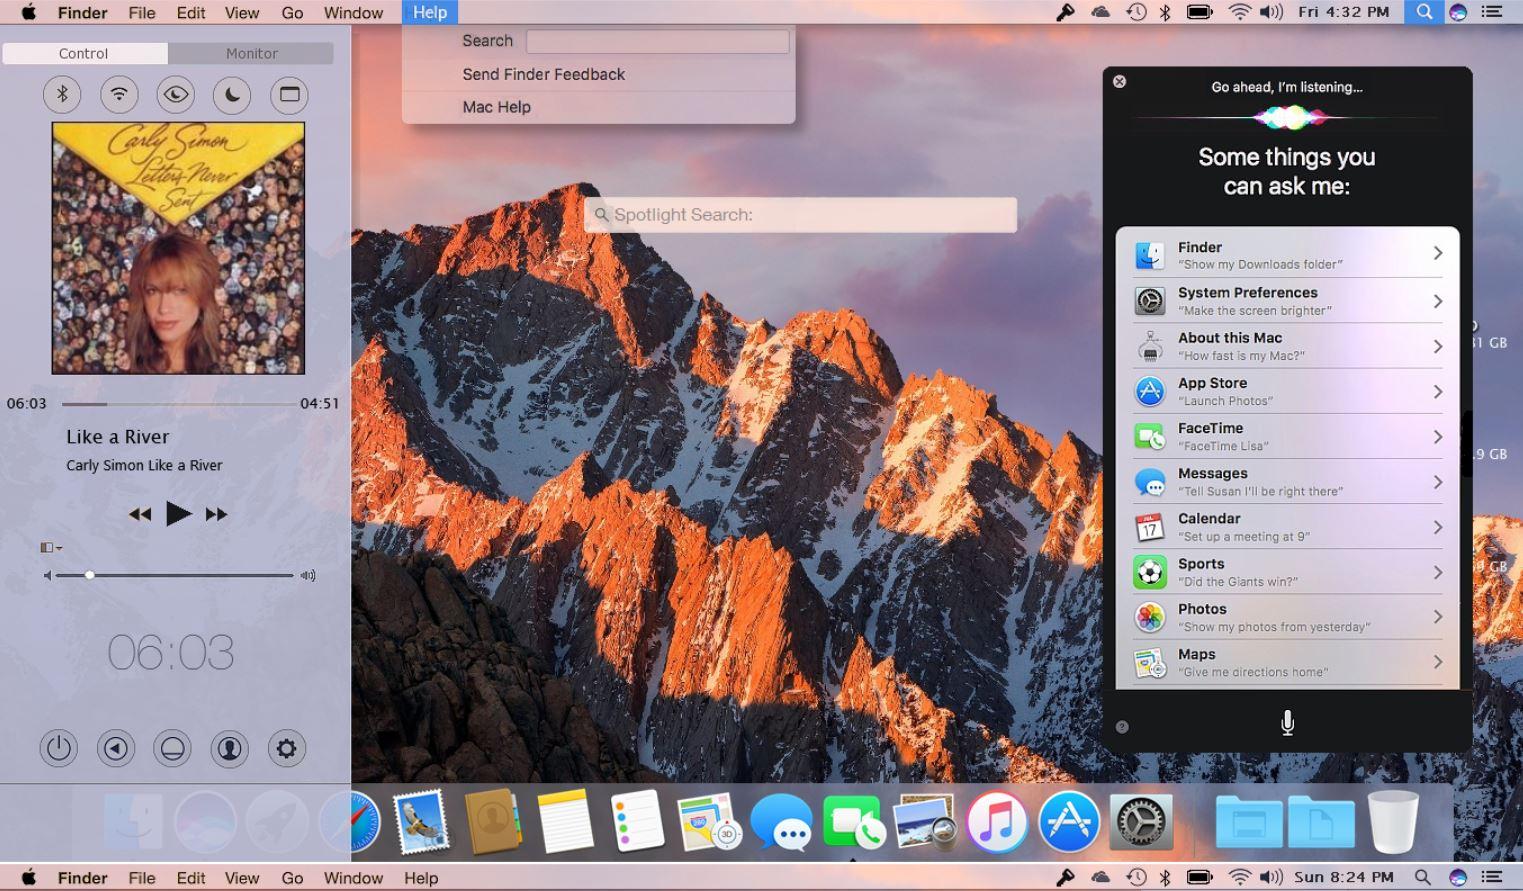
3. Make a Mockup macOS Dock Using MyDockFinder
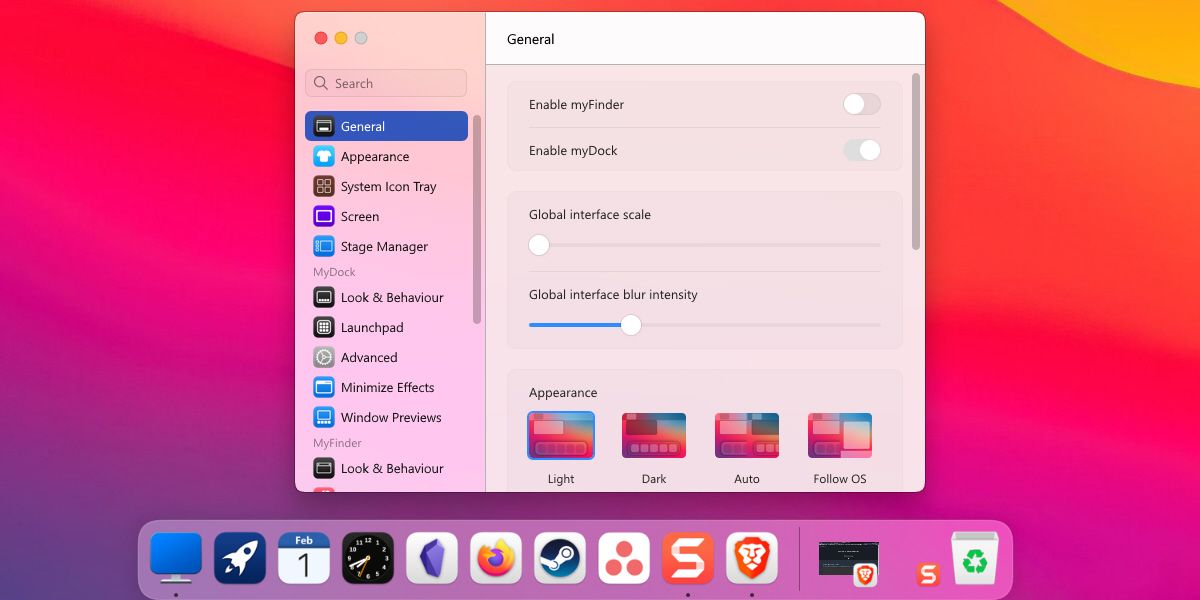
One of the most obvious differences between Windows and macOS is the dock. On macOS, the Dock is similar to the taskbar on Windows, which is always visible at the bottom of the screen.
If you want to replicate the macOS Dock on Windows, you can use a third-party program like MyDockFinder. MyDockFinder is a paid app that allows you to add a macOS-style dock to your Windows desktop.
It provides a wide range of customization options, including the ability to change the dock’s color, size, and position. It is a good alternative for those who want a more powerful and customizable dock than free alternatives.
The best part is that it offers a straightforward user interface, making it easy to customize the dock with just a few clicks. Additionally, it offers an intuitive drag-and-drop feature that allows you to quickly reorder the applications on your dock.
To start with it, you must purchase it from Steam for $4.99. Once you download it, it’ll automatically show a dock on your screen. If you want to customize it further, right-click anywhere on the dock and select Preferences.
Download: MyDockFinder ($4.99)
Droptop 4 is a free Rainmeter skin that adds a macOS-style menu bar to your Windows desktop. The menu bar is a horizontal bar at the top of the screen that displays a list of menus and options, such as the app menu, notifications list, brightness control, and volume control, to name a few.
The interesting part is that you completely control the menu bar with Droptop 4. It allows you to add different folders per your liking, pin different shortcuts to apps, install Droptop community apps, and more.
Follow the below-given steps to customize the menu bar with Droptop 4:
- Download and install Rainmeter first from Rainmeter.net.
-
Follow the on-screen instructions during the installation to set up Rainmeter. Once done, download Droptop 4 Base version from Droptopfour.com.
-
Open the downloads folder and double-click the .rmskin file. It’ll open the Rainmeter Skin Installer. Click Install to let Rainmeter apply Droptop 4 skin and activate the menubar.
-
Click Continue to start the Droptop 4 setup. Select your language and follow the instructions on the screen.


Once you complete the setup process, Rainmeter will automatically apply the Droptop 4 skin to your desktop, and the menubar will display at the top of your screen.
If you’ve previously installed MyDockFinder, you need to disable its menu bar first. To do that, go to MyDockFinder preferences and disable or toggle off the Enable myFinder option.
The good thing is that you can even drag and drop your favorite applications into the menu bar to quickly access them anytime. Additionally, Droptop 4 allows users to easily access folders and files, with the ability to hide specific items from view.
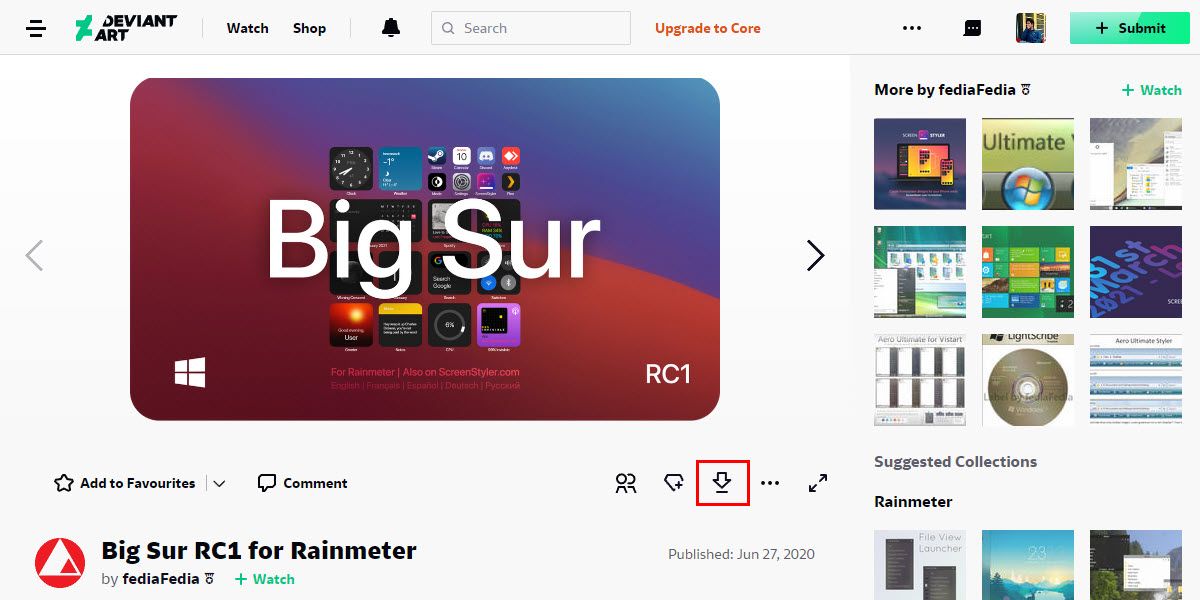
While the previous tweaks will give your Windows operating system a macOS-like look and feel, you can take it one step further by adding macOS-style widgets to Windows. For this purpose, DeviantArt.com is a great website, as it enables you to access a collection of pre-made macOS widgets for your desktop.
Note that the widgets we’re going to add are all Rainmeter based. Rainmeter is free software that allows you to customize and personalize the look of your desktop. It helps you apply custom widgets and skins (themes) to Windows.
We recommend creating a restore point before moving further. It will help you roll back your PC to a previous state in case the theme installation fails. If you’re a newbie, check out our guide on creating a restore point on Windows for help.
Here’s how to install macOS widgets on Windows:
-
Download the Big Sur for Rainmeter widget skin from DeviantArt by clicking the download icon.
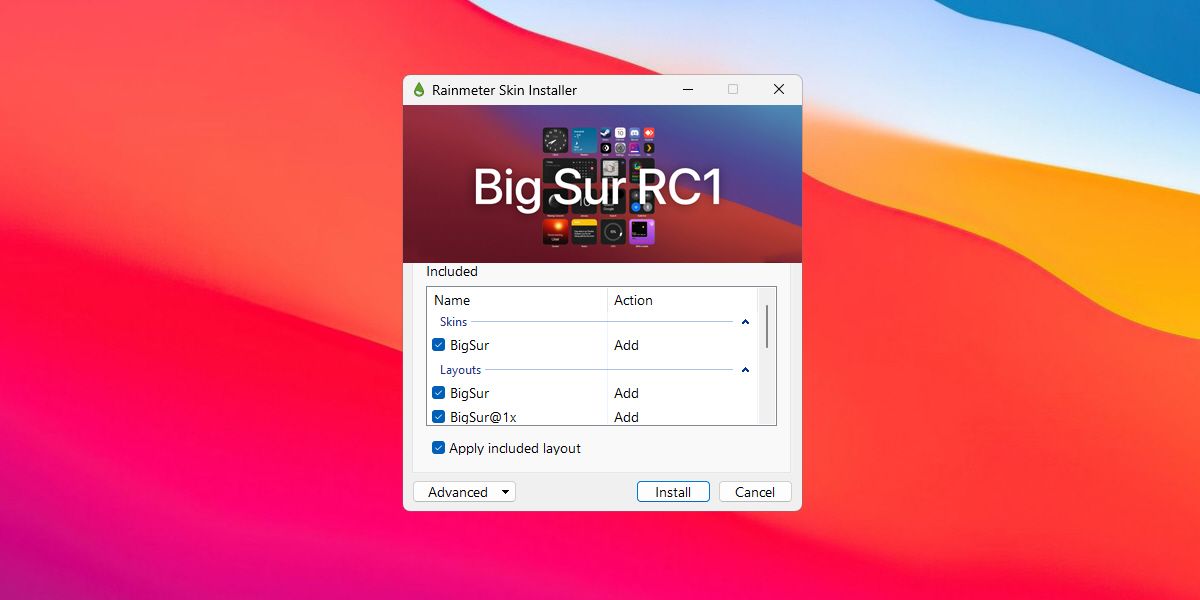
- Extract the downloaded zip file, and under the extracted folder, double-click on the BigSur.rmskin file to open it.
-
Rainmeter will automatically detect the file and launch the Rainmeter Skin Installer. Click Install to apply the macOS widget skin.
You can then customize the theme using Rainmeter’s settings and options. If you want to customize a widget, right-click on it and choose Settings.
Isn’t that easy? Similarly, you can search on DeviantArt for more widgets or even desktop icon packs to further personalize your desktop like macOS.
Get the macOS Look on Windows in No Time
You can make your Windows experience look and feel more like macOS with a few simple tweaks. So, if you’re tired of looking at the boring Windows desktop, transform your Windows PC into macOS and experience something new.
So, what are you waiting for? Give it a try and find the perfect macOS look and feel for your Windows system. You can even download similar tools from the internet and find the perfect combination that suits your needs.
Загрузить PDF
Загрузить PDF
Если на вашем компьютере установлена система Windows, но вам нравится интерфейс OS X, воспользуйтесь несколькими простыми программами, чтобы сделать ваш рабочий стол практически неотличимым от OS X.
Если вы хотите установить OS X на компьютере под управлением Windows, убедитесь, что ваш компьютер построен на базе соответствующих комплектующих (только определенные комплектующие совместимы с Mac OS X). В интернете поищите информацию об установке OS X на компьютере под управлением Windows.
-

Этот пакет изменит интерфейс Windows так, чтобы он имитировал интерфейс OS X. Этот пакет можно скачать на сайте skinpacks.com.
- Если вы хотите, чтобы интерфейс Windows походил на интерфейс более ранней версии OS X (например, Mountain Lion), на указанном сайте скачайте варианты оформления старых версий OS X.
- Убедитесь, что скачиваете инсталлятор, соответствующий вашей версии Windows.
-
Так как пакет оформления внесет изменения в некоторые системные файлы, антивирус может заблокировать его работу. Поэтому отключите антивирус.
- Для отключения антивируса щелкните правой кнопкой мыши по его значку в системном трее и в меню выберите «Остановить», или «Отключить», или «Выйти».
-
На распаковку файлов уйдет некоторое время.
-
Это необходимо сделать при установке пакета Mavericks Skin Pack.
-
По умолчанию будут установлены все доступные компоненты, чтобы интерфейс Windows был максимально похож на интерфейс OS X.
-
Если вы хотите отказаться от каких-либо компонентов, в списке уберите возле них флажки.
- Возле опции «Точка восстановления» поставьте флажок. Это приведет к созданию точки восстановления Windows, что позволит вам вернуть систему в прежнее состояние, если вам не понравится ее новый интерфейс.
-
При этом рабочий стол должен измениться.
-
Интерфейс Windows будет походить на интерфейс OS X.
-
Если вам не нравится новый интерфейс, восстановите систему, чтобы вернуть прежний интерфейс. При этом ваши файлы не пострадают.
- Прочитайте статью Как выполнить восстановление системы. Выберите точку восстановления, созданную перед установкой пакета оформления.
Реклама


Об этой статье
Эту страницу просматривали 38 399 раз.
Была ли эта статья полезной?
Looking to Use Mac OS Themes on Windows 11? Here are the Best MacOS Skins to Install on Windows 11.
If you have been one of the billions across the world, who make use of a Windows OS computer over a macOS computer, then there isn’t much you missing here. Instead, Windows operating system provides more options and flexibility as compared to macOS. However, you may get bored with the same Windows OS themes on your computer.
Thanks to the plethora of themes available that allows you to modify your Windows OS, you can get the look of macOS on your Windows 11 computer. You can apply themes from macOS Sierra, High Sierra, or even Mojave. This guide will list down 5 of the best macOS skin/launcher for Windows 11 you can download to change the way your Windows OS laptop looks. Let us get into it.
1. macOS Transformation Pack
One of the best ways to transform your Windows 11 PC into a macOS look is to download the macOS transformation pack. It will change the look of your Windows 11/10/8/7 PC user interface exactly like a macOS PC. Once you apply this transformation pack, it will change the Windows 11 PC elements such as Login Screen, Wallpapers, Cursors, Themes, Fonts, Sounds, Icons, Dock, Finderbar, Dashboard, Spaces, Launchpad, and more.
The installation is pretty easy, and all you need to do is to download the macOS transformation pack and configure it as per your need. Thanks to the intelligent Metro UI design, you can configure or tweak the macOS theme as per your wish, with just a few clicks. It includes high-quality macOS wallpapers and other customization elements.
Download
2. macOS Monterey Skin Pack
A new and updated skin pack that you can install on your Windows 11 machine to give it a macOS look is the macOS Monterey skin pack. This theme changes every element of the Windows 11 theme like it adds a high-quality bottom dock, icons, wallpapers, etc. The best setting for this skin pack is to set it at 100% scale and layout size. You can tweak this setting from the display setting.
Do note that you need to first install the UXTheme patcher before you can apply this skin pack. The full version with icons and extra features for Windows 11 is available to download for $4.99, and the Lite version without extra icons is available to download for free. So, first, try out the free version of the theme and check if this works perfectly before going for the paid version.
Download
3. macOS Sierra for all Windows OS
From the house of popular theming website, DevianArt, comes a brilliant Windows 11 macOS theme. All the elements included with this theme are of high quality, and you get a working notification center, fully working Finder bar, lock screen, system properties, launchpad, etc. Moreover, this theme also supports picture-in-picture mode for all sizes of videos.
There is a Siri voice assistant clone as well. Do note that in order to install this theme, you need to first install Samurize. After installing Samurize, you need to grab the macOS Sierra DevianArt theme and follow the on-screen instructions for a successful installation.
Download
4. macOS theme (DevianArt)
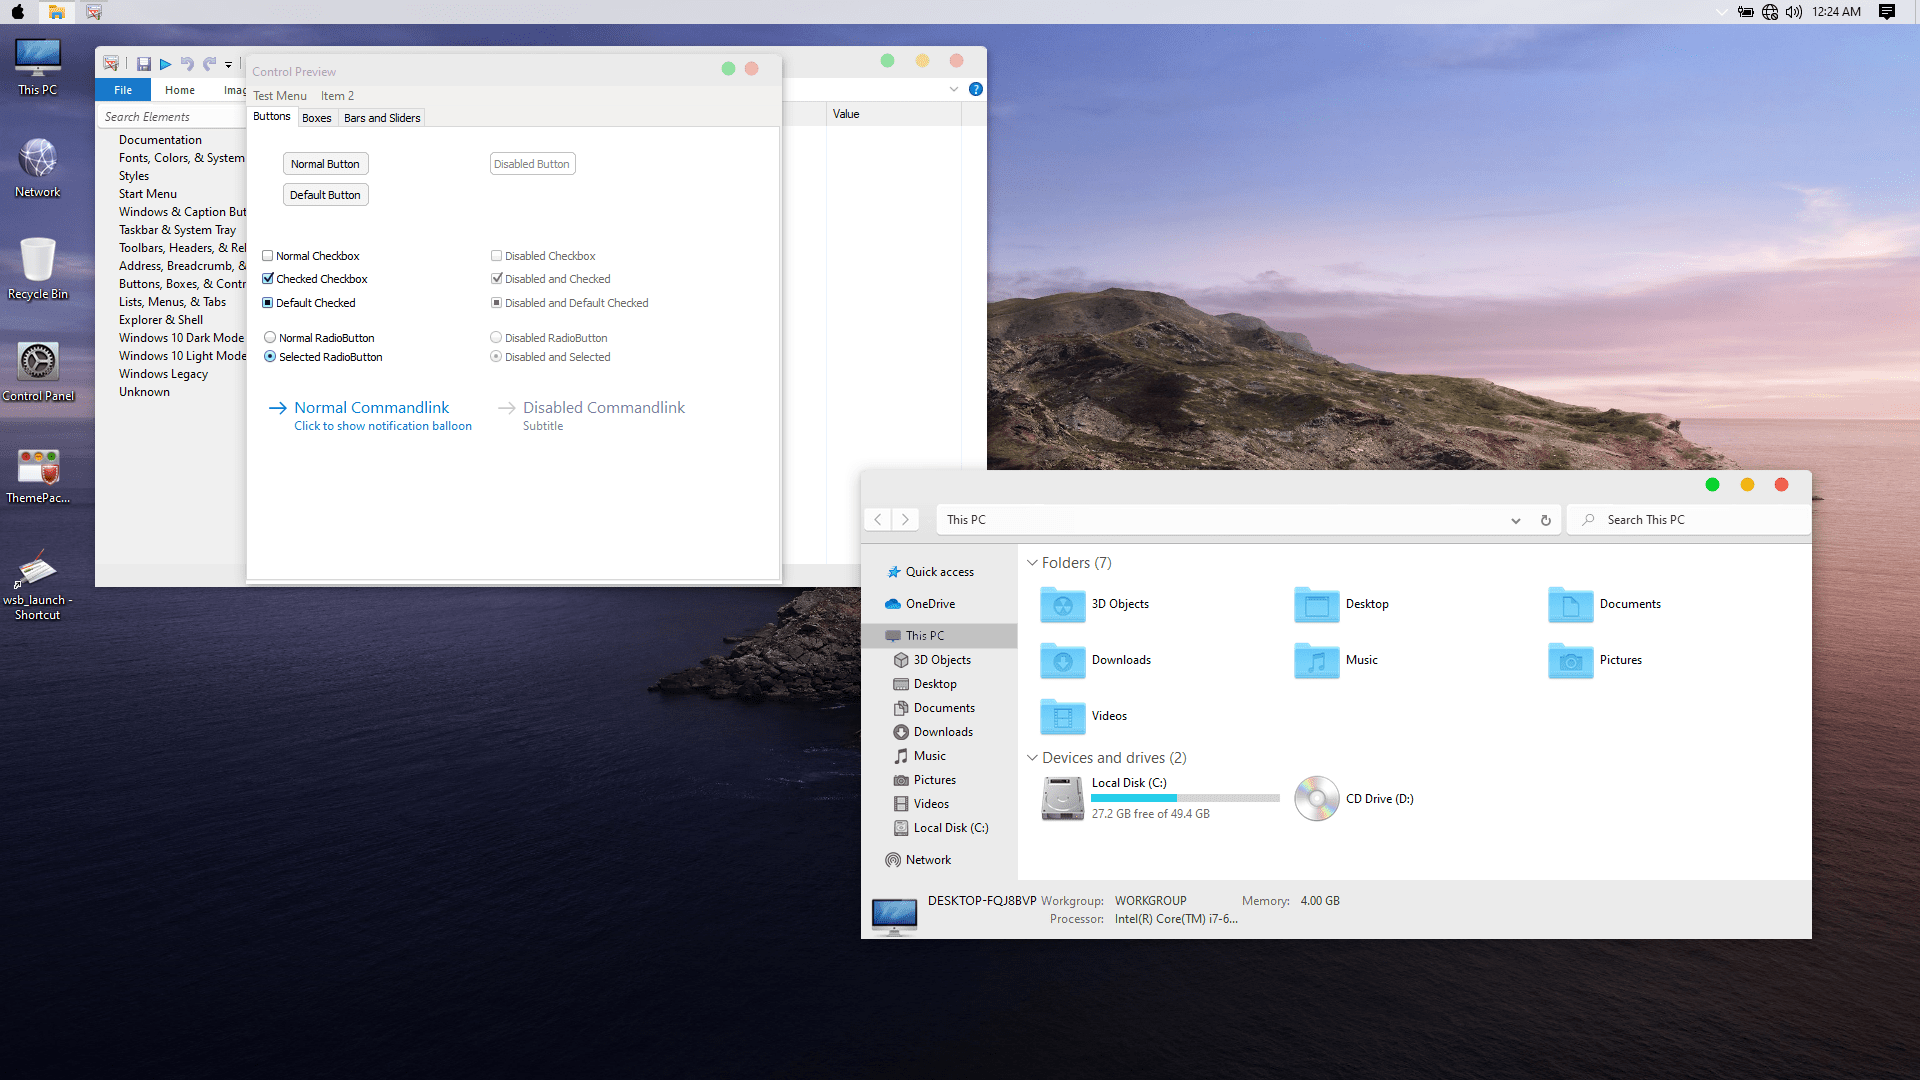
Another favored transformation pack that you can make use of to change the look of your Windows 11 PC to macOS is the macOS theme by DevianArt. This theme is a package that includes wallpapers, themes, icons, supported macOS features, and more. It applies all the macOS elements without tweaking any system file, meaning your system isn’t harmed if you use this transformation pack.
Before you could apply this theme, you need to install the UXTheme patcher, then copy all the theme files to the C:\Windows\Resources\Themes destination. Finally, select the themes by heading over to Settings > Personalization > Themes. Bam! This will transform your Windows 11 PC to macOS.
Download
5. macOS UX Pack 5.0
One of the best theme packs, and the one that stays updated, is the macOS UX Pack 5.0. It comes with everything that will help you to transform your so-called bored Windows OS look into a macOS look.
Applying this UX pack will change everything from the login screen to the dashboard to your wallpaper. Talking about wallpapers, it includes high-quality wallpapers of High Sierra and Mojave. This transformation pack also includes day, night, and dark modes as well.
Download
If you’ve any thoughts on 5 Best macOS Skin and Launcher for Windows 11, then feel free to drop in below comment box. Also, please subscribe to our DigitBin YouTube channel for videos tutorials. Cheers!