
What Is Intel RST Services and How to Fix Intel RST Not Working
In the generation of advanced computers, memory means a lot for the users who regularly check SSD health. The main reason for purchasing the most expensive hard disks is to improve or to boost up the overall system performance from the average mark. That’s why as a big processor manufacturer company, Intel has launched a service which is named as Intel RST. RST stands for Rapid Storage Technology. You can make an idea in your mind about this service just by its name. Rapid storage technology is specially developed to boost your PC performance and memory management. This service will work for all computers which are having SATA disks installed in them. The feature will also lower down the power consumption of the PC which prevents the overheating issue. That’s why RST service offered by Intel is used by every user who is having SATA disk.
Is Intel RST Service active in your PC or not? We ask this question because many Intel users have reported the issue of RST service not working on their PC. You can also check the notification panel of your Windows 10 PC which is present on the right side of the display screen. Whenever this function disables itself, you will receive a notification. If you are among those users who are facing this issue, then you are at exactly the right place. We will introduce 3 major fixes in this article which you can use to solve the “Intel® RST is not running” issue.
Fix 1. Check the List of Running Services in Task Manager
Every time you think that an application or service is not working properly or creating some troubles for your PC, then you can check the Task Manager where all the running applications and services are listed. It is also an important indicator of Windows 10 high CPU or disk usage. We will use Task manager to check this issue of Intel RST not working. It has been seen in many cases that Rapid Storage Technology (RST) is not working due to several issues and to run RST back again, we need to resolve these issues through the help of Task manager.
- Step 1. Right-click on the Taskbar on the bottom of the PC screen and choose Task Manager.
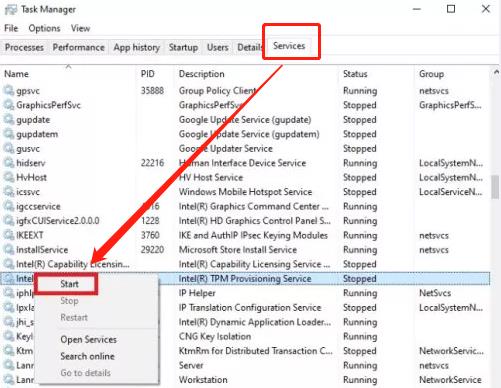
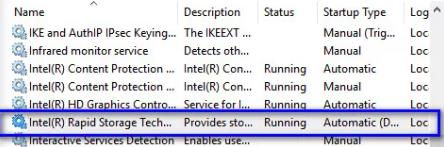
- Step 2. In Task Manager window, search for Intel Rapid Storage Technology in the Services tab.
- Step 3. Check the status of Intel RST. If it is stopped, then right-click it and choose Start.
After starting the service, see if Intel RST is working or not. You can check the status in Task Manager.
Fix 2. Automatically Run Intel RST Service on Startup
Sometimes, when you boot your PC, then RST is not able to launch automatically due to certain issues. That’s why we suggest you reset the default settings so that any issue which is pertaining to resist the launch of RST can be eliminated. For your knowledge, there are two types of startup status, one is automatic which is set as default for RST and another one is Manual. The settings will remain the same as they were. We are just resetting them so that RST can be launched automatically after the booting of PC. In this way, you can also disable some unnecessary startup items to speed up your Windows PC.
Follow these methods to accomplish your task:
- Step 1. Open Run dialogue by pressing Windows + R, then type services.msc and hit Enter.
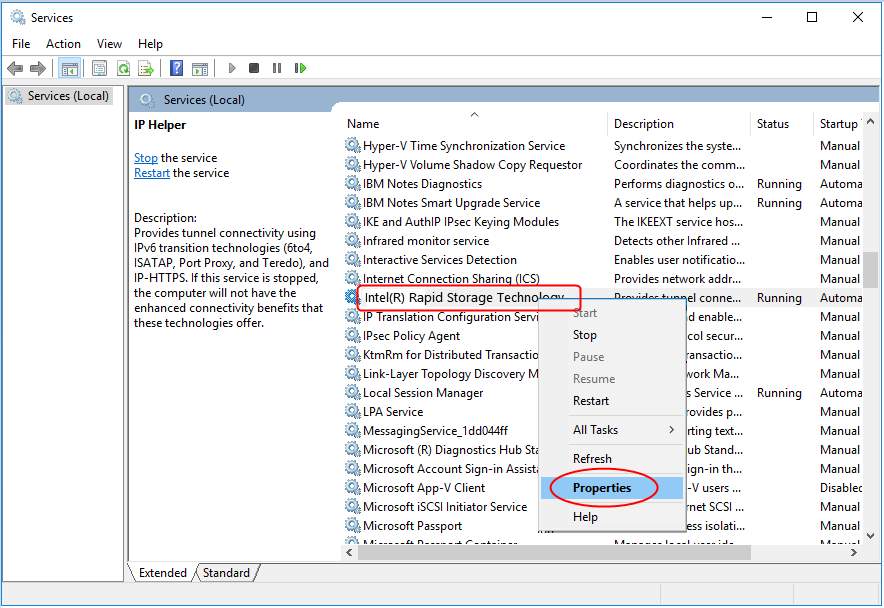
- Step 2. In Services window, scroll down to find Intel Rapid Storage Technology from the list.
- Step 3. Right-click on the option and open the Properties menu.
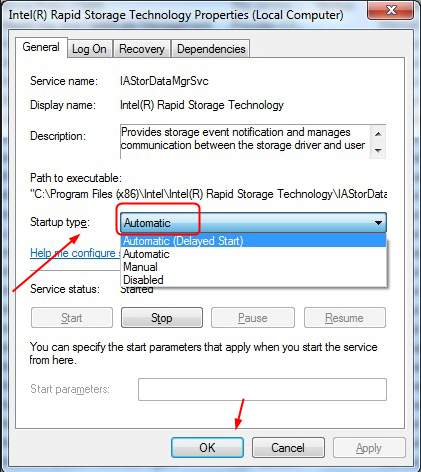
- Step 4. Inside the Properties menu, click the box next to Startup type, then set it as Automatic and hit the Apply option to save the settings.
Reboot your PC and check whether RST start is working normally. If this method is also unable to fix this issue, then we have one another present on this list. You can switch on that positively.
Fix 3. Update Intel RST Driver
Now, this is the ultimate solution to get rid of this issue. It is possible that the SATA disk present in your PC is unable to run on the outdated drivers of RST. There is a protocol which you need to follow in order to update the RST drivers:
This method has a much higher probability of resolving this issue of Intel RST not working on PC.
Pro tips: In case you lose important documents, photos or videos, make sure to use Jihosoft Data Recovery Software to get them back as soon as possible.
Final Words
We have categorized the solutions which we think can help you in a better manner. You can try all these methods one by one because any one of them may work for you. If you find some other methods that can also be engaged to resolve this issue, then please share the details of that method with us in the comments section.
RST stands for Rapid Storage Technology. Intel Rapid Storage Technology is a Windows-based application that improves the performance and reliability of computers equipped with SATA discs. You can benefit from improved performance and decreased power usage when you use one or more SATA drives. When you use more than one SATA drive, you may strengthen your security against data loss in the event of a power outage or other disaster. Users reported seeing an icon on the right-hand side of their taskbar claiming that Intel RST service is not running in a number of circumstances. This might be because the service isn’t operating or because the startup type isn’t configured appropriately. Let’s have a look at the solutions available to address this Intel RST service not running in Windows 10.
Table of Contents
Below are all the possible methods to fix Intel RST Service is not running in Windows 10.
Method 1: Start Intel Rapid Storage Technology Service
We may check if Intel Rapid Storage Technology is truly operating before changing the service parameters of the program. Before making any changes to the app service settings, you should fiRST check to see if Intel RST is truly operating. Even if the program is setup correctly, the Task Manager may show that the service is not functioning. Follow these procedures in Task Manager to see if the service is running or not:
1. Press the Ctrl + Shift + Esc keys together to open Task Manager.
2. Select the Services tab, then select Intel Rapid Storage Technology.

3. Check to see whether it’s running; if it isn’t, right-click it and select Start.

4. Close the Task Manager after saving your modifications.
Also Read: Fix The Active Directory Domain Services is Currently Unavailable
Method 2: Change Startup Status
If the Intel RST service not running windows 10 problem persists, you should try changing the app Startup status. An application can begin in a number of ways. It might be an automated delayed state, a manual one, or something else entirely. We’ll set the status to automatic, which means Intel Rapid Storage Technology will start up automatically whenever the machine boots up. It’s worth mentioning that administrator rights may be required for this strategy to work. This is how you do it:
1. Hit the Windows + R keys simultaneously to open the Run dialog box.
2. Type services.msc and click on OK to open the Services app.

3 In the Service window, look for Intel Rapid Storage Technology and double-click it to view its Properties.

4. Under the General tab, change the Startup type from Automatic (Delayed Start) to Automatic.

5. Click Apply and OK to save your changes.
6. Restart your computer to see whether the Intel RST service is not running issue has been resolved.
Also Read: What is Google Chrome Elevation Service
Method 3: Reinstall Intel RST Driver
If nothing of the above approaches has worked to resolve the Intel RST service not running windows 10 problem, you should try updating the Intel RST driver. We may try deleting your disc drive driver and then installing the default one before updating it, so that if the present driver is faulty, it can be uninstalled. Please keep in mind that this solution will require an active internet connection.
1. Press the Windows key, type device manager, and click on Open.

2. Open the Disk driver sub-category once you’re in the device management.

3. Locate the Intel Rapid Storage Technology supporting platform and pick Uninstall Device from the context menu.

4. Select Scan for hardware changes from the context menu of any empty spot. The default drivers will be installed at this point.

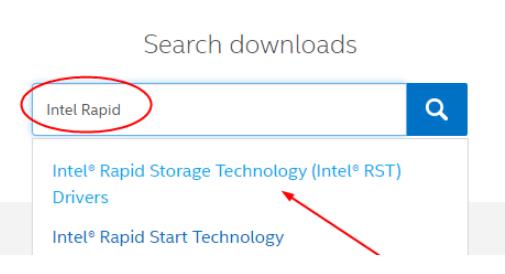
5. Then go to the Intel drivers download page. In the dialogue box, search Intel rapid and select Intel® Rapid Storage Technology (Intel®RST) from the results.

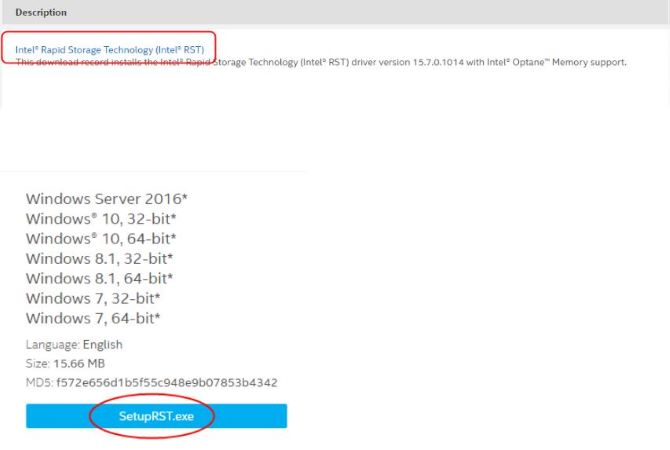
6. Download the executable SetupRST.exe from the driver options list.

7. Run the executable after saving it to a convenient location.
8. Finally, restart your PC after installing the program to see if the Intel RST service is not running issue has been resolved.
Also Read: How to Check Intel Processor Generation of Laptop
Method 4: Update Intel RST Driver
You may install the RST driver on your own by downloading it from the official website. Here’s how to go about it.
1. Go to the Intel Software Download Center page and type RST into the search box.

2. Go to the RST driver download website and download the right and most recent drivers.

3. To install the drivers on your computer, open the downloaded files and follow the on-screen instructions.
Frequently Asked Questions (FAQs)
Q1. Is it necessary to use the Intel RST service?
Ans: Yes, the Intel Rapid Storage Technology service is required for superior SSD and PC performance. Storage management may reduce your PC overall performance if you don’t have it.
Q2. What is the purpose of Intel RST?
Ans: Intel® Smart Response Technology is a feature of Intel Rapid Storage Technology that detects and saves your most frequently used apps and data on a high-performance SSD while providing you full access to a hard disc drive with enormous storage space (HDD).
Recommended:
- What Stores Accept Samsung Pay?
- Fix Yahoo Mail Error 0x8019019a
- Fix Camera In Use by Another App in Windows 10
- Fix Bluetooth Driver Error in Windows 10
We hope you found this information useful and that you were able to resolve how to fix Intel RST service is not running in Windows 10. Please let us know which technique was the most beneficial for you. If you have any questions or comments, please use the form below.
Intel RST service is not running message pops up on your Windows 10’s task bar shown as this image?
No idea how to resolve such error? No worry! Go on with this post, two tried-and-true methods are right here for you to fix it. Just read on.:)
Note: Intel RST service means Intel Rapid Storage Technology service.
- Update your Intel RST driver
- Reset the startup type of Intel RST Service
Method 1: Update your Intel RST driver
1) On your keyboard, press the Windows logo key + X key together to open the quick-access menu.Then click Device Manager.
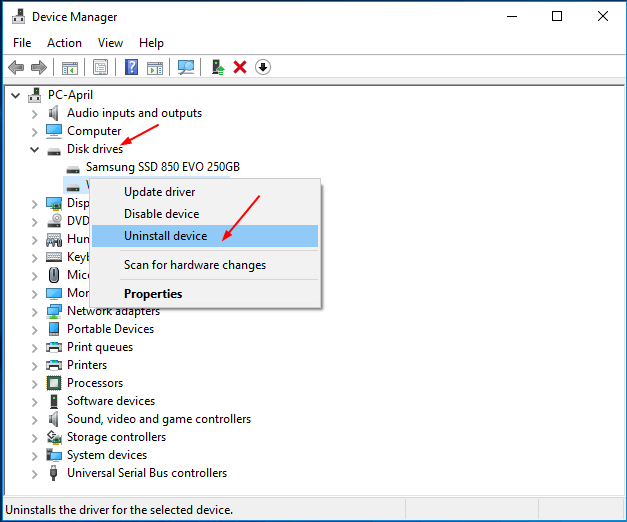
2) On the open window, find and expand the Disk drives section. Then right-click on your Intel Rapid Storage Technology supporting platform and choose Uninstall device.
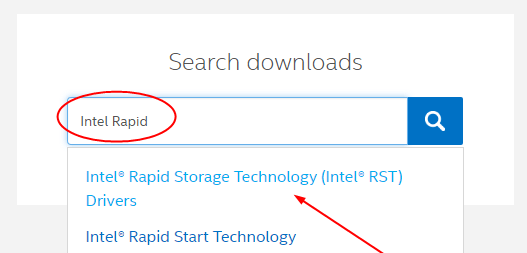
3) Go to Intel Dowload website. Type Intel Rapid in the search box and click Intel Rapid Storage Technology Drivers from the result.
4) Click Intel Rapid Storage Technology. Then on the following open page, find and click SetupRST.exe.

5) When it completes downloading, double-click the .exe file to install the driver on your Windows 10.
If you don’t have the time, patience or computer skills to update your Intel RST driver manually, you can, instead, do it automatically with Driver Easy. Driver Easy will automatically recognize your system and find the correct driver for your Intel RST, and your variant of Windows system, and it will download and install it correctly:
1) Download and install Driver Easy.
2) Run Driver Easy and click the Scan Now button. Driver Easy will then scan your computer and detect any problem drivers.
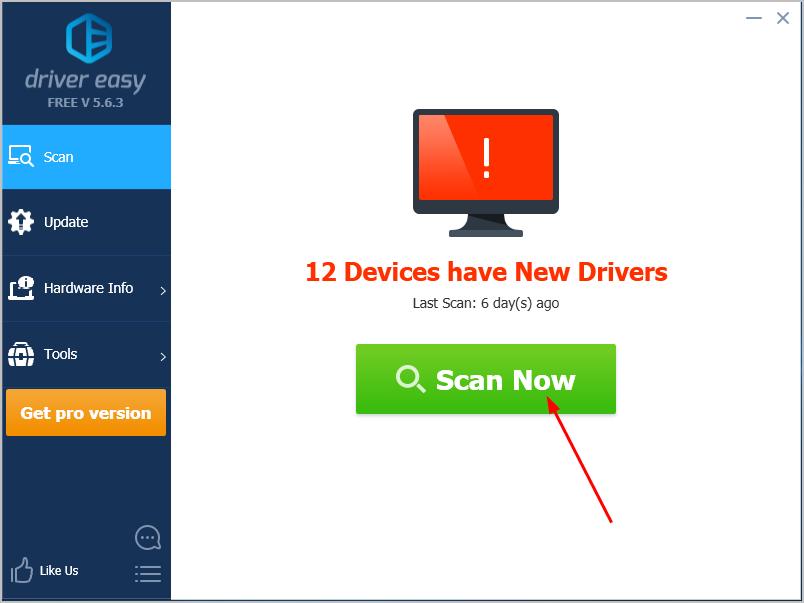
3) Click the Update button next to the flagged Intel RST driver to automatically download and install the correct version of that driver (you can do this with the FREE version).
Or click Update All to automatically download and install the correct version of all the drivers that are missing or out of date on your system. (This requires the Pro version which comes with full support and a 30-day money back guarantee. You’ll be prompted to upgrade when you click Update All.)
Method 2: Reset the startup type of Intel RST Service
If update your RST driver didn’t solve the issue, please reset the startup type of Intel RST service.
You need to do these:
1) On your keyboard, press the Windows logo key + R key together to open a Run box. Then type services.msc in the box and press Enter.
2) On the open window, find and right-click on Intel(R) Rapid Storage Technology. Choose Properties.
3) Choose to view on General tab. Then set the Startup type to be Automatic and click OK to save your setting.
That’s all there is to it.
95
95 people found this helpful
Available in other languages
Viele Nutzer sind auf den Fehler gestoßen, dass Intel RST Service nicht läuft unter auf PC. Wir zeigen Ihnen 4 Lösungsoptionen an.
RST is the short form of Intel Rapid Storage Technology. It can improve your system’s performance and reliability where the attached disks are SATA disks because it is a Windows-based application. When we use one or more SATA disks, you can use lower power consumption and enhanced performance. Similarly, when using multiple SATA disks, you can enhance protection against data loss in a power failure.
In most cases, you may find an icon displayed on the right side of your taskbar saying that the Intel RST service is not running. The causes may be the intel RST service not running or its startup type being set incorrectly.
-
Part 1: Intel RST Service Overview
- 1.1 What does the Intel RST Service do?
- 1.2 Is Intel RST Service Necessary for Windows users?
-
Part 2: Fixes for Intel RST Not Running on Windows 10
- Fix 1: Check If the RST Service is Running in Task Manager
- Fix 2: Reset the Startup Type to Automatic
- Fix 3: Update the Intel RST Driver
- Bonus Tips: How to Recover Lost Data on Widnows Due to Widnows Error?
Part 1: Intel RST Service Overview
Intel RST offers more significant performance, responsiveness, and expandability than ever before. Whether using one or multiple SATA (serial ATA) or PCIe drives, you can take the benefit of lower power consumption and enhanced performance from the latest storage technologies. Furthermore, you can rest easy knowing you have added protection against data loss in the event of a hard drive failure.
1.1 What does the Intel RST Service do?
With Intel Smart Response Technology, you can automatically move your most frequently used applications and data to a high-performance SSD while still having access to the large storage capacity of a hard disk drive (HDD).
1.2 Is Intel RST Service Necessary for Windows users?
Yes, the Intel Rapid Storage Technology (RST) service is necessary for the better performance of SSDs and our PC. Without it, storage management may degrade the overall performance of your PC.
Part 2: Fixes for Intel RST Not Running on Windows 10
Here’re the solutions you need to fix the problems if you get the “Intel RST service not running” error on Windows 10. Try these fixes one by one till you find the solution that works in your case. One of them will indeed resolve the issue.
Fix 1: Check If the RST Service is Running in Task Manager
If the Intel RST service is not running on your PC, its non-running state can be the reason. Therefore, you need to do the first thing is go to Task Manager and check Intel Rapid Storage Technology is running whether or not. Below are the steps to do it.
Step 1: Click on the Windows search bar icon, type “Task Manager,” and select the first result.
Step 2: Once the Task Manager appears, click on the “Services” tab.
Step 3: Then scroll down, and find “Intel Rapid Storage Technology,” If its status is stopped, click on it and choose “Start”.
After all, Save the changes that you have made and close Task Manager. And check if the starts correctly the application.
Fix 2: Reset the Startup Type to Automatic
If the above fix fails to resolve the issue and Intel Rapid Storage Technology is still not running, here’s another solution. There are four startup types for Intel RST service on Windows 10, namely automatic (delayed start), automatic, manual, and disabled. It would help if you changed the startup to automatic so that the service automatically starts running when you turn on the PC. Follow the below steps to do it.
Step 1: Hit Windows and R keys together to launch the Run box. After the Run box comes up, type “services.msc” and click on OK.
Step 2: Once the services window appears, find “Intel Rapid Storage Technology.”
Double click on it and select “Properties” from the on-screen menu.
Step 3: On the next screen, set “Automatic” as a startup type. Choose “Apply” and click on “OK” so that the changes can take effect.
Step 4: Lastly, you restart the PC. And the RST Service should running on your PC.
Fix 3: Update the Intel RST Driver
Faulty or missing drivers are one of the significant reasons which the Intel RST service is not running on Windows 10. Therefore, reinstalling RST drivers can resolve the issue. We are explain steps here that you need to follow for doing it.
Step 1: In the search bar present next to the Start icon, type “Device Manager” and open the first result that you get.
Step 2: Locate and expand the “Disk drives” segment. Now right-click the drive that uses Intel Rapid Storage Technology and choose “Uninstall device”. Uninstall the Intel Rapid Storage Technology device driver.
Step 3: Wait for the uninstallation to complete. Once uninstallation completes, go to Intel Download Centre. In the search box that you see, type “Intel Rapid”. From the search results, select “Intel Rapid Storage Technology”. Then search for intel rapid from official intel site
Step 4: Next, choose your operating system. the select operating system for intel driver
Step 5: Now, click on “Intel Rapid Storage Technology User Interface & drivers.” click on Intel Rapid Storage Technology User Interface and Driver
Step 6: To begin the download, click on “SetupRST.exe”.
After the download finishes, double click on the .exe file to install Intel Rapid Storage Technology drivers on Windows 10.
At Least you follow all steps carefully and still facing Intel RST service is not running what does this mean? It’s intended for your window error.
Bonus Tips: How to Recover Lost Data from Windows due to Windows Error?
Meeting Widnows Errors are common for windows users, some of them are easy to fix, but what if the error can’t be fixed? Things may happen that your Windows computer crashes or stops working. Before you head to a shop to fix it, it’s necessary to retrieve your important data from it. We Recommend you to use Tenorshare 4DDiG data recovery software to recover any lost data from windows.
Here are some features of 4DDiG Data Recovery Software:
- It supports various different scenarios data recovery, inclusing deletion, formatting, RAW, and so on
- It can walk you through recovering data from loca disks and external disks, inclusing SD card, USB, external hard drive, etc.
- Supports data recover from windows error, crash system, virus attack, etc.
- Enables Windows and Mac users to use
- High recover success rate
If Intel RST Service is Not Running can’t be fixed, the storage function on your windows might get a bad influence, which means you might lose data due to some windows error like this, to recover data from windows due to windows error, you can follow below steps:
- Firstly, launch Tenorshare 4DDiG Windows Data Recovery on your windows. Then select the location in your computer and locate where you lost data to begin scanning.
- Now, Tenorshare 4DDiG will srat to look for your missing data on windows. Then you can check the different categories under the Tree View or even the File View to preview the scanned out files.
- You can either stop the scanning process if 4DDiG has already find out the data you need. Then click on recover to get them back. And please avoid to save them in the same location where you lost them.
Conclusion
If you’re fed up with getting Intel RST service not running in Windows 10 Error, you can’t solve it by using any of the above methods. Then it might have something wrong with your windows. It is effortless to accidentally delete some crucial files, which will cause you to stress about how to retrieve these data. Before sending it to the nearby store for repair, remember to back up all your files. If you lost data on windows, don’t worried, you can try Tenorshare 4DDiG data recovery software to get all your lost files back form windows.
Tenorshare 4DDiG Data Recovery
4DDiG is your second to none choice to recover all lost data on Windows/Mac computer from various loss scenarios like deletion, formatting, RAW, etc. with a higher success rate.
Free Download
Free Download
BUY NOW
BUY NOW
Intel Rapid Storage Technology (RST) provides notification of storage events and manages communication between storage drivers and user-space applications. It can improve the performance and reliability of your system, but sometimes you may encounter an Intel RST service not running error.
If the Intel Rapid Storage Technology service is not running on your Windows 11 or Windows 10 computer, the four solutions provided in this article will surely help you.
What is Intel RST service?
RST is an acronym for Intel Rapid Storage Technology. The Intel Rapid Storage Technology (RST) service is an application that monitors storage capabilities on Windows computers to provide better storage options. Now, the app also helps with improved performance and low power consumption.
However, in most cases, you will find an icon on the right side of the taskbar indicating that the Intel RST service is not running.
The reason may be that the Intel RST service is not running or the startup type is not set correctly.
So how to fix the Intel RST service not running error? The methods are listed below.
Solution 1: Check If the RST Service is Running in Task Manager
You may want to check that Intel Rapid Storage Technology is actually running before proceeding to other, slightly more complicated methods. In many cases, the application is configured correctly, but it is not running in the task manager. If the Intel RST service is not running on your PC, its non-running state may be the cause.
So, check if the service is running in Task Manager by following these steps:
Step 1: Press the Win key and the X key at the same time to choose Task Manager.
Step 2: Go to the Services tab, then find Intel Rapid Storage Technology in the list.
Step 3: Check if it is running or not. If not, right-click it and then choose Start.
Step 4: Save the changes that you have made and close Task Manager. And check if the starts correctly the application.
Solution 2: Set the Startup type to Automatic
If you still get the Intel RST service not running error after trying the first method above, you should try changing the startup state of the application. The Intel RST service has four startup types on Windows 10, which are automatic (delayed startup), automatic, manual, and disabled.
You change the status to Automatic so that Intel Rapid Storage Technology should start by itself whenever the computer starts up. Follow the steps below.
Step 1: Press the Windows logo key + R key to open the Run command.
Step 2: Type services.msc and hit Enter.
Step 3: Locate Intel Rapid Storage Technology services, and then double-click it.
Step 4: Change the Startup type from Automatic (Delayed) to Automatic.
Step 5: Click on Apply and then OK to save the change.
Step 6: Exit the Services window and restart your PC.
Solution 3: Update the Intel Rapid Storage Technology driver
Another reason why the Intel Rapid Storage Technology service is not running on your PC is corrupt or outdated drivers. You can fix it by updating the Intel RST driver to the latest version. You can choose to update it manually, but not all users are trained enough to perform driver updates manually. Therefore, you can opt for an automatic driver update tool.
Driver Booster is a useful PC optimizer that helps detect and update outdated, missing, and faulty drivers. Driver Booster has a large driver database containing more than 8 million drivers. This includes drivers for USB, audio, graphics, and other devices. And these drivers pass WHQL to guarantee accurate and safe driver updates.
Additionally, Driver Booster fixes game components like Microsoft DirectX Runtime and Adobe Flash Player ActiveX, which is a great feature to help boost your gaming experience. And it provides useful tools to help users restore the system, view system information, and fix common problems such as no sound, network failures, poor resolutions, and device errors.
You can use Driver Booster to update your Intel Rapid Storage Technology driver automatically and quickly:
Step 1: Download, install and run Driver Booster on your PC.
Step 2: Scan your computer driver.
You can click the Scan button on the main screen. Driver Booster should start scanning your drivers immediately. After scanning, it will show which drivers are outdated.

Step 4: Update the Intel Rapid Storage Technology driver.
You can download and install all driver updates by simply clicking the Update Now button in the upper right corner. If you only want to update the Intel Rapid Storage Technology driver individually, you can just select it and click the Update button next to it.
Solution 4: Reinstall Intel RST Driver
If the updating driver also fails to resolve the Intel RST service not running issue, you should try reinstalling the Intel RST driver. Because if a system driver is damaged or missing, it complicates the communication between the program and the operating system.
Therefore, reinstalling the Intel RST driver can resolve the issue. Please follow the steps below to uninstall the driver, then download and install the latest Intel RST driver from the official website:
Step 1: Press Windows + R key, and then type “devmgmt.msc” in the dialogue box and press Enter.
Step 2: In the Device Manager window, expand the Disk drives.
Step 3: Right-click your Intel Rapid Storage Technology supporting platform and then choose Uninstall device.
Step 4: Follow the on-screen instruction to finish the uninstallation process.
Step 5: Go to the Intel download center.
Step 6: Type Intel Rapid in the search box and then choose Intel® Rapid Storage Technology (Intel®RST).
Step 7: Find and download the file named SetupRST.exe.
Step 8: After completing downloading, double-click the SetupRST.exe file to install the latest Intel Rapid Storage Technology driver on your Windows.
Step 9: Restart your PC to see if the error is fixed.
Conclusion:
This is a summary of how to fix the Intel RST service not running error on Windows 10, 11 or older devices easily and quickly. Hope you found these four methods useful and you were able to resolve this issue smoothly.
More Articles:
[4 Ways] Download Intel Rapid Storage Technology Driver in Windows 11/10/8/7
Download Intel Wireless AC 9560 Driver in Windows 11, 10 (2023 Update)